Free Highland Cow Crochet Snuggler Lovey Pattern (Mini Floppy Baby Lovey)
This Highland cow crochet snuggler lovey pattern creates a soft baby lovey with a rounded stuffed head, shaggy fringe, little horns, a flared unstuffed body, two floppy arms, and two lightly stuffed legs.
Choose your favorite animal and start your next baby lovey project right here.
More baby lovey crochet patterns:
Crochet Baby Snuggler Patterns
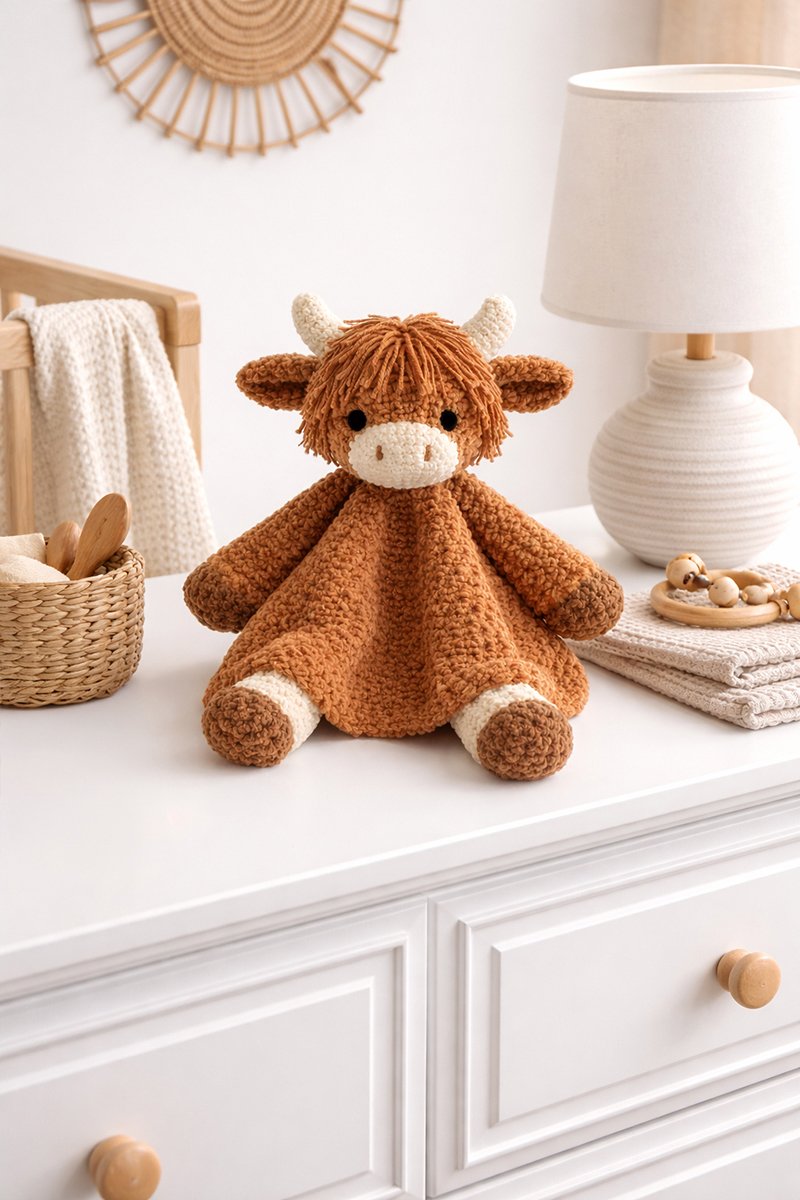
Soft, floppy, and easy to love, this Highland cow snuggler lovey is designed to feel cuddly and giftable from the very first stitch.
See the preferred brown yarn for the Highland cow crochet snuggler here
Jump to what you need:
Highland Cow Crochet Snuggler Lovey Pattern Step by Step
This Highland cow crochet snuggler lovey pattern creates a soft baby lovey with a rounded stuffed head, shaggy fringe, little horns, a flared unstuffed body, two floppy arms, and two lightly stuffed legs.

A rounded head, flared body, two arms, and two legs create the general Highland cow snuggler shape shown in the styled example.
Materials You Will Need
Use soft brown chenille or velvet blanket yarn for the head, body, arms, and legs. Use the same yarn weight in cream for the muzzle, horns, and leg cuffs. A small amount of smoother brown yarn can be used for the fringe and nostrils. You will also need polyester stuffing, a crochet hook that creates firm fabric without visible stuffing gaps, a yarn needle, several removable stitch markers, rustproof pins for assembly, and black embroidery yarn or thread for the eyes.
See preferred crochet yarns suitable for this project
Skill level: Advanced beginner. You should be comfortable making a magic ring, working continuous rounds, increasing, decreasing, changing colors, and sewing crochet pieces together.
Abbreviations: ch = chain, sc = single crochet, inc = work 2 single crochets in the same stitch, dec = single crochet decrease over the next 2 stitches, sl st = slip stitch, st = stitch, rnd = round.
Finished size: Size varies with yarn weight, hook size, and crochet tension.
Pattern rule: Stuff the head firmly. Lightly stuff the muzzle, horn tips, arm tips, and lower portions of the legs. Keep the flared body, upper arms, and upper legs unstuffed.
Round method: Work the head, muzzle, ears, horns, body, arms, and legs in continuous spiral rounds unless a join is specifically stated. Do not join at the end of each round. Place a stitch marker in the first stitch and move it up as each round is completed.
Magic-ring rule: After tightening each magic ring, knot the starting tail securely. Weave the tail through nearby stitches in one direction and then back in the opposite direction. Do not depend on the tightened loop alone to keep the opening closed.
Head, Muzzle, Ears, and Horns
Head
Use brown yarn.
Rnd 1: 6 sc in magic ring (6)
Rnd 2: inc around (12)
Rnd 3: (sc, inc) around (18)
Rnd 4: (2 sc, inc) around (24)
Rnd 5: (3 sc, inc) around (30)
Rnd 6: (4 sc, inc) around (36)
Rnd 7: (5 sc, inc) around (42)
Rnd 8–13: sc around (42)
Rnd 14: (5 sc, dec) around (36)
Rnd 15: (4 sc, dec) around (30)
Rnd 16: (3 sc, dec) around (24)
Stuff firmly but not rigid.
Rnd 17: (2 sc, dec) around (18)
Rnd 18: (sc, dec) around (12)
Rnd 19: dec around (6)
Cut the yarn, leaving an 8-inch tail. Thread the tail through the front loops of the 6 remaining stitches. Pull the opening completely closed, secure the yarn, and weave the tail into the stuffed head.
Muzzle
Use cream yarn.
Ch 7.
Rnd 1: Sc in the second ch from the hook and in the next 4 ch. Work 3 sc in the last ch. Working along the opposite side of the foundation chain, sc in the next 4 ch, then work 2 sc in the unused loop of the same foundation ch that contains the first sc of the round (14).
Rnd 2: Inc in the first st, sc in the next 4 sts, inc in each of the next 3 sts, sc in the next 4 sts, inc in each of the last 2 sts (20).
Rnd 3: sc around (20).
Fasten off, leaving a sewing tail at least 36 inches long. Do not stuff yet. Set the muzzle aside for assembly.
Ears (make 2)
Use brown yarn.
Rnd 1: 6 sc in magic ring (6)
Rnd 2: (sc, inc) 3 times (9)
Rnd 3: sc around (9)
Rnd 4: (2 sc, inc) 3 times (12)
Rnd 5: sc around (12)
Fasten off, leaving an 18-inch sewing tail. Do not stuff. Flatten each ear and set it aside for assembly.
Horns (make 2)
Use cream yarn.
Rnd 1: 4 sc in magic ring (4)
Rnd 2: sc around (4)
Rnd 3: (sc, inc) 2 times (6)
Rnd 4: sc around (6)
Rnd 5: (2 sc, inc) 2 times (8)
Rnd 6: sc around (8)
Add a very small amount of stuffing to the horn tip. Fasten off, leaving an 18-inch sewing tail. Leave the base open and set the horn aside for assembly.
Fringe preparation
Cut 24 strands of smooth brown yarn, each about 6 inches long. Set them aside until the eyes, muzzle, horns, and ears have been attached.
The fringe will be attached across Rnds 8 and 9 of the head. Use 12 strands on each round.
On each round, mark 6 attachment points to the left and 6 attachment points to the right of the center front. Space the attachment points every 2 stitches.
To attach one strand, fold it in half. Insert the crochet hook under one complete head stitch, pull the folded loop through, pass both cut ends through the loop, and tighten the knot against the head.
After all 24 strands are attached, use matching yarn and a yarn needle to tack each fringe knot securely to the head fabric. Weave the sewing ends through the dense head fabric.
Trim the finished fringe to approximately 2 to 3 inches long. Remove long loops and unusually long ends.
Body, Arms, and Legs
Draped body
Make the body separately from the head using brown yarn.
Before making the first chain, leave a starting tail at least 36 inches long. This tail will be used later to sew the body to the head and make the second reinforcing pass around the neck seam.
Ch 18 loosely. Taking care not to twist the chain, sl st in the first ch to form a ring.
Rnd 1: Ch 1. Sc in the same ch and in each remaining ch around (18). Do not join. Mark the first sc and continue in a spiral.
Rnd 2: (2 sc, inc) 6 times (24)
Rnd 3: sc around (24)
Rnd 4: (3 sc, inc) 6 times (30)
Rnd 5: sc around (30)
Rnd 6: (4 sc, inc) 6 times (36)
Rnd 7 through 8: sc around (36)
Rnd 9: (5 sc, inc) 6 times (42)
Rnd 10 through 11: sc around (42)
Rnd 12: (6 sc, inc) 6 times (48)
Rnd 13 through 14: sc around (48)
Rnd 15: (7 sc, inc) 6 times (54)
Rnd 16 through 17: sc around (54)
Rnd 18: (8 sc, inc) 6 times (60)
Rnd 19 through 20: sc around (60)
Rnd 21: (9 sc, inc) 6 times (66)
Rnd 22 through 23: sc around (66)
Rnd 24: (10 sc, inc) 6 times (72)
Rnd 25 through 26: sc around (72)
Sl st in the next stitch and fasten off. Weave in the ending tail without pulling the hem tight.
Leave the 72-stitch lower edge completely open. Do not gather, divide, seam, or close the lower edge.
Body checkpoint
Count 18 stitches around the neck and 72 stitches around the hem. The body should form a smooth open cone. It should spread when placed on a flat surface and collapse into soft folds when held by the neck.
Arms (make 2)
Use brown yarn.
Rnd 1: 6 sc in magic ring (6)
Rnd 2: inc around (12)
Rnd 3: (sc, inc) 6 times (18)
Rnd 4: sc around (18)
Rnd 5: (sc, dec) 6 times (12)
Rnd 6 through 14: sc around (12)
Add a small amount of stuffing to the rounded tip only. Keep Rnds 6 through 14 unstuffed so the arm remains floppy.
Fasten off, leaving a sewing tail at least 30 inches long. Leave the 12-stitch top opening open.
Repeat for the second arm.
Legs (make 2)
Begin with brown yarn.
Color-change method: On the stitch immediately before a color change, insert the hook and pull up a loop with the current color. Complete the final yarn-over with the new color. Continue working in a spiral with the new color. Secure the yarn ends inside the leg and position the small color-change jog toward the back during assembly.
Rnd 1: 6 sc in magic ring (6)
Rnd 2: inc around (12)
Rnd 3: (sc, inc) 6 times (18)
Rnd 4: sc around (18)
Change to cream yarn.
Rnd 5 through 6: sc around (18)
Change back to brown yarn.
Rnd 7: (4 sc, dec) 3 times (15)
Rnd 8 through 15: sc around (15)
Secure the color-change ends inside the leg. Lightly stuff Rnds 1 through 6. Keep Rnds 7 through 15 unstuffed so the leg can bend and drape.
Fasten off, leaving a sewing tail at least 36 inches long. Leave the 15-stitch top opening open.
Repeat for the second leg.
Limb checkpoint
Confirm that you have 2 matching arms with 12-stitch open tops and 2 matching legs with 15-stitch open tops. The rounded arm tips and hoof ends should hold their shape, while the upper portions remain soft and flexible.
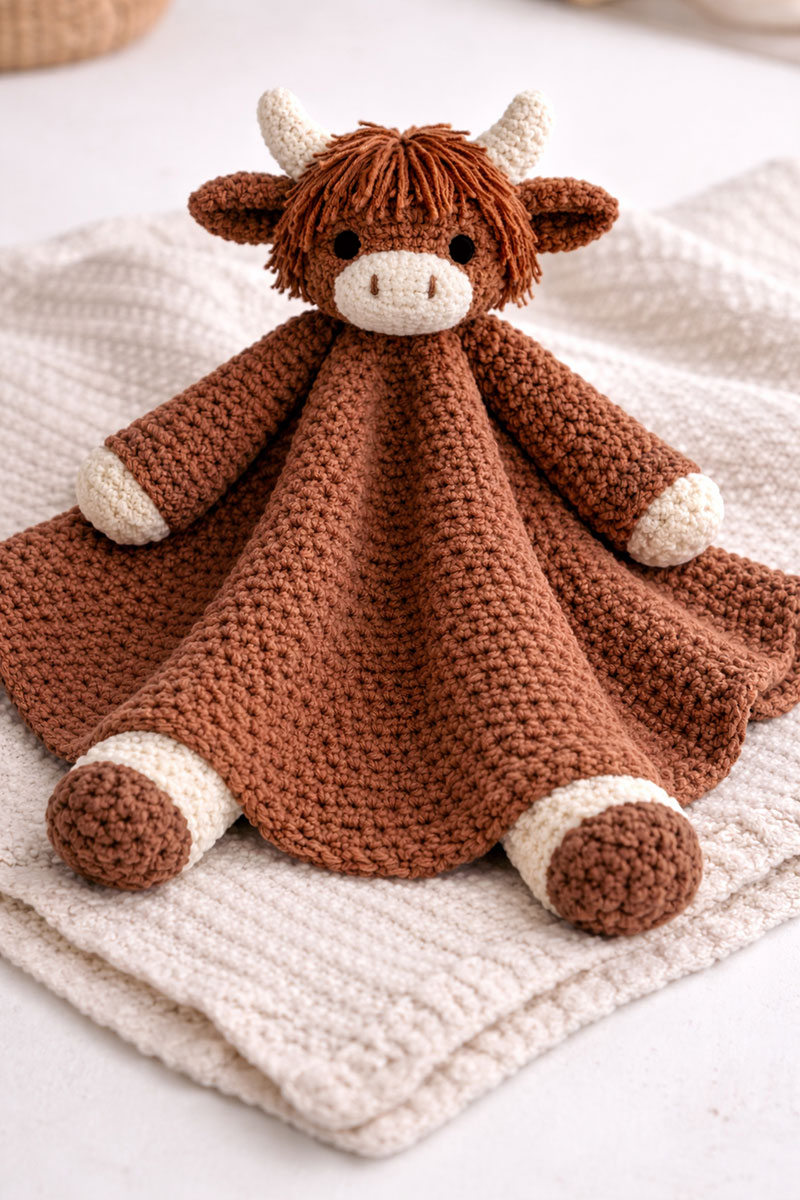
The open hem creates the wide draped body, while separate arms and legs allow the limbs to hang naturally.
Assembly and Final Shaping
Mark the front of the head
Place the head with the final round centered on the underside. Choose one side of the head as the front and mark the center-front stitch.
Attach the muzzle and embroider the face
Before attaching the muzzle, embroider 2 short vertical nostrils on its front. Place the nostrils approximately 5 stitches apart.
Pin the muzzle horizontally across Rnds 11 through 15 of the head, centered on the marked front. Add a small amount of stuffing behind the muzzle before closing the final section of the seam.
Sew through every stitch around the 20-stitch muzzle edge. Make a second reinforcing pass before securing and weaving the tail through the head fabric.
Embroider the eyes between Rnds 10 and 11, approximately 8 stitches apart. Center the muzzle below the eyes. Do not use buttons, beads, plastic eyes, or other detachable facial pieces.
Attach the horns and ears
Pin the horns to the top sides of the head across approximately Rnds 5 through 7. Place them at equal distances from the center front and angle the tips slightly outward.
Pin the flattened ears directly below and slightly outside the horns, centered across approximately Rnds 8 through 10.
Check the head from the front before sewing. Sew around every horn base and across the complete flattened edge of each ear. Make a second reinforcing pass on every attachment.
Attach the body to the head
Use the 36-inch starting tail left at the body neck. Position the body so the round transition line runs down the center back. The opposite side becomes the center front.
Pin the 18-stitch neck edge in an even circle on the underside of the head. Align the center front of the body directly below the muzzle.
Place markers in neck stitches 1, 4, 7, 10, 13, and 16. These markers divide the 18-stitch neck into 6 equal sections containing 3 stitches each. Place 6 matching points evenly around the underside of the head, outside the 6 stitches that closed the head, and match the neck markers to those points.
Do not sew the 18 neck stitches directly into the 6 stitches that closed the head. Sew the 3 neck stitches in each marked section evenly into the surrounding head fabric so the neck lies flat without gathering or folding.
Whipstitch through all 18 neck stitches. Make a second reinforcing pass, then secure and weave the tail through the head fabric.
Attach the arms
Keep the body round transition at the center back. Pin one arm to each side of the upper body, directly below the head seam. Center each 12-stitch arm opening across approximately Body Rnds 3 through 6.
Number the 12 stitches around each arm opening. Place markers in stitches 1, 4, 7, and 10. Each marker begins a section containing 3 stitches: stitches 1–3, 4–6, 7–9, and 10–12. Place 4 corresponding points around the body attachment area and match the markers before sewing.
Angle both arms slightly downward. Sew the 3 arm stitches in each marked section evenly into the body fabric, using all 12 stitches around the open arm top. Make a second reinforcing pass before securing the tail.
Check that both arms begin at the same height and angle in matching directions.
Attach the legs
Lay the body flat with the center front facing upward. The left and right folds of the body mark the side positions.
Place one leg on the lower front halfway between the center front and the left side fold. Place the second leg halfway between the center front and the right side fold.
Pin the 15-stitch top opening of each leg across approximately Body Rnds 18 through 22. Keep both legs at the same height and leave the 72-stitch lower hem completely open.
Number the 15 stitches around each leg opening. Place markers in stitches 1, 4, 7, 10, and 13. Each marker begins a section containing 3 stitches: stitches 1–3, 4–6, 7–9, 10–12, and 13–15. Place 5 corresponding points around the body attachment area and match the markers before sewing.
Sew the 3 leg stitches in each marked section evenly into the body fabric, using all 15 stitches around the open leg top. Make a second reinforcing pass. Confirm that the legs point forward and downward rather than toward the back.
Add the fringe
Attach the 24 prepared fringe strands across Head Rnds 8 and 9, following the fringe placement instructions above. Confirm that every fringe knot has been tacked securely before trimming the strands.
Final shaping and balance check
Hold the finished lovey by the head. The body should fall into soft folds, the lower hem should remain open, the arms should hang from the upper sides, and the 2 legs should hang from the lower front.
Place the lovey on a flat surface. Spread the open body into a broad circle and bring the legs forward. Adjust the limb angles before making any final reinforcing stitches.
Remove and account for every pin and removable stitch marker before completing the final safety check or giving the lovey to a child.
Final safety check: Pull firmly on the muzzle, ears, horns, fringe, neck seam, arms, and legs. Repair any attachment seam that shifts, separates, loosens, or exposes stuffing. The soft arms and legs should bend and hang freely, but their sewn tops should remain firmly attached. Use embroidered facial features only and do not add detachable decorations.
Inspect the lovey before each use and again after washing. Stop using it until any loose seam, fringe strand, yarn end, or exposed stuffing has been repaired.
This lovey is not intended for infant sleep. Keep it out of cribs, bassinets, play yards, and other infant sleep spaces. Review CPSC toy safety and CPSC safe sleep guidance.
Simple Ways to Customize Without Changing the Pattern
Use a lighter muzzle for contrast, shorten horns for a younger look, or adjust fringe density for a fuller forehead. Small changes make a noticeable difference.
Many nurseries end up with handmade pieces that feel more personal simply because of these small shifts rather than major pattern changes.
Bottom Line
This Highland cow crochet snuggler lovey pattern uses a rounded head, open flared body, two separate arms, and two separate legs to create the same general style as the example shown above. Yarn thickness, hook size, tension, stuffing, and assembly will affect the exact finished proportions.
The animal lovey pattern collection also makes it easy to compare this open snuggler shape with flatter blanket-style animal loveys.
My crochet cow pattern creates a flatter spotted barnyard lovey with a square blanket body and simpler shaping that works especially well for beginner crochet projects.
The crochet chicken pattern adds another easy farmhouse-style animal project with a lighter barnyard look that works beautifully for rustic nursery themes and handmade baby shower gifts.
These crochet farm animal lovey patterns also bring together Highland cows, chickens, ducks, lambs, and other beginner-friendly barnyard projects into one coordinated handmade baby gift collection.
A crochet rooster baby lovey pattern adds a slightly brighter farmhouse character to the chicken coop with bold barnyard colors and playful details that pair especially well with rustic nursery themes and country-style baby shower gifts.
If you want to see more ideas like this, explore my free baby patterns to find your next project.
FAQ
Does this pattern match the hero image?
It is designed to create the same general Highland cow snuggler structure. Yarn, hook size, tension, stuffing, and finishing will affect the exact result.
Is the body stuffed?
No. The flared body stays unstuffed. The head is stuffed firmly, while the muzzle and lower portions of the limbs are stuffed lightly.
What yarn works best?
Soft chenille or velvet blanket yarn creates a plush body. Use the same yarn weight for the main and contrast pieces so the proportions remain balanced.
Are the arms and legs attached or integrated?
The 2 arms and 2 legs are made separately and sewn securely to the open draped body.
When you click on links to various merchants on this site and make a purchase, this may result in this site earning a commission. This does not affect the price you pay.

UBGI Gold Standard 2026
Reviewed under the site's
editorial checklist.
Photos, decorating ideas, party setups and reader submissions are shared for inspiration unless a page is specifically presented as a pattern, tutorial, reference guide or step-by-step project. Follow the instructions, measurements, safety guidance and manufacturer directions provided for the particular project or product.
About Jan | Contact | Baby Nursery Ideas (Blog) | Site Map | Privacy Policy | Disclosure Policy | Disclaimer | Affiliate Disclosure | Earnings Disclosure | Facebook | Pinterest
I am a participant in the Amazon Services LLC Associates Program, an affiliate advertising program designed to provide a means for us to earn fees by linking to Amazon. As an Amazon Associate I earn from qualifying purchases.
Copyright © 2006-2026. All Rights Reserved.