Cute Owl Baby Lovey Crochet Pattern (Free Pattern for Advanced Beginners)
This cute owl baby lovey crochet pattern gives advanced beginners a free owl security blanket project with a plush owl head, simple blanket base, embroidered all-yarn face, and step-by-step instructions for making a handmade baby gift.
Compare these patterns before making the owl:
• Bunny lovey (softest + easiest for beginners)
• Brown bear lovey (classic gift favorite)
• Teddy bear lovey (classic baby gift pattern)
• Crochet baby shower gifts (easy handmade ideas that feel personal)
• Elephant lovey (best for structure + shape)
• Giraffe lovey (most unique look)
• Lamb lovey (soft neutral nursery style)
• Fox lovey (woodland theme favorite)
• Duck lovey (sweet spring baby gift)
• Puppy lovey (dog-themed gift favorite)
• Dinosaur lovey (playful prehistoric baby gift)
• Unicorn lovey (magical nursery gift idea)
• Butterfly lovey (delicate garden-themed baby gift)
This owl uses beginner-friendly stitches, but the fuzzy yarn and assembly make it best for an advanced beginner. The yarn you choose will completely change its look.
To compare how different animals change the finished shape, texture, and gift style, see my crochet animal lovey patterns before choosing your next baby lovey project.
For more feathered crochet projects, my free crochet bird patterns collection brings together owl, duck, chicken, rooster, penguin, and other bird-inspired handmade baby projects.
A woodland-style gift set can also include my crochet raccoon pattern, which adds a seated forest animal amigurumi with a mask face and striped tail beside owl, fox, and bear projects.
A gentle fawn-style project also fits beautifully into the same woodland baby gift group, and this crochet deer lovey pattern adds a soft forest animal blanket for deer, fox, owl, bear, and raccoon nursery themes.
A safari-style handmade gift set can also include my crochet lion lovey pattern with a soft blanket base, rounded ears, and textured mane.
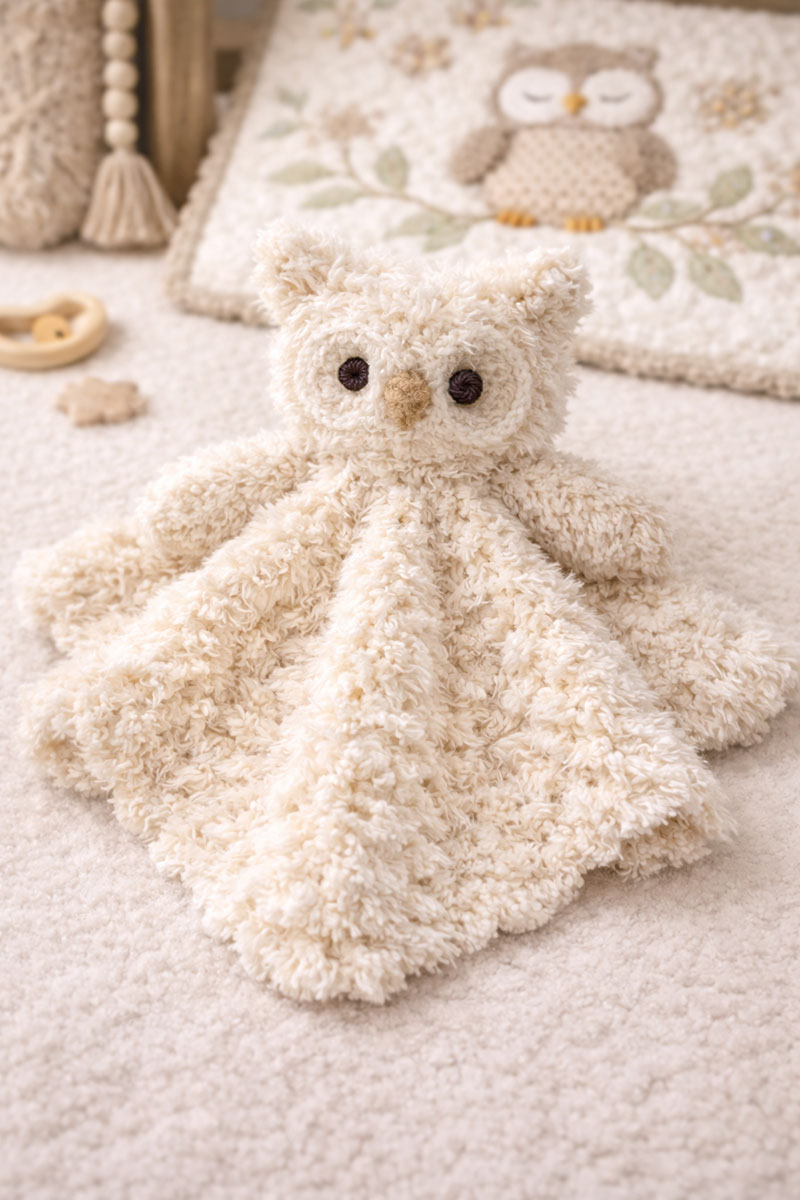
See a plush yarn option suitable for this lovey →
A soft owl baby lovey crocheted in gentle neutral tones for an advanced-beginner handmade nursery project.
Finished-look note: The written pattern below makes a smooth, round blanket with a fuzzy round owl head, embroidered facial details, and optional solid ear tufts. The photos show several styling variations, so use the written measurements and stitch instructions as the construction reference for the blanket texture, face, beak, and tuft shape.
Yarn choice matters here. The same cute owl baby lovey crochet pattern can turn out plush and gift-worthy with the right yarn, or stiff and scratchy with the wrong one.
See a lovey pattern made with a different yarn to see how that affects the look and texture →
For more handmade baby gift ideas, visit my free baby patterns collection. It includes the farm-inspired highland cow crochet snuggler lovey pattern, an easy crochet cow pattern, an ocean-themed crochet turtle lovey pattern, and a playful frog lovey crochet pattern.
Jump to a Section
How to Keep This Pattern Beginner-Friendly
Cute Owl Baby Lovey Crochet Pattern Step by Step
Cute Owl Baby Lovey Crochet Pattern Overview
This cute owl baby lovey crochet pattern is made with a smooth blanket base and a plush owl topper. The smooth blanket keeps most of the stitch counting easy, while the fuzzy head and wings add an advanced-beginner challenge.
The finished owl lovey from this cute owl baby lovey crochet pattern works as a handmade baby shower gift, a nursery keepsake, or a supervised cuddle item. The owl head adds the personality, while the security blanket base keeps the project practical and easy for little hands to hold.
I recommend embroidered eyes for this project instead of plastic safety eyes. That keeps the face fully stitched and avoids the hard pieces that can become a concern on baby items.
Why this owl lovey works well for an advanced beginner:
- The blanket base uses simple, repeatable rounds.
- The owl head is shaped with basic increases and decreases.
- The fuzzy yarn is limited to the head and wings.
- The face uses crochet and embroidery instead of hard attachments.
- The main challenges are fuzzy-yarn counting, stuffing, embroidery, and sewn assembly.
For more animal-shaped handmade gifts, visit my crochet animal lovey patterns collection before choosing your next project. This cute owl baby lovey crochet pattern also fits nicely with my free baby patterns, especially when you want a handmade baby gift that feels useful, personal, and easy to customize.
For nursery-style inspiration that pairs well with owls, forest animals, and handmade gifts, see my woodland nursery ideas page. For coordinating woodland appliqué templates, forest sewing projects, rustic nursery crafts, and handmade décor ideas, browse these woodland nursery patterns for forest-inspired baby rooms and handmade gift projects.
Make Coordinating Woodland Nursery Baskets:
Browse the Free Crochet Basket Patterns Collection
Start With the Extra Large Crochet Storage Basket Pattern
Make the Woodland Bunny Crochet Basket
Forest-themed nurseries usually feel more polished once the decorative layers start working together, and these woodland nursery decor ideas show how rustic shelving, woodland wall accents, natural textures, and cozy styling details can make the room feel complete without becoming visually busy.
You may also like my woodland baby quilt pattern if you want to build a handmade owl or forest-themed baby gift set. For more DIY nursery projects, visit my DIY nursery decor ideas collection.
Materials (Fuzzy Owl Lovey)
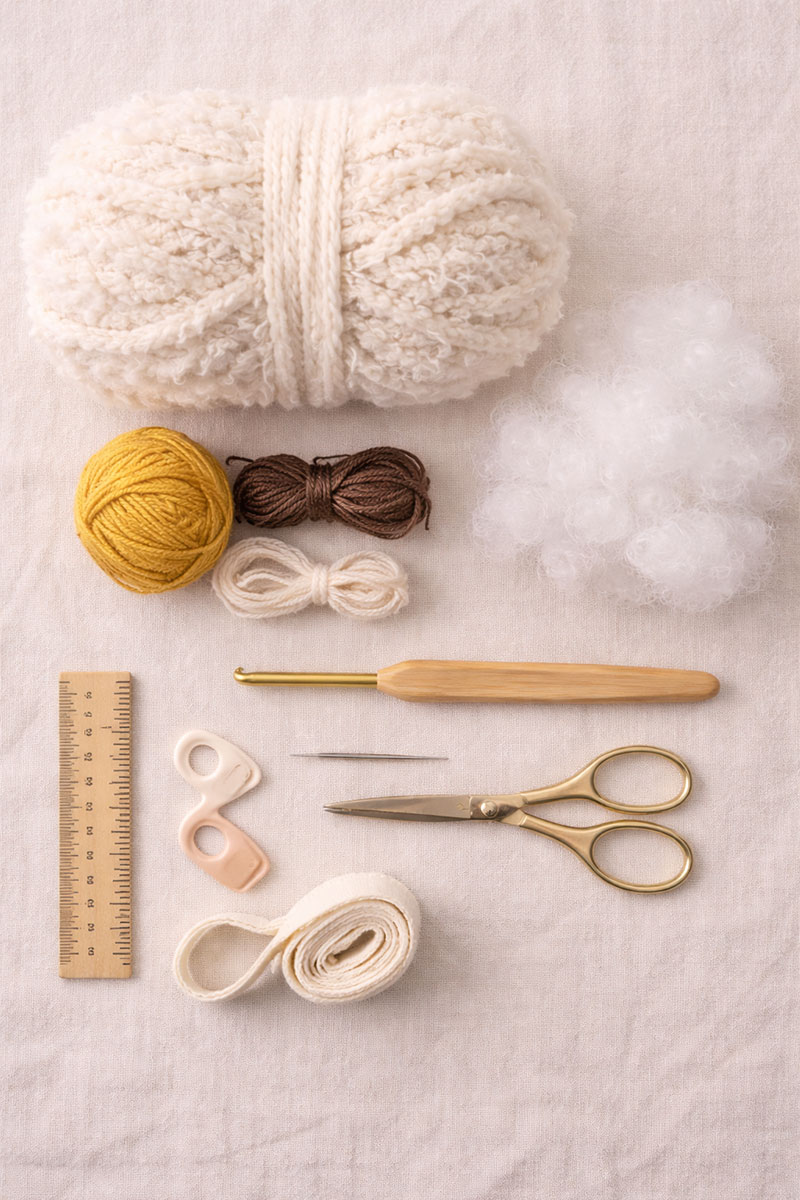
See my favorite plush fuzzy yarn suitable for this baby lovey project
Crochet hook (recommended size for fuzzy yarn)
Locking stitch markers for crochet projects
Large-eye yarn needle for sewing pieces together
This fuzzy owl lovey is designed to look plush and cozy, with a slightly shaggy texture that gives it a handmade cuddle-friendly feel. The pattern uses a main fuzzy yarn for the owl head and wings, plus a smooth yarn for the security blanket so the stitches stay easy to count and the drape stays gentle.
Yarn
- Main (Owl Plush Yarn): Approximately 1 skein of super-bulky fuzzy yarn (size 6) in cream, oatmeal, or light gray. Plush-yarn skein yardage varies widely, so confirm that you have enough for the head, two wings, optional ear tufts, and the two head-attachment strands. Examples include faux-fur, velvet, chenille, “teddy,” or plush yarn.
- Accent (Smooth Worsted/Aran Yarn): small amounts in:
- white or ivory (eye whites)
- black smooth yarn or embroidery floss (embroidered pupils or sleepy eyelids)
- tan, camel, or warm brown (beak)
- optional: taupe or soft brown (eye rings)
- Blanket (Smooth Yarn): Approximately 1 skein of worsted/aran cotton or cotton-blend yarn (size 4) in a coordinating neutral such as cream, oatmeal, or gray. Check the skein yardage because the amount needed will vary with the finished blanket diameter, gauge, and number of border rounds. Cotton gives the blanket flexible drape and washes well.
Hooks
- For fuzzy yarn: 6.0 mm (J-10) or 6.5 mm (K-10.5) hook (choose the size that makes a tight fabric so stuffing doesn’t show).
- For blanket yarn (size 4 cotton): 4.5 mm (7) or 5.0 mm (H-8).
Notions
- Polyester fiberfill stuffing
- Yarn needle (large eye)
- At least 3 stitch markers: one for the beginning of continuous rounds and two for marking the eye centers
- Rustproof pins or extra stitch markers for positioning pieces before sewing
- Small sharp scissors
- Tape measure
Eyes
- Embroidered eyes: Use black smooth yarn or embroidery floss to make oval pupils or sleepy eyelids.
- Do not attach plastic eyes, buttons, beads, or other small hard pieces to a lovey intended for a baby.
Fuzzy Yarn Notes (Read This Before You Start)
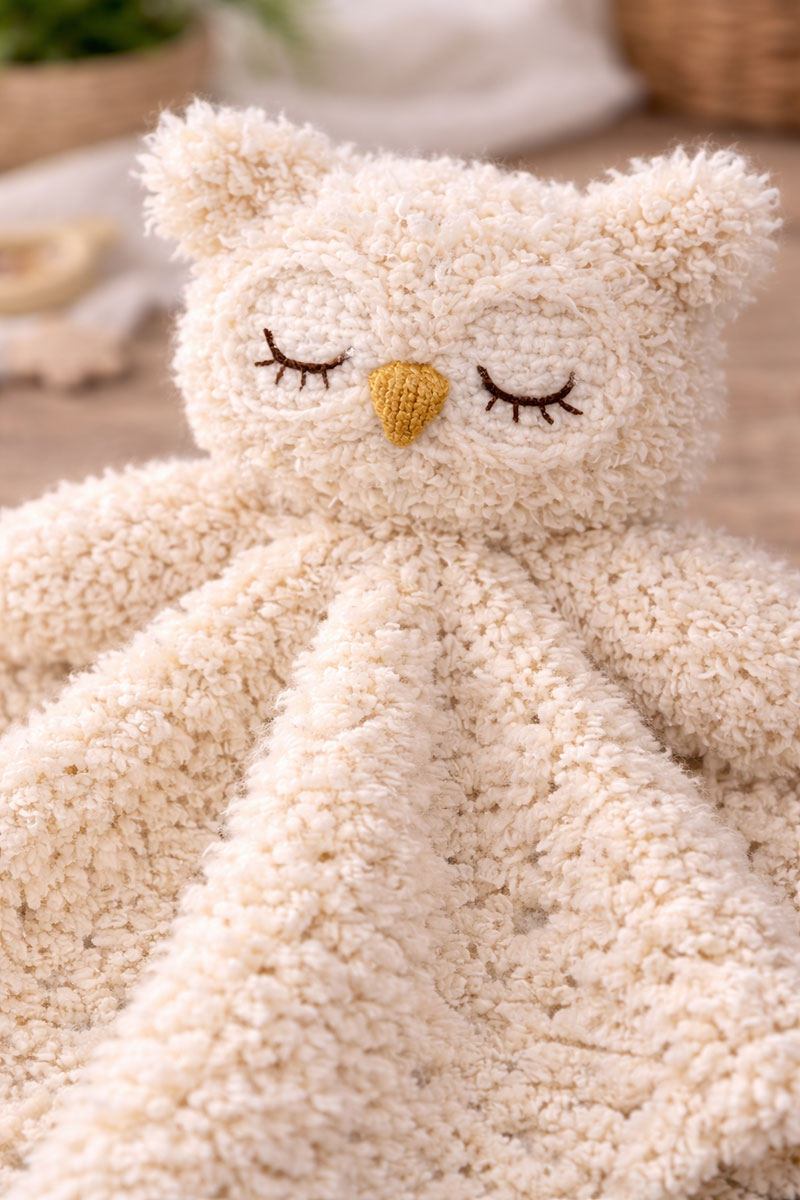
Fuzzy yarn is wonderful for texture, but it can hide your stitches. The goal is to make counting easy and keep your owl shape crisp.
How to Keep This Pattern Beginner-Friendly
- Use stitch markers at the start of every round. Move the marker up each round so you never lose your place.
- Feel for stitches with your fingertips. With plush yarn, you’ll “find” the top loops by touch more than sight.
- Count often. After every increase and decrease round, check the stitch count before moving on.
- Tight fabric matters. If you can see stuffing through the fuzzy yarn, drop your hook size.
Magic Ring Tip for Fuzzy Yarn
- If your fuzzy yarn is hard to tighten in a magic ring, make the ring using a strand of smooth yarn in the same color, then crochet over it with the fuzzy yarn and pull the smooth strand tight. Knot the smooth-yarn ends securely and bury both ends inside the piece before stuffing.
Invisible Decrease Recommendation
- Use an invisible decrease: insert the hook through the front loop of each of the next two stitches, yarn over and pull through both front loops, then yarn over and pull through both loops remaining on the hook.
Washing Note
Check the care labels for both yarns before washing. Follow the more restrictive instructions for washing and drying. If you are gifting the lovey, include a care note based on those two labels.
Fuzzy Owl Baby Lovey Crochet Pattern (Step-by-Step)
This pattern has two main parts: a soft blanket base (worked in smooth cotton yarn) and a fuzzy owl topper (worked in plush yarn). You’ll crochet the blanket first, then crochet the owl head and wings, and finally sew everything together securely.
Finished Size (Approx.)
- Blanket base before border: about 14–16 inches across. The finished blanket will be slightly larger after the single-crochet border is added.
- Owl Head: Finished width varies considerably with plush-yarn thickness, hook size, and tension. The 48-stitch version is the larger option; use the 36-stitch option for a smaller topper.
Skill Level
- Advanced beginner: basic stitches with continuous rounds, fuzzy-yarn counting, stuffing, embroidery, and sewn assembly
Stitches & Abbreviations (US Terms)
- ch = chain
- sl st = slip stitch
- sc = single crochet
- dc = double crochet
- inc = increase (2 sc in same stitch)
- dec = decrease (use invisible decrease if possible)
- MR = magic ring
- ( ) = repeat instructions in parentheses
- [ ] = stitch count at end of round
Gauge
Gauge for blanket: After Round 4, measure from the center ring to the outer edge, not across the complete circle. That center-to-edge measurement should be approximately 2¾ inches when using worsted cotton and a 5 mm hook. Exact gauge is not essential. Continue the increase pattern until the complete diameter measures 14 to 16 inches, even if your blanket requires fewer or more than 12 rounds.
Part A — Blanket Base (Smooth Yarn)
Use your smooth cotton or cotton-blend yarn (size 4) and the smaller hook (4.5–5.0 mm).
Round 1 (Center)
Ch 4, join with sl st to form a ring (or use MR).
Ch 2 (does not count as a stitch). Work 12 dc into the ring. Join with sl st to first dc. [12 dc]
Repeatability note: Work the blanket in joined rounds without turning. In each blanket round, the beginning ch 2 does not count as a stitch. Always join to the first real dc of the round, not to the top of the chain. The side facing you as you work is the right side.
Round 2
Ch 2. 2 dc in each stitch around. Join. [24 dc]
Round 3
Ch 2. (2 dc in next stitch, 1 dc in next stitch) around. Join. [36 dc]
Round 4
Ch 2. (2 dc in next stitch, 1 dc in next 2 stitches) around. Join. [48 dc]
Round 5
Ch 2. (2 dc in next stitch, 1 dc in next 3 stitches) around. Join. [60 dc]
Rounds 6–12 (Grow to your preferred size)
Continue increasing in the same pattern, adding one more “1 dc” between increases each round:
- Round 6: (2 dc, 1 dc in next 4) = [72]
- Round 7: (2 dc, 1 dc in next 5) = [84]
- Round 8: (2 dc, 1 dc in next 6) = [96]
- Round 9: (2 dc, 1 dc in next 7) = [108]
- Round 10: (2 dc, 1 dc in next 8) = [120]
- Round 11: (2 dc, 1 dc in next 9) = [132]
- Round 12: (2 dc, 1 dc in next 10) = [144]
Lay the blanket flat without stretching it and measure straight across the center. Stop when the complete diameter reaches 14 to 16 inches. Do not stop automatically at Round 12 if the blanket is still smaller than 14 inches.
If additional rounds are needed, continue the established increase sequence:
- Round 13: Ch 2. (2 dc in the next stitch, 1 dc in each of the next 11 stitches) around. Join to the first dc. [156]
- Round 14: Ch 2. (2 dc in the next stitch, 1 dc in each of the next 12 stitches) around. Join to the first dc. [168]
Border (Simple, Soft Edge)
Ch 1. Work 1 sc in every stitch around. Join with a sl st to the first sc. For a slightly firmer edge, work one additional round of sc or reverse sc (crab stitch) if desired.
Fasten off and weave in ends.
Part B — Fuzzy Owl Head (Plush Yarn)
Switch to your fuzzy yarn (size 6 plush) and larger hook (6.0–6.5 mm). Work the head in continuous rounds without joining or turning. Use a stitch marker to mark the first stitch and move it up after every completed round.
Round 1
MR, 6 sc into ring. [6]
Round 2
Inc in each stitch around. [12]
Round 3
(1 sc, inc) around. [18]
Round 4
(2 sc, inc) around. [24]
Round 5
(3 sc, inc) around. [30]
Round 6
(4 sc, inc) around. [36]
Choose the head size now: Flatten the 36-stitch piece gently without stretching and compare it with the blanket center. If this width gives the proportion you want, follow the smaller-head option. Otherwise, continue with Round 7 below for the standard 48-stitch head.
For a smaller head, stop increasing after Round 6 [36]. Work Rounds 7–10 even at [36]. Mark the eye centers between Rounds 8 and 9. Then decrease as follows:
- Round 11: (4 sc, dec) around. [30]
Begin stuffing the smaller head now. Add small pieces of fiberfill and shape the head as you continue decreasing.
- Round 12: (3 sc, dec) around. [24]
- Round 13: (2 sc, dec) around. [18]
- Round 14: (1 sc, dec) around. [12]
- Round 15: Dec around. [6]
Fasten off, leaving a long tail. Weave the tail through the remaining front loops and pull tightly to close. Weave the tail into the stuffed head. During assembly, attach the wing bases across approximately Rounds 10 through 13. After completing the smaller head, do not work the standard Head Rounds 7 through 19 below. Continue with Part C.
Round 7
(5 sc, inc) around. [42]
Round 8
(6 sc, inc) around. [48]
Rounds 9–12
Sc in each stitch around for 4 rounds. [48]
Mark the Face Position
Before beginning the decrease rounds, use removable stitch markers to mark the approximate centers of the two eye patches between Rounds 10 and 11. Leave enough room for the eye patches to sit side by side with about 3 to 4 stitches visible between their inner edges. These markers are only placement guides and will be removed during assembly.
Round 13
(6 sc, dec) around. [42]
Round 14
(5 sc, dec) around. [36]
Round 15
(4 sc, dec) around. [30]
Start Stuffing
Stuff firmly with small pieces of fiberfill, concentrating slightly more stuffing toward the face than the back so the owl keeps a rounded front profile. Compress and shape the head as you go.
Round 16
(3 sc, dec) around. [24]
Round 17
(2 sc, dec) around. [18]
Round 18
(1 sc, dec) around. [12]
Round 19
Dec around. [6]
Fasten off leaving a long tail. Use a yarn needle to weave through remaining front loops and pull tight to close. Weave tail in securely.
Part C — Owl Wings (Make 2, Fuzzy Yarn)
Work each wing in continuous rounds without joining or turning. Use a stitch marker to mark the first stitch and move it up after every completed round.
Round 1
MR, 6 sc. [6] (Or ch 2 and work 6 sc into the second chain from the hook if you prefer.)
Round 2
(1 sc, inc) around. [9]
Rounds 3–6
Sc around. [9]
Round 7 (Taper)
(1 sc, dec) around. [6]
Lightly stuff the closed Round 1 end of the wing, leaving the Round 7 end unstuffed. Flatten the six-stitch opening and work 3 sc across, inserting the hook through one stitch from each layer for every sc. Fasten off, leaving a long tail for sewing.
Part D — Eyes + Beak (Smooth Yarn)
Work the eye whites and optional eye rings in continuous rounds without turning. Join only at the end of the final round where the instructions say to join.
Eye Whites (Make 2)
Using white or ivory smooth yarn:
- Round 1: MR, 6 sc. [6]
- Round 2: Inc in each stitch around. Join with a sl st to the first sc. [12]
Fasten off, leaving a long tail for sewing. Lay each circle flat and smooth it gently before assembly.
Optional Eye Rings (Make 2)
Using taupe or soft brown smooth yarn:
- Round 1: MR, 6 sc. [6]
- Round 2: Inc in each stitch around. [12]
- Round 3: (1 sc in the next stitch, inc in the next stitch) around. Join with a sl st to the first sc. [18]
Fasten off each eye ring, leaving its long tail free for attaching the completed eye patch to the head. Center one 12-stitch white eye circle over each 18-stitch eye ring. Use the white eye circle's sewing tail to sew it to the ring so an even border remains visible.
Beak (Small Triangle)
Using tan or warm brown smooth yarn:
- Ch 2.
- Row 1: Work 2 sc in the second chain from the hook. [2]
- Ch 1 and turn.
- Row 2: Work 2 sc in each stitch across. [4]
Fasten off, leaving a long tail for sewing. During assembly, place the four-stitch edge across the top and point the beginning-chain end downward.
Optional: Make Solid Owl Ear Tufts
Using the fuzzy yarn and larger hook (6.0–6.5 mm), make two matching, unstuffed ear tufts before beginning the assembly section.
- Ch 2.
- Row 1: Work 2 sc in the second chain from the hook. [2]
- Ch 1 and turn.
- Row 2: Work 2 sc in each stitch across. [4]
- Ch 1 and turn.
- Row 3: Work 1 sc in each stitch across. [4]
Fasten off, leaving a long tail for sewing. The beginning-chain end forms the upper point. Row 3 forms the four-stitch base that will be sewn to the head.
Place one tuft on each upper side of the head with the beginning-chain point facing up. Position the four-stitch base across approximately Head Rounds 4 through 7. Sew across the base and along the two short lower side edges so the tuft does not flop forward or backward. Pass the yarn tail through the stuffed head and trim it so the end withdraws inside.
Part E: Secure Assembly
1) Position the Face
Place the closed and stuffed head on a flat surface with the marked face side toward you. If you made the optional eye rings, each white eye circle should already be sewn to the center of its ring as instructed in Part D. Pin the two completed eye patches to the head. If you omitted the rings, pin the two white eye circles directly to the head.
Leave about 3 to 4 visible head stitches between the inner edges of the eye patches. Check that both patches are level before sewing.
2) Sew the Eye Patches and Embroider the Eyes
If you made the optional eye rings, use each ring's sewing tail to attach the completed eye patch around its outer edge. If you omitted the rings, use each white eye circle's sewing tail to attach it directly to the head.
Using black smooth yarn or embroidery floss, embroider an oval pupil or a curved sleepy eyelid onto each white eye circle. Pass each finished yarn tail through the stuffed head and bring it out at a different point. Pull gently and trim the tail close so it withdraws into the head.
3) Sew the Beak
Center the beak between the eye patches. Position the four-stitch edge at the top and the beginning-chain point facing down. Sew securely around the outside edge without pulling tightly enough to distort the eye patches.
4) Sew the Wings
For the standard 48-stitch head, place the flattened three-stitch end of one wing against each side of the head between approximately Rounds 12 and 15. For the smaller 36-stitch head, place the wing bases between approximately Rounds 10 and 13. Angle both wings slightly down and forward. Sew across the full three-stitch edge of each wing, then sew back across the same edge for a second pass through solid head fabric. Pass each yarn tail through the stuffed head and trim it so the end withdraws inside.
If you are adding the optional solid ear tufts, attach them before sewing the head to the blanket.
5) Attach the Completed Head to the Blanket
Lay the blanket flat with its right side facing up. Center the final-round closure of the owl head over the blanket center. This is the Round 19 closure for the standard head or the Round 15 closure for the smaller head. Keep the Round 1 end at the top of the owl's head and turn the face toward the chosen front edge of the blanket.
Thread a separate 30 to 36 inch length of fuzzy yarn onto the yarn needle. Sew one complete pass around a circle approximately 2½ to 3 inches wide on the lower outside surface of the head. Take each stitch through solid head fabric and through blanket stitches around Blanket Rounds 2 and 3.
Do not attach the head only through the six drawstring closure loops. Keep the sewing stitches snug but not tight enough to gather or pucker the blanket. Secure the first sewing length beneath the head.
Thread a second 30 to 36 inch length of fuzzy yarn onto the needle. Complete a second pass around the same attachment circle, placing the new stitches between the stitches from the first pass.
Knot each pair of sewing tails securely beneath the head. Bury each tail separately through the lower side of the stuffed head. Bring the needle out at a different point, pull gently, and trim the yarn so the end withdraws inside.
6) Final Construction Check
- Lift the lovey by the blanket and confirm that the head stays upright without rocking away from the center.
- Pull gently on both wings, both eye patches, the embroidered eyes, the beak, and any ear tufts.
- Check that the blanket center lies flat and has not gathered beneath the head.
- Bury all remaining yarn tails.
- Remove every stitch marker and pin.
- Check the complete lovey for loose yarn loops, open seams, exposed stuffing, or pieces that shift when pulled.
Care Notes
Follow the most restrictive care instructions on both yarn labels. If both yarns allow machine washing, place the lovey in a pillowcase or laundry bag and wash on a gentle or delicate cycle. Air dry unless both yarn labels allow tumble drying on low. After washing and drying, repeat the final construction check before the lovey is used again.
Pattern Notes & Sizing Options
This crochet owl lovey pattern is designed to work as a classic security blanket with a plush animal topper. The combination of a smooth cotton blanket and a fuzzy owl head gives the finished piece both comfort and durability, making it useful for gifting, nursery décor, or supervised cuddle time.
Because this is a lovey pattern, exact gauge is not critical. The most important goals are a firmly stitched owl head so stuffing does not show through the fuzzy yarn and a blanket base with a flexible drape.
For baby loveys and security blankets, many makers prefer embroidered details instead of hard attachments. Embroidered eyes and facial features create a fully stitched finish that holds up well to cuddling, washing, and everyday use.
Use note: This handmade lovey is for supervised awake-time use or display. Keep blankets, loveys, stuffed toys, and other soft objects out of a baby's crib, bassinet, or play yard during sleep. For current infant sleep guidance in the United States, see the U.S. Consumer Product Safety Commission Safe Sleep guidance.
Easy Size Adjustments
- Smaller Lovey: Stop the blanket base at 12–13 inches across and follow the complete smaller-head option provided after Head Round 6.
- Standard Lovey (Recommended): Make the blanket base 14–16 inches across and follow the standard 48-stitch head instructions.
- Larger Comfort Lovey: Continue the established blanket increase sequence for 1–2 additional rounds. Keep the fuzzy-yarn hook size that produces tight fabric so the stuffing does not show.
Use and Display Notes
Use embroidered all-yarn facial details for this version. The completed lovey may be used during supervised awake time or displayed as a handmade keepsake. It should not be placed in a baby's sleep space or left with an infant during unsupervised sleep.
This crochet owl lovey works beautifully in neutral nurseries, woodland themes, and handmade baby gift sets. To see how that same woodland look can carry into the room, visit my woodland nursery ideas page.
If you prefer cleaner nursery styling with fewer woodland details or character features, this minimalist crochet lovey pattern has a simpler modern look that works especially well in neutral nursery gift baskets and understated baby room themes.
The fuzzy texture gives the owl extra dimension, while the smooth blanket base and clear stitch counts keep the project manageable for an advanced beginner.
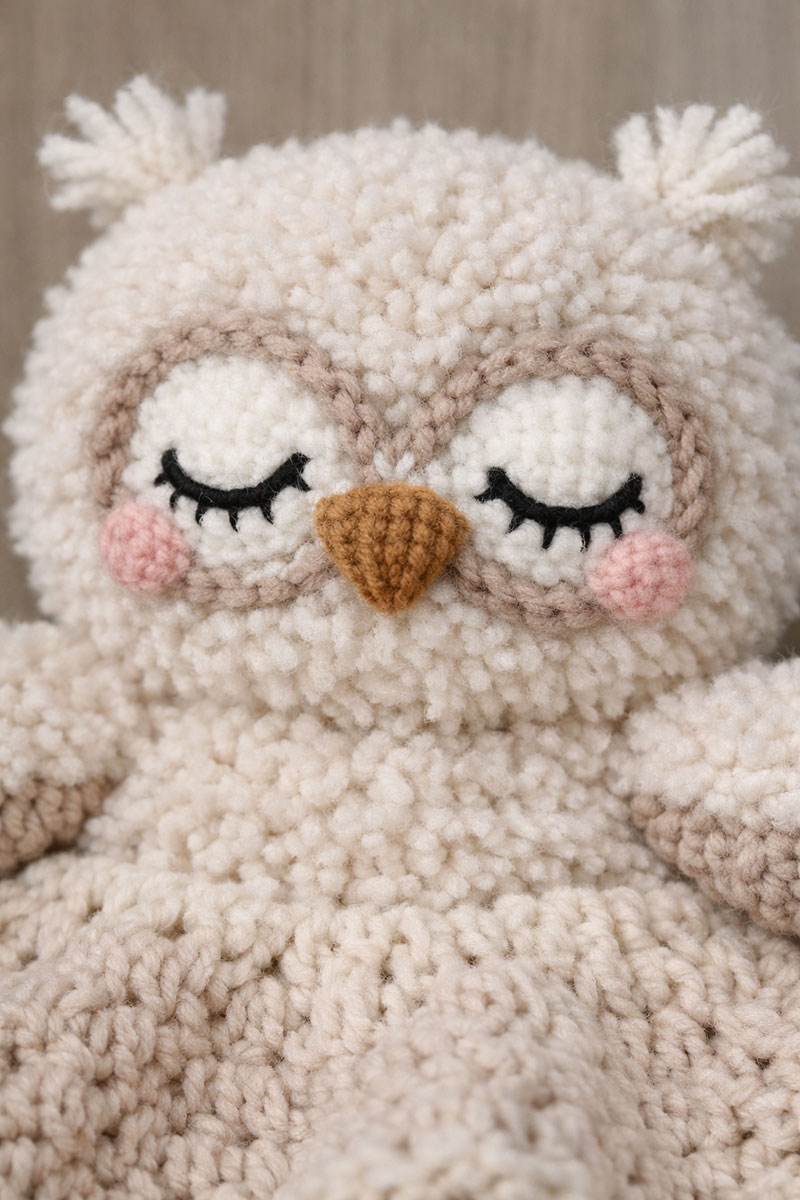
This cute owl baby lovey crochet pattern was written to be easy to follow for an advanced beginner who is ready to work with plush yarn, stuffing, embroidery, and sewn assembly.
Planning more than one handmade baby gift? Compare pattern shapes before starting. Some loveys are faster, some hold their shape better, and some are better for everyday use.
See the easiest and most gift-friendly baby patterns →
Supplies Used for This Crochet Owl Lovey
Plush Fuzzy Yarn (Super Bulky, Size 6)
Cotton Yarn for Blanket Base (Worsted / Size 4)
When you click on links to various merchants on this site and make a purchase, this may result in this site earning a commission. This does not affect the price you pay.

UBGI Gold Standard 2026
Reviewed under the site's
editorial checklist.
Photos, decorating ideas, party setups and reader submissions are shared for inspiration unless a page is specifically presented as a pattern, tutorial, reference guide or step-by-step project. Follow the instructions, measurements, safety guidance and manufacturer directions provided for the particular project or product.
About Jan | Contact | Baby Nursery Ideas (Blog) | Site Map | Privacy Policy | Disclosure Policy | Disclaimer | Affiliate Disclosure | Earnings Disclosure | Facebook | Pinterest
I am a participant in the Amazon Services LLC Associates Program, an affiliate advertising program designed to provide a means for us to earn fees by linking to Amazon. As an Amazon Associate I earn from qualifying purchases.
Copyright © 2006-2026. All Rights Reserved.