Easy Crochet Chicken Pattern (Baby Lovey)
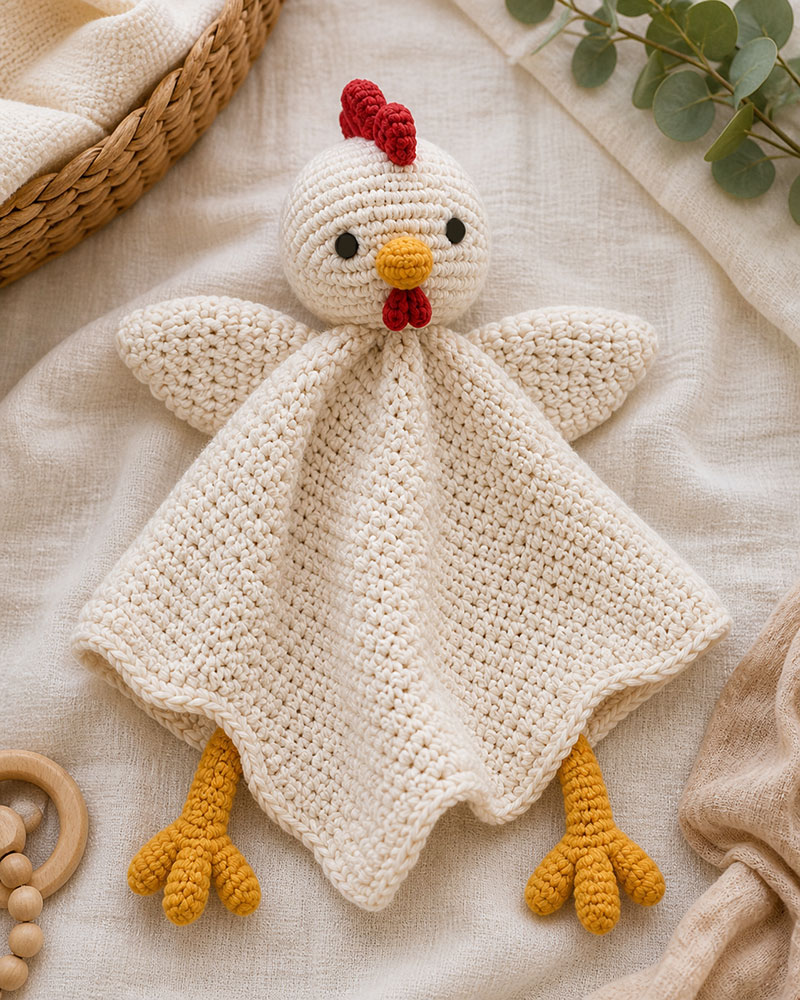
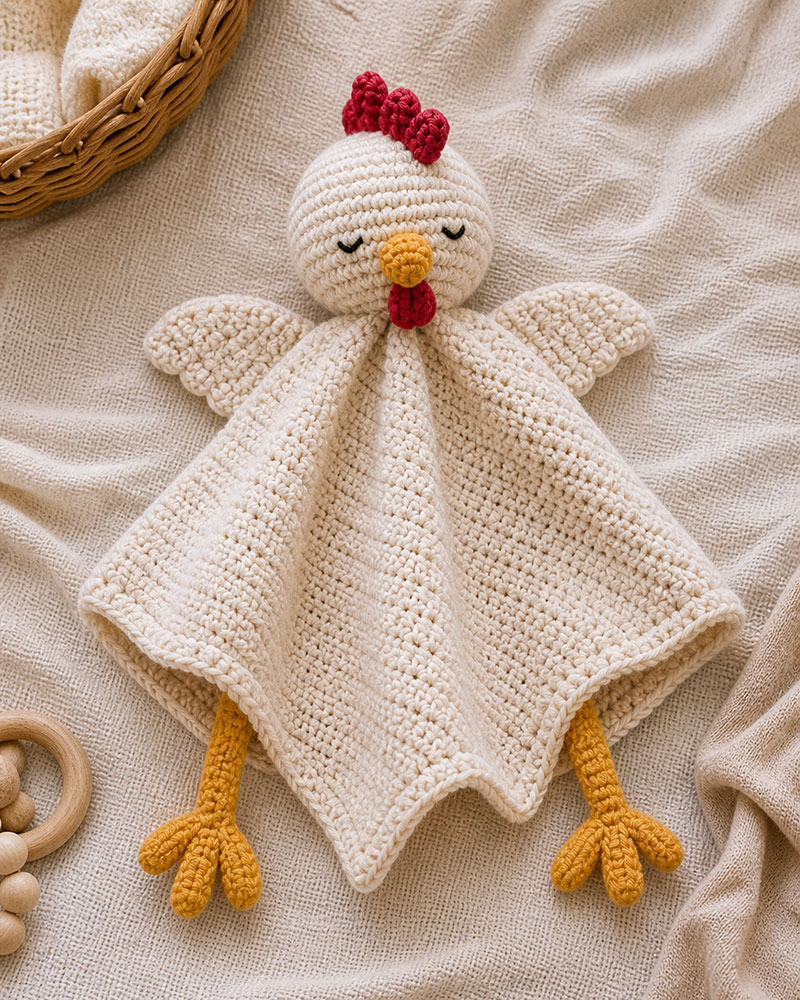
A crochet chicken pattern is used to make a small baby lovey with a blanket body and a simple chicken head that hangs naturally when picked up. This version is designed so beginners can follow exact steps and end up with a finished lovey that actually looks right.
More baby crochet patterns to try next:
Jump to the chicken lovey section you need:
A crochet chicken pattern is a step-by-step set of instructions used to create a baby lovey with a blanket base and attached chicken features such as a head, wings, and legs using basic crochet stitches.
How to Make This Crochet Chicken Pattern
A crochet lovey can look fine on the table and still hang strangely once it is picked up. In this design, a simple granny-style blanket body is used so the lovey hangs correctly instead of sitting stiff.
To compare how different animals hang and drape once finished, these crochet animal lovey patterns show how the same basic idea changes across designs.
This crochet chicken pattern makes a baby lovey with a 12 inch blanket body, one round chicken head, two flat wings, and two dangling legs using beginner crochet stitches.
If you want more animal lovey ideas after this chicken, my crochet animal lovey patterns page is the best next stop.
Materials for This Crochet Chicken Pattern
- Worsted weight yarn in cream for the blanket and head
- Small amount of yellow yarn for beak and legs
- Small amount of red yarn for comb
- 4.0 mm crochet hook
- Yarn needle
- Scissors
- Small amount of stuffing for the head
- Black embroidery thread for eyes
beginner crochet kit with hooks and tools
Crochet Chicken Pattern Blanket Body
This body is made like a small granny-style lovey blanket so it drapes instead of looking like a flat potholder.
If the blanket does not drape when you lift it, it will not look like a lovey no matter how neatly it is crocheted.
Finished size: about 12 inches across.
Abbreviations: ch means chain, sc means single crochet, hdc means half double crochet, dc means double crochet, sl st means slip stitch, st means stitch.
Round 1: Make a magic ring. Ch 3. Work 2 dc into ring. Ch 2. Work 3 dc into ring. Ch 2. Work 3 dc into ring. Ch 2. Work 3 dc into ring. Ch 2. Sl st to top of beginning ch 3. You now have 4 corners and 4 groups of 3 dc.
Round 2: Sl st into the first corner space. Ch 3. Work 2 dc, ch 2, 3 dc in the same corner space. In each remaining corner space, work 3 dc, ch 2, 3 dc. Sl st to top of beginning ch 3.
Round 3: Sl st into the first corner space. Ch 3. Work 2 dc, ch 2, 3 dc in that corner. Work 3 dc in the space between corner groups. In next corner, work 3 dc, ch 2, 3 dc. Repeat around. Sl st to join.
Rounds 4 through 8: Continue the same pattern. In every corner, work 3 dc, ch 2, 3 dc. In every side space, work 3 dc. Join each round with a sl st.
Stop check: After round 8, the blanket should measure about 11 to 12 inches across. If it is smaller, add one more round using the same pattern.
Final edge: Ch 1. Sc evenly around the entire blanket. Work 3 sc in each corner space. Sl st to join. Fasten off and weave in ends.
Crochet Chicken Pattern Head
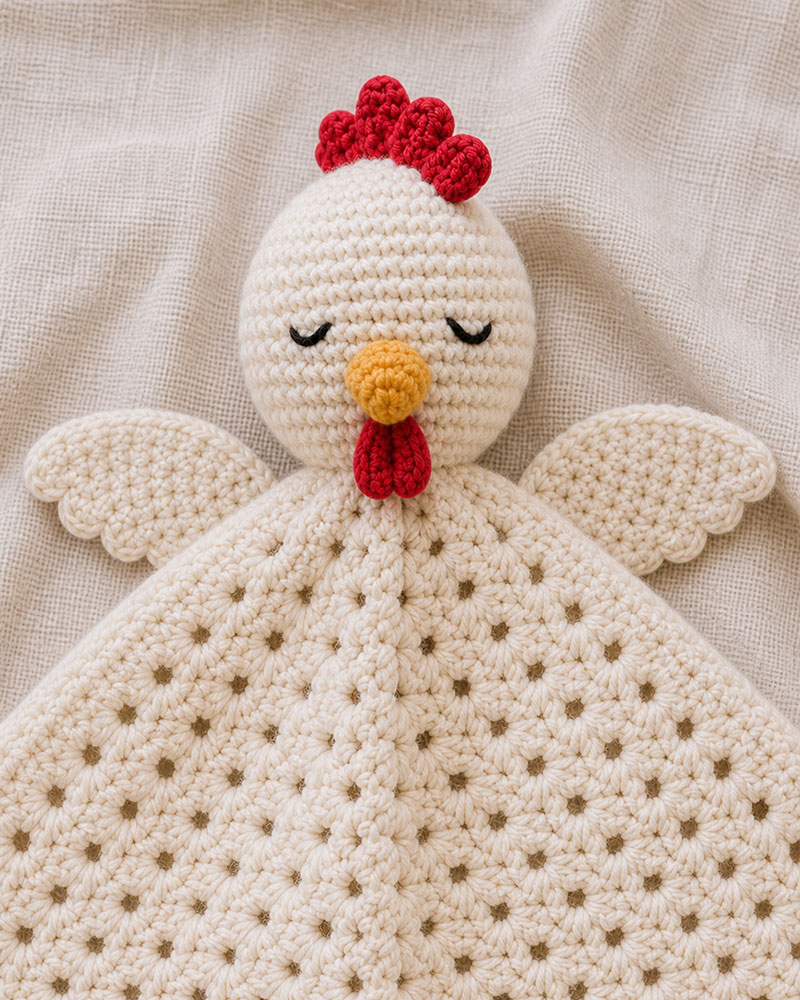
The head should be round, lightly stuffed, and small enough that it does not pull the blanket upward.
Round 1: Magic ring, 6 sc into ring. (6)
Round 2: 2 sc in each st around. (12)
Round 3: 1 sc, increase. Repeat around. (18)
Round 4: 2 sc, increase. Repeat around. (24)
Round 5: 3 sc, increase. Repeat around. (30)
Rounds 6 through 10: 1 sc in each st around. (30)
Embroider eyes between rounds 7 and 8, about 5 stitches apart.
Round 11: 3 sc, decrease. Repeat around. (24)
Round 12: 2 sc, decrease. Repeat around. (18)
Add a small amount of stuffing.
Round 13: 1 sc, decrease. Repeat around. (12)
Round 14: Decrease around. (6)
Fasten off, close the hole, and weave in the tail.
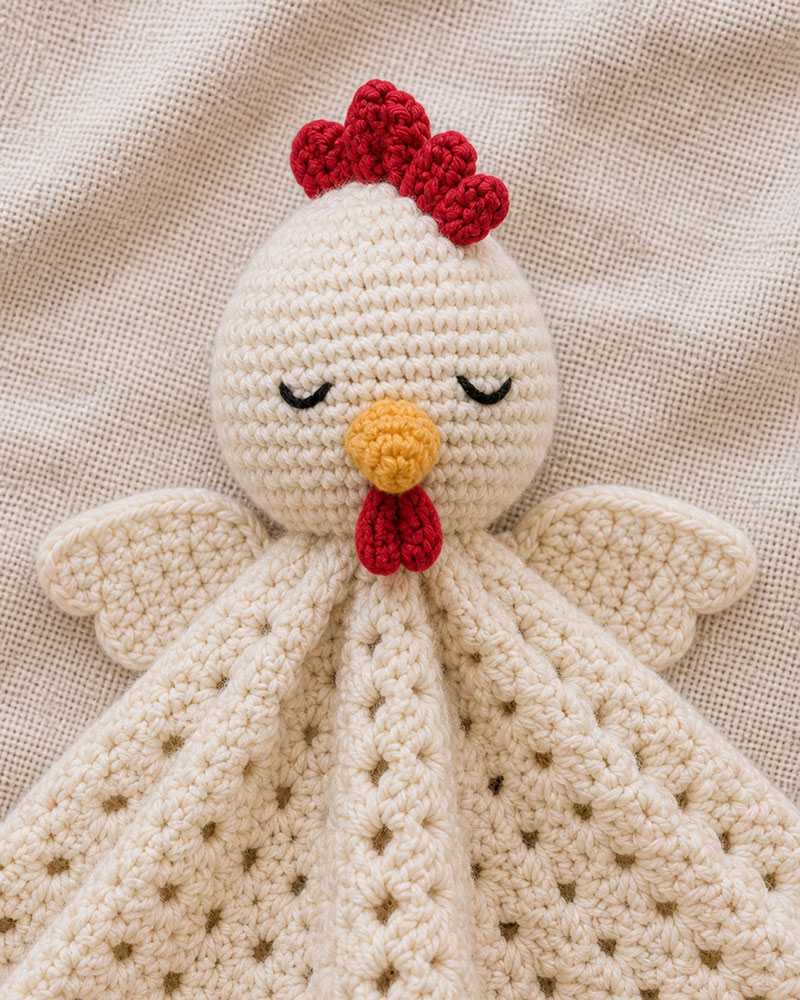
Beak and Comb for the Crochet Chicken
The beak and comb are small, but they do a lot of work. If they are too large, the chicken starts to look less like a baby lovey and more like a toy.
Beak: With yellow yarn, ch 4. Sc in second ch from hook. Hdc in next ch. Dc in last ch. Fasten off, leaving a tail for sewing.
Sew beak between the eyes, centered between rounds 8 and 9.
Comb: With red yarn, join at top center of head. Ch 3, sl st into same spot. Ch 4, sl st into next stitch. Ch 3, sl st into next stitch. Fasten off and weave in ends.
Flat Wings for the Crochet Chicken Pattern
Flat wings make the finished chicken look like a lovey instead of a stuffed toy animal.
Make 2.
Row 1: Ch 8. Sc in second ch from hook and across. (7)
Row 2: Ch 1, turn. Sc across. (7)
Row 3: Ch 1, turn. Sc2tog, sc 3, sc2tog. (5)
Row 4: Ch 1, turn. Sc across. (5)
Fasten off, leaving a long tail for sewing.
Sew one wing to each side of the blanket, about 1 inch below the head.
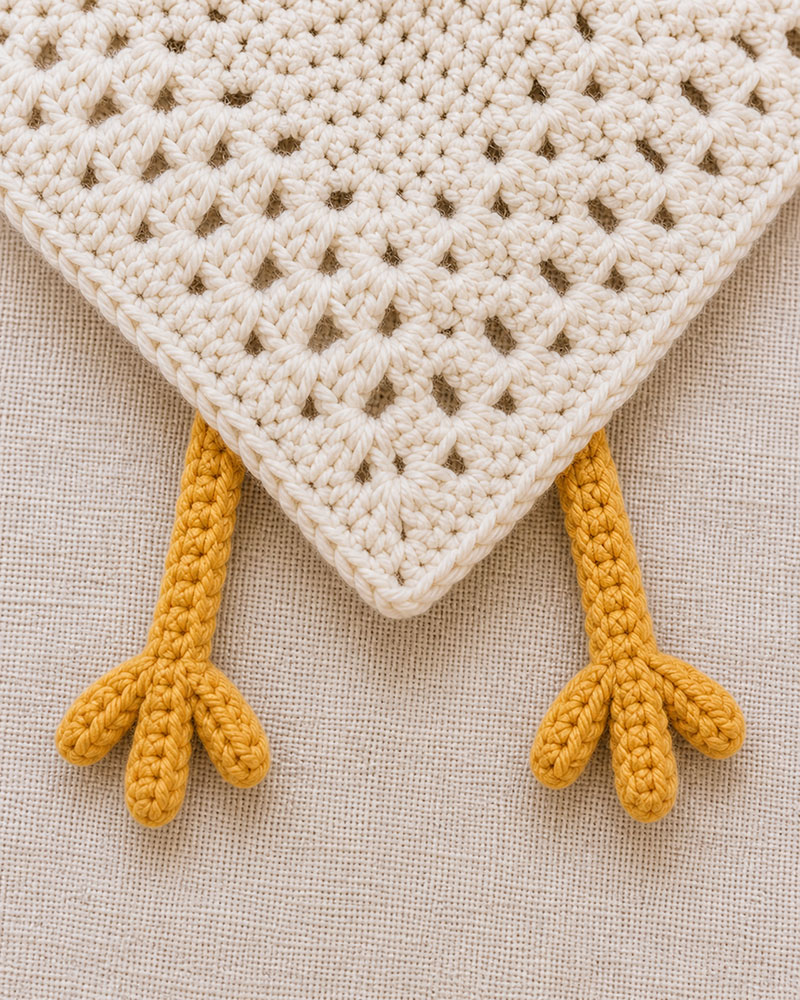
Dangling Legs for the Crochet Chicken Lovey
These legs are designed to make the chicken read as a lovey right away. They wiggle, dangle and move naturally when the blanket is lifted and babies love that.
Make 2.
Leg: With yellow yarn, ch 14. Sl st in second ch from hook and in each ch back to the start. Do not fasten off yet.
Toe 1: Ch 4. Sl st in second ch from hook and in next 2 ch. Sl st back into base of leg.
Toe 2: Ch 4. Sl st in second ch from hook and in next 2 ch. Sl st back into base of leg.
Toe 3: Ch 4. Sl st in second ch from hook and in next 2 ch. Sl st back into base of leg.
Fasten off, leaving a tail for sewing.
Sew one leg to each lower corner of the blanket.
Crochet Chicken Pattern Assembly
Assembly is where this pattern either looks balanced or slightly crooked. Lay every piece down first before sewing.
Step 1: Place the blanket flat with one corner pointing down.
Step 2: Place the head in the center of the blanket, about 1 inch above the exact middle.
Step 3: Sew the head down using 12 to 16 small stitches around the base. Tug gently to make sure it does not wobble.
Step 4: Sew one wing on each side of the head, about 1 inch below the head seam.
Step 5: Sew one leg to each lower corner.
Step 6: Weave in every yarn tail. Check all attached parts before use.
If the head is not centered, the whole lovey will look uneven.
See more crochet animal lovey patterns
Baby Safety Notes for This Crochet Chicken Pattern
For a baby gift, embroidered eyes are the safer choice. Buttons, glued parts, and loose pieces should not be used on baby loveys.
Do not place handmade loveys, blankets, pillows, or loose items in a baby’s sleep space. The U.S. Consumer Product Safety Commission safe sleep guidance recommends keeping the sleep area free of loose items.
Crochet Chicken Pattern FAQ
Is this crochet chicken pattern beginner friendly?
Yes. The blanket uses a repeating granny-style pattern, and the head uses basic increase and decrease rounds.
How big is the finished chicken lovey?
The blanket body is about 12 inches across, depending on yarn, hook size, and tension.
Can I use safety eyes?
For nursery decor, yes. For a baby gift, embroidered eyes are better.
Why does my chicken lovey look like a potholder?
The blanket is usually too tight, too flat, or edged too heavily. A granny-style body with a light final border helps the lovey drape instead of sitting stiff.
Can I make the chicken lovey larger?
Yes. Add more blanket rounds before the final single crochet edge.
More Free Baby Patterns to Make Next
To compare this chicken lovey with other easy baby crochet projects, visit the free baby patterns page first.
Once this chicken lovey is finished, the same basic idea can carry into other animals without starting from scratch each time.
When you click on links to various merchants on this site and make a purchase, this may result in this site earning a commission. This does not affect the price you pay.
UBGI Gold Standard 2026
Verified for performance, SEO,
and accessibility compliance.
Photos, decorating ideas, party setups, and reader submissions are shared for inspiration only and are not intended as step-by-step decorating, construction, or DIY instructions.
About Jan | Contact | Baby Room Ideas (Blog) | Site Map | Privacy Policy | Disclaimer | Affiliate Disclosure | Earnings Disclosure
I am a participant in the Amazon Services LLC Associates Program, an affiliate advertising program designed to provide a means for us to earn fees by linking to Amazon.
Copyright © 2006-2026. All Rights Reserved.