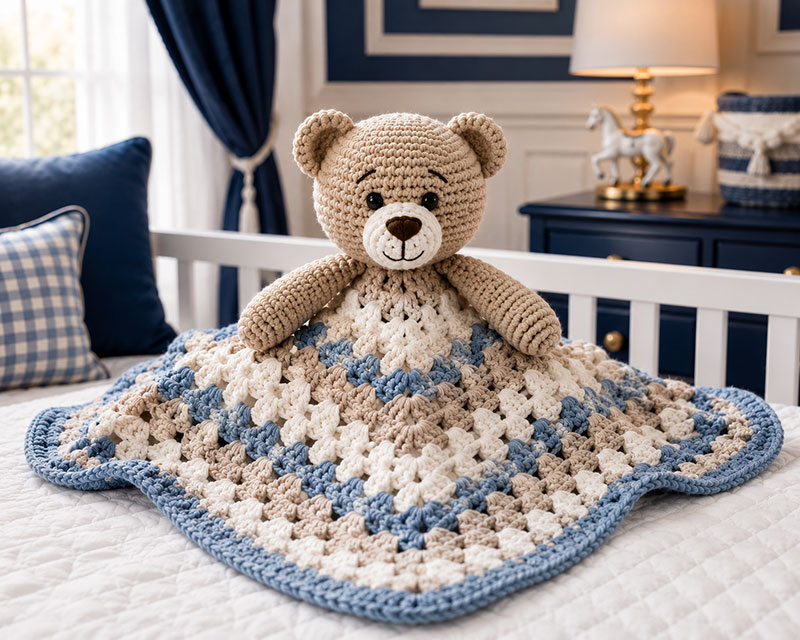
Teddy Bear Lovey Crochet Pattern
This teddy bear lovey crochet pattern is one of the best crochet projects I offer because it works as a handmade baby gift, a baby shower keepsake, and a sweet teddy bear nursery accent all in one.
Before you start this teddy bear lovey, these pages may help you choose the right handmade baby project:
See more crochet animal lovey patterns
Find easier baby lovey crochet patterns
Plan a teddy bear nursery around this handmade lovey
Jump to the part you need first:
Gather the supplies before starting
Sew the bear on without twisting
Teddy Bear Lovey Crochet Pattern Materials
A teddy bear lovey crochet pattern should stay balanced once it is picked up from different corners, folded into a diaper bag, or washed several times. A lot of beginner loveys look fine laid flat on a table, then start leaning sideways because the bear head is too heavy for the blanket underneath it.
This teddy bear lovey crochet pattern keeps the proportions smaller and flatter so the blanket still folds neatly once the bear is attached. I believe that makes nursery loveys look cleaner and easier to handle in real life.
This pattern was written for a beginner who already knows how to chain, single crochet, double crochet, and count stitches carefully. The checkpoint notes below explain what the shape should look like before moving on to the next section.
Finished size: Approximately 15 to 17 inches wide depending on tension and yarn choice.
Materials:
- Worsted weight cotton or cotton blend yarn
- Small amount of lighter yarn for the muzzle
- 4.5 mm crochet hook for the blanket
- 4.0 mm crochet hook for the bear pieces
- Polyester fiberfill
- Yarn needle
- Stitch markers
- Scissors
- Embroidery floss for facial details
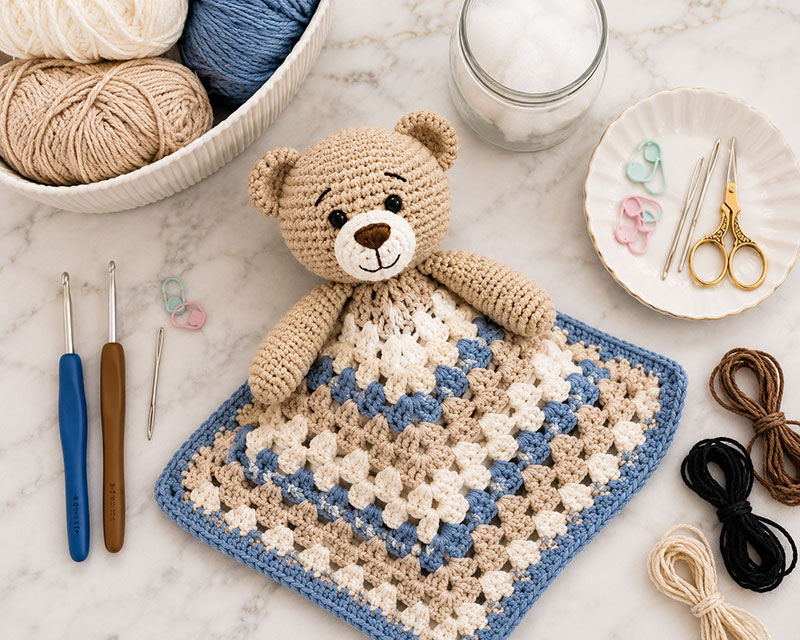
Use embroidered facial features for this teddy bear lovey crochet pattern. Avoid buttons, plastic safety eyes, beads, bells, ribbons, or glued decorations.
Abbreviations:
- ch = chain
- sl st = slip stitch
- sc = single crochet
- hdc = half double crochet
- dc = double crochet
- inc = 2 sc in same stitch
- dec = single crochet 2 stitches together
- st = stitch
- sts = stitches
For more nursery crochet projects, visit crochet animal lovey patterns and easy baby lovey crochet patterns.
Teddy Bear Lovey Crochet Pattern Blanket Base
Start with the blanket first. This helps keep the teddy centered later. Beginners often make the bear first and then try guessing where the head should sit on the blanket.
Round 1: With the 4.5 mm hook, ch 4. Join with sl st to the first ch to form a ring. Ch 3. Work 2 dc into the ring. Ch 2. Work 3 dc into the ring. Ch 2. Repeat two more times. Join with sl st to top of beginning ch 3.
Count: 4 groups of 3 dc and 4 corner spaces.
Checkpoint: The center should resemble a small square with four open corners.
Round 2: Sl st into the first corner space. Ch 3, 2 dc, ch 2, 3 dc in the same corner. Repeat in each remaining corner space. Join with sl st.
Count: 8 groups of 3 dc.
Round 3: Sl st into the first corner space. Ch 3, 2 dc, ch 2, 3 dc in same corner. Work 3 dc into the side space. In the next corner, work 3 dc, ch 2, 3 dc. Continue around. Join with sl st.
Repeat Round 3 until the blanket measures about 14 inches across before the border. Most crocheters will need around 10 to 12 total rounds.
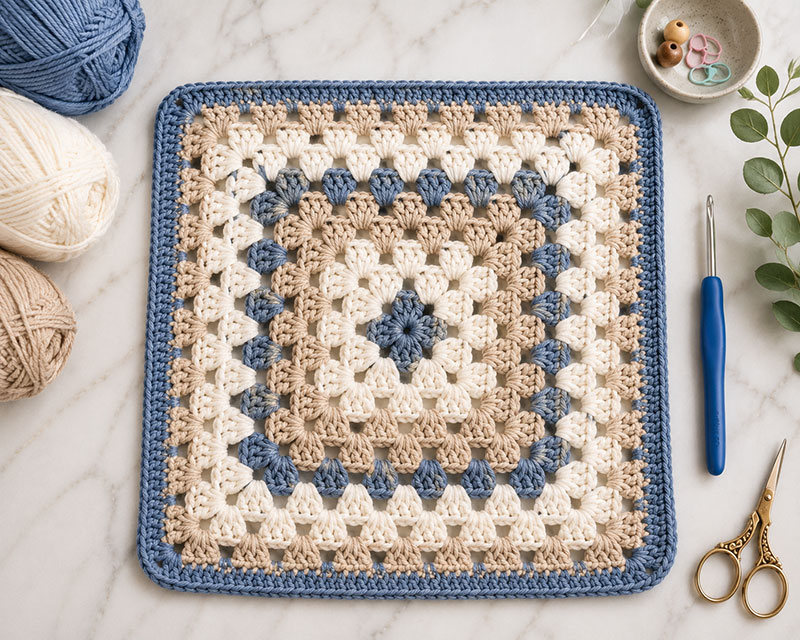
The blanket should stay flat. If the corners curl inward, loosen the corner chain spaces slightly. If the edges ripple, count the side clusters carefully because one extra group can throw the shape off by the next round.
Border Round 1: Ch 1. Work sc evenly around the blanket, placing 3 sc into each corner space. Join with sl st.
Border Round 2: Ch 1. Work hdc evenly around, placing 3 hdc into the center stitch of each corner. Join with sl st. Fasten off and weave in ends.
Checkpoint: Fold the blanket in half both ways. The corners should line up evenly without twisting.
Teddy Bear Lovey Crochet Pattern Bear Pieces
Use the 4.0 mm hook for the bear pieces. Keep a stitch marker in the first stitch of every round.
Bear Head:
Round 1: Work 6 sc into a magic ring. 6 sts.
Round 2: Inc in each stitch around. 12 sts.
Round 3: Sc 1, inc. Repeat around. 18 sts.
Round 4: Sc 2, inc. Repeat around. 24 sts.
Round 5: Sc 3, inc. Repeat around. 30 sts.
Rounds 6 through 10: Sc in each stitch around. 30 sts each round.
Checkpoint: The head should look rounded instead of cone-shaped. Tight tension usually causes the top to become narrow.
Round 11: Sc 3, dec. Repeat around. 24 sts.
Round 12: Sc 2, dec. Repeat around. 18 sts.
Stuff the head firmly enough to hold shape without stretching the stitches apart.
Round 13: Sc 1, dec. Repeat around. 12 sts.
Round 14: Dec around. 6 sts.
Fasten off with a long tail. Thread tail through front loops of the final stitches and pull closed.
Ears, make 2:
Round 1: Work 6 sc into magic ring. 6 sts.
Round 2: Inc in each stitch around. 12 sts.
Round 3: Sc around. 12 sts.
Fasten off with long sewing tail. Do not stuff the ears. Flatten gently into half-circle shapes.
Muzzle:
Ch 5.
Round 1: Sc in second ch from hook. Sc in next 2 ch. Work 3 sc in final ch. Continue along opposite side of foundation chain. Sc in next 2 ch. Work 2 sc in last ch. 10 sts.
Round 2: Work 2 sc in the first stitch. Sc in each of the next 2 stitches. Work 2 sc in each of the next 3 stitches. Sc in each of the next 2 stitches. Work 2 sc in each of the last 2 stitches. 16 sts.
Round 3: Sc around. 16 sts.
Fasten off with long sewing tail. Add only a tiny pinch of stuffing during assembly.
Arms, make 2:
Round 1: Work 6 sc into magic ring. 6 sts.
Round 2: Sc 1, inc. Repeat around. 9 sts.
Rounds 3 through 7: Sc around. 9 sts each round.
Stuff only the lower half of the arm lightly.
Do not crochet the top closed. Flatten the opening gently with your fingers and sew the arm directly to the blanket through both layers during assembly. This keeps the arm flatter and avoids forcing the 9-stitch opening into an uneven closure.
A teddy bear lovey crochet pattern usually looks cleaner when the arms stay lightly stuffed instead of packed tightly all the way upward.
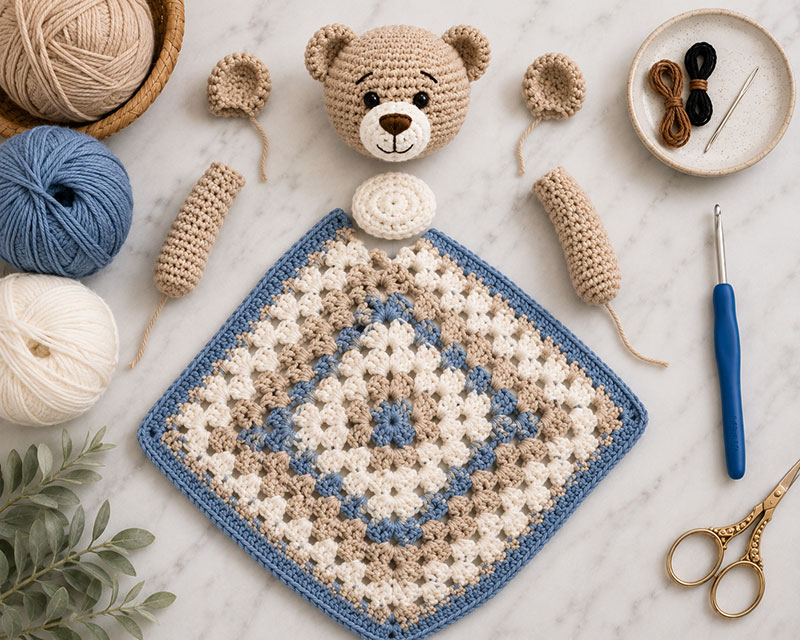
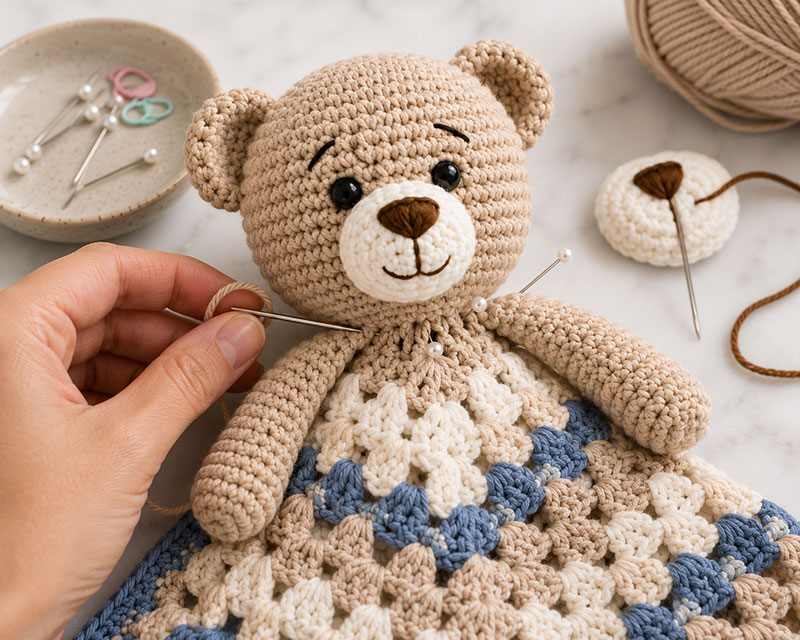
Teddy Bear Lovey Crochet Pattern Assembly
Do not sew anything permanently until every piece is pinned first.
Fold the blanket vertically and horizontally to locate the exact center point. Mark that center with a stitch marker.
Pin the bear head onto the center of the blanket. Look at it from several directions before sewing. Small shifts become obvious once the lovey is hanging from one corner.
Using the long tail from the head, whip stitch around the base of the head. Catch stitches from the bottom edge of the head and the top blanket stitches. Sew through both loops where possible. Go around twice for stability.
Pin the ears between Rounds 4 and 7 of the head. Each ear should sit slightly outward from the top center curve. Sew through both flattened ear layers and into the head using small whip stitches.
Pin the muzzle between Rounds 8 and 11. Sew halfway around, tuck in a tiny amount of stuffing, then finish sewing. Embroider the nose and mouth after the muzzle is attached.
Embroider the eyes about 5 stitches apart using several short horizontal stitches instead of one long strand.
Flatten the top of each arm against the blanket beside the head. Sew through both arm layers and into the blanket with whip stitches. Add two tiny tack stitches lower on the arm so it does not spin or flap loosely.
I notice crooked arms much faster than uneven stitches when I see handmade loveys at nursery markets. Balanced placement matters more than fancy detailing on projects like this.
Lift the lovey from different corners after assembly. If the head shifts sideways, reinforce the lower side of the seam with several hidden stitches.
Teddy Bear Lovey Crochet Pattern Troubleshooting
If the blanket ripples: Count the side clusters carefully. An extra 3-dc group is usually the problem.
If the corners curl inward: The corner chain spaces are probably too tight.
If the head looks pointed: Roll the stuffed head gently between your palms before closing the last round.
If the muzzle sits crooked: Re-pin it before sewing instead of trying to adjust placement while stitching.
If the ears fold forward: Stitch deeper into the head and catch both flattened layers.
If the arms rotate: Add the lower tack stitches during assembly. Beginners often skip them, but they help keep the arms steady.
A teddy bear lovey crochet pattern gets picked up from every direction. The best final test is simple. Hold the blanket by one corner. If the bear stays centered and the blanket hangs evenly, the structure is stable enough for gifting.
Baby Safety Notes for a Teddy Bear Lovey Crochet Pattern
This teddy bear lovey crochet pattern should be used as a supervised comfort item, stroller accessory, nursery keepsake, or baby shower gift. Loose handmade items should stay out of infant sleep spaces.
The U.S. Consumer Product Safety Commission recommends a bare infant sleep environment with only a fitted sheet. For current guidance, visit the CPSC Safe Sleep recommendations.
Before gifting the lovey, tug firmly on the ears, muzzle, embroidery, and arms. If anything shifts, reinforce the stitches before wrapping it.
If you are putting together a handmade nursery gift, these baby shower gift basket ideas pair naturally with this teddy bear lovey crochet pattern.
Teddy Bear Lovey Crochet Pattern FAQ
Is this teddy bear lovey crochet pattern beginner-friendly?
Yes. The shaping stays simple and repetitive, but the assembly instructions are detailed enough to help beginners avoid crooked placement and uneven sewing.
Why does my teddy bear head lean sideways?
The blanket center may not have been marked accurately before sewing. Fold the blanket vertically and horizontally first so the head sits exactly at the center point.
Can I use acrylic yarn for this teddy bear lovey crochet pattern?
Yes, but cotton blends usually help the blanket stay flatter after repeated washing. Some acrylic yarns stretch more once the bear is attached.
Should the arms be stuffed firmly?
No. Light stuffing works better because heavily packed arms tend to pull downward and make the blanket bunch awkwardly near the center.
Can I use safety eyes on this lovey?
No. Embroidered eyes are the safer choice for nursery crochet projects intended for babies.
What size should the finished lovey be?
This teddy bear lovey crochet pattern should finish around 15 to 17 inches across depending on yarn and tension.
How do I know the blanket shape is correct before assembly?
Fold the blanket in half both ways before sewing the bear pieces on. The corners should line up evenly without twisting or rippling.
For nursery inspiration built around handmade pieces, visit baby nursery themes and nursery ideas.
When you click on links to various merchants on this site and make a purchase, this may result in this site earning a commission. This does not affect the price you pay.
UBGI Gold Standard 2026
Verified for performance, SEO,
and accessibility compliance.
Photos, decorating ideas, party setups, and reader submissions are shared for inspiration only and are not intended as step-by-step decorating, construction, or DIY instructions.
About Jan | Contact | Baby Room Ideas (Blog) | Site Map | Privacy Policy | Disclaimer | Affiliate Disclosure | Earnings Disclosure | Facebook | Pinterest
I am a participant in the Amazon Services LLC Associates Program, an affiliate advertising program designed to provide a means for us to earn fees by linking to Amazon.
Copyright © 2006-2026. All Rights Reserved.