Brown Bear Lovey Pattern (Faux Fur & Crochet Hybrid)
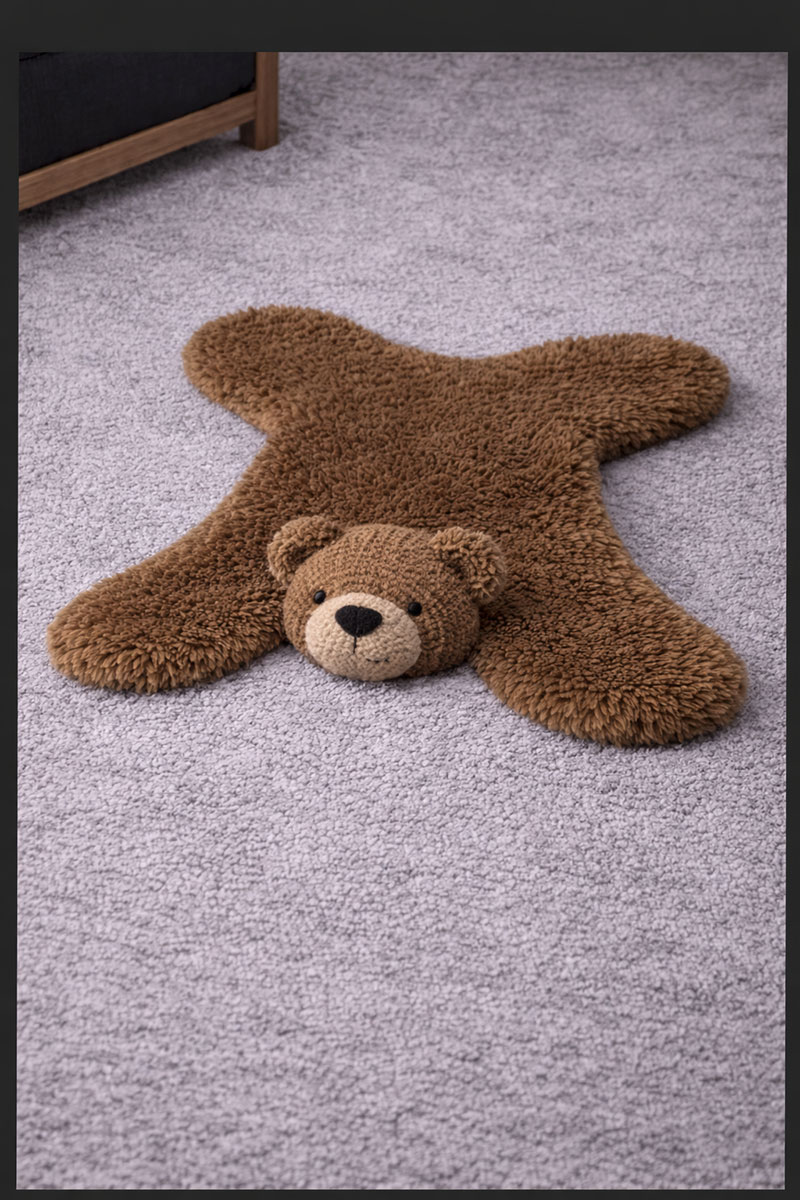
This brown bear lovey pattern combines a soft faux fur blanket with a crocheted bear head to create a cozy, baby-safe security lovey that fits beautifully in woodland nurseries and makes a memorable handmade gift.
Go here to see faux fur recommendations for this brown bear lovey pattern
If You’re Looking for a Woodland Creature Lovey, This Snuggly Bear Will Not Disappoint
If you enjoy handmade projects like this one, you can explore more ideas in my free baby patterns collection.
The highland cow crochet snuggler lovey pattern creates a shaggy rustic look, while my crochet cow pattern is more "domestic" and uses a flatter blanket body with simple spots that is easy for beginners to assemble.
For a water-oriented animal style, my ocean-inspired turtle crochet lovey pattern fits beautifully in a beach or coastal nursery theme, while my frog lovey crochet pattern adds a playful handmade baby gift option with a lighter, more whimsical feel than the bear.
For a broader mix of styles in one place, these crochet animal lovey patterns make it easier to compare different animals and pick the one that fits your project.
For quicker blanket-style projects with simpler shaping and lighter construction, these easy baby lovey crochet patterns work especially well for beginner baby gifts, nursery baskets, and fast handmade shower projects.
For cleaner nursery aesthetics and understated handmade baby gifts, this minimalist crochet lovey pattern uses a simpler modern style that fits beautifully into neutral nursery themes and contemporary baby rooms.
What to do next: start by reading the quick checks below, then draft and cut your faux fur body first. Once the silhouette is right, everything else falls into place (and you won’t waste time crocheting a head that doesn’t sit correctly). This early step matters more than anything else when you’re working through the Brown Bear Lovey Pattern, because the body shape sets the entire look.
See the kind of faux fur I prefer here
Quick fit check
Lay your paper pattern on the floor and step back — this quick check is essential when following the Brown Bear Lovey Pattern. You should see two front legs, two back legs, a narrower “waist,” and a shallow neckline that sits behind where the muzzle will land. If it reads like a bib, apron, or dress shape under the face, you’ve accidentally drifted into blanket territory.
I keep one rule in mind while I’m drafting the Brown Bear Lovey Pattern: the body begins behind the head, never beneath it. If you follow that, you won’t get that unwanted drape under the chin.
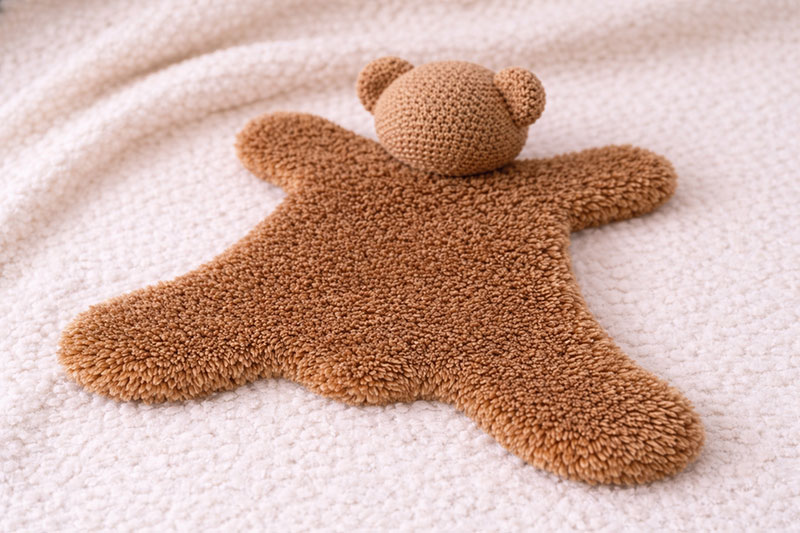
Brown bear lovey faux fur crochet pattern: the exact shape that makes it look a bit like a tiny bearskin rug
This brown bear lovey pattern is a combination faux fur and crochet pattern that is built around a bear silhouette—flat, fluffy, and meant to drape naturally—rather than a torso or square lovey. The body is two identical faux fur pieces sewn together and turned right-side out. The center stays unstuffed so it keeps that cozy blanket-like feel, while the crocheted head gets light stuffing so it has a sweet, forward-facing presence.
For the fur, I go for a woodland brown that feels warm and natural (not reddish). The pile should be very soft and fuzzy, but not so long that it mats instantly. If you’ve ever bought faux fur that sheds all over your sewing room, you know why I’m picky here. I’d rather use a slightly denser “plush” fur that behaves and still looks luxurious once it’s stitched.
If you want it extra snuggly without getting bulky, let the fur do the work. A flat body with thick pile looks plush, but it stays easy for little hands.
Draft the faux fur body first
I always draft the Brown Bear Lovey Pattern at full size on paper before cutting into faux fur. The goal is a finished body that measures about 18 inches wide by 23 inches long after sewing and turning, so the paper pattern needs to be slightly larger to account for seam allowance.
If you’re using a standard ¼-inch seam allowance, draft your paper pattern to approximately 18½ inches wide by 23½ inches long. Faux fur pile compresses slightly when sewn, so this lands very close to the finished size once everything is turned and fluffed.
How I sketch the silhouette
I start with a vertical center line and build the shape symmetrically. Think “bear shape,” not rectangle or square shaped blanket. Wide shoulders, rounded front legs, a gentle taper through the middle, and two distinct back legs with a slight dip between them.
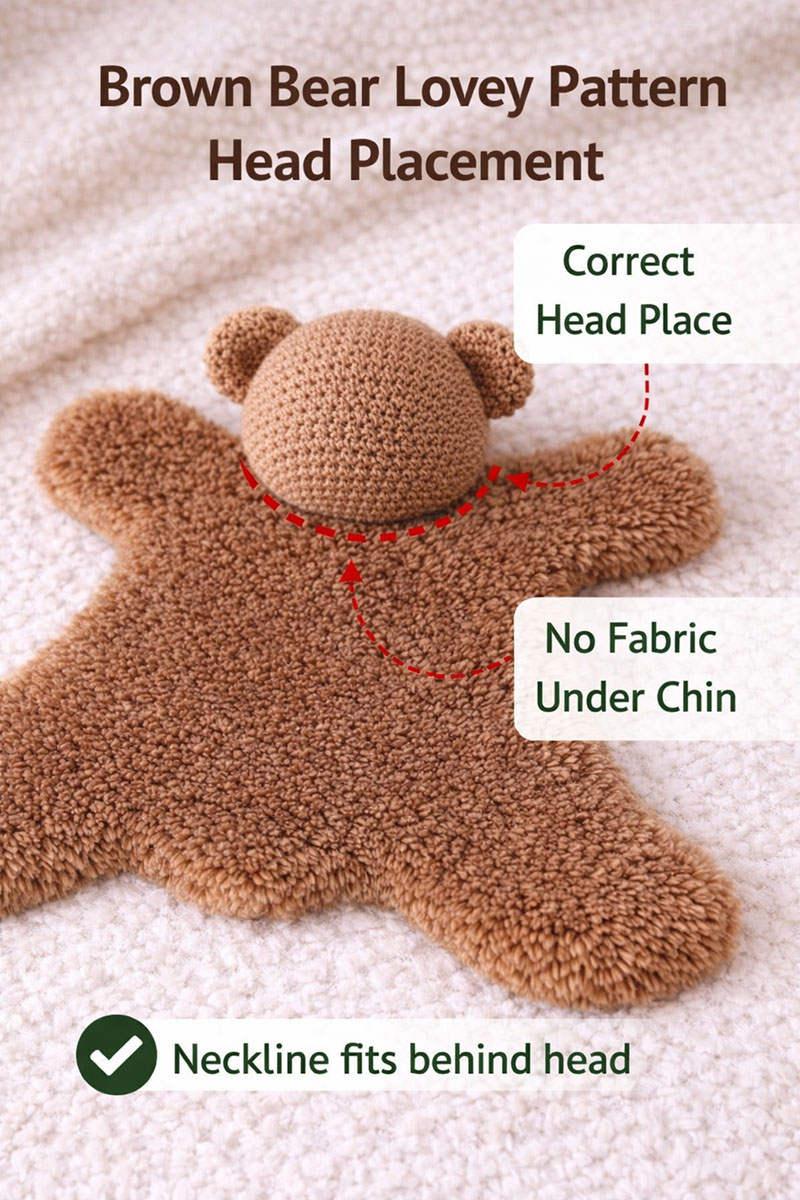
The neckline is critical. Draw a shallow U-shaped curve that is just deep enough to seat the crocheted head. It should sit behind where the muzzle will land — not under it. If the neckline looks generous or scoop-shaped, it’s too deep.
When I step back from the paper pattern, it's easy to see four paws and a narrow midsection. If there is a bib, or apron shape beneath the neckline; you've drifted off track.
See a baby-soft plush faux fur option here
If you only remember one thing
Do not build a “chest panel” when working through the Brown Bear Lovey Pattern. If the faux fur body continues straight down from the neckline under the chin, it will drape there. The detailed look comes from a neckline that starts behind the head and a body that’s shaped like a teddy bear — not a bib.
Sew the faux fur body so it stays flat, fluffy, and cozy
Place your two faux fur body pieces right sides together and sew around the outline with a consistent seam allowance. I leave a small turning opening along a side seam (not at the neckline). After turning it right-side out, I gently push out the curves and hand-stitch the opening closed with a tidy ladder stitch.
I do not stuff the torso when making this Brown Bear Lovey Pattern. That’s the secret sauce. A stuffed center turns this into a plush toy body. A flat center keeps the miniature-rug feel. If you want just a touch of structure, you can add a tiny pinch of stuffing in each paw tip—just enough to give the ends a little “plump”—and then stop. The minute you start filling the middle, you’ll lose the drape that makes this shape so charming.
Crochet the head and muzzle with a calm, classic bear face
I like a slightly lighter yarn for the muzzle (cream or tan), because it reads as “bear” instantly against the brown faux fur. A simple round head works beautifully here, especially when the muzzle has a little lift and the nose is centered cleanly. This is where you can make it feel handmade in the best way, and if you’d like to explore more projects like this, you’ll find them in my free baby crochet patterns collection.
For baby loveys, I strongly prefer embroidered features over buttons. A soft stitched mouth and sleepy eyes look sweet and hold up well through real-life use and washing. If you like having another example of how I finish and reinforce crochet details on baby items, my baby crown crochet pattern has some nice finishing ideas that translate well to this project.
Quick placement tip
Before you stitch the head on permanently, set it on the neckline and take a photo from above. The camera is honest. If the head looks too far back, it will read like a plush rug. If it’s too far forward, it can look detached. The sweet spot is forward enough that the muzzle clears the fur, but anchored at the neckline so there’s no fabric “apron” under the chin.
Attach the crocheted head at the neckline (so the muzzle stays clean)
This is the step that makes or breaks the look. Align the base of the crocheted head with the neckline curve and stitch it down tightly with small whip stitches all the way around. I usually do one full pass, then a second reinforcement pass, because loveys get loved hard. Add only a small amount of stuffing inside the head and, if needed, a tiny bit right at the neck seam to support the head’s shape.
If you notice the faux fur creeping up toward the underside of the muzzle as you sew, pause and reposition. The fur should sit behind the head, not under it. When this is right, the face looks proud and forward—like a little bear shaped character—rather than a blanket with a face pasted on.
Make it nursery-friendly (and actually practical to live with)
I love how this unique lovey fits into woodland, rustic, and neutral nurseries without feeling theme-y or loud. It’s one of those pieces that looks sweet tossed over a chair, but it’s also genuinely useful for soothing.
That same relaxed woodland style shows up across these woodland nursery ideas, where simple forest details and soft textures create a space that feels warm and very woods-y.
The nursery usually feels more complete and polished once the smaller decorative elements start supporting the woodland atmosphere, and these woodland nursery decor ideas show how forest-inspired wall accents, rustic textures, shelving, and nature-themed details can help the room feel finished without looking overloaded.
And if you’re putting together a handmade gift bundle, this lovey pairs so nicely with a simple quilt or stroller blanket. I keep mine uncomplicated—nothing fussy—because the lovey already brings the “aww.” My baby quilt patterns collection is a good place to grab an easy companion project if you want a matching set.
For forest-inspired sewing projects, woodland appliqué templates, rustic nursery crafts, and coordinated handmade décor ideas that pair naturally with bear and woodland animal themes, browse these woodland nursery patterns for cozy woodland baby rooms and handmade gift projects.
Important!
For baby loveys, I avoid using anything that can loosen over time (buttons, glued elements, loose embellishments). Embroidered facial features are usually the best choice. Reinforce your seams, double-check your head attachment stitches, and always supervise use—especially for younger babies.
If you want an authoritative safety refresher that’s non-competing and easy to skim, the U.S. Consumer Product Safety Commission has a solid overview here: toy safety guidance from the CPSC.
Care & washing note: This lovey holds up best with gentle care. I recommend hand washing or using a delicate machine cycle in cold water, then laying it flat to air dry so the faux fur keeps its softness and shape.
Skill level note: This project is best suited for a confident beginner to intermediate maker. Basic crochet skills and simple sewing are all that’s required, but careful placement and finishing make the difference in the final look.
What to do next (so you finish it and love the result)
Here’s my simple finish order: draft and cut the bear silhouette, sew the flat faux fur body, crochet the head and muzzle, then attach the head at the neckline so the muzzle stays clean.
Once you’ve made one, you can repeat the same silhouette in other colors (polar bear, black bear, even a soft beige “teddy” version). The body shape stays the same, and you just swap fur and yarn shades. That’s my favorite kind of pattern—the kind you can come back to without reinventing it every time.
See how this same idea works as a soft elephant lovey design →
Brown Bear Lovey Pattern
I’m sharing the full, buildable Brown Bear Lovey Pattern here in one place so you can actually make this lovey without guessing. This is a true combination plush stuffed toy/security blanket baby lovey: a flat faux fur body shaped like a tiny bear hide, with a crocheted head and muzzle attached at the neckline so there is absolutely no fabric draping under the chin.
This is not a blanket. It’s not a plush torso. The body stays flat like a security blanket, and the head sits forward, just like the reference image we locked in.
Finished size
This bear lovey is intentionally larger than many traditional security baby lovies. Once sewn and turned right-side out, the finished faux fur body measures approximately 18 inches wide (paw to paw) by 23 inches long.
I chose this size deliberately after studying other examples. That slightly larger footprint gives the piece a security blanket feel ... soft, flexible, and easy for babies to cuddle, drag, and cling to during naps and quiet time.
The body stays flat and unstuffed so it can easily serve as a blanket. The fluff comes from the faux fur pile itself, not from added bulk.
Materials
Faux fur body
You’ll need about half a yard of very soft, baby-safe faux fur in a woodland brown tone. I prefer a plush or medium-pile fur that feels fluffy but doesn’t shed excessively. Optional but helpful: half a yard of cotton flannel or minky to use as a backing layer for stability.
Crochet head and muzzle
Use worsted-weight yarn in brown for the head and a lighter tan or cream for the muzzle. A 4.0 mm (G) crochet hook works well for a firm but soft fabric. You’ll also need black embroidery floss for the eyes and mouth, or a small embroidered nose.
Other supplies
Polyester fiberfill (small amount for head only), matching sewing thread, sewing machine, hand-sewing needle, and clips or pins.
Below is the complete, buildable pattern, broken into clear sections so you can work at your own pace.
Part A: Faux fur bear body silhouette
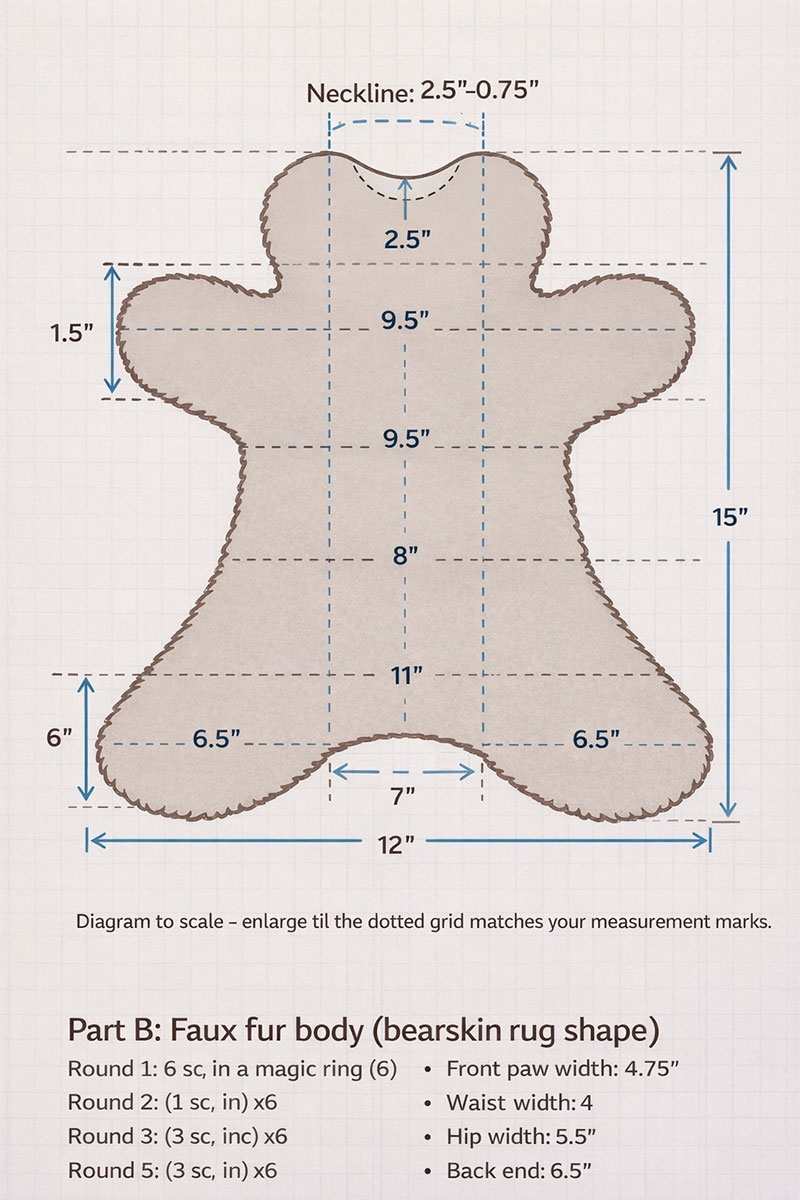
This body pattern diagram represents the full-size silhouette for this project's main body. When printed or traced at 100%, it corresponds to a finished lovey measuring approximately 18 inches wide by 23 inches long after sewing and turning.
Sizing & Printing Notes
This pattern is drafted at full size. When printed or traced at 100%, the finished faux fur body will measure approximately 18 inches wide by 23 inches long after sewing and turning.
For best results, print without scaling or fit-to-page settings. If you’re tracing from the screen, confirm your final paper pattern matches these measurements before cutting into your faux fur.
Draft the body pattern
Start with a large sheet of paper and draw a vertical center line. This will help keep the body symmetrical.
Mark these points down the center line from top to bottom:
Neckline top: 0 inches
Shoulder line: 1.5 inches
Waist line: 6 inches
Hip line: 9 inches
Back end: 15 inches
From the center line, draw half of the body shape using these widths (measure outward from the center line, then mirror):
Neckline width: 1.25 inches (total opening about 2.5 inches)
Shoulder width: 4.75 inches
Front paw width: 6.5 inches
Waist width: 4 inches
Hip width: 5 inches
Back paw width: 6 inches
Back end width: 3.75 inches
Connect these points with smooth, rounded curves. The front legs should form soft lobes extending from the shoulders. The torso should taper slightly, then widen again for the back legs, with a gentle dip between them.
The neckline (this matters)
At the top of the pattern, draw a shallow U-shaped neckline. The opening should be about 2.5 inches wide and only about ¾ inch deep. Keep this neckline shallow. It must sit behind the muzzle once the head is attached. This is what prevents the faux fur from creeping under the chin.
Cutting the fabric
Cut two identical body pieces from faux fur. If you’re using a backing, cut two matching backing pieces as well. When cutting faux fur, snip from the backing side only so you don’t chop off the pile.
Sewing the body
Place the two faux fur pieces right sides together. Sew around the entire outline using a ¼-inch seam allowance, leaving a 3-inch opening along one side seam. Turn the body right side out and gently push out the curves.
Do not stuff the body. The center should remain flat so it drapes like a tiny rug. If you want a hint of structure, you may add a very small pinch of stuffing to the tips of each paw only. Close the opening with a ladder stitch.
If you’re using a backing layer, sew the backing pieces together the same way, turn, then slip it inside the faux fur body and tack the layers together with a few hidden stitches.
Part B: Crocheted head
Head (brown yarn, worked in the round)
Round 1: 6 single crochet in a magic ring (6)
Round 2: Increase in each stitch (12)
Round 3: (1 sc, inc) x6 (18)
Round 4: (2 sc, inc) x6 (24)
Round 5: (3 sc, inc) x6 (30)
Round 6: (4 sc, inc) x6 (36)
Rounds 7–10: Single crochet around (36)
Round 11: (4 sc, dec) x6 (30)
Round 12: (3 sc, dec) x6 (24)
Round 13: (2 sc, dec) x6 (18)
Lightly stuff the head.
Round 14: (1 sc, dec) x6 (12)
Round 15: Decrease x6 (6)
Fasten off and close.
Ears (make two)
Round 1: 6 sc in a magic ring (6)
Round 2: (1 sc, inc) x3 (9)
Rounds 3–4: Single crochet around (9)
Fasten off, leaving a tail.
Sew the ears to the top sides of the head, slightly forward.
Part C: Crocheted muzzle
Muzzle (tan or cream yarn, oval)
Chain 7.
Round 1: Sc in second chain from hook and next 4 chains (5 sc). Work 3 sc in the last chain. Continue down the opposite side with 5 sc. Work 2 sc in the first chain (15).
Round 2: Inc, sc 4, inc x3, sc 4, inc x2 (20).
Round 3: Single crochet around (20).
Round 4: (Optional) Single crochet around (20).
Fasten off with a long tail.
Face details
Sew the muzzle to the head, centered and slightly low. Lightly stuff the muzzle before closing the final stitches. Embroider a small oval nose and simple eyes. A short stitched mouth is optional.
Part D: Attaching the head to the body
Correct placement
Center the head at the neckline opening. The base of the head should align with the neckline curve so the muzzle sits forward and completely clears the faux fur body. No fur should extend beneath the chin.
Sewing the head
Using small, tight whip stitches, sew the head to the body only along the neckline edge. Go around once, then reinforce with a second pass of stitching. Add a tiny bit of stuffing at the neck seam if needed to support the head, but keep the body flat.
If you see faux fur creeping under the muzzle at any point, stop, undo, and reposition the head slightly forward. The finished lovey should clearly read as a tiny bear silhouette with a crocheted head—not a blanket with a face in the center.
Final checklist
Two front legs and two back legs are clearly defined. The body stays flat like a blanket. The neckline is shallow. The head sits forward with the muzzle clean and visible. There is no fabric under the chin.
When you click on links to various merchants on this site and make a purchase, this may result in this site earning a commission. This does not affect the price you pay.
UBGI Gold Standard 2026
Verified for performance, SEO,
and accessibility compliance.
Photos, decorating ideas, party setups, and reader submissions are shared for inspiration only and are not intended as step-by-step decorating, construction, or DIY instructions.
About Jan | Contact | Baby Room Ideas (Blog) | Site Map | Privacy Policy | Disclosure Policy | Disclaimer | Affiliate Disclosure | Earnings Disclosure | Facebook | Pinterest
I am a participant in the Amazon Services LLC Associates Program, an affiliate advertising program designed to provide a means for us to earn fees by linking to Amazon.
Copyright © 2006-2026. All Rights Reserved.