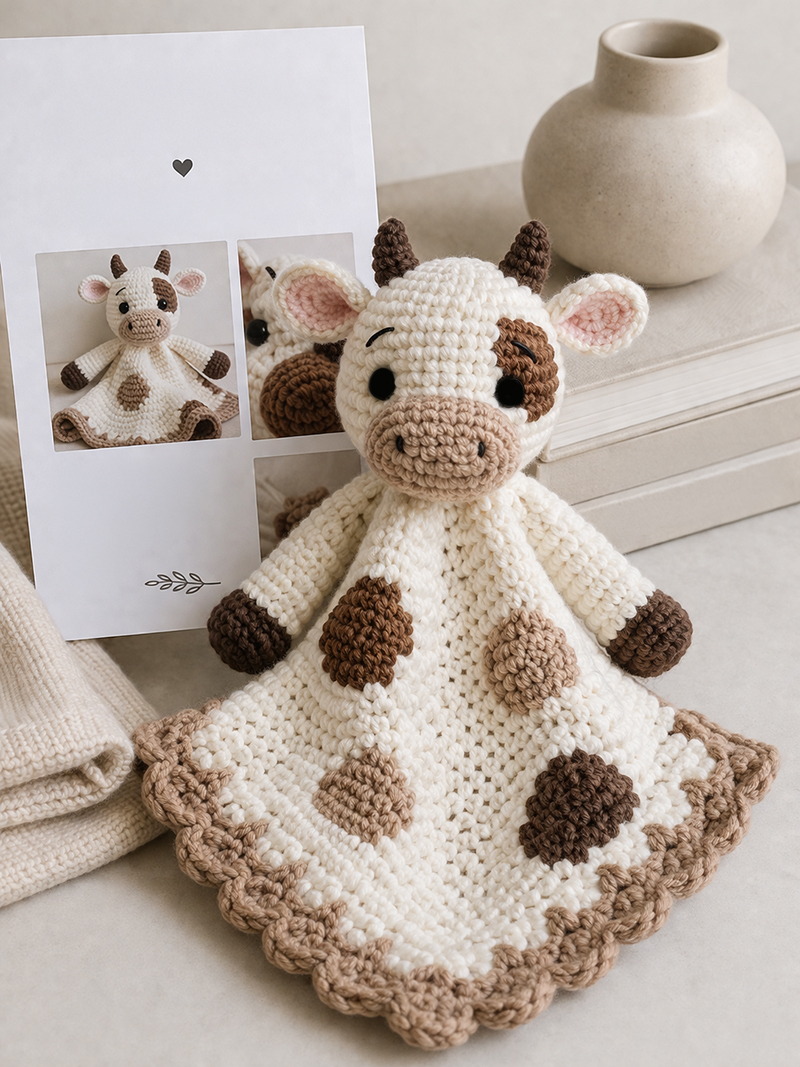
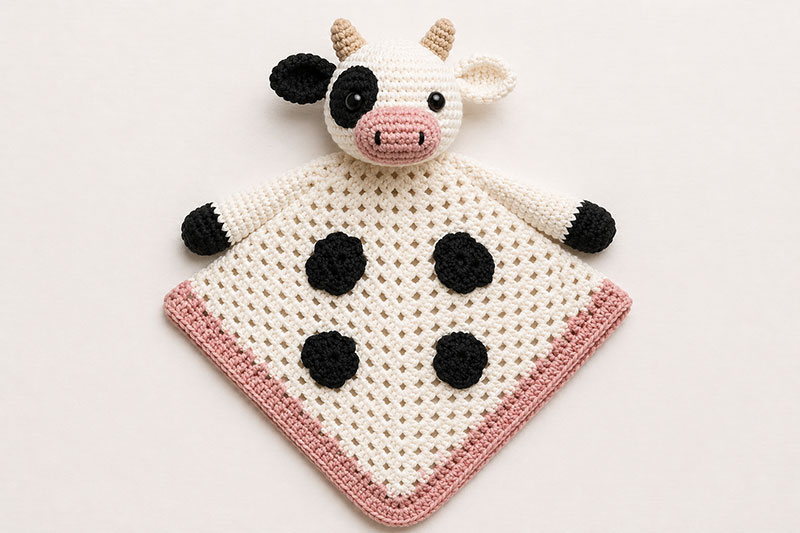
Crochet Cow Pattern for a Soft Plushie or Baby Lovey
This crochet cow pattern shows exactly how to make a soft cow lovey or plushie step by step, including the head, arms, body, and assembly using beginner-friendly stitches and baby-safe finishing details.
Start here:
Crochet animal lovey patterns →
See more lovey styles that little hands love to hold onto
Elephant crochet lovey pattern →
A popular beginner-friendly lovey with a fabulous trunk and floppy ears
Owl crochet lovey pattern →
Woodland creature with charming personality
Free baby crochet patterns →
Browse all free patterns for easy crochet projects for baby gifts and the nursery
See soft cotton yarn and crochet yarns for crochet baby gift projects
Crochet Cow Pattern (Easy Beginner-Friendly Cow Baby Lovey)
Finished Size
Lovey body: about 10–12 inches wide
Cow head: about 3–4 inches tall
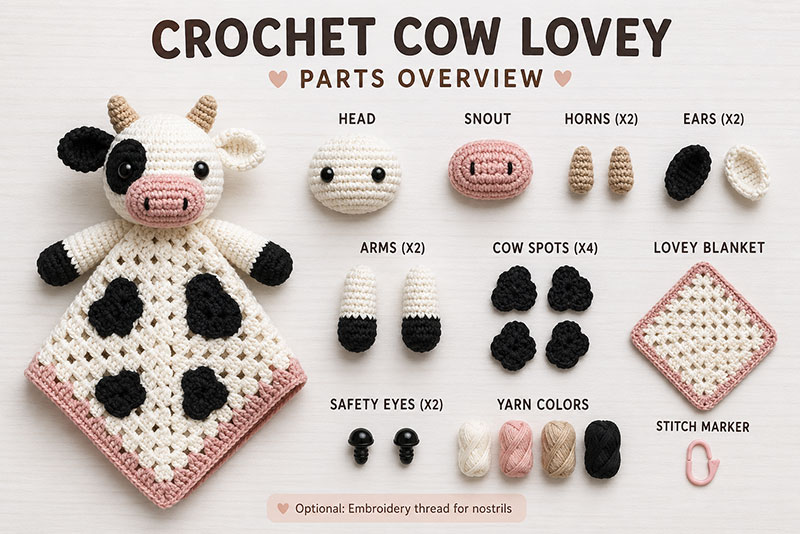
Materials
- Worsted weight yarn in cream or white for the main color
- Brown or black yarn for hooves and spots
- Pink yarn for the snout
- Tan yarn for the horns
- Black yarn or embroidery thread for the face
- 4.0 mm crochet hook
- Polyfill stuffing
- Yarn needle
- Stitch marker
- Scissors
Abbreviations
- ch = chain
- sl st = slip stitch
- sc = single crochet
- inc = 2 sc in the same stitch
- dec = invisible decrease
- st = stitch
- sts = stitches
- MR = magic ring
Beginner option: If you do not want to use a magic ring, ch 2 and work the first round into the second chain from the hook.
Cow Head
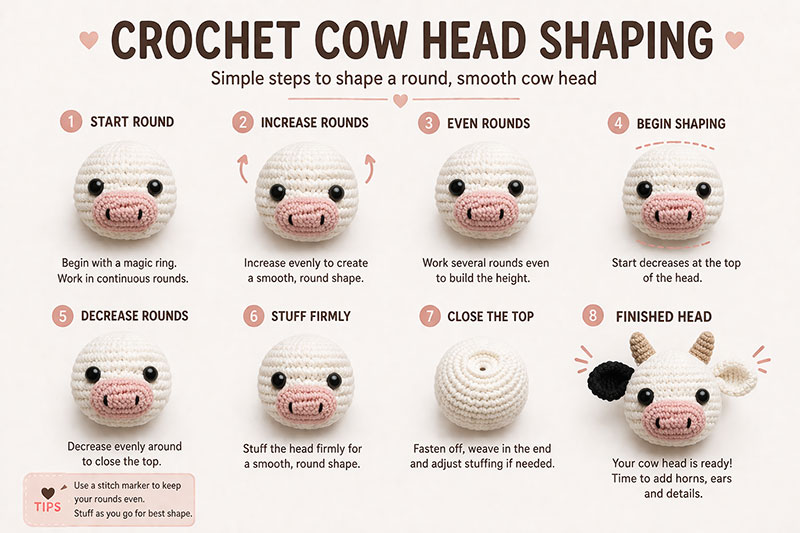
Use cream or white yarn. Work in continuous rounds without joining. Use a stitch marker to mark the first stitch of each round.
R1: 6 sc in MR. (6)
R2: inc in each st around. (12)
R3: *sc in next st, inc in next st* repeat around. (18)
R4: *sc in next 2 sts, inc in next st* repeat around. (24)
R5: *sc in next 3 sts, inc in next st* repeat around. (30)
R6: *sc in next 4 sts, inc in next st* repeat around. (36)
R7–R11: sc in each st around. (36)
R12: *sc in next 4 sts, dec* repeat around. (30)
R13: *sc in next 3 sts, dec* repeat around. (24)
R14: *sc in next 2 sts, dec* repeat around. (18)
Stuff the head firmly enough to hold its shape, but not so firmly that the stitches stretch open.
R15: *sc in next st, dec* repeat around. (12)
R16: dec around. (6)
Fasten off. Use the yarn tail to sew through the front loops of the last 6 stitches, pull closed, and weave in the end.
Snout
Use pink yarn. Work in continuous rounds.
R1: 6 sc in MR. (6)
R2: inc in each st around. (12)
R3: *sc in next st, inc in next st* repeat around. (18)
R4–R5: sc in each st around. (18)
Fasten off, leaving a long tail. Lightly stuff the snout. Sew it to the front of the head between R8 and R13. Keep it centered, with the top edge just below the eye line.
Eyes and Face
For a baby-safe version, embroider the eyes instead of using plastic safety eyes. Place the eyes between R8 and R9, about 6 stitches apart. Make each eye with 3–4 small vertical stitches using black yarn or embroidery thread.
For general baby product safety guidance, you can review recommendations from the U.S. Consumer Product Safety Commission safe sleep guidelines, which outline important considerations for items used around infants.
Embroider two small nostrils on the snout, about 4 stitches apart. Add a tiny curved smile under the snout if desired.
Ears — Make 2
Use cream or white yarn. Work in continuous rounds.
R1: 6 sc in MR. (6)
R2: *sc in next st, inc in next st* repeat around. (9)
R3: *sc in next 2 sts, inc in next st* repeat around. (12)
R4–R5: sc in each st around. (12)
Do not stuff. Flatten each ear and sew the opening closed. Sew ears to the sides of the head between R5 and R7, angled slightly outward.
Horns — Make 2
Use tan yarn. Work in continuous rounds.
R1: 4 sc in MR. (4)
R2: sc in each st around. (4)
R3: *sc in next st, inc in next st* repeat around. (6)
R4: sc in each st around. (6)
Fasten off, leaving a tail for sewing. Add only a tiny pinch of stuffing if needed. Sew horns to the top of the head between R3 and R5, about 4 stitches apart.
Optional Cow Spots
Use brown or black yarn. Make 1–3 flat spots if you want a spotted cow look.
Small circle spot:
R1: 6 sc in MR. (6)
R2: inc in each st around. (12)
Fasten off, leaving a tail for sewing.
Oval spot:
Ch 5.
R1: sc in second ch from hook, sc in next 2 ch, 3 sc in last ch. Working down the other side of the chain, sc in next 2 ch, 2 sc in last ch. (10)
R2: inc in first st, sc in next 2 sts, inc in next 3 sts, sc in next 2 sts, inc in last 2 sts. (16)
Fasten off, leaving a tail for sewing.
Sew spots flat to the head or lovey body. Keep body spots away from the outer edges so they do not affect how the blanket lies.
Arms — Make 2
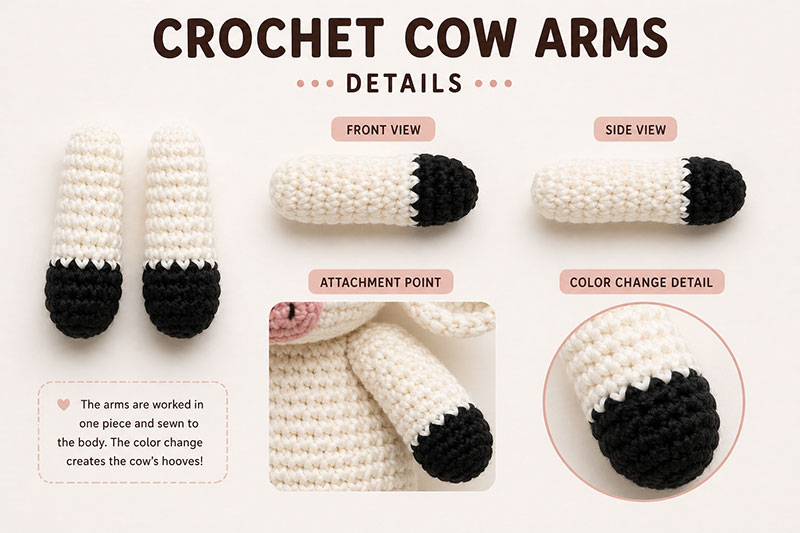
Start with brown or black yarn for the hoof. Work in continuous rounds.
R1: 6 sc in MR. (6)
R2: inc in each st around. (12)
R3: sc in each st around. (12)
Switch to cream or white yarn.
R4–R9: sc in each st around. (12)
Lightly stuff the hoof end only. Leave the upper part mostly flat so the arm does not pull the lovey body inward.
Flatten the opening and sc through both layers across the top to close. Fasten off, leaving a long tail for sewing.
Flat Square Lovey Body
Use cream or white yarn. This body is worked from the center outward in joined rounds. Each round adds 2 stitches per side, which keeps the blanket flat and square.
R1: Ch 4. Sl st into the first ch to form a ring.
R2: Ch 1. Work into the center ring: sc, ch 2, sc, ch 2, sc, ch 2, sc, ch 2. Sl st to the first sc to join. You now have 4 corner spaces.
R3: Sl st into the first ch-2 corner space. Ch 1. Work *(sc, ch 2, sc) in corner space, sc in next sc* repeat 4 times. Sl st to the first sc to join. Each side has 1 sc between corners.
R4: Sl st into the first ch-2 corner space. Ch 1. Work *(sc, ch 2, sc) in corner space, sc in each stitch across the side* repeat around. Sl st to the first sc to join. Each side has 3 sc between corners.
R5: Repeat R4. Each side has 5 sc between corners.
R6: Repeat R4. Each side has 7 sc between corners.
R7: Repeat R4. Each side has 9 sc between corners.
R8: Repeat R4. Each side has 11 sc between corners.
R9: Repeat R4. Each side has 13 sc between corners.
R10: Repeat R4. Each side has 15 sc between corners.
R11: Repeat R4. Each side has 17 sc between corners.
R12: Repeat R4. Each side has 19 sc between corners.
Stop after R12 for a body that measures about 10–12 inches across, depending on yarn and tension. For a smaller cow nursery mobile decoration, stop after R7 or R8 and use a smaller, lightly stuffed head.
Lovey Body Border
Ch 1. Sc in each stitch around the entire edge. When you reach each corner space, work 3 sc into the corner. Sl st to the first sc to join. Fasten off and weave in the end.
If the body curls upward, your stitches are too tight. Try loosening your tension or moving up one hook size. If the body looks wavy, check that you are only working one corner increase in each corner space per round.
Assembly
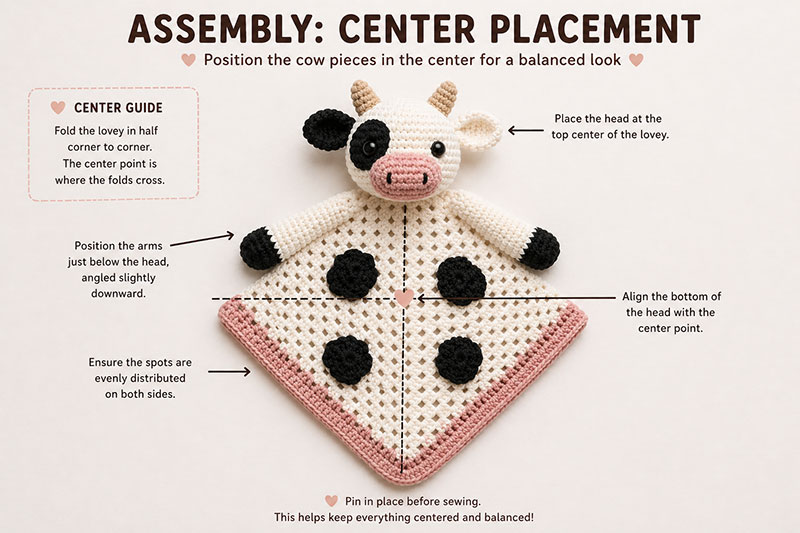
This crochet cow pattern comes together with simple sewing, and once you’ve done one piece, the rest feels easy to line up and attach. Each piece is attached securely so the cow stays stable and long-lasting.
Lay the lovey body flat with one corner pointing up, like a diamond.
Place the cow head slightly above the center of the body. Pin it in place before sewing.
When sewing the head to the body, stitch through both the bottom edge of the head and the stitches of the body directly underneath. Keep your stitches close together, about one stitch apart, all the way around the base.
After the first pass, gently pull the yarn to tighten the join. Sew around the base a second time to secure it. This helps keep the head from flopping forward.
Sew one arm to each side of the body about 1 inch below the head base. Angle the arms slightly downward and avoid pulling the stitches too tightly, or the body may pucker.
Check the ears and horns after the head is attached. The ears should sit between R5 and R7 on each side of the head. The horns should sit between R3 and R5 on top of the head, about 4 stitches apart.
Common Beginner Fixes for This Crochet Cow Pattern
- If the head looks lumpy, remove a little stuffing and reshape it with your hands.
- If the body curls upward, your stitches are too tight. Use a larger hook or loosen your tension.
- If the body looks wavy, make sure you are not adding extra corner stitches.
- If the head leans forward, add one more round of sewing stitches around the base.
- If the arms pull the body inward, remove them and reattach with looser sewing stitches.
Final Check
- The head should sit upright without tipping forward.
- The snout should be centered and lightly stuffed.
- The ears should sit at the same height and angle outward.
- The horns should be even and close to the top center of the head.
- The lovey body should lie flat when placed on a table.
- The arms on this cow crochet pattern should be secure but should not pull the body inward.
- All yarn ends should be woven in completely.
Baby-Safe Notes
For a baby gift, embroidered eyes are the safest choice for this crochet cow pattern. Do not use buttons, beads, plastic safety eyes, bells, ribbons, glued pieces, or loose decorations. Tug gently on every attached piece before gifting to make sure the head, arms, ears, horns, snout, and spots are secure.
If this crochet cow pattern is adapted into a nursery mobile decoration, make the cow smaller, lighter, and firmly attached to the mobile. Do not place a mobile piece loose inside the crib.
If you are planning a cow nursery theme, see these baby mobile ideas for safe ways to coordinate handmade pieces with crib decor.
When you click on links to various merchants on this site and make a purchase, this may result in this site earning a commission. This does not affect the price you pay.
UBGI Gold Standard 2026
Verified for performance, SEO,
and accessibility compliance.
Photos, decorating ideas, party setups, and reader submissions are shared for inspiration only and are not intended as step-by-step decorating, construction, or DIY instructions.
About Jan | Contact | Baby Room Ideas (Blog) | Site Map | Privacy Policy | Disclaimer | Affiliate Disclosure | Earnings Disclosure
I am a participant in the Amazon Services LLC Associates Program, an affiliate advertising program designed to provide a means for us to earn fees by linking to Amazon.
Copyright © 2006-2026. All Rights Reserved.