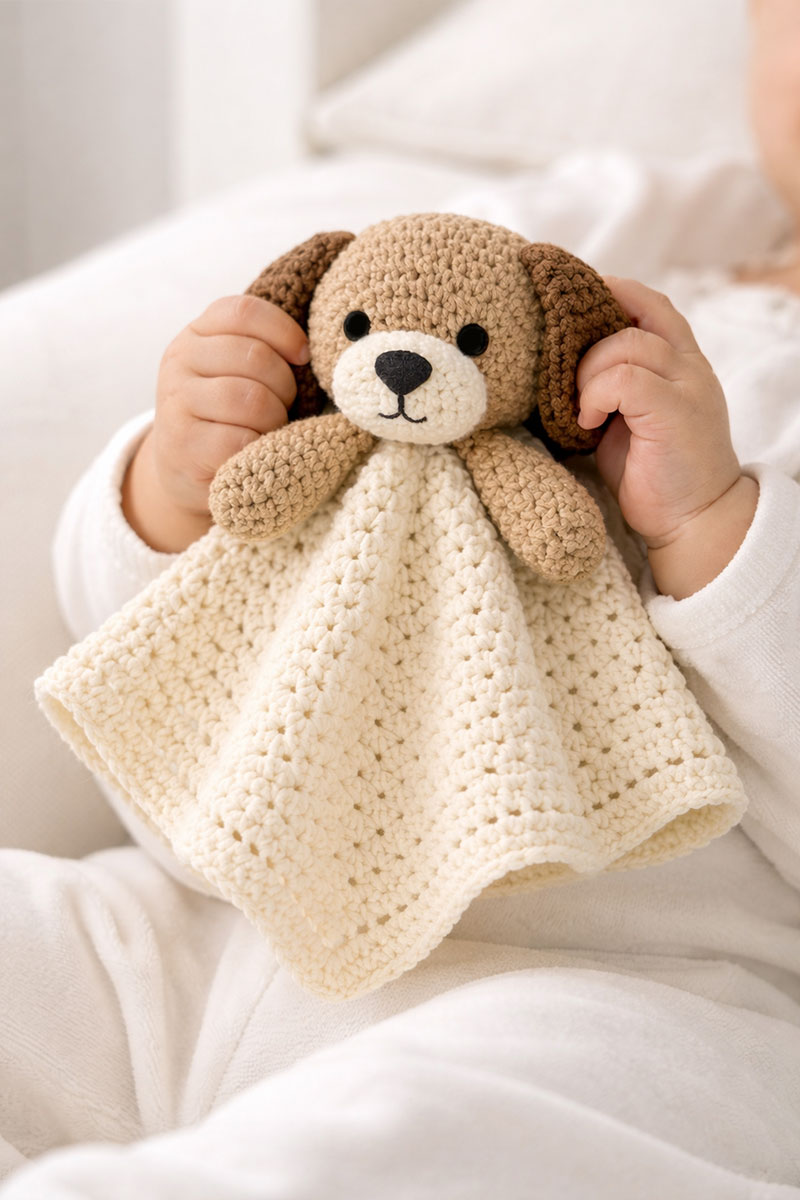
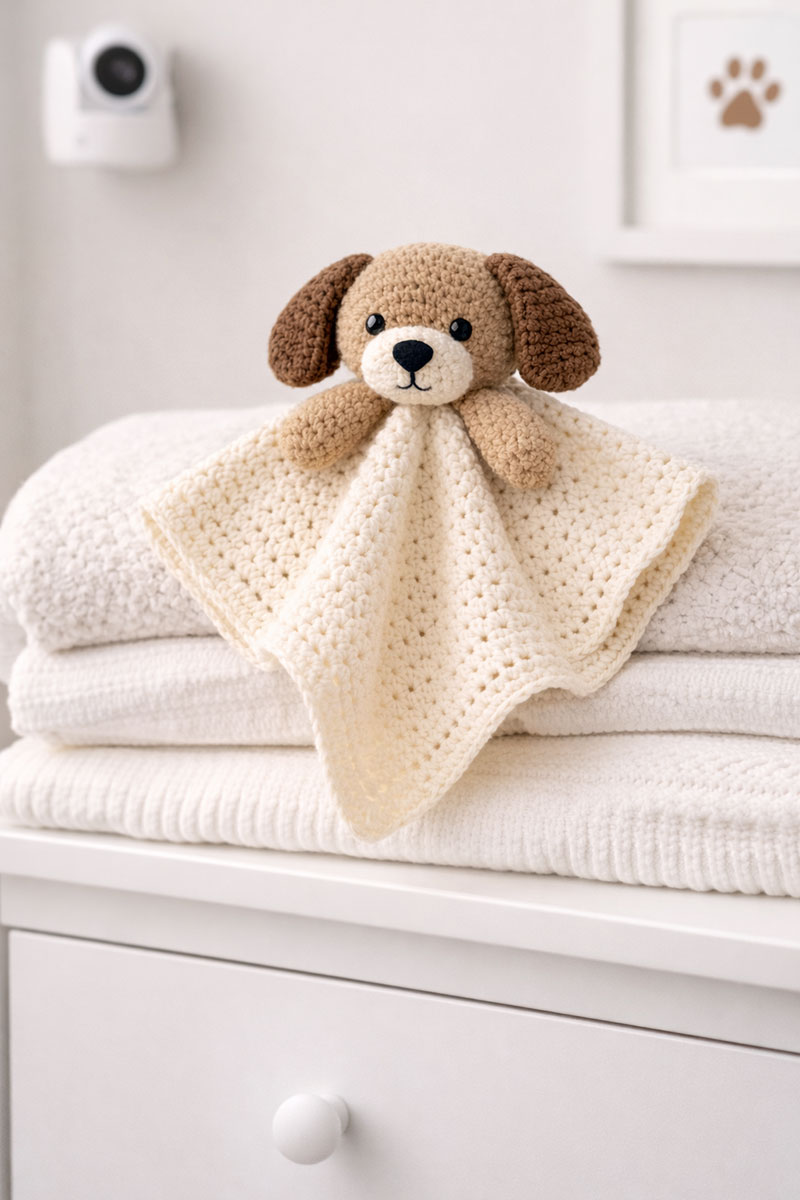
Puppy Lovey Crochet Pattern for Babies
This puppy lovey crochet pattern shows you exactly how to make a floppy-eared crochet dog lovey with a lightweight blanket base, beginner-friendly shaping, and precise stitch counts that help the finished lovey drape naturally instead of feeling stiff or bulky.
A good puppy lovey is small enough for a baby to carry easily, soft enough to fold into one hand, and durable enough for daily use in strollers, car rides, nursery baskets, and supervised cuddle time.
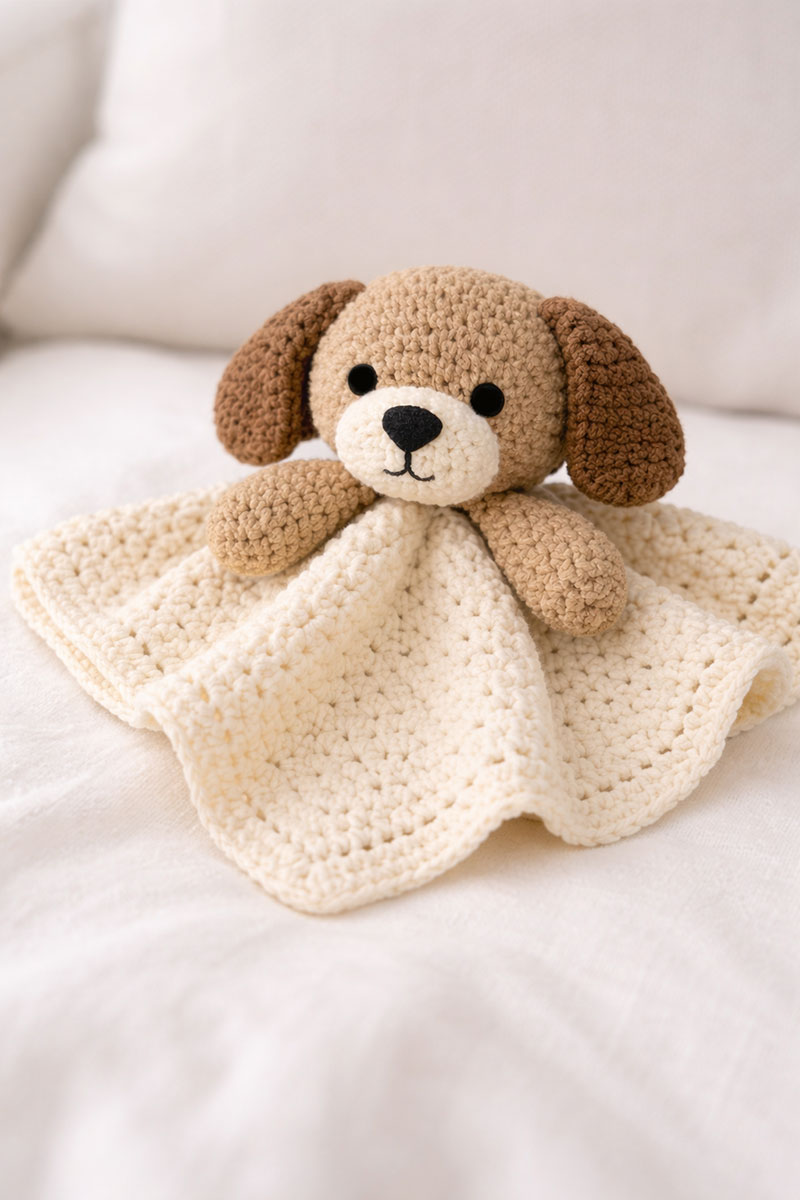
This step-by-step puppy lovey crochet pattern shows you exactly how to create a soft, draped security blanket with a simple puppy head, including precise stitch counts, placement guides, and assembly so you can match the finished look.
More Lovey Patterns and Puppy Nursery Ideas
Teddy Bear Lovey Crochet Pattern
See the correct yarn for this puppy lovey style for inspiration
Quick answer:
A puppy lovey crochet pattern works best when the blanket base stays loose, the head stays small, and the ears hang low enough to move when baby carries it around. That balance gives you a comfort item that feels easy to hold instead of bulky or stiff.
A lot of puppy loveys look cute in photos but feel awkward once they are finished because the head is too big or the blanket is too thick for a baby’s hand to comfortably hold. The one that gets used most is the one that hangs, folds, and drapes without fighting back.
The most successful puppy loveys usually coordinate with the nursery instead of trying to copy every dog-themed item in the room. Simpler color palettes almost always age better than highly detailed novelty designs.
For more beginner-friendly projects and pattern ideas, visit free baby crochet patterns to see how different lovey styles compare.
My frog lovey crochet pattern adds a pond-inspired option that fits naturally alongside other baby animal lovey designs.
My crochet cow pattern adds a lovey that can be crocheted to resemble your favorite breed with a security blanket body and simple shaping that works especially well for beginner crochet baby gifts and nursery gift baskets.
For more coordinated barnyard-style projects, these crochet farm animal lovey patterns gather cows, chickens, ducks, lambs, and other beginner-friendly animal loveys into one easy handmade baby gift collection.
For more decorating tips, visit my puppy dog nursery theme ideas collection for puppy-themed room inspiration, wall décor, and color ideas.
Why a Puppy Lovey Crochet Pattern Gets Used More
Parents notice that the security item baby keeps reaching for is rarely the one with the most detail. It is usually the one that folds into one hand, rests comfortably against the cheek, and still hangs down far enough to grab again when it slips.
A puppy shape works especially well because the ears are a favorite handle. They move a little when the lovey is picked up, which makes the whole piece feel more natural even though the construction stays simple. That is a better choice than adding paws, tails, or thick trim that turn the center into a lump.
The best finished result looks balanced. The head sits at the point where the blanket can fold under the chin. The ears fall past the side of the face. The corners stay free instead of being trapped by too much stitching. To carry the same puppy look into wall art, this puppy dog paw print stencil is an easy companion idea that does not compete with the crochet piece.
Best Yarn and Supplies for a Puppy Lovey
The yarn choice changes the finished lovey more than the stitch pattern does. Thick stiff yarn makes the blanket bunch upward around the neck, while lighter flexible yarn allows the lovey to hang naturally when carried by the head.
Worsted-weight yarn usually creates the best balance between structure, durability, and beginner-friendly stitching. Plush yarn can work for the ears or head, but extremely heavy blanket yarn often removes the relaxed drape that makes loveys comfortable for babies to hold.
What makes this puppy lovey pattern different?
Many free lovey patterns leave out shaping proportions, head sizing, drape control, and exact placement measurements. This pattern includes those details so the finished puppy lovey hangs correctly and looks balanced when completed.
Complete Puppy Lovey Crochet Pattern for Beginners (No Guesswork)
Skill level: Beginner
Finished size: Blanket 12 inches wide. Full length from top of head to bottom point about 14 inches.
The turning chain does not count as a stitch throughout this pattern.
Materials
Worsted weight yarn
Color A: cream (blanket and muzzle) about 120 yards
Color B: tan (head and ears) about 60 yards
Small amount of black yarn for face details
4.5 mm crochet hook
Tapestry needle
Stitch marker
Scissors
Small amount of fiberfill stuffing
Abbreviations
ch = chain
sl st = slip stitch
sc = single crochet
hdc = half double crochet
dc = double crochet
inc = 2 stitches in same stitch
dec = single crochet decrease
st = stitch
Gauge
4 inches = 10 hdc stitches and 8 rows
Finished fabric should bend easily when folded in half. If it stands up, go up one hook size.
Blanket Base (Exact Shape and Orientation)
With Color A
Round 1: ch 4, join. ch 2, 12 dc into ring. join. (12)
Round 2: ch 2, inc in each st. join. (24)
Round 3: ch 2, 1 dc in next st, inc in next around. join. (36)
Round 4: ch 2, 1 dc in next 2 sts, inc in next around. join. (48)
Round 5: ch 2, 1 dc in next 3 sts, inc in next around. join. (60)
The circle should measure about 7.5 to 8 inches across.
Important orientation step: Lay the circle flat. Place your first marker at the join seam of Round 5, then count 30 stitches clockwise. Place a second marker. These 30 stitches form the working section for rows.
Row 6: attach yarn at first marker. ch 2, hdc in same st and each of the next 29 sts. turn. (30)
Row 7–16: ch 2, hdc across 30 sts. turn. (30 each row)
After row 16, the blanket should measure about 14 inches from top edge to bottom edge.
Shape check: The top edge is straight. The bottom edge forms a curve that hangs naturally when held at the top.
Border round: sc evenly around entire piece. Work 3 sc in each corner point. join.
Final round: hdc evenly around. join and fasten off.
Puppy Head (Exact Size)
With Color B
Round 1: magic ring, 6 sc. (6)
Round 2: inc in each st. (12)
Round 3: 1 sc, inc around. (18)
Round 4: 2 sc, inc around. (24)
Round 5–8: sc in each st. (24)
Begin stuffing lightly after round 7. Add small amounts only.
Round 9: 2 sc, dec around. (18)
Round 10: 1 sc, dec around. (12)
Round 11: dec around. (6)
Finish stuffing so the head feels lightly filled, not firm. Close opening.
Size check: Head should measure about 2.5 inches across.
Puppy Ears (Make 2, Exact Shape)
With Color B
ch 9
Row 1: sc in 2nd ch, sc across. (8)
Row 2: ch 1, turn, sc across. (8)
Row 3: ch 1, turn, inc, sc across to last st, inc. (10)
Row 4–8: ch 1, turn, sc across. (10)
Size check: Each ear should measure about 3.5 inches long.
Puppy Muzzle (Exact Placement Size)
With Color A
ch 5
Round 1: sc in 2nd ch, sc in next 2 sts, 3 sc in last ch, continue around, sc in next 2 sts, 2 sc in last st. join. (10)
Round 2: sc around, placing 2 sc in each of the 3 corner sts. join. (14)
Size check: Muzzle should measure about 1.5 inches wide.
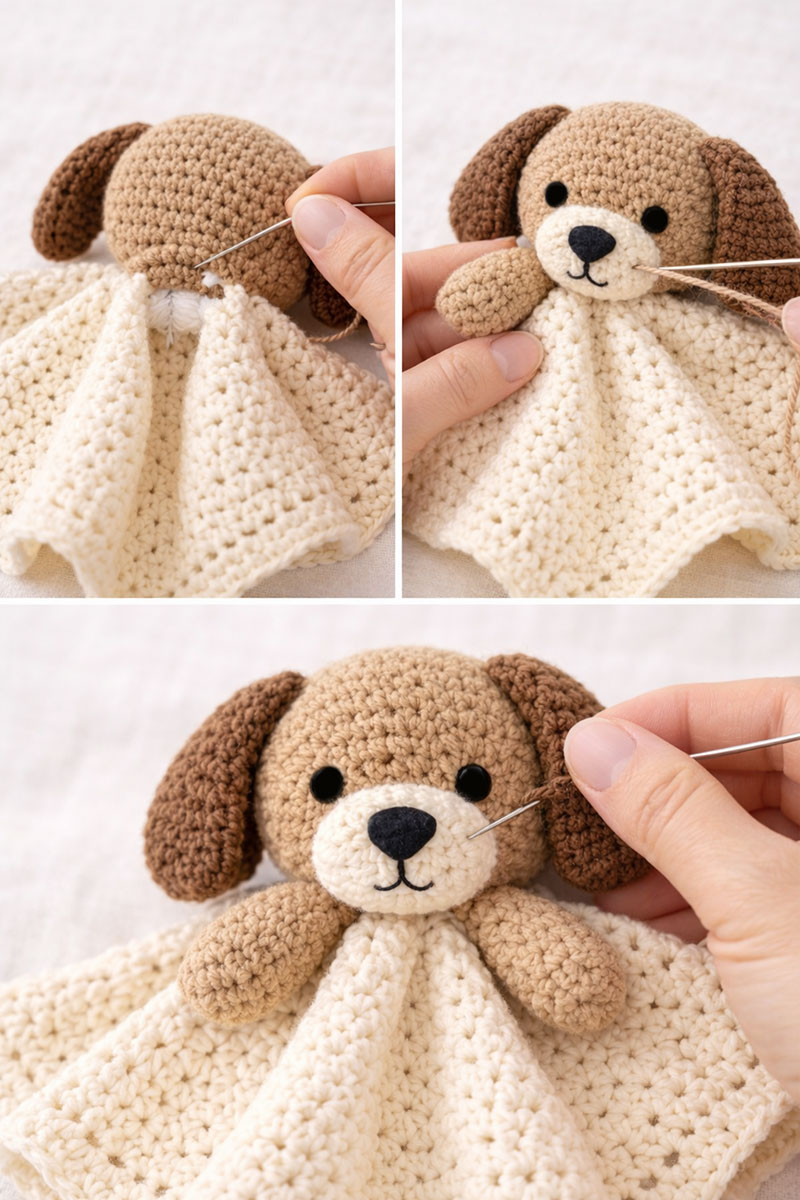
Exact Assembly (No Guesswork)
Lay the blanket flat with the straight edge at the top.
Head placement: Count 15 stitches from either side along the top edge. Mark the center. Place the head centered on this point.
Sew the head across 6 stitches only at the top center. Do not sew the entire base of the head flat. This allows the blanket to fold under the chin naturally.
Muzzle placement: Attach muzzle centered on the head between rounds 6 and 9.
Eye placement: To embroider eyes, count from the center front of the muzzle. Place each eye 3 stitches to the left and right.
Nose: Stitch a small triangle centered at the top of the muzzle. Add a short vertical line below it.
Ear placement: Attach ears so the top of each ear begins at round 3 and spans 4 stitches backward from the eye.
Ears that fold slightly forward usually create a more relaxed finished look and make the lovey easier for babies to grab and carry.
Weave in all ends securely.
Final check:
When held from the head, the blanket should hang straight down without folding upward at the neck.
The blanket should fold easily in one hand.
The head should not pull the blanket upward.
The ears should hang past the sides of the head.
If all four are true, the shape matches the intended design.
Tips to Make the Puppy Lovey Hold Up Well
Parents often notice this when baby starts chewing on corners. The pieces that last are the ones with fewer hard transitions. That means embroidered eyes instead of plastic parts, firm sewing at the neck, and no extra bows, buttons, or add-ons.
Use these finishing rules:
Keep the head lightly stuffed. Heavy stuffing pulls the blanket upward.
Embroider the eyes slightly wider than you think you should. Faces read better from a distance that way.
Stitch the ears on after pinning them in place and folding them once near the top.
Wash the finished lovey before gifting it so you can catch any loose joins.
Make one small change of your own, like a face patch shape, ear length, or border round count, so the finished design feels original and personal.
For general product safety around infant sleep items and nursery use, the American Academy of Pediatrics is a useful reference. A lovey is for cuddling when baby is awake and supervised, not for setting up a sleep space.
Puppy Lovey Gift Ideas and Nursery Matchups
A puppy lovey looks its best when it echoes the room without trying to match every item exactly. In a real nursery, the look usually feels better when the crochet piece picks up one or two room colors and leaves the rest alone.
A tan and cream lovey works nicely with a dog themed room because it can sit on a shelf, dresser, or chair without shouting for attention. When the room already has paw prints or dog art, the lovey becomes the handmade piece that makes the theme feel lived in. That is a far better result than trying to crochet the exact same face shown on every other puppy item in the room.
The blanket corners usually become the most handled part of the lovey, which is why flexible drape and lightweight shaping matter more than heavy decorative details.
To make a second animal lovey for the same gift set, start with my crochet animal lovey patterns collection so you can compare the different face shapes, ear placements, blanket drapes, and finished styles in one place.
The crochet bunny lovey pattern, crochet elephant lovey free pattern, and owl baby lovey crochet pattern are all gentle companion choices, while this highland cow crochet snuggler lovey pattern gives you a thicker, slightly shaggier farm-animal look.
FAQ About Puppy Lovey Crochet Patterns
What size should a puppy lovey crochet pattern be?
A good target is 12 to 16 inches across the blanket base. That is large enough to hold and fold, but not so large that the head gets lost.
What stitch works best for a crochet puppy lovey?
Half double crochet, double crochet, and moss stitch all work well because they create movement in the fabric. Very tight stitches can make the lovey feel stiff.
Should the puppy head be large or small?
Small is better for this style. A smaller head keeps the focus on the comfort cloth feel and makes the lovey easier for baby to carry.
Can I make this pattern look different from store versions?
Yes. Change the ear length, face patch shape, muzzle size, border rounds, or color placement. Those small shifts help create a version that feels personal without changing the basic idea that makes the lovey work.
Is this still a good pattern choice a few years from now?
Yes. Puppy loveys continue to stay popular because they work as both a comfort item and a handmade baby gift without depending on fast-changing nursery trends.
When you click on links to various merchants on this site and make a purchase, this may result in this site earning a commission. This does not affect the price you pay.
UBGI Gold Standard 2026
Verified for performance, SEO,
and accessibility compliance.
Photos, decorating ideas, party setups, and reader submissions are shared for inspiration only and are not intended as step-by-step decorating, construction, or DIY instructions.
About Jan | Contact | Baby Room Ideas (Blog) | Site Map | Privacy Policy | Disclosure Policy | Disclaimer | Affiliate Disclosure | Earnings Disclosure | Facebook | Pinterest
I am a participant in the Amazon Services LLC Associates Program, an affiliate advertising program designed to provide a means for us to earn fees by linking to Amazon.
Copyright © 2006-2026. All Rights Reserved.