Horse Crochet Lovey Pattern
This horse crochet lovey pattern makes a special piece that fits both farm and western baby nursery décor. It feels handmade, cozy, and timeless, and it makes a thoughtful baby shower gift that feels right at home in farmhouse, cowboy, ranch, and farm animal nursery themes.
If you love farm nursery decorating ideas, these pages are packed with inspiration and pattern ideas:
Farm nursery ideas that are fresh and modern
See more crochet farm animal lovey patterns
Crochet bee lovey pattern for a sweet handmade baby gift
The animal lovey patterns readers love the most
Farm and western baby quilt ideas that pair beautifully with this lovey

Jump to What You Need
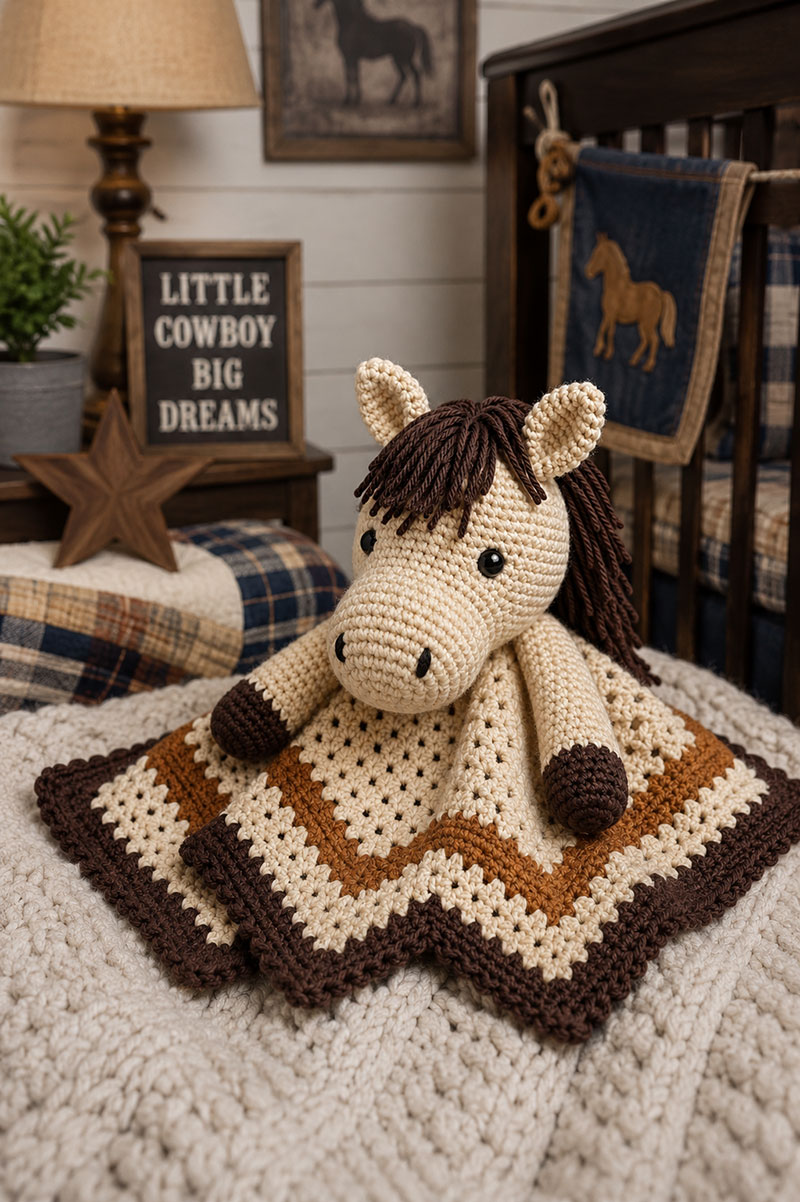
Quick Answer: This horse crochet lovey pattern uses a separately shaped oval muzzle, dark hooves, flexible front legs, a layered yarn mane, and a striped granny-style comfort blanket. The pattern includes stitch counts and placement checkpoints, but the finished measurements and appearance may vary with yarn, hook size, gauge, and individual tension.
A lot of nursery crochet projects look charming in photos but end up sitting untouched on a shelf because they are either too stiff, too small, or shaped awkwardly for a baby to carry around. This horse crochet lovey pattern was designed differently from the start. The blanket drapes naturally, the horse head stays upright without becoming bulky, and the finished shape works both as nursery décor and as a comfort lovey later on.
This construction creates a horse lovey with a broad oval muzzle, dark layered mane, striped ranch-style blanket, cupped ears, dark hooves, and flexible front legs. The styled photographs show glossy plastic eyes, but the written infant version uses embroidered eyes instead.
The blanket is intended to measure approximately 16 inches from one outer side to the opposite outer side, measured straight across rather than diagonally from corner to corner.
Because the head faces one blanket corner, the total finished height from the highest ear tip to the lowest blanket point must be measured after assembly. Finished measurements vary with yarn thickness, hook size, stitch height, and individual tension.
Skill Level: Confident beginner. The crochet stitches are basic, but the project also requires working around a foundation chain, joined granny rounds, color changes, embroidery, mane attachment, and careful assembly.
This pattern was built specifically for farm and western nursery décor.
Horse Crochet Lovey Supplies and Yarn Colors
The yarn colors matter more than people expect with western nursery décor. Bright primary colors push the project toward toy styling instead of the ranch-inspired nursery look shown in the photos.
Use these yarn colors:
- Cream yarn for the head, muzzle, ears, legs, and cream blanket rounds
- Chocolate brown yarn for the mane, hooves, and outer blanket rounds
- Medium saddle brown yarn for the blanket accent rounds
- Black embroidery thread for the eyes and nostrils
Materials List
- Worsted weight cotton blend yarn
- 4.0 mm crochet hook
- Yarn needle
- Sharp embroidery needle
- Scissors
- Polyfill stuffing
- Black embroidery thread for eyes
- Stitch marker
- Straight sewing pins for assembly
Abbreviations
- sc = single crochet
- dc = double crochet
- inc = increase using 2 stitches in one stitch
- dec = invisible decrease
- sl st = slip stitch
- ch = chain
- st = stitch
This pattern uses standard United States crochet terminology.
Construction Note
Work the head, muzzle, ears, and legs in continuous rounds. Do not join or turn unless a section specifically instructs you to do so. Place a stitch marker in the first stitch of each round and move it up as the work progresses.
After completing any magic ring, pull the starting tail firmly until the center is fully closed. Secure the tail around a nearby stitch, then weave it back and forth through several stitches in more than one direction before stuffing or assembling the piece.
The cotton blend helps the blanket relax naturally after assembly instead of curling upward around the corners.
Horse Head Construction
Use cream yarn and 4.0 mm hook.
Round 1
Create magic ring. Work 6 sc into ring. Pull tight. (6)
Round 2
Inc in each stitch around. (12)
Round 3
1 sc, 1 inc. Repeat around. (18)
Round 4
2 sc, 1 inc. Repeat around. (24)
Round 5
3 sc, 1 inc. Repeat around. (30)
Round 6
4 sc, 1 inc. Repeat around. (36)
Rounds 7 through 11
1 sc in every stitch around. (36)
At this stage the piece should look like a rounded ball shape with a flat opening at the bottom.
Round 12
4 sc, 1 dec. Repeat around. (30)
Round 13
3 sc, 1 dec. Repeat around. (24)
Stuff the head firmly but leave the lower front area slightly softer where the muzzle will attach.
Round 14
2 sc, 1 dec. Repeat around. (18)
Round 15
1 sc, 1 dec. Repeat around. (12)
Add the final stuffing, keeping the head firm but not rigid.
Do not work another decrease round and do not close the opening. Fasten off, leaving a sewing tail at least 30 inches long.
The remaining 12-stitch opening forms the head base. During final assembly, these 12 stitches will be matched to the 12 double crochets in Round 1 of the blanket.
Separate Oval Horse Muzzle Construction
The muzzle begins around a foundation chain so it forms a true oval rather than a round cup.
Use cream yarn.
Foundation
Ch 6.
Round 1
Beginning in the second chain from the hook, sc in the next 4 chains. Work 3 sc in the last chain.
Continue along the unused loops on the opposite side of the foundation chain. Sc in the next 3 loops and work 2 sc in the final loop. (12)
Round 2
Inc in the first stitch, sc in the next 3 stitches, inc in each of the next 3 stitches, sc in the next 3 stitches, and inc in each of the final 2 stitches. (18)
Round 3
2 sc, 1 inc. Repeat around. (24)
Rounds 4 through 7
1 sc in every stitch around. (24)
Embroider the Nostrils Before Assembly
Before stuffing or attaching the muzzle, embroider the nostrils directly onto its broad front using black embroidery thread.
- Place one nostril on each side of the muzzle front
- Position the nostril centers approximately 7 stitches apart
- Use short diagonal embroidery stitches
- Place both nostrils slightly below the horizontal center of the muzzle
Take the embroidery-thread tails to the inside of the muzzle. Knot the matching tails securely, weave them through several interior stitches in more than one direction, and trim the excess.
Stuff the muzzle lightly. Keep the oval front rounded, but do not pack it so firmly that it becomes rigid.
Fasten off, leaving a sewing tail at least 24 inches long.
Detailed Muzzle Placement and Sewing Guide
Before attaching any facial pieces, hold the head with the 12-stitch opening at the bottom. Choose the smoothest side as the front and mark the front center with a removable stitch marker. Mark the opposite point as the back center.
Keep these markers in place while positioning the muzzle, eyes, ears, mane, and legs so every feature remains aligned with the same front and back orientation.
Center the muzzle on the lower front of the head.
- Place the upper edge of the muzzle at Round 10 of the head
- Place the lower edge near Round 14
- Keep the long axis of the oval horizontal
- Leave one complete round of visible head fabric between the eyes and the upper muzzle edge
Pin the top, bottom, left, and right points before adding the remaining pins.
Sew once through every stitch around the 24-stitch muzzle opening. Catch the head fabric immediately beneath each muzzle stitch so the seam stays even.
Add a small amount of stuffing before closing the final few stitches if the muzzle begins to collapse inward.
Eye Placement and Nostril Check
Before continuing, confirm that the nostrils have been embroidered and that their thread tails were secured inside the muzzle before it was stuffed and attached.
Using black embroidery thread:
- Center the embroidered eyes between Rounds 8 and 9 of the head
- Place the eye centers 7 stitches apart
- Keep both eyes level before completing the embroidery
- Leave one full round of visible head fabric between the eyes and the top of the muzzle
Lower eye placement helps create the relaxed western ranch-style expression shown in the finished lovey.
After completing the eyes, take both embroidery-thread tails to the inside of the head. Knot them securely, weave them through several interior crochet stitches in more than one direction, and trim the excess. Complete this step while the 12-stitch head opening is still accessible.
Ear Construction and Placement
Make 2 ears.
Use cream yarn and work in continuous rounds.
Round 1
Work 4 sc in a magic ring. (4)
Round 2
Inc in every stitch around. (8)
Round 3
1 sc, 1 inc. Repeat around. (12)
Rounds 4 through 7
1 sc in every stitch around. (12)
Do not stuff. Pinch only the final round together so the upper portion of the ear remains slightly cupped.
Fasten off, leaving a sewing tail at least 12 inches long.
Placement Guide
- Attach each pinched ear base across Rounds 4 through 6 of the head
- Leave approximately 6 head stitches between the inner edges of the ears
- Tilt the ear tips slightly inward
Pin both ears before sewing and compare them from the front, back, and both sides.
Mane Placement and Strand Counts
Cut 34 strands of chocolate brown yarn. Each strand should measure approximately 8 inches before attachment.
Hold 2 strands together for every attachment. This creates 17 two-strand bundles.
Forelock
- Use 7 two-strand bundles, for a total of 14 strands
- Place the bundles across the upper forehead between the ears
- Space them evenly across Rounds 4 through 7
Side Mane
- Use the remaining 10 two-strand bundles, for a total of 20 strands
- Begin immediately behind one ear
- Continue in one line down the same side of the back of the head toward Round 13
- The mane may fall on either side, but all 10 side-mane bundles should remain on the chosen side
To attach each bundle, fold the 2 strands in half. Insert the crochet hook beneath a head stitch, pull the folded loop through, pass all 4 yarn ends through the loop, and tighten firmly.
Tug-test every bundle. Complete the final trimming only after the head has been attached to the blanket.

Front Leg and Hoof Construction
Make 2 matching legs.
Begin with chocolate brown yarn and work in continuous rounds.
Round 1
Work 6 sc in a magic ring. (6)
Round 2
Inc in every stitch around. (12)
Rounds 3 through 5
1 sc in every stitch around. (12)
During the final sc of Round 5, stop before the last yarn-over. Yarn over with cream and pull the cream yarn through the final 2 loops to complete the stitch and color change.
Cut the chocolate yarn, leaving a 6-inch tail. Secure and weave the chocolate tail through several stitches on the inside of the hoof before adding stuffing.
Round 6
Using cream yarn and working in the back loops only, sc in every stitch around. (12)
Rounds 7 through 15
1 sc in every stitch around. (12)
Stuff the chocolate hoof firmly enough to hold its rounded shape. Stuff the cream leg lightly so it remains flexible.
Flatten the final round so the 12 stitches form 6 paired stitches across the top.
Fasten off, leaving a sewing tail at least 18 inches long.
Leg Placement
- Turn the head so the muzzle faces directly forward
- Pin one leg to the lower left side of the head and the other leg to the lower right side
- Do not place the two legs across the lower front of the head
- Position the upper end of each flattened 6-stitch edge near Round 11 and the lower end near Round 14
- Keep the inner edge of each leg immediately behind the outer side of the muzzle seam
- Keep the 12-stitch head opening completely clear for attachment to the blanket
- Mirror the placement so both legs angle forward and downward at the same angle
Sew through all 6 paired stitches at the top of each leg. Check the placement from the front and both sides before securing the yarn tails. Attach both legs before sewing the head to the blanket.
Before attaching the head to the blanket, take the muzzle, ear, and leg sewing tails through the 12-stitch opening to the inside of the head. Secure each tail around a nearby interior stitch, weave it through several stitches in more than one direction, and trim the excess. Confirm that no sewing tail remains loose inside or outside the head.
Lovey Blanket Construction With Round Counts
Work the blanket in joined rounds with the right side facing. Do not turn between rounds. Do not chain between the 3-double-crochet groups along the sides.
Round 1, Cream
Create a magic ring.
Ch 3, which counts as the first dc. Work 2 dc into the ring and ch 2.
Work 3 dc and ch 2 into the ring 3 more times.
Join with a sl st to the top of the beginning ch 3. (12 dc and four ch-2 corner spaces)
Pull the starting tail firmly until the center opening is completely closed. Secure and weave in the tail before continuing so filling cannot become accessible through the blanket center after the head is attached.
Round 2, Cream
After joining Round 1, sl st in each of the next 2 dc, then sl st into the adjacent ch-2 corner space.
Ch 3, 2 dc, ch 2, and 3 dc in the same corner space.
Work 3 dc, ch 2, and 3 dc in each of the remaining 3 corner spaces.
Join with a sl st to the top of the beginning ch 3. (24 dc)
Round 3, Cream
After joining Round 2, sl st in each of the next 2 dc, then sl st into the adjacent ch-2 corner space.
Ch 3, 2 dc, ch 2, and 3 dc in the same corner space.
Work 3 dc in the gap between the two corner groups along the side.
In each remaining corner, work 3 dc, ch 2, and 3 dc. Work 3 dc in each side gap between corners.
Join with a sl st to the top of the beginning ch 3. (36 dc)
Rounds 4 through 13
If the round continues in the same color, the previous round should already be joined. Sl st in each of the next 2 dc, then sl st into the adjacent ch-2 corner space.
If the round begins with a new color, make sure the previous round has been joined, then fasten off. Join the new color directly in any ch-2 corner space.
From the starting corner space, ch 3, work 2 dc, ch 2, and work 3 dc in the same corner space.
Work 3 dc in every gap between the 3-dc groups along the first side.
In each of the remaining 3 corner spaces, work 3 dc, ch 2, and 3 dc. After each corner, work 3 dc in every gap along the next side.
Do not chain between the side groups.
At the end of every round, join with a sl st to the top of the beginning ch 3.
Color and Stitch Count Guide
- Round 4, cream: 48 dc
- Round 5, cream: 60 dc
- Round 6, cream: 72 dc
- Round 7, cream: 84 dc
- Round 8, saddle brown: 96 dc
- Round 9, saddle brown: 108 dc
- Round 10, cream: 120 dc
- Round 11, cream: 132 dc
- Round 12, chocolate brown: 144 dc
- Round 13, chocolate brown: 156 dc
When changing colors, fasten off the previous color after completing its round. Join the new color in any corner space.
After Round 13, fasten off securely and weave every yarn end through several stitches in more than one direction.
The blanket should lie flat without rippling or pulling inward. Check that every corner contains 3 dc, ch 2, and 3 dc before proceeding to the next round.
Blanket Checkpoint Before Assembly
- Lay the completed blanket flat with the right side facing upward
- Confirm that all four sides are equal in length
- Confirm that all four corners lie flat and contain their ch-2 spaces
- Round 13 should show 13 three-double-crochet groups along each side when the corner group at each end is included
- Check that no section cups inward or ripples outward
- Weave in and secure every blanket yarn tail before attaching the head
Final Assembly Sequence
- Complete the head through Round 15, leaving the 12-stitch opening unclosed
- Complete the oval muzzle, embroider and secure the nostrils inside it, then stuff and attach the muzzle
- Embroider the eyes and secure their thread tails inside the head
- Complete and attach both ears
- Attach the forelock and side mane
- Complete both legs and sew one to each lower side of the head, immediately behind the outer edges of the muzzle
- Complete the blanket through Round 13
- Center the head opening over Round 1 of the blanket
- Match the 12 head-opening stitches to the 12 double crochets in blanket Round 1
- Sew the head to the blanket and reinforce the complete seam
- Trim the mane and complete the final safety inspection
Before sewing the head, place a pin at each of the four quarter points. Confirm that the muzzle faces one blanket corner rather than one flat side.
Using the long head tail, begin at one of the four 3-dc clusters in blanket Round 1.
Match 3 consecutive head-opening stitches to the 3 double crochets in that cluster. Repeat around the center so each group of 3 head stitches is attached to one complete 3-dc cluster. After the first pass, all 12 head stitches should be attached to all 12 double crochets.
Make a second complete reinforcing pass around the attachment. At each of the four ch-2 corner spaces, pass the needle through the corner space and through the nearest head-opening stitch before continuing around the seam. These four additional anchor stitches close the gaps between the 3-dc clusters.
Secure the tail and weave it deeply into the head fabric.
The attachment should hold the head upright while allowing the blanket corners to drape evenly.
Farm and Western Nursery Styling Ideas
Horse nursery décor can get out of control quickly if every item in the room follows the same western theme. That's where a classic ranch-room direction with cowboy boots, denim textures, rope accents, and my cowboy baby nursery ideas can be helpful.
The rooms that age best usually mix horse accents with darker woods, plaid textiles, denim textures, and layered farmhouse fabrics instead of novelty décor everywhere.
These horse nursery theme ideas show how to use pony artwork, ranch textures, stable-inspired details, and equestrian accents without overloading the nursery.
This horse crochet lovey pattern pairs especially well with:
- Navy nursery accents
- Western plaid blankets
- Farm animal nursery décor
- Dark stained cribs
- Cowgirl nursery accents
- Ranch-inspired nursery styling
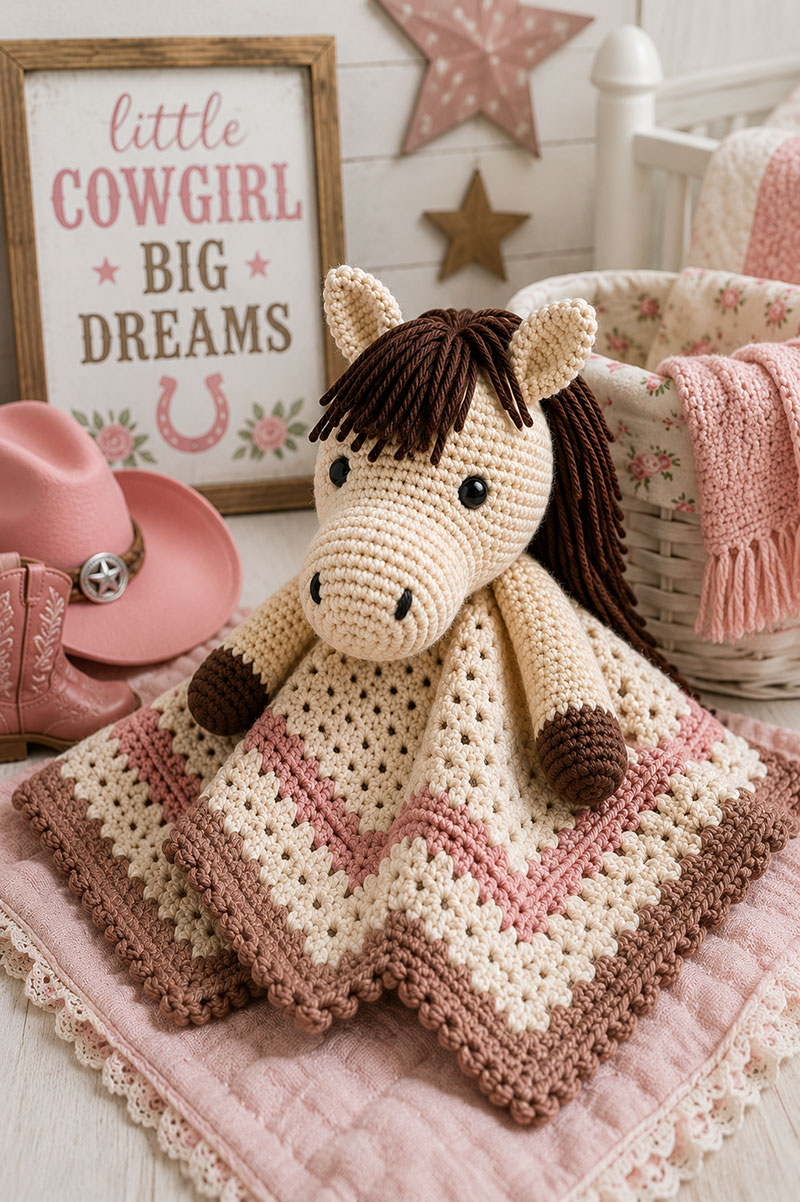
Farm nursery decorating ideas can help tie together western textures, horse accents, and ranch-inspired nursery styling naturally.
These crochet farm animal lovey patterns include additional handmade nursery projects with a similar farmhouse style.
A safari-style handmade gift set can also include my crochet lion lovey pattern with a soft blanket base, rounded ears, and textured mane.
For a woodland-inspired baby gift, my crochet raccoon pattern creates a charming forest animal with a striped tail, mask markings, and nursery-friendly handmade appeal.
For more nursery-friendly handmade projects, these crochet animal lovey patterns include several additional baby comfort loveys and nursery gift ideas.
The U.S. Consumer Product Safety Commission safe sleep recommendations continue to recommend keeping loose comfort items outside infant sleep spaces during sleep times.
Before use, tug firmly on every mane bundle, embroidered feature, leg seam, ear seam, muzzle seam, and head attachment. Check that no yarn end, strand, seam, or filling can be pulled loose. Stop using the lovey immediately if any attachment loosens or any filling becomes accessible.
Beginner Troubleshooting Guide
The muzzle looks crooked.
Pin the muzzle in place first and check alignment from the front before sewing permanently.
The blanket curls upward.
One or more corners likely missed the ch 2 space increase.
The horse face looks too round.
The muzzle may have been overstuffed or attached too high on the head.
The head leans forward.
Use tighter whip stitches around the entire head base and reinforce underneath with extra stitches if needed.
The mane stands straight upward.
Trim the mane unevenly and separate yarn fibers gently using fingers after attaching.
Washing and Care Instructions
Wash the lovey inside a mesh laundry bag using cold water and gentle cycle settings.
Lay flat to dry and reshape the muzzle gently while damp.
Avoid high dryer heat because it can tighten the blanket corners and shrink the mane unevenly.
Many handmade loveys soften naturally after several washes, which often improves the relaxed ranch-style appearance over time.
Horse Crochet Lovey Pattern FAQ
Is this horse crochet lovey pattern beginner friendly?
It is suitable for a confident beginner. The stitches are basic, but the pattern also includes an oval worked around a foundation chain, joined granny rounds, color changes, embroidery, mane attachment, and detailed assembly instructions.
How large is the finished lovey?
The blanket is intended to measure approximately 16 inches from one outer side to the opposite outer side. The total finished height varies with gauge and assembly and should be measured after the head is attached.
Can this work for western nursery décor?
Yes. The darker yarn accents and ranch-style horse shape pair naturally with western and farmhouse nursery themes.
Should safety eyes be used?
No. For infant loveys, embroidered eyes are the safer choice because they avoid small plastic parts and hold up better through repeated washing and use.
What yarn works best for this pattern?
Cotton blend yarn works especially well because it holds shape while still allowing the blanket to drape naturally.
When you click on links to various merchants on this site and make a purchase, this may result in this site earning a commission. This does not affect the price you pay.

UBGI Gold Standard 2026
Reviewed under the site's
editorial checklist.
Photos, decorating ideas, party setups and reader submissions are shared for inspiration unless a page is specifically presented as a pattern, tutorial, reference guide or step-by-step project. Follow the instructions, measurements, safety guidance and manufacturer directions provided for the particular project or product.
About Jan | Contact | Baby Nursery Ideas (Blog) | Site Map | Privacy Policy | Disclosure Policy | Disclaimer | Affiliate Disclosure | Earnings Disclosure | Facebook | Pinterest
I am a participant in the Amazon Services LLC Associates Program, an affiliate advertising program designed to provide a means for us to earn fees by linking to Amazon. As an Amazon Associate I earn from qualifying purchases.
Copyright © 2006-2026. All Rights Reserved.