Crochet Bee Lovey Pattern
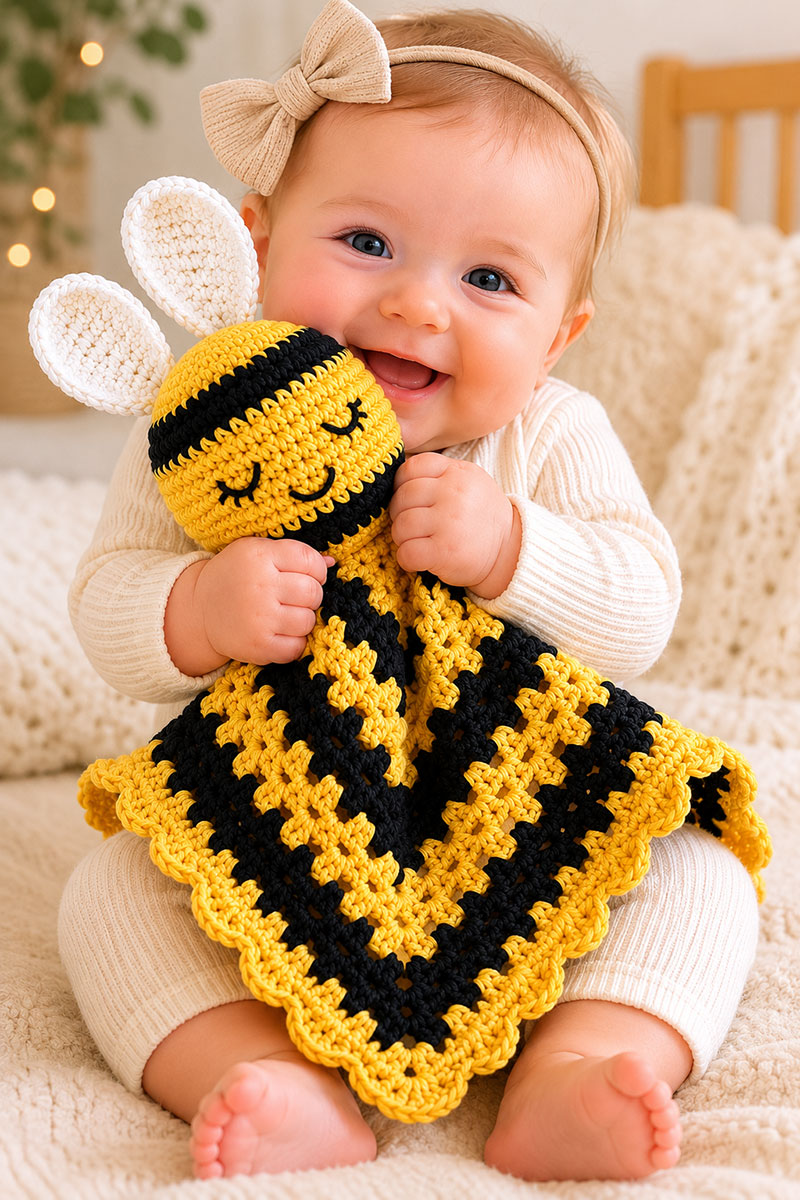
This free crochet bee lovey pattern will show you how to make a baby security blanket that is both playful and practical. The design combines a cuddly honey bee with a comforting blanket, making it a thoughtful baby shower gift, nursery accessory, or handmade keepsake for little ones.
More Free Crochet Baby Patterns:

This crochet bee lovey pattern combines a cheerful bee design with a comforting baby security blanket.
Helpful Supplies for This Crochet Bee Lovey Pattern
A soft cotton yarn, this crochet bee lovey pattern and a quality crochet hook make this an easy project.
Pattern Note: This pattern is written to recreate the crochet bee lovey shown in the page images. Finished measurements may vary slightly depending on yarn brand, hook size, and individual crochet tension.
Safety Note: This pattern uses embroidered facial features. For baby projects, avoid buttons, beads, plastic eyes, or any other small attached parts that could become detached.
Jump To:
Looking for another nursery themed project? Browse these crochet animal lovey patterns for more handmade nursery gift ideas.
Materials For This Crochet Bee Lovey Pattern
This pattern creates a crochet bee lovey with a striped bee head, upright wings, embroidered sleepy eyes, and a 15 inch striped blanket matching the design shown in the page images.
- 75 yards yellow worsted weight yarn
- 35 yards black worsted weight yarn
- 10 yards white worsted weight yarn
- 4.0 mm crochet hook
- 15 to 20 grams polyfill stuffing
- Black embroidery floss
- Yarn needle
- Scissors
- Stitch marker
Abbreviations
- ch = chain
- sc = single crochet
- hdc = half double crochet
- dc = double crochet
- sl st = slip stitch
- inc = increase
- dec = decrease
Gauge
16 single crochet stitches and 18 rows = 4 inches.
Checking gauge before starting helps the finished bee match the measurements used throughout this pattern.
Finished Measurements
- Bee head: approximately 5 inches wide
- Wing height: approximately 2.5 inches
- Wing width: approximately 1.75 inches
- Blanket: approximately 15 inches square
- Finished lovey: approximately 18 inches from top of bee head to lower blanket edge
Skill Level: Beginner
Bee Head Pattern
Using yellow yarn:
Round 1: Magic ring, 6 sc. (6)
Round 2: Inc in each stitch around. (12)
Round 3: *Sc, inc* around. (18)
Round 4: *2 sc, inc* around. (24)
Round 5: *3 sc, inc* around. (30)
Round 6: *4 sc, inc* around. (36)
Round 7: *5 sc, inc* around. (42)
Rounds 8 through 10: Sc around. (42)
Change to black yarn.
Rounds 11 and 12: Sc around. (42)
Change to yellow yarn.
Rounds 13 through 16: Sc around. (42)
Change to black yarn.
Rounds 17 and 18: Sc around. (42)
Change to yellow yarn.
Round 19: Sc around. (42)
Round 20: *5 sc, dec* around. (36)
Add stuffing.
The head should be firm enough to hold its shape but not packed so tightly that the stitches stretch open.
Round 21: *4 sc, dec* around. (30)
Round 22: *3 sc, dec* around. (24)
Round 23: *2 sc, dec* around. (18)
Round 24: *Sc, dec* around. (12)
Round 25: Dec around. (6)
Fasten off and close the opening.
Face Placement:
Position the sleepy eyes between rounds 14 and 15.
Each eye should be approximately four stitches wide.
Leave six stitches between the eyes.
Position the smile between rounds 17 and 18.
Use black embroidery floss only.
Bee Wings Pattern
Make two wings using white yarn.
Ch 9.
Working into the second chain from hook:
Sc, hdc, dc, dc, dc, dc, hdc, sc.
Rotate and work along the opposite side of the foundation chain:
Sc, hdc, dc, dc, dc, dc, hdc, sc.
Join with a sl st.
Fasten off, leaving a 10 inch tail for sewing.
Each finished wing should measure approximately 2.5 inches tall and 1.75 inches wide.
The wings shown in the page images stand upright rather than lying flat. This effect comes from sewing only the lower portion of each wing during assembly.
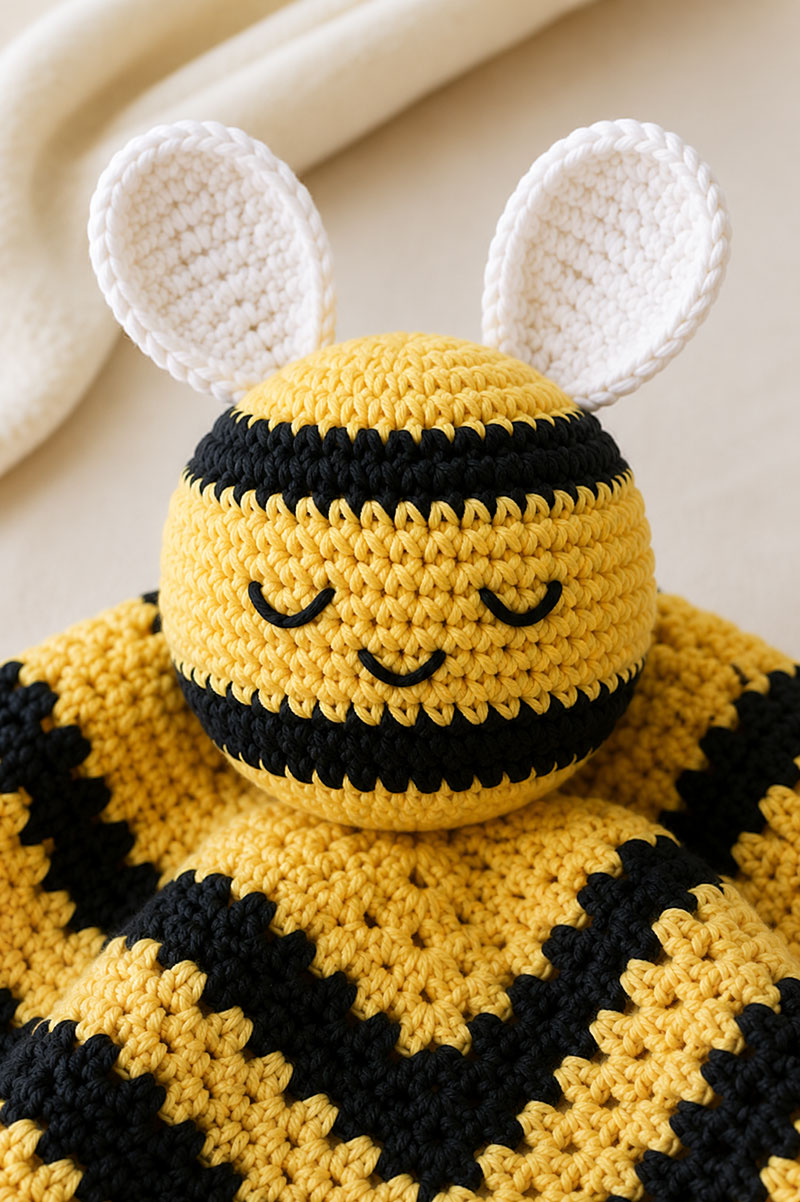
Close view showing the wing shape and the two black stripes used on the bee head.
15 Inch Bee Lovey Blanket Pattern
The blanket uses a solid granny square construction with fewer openings than a traditional granny square. This creates the fuller blanket appearance shown in the page images.
Using yellow yarn:
Round 1: Ch 4. Join with sl st to form a ring.
Ch 3. Work 2 dc into ring. Ch 2.
*3 dc into ring. Ch 2.*
Repeat from * to * three more times.
Join to top of beginning chain.
You should now have 4 corner clusters.
Round 2:
Sl st into first corner space.
Ch 3.
2 dc, ch 2, 3 dc in same corner space.
3 dc in side space.
3 dc, ch 2, 3 dc in corner.
Repeat around.
Join.
Round 3:
Sl st into corner.
Work 3 dc, ch 2, 3 dc in each corner.
Work 3 dc in every side space.
Join.
Round 4:
Repeat Round 3.
At this point the square should measure approximately 4.5 inches.
Change to black yarn.
Round 5:
Work 3 dc, ch 2, 3 dc in each corner.
Work 3 dc in every side space.
Join.
Round 6:
Repeat Round 5.
The square should now measure approximately 6 inches.
Change to yellow yarn.
Round 7:
Repeat Round 5.
Round 8:
Repeat Round 5.
Square should measure approximately 8 inches.
Change to black yarn.
Round 9:
Repeat Round 5.
Round 10:
Repeat Round 5.
Square should measure approximately 10 inches.
Change to yellow yarn.
Round 11:
Repeat Round 5.
Round 12:
Repeat Round 5.
Square should measure approximately 12.5 inches.
Change to black yarn.
Round 13:
Repeat Round 5.
Round 14:
Repeat Round 5.
The finished blanket should now measure approximately 15 inches square.
Stripe Sequence Used In The Page Images:
- Rounds 1 through 4: Yellow
- Rounds 5 and 6: Black
- Rounds 7 and 8: Yellow
- Rounds 9 and 10: Black
- Rounds 11 and 12: Yellow
- Rounds 13 and 14: Black
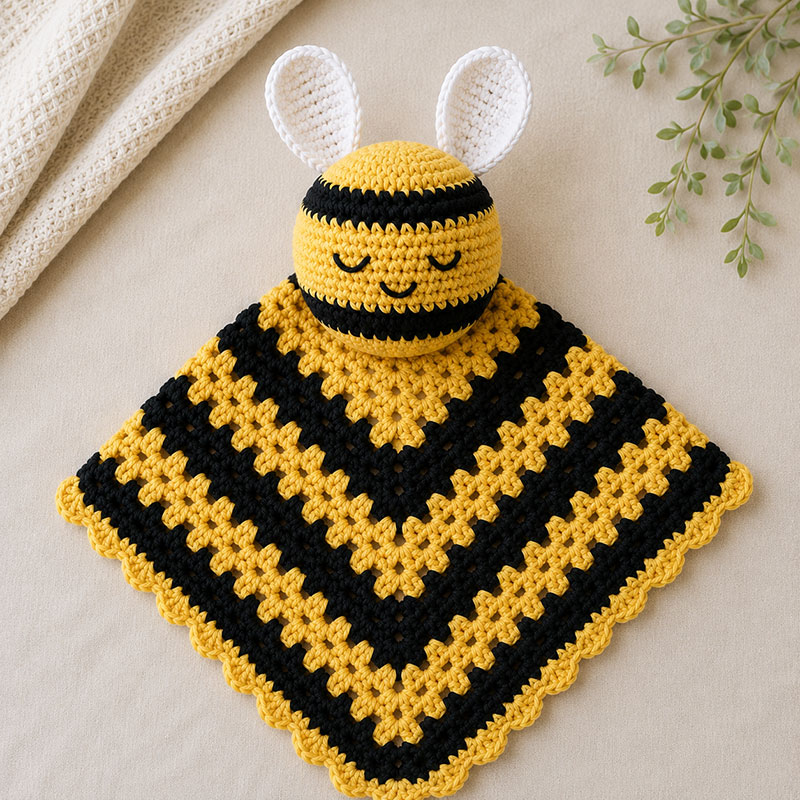
The completed blanket should display alternating yellow and black stripe sections similar to the page images.
Scalloped Border
Join yellow yarn in any corner.
Ch 1.
Skip 2 stitches.
Work 5 dc in next stitch.
Skip 2 stitches.
Sl st in next stitch.
Repeat around all four sides.
In each corner space work 5 dc, ch 1, 5 dc.
Join and fasten off.
The border should create the smaller scalloped edge shown in the page images rather than a large ruffled edge.
Assembly Instructions
This step is where the bee begins to look like the finished lovey shown in the page images.
Lay the blanket flat with the right side facing upward.
Locate the original center ring from Round 1.
Position the bee head directly over that center ring.
The face should point toward one blanket corner rather than toward the middle of a side.
This matches the orientation shown in the page images and helps the finished lovey drape more naturally when carried.
Thread a yarn needle with yellow yarn.
Sew completely around the base of the bee head.
Pass through both the blanket stitches and the outer edge of the bee head.
Continue around the entire circumference.
Make a second pass around the base for added durability.
Weave the yarn tail through several nearby stitches before trimming.
Wing Placement
Position both wings between rounds 8 and 9 on the bee head.
Place the wing bases approximately ¼ inch apart.
The rounded ends should angle slightly outward.
Sew only the lower third of each wing to the head.
This allows the upper portion of the wings to stand upright like the wings shown in the page images.
Once both wings are attached, check that they appear balanced when viewed from the front.
The completed bee lovey should have a centered head, upright wings, and evenly spaced stripes.
Final Size Verification Checklist
Before gifting or displaying the finished bee lovey, compare it to this checklist.
- Bee head measures approximately 5 inches wide.
- Each wing measures approximately 2.5 inches tall.
- Each wing measures approximately 1.75 inches wide.
- Blanket measures approximately 15 inches square.
- Two black stripes appear on the bee head.
- Sleepy eyes are embroidered between rounds 14 and 15.
- Smile is positioned between rounds 17 and 18.
- Bee head is centered directly over the blanket starting ring.
- Face points toward a blanket corner.
- Wings stand upright when viewed from the front.
If your finished measurements are close to those listed above, your bee lovey should closely match the project shown in the page images.
Bee Lovey Gift Ideas
A crochet bee lovey works well as a baby shower gift because it combines a comfort blanket and character toy in a single project.
Many handmade gifts are admired for a few minutes and then placed on a shelf. A lovey tends to become part of everyday routines because it is easy to carry from room to room.
If you are creating a bee themed gift basket, you may also enjoy these bumble bee baby shower ideas.
For additional nursery themed crochet projects, visit these free baby patterns.
Many readers also enjoy browsing these crochet animal lovey patterns for coordinating nursery gifts.
Frequently Asked Questions
Can beginners make this crochet bee lovey pattern?
Yes. The pattern uses basic crochet stitches, simple shaping, and straightforward assembly.
Can I use acrylic yarn?
Yes. Cotton blends and acrylic yarns both work, although finished measurements may vary slightly.
Should I use safety eyes?
No. Embroidered facial features are recommended for baby projects.
Can I make the blanket larger?
Yes. Continue adding solid granny square rounds before working the border.
Will my finished bee look exactly like the page images?
The pattern is written to recreate the bee lovey shown in the page images. Small differences may occur because yarn thickness, hook size, and individual tension vary from one crocheter to another.
How should the finished lovey be washed?
Hand washing or a gentle machine cycle followed by flat drying will help the project keep its shape.
Care And Safety Notes
Inspect all sewn areas periodically if the lovey will be used by a baby or toddler.
Check wing attachments, embroidered facial details, and woven yarn ends after repeated washing.
For general child product safety information in the United States, visit the Consumer Product Safety Commission.
This pattern is intended for personal use and handmade gift giving. Finished projects may vary slightly depending on materials and crochet tension.
When you click on links to various merchants on this site and make a purchase, this may result in this site earning a commission. This does not affect the price you pay.
UBGI Gold Standard 2026
Verified for performance, SEO,
and accessibility compliance.
Photos, decorating ideas, party setups, and reader submissions are shared for inspiration only and are not intended as step-by-step decorating, construction, or DIY instructions.
About Jan | Contact | Baby Room Ideas (Blog) | Site Map | Privacy Policy | Disclosure Policy | Disclaimer | Affiliate Disclosure | Earnings Disclosure | Facebook | Pinterest
I am a participant in the Amazon Services LLC Associates Program, an affiliate advertising program designed to provide a means for us to earn fees by linking to Amazon.
Copyright © 2006-2026. All Rights Reserved.