Free Crochet Duck Lovey Pattern: A Snuggler Babies Love to Hold
My free crochet duck lovey pattern is a sweet way to make a soft, simple baby snuggler that little hands can easily hold onto. More than just a cute toy, this snuggler is designed to be light, comforting, and easy to carry from nap time to stroller rides and quiet cuddle moments. If you have been searching for a beginner-friendly baby gift that feels both practical and heartfelt, this duck lovey is the kind of project that quickly becomes a favorite.
Explore more lovey patterns:
See the chunky plush yarn for this duck lovey
Jump to what you need:
There’s something about a soft lovey like this that babies don’t just play with—they hold onto it, drag it along, and keep it close during naps, car rides, and quiet moments. That is exactly why this duck is designed to feel light, flexible, and easy to carry instead of being stiff or overstuffed.
This free crochet duck lovey pattern also makes a thoughtful handmade baby gift because it feels personal, useful, and easy for little hands to enjoy right away.
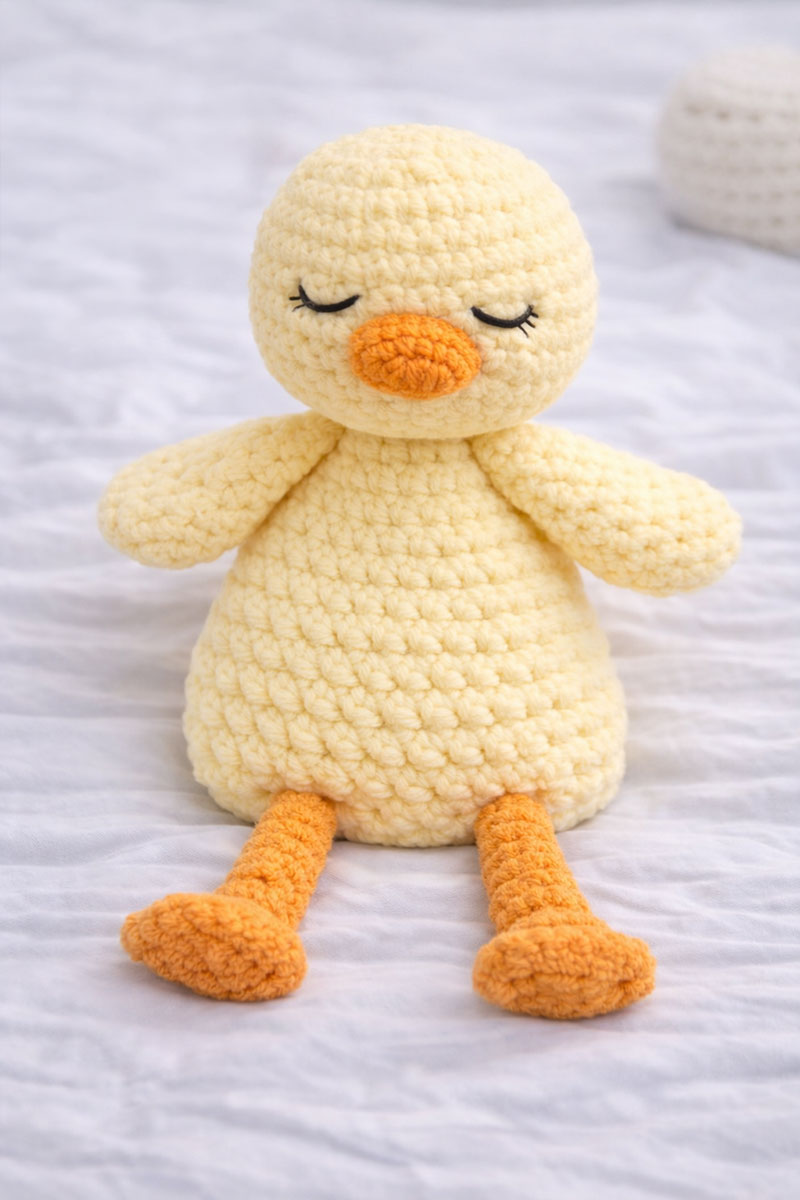
Quick answer: This free crochet duck lovey pattern makes a duck with a stuffed head, an unstuffed shaped body, floppy wings, and dangling legs with lightly padded feet. The body stays empty on purpose so the lovey bends and settles the way a baby lovey should.
By the time you finish this free crochet duck lovey pattern, you will have a soft duck snuggler with a gently shaped, unstuffed body that folds easily and feels natural in a baby’s hands. One thing that becomes obvious fast in a nursery is that babies do not care how a pattern looks on paper. They reach for what bends, what feels light, and what settles comfortably when they hold it. That is why this design uses a full head for structure and a hollow body for softness.
The body stays empty.
Materials needed for this free crochet duck lovey pattern
This pattern is written so that even a first-time plush yarn user can complete it without guessing or reshaping.
Pay attention to this part because it matters; with plush yarn, one hook size or one loose round can change the whole look.
You will need:
Yellow super bulky plush yarn, size 6, about 120 to 150 yards
Orange super bulky plush yarn, small amount for the beak and feet
7 mm crochet hook
Polyfill stuffing for the head and feet
Tapestry needle
Stitch marker
Black yarn or black embroidery thread for the eyes
Scissors
Abbreviations:
ch = chain
sc = single crochet
inc = 2 single crochet in the same stitch
dec = single crochet decrease
sl st = slip stitch
mr = magic ring
fo = fasten off
Gauge: Gauge does not have to be exact, but your stitches do need to be tight enough that stuffing does not show through the head.
Finished size and what the duck should look like
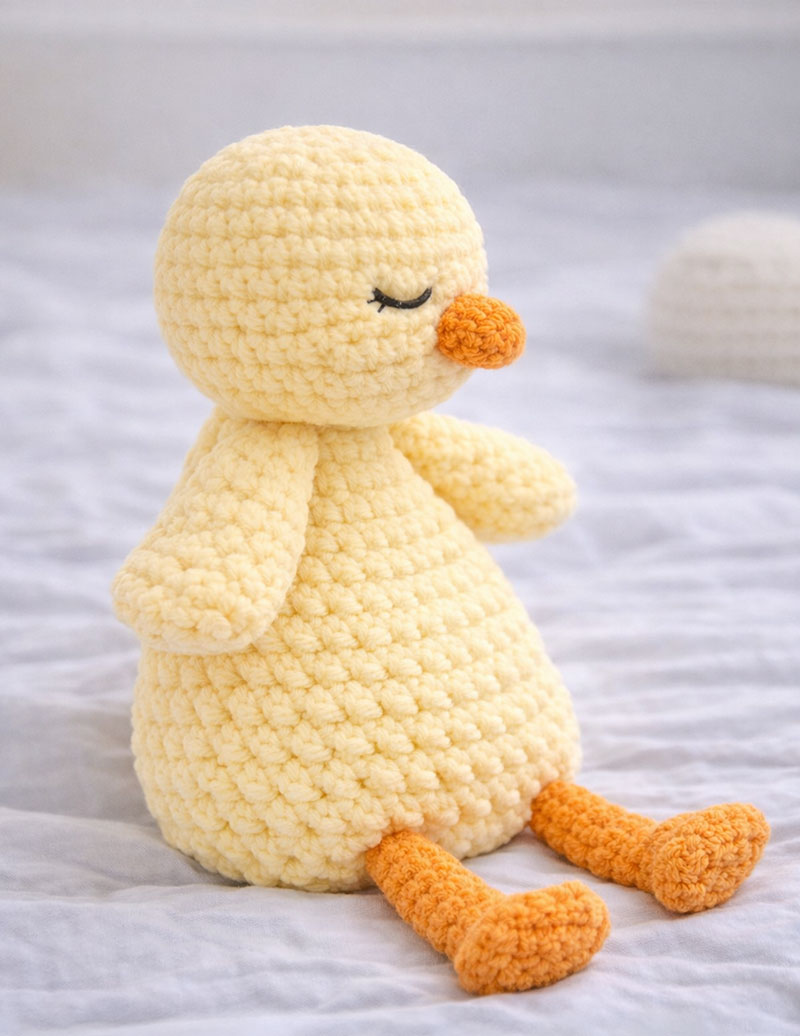
The finished duck is about 12 to 14 inches tall from the top of the head to the bottom of the feet. The head looks full. The body looks like a small duck torso, not a square, not a blanket, and not a stuffed toy. When you lift it by the body, it should drape a little. When you set it down, it should settle instead of springing back upright. In a real nursery, that is the difference between something that looks usable and something that looks like it belongs on a shelf.
If you enjoy this style of lovey, the owl lovey crochet pattern is another good one to bookmark because it keeps that same easy-to-hold size while giving you a different animal shape.
How to crochet the duck lovey step by step
Step 1. Crochet the head in yellow yarn.
Round 1: 6 sc in mr. You have 6 stitches.
Round 2: inc in each stitch around. You have 12 stitches.
Round 3: sc 1, inc. Repeat around. You have 18 stitches.
Round 4: sc 2, inc. Repeat around. You have 24 stitches.
Round 5: sc 3, inc. Repeat around. You have 30 stitches.
Round 6: sc 4, inc. Repeat around. You have 36 stitches.
Round 7: sc 5, inc. Repeat around. You have 42 stitches.
Rounds 8 through 13: sc in each stitch around. Keep 42 stitches.
Begin stuffing now. Add more stuffing to the back and sides than to the front. Leave the front a little less full because that helps the face flatten slightly once the beak and eyes are added.
Round 14: sc 5, dec. Repeat around. You have 36 stitches.
Round 15: sc 4, dec. Repeat around. You have 30 stitches.
Round 16: sc 3, dec. Repeat around. You have 24 stitches.
Round 17: sc 2, dec. Repeat around. You have 18 stitches.
Round 18: sc 1, dec. Repeat around. You have 12 stitches.
Add the last bit of stuffing. Fasten off with a long tail. Close the opening and weave the tail in securely.
Step 2. Crochet the beak in orange yarn.
Chain 5.
Row 1: Starting in the second chain from hook, sc across. You have 4 stitches.
Rows 2 through 4: sc across. Keep 4 stitches.
Fasten off with a long tail. Do not stuff the beak. When you sew it on, curve it slightly so it looks rounded instead of flat.
Step 3. Crochet the unstuffed body shell in yellow yarn.
This is the section that gives the duck its real shape. You are making a hollow shell, not a stuffed belly.
Chain 8.
Round 1: Starting in the second chain from hook, sc 6. Put 3 sc in the last chain. Work on the other side of the foundation chain, sc 5, inc in the final stitch. You have 16 stitches.
Round 2: inc in first stitch, sc 5, inc in next 3 stitches, sc 5, inc in last 2 stitches. You have 22 stitches.
Round 3: sc around. Keep 22 stitches.
Round 4: inc in first stitch, sc 9, inc in next 2 stitches, sc 9, inc in last stitch. You have 26 stitches.
Rounds 5 through 7: sc around. Keep 26 stitches.
Round 8: dec, sc 11, dec, sc 11. You have 24 stitches.
Rounds 9 and 10: sc around. Keep 24 stitches.
Round 11: dec, sc 10, dec, sc 10. You have 22 stitches.
Round 12: sc around. Keep 22 stitches.
Round 13: dec, sc 9, dec, sc 9. You have 20 stitches.
Round 14: sc around. Keep 20 stitches.
Round 15: dec, sc 8, dec, sc 8. You have 18 stitches.
Round 16: sc around. Keep 18 stitches.
Fasten off with a long tail. Leave the body completely unstuffed. That is not a mistake. That is the whole point of this style.
Step 4. Crochet 2 wings in yellow yarn.
Chain 6.
Round 1: Starting in second chain from hook, sc 4. Put 3 sc in last chain. Work on the other side, sc 3, inc in final stitch. You have 12 stitches.
Round 2: inc, sc 3, inc in next 3 stitches, sc 3, inc in last 2 stitches. You have 18 stitches.
Round 3: sc around. Keep 18 stitches.
Round 4: dec, sc 7, dec, sc 7. You have 16 stitches.
Fasten off with a long tail. Do not stuff the wings.
Step 5. Crochet 2 legs in orange yarn.
Chain 6.
Row 1: Starting in second chain from hook, sc across. You have 5 stitches.
Rows 2 through 6: sc across. Keep 5 stitches.
Fasten off with a long tail.
Step 6. Crochet 2 feet in orange yarn.
Chain 4.
Round 1: Starting in second chain from hook, sc 2. Put 4 sc in the last chain. Work on the other side, sc 1, inc in the last stitch. You have 10 stitches.
Round 2: sc around. Keep 10 stitches.
Add a very small amount of stuffing. You only want enough to help the feet hold their shape. Fasten off with a long tail.
Assembly and face shaping that make the duck look right
This is where most loveys either come together or start looking off. The stitches are basic. Placement is what matters.
Step 7. Sew the feet to the legs.
Flatten each foot slightly as you attach it to the end of a leg. That tiny change helps the feet look wider than the legs, which reads more like a duck and less like a tube.
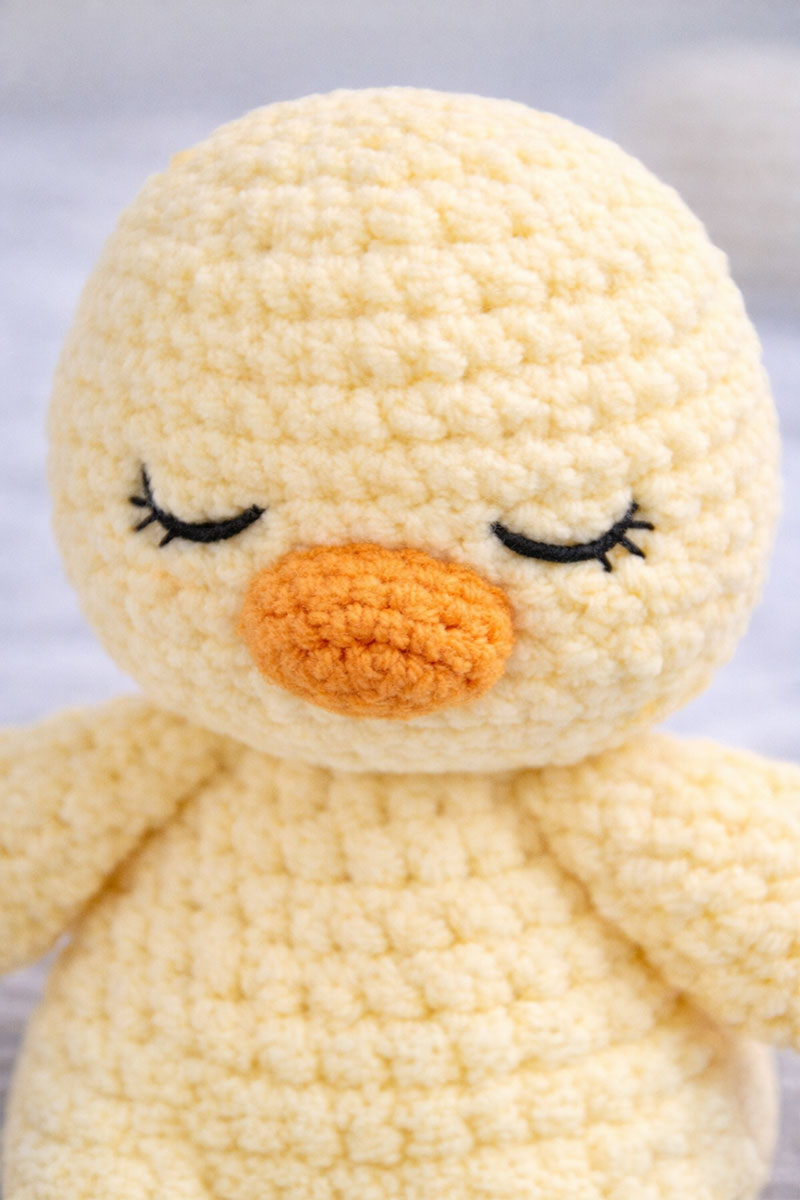
Step 8. Sew the beak to the head.
Place the beak lower on the face than you might first think. Center it on the lower front of the head. When the beak sits lower, the eye area has room to create that shaped face instead of a hard round ball.
Step 9. Embroider the eyes.
Use black yarn or embroidery thread.
Place each eye slightly above the beak and angle the outer ends upward a little.
Each eye should be about 3 stitches long.
Leave about 5 to 6 stitches between the eyes.
Make one curved stitch for each eye first. Then go back over each eye with 1 or 2 more stitches so the center looks thicker than the ends. Pull just enough to create a slight indentation. Do not pull so hard that the head puckers. You are shaping the face, not cinching it closed.
Parents often notice this detail without knowing why. A shaped face looks calmer and more finished.
Step 10. Sew the head to the body.
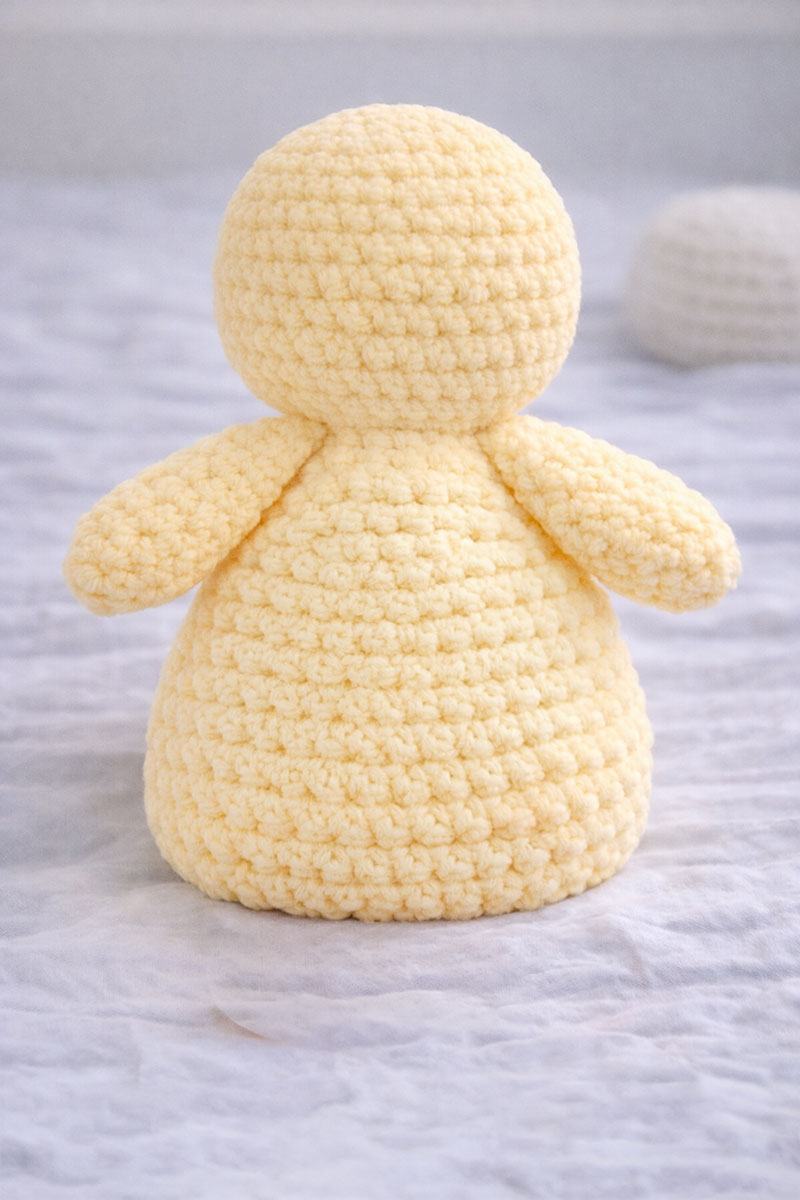
Match the back of the head to the back of the body opening. Sew all the way around with the long body tail or head tail. Tilt the head very slightly forward as you attach it. That little angle makes the duck look more relaxed when it is lying down or propped in a basket.
Step 11. Sew the wings to the upper sides of the body.
Attach one wing on each side just below the head seam. Angle the front edges forward a little. Wings that sit straight out tend to look stiff.
Step 12. Sew the legs to the lower front of the body.
Attach the legs low enough that they dangle. If you place them too high, the body can start looking like a skirt shape. If that happens, remove the legs and lower them. That fixes it fast.
I have learned that most proportion problems come from placement, not from the stitches themselves. Lowering the beak, easing the stuffing in the front of the head, and keeping the legs low on the body solve almost everything.
Beginner fixes and more lovey patterns to try
If the head looks too round, take out a little stuffing from the front and add a little more to the back.
If the body feels too stiff, go up one hook size for the body only.
If the duck does not settle nicely when you set it down, the feet may need a touch more stuffing.
One useful thing about this free crochet duck lovey pattern is that the hollow body and lightly weighted feet help the lovey land in a natural way when it is dropped onto a chair, a rug, or the side of a changing table. You do not see that explained often, but once you notice it, you start seeing why some loveys photograph better than others.
To see how this duck compares with other baby gift styles, these crochet animal lovey patterns show how different shapes, faces, and blanket bodies come together across the full collection.
For more farm-style projects, my crochet cow pattern has a flat blanket body with simple shaping, while the crochet chicken pattern adds a cheerful barnyard look that pairs naturally with duck, cow, and country nursery themes.
These crochet farm animal lovey patterns also bring together ducks, cows, chickens, lambs, and other beginner-friendly barnyard projects that work beautifully for handmade baby gifts and nursery baskets.
A crochet rooster baby lovey pattern adds a slightly brighter farmhouse personality with bold barnyard colors and a playful country look that pairs naturally with duck, chicken, and rustic nursery themes.
Loveys like this work beautifully in a nursery because they add a handmade touch that feels personal and easy to coordinate with animal, pond, ocean, woodland, or farmhouse baby themes. Another easy project to try after this one is my turtle crochet lovey pattern, while the frog lovey crochet pattern, Highland cow crochet snuggler lovey pattern, crochet bunny lovey pattern, elephant lovey free pattern, and monkey lovey free pattern give you several different animal styles to make next. You can also see all baby crochet patterns in one place.
FAQ about this free crochet duck lovey pattern
What yarn works best for a duck lovey?
Super bulky plush yarn creates the softest finish and helps the lovey hold its shape without needing extra stuffing.
How do you keep a lovey soft but not floppy?
Use tight stitches for structure, leave the body unstuffed, and add just a small amount of weight to the feet so it settles naturally.
Is this pattern beginner friendly?
Yes. The stitches are basic. The most important part is assembly, especially beak placement and eye embroidery.
Why is the body unstuffed?
The empty body makes the lovey easier to bend, carry, and cuddle.
Can I use regular yarn instead of plush yarn?
Yes, but the duck will come out smaller and the body will not drape the same way.
Do I need plastic safety eyes?
No. This pattern is written for embroidered eyes, which also help shape the face.
What is the easiest fix if my duck looks wrong?
Check three things first. Keep the body empty. Place the beak lower. Attach the legs low on the body.
When you click on links to various merchants on this site and make a purchase, this may result in this site earning a commission. This does not affect the price you pay.
UBGI Gold Standard 2026
Verified for performance, SEO,
and accessibility compliance.
Photos, decorating ideas, party setups, and reader submissions are shared for inspiration only and are not intended as step-by-step decorating, construction, or DIY instructions.
About Jan | Contact | Baby Room Ideas (Blog) | Site Map | Privacy Policy | Disclosure Policy | Disclaimer | Affiliate Disclosure | Earnings Disclosure | Facebook | Pinterest
I am a participant in the Amazon Services LLC Associates Program, an affiliate advertising program designed to provide a means for us to earn fees by linking to Amazon.
Copyright © 2006-2026. All Rights Reserved.