Free Maple Leaf Quilt Pattern for a Fall Baby Quilt
By Jan Bay
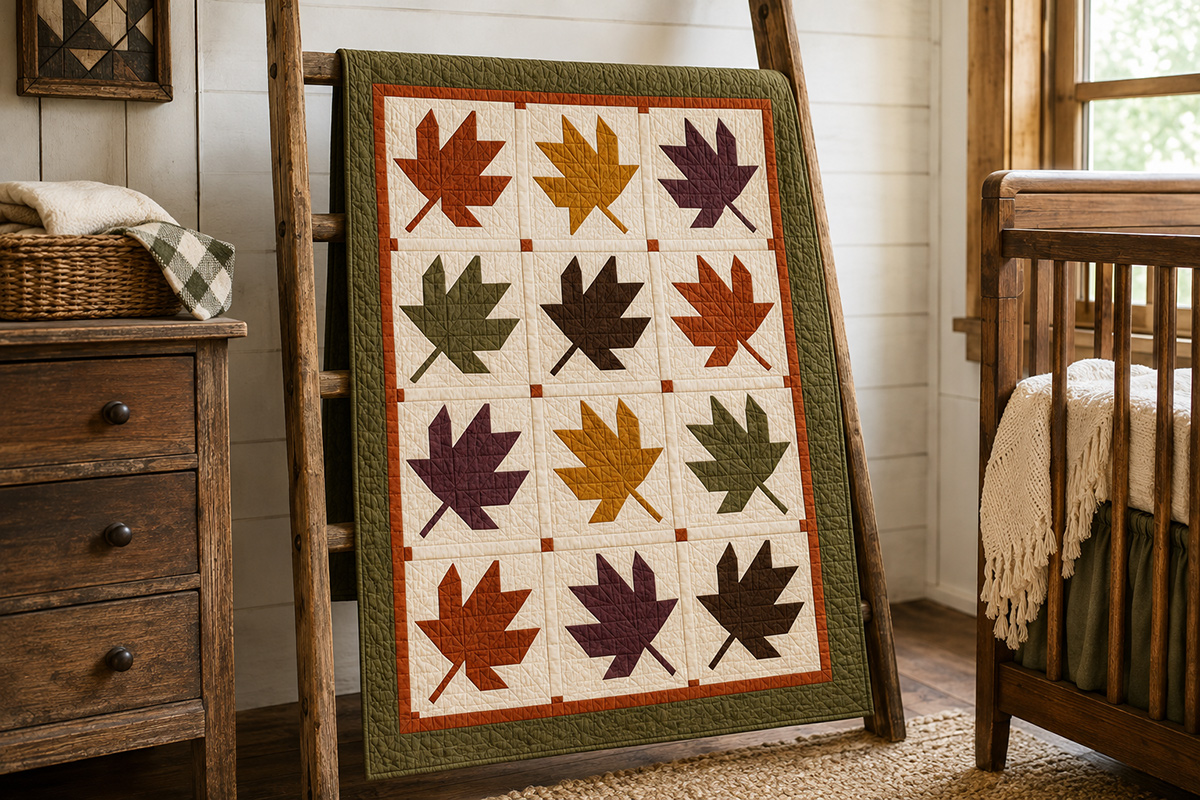
This free maple leaf quilt pattern makes a warm fall baby quilt with traditional pieced leaf blocks in rust, mustard, muted olive, plum and brown. The simple patchwork design uses squares and half square triangles rather than appliqué, making it an approachable nursery quilt project with a cozy autumn look.
Explore More Baby Quilt Patterns
Free Maple Leaf Quilt Pattern at a Glance
This maple leaf baby quilt is built from twelve traditional pieced leaf blocks arranged three across and four down. I wanted the leaves to have plenty of room to show instead of shrinking them into a busy fall print, so each one finishes at 12 inches square.
The construction is straightforward patchwork. You'll make half square triangles for the pointed edges of each leaf, three solid squares for the center of the leaf and one pieced diagonal stem unit. There are no appliqué shapes to trace, no paper piecing and no templates to print.
The little details around the blocks matter to the finished look. Narrow ivory sashing separates the leaves, small rust cornerstones mark the intersections, a slim rust border repeats that color around the whole quilt and a wider muted olive border finishes the outside edge.
I'm using a deliberately mixed fall palette rather than making all twelve leaves orange. The sample layout uses three rust leaves, two mustard leaves, two muted olive leaves, three plum leaves and two deep brown leaves. That gives you autumn color without turning the quilt into one big block of orange and brown.
Project at a glance:
Finished quilt: approximately 42 x 54 1/2 inches
Finished block size: 12 x 12 inches
Number of maple leaf blocks: 12
Layout: 3 blocks across x 4 blocks down
Sashing: 1/2 inch finished with rust cornerstones
Inner border: 1/2 inch finished rust
Outer border: 1 1/2 inches finished muted olive
Seam allowance: 1/4 inch unless stated otherwise
Skill level: confident beginner
If you've been avoiding leaf quilts because so many of them involve appliqué pieces and templates, this one takes a much simpler route. Every block uses the same nine pieces, with selected blocks arranged as mirror images to vary the direction of the leaves.
Finished Size for This Fall Baby Quilt
The calculated finished size of this quilt is approximately 42 x 54 1/2 inches. That gives you a useful baby-size quilt without making the project so large that twelve leaf blocks turn into twenty or thirty.
Each maple leaf block finishes at 12 inches square and should measure 12 1/2 inches square before it is sewn into the quilt.
The narrow sashing is part of the design rather than just empty space between the leaves. It finishes at 1/2 inch wide, with matching 1/2-inch rust cornerstones at each sashing intersection. Once all twelve blocks and the complete sashing lattice are joined, the center section should be approximately 38 x 50 1/2 inches finished.
The rust inner border adds another 1/2 inch around the quilt, and the muted olive outer border adds 1 1/2 inches. I prefer that narrow-and-wide border combination here because another large decorative border would compete with the leaves.
Don't worry if your quilt top varies by a small amount after piecing. Measure the completed center before cutting the final border lengths rather than forcing a precut border onto a quilt top that may be a quarter inch different from the calculated measurement.
Materials and Supplies
You can make the leaves from yardage, but this pattern is especially well suited to fat eighths and larger scraps. Using a different fabric for each leaf gives the finished quilt the collected fall look I want for this design.
Fabric:
12 fat eighths for the maple leaves, each at least 9 x 21 inches
1 1/2 yards warm ivory quilting cotton for block backgrounds and sashing
1/4 yard rust quilting cotton for cornerstones and the narrow inner border
3/8 yard muted olive quilting cotton for the outer border
1/2 yard deep brown quilting cotton for binding
3 1/2 yards of standard 42-inch-wide fabric for a pieced backing, or about 2 yards if using backing fabric at least 60 inches wide
Other supplies:
Batting at least 50 x 63 inches
Coordinating quilting thread
Rotary cutter and cutting mat
Acrylic quilting ruler, including a square ruler large enough to trim a 4 1/2-inch unit
Fabric marking pencil or removable fabric marker
Sewing machine
Iron and ironing surface
Straight pins or quilting clips
Basting supplies for quilting
Use quilting-weight cotton with enough contrast between the warm ivory background and the leaf fabrics. Tiny prints and mottled fabrics are fine. I'd skip a large multicolor print that makes the edges of the maple leaf disappear into the background.
You can also make two leaves from the same fabric if you're working from fat quarters instead of fat eighths. Six fat quarters will give you enough leaf fabric for twelve blocks when they're cut carefully.
Cutting Chart for the Maple Leaf Baby Quilt
Press the fabric before cutting and square the edge of each piece of yardage first. WOF means width of fabric. The yardage amounts assume approximately 40 inches of usable width after the selvedges are removed.
At this point in every quilt project, I thank Heaven for my rotary cutter and self-healing cutting mat. Aside from my floor stand quilting frame, they’re the best quilting tools I’ve ever invested in.
From EACH of the 12 leaf fabrics, cut:
2 squares at 5 x 5 inches for half square triangles
3 squares at 4 1/2 x 4 1/2 inches for the solid leaf sections
1 strip at 1 x 9 inches for the stem
Keep the six pieces for each leaf together while you work. It is surprisingly easy to mix a plum stem into a rust block once twelve colors are sitting beside the sewing machine.
From the warm ivory background fabric, cut:
36 squares at 5 x 5 inches
12 squares at 4 1/2 x 4 1/2 inches
31 sashing strips at 1 x 12 1/2 inches
Of the 36 ivory 5-inch squares, 24 are used for the half square triangles and 12 are used for the stem units.
From the rust fabric, cut:
20 cornerstones at 1 x 1 inch
5 strips at 1 inch x WOF for the inner border
If it is easier, cut six 1-inch WOF strips from the rust fabric first. Subcut the twenty 1-inch cornerstones from one strip and reserve the remaining five strips for the border.
From the muted olive fabric, cut:
6 strips at 1 3/4 inches x WOF for the outer border
From the deep brown binding fabric, cut:
6 strips at 2 1/2 inches x WOF
Don't cut the rust and olive border strips to their final lengths yet. We'll measure the completed quilt center before attaching the borders so they lie flat rather than pulling the quilt top out of square.
12 Inch Maple Leaf Quilt Block
Before you make all 12 blocks: Make one standard maple leaf block first and check that it measures 12 1/2 x 12 1/2 inches. Check the HST directions and stem placement against the block image, too. Then make one mirrored block using the layout below and check that block as well. Once both are correct, use them as your references while you piece the remaining ten.
The block is arranged as a three-by-three grid. Six of the nine positions are half square triangle, background or stem units, while the remaining three positions are solid leaf squares.
For the standard orientation used in these instructions, the plain ivory square sits at the upper left and the stem unit sits at the lower right.
Lay out the nine units like this:
Top row: plain ivory square, HST, HST
Middle row: HST, leaf square, leaf square
Bottom row: HST, leaf square, stem unit
On both HSTs in the top row, position the leaf-colored triangle toward the lower left. On both HSTs in the left side of the middle and bottom rows, position the leaf-colored triangle toward the upper right. The colored triangles should visually connect with the three solid leaf squares in the center.
Place the stem unit so the colored stem runs diagonally from the upper left toward the lower right corner.
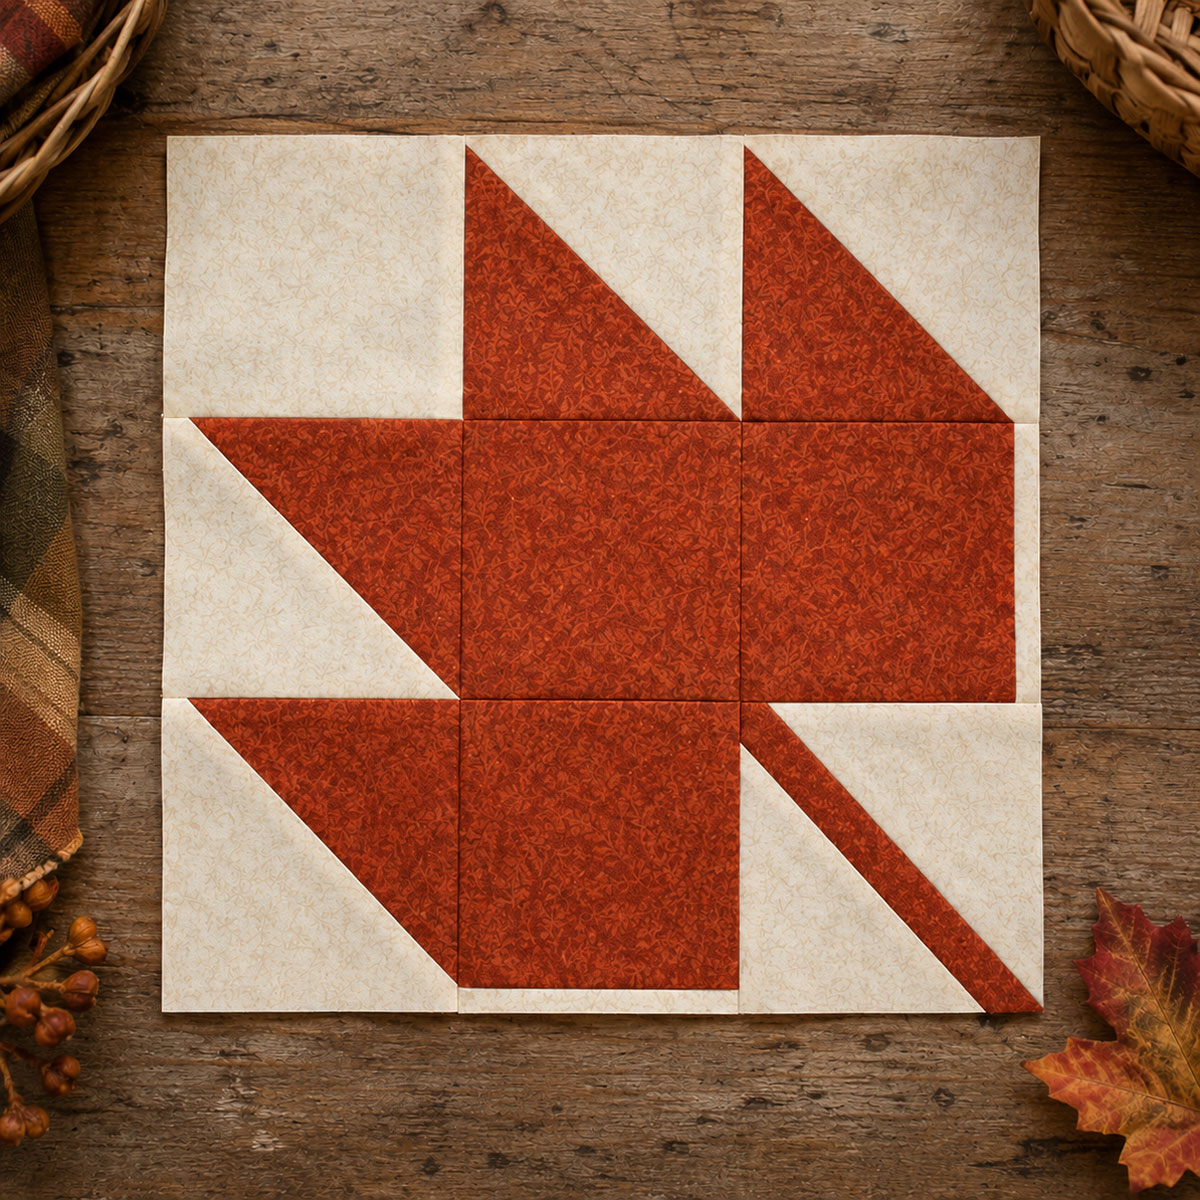
You only need two block orientations for the finished quilt: the standard block shown above and a mirror image of that block. Both use exactly the same cut pieces.
For the mirrored maple leaf block, lay out the nine units like this:
Top row: HST, HST, plain ivory square
Middle row: leaf square, leaf square, HST
Bottom row: stem unit, leaf square, HST
For the two HSTs in the top row of the mirrored block, position the leaf-colored triangle toward the lower right. For the HSTs at the right side of the middle and bottom rows, position the leaf-colored triangle toward the upper left.
Turn the stem unit so the colored stem runs diagonally from the upper right toward the lower left corner. Sew the mirrored block together in three rows exactly as you did for the standard block. It should also measure 12 1/2 x 12 1/2 inches unfinished.
How to Make the Maple Leaf Block
Step 1: Make four half square triangles.
Take two 5-inch squares from one leaf fabric and two 5-inch ivory squares. Pair each leaf square with one ivory square, right sides together.
Draw a diagonal line from corner to corner on the wrong side of each ivory square.
Sew one seam 1/4 inch on each side of the marked diagonal line. You will have two parallel seams with the drawn line running between them.
Cut directly on the marked line. Open the pieces and press the seam allowances toward the leaf fabric. The two fabric pairs will give you four half square triangle units.
Trim every HST to exactly 4 1/2 x 4 1/2 inches. Use the 45-degree line on your ruler to keep the diagonal seam running precisely from corner to corner as you trim.
That trimming step is worth doing. Four slightly oversized HSTs can turn into a surprisingly crooked 12-inch block once they're sewn into the three-by-three grid.
Step 2: Make the diagonal stem unit.
Take one remaining 5-inch ivory square and cut it once diagonally from corner to corner. You now have two ivory triangles.
Fold the 1 x 9-inch leaf-colored stem strip in half crosswise and lightly crease the center. Find and lightly crease the center of the long bias edge of each ivory triangle as well.
With right sides together, match the center of one long triangle edge to the center of one long edge of the stem strip. Pin without stretching the bias edge.
Sew with a 1/4-inch seam allowance. Press the triangle away from the stem strip.
Place the second ivory triangle right sides together with the opposite long edge of the stem strip. Match the centers again, sew with a 1/4-inch seam allowance and press open.
The unit will be larger and a little uneven around the outside. That's expected at this stage.
Place a square quilting ruler over the unit and align the ruler's 45-degree line with the center of the diagonal stem. Trim the unit to exactly 4 1/2 x 4 1/2 inches.
Step 3: Lay out the block.
Place the 4 1/2-inch plain ivory square, four HSTs, three 4 1/2-inch leaf squares and the stem unit in the three-by-three arrangement described above.
Stop before sewing and look at the colored triangles. They should all point into the main leaf shape. If one colored triangle points away from the leaf, turn that HST now.
Step 4: Sew the three rows.
Sew the three units in the top row together with 1/4-inch seams.
Sew the three units in the middle row together.
Sew the three units in the bottom row together.
Press the seams in the top and bottom rows in one direction and the seams in the middle row in the opposite direction. That lets the seam allowances nest when the rows are joined.
Step 5: Join the rows.
Place the top and middle rows right sides together. Match the two vertical seam intersections and pin them. Sew across the row with a 1/4-inch seam.
Add the bottom row the same way.
Press the completed block flat without pulling it out of square.
Step 6: Check the block.
The block should measure 12 1/2 x 12 1/2 inches unfinished. The visible leaf will finish at 12 inches square once the block is sewn into the quilt.
If the block is slightly oversized, square it carefully to 12 1/2 inches while preserving the 1/4-inch seam allowance beyond the leaf points. If it is noticeably smaller than 12 1/2 inches, check the seam allowance and HST trimming before making the remaining blocks. Don't solve an undersized first block by immediately cutting all twelve smaller.
Continue until you have twelve maple leaf blocks total, using the standard or mirrored layout for each block according to the quilt layout below. The HST, stem-unit, row-sewing and size-check steps are the same for both orientations.
Maple Leaf Quilt Layout with Sashing and Cornerstones
Now you can turn the twelve maple leaf blocks into a quilt without making the leaves look as though the same shape was stamped and repeated across the surface.
Arrange the blocks three across and four down. Keep every maple leaf upright, but alternate the standard and mirrored blocks to vary the direction of the stems and leaf shapes.
For this quilt, use this color order:
Row 1: rust, mustard, plum
Row 2: muted olive, deep brown, rust
Row 3: plum, mustard, muted olive
Row 4: rust, plum, deep brown
Then arrange the standard and mirrored blocks like this:
Row 1: mirrored, standard, standard
Row 2: mirrored, mirrored, standard
Row 3: mirrored, standard, standard
Row 4: mirrored, standard, mirrored
In the standard block, the stem runs toward the lower right. In the mirrored block, it runs toward the lower left. Keep the top of every leaf pointing upward as you arrange the quilt.
The direction changes are deliberately uneven rather than alternating perfectly from block to block. That keeps the leaves from looking like a rigid checkerboard while preserving the upright fall-leaf layout shown in the finished quilt.
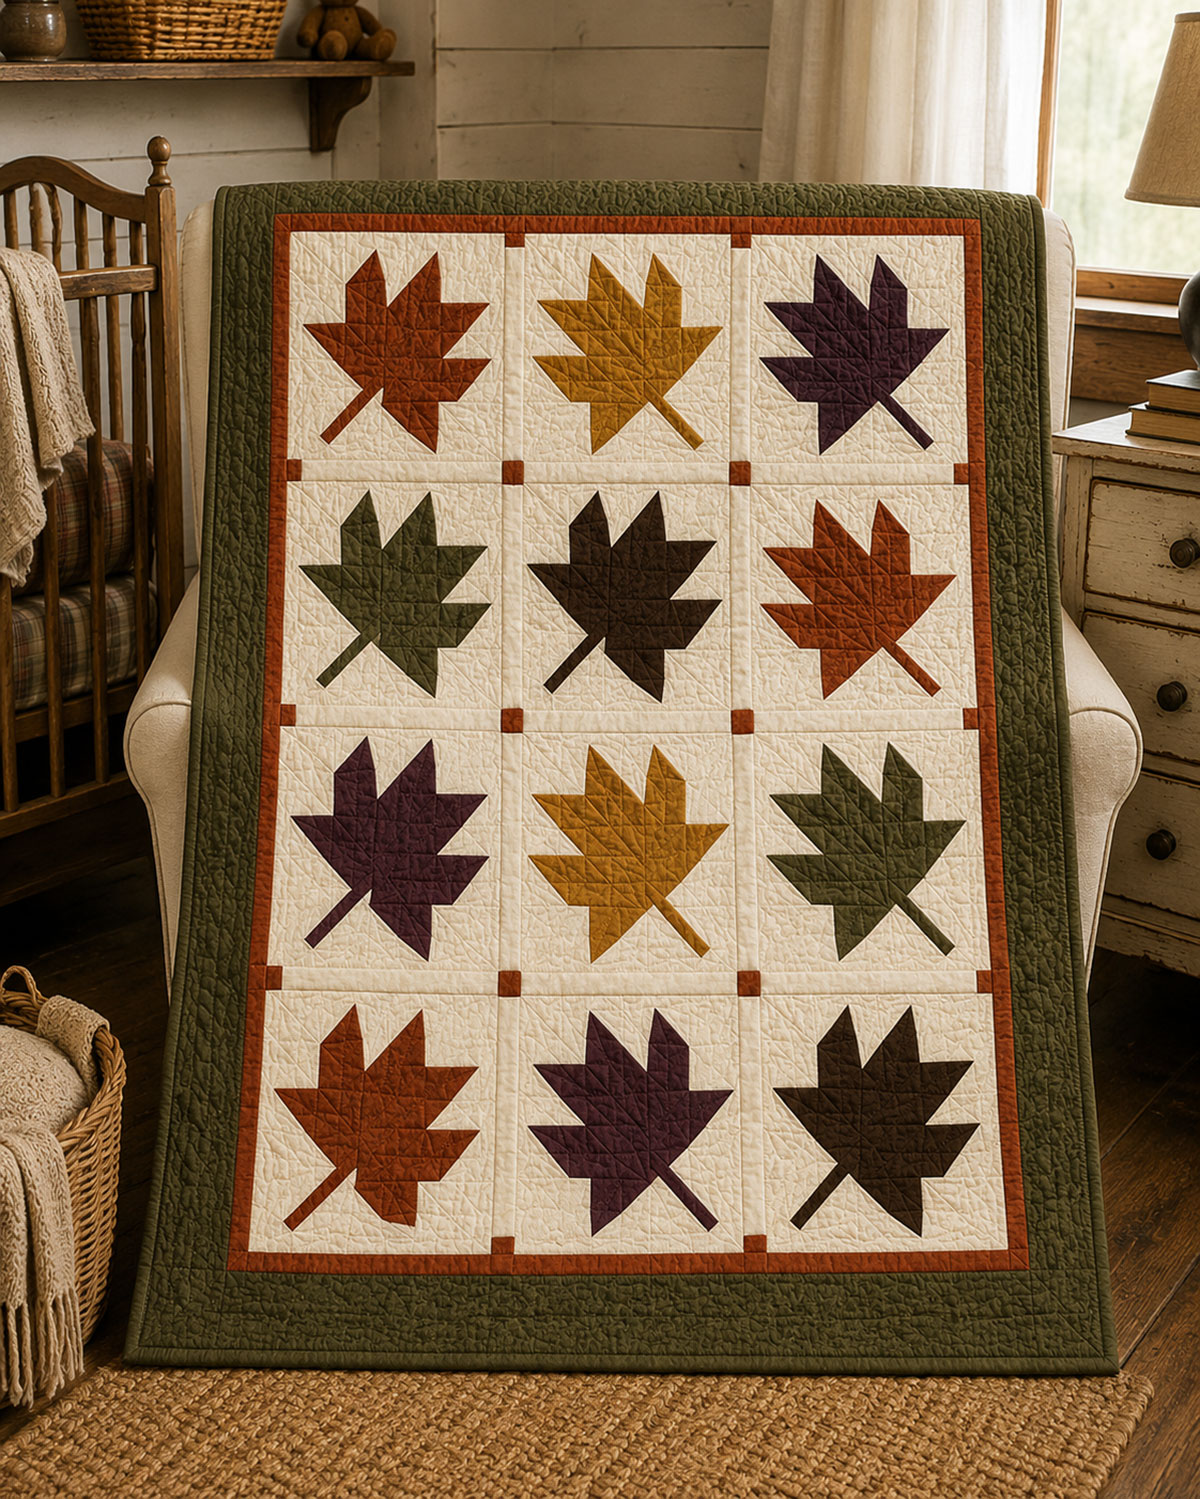
The 1/2-inch finished sashing is intentionally narrow. I wouldn't widen it to two or three inches for this quilt. The extra background would spread the leaves too far apart and change the compact patchwork look we're after.
Assemble the Quilt Top
The sashing forms a complete ivory lattice around and between the blocks, with small rust squares at every intersection. There are four vertical sashing pieces across each block row and five horizontal lattice rows from top to bottom.
Step 1: Assemble each block row.
For Row 1, lay out the pieces in this order:
1 ivory sashing strip
Maple leaf block
1 ivory sashing strip
Maple leaf block
1 ivory sashing strip
Maple leaf block
1 ivory sashing strip
Every sashing strip measures 1 x 12 1/2 inches.
Sew the pieces together with 1/4-inch seams. Press the seams toward the maple leaf blocks where practical so the darker seam allowance is less likely to show through the narrow ivory strips.
Repeat for Rows 2, 3 and 4.
Each completed block row should measure approximately 38 1/2 inches wide by 12 1/2 inches high before it is joined to the rest of the quilt.
Step 2: Make five horizontal sashing rows.
Each horizontal sashing row uses three ivory 1 x 12 1/2-inch strips and four rust 1-inch cornerstones.
Lay out each row like this:
Rust cornerstone
Ivory sashing strip
Rust cornerstone
Ivory sashing strip
Rust cornerstone
Ivory sashing strip
Rust cornerstone
Sew the seven pieces together with 1/4-inch seams. Press the seams toward the rust cornerstones.
Make five identical horizontal sashing rows.
Step 3: Join the quilt center.
Lay the quilt out in this order:
Horizontal sashing row
Block Row 1
Horizontal sashing row
Block Row 2
Horizontal sashing row
Block Row 3
Horizontal sashing row
Block Row 4
Horizontal sashing row
Pin before sewing so each rust cornerstone lines up with the narrow vertical sashing running between the blocks.
Sew the rows together one at a time with 1/4-inch seams. Press carefully after each addition.
Once the complete lattice is assembled, the quilt center should measure approximately 38 1/2 x 51 inches unfinished. That corresponds to a finished center of approximately 38 x 50 1/2 inches.
If your measurement differs a little, use the actual center measurement for the borders. What matters now is that the quilt lies flat and the opposite sides measure the same.
Borders and Finishing
The two borders are intentionally simple. The narrow rust line picks up the cornerstones, and the wider olive border gives the quilt a darker outside edge without returning to the very heavy dark frame used on many traditional fall leaf quilts.
Add the rust inner border.
Measure the quilt vertically through the center. Piece the 1-inch rust WOF strips as needed and cut two side border strips to that measurement.
Sew one strip to each side with a 1/4-inch seam allowance. Press the seams toward the rust border.
Measure horizontally across the center again, including the newly attached side borders. Cut two rust strips to that measurement and sew them to the top and bottom.
The rust border finishes at 1/2 inch wide.
Add the muted olive outer border.
Use the same measuring method with the 1 3/4-inch olive strips. Measure vertically through the center, piece and cut two side strips, then attach them.
Measure horizontally through the quilt after the side borders are attached. Cut the top and bottom olive border strips to that measurement and sew them in place.
The olive border finishes at 1 1/2 inches wide.
Give the quilt top a final press and check that it lies flat before making the quilt sandwich.
Quilt the layers.
If you're using standard 42-inch-wide backing fabric, cut the 3 1/2 yards into two 63-inch lengths. Remove the selvedges, place the pieces right sides together and sew them along one long edge with a 1/2-inch seam allowance. Press the backing seam open, then trim the pieced backing to at least 50 x 63 inches. If you're using backing fabric at least 60 inches wide, cut one piece at least 50 x 63 inches.
Cut the batting to at least 50 x 63 inches. Center the batting over the backing, then place the quilt top over the batting.
Baste the three layers using your preferred method.
You don't need complicated quilting to make the leaf shapes readable. A simple all-over meander, gentle loops or straight-line quilting through the background will hold the layers securely without competing with the patchwork.
After quilting, trim the excess batting and backing even with the quilt top.
Add the binding.
Join the six 2 1/2-inch binding strips end to end with diagonal seams. Trim the joining seams and press them open.
Fold the long binding strip in half lengthwise with wrong sides together and press.
Sew the binding around the quilt with a 1/4-inch seam, mitering the corners. Join the ends, fold the binding over the raw edge and finish it by machine or by hand.
The completed quilt should finish at approximately 42 x 54 1/2 inches.
Because this is a baby-size quilt, I also want to make the distinction between quilt size and sleep use. A handmade quilt can be used for nursery display, supervised floor time or saved as a keepsake, but loose quilts and blankets should not be placed in an infant's sleep space. The U.S. Consumer Product Safety Commission safe sleep guidance recommends a bare infant sleep space with only a fitted sheet.
Maple Leaf Baby Quilt for a Fall Nursery
I wouldn't limit this quilt to a nursery that is decorated for fall. The leaves are seasonal, but rust, mustard, olive, plum and brown also fit woodland, rustic and earth-tone rooms that stay that way all year.
If you're choosing the room colors around the quilt, start with the ivory rather than trying to match every leaf. Warm white or cream walls give the darker patchwork room to stand out. Then repeat one or two leaf colors elsewhere in the room instead of all five.
For example, an olive and ivory nursery could use the quilt as the place where the rust, mustard and plum accents appear. A warmer room could use clay or rust as the main accent and let the olive border keep everything grounded.
If you're still deciding which direction to take the room, my baby color schemes page can help you compare earth tones, sage, warm neutrals and other nursery palettes before you choose the surrounding decor.
For display, I'd fold the quilt over the back of a nursery chair, hang it securely as textile wall art or place it on a quilt rack. You can also use it for supervised floor play and then put it away when you're finished.
Don't feel obligated to buy maple leaf decorations for the rest of the nursery. The quilt already supplies plenty of autumn atmosphere. A few rustic wood pieces, simple artwork and one or two colors repeated from the patchwork are enough.
For more ways to carry those same leaf colors through the room, browse my fall nursery room ideas for woodland, harvest and farmhouse decorating directions.
If you want to compare this project with other baby-size quilt styles before cutting fabric, browse the baby quilt patterns collection. And if you'd rather start with an even simpler patchwork project, these easy baby quilt patterns give you several other options.
If you want to stay with fall patchwork, my free fall harvest quilt pattern combines this maple leaf with the pumpkin quilt block pattern and acorn quilt block pattern. For a quilt built around one repeated motif, use the free pumpkin quilt pattern or free acorn quilt pattern.
I especially like this maple leaf design as a handmade baby keepsake because the fall theme comes from the piecing itself. There aren't appliqué pieces that have to carry the whole design. Once those twelve leaves are sewn together, the quilt already has everything it needs.
When you click on links to various merchants on this site and make a purchase, this may result in this site earning a commission. This does not affect the price you pay.

UBGI Gold Standard 2026
Reviewed under the site's
editorial checklist.
Photos, decorating ideas, party setups and reader submissions are shared for inspiration unless a page is specifically presented as a pattern, tutorial, reference guide or step-by-step project. Follow the instructions, measurements, safety guidance and manufacturer directions provided for the particular project or product.
About Jan | Contact | Baby Nursery Ideas (Blog) | Site Map | Privacy Policy | Disclosure Policy | Disclaimer | Affiliate Disclosure | Earnings Disclosure | Facebook | Pinterest
I am a participant in the Amazon Services LLC Associates Program, an affiliate advertising program designed to provide a means for us to earn fees by linking to Amazon. As an Amazon Associate I earn from qualifying purchases.
Copyright © 2006-2026. All Rights Reserved.