Free Fall Harvest Quilt Pattern with Pumpkin, Acorn and Maple Leaf Patchwork Blocks
By Jan Bay
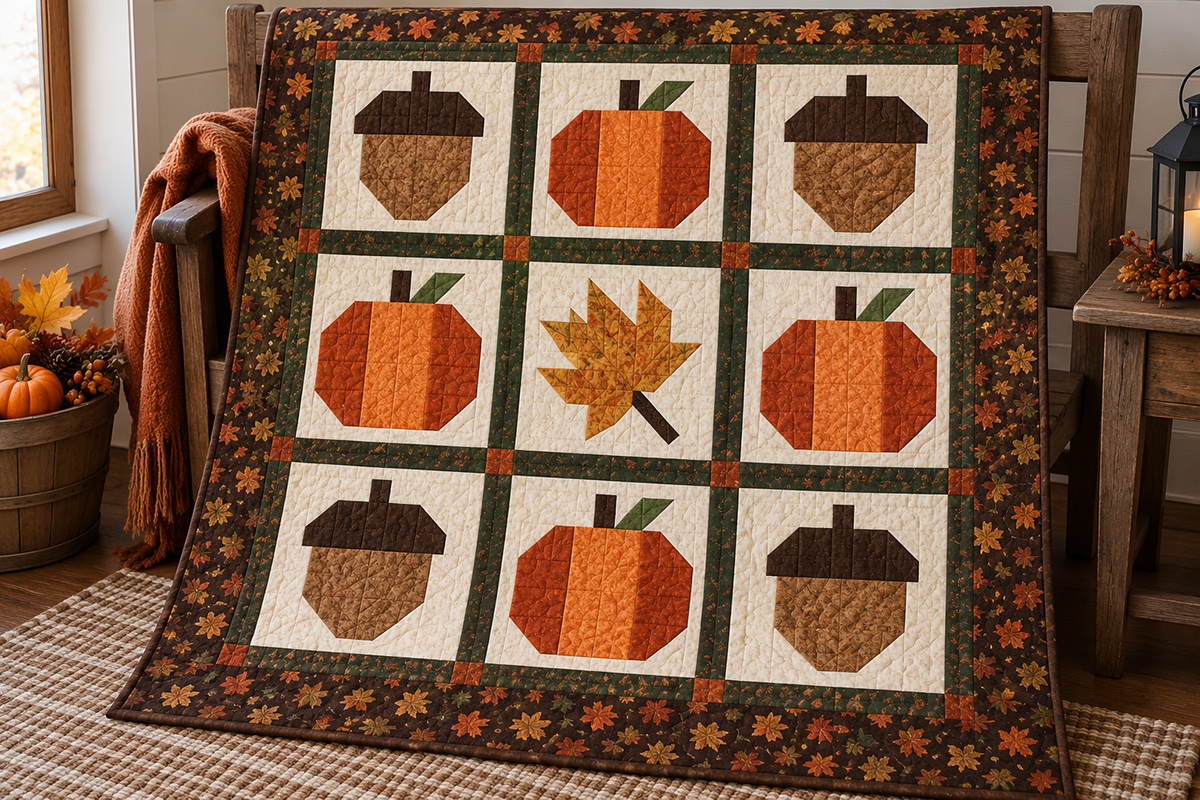
This free Fall Harvest Quilt Pattern brings three pieced autumn favorites together in one quilt: maple leaves, pumpkins and acorns. The nine-block patchwork layout uses four acorns, four pumpkins and one maple leaf in the center, so no row is made from a single repeated motif. Each block finishes at 12 inches square.
Explore More Free Baby Quilt Patterns
Free Maple Leaf Quilt Block Pattern
Free Pieced Pumpkin Quilt Block Pattern
Quilting Supplies For This Project
Jump to:
Fall Harvest Quilt Pattern Layout
This Fall Harvest Quilt Pattern uses nine 12-inch finished blocks arranged around one maple leaf in the center. Four acorns fill the corners and four pumpkins sit between them. Dark 2-inch finished sashing separates the blocks and continues around the outside of the block grid, with small rust cornerstones marking each intersection. A 4-inch finished dark outer border frames the whole quilt.
That arrangement gives the quilt a finished size of approximately 52 inches square. More important, it keeps any one motif from marching straight across a row. The acorns anchor the four corners, the pumpkins make a loose cross around the center and the single maple leaf becomes the focal point.
The three motifs keep their own separate construction instructions. Make one block from my free maple leaf quilt block pattern, four from the pieced pumpkin quilt block pattern and four from the acorn quilt block pattern. Every completed block needs to measure 12½ inches square unfinished before you begin assembling the quilt top.
Don't trim one block smaller just because another one comes out a little differently. Check the individual block and correct the seam or trimming issue there. All nine blocks need to start at the same 12½-inch unfinished size or the sashing grid will tell on you later.
Use this 3 by 3 block arrangement:
Row 1: Acorn | Pumpkin | Acorn
Row 2: Pumpkin | Maple Leaf | Pumpkin
Row 3: Acorn | Pumpkin | Acorn
Keep the pumpkins and acorns upright. The maple leaf stays upright in the center as shown in the example. There isn't any need to rotate blocks just to make the layout look busier. The different silhouettes already give you plenty to look at.
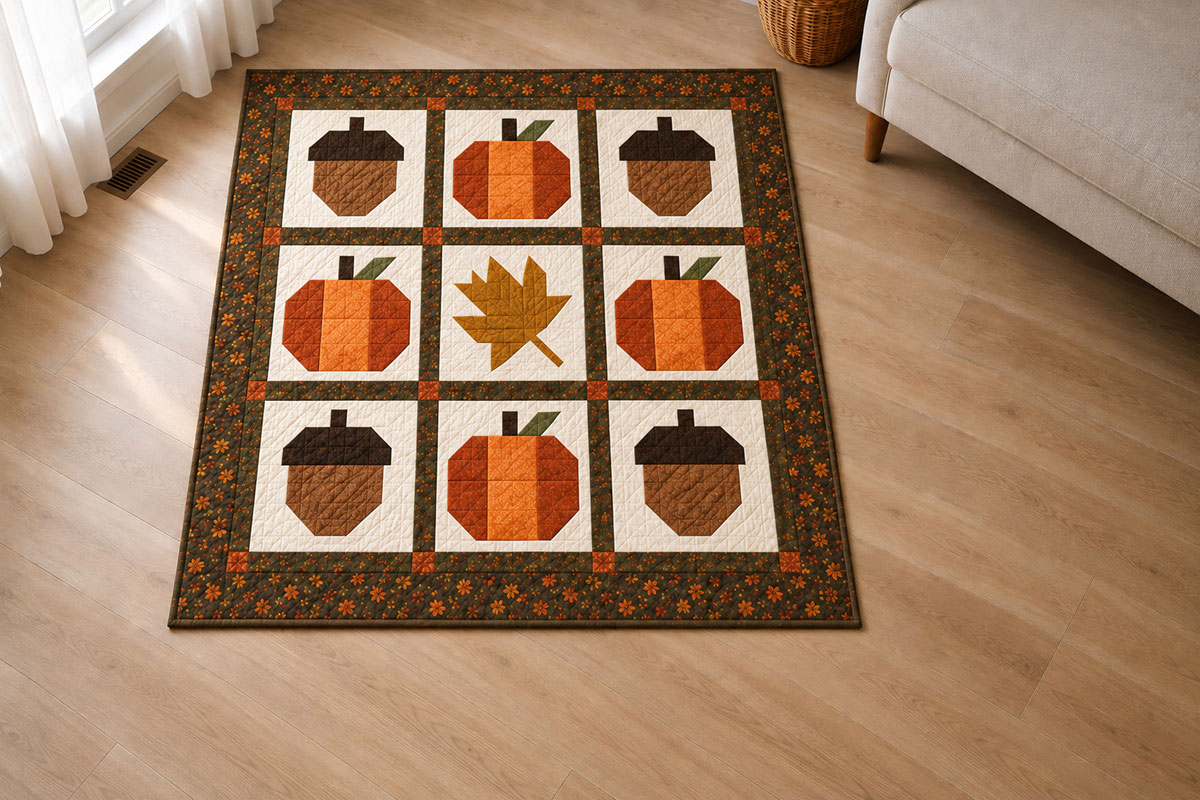
I would keep the cream block background consistent and use one dark print for both the sashing and outer border. That darker frame is doing useful work here. It separates the cream blocks, defines the nine-block grid and keeps all that pale background from taking over the quilt. The rust cornerstones add just enough contrast without becoming another motif.
If you'd rather build the whole quilt around one shape, the free pumpkin quilt pattern keeps the focus on pumpkins, while the free acorn quilt pattern uses repeated acorn blocks. This quilt has a different job. It brings all three fall blocks together in one coordinated harvest layout.
Materials for the Fall Harvest Quilt
The individual block pages give you the cutting measurements for the maple leaf, pumpkin and acorn pieces. Use those measurements rather than keeping a second version of the block cutting charts here. For this quilt, you'll make one maple leaf, four pumpkins and four acorns.
Finished quilt size: approximately 52 × 52 inches
Block size: 12 inches finished, 12½ inches unfinished
Number of blocks: 9 total
Sashing: 2 inches finished
Cornerstones: 2 inches finished
Outer border: 4 inches finished
Seam allowance: ¼ inch unless an individual block pattern tells you otherwise
For the nine pieced blocks:
Prepare enough quilting cotton to cut:
Use the cutting chart on each block page and cut the number of complete sets listed above. That keeps every block consistent with its original pattern instead of giving you two sets of measurements to compare.
For the quilt assembly:
2 yards dark floral or dark coordinating quilting cotton, at least 40 inches usable width, for the sashing and outer border
1/4 yard rust or copper quilting cotton for the 16 cornerstones
1/2 yard quilting cotton for binding
3½ yards standard-width quilting cotton for a pieced backing, or one backing piece at least 60 × 60 inches
Batting at least 60 × 60 inches
Coordinating cotton quilting thread
Rotary cutter
Quilting ruler
Cutting mat
Straight pins or quilting clips
Curved safety pins, basting spray or thread for basting the quilt sandwich
Iron and ironing surface
Sewing machine
The backing and batting are intentionally larger than the 52-inch finished quilt. Leave that extra material in place for quilting and squaring.
Cut the dark sashing:
Cut 24 strips measuring 2½ × 12½ inches.
Cut the rust cornerstones:
Cut 16 squares measuring 2½ × 2½ inches.
Cut the dark outer border:
Cut 2 side border strips measuring 4½ × 44½ inches.
Cut 2 top and bottom border strips measuring 4½ × 52½ inches.
If you're using the same dark fabric for the sashing and border, cut the four 4½-inch-wide border strips lengthwise, parallel to the selvages, from the 2-yard piece first. Trim two to 44½ inches long and two to 52½ inches long. Then cut the 2½ × 12½-inch sashing pieces from the remaining fabric.
The border lengths above are the expected measurements when the block and sashing panel finishes at the planned size. Measure the assembled panel through its center before attaching each pair of borders. If your actual measurement differs slightly, cut the border to the center measurement instead of stretching either piece to fit.
If you're still deciding what type of batting to put inside the quilt, my crib quilt batting guide explains the common choices and how they affect the finished quilt.
Make One Maple Leaf Block
Start with one complete 12-inch finished block from my free maple leaf quilt block pattern.
Follow the cutting chart, piecing sequence and trimming measurements on that page. The maple leaf is the center block in this quilt, so you only need one.
For the example layout, I would choose a mustard, ochre or another warm autumn leaf color that is clearly different from both the orange pumpkins and brown acorns. The center doesn't need extra decoration. The leaf shape and color change are enough.
After pressing, check the block with a square quilting ruler. It should measure 12½ × 12½ inches unfinished, with the important leaf points protected inside the final ¼-inch seam allowance.
Make Four Pieced Pumpkin Blocks
Make four blocks from the free pieced pumpkin quilt block pattern.
Each pumpkin block should measure 12½ inches square unfinished. Keep all four upright. They will sit above, below and on both sides of the center maple leaf.
You can use one orange throughout or use closely related orange fabrics. I would keep the stems and leaves consistent if you vary the pumpkin fabric. That gives the four blocks enough repetition to look intentional.
Pay close attention to the stitch-and-flip corners because those diagonals create the pumpkin silhouette. Sew on the marked line, trim the outside corner ¼ inch beyond the sewn line and press the replacement triangle fully open.
Set all four finished pumpkins beside one another before assembly. Check that the bodies sit at the same height and that every block measures 12½ inches square.
If you'd rather repeat pumpkins across the entire quilt, use the free pumpkin quilt pattern. Here, four pumpkins are enough to surround the center leaf without taking over the layout.
Make Four Pieced Acorn Blocks
Make four blocks with my free acorn quilt block pattern.
Each completed acorn block should measure 12½ inches square unfinished. These four blocks go in the four corners of the quilt layout.
Keep all four acorns upright. I would also keep good contrast between the darker cap and the lighter brown body so the acorn doesn't flatten into one solid shape from across the room.
The stitch-and-flip corners are not in the same positions on the cap and body. The cap is shaped across its upper corners, while the body is shaped across its lower corners. Follow the individual block directions and mirror the diagonal on the opposite side.
Once all four are complete, set them together and check the cap height, body direction and overall size. Square each block to 12½ inches.
If you want a quilt built entirely around this motif, use the separate free acorn quilt pattern. In the harvest quilt, the acorns belong in the corners where their darker caps help anchor the layout.
Assemble the Fall Harvest Quilt Top
Once all nine blocks measure 12½ inches square, lay them out before sewing:
Row 1: Acorn | Pumpkin | Acorn
Row 2: Pumpkin | Maple Leaf | Pumpkin
Row 3: Acorn | Pumpkin | Acorn
Keep every acorn and pumpkin upright and check the center maple leaf against the example before you start joining rows.
Step 1: Make the first block row.
Lay out four 2½ × 12½-inch dark sashing strips with the three Row 1 blocks in this order:
Sashing | Acorn | Sashing | Pumpkin | Sashing | Acorn | Sashing
Join the pieces with ¼-inch seams.
Press the seam allowances toward the dark sashing.
The completed row should measure approximately 12½ inches high by 44½ inches wide.
Step 2: Make Rows 2 and 3.
Make Row 2 in this order:
Sashing | Pumpkin | Sashing | Maple Leaf | Sashing | Pumpkin | Sashing
Make Row 3 in this order:
Sashing | Acorn | Sashing | Pumpkin | Sashing | Acorn | Sashing
Use four 2½ × 12½-inch sashing strips in each row. Press the seams toward the dark sashing.
All three completed block rows should measure approximately 12½ × 44½ inches.
If one row is noticeably wider or narrower, stop and correct it now. Don't make the next strip absorb the difference.
Step 3: Make four cornerstone sashing rows.
Each horizontal sashing row uses three 2½ × 12½-inch dark sashing strips and four 2½-inch rust cornerstones.
Arrange each row like this:
Cornerstone | Sashing | Cornerstone | Sashing | Cornerstone | Sashing | Cornerstone
Join the pieces with ¼-inch seams.
Press the seam allowances toward the long dark sashing pieces. This puts the seam allowances opposite the ones in the block rows and makes it easier to match the intersections.
Make four identical cornerstone sashing rows. Each should measure approximately 2½ × 44½ inches.
Step 4: Join the seven rows.
Lay out the quilt center in this order:
Cornerstone sashing row
Block Row 1
Cornerstone sashing row
Block Row 2
Cornerstone sashing row
Block Row 3
Cornerstone sashing row
Pin the first sashing row to Block Row 1. Match each cornerstone to the vertical sashing strip directly below it.
Sew with a ¼-inch seam.
Continue joining the rows in order, matching every cornerstone to the vertical sashing above and below it.
Press each long joining seam toward the horizontal sashing row.
The completed sashed panel should measure approximately 44½ × 44½ inches unfinished.
Step 5: Add the side borders.
Measure the sashed panel vertically through its center. The expected measurement is 44½ inches.
Cut or trim two 4½-inch-wide side border strips to that measurement.
Fold each border and the corresponding quilt edge in half and lightly crease the centers.
Match the ends and center marks, then pin between them.
Sew both side borders with ¼-inch seams and press toward the border.
The quilt top should now measure approximately 52½ inches wide.
Step 6: Add the top and bottom borders.
Measure horizontally through the center of the bordered quilt top. The expected measurement is 52½ inches.
Cut or trim two 4½-inch-wide border strips to that measurement.
Match the ends and centers, pin and sew with ¼-inch seams.
Press toward the borders.
The completed quilt top should measure approximately 52½ × 52½ inches unfinished and finish at approximately 52 × 52 inches after binding.
Layer, Quilt and Bind the Harvest Quilt
Press the completed quilt top from the back and check the outer edge before making the quilt sandwich. Trim stray threads, but don't trim away the ¼-inch seam allowance around the outside of the top.
Step 1: Prepare the backing.
Your backing should measure at least 60 × 60 inches.
If you're using the 3½ yards of standard-width quilting cotton, cut two pieces approximately 62 inches long. Remove the selvages, place the two pieces right sides together along one long edge and sew that edge with a ½-inch seam. Press the seam open, then trim the pieced backing to at least 60 × 60 inches.
Step 2: Prepare the batting.
Cut a batting piece at least 60 × 60 inches.
Both the backing and batting should extend beyond the quilt top on every side while you're quilting.
Step 3: Make the quilt sandwich.
Place the backing wrong side up on a clean flat surface.
Smooth the batting over the backing.
Center the quilt top right side up over the batting.
Smooth all three layers from the center outward.
Baste the layers with curved safety pins, basting spray or thread basting, working from the center toward the outside edges so the three layers stay smooth.
Step 4: Quilt the layers.
You don't need complicated quilting to compete with the pieced motifs and dark grid. Straight-line quilting is enough.
One simple option is to quilt along both sides of the sashing seams and continue straight lines through the outer border. Add quilting inside the individual blocks if the batting you're using requires closer spacing.
Check the batting manufacturer's instructions before deciding how far apart your quilting lines can be. Different battings have different maximum quilting distances.
Work from the center outward and check the backing periodically so a fold doesn't get stitched into place.
Step 5: Square the quilt.
After quilting, remove every pin, clip or temporary basting thread.
Trim the extra batting and backing even with the quilt top.
Use a long quilting ruler to check the corners and straighten the outside edges without cutting away more than necessary.
Step 6: Make the binding.
Cut 6 binding strips measuring 2½ inches wide by the usable width of your binding fabric.
Join the strips end to end with diagonal seams.
Trim the joining seams to ¼ inch and press them open.
Fold the long binding strip in half lengthwise with wrong sides together and press.
Step 7: Attach the binding.
Begin along one side rather than at a corner and leave an unsewn binding tail several inches long.
Sew the raw edges of the folded binding to the raw edge of the quilt with a ¼-inch seam.
At each corner, stop ¼ inch before the next edge, secure the stitching and remove the quilt from the machine.
Fold the binding up and away from the quilt, then fold it back down along the next side to form the mitered corner.
Continue around all four sides.
Join the beginning and ending binding tails, finish sewing the remaining section and fold the binding over the quilt edge.
Finish the second side by hand for a less visible seam or machine stitch it in place if you prefer.
Inspect the finished quilt before using or gifting it. Check the binding, block seams and quilting for loose stitching and make sure every temporary pin, clip and basting thread has been removed.
A 52-inch-square quilt works as a nursery floor quilt, play quilt, decorative quilt or keepsake. If you're making it for a baby, don't place it loose in an infant's crib or other sleep space. The American Academy of Pediatrics recommends keeping quilts, blankets and other loose bedding out of an infant's sleep area. You can read the current AAP safe sleep guidance for details.
The finished layout is deliberately simple: four darker acorns anchor the corners, four orange pumpkins fill the spaces around the center and one maple leaf gets the middle all to itself. The dark sashing, rust cornerstones and matching outer border hold those nine blocks together without asking the blocks to match one another.
If you're using this harvest quilt as the room's seasonal focal point, my fall nursery room ideas show how to carry pumpkin, acorn, maple leaf, rust, olive and warm neutral details through the rest of the nursery.
To move your quilting into a creepier direction in October, try my spooky Halloween quilt pattern that swaps the harvest layout for an easy patchwork graveyard centerpiece medallion with bats, tombstones, pumpkins and a geometric moon. I toyed with the idea of appliqueing the letters BOO across the headstones but didn't since I had promised a "no applique and no templates" pattern. Don't let that stop you from doing it though.
If you want another baby-size quilt after this one, browse the Baby Quilt Patterns collection for more pieced, patchwork and themed quilt projects.
When you click on links to various merchants on this site and make a purchase, this may result in this site earning a commission. This does not affect the price you pay.

UBGI Gold Standard 2026
Reviewed under the site's
editorial checklist.
Photos, decorating ideas, party setups and reader submissions are shared for inspiration unless a page is specifically presented as a pattern, tutorial, reference guide or step-by-step project. Follow the instructions, measurements, safety guidance and manufacturer directions provided for the particular project or product.
About Jan | Contact | Baby Nursery Ideas (Blog) | Site Map | Privacy Policy | Disclosure Policy | Disclaimer | Affiliate Disclosure | Earnings Disclosure | Facebook | Pinterest
I am a participant in the Amazon Services LLC Associates Program, an affiliate advertising program designed to provide a means for us to earn fees by linking to Amazon. As an Amazon Associate I earn from qualifying purchases.
Copyright © 2006-2026. All Rights Reserved.