Free Pieced Patchwork Pumpkin Quilt Block Pattern
By Jan Bay
This easy pieced patchwork pumpkin quilt block pattern comes together with squares, rectangles and stitch-and-flip corners...no appliqué, paper piecing or templates necessary. It makes a 12-inch block with a warm ivory background, a pumpkin body, a simple brown stem and a little angled leaf. You can make one for a seasonal wall quilt or sew nine blocks together for a scrappy fall pumpkin quilt.
Explore More Free Baby Quilt Patterns
Helpful Quilting Supplies for this Project
Jump to a Section
Supplies for This Pumpkin Quilt Block Pattern
You don't need much fabric for one block, so this is a good place to use fall scraps you already have. I like the pumpkin better with two orange fabrics instead of making the whole body one flat color. Use a darker rust or burnt orange for the four outside sections and a slightly lighter copper or pumpkin orange through the center.
For one 12-inch finished block, you'll need:
- Warm ivory quilting cotton for the background and pieced corner sections, about 1 fat eighth
- Dark rust or burnt orange quilting cotton for the four outside pumpkin sections, about 1 fat eighth
- Copper or pumpkin-orange quilting cotton for the center, a piece at least 4½ × 9 inches
- Dark brown quilting cotton for the stem, a small scrap
- Olive green quilting cotton for the leaf, a small scrap
- Coordinating all-purpose or cotton sewing thread
You'll also need a sewing machine, rotary cutter, cutting mat, quilting ruler, iron, ironing surface and a removable fabric marker or sharp pencil for marking the diagonal sewing lines. A ¼-inch presser foot is handy, but it isn't required.
Use an accurate ¼-inch seam allowance throughout the block. That little measurement matters here because three 4½-inch units have to join into a 12½-inch unfinished row. If you aren't sure whether the ¼-inch guide on your machine is exact, the American Quilter's Society has a simple method for checking an accurate patchwork seam before you start.
You won't need templates or specialty rulers for the pumpkin corners. They're made by placing small ivory squares on the orange squares, sewing across the diagonal and flipping the corner open after trimming. The leaf uses the same basic stitch-and-flip idea on two corners, so once you've made the pumpkin units, that little top section won't feel unfamiliar.
Cutting Chart for This Pumpkin Quilt Block Pattern
Cut everything before you start sewing and keep the four little ivory pumpkin-corner squares together. Those are the pieces that give the pumpkin its rounded, almost octagonal shape without turning the side sections into half-square triangles.
| Fabric | Cut | Used For |
|---|---|---|
| Warm ivory | 2 squares, 4½ × 4½ inches | Top background |
| Warm ivory | 4 squares, 2¼ × 2¼ inches | Pumpkin corner shaping |
| Warm ivory | 1 rectangle, 4½ × 2½ inches | Upper part of stem-and-leaf unit |
| Warm ivory | 1 rectangle, 1½ × 2½ inches | Left side of stem |
| Warm ivory | 2 squares, 1½ × 1½ inches | Leaf shaping |
| Dark rust or burnt orange | 4 squares, 4½ × 4½ inches | Four outside pumpkin units |
| Copper or pumpkin orange | 2 squares, 4½ × 4½ inches | Center pumpkin column |
| Dark brown | 1 rectangle, 1½ × 2½ inches | Stem |
| Olive green | 1 square, 2½ × 2½ inches | Leaf |
All of these measurements include the ¼-inch seam allowance. Don't trim the 4½-inch units smaller after piecing them unless you truly need to straighten a tiny uneven edge. The finished block depends on those units staying 4½ inches before the rows are joined.
Make the Stitch-and-Flip Pumpkin Corner Units
The four outside pumpkin sections start as full 4½-inch orange squares. Only one outside corner of each square gets replaced with ivory. That keeps a lot more orange in the block and gives the pumpkin the fuller shape shown in the example instead of the sharper look you'd get from four half-square triangles.
Start with the upper-left pumpkin unit. Place one 2¼-inch ivory square right sides together on the upper-left corner of a 4½-inch dark rust square. Match the top and left raw edges. On the wrong side of the ivory square, draw a diagonal sewing line from its lower-left corner to its upper-right corner.
The marked line should connect the two corners beside the outside corner. It should not run through the outside corner of the orange square.
Sew directly on the marked line. Before trimming, flip the ivory square toward the upper-left corner and make sure it completely covers the orange corner beneath it. Flip it back, then trim ¼ inch outside the stitching line toward the upper-left corner. You'll remove the excess ivory and the orange fabric underneath it.
Press the ivory triangle open. The unit should still measure 4½ × 4½ inches unfinished.
Make the remaining three units the same way, using these placements and sewing-line directions:
- Upper-left unit: place ivory at upper left; mark from lower left to upper right.
- Upper-right unit: place ivory at upper right; mark from upper left to lower right.
- Lower-left unit: place ivory at lower left; mark from upper left to lower right.
- Lower-right unit: place ivory at lower right; mark from upper right to lower left.
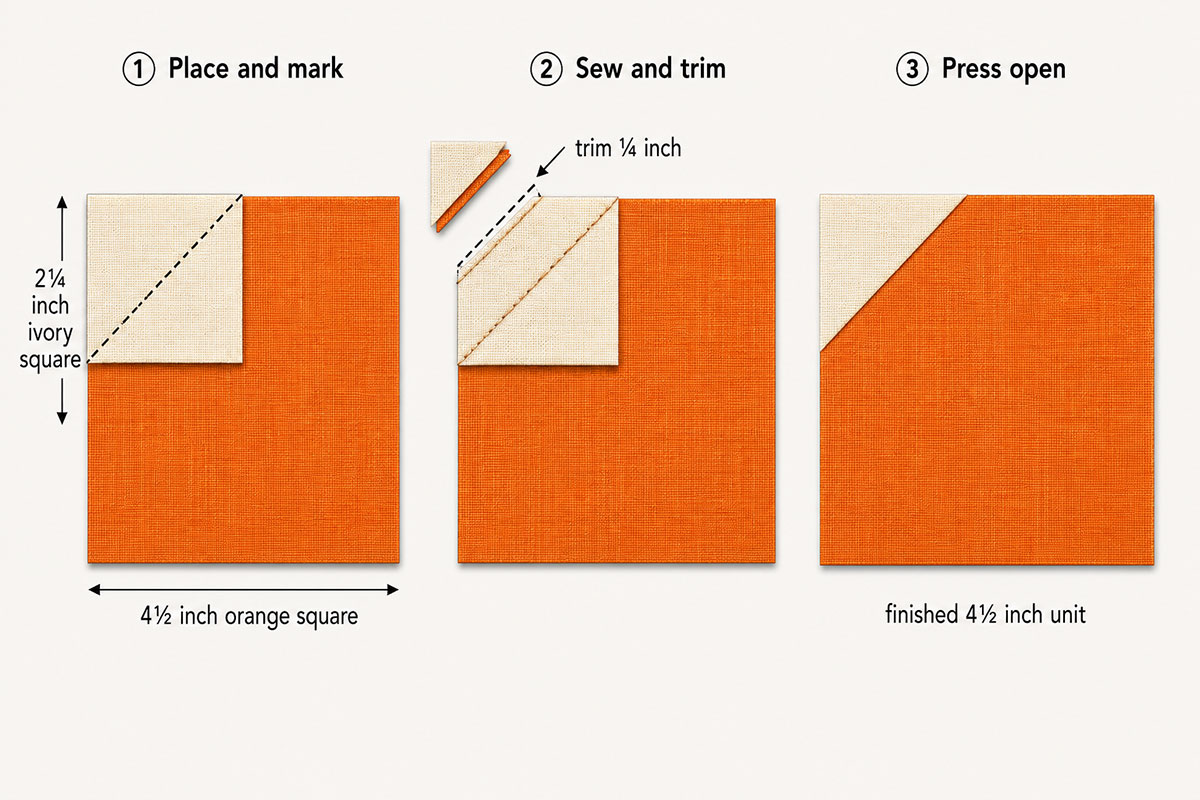
There may be an issue with exactly how deep the corner shaping looks once the first block is sewn. The 2¼-inch square is the measurement I'd start with because it leaves the orange as the dominant part of every unit. If you make a sample and want the pumpkin a little squarer or a little more clipped at the corners, this is the measurement to adjust. Keep the same stitch-and-flip construction.
Piece the Brown Stem and Angled Olive Leaf
The top-center unit looks a little more complicated than the pumpkin body, but it's still made entirely from squares and rectangles. The brown stem is vertical, and the olive leaf sits to its right with ivory cutting into two opposite corners.
Start with the 2½-inch olive square and the two 1½-inch ivory squares.
Place one ivory square right sides together on the upper-left corner of the olive square. Match the top and left raw edges. Draw a diagonal sewing line from the ivory square's lower-left corner to its upper-right corner. Sew on the marked line, trim ¼ inch outside the seam toward the upper-left corner, then press the ivory triangle open.
Place the second ivory square right sides together on the lower-right corner of the olive square. Match the bottom and right raw edges. Draw the sewing line from the ivory square's upper-right corner to its lower-left corner. Sew, trim ¼ inch outside the seam toward the lower-right corner and press open. The leaf unit should still measure 2½ × 2½ inches unfinished.
Now lay out the lower half of the stem-and-leaf unit from left to right like this:
1½ × 2½-inch ivory rectangle | 1½ × 2½-inch brown rectangle | 2½ × 2½-inch olive leaf unit
Sew the ivory rectangle to the left side of the brown stem with a ¼-inch seam. Then sew the leaf unit to the right side of the stem. Press the seams carefully so the strip lies flat. It should measure 4½ × 2½ inches.
Sew the 4½ × 2½-inch ivory rectangle across the top of that strip. Press the seam toward the ivory rectangle. The completed stem-and-leaf unit should measure 4½ × 4½ inches.
The brown stem will sit slightly left of center with the olive leaf pointing across the right side. That's intentional. Don't center the stem by changing the widths of the pieces because that would change the look of the finished block.
This section is less certain from the reference only in the exact visual proportions of the leaf after sewing. The piecing math works at 4½ inches. If the first sample shows that the leaf needs to look a little longer or narrower, that's the place I'd fine-tune before making several blocks.
Assemble the 12½-Inch Pumpkin Quilt Block
Once the small units are finished, the rest is just a three-by-three block. Lay everything out before you sew so none of the ivory pumpkin corners gets turned the wrong way.
Top row:
- 4½-inch warm ivory background square
- 4½-inch stem-and-leaf unit
- 4½-inch warm ivory background square
Middle row:
- Dark rust square with ivory upper-left corner
- 4½-inch copper or pumpkin-orange square
- Dark rust square with ivory upper-right corner
Bottom row:
- Dark rust square with ivory lower-left corner
- 4½-inch copper or pumpkin-orange square
- Dark rust square with ivory lower-right corner
Take a quick look at the layout before you move anything. All four ivory pumpkin corners should point toward the outside of the block. The straight orange edges should meet through the center so the pumpkin stays full instead of breaking into separate shapes.
Sew the three units in the top row together with ¼-inch seams. Press those row seams toward the two outside ivory squares.
Sew the middle row together and press both seams toward the center orange square.
Sew the bottom row together and press the seams toward the two outside rust squares.
Alternating the pressing direction lets the vertical seams nest when you join the rows. Match the seam intersections, pin if you like, and sew the top row to the middle row with a ¼-inch seam. Then add the bottom row.
Press the two long row seams. I prefer pressing them away from the center row when the fabric will cooperate, but the important thing is that the block lies flat and the seam intersections aren't twisted.
Before trimming anything, measure the block. With accurate 4½-inch units and ¼-inch seams, it should measure approximately 12½ × 12½ inches unfinished.
Check the Finished Pumpkin Quilt Block
Your patchwork block should measure about 12½ × 12½ inches at this stage. Once it's sewn into a quilt with ¼-inch seams around the outside, the block finishes at 12 × 12 inches.
Look at the pumpkin shape before you call it done. The center should stay broad and rectangular, while the four ivory corners clip only the outside edges of the darker rust sections. You should still see plenty of orange along both sides. That's what keeps it looking like a full pumpkin instead of a diamond-shaped or heavily tapered block.
The stem should rise from the middle of the pumpkin with the olive leaf tucked beside it. The leaf doesn't need to be perfectly centered or symmetrical. Its little diagonal ivory corners are what give it the angled shape without appliqué or templates.
If your block is a little larger than 12½ inches, don't automatically trim a wide strip from every side. Check the seam allowances and the individual units first. You want to keep a full ¼-inch seam allowance outside the pumpkin and background pieces so none of the corners disappear when the block goes into a quilt.
If you're making several blocks, make one complete block first and check the pumpkin corners and leaf proportions before chain-piecing the rest. Since this pattern hasn't been physically test-made from these instructions, those are the two areas worth checking most carefully on the first sample.
If you like simple patchwork fall blocks, the free maple leaf quilt pattern uses the same 12-inch finished block size, so the two designs can also be used together in a fall quilt. For a Halloween version, my free witch hat quilt block pattern gives you another 12-inch pieced block without appliqué or paper piecing.
For another Halloween motif to use with the pumpkin and witch hat, make my free ghost quilt block pattern.
Turn the Block Into a Nine-Block Pumpkin Quilt
You can stop with one pumpkin for a small wall quilt, pillow front or seasonal project, or repeat the block nine times for a larger patchwork top.
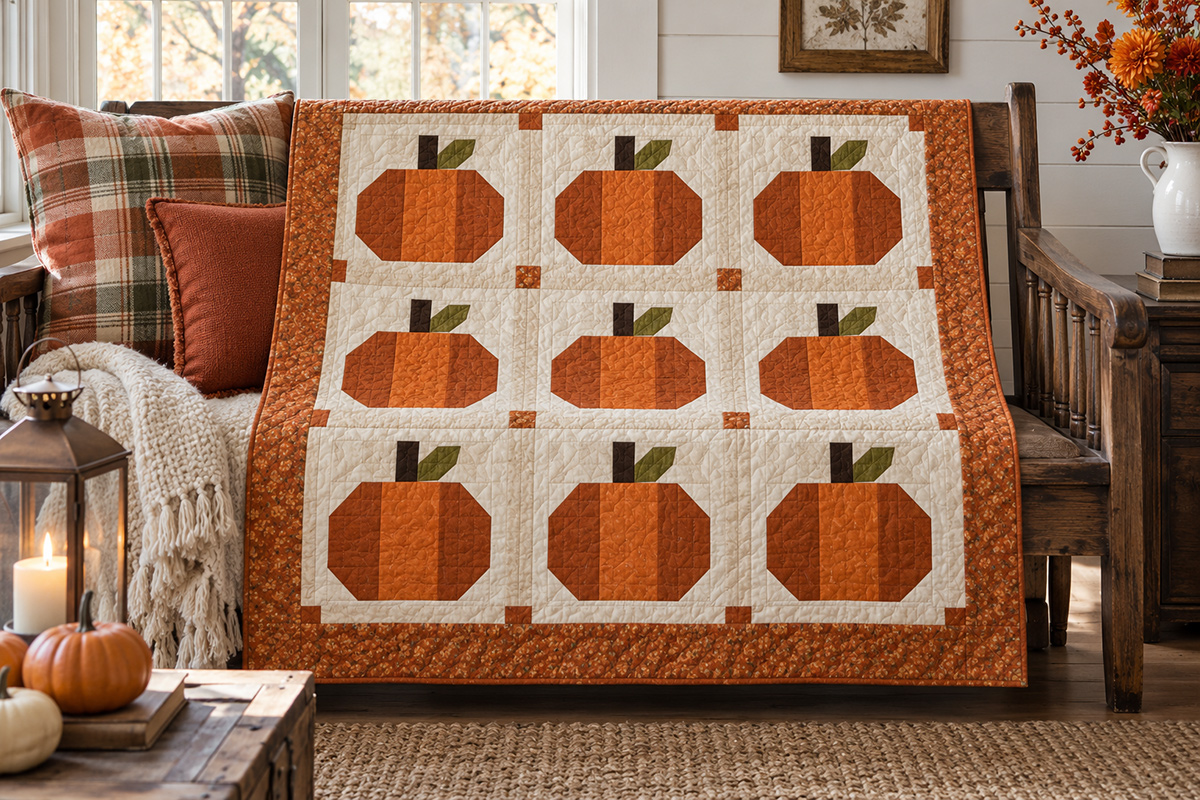
If you want the complete yardage, sashing, cornerstones, border and assembly plan for that nine-block version, use my free pumpkin quilt pattern.
For a darker Halloween quilt that keeps pumpkins in the mix, my spooky Halloween quilt pattern builds a pieced graveyard medallion with bats, tombstones, pumpkins and a geometric moon. If you want to compare pumpkin projects beyond quilting, browse my pumpkin craft ideas.
For nine pumpkins, make nine complete 12½-inch unfinished blocks and arrange them in three rows of three. If you sew the blocks directly to one another with ¼-inch seams and don't add sashing, the assembled nine-block center will measure approximately 36½ × 36½ inches unfinished. The nine pumpkin blocks contribute a 36 × 36-inch finished grid after the outside ¼-inch seam allowances are used in the quilt.
I wouldn't make every pumpkin exactly the same unless that's the look you want. Keep the ivory background, brown stems and olive leaves consistent, then vary the rust, copper and pumpkin-orange fabrics from block to block. You can use two orange fabrics in every pumpkin or pull several coordinating fall scraps and mix them through the nine blocks.
Keep the same corner placement on every block so the pumpkin shape stays consistent. The fabric colors can change. The construction doesn't need to.
If you want a larger quilt, add sashing between the blocks or a border around the outside rather than changing the size of the pumpkin block itself. That way the 12-inch block stays useful on its own and every pumpkin keeps the same proportions.
For more straightforward quilt projects, you can also browse my easy baby quilt patterns or use this pumpkin block alongside other simple fall piecing.
To mix this pumpkin with other 12-inch fall blocks, use my free fall harvest quilt pattern, which combines pumpkin, acorn and maple leaf blocks in one layout.
For a creepier October quilt, my spooky Halloween quilt pattern uses pieced bats, tombstones, pumpkins and a geometric moon in one graveyard medallion layout.
When you click on links to various merchants on this site and make a purchase, this may result in this site earning a commission. This does not affect the price you pay.

UBGI Gold Standard 2026
Reviewed under the site's
editorial checklist.
Photos, decorating ideas, party setups and reader submissions are shared for inspiration unless a page is specifically presented as a pattern, tutorial, reference guide or step-by-step project. Follow the instructions, measurements, safety guidance and manufacturer directions provided for the particular project or product.
About Jan | Contact | Baby Nursery Ideas (Blog) | Site Map | Privacy Policy | Disclosure Policy | Disclaimer | Affiliate Disclosure | Earnings Disclosure | Facebook | Pinterest
I am a participant in the Amazon Services LLC Associates Program, an affiliate advertising program designed to provide a means for us to earn fees by linking to Amazon. As an Amazon Associate I earn from qualifying purchases.
Copyright © 2006-2026. All Rights Reserved.