Free Turkey Quilt Wall Hanging Pattern
By Jan Bay
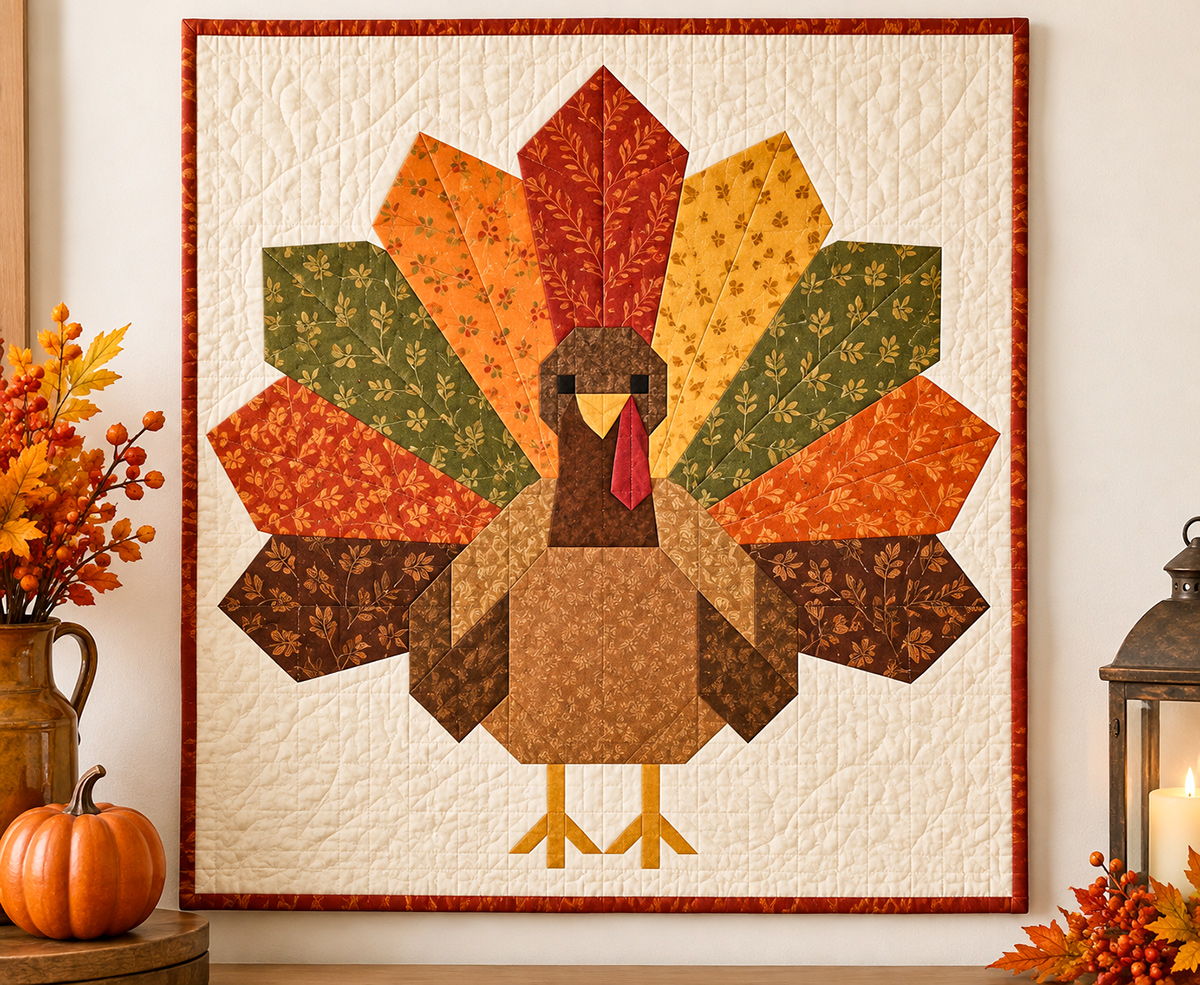
This free turkey quilt wall hanging pattern creates a modern version of a traditional Thanksgiving turkey that will look nice on a nursery wall, in a child's room or even in the dining room during the Thanksgiving holiday. The feathers of the impressively oversized fan tail feature rich autumn colors, while I kept the body simple against a warm-white background with narrow binding. I feel that less "froo-froo" gives you more time to enjoy it. As designed, it can stay on display throughout the fall season and right up until you replace it with Christmas decorations.
Explore More Free Fall Quilt Patterns
Helpful supplies for this project.
Jump to:
Finished Size for the Turkey Quilt Wall Hanging Pattern
The finished turkey quilt wall hanging is designed to measure about 28 x 36 inches. The pieced center finishes at 24 x 30 inches, with warm-white borders added around it before quilting and binding.
I chose that size on purpose. It's large enough for the nine-feather turkey to have some presence on the wall, but it doesn't turn into a full-size quilt that takes over the room. You still get plenty of background around the bird, which is part of what keeps the design from looking too busy.
Finished size: approximately 28 x 36 inches
Central pieced field: 24 x 30 inches finished
Skill level: Advanced
Construction: Foundation paper piecing with straight seams, followed by conventionally pieced outer borders
Seam allowance: 1/4 inch unless otherwise stated
Pattern note: This is a mathematically drafted, untested quilt pattern. The geometry, section sizes and print scale have been checked, but the pattern has not yet been physically test-sewn.
The advanced rating comes mainly from the number of foundation-pieced units and the amount of alignment involved. The turkey is built from six larger sections containing smaller foundation units, and several of the face and foot pieces are quite small. If you're comfortable with foundation paper piecing and matching angled seams, the construction should make sense. I would not choose this as a first FPP project.
The turkey has exactly nine radiating tail feathers. The fan spreads across roughly 22 1/2 inches and is pieced from rust, pumpkin, olive, mustard and brown fabrics. The body and wings cross the horizontal join between the upper and lower sections, which lets the finished bird stay much closer to the example image than it would if the body were squeezed into one rectangular block.
There are no curved seams and no appliqué pieces. The rounded look of the turkey is made with small changes in angle, while the tail feathers stay broad, pointed and geometric. The only embroidered details are the two small black eyes.
Materials and Tools
Foundation paper piecing uses more fabric than a simple area calculation would suggest because each patch needs enough extra fabric to cover its shape after it is flipped and sewn. I wouldn't cut the yardage too close on this one. The amounts below already allow for the generous patch rectangles used in the pattern.
Fabric and supplies:
1 1/2 yards warm-white fabric for the background and borders
1/2 yard rust fabric for the tail
1/2 yard muted olive fabric for the tail
1/2 yard pumpkin fabric for the tail
1/2 yard mustard/gold fabric for the tail, beak, legs and feet
1/2 yard medium-brown fabric for the body
1/4 yard tan fabric for the wings
1/2 yard dark brown fabric for the neck, darker wing sections and deep-brown tail areas
1/4 yard dark-brown fabric for the head
1/4 yard deep-red fabric for the wattle
3/8 yard rust fabric for binding
1 1/4 yards backing fabric with at least 41 inches of usable width. If your fabric gives you only 40 inches of usable width after the selvages are removed, buy 1 1/2 yards instead.
Batting at least 33 x 41 inches
Black embroidery floss for the eyes
Optional: 1/3 yard fabric for the hanging sleeve
You can repeat the same tail fabrics instead of buying a different print for every feather. In fact, I prefer that here. Repeating the rust, pumpkin, olive and gold keeps the fan tied together while the patchwork within each feather gives it enough variation.
Tools:
Letter-size foundation paper, printer, quilting ruler, rotary cutter, cutting mat, paper scissors, sewing machine, fine sewing needle, neutral thread, pins or fabric glue stick, iron and a light source for checking fabric placement through the paper.
An Add-A-Quarter style ruler is useful for trimming foundation-piecing seam allowances, but it isn't required if you already have a method you like.
Fabric Requirements and Color Placement
The colors matter more than the exact prints. I'd stay with warm autumn shades rather than novelty Thanksgiving fabric because the turkey already makes the point. You don't need little printed turkeys on top of the turkey.
The front-view tail order runs from left to right as follows:
deep brown, rust, olive, pumpkin, rust, mustard, olive, pumpkin, deep brown
Some feathers use more than one patch of the same color, and you can use a second tone of rust, olive, pumpkin or gold if you want a little more movement. That's optional. The pattern works with one fabric per color family.
Keep the background warm white rather than stark white or yellow cream. The softer white gives the browns and fall colors enough contrast without making the quilt look harsh.
The body uses medium brown, with tan and darker brown sections in the wings. Use a darker brown for the head so it stays distinct from the body, mustard/gold for the beak and legs, and a small amount of deep red for the wattle.
If you're pulling from scraps, make sure every piece is large enough for the generous patch rectangle listed in the cutting chart. Foundation paper piecing is not forgiving when a patch looks large enough before sewing and then misses a corner after it is flipped.
Cutting and Printing Instructions
Before you cut the first patch, print the foundation templates at 100% or Actual Size. Turn off Fit, Shrink, Scale to Fit, borderless expansion and any other printer setting that changes the page size. The foundations are already reversed for sewing from the printed side, so don't mirror them again.
Print one template page first and measure the 1-inch calibration square in both directions. It needs to measure exactly 1 inch wide and 1 inch high. Check one of the 1-inch grid intervals on a tiled page, too. If either measurement is off, fix the printer setting before printing the rest of the pattern. Changing the seam allowance later won't repair a template that printed at the wrong scale.
If you're printing the PDF through Adobe Acrobat or Reader and want to double-check the settings, Adobe's PDF printing instructions explain the available scaling controls.
The full-size foundations are tiled across letter-size pages where necessary. Each tile overlaps the next by 1/4 inch. Circled crosses are paper-alignment targets; uncircled crosses on sewing lines are fabric registration marks. For each later column, trim the left edge on the dashed window frame. For each later row, trim the top edge there. Match the duplicated circled targets, grid and geometry through the overlap, then tape the pages together on the side that won't be sewn. Do not sew the paper overlap as though it were another fabric seam.
Template line key:
Thin solid lines mark sewing lines and the finished outline of each foundation unit.
The heavier outside line is the trimming line and already includes the 1/4-inch seam allowance.
Numbers inside a unit show the order in which the fabric patches are added.
Each foundation sheet header gives the fabric code for every numbered patch on that sheet. For example, B03 1=H 2=G means patch 1 in unit B03 uses fabric H and patch 2 uses fabric G. The cutting chart repeats the same assignments so you can check them before sewing.
One-piece foundation units don't need fake internal seams. Center the oversized fabric over the paper, then trim the completed unit on its outer line.
The patch dimensions in the PDF cutting chart are deliberately generous. They are enclosing rectangles for the actual shapes, not exact-cut traditional quilt pieces. Rotate a rectangle as needed to cover its numbered foundation patch, and always fold the fabric into its sewn position before stitching to make sure it covers the entire area plus the seam allowance.
That's worth checking every time. A patch that misses one corner after the flip is much easier to replace before the next seam goes in.
Conventionally cut pieces:
Cut two warm-white side borders 2 1/2 x 30 1/2 inches.
Cut two warm-white top and bottom borders 3 1/2 x 28 1/2 inches.
Cut backing and batting 33 x 41 inches each.
Cut four rust binding strips 2 1/2 inches x width of fabric.
For the optional hanging sleeve, cut one piece 8 1/2 x 28 1/2 inches.
Foundation Piece the Nine-Feather Turkey Tail
The turkey's oversized tail is spread through Sections A, B and C, with the lowest feather tips continuing into D and F. That's why I wouldn't try to treat the fan as a separate block. The feathers and body overlap visually, and the section layout keeps that layered look without adding appliqué.
Work through the foundation units in Sections A, B, C, D, E and F. Keep every small unit labeled as you finish it. The labels matter because several of the shapes are similar once they're trimmed.
The foundation maps show the finished front view, while the sewing foundations are already reversed. Keep the top edge of every section oriented the same way as you work.
Paper Piece Each Small Foundation Unit
1. Place the first fabric. Put patch 1 wrong side against the unprinted side of the paper. Hold it to a light source and center the fabric over its finished shape. Leave at least 1/4 inch beyond every edge, and more where the next flip needs it.
2. Position the next patch. Fold the paper back on the seam between the completed area and the next numbered patch. Trim the existing fabric to a 1/4-inch allowance beyond the fold.
Open the paper again. Place the next fabric right sides together with the existing fabric and line its edge up with that trimmed allowance. Fold it into its future position before sewing and check that it covers the entire numbered area and the outer allowance.
3. Sew the seam. Sew directly on the printed line between the two patches. A short stitch length of about 1.5 to 1.8 mm works well for perforating foundation paper, but test the setting with your own paper first.
4. Open and press. Fold the new patch open and press it flat without stretching the bias edges. Continue through the numbers in order.
5. Trim the unit. Once all of the numbered areas are covered, trim the fabric and paper together on the heavy outside line. Do not trim on the inner finished line.
Leave the foundation paper attached while you assemble the smaller units into their larger sections. It helps stabilize all of those angled edges.
Assemble Section A
Section A forms the left portion of the upper fan and finishes at 8 x 18 inches. Before joining it to the rest of the quilt, it should measure 8 1/2 x 18 1/2 inches unfinished.
Paper piece units A01 through A09, then join them in the order shown on the PDF Section A map and join chart. Line up the marked sewing-line endpoints rather than trying to match the clipped paper tips.
Press the joined seam allowances open as the subassemblies grow. Once Section A is complete, compare it with the front-view map before moving on.
Assemble Section B
Section B is the busiest upper section. It carries the center portion of the fan along with the turkey's head and several connecting body shapes, so keep the unit labels in place until the section is complete.
Paper piece units B01 through B20 and follow the PDF join order exactly. Section B finishes at 8 x 18 inches and should measure 8 1/2 x 18 1/2 inches unfinished.
Don't be tempted to join the pieces by whichever edges appear easiest. The numbered join sequence was drafted around the actual seam boundaries, and changing the order can leave you with an enclosed seam that can't be sewn flat.
Assemble Section C
Section C forms the right portion of the upper fan. Paper piece units C01 through C11, then assemble them according to the Section C join chart.
Like A and B, Section C should measure 8 1/2 x 18 1/2 inches unfinished.
Lay A, B and C side by side before sewing them together. From the front of the quilt the order is A, B, C from left to right. Check the nine-feather sweep before committing to the long section seams.
Piece the Turkey Body, Wings, Legs and Lower Tail
The body isn't a separate piece laid over the fan. Parts of the wings and body cross the horizontal seam between the upper and lower rows, which is what lets the finished turkey keep the proportions of the example image.
Section E is the large lower-center section. It includes most of the brown body, wing shapes, gold legs and feet, plus the background between them. Paper piece units E01 through E17 and assemble them in the order shown in the PDF.
Completed Section E finishes at 12 x 12 inches and should measure 12 1/2 x 12 1/2 inches unfinished.
Sections D and F sit on either side of E. They look mostly like background, but each contains part of the lowest outside feather geometry. That small detail matters. Replacing D and F with plain white rectangles would chop off the lower fan and change the design.
Complete D01 for Section D and F01 for Section F according to their foundations.
Each of those sections finishes at 6 x 12 inches and should measure 6 1/2 x 12 1/2 inches unfinished.
Before joining the lower row, place D, E and F in front-view order from left to right. Check the feet, lower body and feather tips against the map.
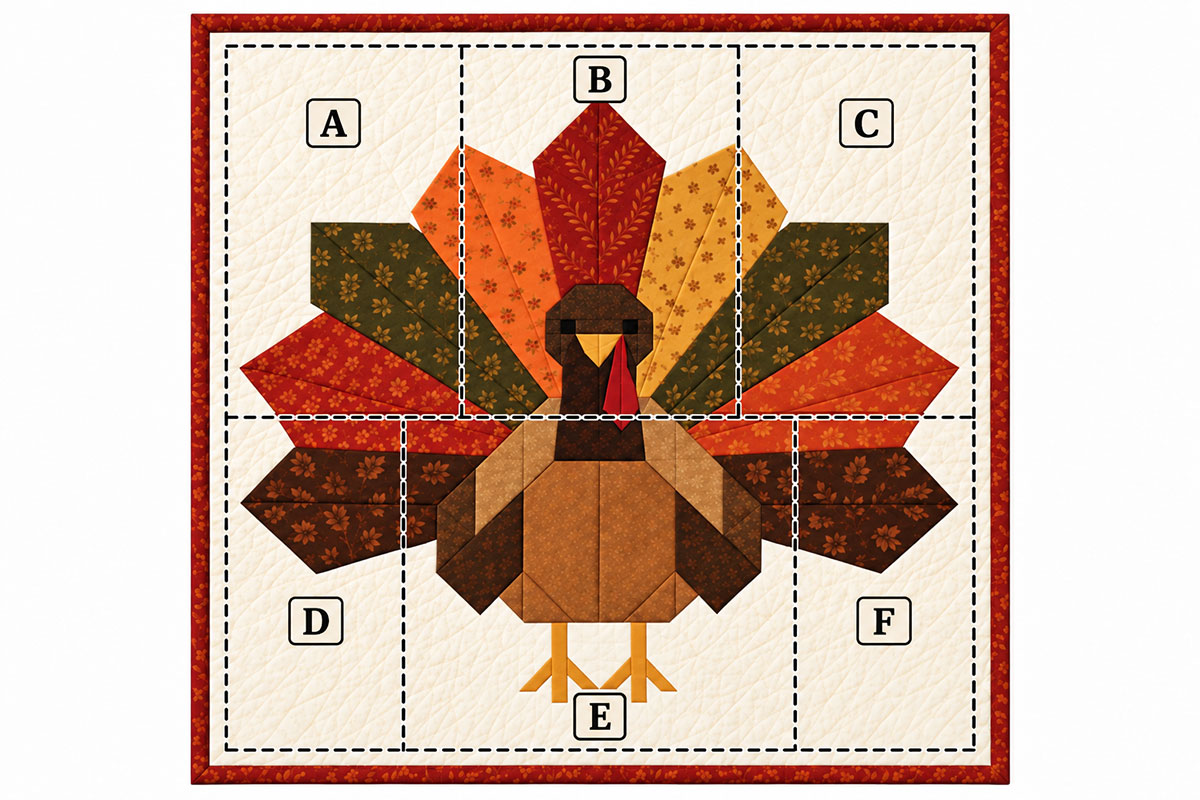
Layout note: This image is a visual guide to the six main sections, not a cutting or foundation template. Use the full-size PDF section maps and foundations for exact seam placement, proportions and assembly.
Assemble the Turkey Quilt Wall Hanging Top
Join Sections A and B first, then add C to make the upper row. Match the marked endpoints and seam intersections carefully.
The completed upper row should measure:
24 1/2 x 18 1/2 inches unfinished
Join D to E, then add F to make the lower row.
The completed lower row should measure:
24 1/2 x 12 1/2 inches unfinished
The vertical seams in those two rows are intentionally offset. They are not supposed to form one straight line from the top to the bottom of the quilt.
Place the upper and lower rows right sides together and join them across the 24-inch finished horizontal boundary. Match the marked seam intersections so the body and wings continue cleanly across the join.
The completed central field should measure:
24 1/2 x 30 1/2 inches unfinished
Carefully remove the remaining foundation paper. If a bias-heavy edge needs a little help before the paper comes off, stay-stitch inside the outer seam allowance first.
Press the field flat without pulling it out of square. If the center is noticeably undersized, check your seam accuracy rather than simply trimming the whole field smaller and carrying the error forward.
Add the Warm-White Borders
Measure through the vertical center of the quilt field. The target unfinished length is 30 1/2 inches.
Pin one 2 1/2 x 30 1/2-inch side border at the ends, center and quarter points. Sew with a 1/4-inch seam and press toward the border. Repeat on the other side.
The quilt top should now measure approximately:
28 1/2 x 30 1/2 inches unfinished
Add the two 3 1/2 x 28 1/2-inch top and bottom borders the same way.
The completed quilt top should measure approximately:
28 1/2 x 36 1/2 inches unfinished
If there's a small difference caused by normal sewing tolerance, ease it evenly between the pins. Don't stretch one border to make the numbers agree.
Embroider the Eyes Before Quilting
Use black embroidery floss for two small satin-stitched oval eyes. Each eye is approximately 1/8 inch tall.
On the 24 x 30-inch finished central field, the drafted eye centers are approximately 11 inches and 13 inches from the finished left edge, with both positioned 12 1/2 inches down from the finished top edge.
Secure the floss neatly on the back without bulky knots. The eyes are embroidered details, not tiny pieced black squares.
Quilting and Finishing the Turkey Wall Hanging
Once the quilt top is complete, give it a final press and check that the outer edges are square before you layer it. The 28 x 36-inch size is the nominal finished size of the design. Quilting can pull the top in slightly, so don't trim away part of the border later just to force the finished quilt back to an exact number.
Make the Quilt Sandwich
Press the backing and place it wrong side up on a clean flat surface. Center the 33 x 41-inch batting over it, then place the quilt top right side up on the batting.
You should have at least about 2 inches of backing and batting extending beyond the quilt top on all four sides.
Baste from the center outward using your preferred method. Keep the turkey flat as you work, especially around the angled tail seams where there are more bias edges and seam intersections.
Quilt the Wall Hanging
I'd keep the quilting simple. The pieced turkey already has plenty going on, especially through that big nine-feather fan.
A loose meander or soft all-over looping design spaced roughly 1 1/2 to 2 1/2 inches apart will hold the layers together without covering the patchwork with another design. Follow the maximum quilting distance specified for the batting you're using if it calls for closer stitching.
I would skip quilted leaves, pumpkins, words or extra feather motifs. The turkey doesn't need help announcing fall.
After quilting, square the quilt carefully and trim the excess backing and batting even with the quilt top. Preserve the full outer border. The actual measurement may vary slightly after quilting because of normal take-up.
Prepare the Binding
Join the four 2 1/2-inch rust binding strips end to end with diagonal seams. Trim each join to a 1/4-inch seam allowance and press the seams open.
Four approximately 40-inch width-of-fabric strips should give you about 152 1/2 inches of binding after the three diagonal joins. Confirm that you have at least about 142 inches after trimming the joins. That gives you more comfortable working room than trying to finish the approximately 130-inch raw-edge perimeter with only the bare minimum.
Press the long binding strip in half lengthwise with wrong sides together.
Starting along one side of the quilt, leave an unsewn tail of about 8 inches and attach the binding to the front with a 1/4-inch seam. Miter the four corners as you go.
Stop before you reach the starting point and leave another generous tail. Join the two ends with a diagonal seam, trim the join and finish sewing the binding to the quilt.
Fold the binding over the raw edge and secure the folded edge to the back by hand or machine. Check the corners from both sides and make sure all four lie flat.
Add the Optional Hanging Sleeve
If you're actually putting the quilt on the wall, I'd add the sleeve. It keeps the hanging hardware behind the quilt instead of making the top edge do all the work.
Start with the 8 1/2 x 28 1/2-inch sleeve piece.
Turn each short end under 1/4 inch twice and stitch it in place. The finished sleeve length will be about 27 1/2 inches.
Fold the strip in half lengthwise with right sides together and sew the long raw edges with a 1/4-inch seam.
Turn the tube right side out. Shift the seam so it sits in the center of the side that will face the quilt and press gently. The flat sleeve will be about 4 inches high.
After the binding is finished, center the sleeve across the upper back of the quilt just below the binding. Hand-stitch the upper edge to the backing without catching the quilt front.
Slide the hanging rod you plan to use into the sleeve before positioning the lower edge. Let the fabric curve around the rod instead of pulling the sleeve completely flat, then hand-stitch the lower edge to the backing. Leave both sleeve ends open.
Construction Checkpoints Before You Call It Finished
There are a lot of pieces in this turkey, so these measurements are useful places to stop and check your work rather than waiting until the borders are on.
Section A: 8 1/2 x 18 1/2 inches unfinished
Section B: 8 1/2 x 18 1/2 inches unfinished
Section C: 8 1/2 x 18 1/2 inches unfinished
Section D: 6 1/2 x 12 1/2 inches unfinished
Section E: 12 1/2 x 12 1/2 inches unfinished
Section F: 6 1/2 x 12 1/2 inches unfinished
Upper row A + B + C: 24 1/2 x 18 1/2 inches unfinished
Lower row D + E + F: 24 1/2 x 12 1/2 inches unfinished
Completed central field: 24 1/2 x 30 1/2 inches unfinished
After the side borders: 28 1/2 x 30 1/2 inches unfinished
Completed quilt top before quilting: approximately 28 1/2 x 36 1/2 inches unfinished
If a section is noticeably off at one of those checkpoints, fix the seam or piecing problem there. Don't keep trimming pieces smaller to make them fit and expect the next section to repair the difference.
Why I Kept This Turkey Quilt Simple Around the Edges
The tail is where I wanted the color and detail, so I kept the rest of the wall hanging pretty restrained. The warm-white field gives the nine feathers room to spread, and the narrow rust binding finishes the edge without turning into another border competing with the bird.
That also makes the quilt easier to use beyond Thanksgiving day itself. The colors work with the same rust, pumpkin, olive and brown shades you'll find in my fall quilt patterns, so it can go up when you start decorating for fall and stay there until the Christmas decorations come out.
If you like combining several traditional fall motifs in one project, the fall harvest quilt pattern mixes seasonal blocks into a larger quilt. For a single-motif design, the pumpkin quilt pattern and free maple leaf quilt pattern take the same less-fussy approach.
I wouldn't add another decorative border, words or extra Thanksgiving motifs to this one. The fan tail is the feature. Let it be the feature.
Printable Turkey Quilt Wall Hanging Pattern PDF
Download the Free Turkey Quilt Wall Hanging Pattern PDF
The printable pattern includes the full-size foundation paper-piecing templates, section maps, patch-cutting charts, join order, fabric cutting layouts and 1-inch calibration square.
Download the Free Turkey Quilt Wall Hanging Pattern PDF
Print the foundation templates at 100% or Actual Size and check the 1-inch calibration square before cutting fabric.
The printable pattern package for this project includes the full-size foundation paper-piecing templates, section maps, patch-cutting charts, join order and the 1-inch calibration square you'll need before cutting fabric.
Print the templates at 100% or Actual Size. Don't use Fit to Page or any setting that enlarges or reduces the pattern. Measure the calibration square before printing the complete set.
The PDF is designed so you won't need to enlarge the templates yourself or reverse the left and right sections. Follow the front-view maps for placement and the numbered foundations for sewing order.
Pattern status: This is a mathematically drafted, untested quilt pattern. The geometry, section sizes and print scale have been checked, but the pattern has not yet been physically test-sewn.
Turkey Quilt Wall Hanging Pattern Questions
Can I leave off the hanging sleeve?
Yes. The sleeve is optional. Leave it off if you want to use the finished piece as a seasonal mini quilt or table topper instead of hanging it on the wall.
Can I change the turkey's colors?
Absolutely. I'd keep the same general light-to-dark contrast so the individual feathers, body and wings don't blend together. Rust, pumpkin, olive, gold and brown give the sample its fall look, but you can change the actual fabrics without changing the construction.
Why are there so many small foundation pieces?
The extra pieces are what let the straight seams reproduce the angled fan, rounded-looking body and small facial details without appliqué or curved piecing. A simpler version would be easier to sew, but it would no longer match the finished turkey shown here.
Can I enlarge or reduce the templates?
I wouldn't. The six main sections, border measurements and joining seams were calculated to work together at the supplied scale. Enlarging or shrinking only the templates would change the section sizes and throw off the rest of the pattern.
Can I use scraps for the tail feathers?
Yes, as long as each scrap is large enough for the generous patch rectangle listed in the cutting chart. You don't need nine different fabrics. Repeating a few rust, pumpkin, olive and gold prints actually helps the fan look more pulled together.
If you're looking for another fall project after this one, browse the fall quilt patterns collection for more pieced designs using pumpkins, leaves, acorns and other seasonal motifs.
When you click on links to various merchants on this site and make a purchase, this may result in this site earning a commission. This does not affect the price you pay.

UBGI Gold Standard 2026
Reviewed under the site's
editorial checklist.
Photos, decorating ideas, party setups and reader submissions are shared for inspiration unless a page is specifically presented as a pattern, tutorial, reference guide or step-by-step project. Follow the instructions, measurements, safety guidance and manufacturer directions provided for the particular project or product.
About Jan | Contact | Baby Nursery Ideas (Blog) | Site Map | Privacy Policy | Disclosure Policy | Disclaimer | Affiliate Disclosure | Earnings Disclosure | Facebook | Pinterest
I am a participant in the Amazon Services LLC Associates Program, an affiliate advertising program designed to provide a means for us to earn fees by linking to Amazon. As an Amazon Associate I earn from qualifying purchases.
Copyright © 2006-2026. All Rights Reserved.