Free Acorn Quilt Pattern
By Jan Bay
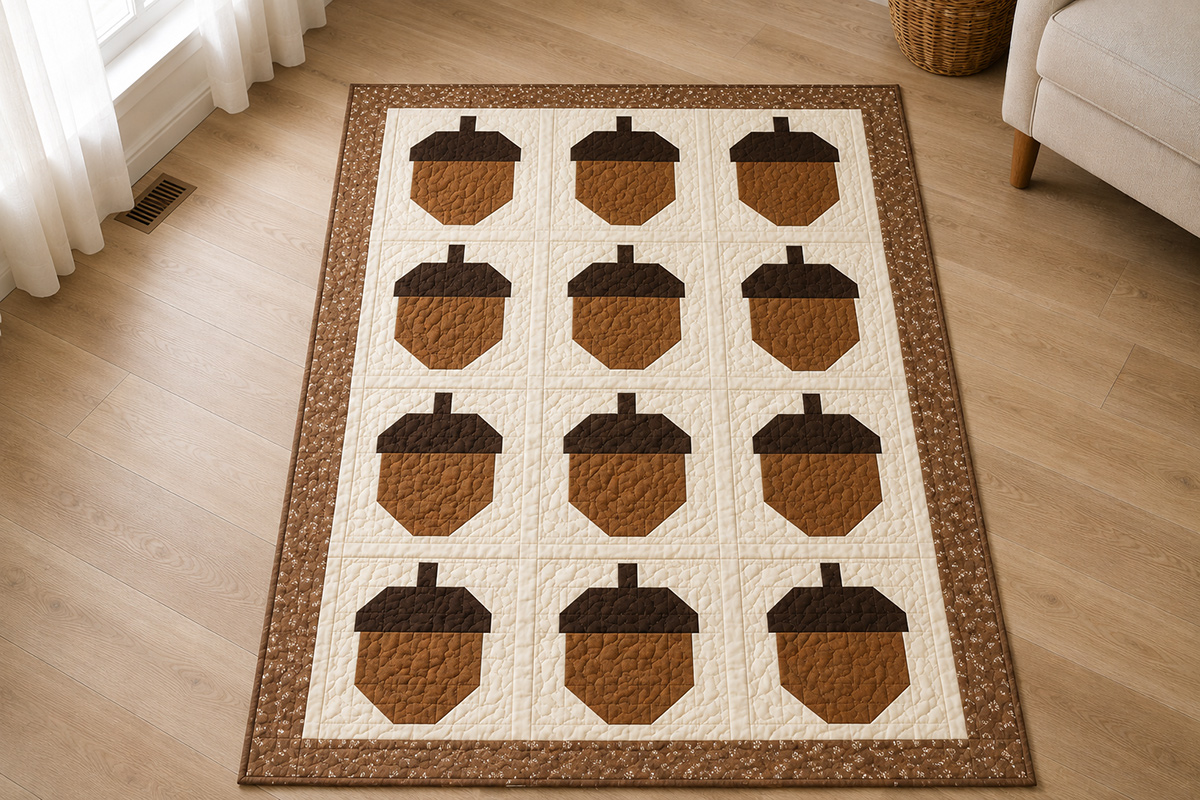
This free acorn quilt pattern uses twelve 12 inch patchwork acorn blocks arranged in a 3 by 4 layout with sashing and a simple outer border. The finished quilt is designed to measure about 46 x 60 inches, giving you a complete fall quilt rather than just a single block, while keeping the same acorn construction used in the companion block pattern.
Quilting Supplies For This Project
Jump to:
Materials and Supplies
This quilt uses twelve 12 inch patchwork acorn blocks, plus sashing and a simple outer border. I’d make one block first before cutting fabric for all twelve. That gives you a chance to check the proportions, your quarter-inch seam allowance and the stitch-and-flip corners before you commit the rest of the fabric.
Use the free acorn quilt block pattern for the complete cutting chart and construction instructions for each 12 inch block. This page picks up from there and shows you how to turn those blocks into the finished quilt.
| Material | Amount | Use |
|---|---|---|
| Light quilting cotton | 1 1/2 yards | Background pieces for 12 acorn blocks |
| Medium brown quilting cotton | 1/2 yard | Acorn bodies |
| Dark brown quilting cotton | 1/2 yard | Acorn caps and stems |
| Sashing fabric | 1/2 yard | 2 inch finished sashing between blocks and rows |
| Border fabric | 3/4 yard | 3 inch finished outer border |
| Backing fabric | 4 yards of standard-width quilting cotton | Pieced quilt backing |
| Batting | At least 54 × 68 inches | Quilt sandwich with extra batting around the quilt top |
| Binding fabric | 1/2 yard | Binding around the finished quilt |
You’ll also need coordinating cotton thread, a rotary cutter, self-healing cutting mat, acrylic quilting ruler, removable fabric marker, sewing machine, iron and ironing surface. A quarter-inch presser foot is useful if you have one.
The fabric amounts above are calculated with a little working room rather than being cut to the last possible inch. I prefer that here. Twelve repeated blocks leave plenty of chances for one strip to be cut crooked or one square to need replacing, and saving a few inches of fabric isn’t worth making the whole cutting process tight.
If you want the block background and sashing to match, you can buy about 2 yards total of that light fabric instead of purchasing the two amounts separately. Keeping the sashing the same color as the block background gives the acorns more open space visually. A contrasting sashing fabric makes the 3 by 4 grid much more obvious.
I’d keep the acorn caps darker than the bodies even if you use several different browns across the quilt. That small value change does a lot of the work of making each acorn readable.
Use a consistent 1/4-inch seam allowance for the patchwork and quilt-top assembly. Janome also uses a quarter-inch seam allowance when assembling its 12 inch finished quilt blocks and notes that a 12 inch finished block measures 12 1/2 inches unfinished in its 12 inch quilt block instructions.
Before cutting all twelve blocks: make one complete acorn block and check that it measures approximately 12 1/2 inches square unfinished. The block pattern has been mathematically checked, but it has not been physically test-sewn from these instructions. That first block is the place to catch a seam allowance or stitch-and-flip problem before you repeat it eleven more times.
Free Acorn Quilt Pattern Finished Size
The quilt is built from twelve 12-inch finished patchwork acorn blocks arranged three blocks across and four blocks down. Each block measures 12 1/2 inches square before it is joined to the quilt top.
Between the blocks, we're adding 2-inch finished sashing. A 3-inch finished outer border goes around the completed patchwork center.
The calculated quilt dimensions are:
| Part of Quilt | Calculated Size |
|---|---|
| Three finished acorn blocks across | 36 inches |
| Two finished vertical sashing strips | 4 inches |
| Patchwork center width | 40 inches |
| Four finished acorn blocks down | 48 inches |
| Three finished horizontal sashing strips | 6 inches |
| Patchwork center height | 54 inches |
| 3-inch border on both sides | Adds 6 inches |
| 3-inch border at top and bottom | Adds 6 inches |
That gives the quilt top a calculated size of approximately 46 × 60 inches before quilting and binding. The finished quilt should remain close to that size, allowing for any small amount of shrinkage during quilting.
I like this size for the acorns because the blocks are large enough to see clearly, but the quilt doesn't need twenty or thirty repeats to look finished. Twelve is plenty.
The light sashing also does something useful here. Instead of having one brown acorn run directly into the next one, each block gets a little space around it. I'd keep the sashing the same color as the block background, or very close to it, if you want the acorns to look as though they're floating across one larger background.
Make the Patchwork Acorn Blocks
Make 12 complete acorn quilt blocks before you start assembling the quilt top. Each one should measure approximately 12 1/2 × 12 1/2 inches unfinished.
The complete construction for one block is on the free acorn quilt block pattern. That pattern gives you the individual cutting chart, stitch-and-flip directions, cap and body measurements, stem placement and row-by-row assembly.
You don't need to repeat all of those instructions twelve separate times. Once your first block measures correctly, batch cutting and sewing the rest is faster and makes it easier to keep them alike.
For all twelve blocks together, you'll need these quantities:
| Fabric | Cut Size | Total Quantity | Use |
|---|---|---|---|
| Light background | 12 1/2 × 1 1/2 in. | 12 | Top background strips |
| Light background | 5 3/4 × 2 in. | 24 | Beside stems |
| Light background | 2 1/4 × 3 in. | 24 | Beside caps |
| Light background | 2 × 2 in. | 48 | 24 upper cap corners and 24 lower body corners |
| Light background | 2 3/4 × 5 1/2 in. | 24 | Beside acorn bodies |
| Light background | 12 1/2 × 2 1/2 in. | 12 | Bottom background strips |
| Dark brown | 8 1/2 × 3 in. | 12 | Acorn caps |
| Dark brown | 1 1/2 × 2 in. | 12 | Stems |
| Medium brown | 7 1/2 × 5 1/2 in. | 12 | Acorn bodies |
Keep the 2-inch background squares separated by purpose while you work. Half belong on the upper corners of the caps, and half belong on the lower corners of the bodies. They're the same size, so it's easy to start sewing without thinking about which corners you're shaping.
The cap gets two angled upper corners. The body gets two angled lower corners. That's it.
If you're using several browns, I wouldn't scatter every fabric randomly. Make a small group of coordinated combinations first. You might use a chestnut body with a chocolate cap, a rust body with a deep brown cap, and a caramel body with another darker brown. Repeat those combinations across the quilt so the color changes look intentional.
Measure more than the first block. I'd check blocks 1, 4, 8 and 12, or at least a few spread through the batch. If your seam allowance starts drifting while you're chain piecing, it's much easier to catch it before the blocks are all finished.
Don't trim a noticeably small block to make it match the others. A block that's already too small needs its seam allowance checked. Trimming only makes that problem permanent.
Cut the Sashing and Borders
The sashing is cut 2 1/2 inches wide so it finishes at 2 inches after a quarter-inch seam is taken on each side.
For the sashing, cut:
| Piece | Cut Size | Quantity | Placement |
|---|---|---|---|
| Vertical sashing | 2 1/2 × 12 1/2 in. | 8 | Between blocks within each row |
| Horizontal sashing | 2 1/2 × 40 1/2 in. | 3 | Between the four completed block rows |
A standard width of quilting cotton may not give you a full usable 40 1/2 inches after the selvages are removed. If yours doesn't, piece the horizontal sashing strips to the required length. There's no need to squeeze a strip out of fabric that's a little too short.
If you piece a long sashing strip, stagger the joins so all three don't fall in exactly the same place in the finished quilt. Keep the join away from the ends when you can.
The patchwork center is calculated to measure 40 1/2 × 54 1/2 inches unfinished once all twelve blocks and the sashing are joined.
The border strips are cut 3 1/4 inches wide. After the 1/4-inch seam joins the border to the quilt center, 3 inches remain from that seam line to the outer raw edge.
For the calculated border sizes, prepare:
| Border | Cut Size | Quantity |
|---|---|---|
| Left and right borders | 3 1/4 × 54 1/2 in. | 2 |
| Top and bottom borders | 3 1/4 × 46 in. | 2 |
Those border pieces will need to be pieced from width-of-fabric strips unless you're using unusually wide yardage. Join enough 3 1/4-inch strips to make each required length, press the joining seams open, and then cut the finished border strip to size.
Before you cut every border to the calculated number, measure your actual quilt center. Measure vertically through the left side, middle and right side. If the measurements are very close, use the middle measurement for both side borders so you're not sewing a longer border onto one side and a shorter one onto the other.
After the side borders are attached, measure horizontally across the top, middle and bottom. Use the middle measurement for both top and bottom borders.
If your quilt center is substantially different from the calculated 40 1/2 × 54 1/2 inches, don't make the borders compensate for it. Check the block sizes, sashing widths and seam allowances first. A border can ease a tiny difference. It shouldn't be asked to hide a half-inch or inch of accumulated piecing error.
Acorn Quilt Layout
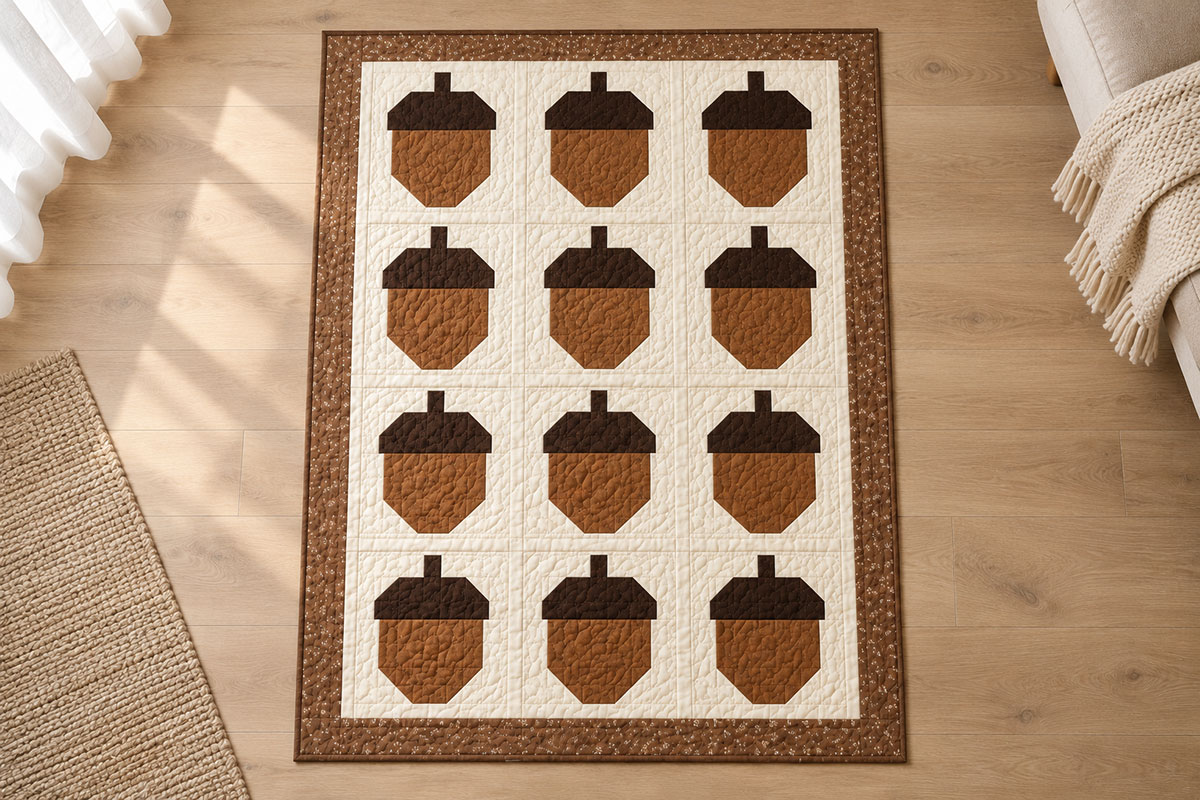
Lay the twelve blocks out in three columns and four rows before you sew any of them together.
All twelve stems should point toward the top of the quilt. It sounds obvious, but once you're moving a stack of nearly identical blocks around the table, turning one upside down is easier than you'd think.
For each of the four rows, arrange the pieces in this order:
Acorn block + vertical sashing + acorn block + vertical sashing + acorn block
Each completed row is calculated to measure 40 1/2 inches wide × 12 1/2 inches tall before it is joined to the next row.
The width check is:
12 1/2 + 2 1/2 + 12 1/2 + 2 1/2 + 12 1/2 = 42 1/2 inches before the four seams are sewn.
Four joining seams remove a total of 2 inches, leaving a 40 1/2-inch unfinished row.
Once all four rows are made, put one 2 1/2 × 40 1/2-inch horizontal sashing strip between each pair of rows. You need three horizontal strips altogether.
The full sequence from top to bottom is:
Block Row 1
Horizontal Sashing
Block Row 2
Horizontal Sashing
Block Row 3
Horizontal Sashing
Block Row 4
Four 12 1/2-inch rows plus three 2 1/2-inch sashing strips total 57 1/2 inches before sewing. Six horizontal joining seams remove 3 inches, leaving a calculated center height of 54 1/2 inches unfinished.
If you're mixing several brown combinations, move the blocks around before you sew. I wouldn't put all the darkest acorns in one row or all the caramel ones in another. Spread them through the quilt so your eye moves across the whole patchwork instead of stopping on one dark corner.
And don't make yourself crazy trying to create a perfectly random arrangement. You only need to avoid an obvious clump.
Assemble the Quilt Top
1. Sew the first block row.
Place one 2 1/2 × 12 1/2-inch sashing strip right sides together with the right edge of the first acorn block. Sew with a 1/4-inch seam allowance.
Add the second acorn block to the other side of that sashing strip. Add another 2 1/2 × 12 1/2-inch sashing strip, followed by the third acorn block.
Press the seams in the direction that lets the row lie flat. If the sashing is very light and the darker block seam allowances show through it, press toward the blocks instead.
Measure the row. It should be approximately 40 1/2 × 12 1/2 inches.
2. Make three more rows the same way.
Use three acorn blocks and two short sashing strips in each row. Check that every stem is pointing toward the same end before you sew the row together.
When all four rows are finished, lay them back on the table in their planned order.
3. Join Rows 1 and 2.
Place one 2 1/2 × 40 1/2-inch horizontal sashing strip along the bottom edge of Row 1 with right sides together. Match the ends and pin or clip along the length without stretching either piece.
Sew with a 1/4-inch seam allowance and press.
Place Row 2 right sides together with the remaining long edge of that sashing strip. Match the side edges, sew with a 1/4-inch seam and press.
4. Add Rows 3 and 4.
Repeat the same process with the second horizontal sashing strip between Rows 2 and 3, then the third strip between Rows 3 and 4.
After pressing, the patchwork center is calculated to measure approximately 40 1/2 × 54 1/2 inches unfinished.
Measure it before adding the borders. Check the width near the top, middle and bottom, then check the height near both sides and through the center.
A tiny difference from one measurement to the next can usually be eased while the border is attached. A noticeable difference needs to be found before you keep sewing.
5. Add the side borders.
Use the two 3 1/4-inch-wide side borders prepared for your measured quilt center. Find the midpoint of each border and the midpoint of the corresponding quilt edge. Match the centers first, then match the ends and distribute the remaining fabric evenly.
Sew one border to each side with a 1/4-inch seam allowance. Press the seams toward the border if that gives you the flattest result.
With the calculated dimensions, the quilt top should now measure approximately 46 inches wide × 54 1/2 inches tall.
6. Add the top and bottom borders.
Measure the width of the bordered quilt through the center. Cut or adjust both remaining 3 1/4-inch border strips to that same measurement. With accurate piecing, that measurement should be about 46 inches.
Match the center and ends of the top border to the quilt. Sew with a 1/4-inch seam allowance and press. Repeat at the bottom.
The completed quilt top is calculated to measure approximately 46 × 60 inches before quilting and binding.
Give it a final press and lay it flat. The borders should lie flat too. If one border ripples, don't quilt over the problem and hope it disappears. Check whether that strip was cut longer than the quilt edge and correct it while you can still get to the seam easily.
Backing, Batting and Binding
Once the quilt top is finished, prepare the backing and batting so both extend beyond the quilt top on all four sides.
For a quilt top measuring about 46 × 60 inches, a backing and batting area of approximately 54 × 68 inches or larger gives you about 4 inches of working room beyond the quilt top on all four sides. If you're sending the quilt to someone else for quilting, ask what amount of extra backing and batting they require before you cut them down.
Standard-width backing fabric will need to be pieced because one width isn't wide enough for this quilt.
From the 4 yards of backing fabric, cut two 72-inch lengths. Remove the selvages from the edges that will be joined, sew the two pieces together with a secure seam, and press that seam open. Trim the pieced backing only after you've confirmed that it remains comfortably larger than the quilt top in both directions.
Make the quilt sandwich.
Lay the backing wrong side up on a clean flat surface. Smooth the batting over it, then center the quilt top right side up over the batting.
Baste the three layers using your preferred quilting method. Work from the center outward so you're not pushing wrinkles toward the middle as you go.
Quilt the layers.
You can keep the quilting simple. Straight lines running through the sashing make sense for this design because they reinforce the patchwork grid without competing with the acorn shapes.
If you want more quilting, add lines through the background areas or quilt around the major acorn shapes. I wouldn't bury these big graphic blocks under an extremely busy quilting design. The acorns are already doing enough.
After quilting, trim the backing and batting even with the quilt-top edges. Keep the quilt square as you trim rather than following a wavy batting edge.
Make the binding.
For the approximately 46 × 60-inch quilt, cut six 2 1/2-inch-wide binding strips across the width of the binding fabric.
Join the strips end to end with diagonal seams. Trim the joining seams to about 1/4 inch and press them open. Press the long binding strip in half lengthwise with wrong sides together.
Six standard-width strips give you roughly 240 inches or more of binding before the joining seams are accounted for. The quilt perimeter is about 212 inches, so that leaves enough working length for the joining seams, corners and final overlap.
Attach the binding.
Sew the folded binding around the front edge of the quilt with about a 1/4-inch seam allowance, mitering each corner. Leave enough loose binding at the beginning and end to join the final ends neatly rather than folding one raw end over the other.
Wrap the binding over the raw quilt edge and secure it on the back by hand or machine. Check all four corners and the entire binding edge before you're finished so there aren't any open sections or loose joining seams.
If this quilt is being made for a baby, use it as a supervised floor quilt, play quilt or keepsake rather than adding it as loose bedding to an infant sleep space. The U.S. Consumer Product Safety Commission recommends keeping infant sleep spaces bare, with no blankets or quilts in the crib, bassinet or play yard. You can read the current CPSC safe sleep guidance.
Use the Acorn Blocks in a Fall Harvest Quilt
You don't have to make all twelve blocks acorns. The 12-inch grid is also what makes this pattern useful when you want to build a larger fall harvest quilt from several different block designs.
The important number is 12 1/2 inches unfinished. Any replacement block that measures 12 1/2 inches square before assembly will finish at 12 inches and can take the place of one acorn without changing the sashing calculations.
That means you can combine this acorn with the 12 inch maple leaf quilt block and the pumpkin quilt block pattern while keeping the same three-column by four-row quilt structure.
For a balanced 12-block fall harvest version, I'd use four acorns, four maple leaves and four pumpkins.
If you want the complete mixed-block layout already worked out, use my free fall harvest quilt pattern.
| Row | Block 1 | Block 2 | Block 3 |
|---|---|---|---|
| Row 1 | Maple Leaf | Acorn | Pumpkin |
| Row 2 | Acorn | Pumpkin | Maple Leaf |
| Row 3 | Pumpkin | Maple Leaf | Acorn |
| Row 4 | Maple Leaf | Acorn | Pumpkin |
That arrangement keeps the three motifs moving across the quilt instead of putting four pumpkins together, four leaves together and four acorns together.
Keep the background fabric consistent across all three block patterns if you want them to read as one quilt. I'd also repeat at least a few colors from one motif to another. A rust pumpkin can pick up the rust in an acorn body, and a deep brown used for an acorn cap can appear again in a leaf or stem.
You don't need every fall color you can find. Rust, brown, muted green, warm red and a clear light background are already plenty.
The sashing and border measurements on this page stay the same for that mixed-block version as long as all twelve blocks finish at 12 inches. That's the advantage of keeping the harvest blocks on one standard grid.
For the all-acorn version, though, keep all twelve acorns. That's the quilt this page is designed to make.
More Free Quilt Patterns
If you'd like to keep building quilts one block at a time, browse my baby quilt patterns for more complete quilts and individual block projects.
You can also look through the easy baby quilt patterns if you want another project based on straightforward patchwork rather than appliqué templates.
This acorn quilt is really a simple grid once the twelve blocks are made. Get the first acorn right, keep the blocks at 12 1/2 inches unfinished, and don't let the borders compensate for inaccurate piecing. From there, the sashing and assembly are ordinary straight seams.
When you click on links to various merchants on this site and make a purchase, this may result in this site earning a commission. This does not affect the price you pay.

UBGI Gold Standard 2026
Reviewed under the site's
editorial checklist.
Photos, decorating ideas, party setups and reader submissions are shared for inspiration unless a page is specifically presented as a pattern, tutorial, reference guide or step-by-step project. Follow the instructions, measurements, safety guidance and manufacturer directions provided for the particular project or product.
About Jan | Contact | Baby Nursery Ideas (Blog) | Site Map | Privacy Policy | Disclosure Policy | Disclaimer | Affiliate Disclosure | Earnings Disclosure | Facebook | Pinterest
I am a participant in the Amazon Services LLC Associates Program, an affiliate advertising program designed to provide a means for us to earn fees by linking to Amazon. As an Amazon Associate I earn from qualifying purchases.
Copyright © 2006-2026. All Rights Reserved.