Free Acorn Quilt Block Pattern
This free acorn quilt block pattern makes a 12 inch finished block with a pieced brown acorn, darker cap and small stem set against a light background. The patchwork block uses straightforward patchwork rather than appliqué or printable templates, making it a manageable fall quilting project for a confident beginner and an easy block to repeat in autumn, woodland and baby quilts.
By Jan Bay
Explore More Baby Quilt Patterns
Quilting Supplies For This Project
Jump to:
Materials and Supplies
You don't need much fabric for one acorn quilt block, which makes this a good place to use smaller pieces left from another fall or woodland quilt. I'd choose three fabrics with enough contrast that the cap, acorn body and background are easy to see from across the room.
- Light background quilting cotton: 1 fat quarter
- Medium brown quilting cotton: 1 fat eighth for the acorn body
- Dark brown quilting cotton: 1 fat eighth for the cap and stem
- Coordinating cotton sewing thread
- Rotary cutter
- Self-healing cutting mat
- Acrylic quilting ruler
- Fabric marking pencil or other removable fabric marker
- Sewing machine
- Iron and ironing surface
- Quarter-inch presser foot, if you have one
The fabric amounts give you more than the exact pieces require, so you have room to straighten the fabric and recut a piece if necessary. I wouldn't try to reduce the background fabric to the absolute minimum. The long top and bottom strips are much easier to cut accurately when you aren't working from a tiny scrap.
Use a consistent 1/4-inch seam allowance throughout the block. That matters here because all five horizontal sections have been calculated to join into a 12 1/2-inch unfinished block. If the seam allowance grows or shrinks as you sew, the sections won't line up as neatly. Janome also uses a 1/4-inch seam allowance for piecing its 12-inch finished quilt blocks and trims the completed blocks to 12 1/2 inches when needed in its 12-inch quilt block instructions.
You can use prints instead of solids, but I'd keep the background fairly quiet. The acorn shape comes from the piecing itself, and a busy background can make those angled cap and lower corners harder to see.
Finished Block Size
This acorn quilt block is drafted to finish at 12 inches square after it is sewn into a quilt. Before that final seam allowance is used, the completed block should measure 12 1/2 inches square.
The acorn is centered in the block with enough light background around it to keep the shape easy to see when several blocks are joined together. The finished acorn proportions are:
- Stem: 1 inch wide by 1 1/2 inches tall
- Acorn cap: 8 inches wide by 2 1/2 inches tall
- Acorn body: 7 inches wide by 5 inches tall
- Cap overhang: 1/2 inch beyond the body on each side
- Background above the stem: 1 inch finished
- Background below the acorn: 2 inches finished
The cap is supposed to be a little wider than the nut. Don't try to line those two pieces up flush at the sides. That small 1/2-inch overhang on each side is part of the acorn shape shown in the example image.
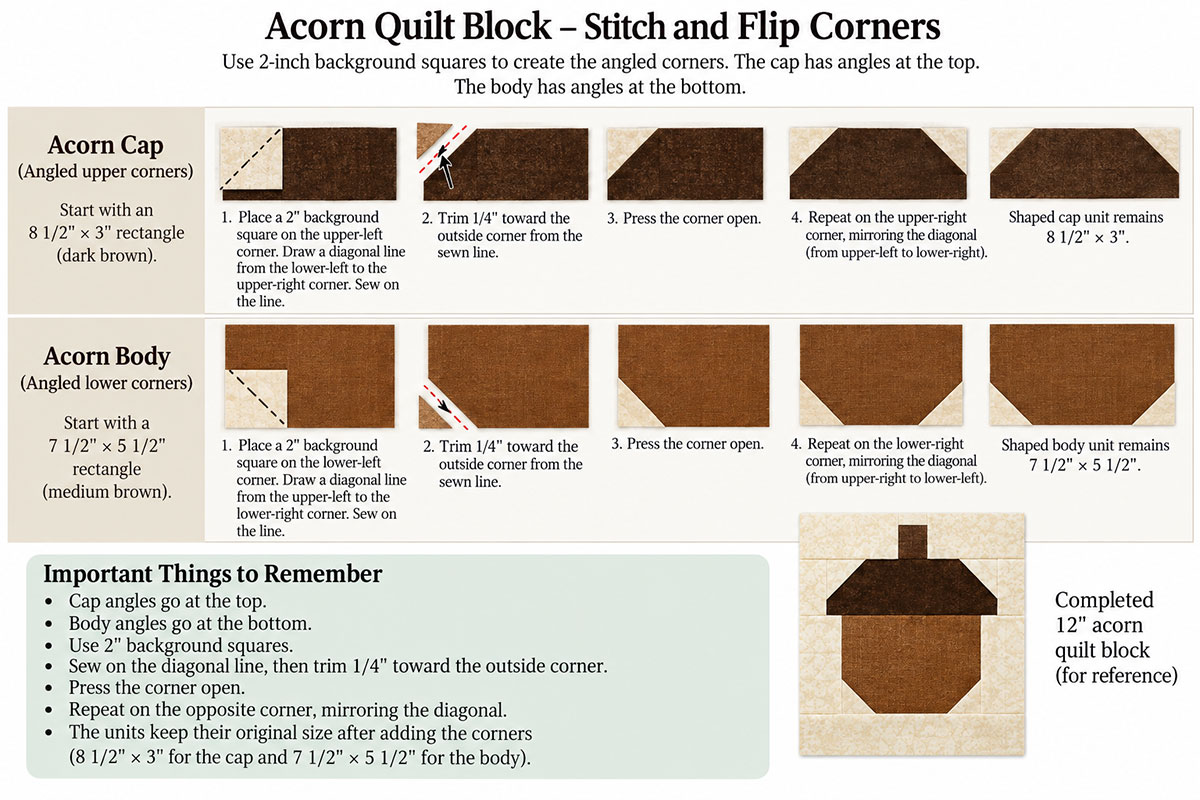
The body also keeps a straight top edge and straight upper sides. Only the two lower corners are angled. The cap gets its angles at the two upper corners.
Cutting Chart for One 12 Inch Acorn Quilt Block
Cut all pieces carefully before you start sewing. The long background strips are already calculated for a 12 1/2-inch unfinished block, so don't add extra seam allowance to any measurement in the chart.
| Fabric | Piece | Cut Size | Qty. | Use |
|---|---|---|---|---|
| Light background | A | 12 1/2 × 1 1/2 in. | 1 | Top background |
| Light background | B | 5 3/4 × 2 in. | 2 | Beside stem |
| Light background | C | 2 1/4 × 3 in. | 2 | Beside cap |
| Light background | D | 2 × 2 in. | 2 | Upper cap corners |
| Light background | E | 2 3/4 × 5 1/2 in. | 2 | Beside acorn body |
| Light background | F | 2 × 2 in. | 2 | Lower body corners |
| Light background | G | 12 1/2 × 2 1/2 in. | 1 | Bottom background |
| Dark brown | H | 8 1/2 × 3 in. | 1 | Acorn cap |
| Medium brown | I | 7 1/2 × 5 1/2 in. | 1 | Acorn body |
| Dark brown | J | 1 1/2 × 2 in. | 1 | Stem |
You'll notice that the cap and body both begin as rectangles. The acorn shape comes from sewing light background squares across selected corners, trimming away the excess and pressing the new corners open. That keeps the whole block traditionally pieced. There are no appliqué shapes to trace or cut.
How to Make the Free Acorn Quilt Block Pattern
Make the cap and body first. Once those two shaped pieces are finished, the rest of the block is ordinary straight-seam piecing.
1. Shape the upper-left corner of the cap.
Place one 2-inch background square D right sides together on the upper-left corner of the 8 1/2 × 3-inch dark brown cap rectangle H. Match the top and left raw edges.
Draw a diagonal line across the small square from its lower-left corner to its upper-right corner. Sew directly on the drawn line.
Measure 1/4 inch from the sewn line toward the outside upper-left corner. Trim away the excess background and dark brown fabric beyond that trimming line. Press the remaining background triangle open.
2. Shape the upper-right corner of the cap.
Place the second 2-inch background square D on the upper-right corner of H with right sides together and the raw edges matched.
Draw the diagonal from the small square's upper-left corner to its lower-right corner. Sew on the line, trim 1/4 inch toward the outside corner and press the background triangle open.
The cap unit should still measure 8 1/2 × 3 inches. Don't trim the cap down after adding the corners.
The cap should now have a broad flat top, two matching diagonal shoulders and a straight lower edge. That's the shape we want. It should not come to a point like a triangle.
3. Add the background beside the cap.
Sew one 2 1/4 × 3-inch background rectangle C to each side of the shaped cap. Press the seams toward the background fabric if that gives you the flattest unit.
The completed cap row should measure:
12 1/2 inches wide × 3 inches tall.
Here's the width check before you go farther:
2 1/4 + 8 1/2 + 2 1/4 = 13 inches before sewing. The two 1/4-inch seams use a total of 1/2 inch, leaving a 12 1/2-inch-wide cap row.
4. Shape the lower-left corner of the acorn body.
Place one 2-inch background square F on the lower-left corner of the 7 1/2 × 5 1/2-inch medium brown body rectangle I.
Draw a diagonal line from the small square's upper-left corner to its lower-right corner. Sew on the line.
Trim 1/4 inch toward the outside lower-left corner, removing the excess layers. Press the background triangle open.
5. Shape the lower-right corner.
Place the remaining 2-inch F square on the lower-right corner.
Draw the diagonal from the small square's upper-right corner to its lower-left corner. Sew on the line, trim 1/4 inch toward the outside corner and press open.
The acorn body should still measure 7 1/2 × 5 1/2 inches.
Keep the top corners of the body square. Only the bottom corners are clipped. If you stitch background squares onto all four corners, you'll end up with a different acorn than the one shown in the example image.
6. Add the background beside the body.
Sew one 2 3/4 × 5 1/2-inch background rectangle E to each side of the shaped acorn body.
The completed body row should measure:
12 1/2 inches wide × 5 1/2 inches tall.
The width check is 2 3/4 + 7 1/2 + 2 3/4 = 13 inches before sewing. The two seams remove 1/2 inch, leaving 12 1/2 inches.
At this point, set the cap row directly above the body row before sewing anything together. The 8-inch finished cap will extend about 1/2 inch beyond the 7-inch finished body on each side. If that relationship looks right, your two main acorn sections are ready for assembly.
Assemble the Acorn Quilt Block
Before joining the rows, lay all five sections on the table in order. You should have:
- 12 1/2 × 1 1/2-inch top background strip A
- 12 1/2 × 2-inch stem row
- 12 1/2 × 3-inch cap row
- 12 1/2 × 5 1/2-inch acorn body row
- 12 1/2 × 2 1/2-inch bottom background strip G
Check the alignment before you sew. The stem should be centered over the cap, and the body should be centered under it. The cap will extend about 1/2 inch farther than the body on each side after the block is finished.
1. Make the stem row.
Sew one 5 3/4 × 2-inch background rectangle B to each side of the 1 1/2 × 2-inch dark brown stem J.
Press the seams toward the background fabric. The stem row should measure 12 1/2 × 2 inches.
The width check is:
5 3/4 + 1 1/2 + 5 3/4 = 13 inches before sewing. Two 1/4-inch seams remove 1/2 inch, leaving 12 1/2 inches.
2. Join the top background to the stem row.
Sew the 12 1/2 × 1 1/2-inch A strip across the top of the stem row using a 1/4-inch seam allowance.
Press the seam toward the top background strip.
3. Add the cap row.
Place the cap row directly under the stem row with right sides together. Match the side edges and make sure the stem is centered over the flat top of the cap.
Sew across the row with a 1/4-inch seam allowance. Press the seam in the direction that lets the block lie flat without forcing the fabric around the stem.
4. Add the acorn body row.
Place the body row under the cap row. Match the side edges. The straight top of the medium brown body should sit directly below the straight lower edge of the dark brown cap.
Sew with a 1/4-inch seam allowance and press the seam flat.
Don't try to stretch the 7 1/2-inch body so its sides line up with the wider cap. The difference in width is intentional.
5. Add the bottom background.
Sew the 12 1/2 × 2 1/2-inch G strip across the bottom of the body row. Press the seam toward the background strip.
The block should now be approximately 12 1/2 × 12 1/2 inches unfinished.
Here's the height check:
1 1/2 + 2 + 3 + 5 1/2 + 2 1/2 = 14 1/2 inches before the horizontal rows are joined.
There are four joining seams. Each seam uses 1/4 inch from each of the two adjoining rows, for a total reduction of 1/2 inch per seam.
14 1/2 inches minus 2 inches of total seam allowance = 12 1/2 inches unfinished.
Once the block is sewn into the quilt with another 1/4-inch seam allowance around its outside edges, it finishes at 12 inches square.
Square the Finished Acorn Quilt Block
Give the block a final press before you measure it. Don't pull it into shape with the iron. Set the seams and press the block flat so the ruler is measuring the piecing rather than wrinkles.
The unfinished block is calculated to measure 12 1/2 inches square.
Place a 12 1/2-inch square ruler over the block if you have one. The center of the block should fall at 6 1/4 inches in both directions, and the stem, cap and body should all remain centered on that line.
If the block is only a thread or two larger than 12 1/2 inches, trim the outside background edges lightly. Don't trim into the acorn just to make the ruler fit.
If the block is noticeably smaller than 12 1/2 inches, stop before trimming. Check the 1/4-inch seam allowance first. Trimming a small block even smaller won't fix the problem.
I would also check these four things before calling the block finished:
- The stem is centered over the cap.
- The cap is wider than the body by about 1/2 inch on each side.
- The body has square upper corners and angled lower corners.
- The cap has angled upper corners and a straight bottom edge.
Those details are what keep the block looking like the acorn in the example image instead of turning into a generic oval or pointed nut shape.
Pattern note: The dimensions and seam math for this block have been calculated to produce a 12-inch finished block. The pattern has not been physically test-sewn from these instructions, so check your measurements as you work, especially after making the stitch-and-flip corners and before joining the five horizontal rows.
Ways to Use Your Acorn Quilt Block
You can repeat the block exactly as shown and make a whole fall quilt, but you don't have to. One 12-inch block is large enough to use as the center of a small wall hanging or pillow front, and a few blocks can be mixed with simpler patchwork to keep the acorns from taking over the whole project.
If you want to repeat the block in a complete 3 by 4 quilt with sashing and borders, use my free acorn quilt pattern.
For a baby quilt, I'd leave some breathing room between the acorns. Alternating these blocks with plain squares, simple nine-patch blocks or another woodland design would keep the quilt playful without making every inch busy.
If you want a more seasonal quilt, pair the acorn with the free maple leaf quilt block pattern. Both are pieced blocks, so you can keep the project in the same patchwork style without adding appliqué templates.
For a mixed fall quilt, my free fall harvest quilt pattern combines this acorn with pumpkin and maple leaf blocks that finish at the same 12-inch size.
You could also use several acorn blocks across a fall table runner, arrange four into a square wall hanging, or make a row of them for the bottom of a larger autumn quilt.
If you're building a woodland baby quilt, brown doesn't have to mean everything else has to be brown too. Muted green, rust, gold, soft red or a clear ivory background can give the acorns more contrast while still keeping the woodland look.
Keep the acorn cap darker than the body. That color difference matters almost as much as the piecing because it makes the cap readable from a distance.
How Many Acorn Blocks Do You Need for a Quilt?
Because each block finishes at 12 inches square, figuring out a simple quilt layout is pretty easy. If you're sewing the blocks directly to one another with no sashing, decide how many blocks you want across and down, then multiply each number by 12 inches.
| Block Layout | Number of Blocks | Finished Size Before Borders |
|---|---|---|
| 2 × 2 | 4 | 24 × 24 in. |
| 2 × 3 | 6 | 24 × 36 in. |
| 3 × 3 | 9 | 36 × 36 in. |
| 3 × 4 | 12 | 36 × 48 in. |
| 4 × 5 | 20 | 48 × 60 in. |
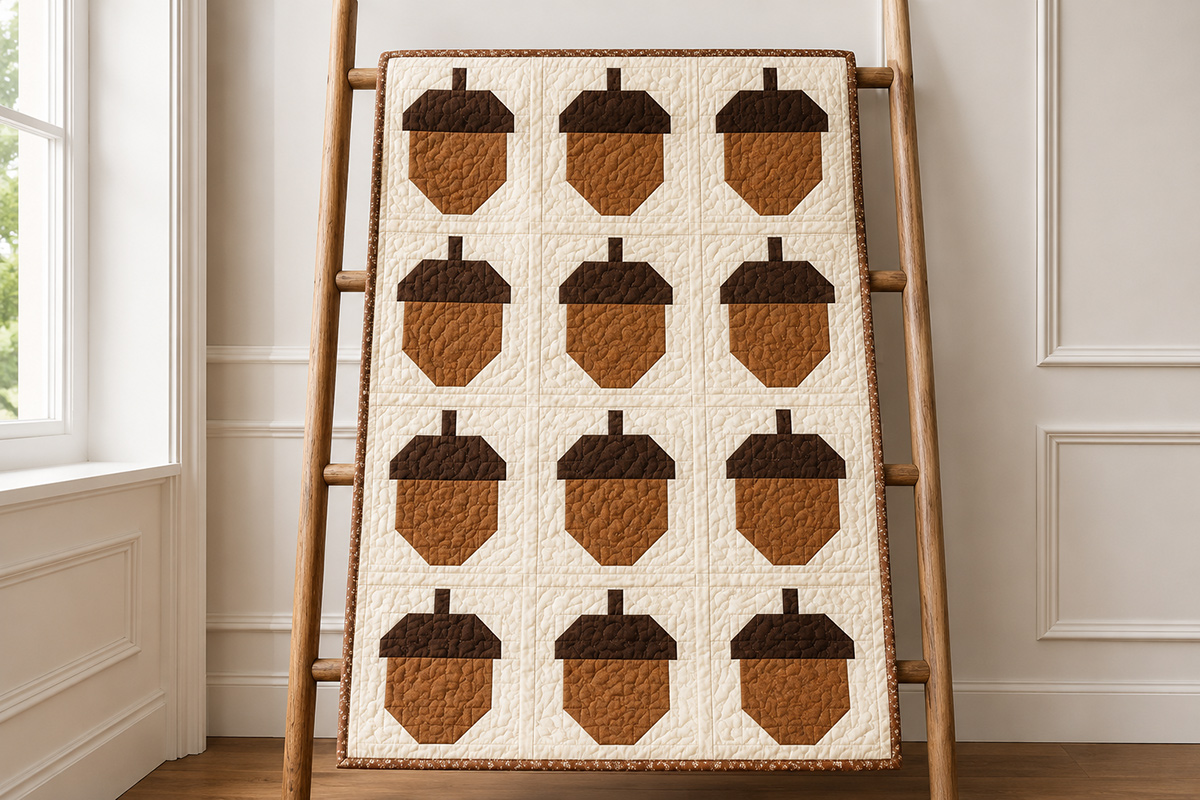
The example quilt uses a 3 × 4 arrangement of 12 acorn blocks. Sewn directly together with no sashing, those blocks make a 36 × 48-inch patchwork center before adding any borders.
You don't have to repeat the same brown fabrics in every block. A mix of rust, chestnut, caramel and deeper chocolate browns would still read as one coordinated acorn quilt as long as the cap stays darker than the body.
If you'd rather break up the repetition, alternate acorn blocks with plain 12-inch blocks. That cuts the number of pieced patchwork acorns you need while keeping the finished quilt built on the same 12-inch grid.
Keeping the Acorn Shape Consistent From Block to Block
If you're making twelve or twenty of these blocks, consistency matters more than speed. I'd cut all of the pieces for one test block first rather than cutting an entire quilt's worth before you know you like the proportions.
Once you're happy with that first block, cut the remaining pieces in groups by size. Keep the 2-inch corner squares together, the cap rectangles together and the body rectangles together. That makes it much harder to accidentally use a cap-corner square in the wrong place.
Pay particular attention to the four stitch-and-flip corners. Every cap should have its two angles at the top, and every body should have its two angles at the bottom.
The diagonal stitching direction matters too. If one diagonal is reversed, that corner will angle toward the wrong part of the block.
I would also measure the first completed cap row and first completed body row before chain-piecing a stack of them. You want:
- Cap row: 12 1/2 × 3 inches
- Body row: 12 1/2 × 5 1/2 inches
- Stem row: 12 1/2 × 2 inches
If those three units are right, the rest of the assembly is just straight seams.
Making an Acorn and Maple Leaf Fall Quilt
The acorn and maple leaf blocks work especially well together because both finish at 12 inches and both are made with traditional piecing rather than appliqué.
You could alternate one acorn with one 12 inch maple leaf quilt block across the quilt, or use a row of leaves above and below a group of acorns.
I wouldn't add too many different motifs to the same small quilt. Acorns and leaves are enough to establish the fall theme, and keeping the blocks on the same 12-inch grid makes the layout easier to plan.
If you're new to making blocks this size, you can also browse my easy baby quilt patterns for more straightforward patchwork ideas.
Free Acorn Quilt Block Pattern FAQ
Is this acorn quilt block appliqué?
No. The acorn is made entirely from pieced patchwork quilting cotton. The angled corners are created with stitch-and-flip background squares, so there are no appliqué templates or fusible shapes.
What size does the acorn quilt block finish?
The block should measure approximately 12 1/2 inches square before it is sewn into a quilt. It finishes at 12 inches square after the outer 1/4-inch seam allowances are used.
Can I make the cap and acorn body from the same fabric?
You can, but you'll lose some of the definition that makes the acorn easy to recognize. I'd use a darker fabric for the cap and a medium brown, rust or caramel fabric for the body.
Why is the cap wider than the acorn body?
That's intentional. The finished cap measures 8 inches wide while the body measures 7 inches wide, leaving about a 1/2-inch overhang on each side. Keep that difference when you assemble the block.
Can I use this block in a baby quilt?
Yes. A 3 × 4 layout makes a 36 × 48-inch patchwork center before borders. You can also alternate the acorns with plain blocks or other 12-inch woodland quilt blocks if you want more open space in the design.
Has this pattern been physically test sewn?
No. The cutting sizes, seam allowances and finished measurements have been mathematically checked against the intended 12-inch block design, but the pattern has not been physically test sewn. Measure the first cap, body and completed block before cutting enough pieces for a full quilt.
More Free Quilt Patterns to Try
If you like building one block at a time, browse my baby quilt patterns for more patchwork ideas and finished quilt projects.
You can also look through the free baby patterns collection for more sewing, quilting and handmade nursery projects.
This acorn block is simple enough to repeat but distinctive enough to carry a whole fall quilt. Keep the cap darker than the body, keep those four angled corners in the correct positions, and check the first block at 12 1/2 inches before you cut the rest.
When you click on links to various merchants on this site and make a purchase, this may result in this site earning a commission. This does not affect the price you pay.

UBGI Gold Standard 2026
Reviewed under the site's
editorial checklist.
Photos, decorating ideas, party setups and reader submissions are shared for inspiration unless a page is specifically presented as a pattern, tutorial, reference guide or step-by-step project. Follow the instructions, measurements, safety guidance and manufacturer directions provided for the particular project or product.
About Jan | Contact | Baby Nursery Ideas (Blog) | Site Map | Privacy Policy | Disclosure Policy | Disclaimer | Affiliate Disclosure | Earnings Disclosure | Facebook | Pinterest
I am a participant in the Amazon Services LLC Associates Program, an affiliate advertising program designed to provide a means for us to earn fees by linking to Amazon. As an Amazon Associate I earn from qualifying purchases.
Copyright © 2006-2026. All Rights Reserved.