Free Heart Quilt Block Pattern
By Jan Bay
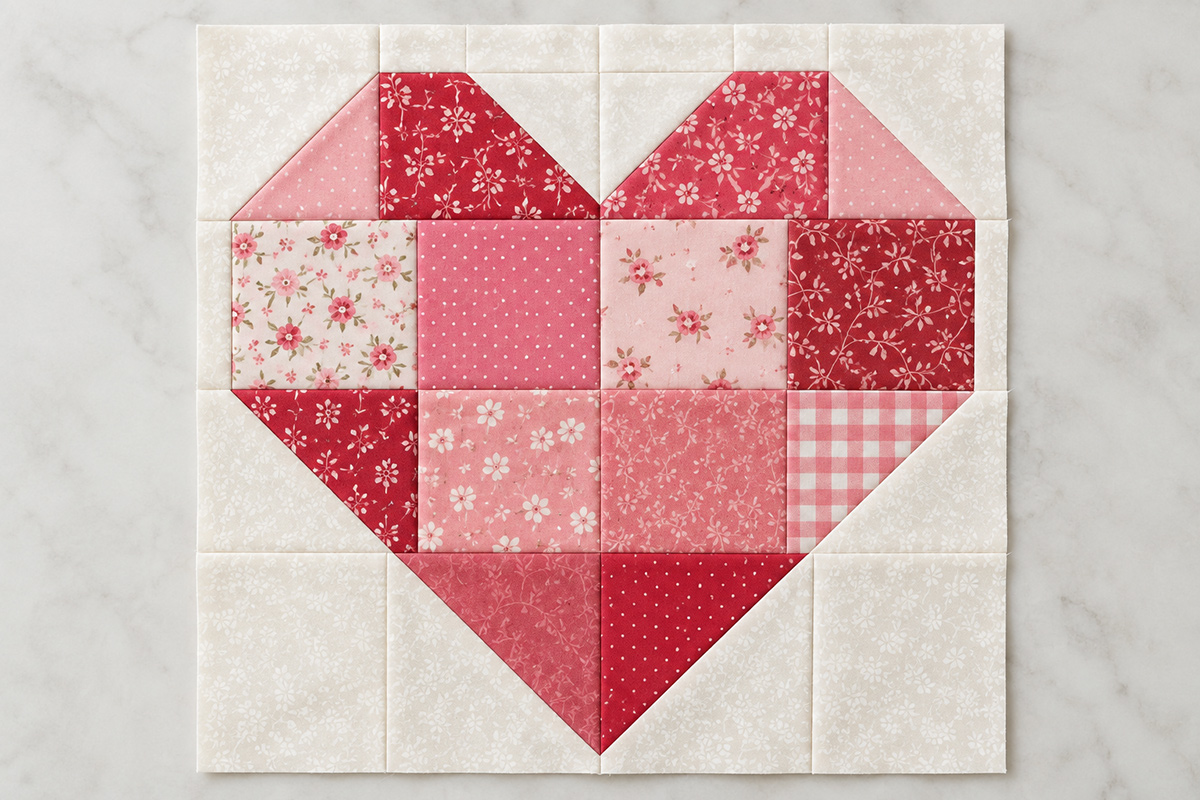
This free heart quilt block pattern makes a pretty 12 inch finished block from straightforward patchwork pieces, giving you a heart that is easy to repeat for a baby quilt or use by itself for a pillow, wall hanging or other small quilted project. It's a classic heart block that I believe you will use time and time again in your quilting projects.
Explore More Free Quilt Patterns
Free Maple Leaf Quilt Block Pattern
Quilting Tools and Supplies for this Project
Jump to:
Free Heart Quilt Block Pattern at a Glance
This is a traditionally pieced heart, so you won't need templates, appliqué pieces or foundation paper piecing. The finished block measures 12 inches square and is built from squares and half-square triangles that are easy to cut with a rotary cutter and ruler.
I like the scrappy look for this one. Use several pink and red fabrics instead of cutting the whole heart from one print and the individual patches become part of the design. Florals, dots, gingham and small prints can all live together here.
The background should stay fairly quiet so the heart reads clearly. The example uses warm white, but a pale neutral would work just as well.
- Finished block size: 12 × 12 inches
- Unfinished block size: 12 1/2 × 12 1/2 inches
- Skill level: confident beginner
- Technique: traditional patchwork piecing
- Seam allowance: 1/4 inch
- Templates: none
- Half-square triangles: 6
A consistent quarter-inch seam matters on a block with this many intersections. The American Quilter's Society beginner lesson on seam allowance and patchwork is a useful reference if you want to check your machine setup before you start.
Materials for the 12 Inch Heart Quilt Block
- Warm-white quilting cotton for the background, about one fat eighth
- Assorted pink and red quilting cotton scraps
- Neutral 50 wt. cotton piecing thread
- Rotary cutter
- Cutting mat
- Acrylic quilting ruler
- Sewing machine
- Iron and pressing surface
- Optional 3 1/2-inch square ruler for trimming half-square triangles
You do not need matching heart fabrics. In fact, I wouldn't bother. Eight or ten scraps that share the same pink-to-red color family give the block much more life than one repeated print.
Cutting Chart for the Free Heart Quilt Block Pattern
All measurements below include the 1/4-inch seam allowance. The 4-inch squares are intentionally oversized so the half-square triangles can be trimmed accurately after sewing.
Warm-White Background Fabric
- Cut 3 squares measuring 4 × 4 inches for the half-square triangles.
- Cut 2 squares measuring 3 1/2 × 3 1/2 inches for the lower outside corners.
- Cut 2 background rectangles measuring 3 1/2 inches wide × 1 1/4 inches high for the narrow sections above the heart lobes.
- Cut 2 squares measuring 1 1/2 × 1 1/2 inches for the center notch between the lobes.
Pink and Red Heart Fabrics
- Cut 3 assorted squares measuring 4 × 4 inches for the half-square triangles.
- Cut 6 assorted squares measuring 3 1/2 × 3 1/2 inches for the center of the heart.
- Cut 2 assorted heart-fabric rectangles measuring 3 1/2 inches wide × 2 3/4 inches high for the two upper heart lobes.
I would mix the fabrics instead of trying to match the two sides exactly. The heart itself is symmetrical, but the prints don't need to be. That's what gives the block the scrappy look shown in the example.
If you're using a stripe, gingham or another print with an obvious direction, lay the block out before sewing. Small florals and dots are much more forgiving.
Make the Six Half-Square Triangles
Pair each 4-inch background square with one 4-inch pink or red square, right sides together. You will make two half-square triangles from each pair, for a total of six.
- Draw a diagonal line from corner to corner on the wrong side of each 4-inch background square.
- Place one marked background square right sides together with one 4-inch heart-fabric square.
- Sew a seam 1/4 inch away from the drawn line on both sides of the line.
- Cut directly on the drawn line to separate the pair into two units.
- Press each unit open, pressing the seam allowance toward the darker fabric.
- Trim each half-square triangle to exactly 3 1/2 × 3 1/2 inches.
- Repeat with the remaining two pairs to make six HST units altogether.
Don't skip the trimming. Those six units control the outside slopes and bottom point of the heart, and a small size difference here can show up again when the rows are joined.
Make the Two Upper Heart Lobe Units
The upper units are a little different from the rest of the block because they give the heart its center dip and leave that narrow strip of background above the lobes.
Left Heart Lobe
- Place one 1 1/2-inch background square right sides together on the upper right corner of one 3 1/2-inch-wide × 2 3/4-inch-high heart rectangle.
- Draw a diagonal line across the small square from the upper left corner to the lower right corner.
- Sew directly on the drawn line.
- Trim away the outside corner layers, leaving a 1/4-inch seam allowance beyond the stitched line. Do not trim away the portion of the heart rectangle that remains inside the block.
- Press the background triangle toward the corner.
- Sew one 1 1/4 × 3 1/2-inch background rectangle across the top edge of the heart unit, right sides together.
- Press the seam allowance toward the background strip.
The finished unit should measure 3 1/2 × 3 1/2 inches.
Right Heart Lobe
Make the second lobe as a mirror image.
- Place the remaining 1 1/2-inch background square on the upper left corner of the second heart rectangle.
- Draw the diagonal line from the upper right corner to the lower left corner.
- Sew directly on the drawn line. Trim away the outside corner layers, leaving a 1/4-inch seam allowance beyond the stitched line, then press the background triangle outward.
- Add the remaining 1 1/4 × 3 1/2-inch background strip across the top.
- Press toward the background.
The right lobe unit should also measure 3 1/2 × 3 1/2 inches.
Set the two units next to one another before you go farther. The small background triangles should meet in the center and form the V-shaped dip between the two lobes.
Lay Out the Heart Quilt Block
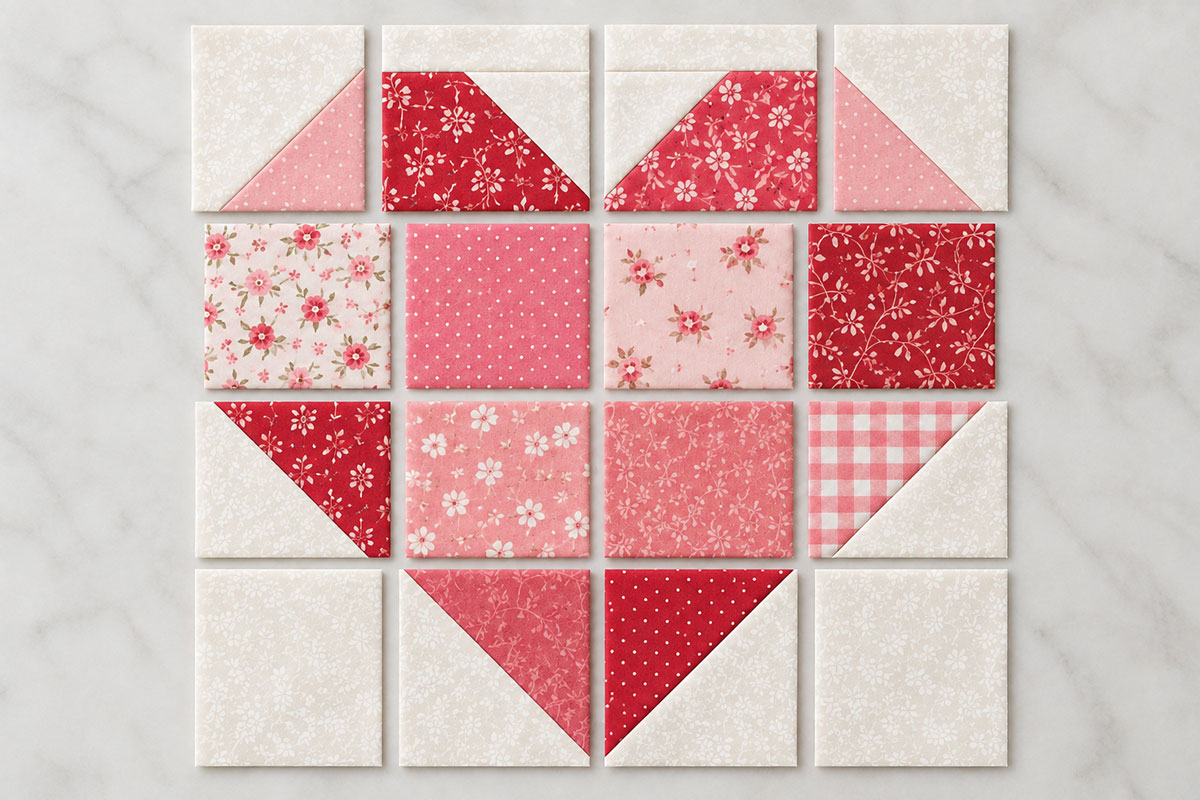
Now put everything on the table before you start joining rows. I would do this even if you've made dozens of quilt blocks. With several pink fabrics in play, it's much easier to move one square now than to discover two identical prints sitting together after the seams are sewn.
Arrange the pieces in four rows from left to right as follows.
Row 1
- Half-square triangle with the heart fabric toward the lower inside corner
- Left heart lobe unit
- Right heart lobe unit
- Half-square triangle with the heart fabric toward the lower inside corner
Row 2
Place four 3 1/2-inch heart squares across the row.
Row 3
- Half-square triangle with the heart fabric toward the upper inside corner
- One 3 1/2-inch heart square
- One 3 1/2-inch heart square
- Half-square triangle with the heart fabric toward the upper inside corner
Row 4
- One 3 1/2-inch background square
- Half-square triangle with the heart fabric toward the upper right
- Half-square triangle with the heart fabric toward the upper left
- One 3 1/2-inch background square
The heart fabrics in the two middle units of Row 4 should meet and form one centered point. If they don't, rotate one or both HSTs before sewing.
Look at the whole heart before moving on. You should see two upper lobes, a clear center dip, a broad middle and two diagonal sides that taper into one point.
Sew the Four Rows
Work on one row at a time so the layout doesn't get mixed up.
- Sew the four units in Row 1 together with 1/4-inch seams.
- Join the four squares in Row 2.
- Join the four units in Row 3.
- Join the four units in Row 4.
Check each completed row against your layout before pressing it. It's surprisingly easy to turn an HST while carrying pieces back and forth to the machine.
Press the Seams
You can press the row seams in alternating directions so the intersections nest when the rows are joined. I would press Rows 1 and 3 in one direction and Rows 2 and 4 in the opposite direction.
There are places where the HST seams may naturally want to lie another way. Don't fight a bulky intersection just to follow a rule. The goal is a flat block with the row intersections lined up neatly.
Use the iron to press rather than dragging it back and forth over the pieces. Small patchwork units can stretch, especially along diagonal edges.
Join the Rows
- Place Row 1 and Row 2 right sides together.
- Match the vertical seams and pin or clip the intersections.
- Sew the rows together with a 1/4-inch seam.
- Add Row 3 in the same way.
- Sew Row 4 to the bottom, making sure the two lower HSTs remain centered beneath the heart.
- Press the horizontal seams.
Take a look at the center notch and the bottom point before you trim anything. Those are the two places your eye will go first. If both are centered, the rest of the block tends to look right even when every scrappy print is different.
Square the Block to 12 1/2 Inches
The completed block should measure approximately 12 1/2 × 12 1/2 inches before it is sewn into a quilt.
Place a large square ruler over the block and check all four sides. The center of the heart should fall at approximately the 6 1/4-inch point of the unfinished block, with the bottom point centered on that same vertical line.
Trim only what you need to straighten the edges. Don't keep shaving the block smaller trying to make every last thread perfect.
Once the block is sewn into a project with a 1/4-inch seam allowance, it finishes at 12 × 12 inches.
Quick Checkpoints Before You Call It Finished
- The unfinished block is approximately 12 1/2 inches square.
- The two upper lobes are separated by a visible center dip.
- A narrow strip of background shows above both lobes.
- The broad middle of the heart spans the full second row.
- The lower sides taper evenly toward the center.
- The two bottom HSTs meet to form one centered point.
- No background HST has accidentally been rotated into the heart.
If one of those looks wrong, check the orientation of the HSTs before you reach for the seam ripper. Rotation is the most likely culprit.
Ways to Use the Finished Heart Quilt Block
One block is enough for a small wall hanging or the center of a quilted pillow front. Add borders if you want more breathing room around the heart.
For a larger project, repeat the block. A three-by-four arrangement of 12-inch finished blocks gives you a 36 × 48-inch patchwork center before borders are added. Four blocks across by five down gives you a 48 × 60-inch center.
If you'd rather start with a complete quilt layout instead of deciding how many blocks to make, use my free heart quilt pattern. This block page is meant for the quilter who specifically wants a single reusable heart unit.
The block can also be mixed with other seasonal patchwork instead of repeated by itself. My pumpkin quilt block pattern and maple leaf quilt block pattern give you two more pieced motifs that work well when you want to build a larger sampler-style project.
Change the Fabrics Without Changing the Pattern
Pink and red make the heart obvious, but the construction doesn't depend on those colors. You can make the heart from peach, burgundy, coral, lavender or a completely scrappy mix.
I'd keep one thing consistent: give the heart enough contrast against the background. A pale pink heart on an almost identical pale pink background can make all that careful piecing disappear.
You can also make every heart square from the same fabric if you want a quieter block. It will still work. You simply lose some of the patchwork character shown in the example.
If the Heart Block Isn't Lining Up
My Half-Square Triangles Are Too Small
That is exactly why the pattern starts with 4-inch squares. Sew first and trim each HST to 3 1/2 inches afterward. If a unit is already smaller than 3 1/2 inches before trimming, check the seam allowance before making the remaining HSTs.
The Bottom Point Looks Cut Off
Don't trim extra fabric from the lower edge trying to sharpen the heart point. Keep the block at 12 1/2 inches square. The point where the two bottom HSTs meet should sit about 1/4 inch above the lower raw edge, leaving enough seam allowance below the point for it to remain visible after the block is sewn into a project.
The Center Notch Is Uneven
Compare the two upper lobe units before sewing Row 1. The 1 1/2-inch corner squares need to be sewn as mirror images. If both diagonal seams run the same direction, the notch won't meet correctly.
My Block Is Smaller Than 12 1/2 Inches
Check the 1/4-inch seam allowance first. A seam that is only a little too wide gets multiplied across several units. Also confirm that every HST was trimmed to 3 1/2 inches, not 3 inches.
Pattern Notes
- Use a 1/4-inch seam allowance throughout.
- Measurements are given in inches.
- Press rather than stretching or dragging the iron over bias edges.
- The block measures 12 1/2 inches unfinished and 12 inches finished.
- The heart is traditionally pieced. No appliqué or paper piecing is used.
- The fabric placement can vary, but the construction and orientation of the units should remain the same.
The cutting and assembly measurements for this pattern have been worked out mathematically to produce the 12-inch finished block shown here. The pattern has not been physically test sewn, so I don't describe it as a tested pattern.
Heart Quilt Block Pattern FAQ
What size does the heart quilt block finish?
It finishes at 12 × 12 inches after it is sewn into a quilt. Before joining, the block should measure approximately 12 1/2 × 12 1/2 inches.
Can I make the heart from one fabric?
Yes. Replace all of the assorted pink and red pieces with one heart fabric and follow the same cutting measurements. The shape does not change.
Is this a beginner heart quilt block?
A confident beginner who is comfortable sewing a 1/4-inch seam and making half-square triangles should be able to follow it. The block uses ordinary patchwork pieces and doesn't require templates.
Can I turn this block into a full heart quilt?
Yes. Repeat the block in rows, add sashing if you want space between the hearts, or use the complete layout on my free heart quilt pattern page.
More Free Quilt Patterns
If you want another individual block before starting a larger quilt, the free pumpkin quilt block pattern is another traditionally pieced design with a completely different shape.
You can also browse baby quilt patterns and ideas when you're ready to turn individual blocks into a larger project.
I would save a few of the leftover pink and red scraps from this block. We already have enough going on in the heart that tiny pieces can be useful later without needing to match anything perfectly.
When you click on links to various merchants on this site and make a purchase, this may result in this site earning a commission. This does not affect the price you pay.

UBGI Gold Standard 2026
Reviewed under the site's
editorial checklist.
Photos, decorating ideas, party setups and reader submissions are shared for inspiration unless a page is specifically presented as a pattern, tutorial, reference guide or step-by-step project. Follow the instructions, measurements, safety guidance and manufacturer directions provided for the particular project or product.
About Jan | Contact | Baby Nursery Ideas (Blog) | Site Map | Privacy Policy | Disclosure Policy | Disclaimer | Affiliate Disclosure | Earnings Disclosure | Facebook | Pinterest
I am a participant in the Amazon Services LLC Associates Program, an affiliate advertising program designed to provide a means for us to earn fees by linking to Amazon. As an Amazon Associate I earn from qualifying purchases.
Copyright © 2006-2026. All Rights Reserved.