Free Pumpkin Quilt Pattern with Nine Pieced Patchwork Pumpkins
By Jan Bay
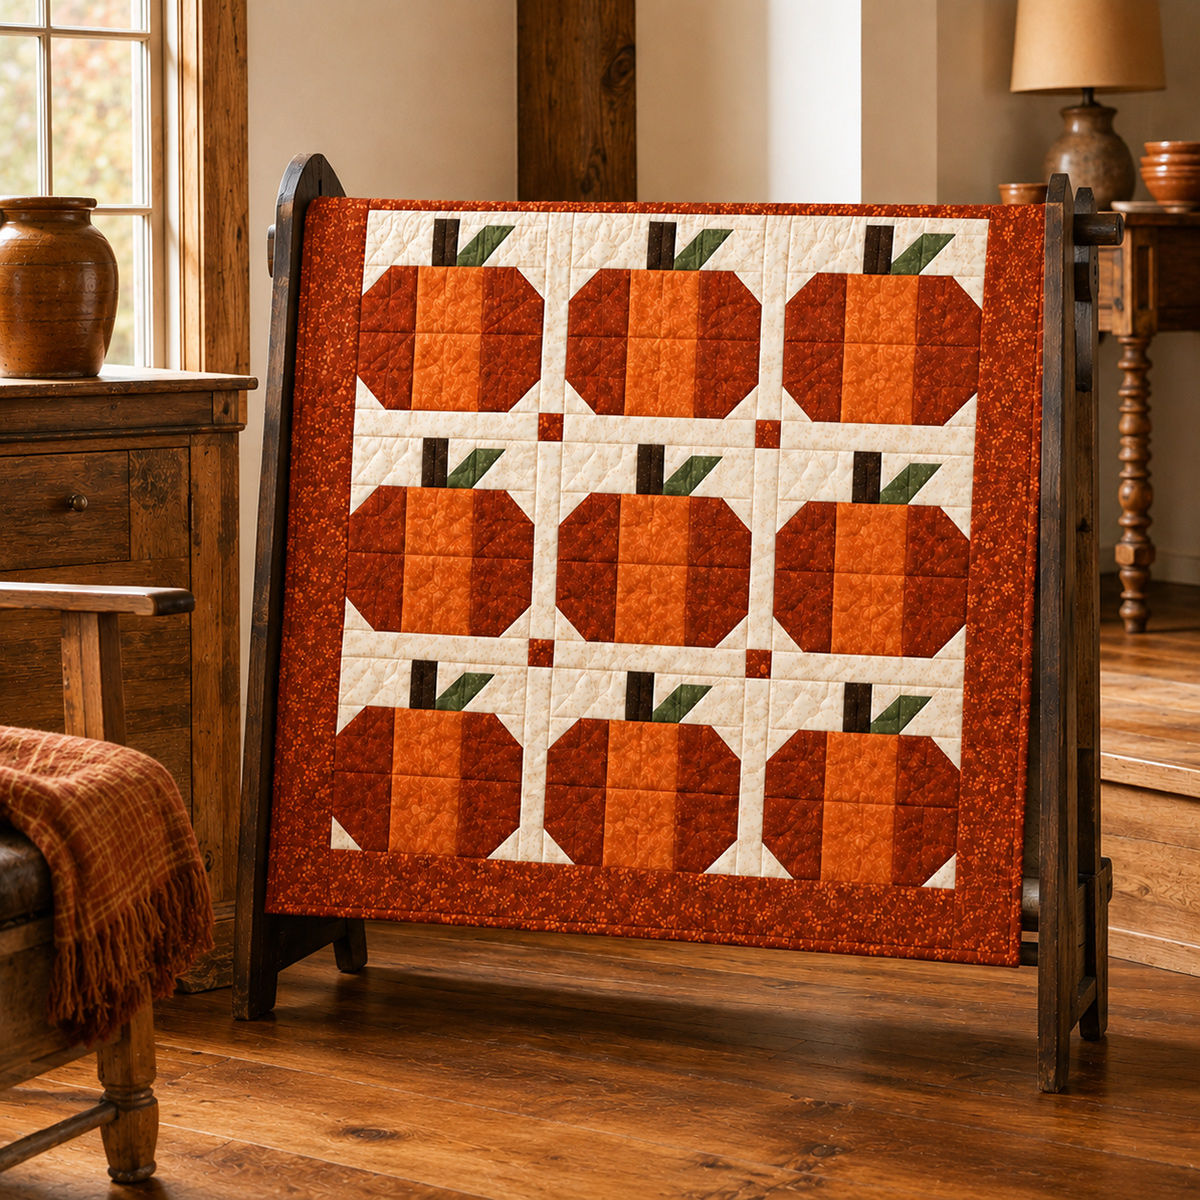
This free pumpkin quilt pattern is a fun way to turn nine pieced pumpkin patchwork blocks into a cozy 48-inch fall quilt for a baby quilt or seasonal wall hanging. The rust and copper pumpkins are separated with warm ivory sashing and cornerstones, then framed with a simple border that gives the whole quilt a finished look. Once your 12-inch pumpkin blocks are ready, the quilt top comes together one row at a time, so you can enjoy choosing your fall fabrics and watching the pumpkin patch grow as you sew.
Explore More Free Baby Quilt Patterns
Helpful Quilting Supplies for This Pumpkin Quilt
Jump to a Section
Pumpkin Quilt Yardage and Supplies
Arrange the Pumpkin Quilt Layout
Pumpkin Quilt Pattern Yardage and Supplies
For this quilt, I'd keep the color plan pretty simple and let the pumpkins do the work. Use warm ivory for the block backgrounds and sashing, a darker rust for the outside pumpkin sections, a lighter copper or pumpkin orange through the centers, dark brown for the stems and olive green for the leaves. Then choose one coordinating rust or fall print for the cornerstones and outer border.
The yardage below is calculated for the 48 × 48-inch quilt shown in this pattern. It gives you enough fabric for nine 12-inch finished pumpkin blocks, 2-inch finished sashing, 2-inch finished cornerstones and a 4-inch finished outer border. Since this quilt hasn't been physically test-made from these instructions, I would not cut every last piece from every fabric before making the first pumpkin block. Make one block, check the proportions, then cut the remaining eight. That's the safest place to make any small adjustment without wasting a stack of fabric.
- Warm ivory quilting cotton: 1¼ yards for the pumpkin block backgrounds, stitch-and-flip corners and sashing
- Dark rust or burnt orange quilting cotton: ¾ yard for the outside pumpkin sections
- Copper or pumpkin-orange quilting cotton: ½ yard for the center pumpkin sections
- Dark brown quilting cotton: ⅛ yard or a generous scrap for the nine stems
- Olive green quilting cotton: ⅛ yard or a generous scrap for the nine leaves
- Coordinating rust or fall-print quilting cotton: ¾ yard for the cornerstones and outer border
- Backing fabric: about 3¼ yards of standard-width quilting cotton for a pieced backing approximately 56 × 56 inches
- Batting: one piece approximately 56 × 56 inches
- Binding fabric: ½ yard for six 2½-inch binding strips
- Coordinating cotton or all-purpose sewing thread
You'll also need a sewing machine, rotary cutter, cutting mat, quilting ruler, iron, ironing surface and a removable fabric marker or sharp pencil. A ¼-inch presser foot is useful here because the block rows, sashing and borders all depend on the same seam allowance.
I wouldn't skip checking that seam allowance just because the individual pumpkin blocks look right. A tiny difference repeated across three blocks and two strips of sashing can change the width of the whole quilt center. The American Quilter's Society explains a simple way to check an accurate patchwork seam before you start joining the blocks.
The backing and batting measurements give you about 4 inches of extra material beyond the quilt top on each side. If you're sending the quilt to a longarm quilter, ask what size backing and batting they want before you cut them. Some quilters prefer a different amount of extra fabric around the edges.
If you're using scraps for the pumpkins, don't worry about making all nine exactly alike. I'd keep the ivory background, stems and leaves consistent, then vary the rust and copper fabrics a little from block to block. It still reads as one quilt, but the pumpkin patch has more life to it.
Make the Nine Pieced Pumpkin Patchwork Quilt Blocks
Start by making nine complete pumpkin blocks using my free pieced pumpkin patchwork quilt block pattern. That page has the cutting measurements and step-by-step instructions for the stitch-and-flip pumpkin corners, brown stem and angled olive leaf.
I wouldn't repeat all of those block instructions here because there should only be one set of measurements to follow. For this quilt, what matters is that you finish with nine blocks that each measure approximately 12½ × 12½ inches unfinished. They'll finish at 12 inches after they're sewn into the quilt.
Make the first block before you cut and piece the other eight. Check the pumpkin shape, the clipped ivory corners and the leaf proportions. If you're happy with that first one, then go ahead with the rest.
You can keep all nine pumpkins identical, but I like a little variation in the orange fabrics. Keep the basic color placement the same, with darker rust along the outside and the lighter copper running through the center. Then swap in a few coordinating fabrics if you want the quilt to look more like a patch of pumpkins instead of nine copies of the same one.
Before moving on, lay the blocks on a flat surface and check them together. Each one should have:
- A dark rust or burnt-orange section on both sides of the pumpkin
- A lighter copper or pumpkin-orange center column
- Four ivory stitch-and-flip corners pointing toward the outside of the block
- A vertical dark brown stem
- An olive leaf angled beside the stem
- An unfinished measurement close to 12½ × 12½ inches
Don't square a block down just because one edge is a tiny bit uneven. You need the full 12½-inch size for the sashing math below. If one block is noticeably smaller than the others, I'd go back and check its seam allowances before assembling the quilt.
Arrange the Pumpkin Quilt Layout
Lay the nine finished blocks in three rows of three. Keep every pumpkin upright with the stem at the top. You don't need to rotate any of the blocks for this layout.
Before you add the sashing, move the pumpkins around until the color balance looks right. If one pumpkin is much darker than the others, I wouldn't park it in a corner unless you want your eye to go straight there. Spread the darkest and lightest oranges through the quilt instead.
The finished block portion of the quilt accounts for 36 inches across and 36 inches from top to bottom. The 2-inch finished sashing between the blocks adds another 4 inches in each direction, bringing the finished center to approximately 40 × 40 inches before the outer border.
Keep the sashing between the pumpkin blocks rather than adding another row of pumpkin pieces. The ivory gives the rust and copper fabrics some breathing room and makes each pumpkin easier to see.
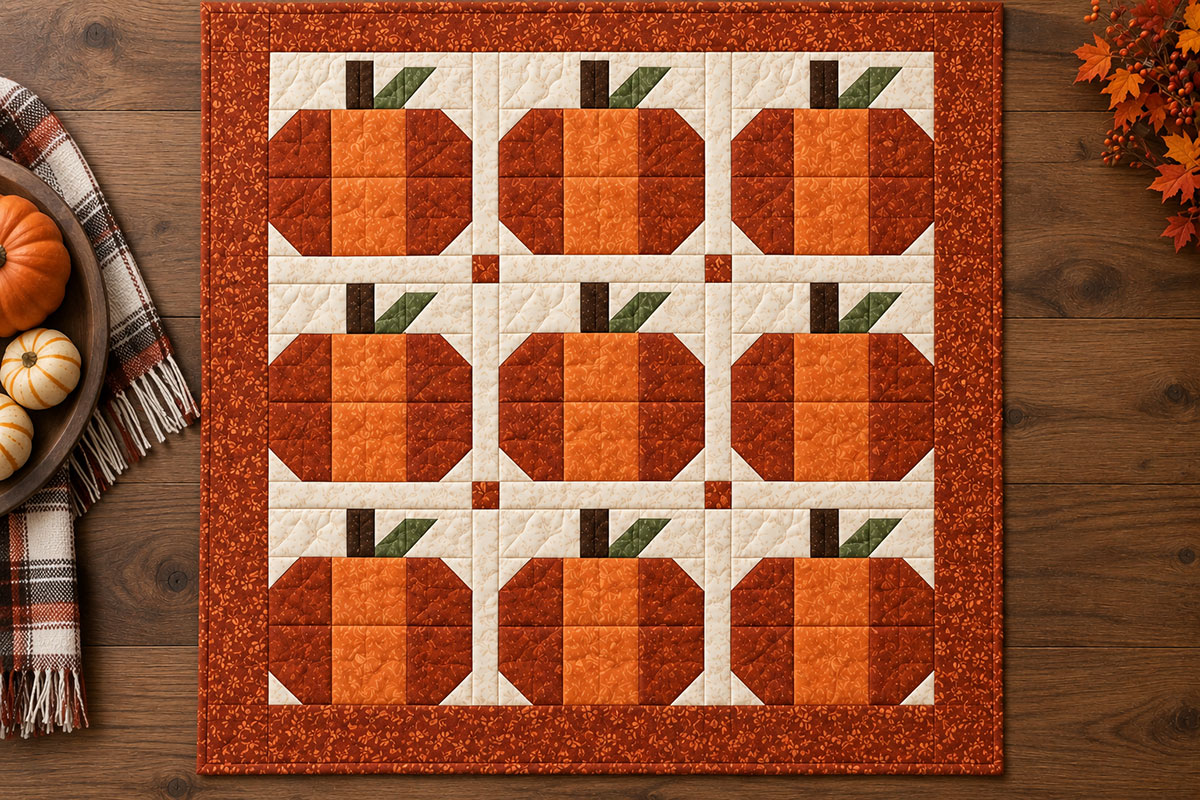
Don't sew the blocks together yet. The sashing strips go between them, and the four small cornerstones will sit where the horizontal and vertical sashing lines cross.
Cut the Ivory Sashing and Rust Cornerstones
The sashing is cut 2½ inches wide so it finishes at 2 inches after the ¼-inch seams are sewn. All of the sashing pieces are the same length as an unfinished pumpkin block, which keeps the cutting simple.
From the warm ivory fabric, cut:
- 12 strips, 2½ × 12½ inches
Six of those strips will go vertically between the pumpkin blocks. The other six will be used in the two horizontal sashing rows.
From the coordinating rust or border fabric, cut:
- 4 cornerstones, 2½ × 2½ inches
I would cut those four little squares before cutting the outer border strips. They're easy to forget, and they use so little fabric that there's no reason to leave them until the end.
Each of the three pumpkin rows will be arranged like this:
Pumpkin block | ivory sashing | pumpkin block | ivory sashing | pumpkin block
Each of the two horizontal sashing rows will be arranged like this:
Ivory sashing | rust cornerstone | ivory sashing | rust cornerstone | ivory sashing
Once sewn with accurate ¼-inch seams, each completed pumpkin row and each completed sashing row should measure approximately 40½ inches wide unfinished.
That number is worth checking before you start joining the rows. Three 12½-inch blocks plus two 2½-inch sashing strips begin at 42½ inches. Four ¼-inch seams remove a total of 2 inches, leaving the 40½-inch unfinished row we need.
Assemble the Pumpkin Quilt Top
Start with the top row of pumpkins. Sew one 2½ × 12½-inch ivory sashing strip to the right side of the first block with a ¼-inch seam. Add the second pumpkin, another sashing strip and then the third pumpkin.
Repeat that process with the middle and bottom rows. You should now have three pumpkin rows, each containing three blocks and two vertical sashing strips.
Next, make the two horizontal sashing rows. Sew three 2½ × 12½-inch ivory strips together with two 2½-inch rust cornerstones between them.
Make the second horizontal sashing row the same way.
Lay everything out again in this order:
- Top pumpkin row
- Horizontal sashing row
- Middle pumpkin row
- Horizontal sashing row
- Bottom pumpkin row
Take a minute to line up the four cornerstones with the vertical sashing strips above and below them. That's the detail that makes the grid look deliberate instead of a little crooked.
Sew the first horizontal sashing row to the bottom of the top pumpkin row. Pin at the sashing intersections so the vertical strips line up with the cornerstones.
Add the middle pumpkin row, then the second horizontal sashing row and finally the bottom pumpkin row.
Press as you go. I wouldn't force every seam in one particular direction if the bulk wants to lie another way. The important thing here is that the rows stay flat and the sashing intersections line up cleanly.
With accurate ¼-inch seams, the assembled quilt center should measure approximately 40½ × 40½ inches unfinished.
If yours is a little different, measure it before cutting the border pieces. Don't try to make a slightly smaller center fit a border that was cut from a theoretical measurement. Measure what you actually have and fit the border to that.
Add the 4-Inch Finished Outer Border
The rust outer border frames the ivory sashing and brings the quilt to its finished size. Cut it 4¼ inches wide. After the ¼-inch seam joins the border to the quilt center, about 4 inches remain from that seam to the outside edge.
From the coordinating rust or fall-print border fabric, cut:
- 5 strips, 4¼ inches wide × width of fabric
The ¾-yard amount in the supply list assumes you'll piece these border strips rather than cutting four long border pieces on the lengthwise grain.
Join the strips end to end with ¼-inch seams and press the joining seams open. You'll cut the exact border lengths from this pieced strip after measuring the quilt center.
Measure the quilt center from top to bottom in three places: near the left edge, through the middle and near the right edge. If those numbers vary slightly, use the average for the two side borders.
If your center is right on target at 40½ inches, cut two side border pieces approximately 4¼ × 40½ inches.
Pin one border to each side of the quilt center, matching the ends and midpoint. Sew with a ¼-inch seam and press the borders away from the quilt center.
Now measure the quilt from side to side in three places, including the newly attached borders. The expected measurement is approximately 48 inches.
Cut two top-and-bottom border pieces to that measured length. If everything is on target, they'll be approximately 4¼ × 48 inches.
Sew one border to the top and one to the bottom, matching the ends and centers before stitching. Press those seams toward the border.
Don't stretch a border strip to make it reach. That can leave the outside edge of the quilt wavy even when the block center was perfectly flat. Fit the border to the measured quilt instead.
At this point, the quilt top should measure approximately 48 × 48 inches before quilting and binding. Small differences are possible from seam allowances, quilting take-up and finishing.
Finish the 48-Inch Pumpkin Quilt
Once the top is finished, give it a final press and check the seams before you make the quilt sandwich. Look for any loose threads or seam openings now. They're much easier to fix before the quilting starts.
For a backing approximately 56 × 56 inches, cut two backing pieces about 56 inches long from standard-width quilting cotton. Remove the selvages where the two pieces will be joined, sew them together with a ½-inch seam and press that seam open. Trim the pieced backing to the size you need.
Lay the backing wrong side up on a clean flat surface. Center the batting over it, then place the pumpkin quilt top right side up on the batting.
You should have several inches of backing and batting extending beyond every edge of the quilt top. Smooth all three layers before basting so you don't trap puckers underneath.
Baste the layers using your preferred method, then quilt the three layers together. You can keep the quilting simple. Straight lines along the sashing and around the pumpkin blocks will hold the layers securely without competing with the patchwork design.
After quilting, trim the excess batting and backing even with the outside edge of the quilt top.
For the binding, cut:
- 6 strips, 2½ inches wide × width of fabric
Join the binding strips end to end. Press the long strip in half lengthwise with wrong sides together.
Sew the folded binding around the front edge of the quilt with a ¼-inch seam, mitering the four corners. Join the binding ends, then fold the binding over the raw quilt edge and secure it on the back by hand or machine.
Give the finished quilt one last inspection. Remove any remaining basting pins, clips, loose threads or removable marking lines.
The finished pumpkin quilt should measure about 48 × 48 inches. That's a handy size for a fall wall hanging or a baby quilt used while a little one is awake and supervised.
If you're making it for a baby, keep the quilt out of the crib or other infant sleep space. The U.S. Consumer Product Safety Commission recommends keeping infant sleep spaces bare except for a fitted sheet.
And that's really enough. Nine pumpkins, simple ivory sashing and one border give you plenty of fall color without piling extra pieces around the design.
If you would rather mix several fall motifs instead of repeating nine pumpkins, use my free fall harvest quilt pattern. For another single-motif fall quilt, the free acorn quilt pattern uses twelve pieced acorn blocks with sashing and a border.
If you want to compare this quilt with pumpkin projects in other formats, browse my pumpkin craft ideas.
When you click on links to various merchants on this site and make a purchase, this may result in this site earning a commission. This does not affect the price you pay.

UBGI Gold Standard 2026
Reviewed under the site's
editorial checklist.
Photos, decorating ideas, party setups and reader submissions are shared for inspiration unless a page is specifically presented as a pattern, tutorial, reference guide or step-by-step project. Follow the instructions, measurements, safety guidance and manufacturer directions provided for the particular project or product.
About Jan | Contact | Baby Nursery Ideas (Blog) | Site Map | Privacy Policy | Disclosure Policy | Disclaimer | Affiliate Disclosure | Earnings Disclosure | Facebook | Pinterest
I am a participant in the Amazon Services LLC Associates Program, an affiliate advertising program designed to provide a means for us to earn fees by linking to Amazon. As an Amazon Associate I earn from qualifying purchases.
Copyright © 2006-2026. All Rights Reserved.