Crochet Turtle Lovey Pattern - Soft Baby Snuggler
This crochet turtle lovey pattern is designed to create that special handmade piece that ends up becoming the one toy a baby reaches for all day. It gives you a small finished turtle that looks complete, holds its shape, and feels right in your hands from the moment you finish it.
More Lovey Patterns and Baby Blanket Favorites:
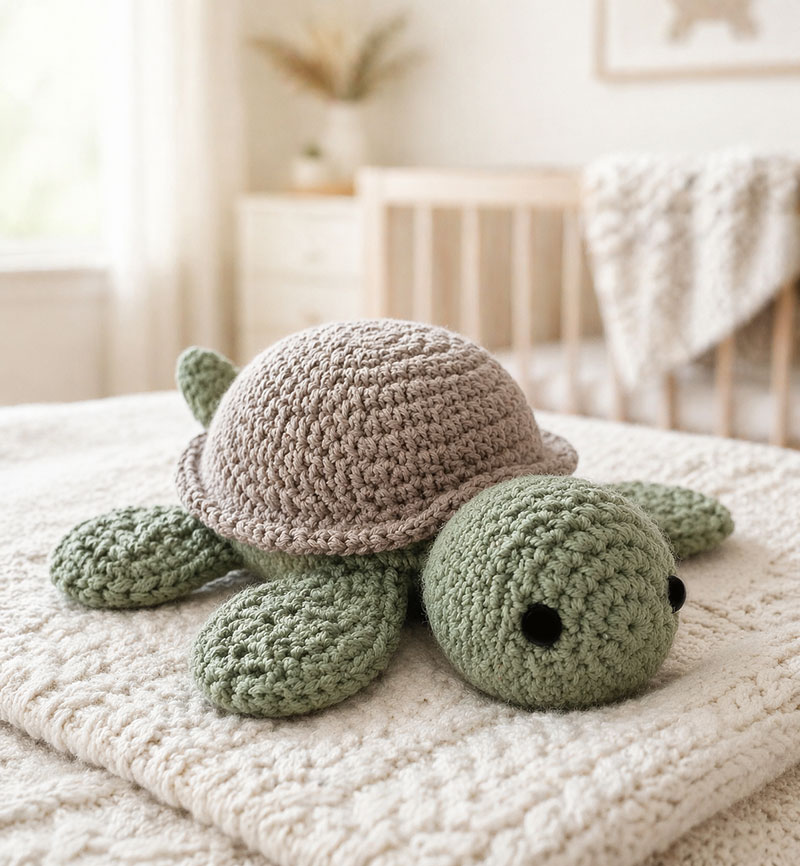
Babies love this small plush crochet turtle with a rounded top shell, flat bottom shell, four short flippers, a simple round head, a tiny tail, and embroidered eyes.
Want an easy yarn option for this project?
See a soft plush yarn used for this crochet turtle lovey here
Jump to what you need:
What This Crochet Turtle Lovey Looks Like
Crochet Turtle Lovey Pattern Materials You Actually Need
Crochet Turtle Lovey Pattern Step By Step
How To Assemble The Crochet Turtle Lovey Cleanly
Easy Ways To Change This Crochet Turtle Lovey Pattern
Care And Safe Use For A Crochet Turtle Lovey
Why This Crochet Turtle Lovey Pattern Works In A Real Nursery
Quick answer: A crochet turtle lovey pattern is a small cuddle toy shaped like a turtle with a rounded shell, a flat lower shell, four short flippers, a round head, and a tiny tail. This version is a snuggler style lovey, not the security blanket style.
People that crochet often complain that some crochet patterns look adorable in the photo and then turn out all wrong when they actually make them. That is why this crochet turtle lovey pattern keeps the shaping simple and the steps direct. You are making one compact turtle with clean parts that fit together so that it looks good in your hands, not just on the screen.
A turtle like this works because the shell gives you a clear center, the flippers balance the body, and the head is large enough to look friendly without getting wobbly. That matters in a nursery because little handmade pieces tend to get picked up, set down on a dresser, tucked into a diaper bag, and carried from room to room more than people expect.
To compare how this style fits alongside other animals, these crochet animal lovey patterns show how different shapes and designs come together across the full collection.
For a cheerful garden-themed variation, this crochet bee lovey pattern gives the animal lovey collection a brighter handmade baby gift option.
What This Crochet Turtle Lovey Pattern Looks Like
This crochet turtle lovey pattern makes a small plush turtle with a dome shell on top, a flatter base underneath, four short flippers, a round head, and a tiny tail. When finished it is cute and displays nicely sitting on a nursery shelf.
Beginners say they enjoyed this pattern because they got a better result with the shell made as two separate pieces instead of trying to shape the whole turtle in one complicated form. That is the small difference here that makes the pattern easier to follow and easier to seam cleanly.
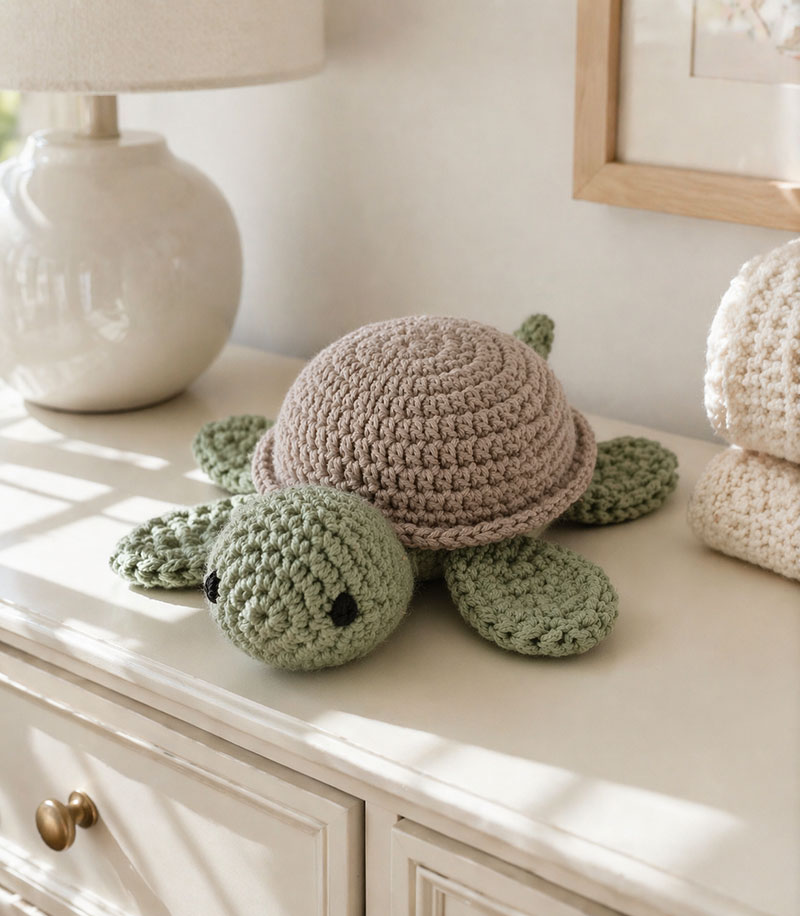
Set on a dresser, the shell shape is easy to see, which helps when you are checking your stitch count before assembly.
This pattern is meant to make one plush turtle only.
If you like animal comfort toys, you may also want to see the owl lovey pattern, the bunny lovey pattern, the giraffe lovey pattern, and the bear lovey pattern.
Crochet Turtle Lovey Pattern Materials You Actually Need
You do not need a long shopping list for the material needed to make this one.
Exact yarn usage will vary with the yarn, tension, shell version, and amount of sewing yarn used. Keep extra yarn from both colors available for assembly rather than cutting the working yarns short.
Use these materials:
Worsted weight yarn in two colors. One for the head, flippers, tail, and lower shell. One for the top shell.
Crochet hook size 4.0 mm or the size that gives you a firm fabric.
Polyfill stuffing.
Yarn needle.
Stitch marker.
Scissors.
Black yarn or embroidery floss for securely embroidered eyes.
Safety Note: Because this pattern is presented as a baby lovey, use securely embroidered eyes rather than safety eyes, buttons, beads, or other attached pieces that could come loose.
The sample turtle in the photo uses one muted green and one light beige yarn. That color split makes the shell stand out.
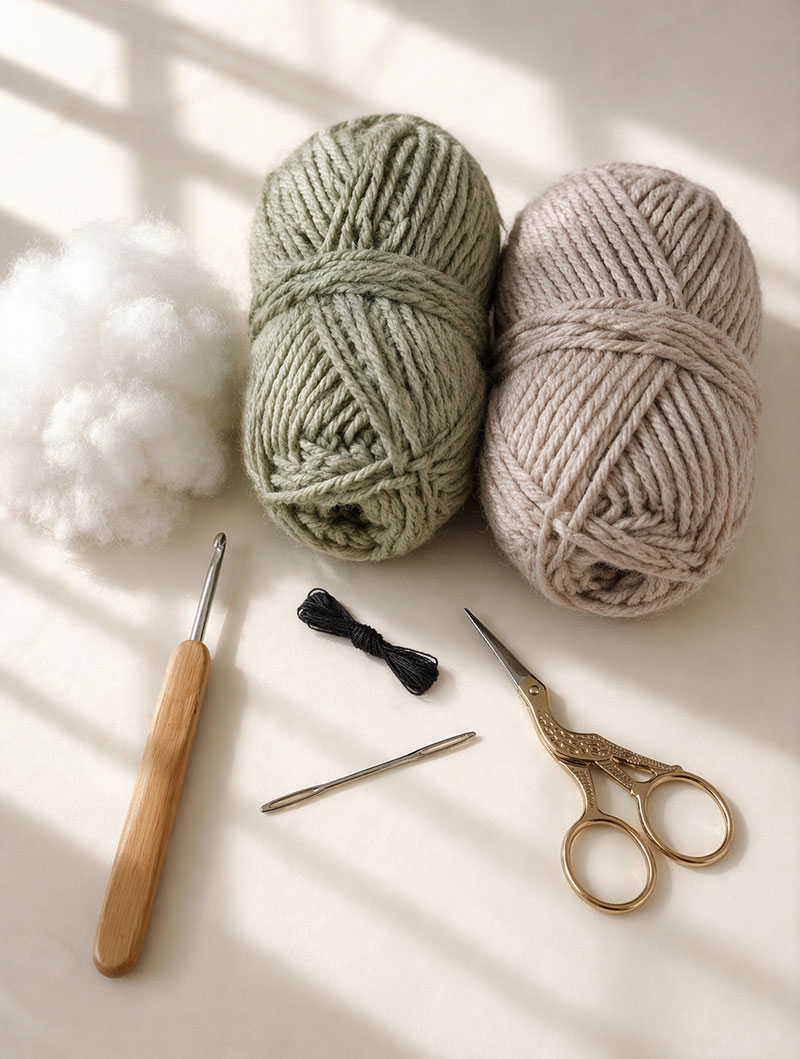
This is an easy crochet project that can actually get finished in just a few hours.
Crochet Turtle Lovey Pattern Step By Step
Abbreviations used in this pattern:
MR = magic ring
sc = single crochet
inc = 2 sc in the same stitch
dec = invisible decrease
sl st = slip stitch
ch = chain
FO = fasten off
Skill level: Confident beginner. You should be comfortable making a magic ring, working continuous rounds, increasing, decreasing, working in back loops only, stuffing small pieces, and sewing crocheted parts together.
Round and gauge notes: Work the head, shells, and tail in continuous spiral rounds. Do not slip stitch to join or chain at the beginning of a round. Place a stitch marker in the first stitch of each round and move it up as you work. Repeat all instructions inside parentheses the stated number of times. Exact gauge is not required, but use a hook size that produces firm single crochet fabric without openings that allow stuffing to show.
Right-side and magic-ring note: Keep the right side of the single crochet fabric facing outward. If a piece curls inside out while you work, turn it right side out before stuffing or assembly. Pull each magic ring firmly closed, then weave its starting tail through the base stitches in more than one direction before trimming it.
The turtle is made in this order. Head, top shell, bottom shell, four flippers, tail, then assembly.
Head
Round 1: 6 sc in MR. 6
Round 2: inc in each stitch around. 12
Round 3: (1 sc, inc) 6 times. 18
Round 4: (2 sc, inc) 6 times. 24
Round 5: (3 sc, inc) 6 times. 30
Rounds 6 through 10: sc in each stitch around. 30
Round 11: (3 sc, dec) 6 times. 24
Round 12: (2 sc, dec) 6 times. 18
Choose the side opposite the round marker and round-change line as the front of the face. Before stuffing, embroider the eyes securely between Rounds 8 and 9, about 6 stitches apart. Knot and secure the embroidery ends inside the head.
Start stuffing.
Round 13: (1 sc, dec) 6 times. 12
Round 14: dec 6 times. 6
Finish stuffing. FO, leaving a long tail for closing the head and sewing it to the shell. Thread the tail through the front loop of each of the remaining 6 stitches and pull firmly to close the opening. Secure the closure without cutting the remaining tail. Use that tail later to sew the head to the shell.
The head should look round and full, not tall. If it starts to stretch upward like a small ball on a stem, your tension is probably too loose.
Top Shell
Using shell color.
Round 1: 6 sc in MR. 6
Round 2: inc in each stitch around. 12
Round 3: (1 sc, inc) 6 times. 18
Round 4: (2 sc, inc) 6 times. 24
Round 5: (3 sc, inc) 6 times. 30
Round 6: (4 sc, inc) 6 times. 36
Round 7: (5 sc, inc) 6 times. 42
Rounds 8 through 10: sc in each stitch around. 42
Round 11: working in back loops only, sc in each stitch around. 42
Round 12: sc in each stitch around. 42
FO, leaving a long tail for sewing.
Pattern note: The main shell pattern above makes a smooth rounded turtle shell. The photo shows a more textured shell, so I added an optional textured-shell variation for anyone who wants that raised-ridge look.
That back-loop-only round creates a slight lip around the shell and gives the edge a more defined finished outline.
Optional Textured Turtle Shell Variation
If you want the shell to look more like the turtle in the photo, use this textured-shell version instead of the plain top shell. The stitch count stays simple, but the raised stitches give the shell more definition.
Textured Top Shell
Using shell color.
Round 1: 6 sc in MR. 6
Round 2: inc in each stitch around. 12
Round 3: (1 sc, inc) 6 times. 18
Round 4: (2 sc, inc) 6 times. 24
Round 5: working in back loops only, (3 sc, inc) 6 times. 30
Round 6: sc in each stitch around. 30
Round 7: working in back loops only, (4 sc, inc) 6 times. 36
Round 8: sc in each stitch around. 36
Round 9: working in back loops only, (5 sc, inc) 6 times. 42
Rounds 10 through 11: sc in each stitch around. 42
Round 12: working in back loops only, sc in each stitch around. 42
FO, leaving approximately 36 inches for sewing the top shell to the bottom shell.
The back-loop-only rounds leave visible front loops that create subtle raised rings across the outside of the shell. For a stronger turtle-shell look, use a yarn needle and matching yarn to stitch six evenly spaced gentle lines from the center of the shell outward before sewing the shell to the bottom piece. Secure the stitching ends on the wrong side of the shell before assembly.
Bottom Shell
Using body color.
Round 1: 6 sc in MR. 6
Round 2: inc in each stitch around. 12
Round 3: (1 sc, inc) 6 times. 18
Round 4: (2 sc, inc) 6 times. 24
Round 5: (3 sc, inc) 6 times. 30
Round 6: (4 sc, inc) 6 times. 36
Round 7: (5 sc, inc) 6 times. 42
FO and weave the ending tail securely into the wrong side of the bottom shell. Use the long tail from the chosen top-shell version to sew the shell pieces together.
Flippers
Make 4. Work in turned rows. The turning ch 1 does not count as a stitch.
Starting chain: ch 6.
Row 1: sc in 2nd chain from hook and in each remaining chain, turn. 5
Row 2: ch 1, inc in first stitch, 3 sc, inc in last stitch, turn. 7
Row 3: ch 1, sc in each stitch across, turn. 7
Row 4: ch 1, dec, 3 sc, dec. 5
Do not stuff.
FO, leaving a tail. The five stitches of Row 4 form the edge that will be placed between the two shell pieces during assembly.
Tail
Round 1: 4 sc in MR. 4
Round 2: sc in each stitch around. 4
Flatten the opening so the 4 stitches form 2 matched pairs.
Working through both layers, make 1 sl st through each matched pair. 2 sl st
FO, leaving a tail. The 2 slip stitches form the edge that will be placed between the two shell pieces during assembly.
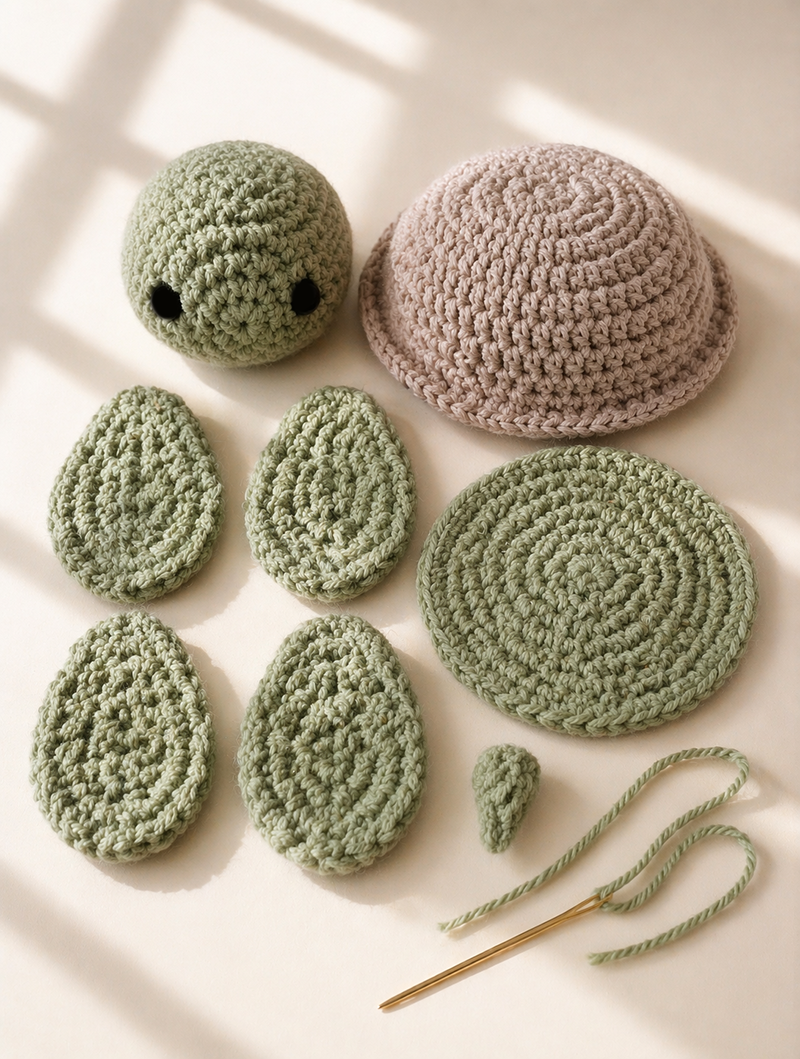
Seeing the parts flat before sewing helps you keep the turtle balanced instead of drifting off center.
How To Assemble The Crochet Turtle Lovey Cleanly
Before closing the shell, weave in the starting tails on the four flippers and tail. Use each remaining ending tail either to tack the piece to the wrong side of the bottom shell or weave it securely into the piece. Keep all trimmed ends inside the shell.
Place the four flippers between the top shell and bottom shell before you begin sewing the shell closed. Put two near the front and two near the back. Add the tail at the back center.
Placement checkpoint: On the final 42-stitch round of both shell pieces, place a front-center marker in the gap between stitches 42 and 1. Align the two shell pieces stitch for stitch. Place the five-stitch Row 4 edge of the first front flipper across shell stitches 4 through 8, the first rear flipper across stitches 14 through 18, the two-stitch flattened tail across stitches 21 and 22, the second rear flipper across stitches 25 through 29, and the second front flipper across stitches 35 through 39. This uses 22 shell positions and leaves the front-center area open for attaching the head.
Match the 42 stitches of the top shell with the 42 stitches of the bottom shell. Sew one top-shell stitch to one bottom-shell stitch at every position. Where a flipper or the tail is placed, pass the sewing yarn through one top-shell stitch, the corresponding appendage stitch, and one bottom-shell stitch without adding an extra seam stitch. When you are about three quarters of the way around, add a small amount of stuffing to the shell. Stop before it becomes puffy. The shell in the photo has shape, but it is not packed too full.
Center the head over the front-center gap between shell stitches 42 and 1. Tack it at the top, bottom, and both sides before sewing around the lower curve of the head. The closed head does not have a one-to-one stitch match with the shell, so do not try to attach all 30 head stitches to shell-edge stitches. Position the lower part of the head slightly underneath the shell lip so it looks tucked in rather than stuck on.
Final finishing: After all pieces are sewn securely, weave every remaining yarn tail through several stitches inside the stuffed turtle, change direction at least once, and trim the end only after it is secure. Shape the head, shell, and flippers gently with your hands. Blocking is not required. Before use, check that the magic rings, embroidered eyes, head, flippers, tail, and entire shell seam cannot be pulled loose.
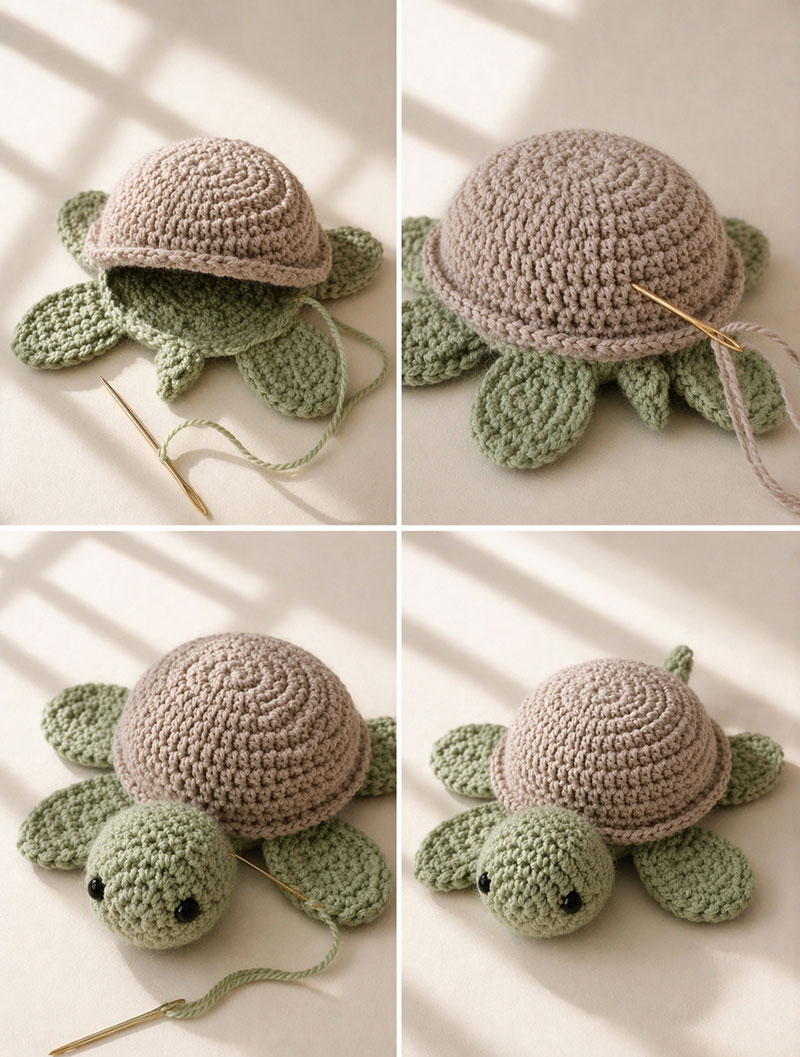
During assembly, keep the flippers angled outward a bit so the turtle rests evenly on a flat surface.
The resulting turtle should look compact, balanced, and it should be easy to recognize as a turtle at a glance.
Easy Ways To Change This Crochet Turtle Lovey Pattern
You can keep the exact same body and change only the color story. Sage and beige feels quiet. Cream and brown gives it an earthy look. Pale blue and sand leans coastal, bringing sandy beaches to mind.
You can also stitch a simple six-section shell pattern on top with yarn in a close shade if you want more detail. Keep it restrained. I prefer the cleaner version.
That same quieter coastal palette also shows up beautifully in these sea turtle nursery bedding ideas, where layered aqua tones, quilted textures, and realistic turtle details help the crib area feel coordinated without becoming overly themed.
A small crochet crab pattern adds a playful shoreline accent that fits beside turtle, whale, starfish, fish, and other coastal baby crochet projects.
Parents often notice this when they compare handmade items side by side. The toy with fewer little extras usually looks better longer.
A handmade quilt with appliqué sea turtles and layered coastal fabrics can also extend the same ocean-inspired nursery look into the crib area naturally, especially with this sea turtle quilt pattern designed for beach and underwater-themed baby rooms.
Care And Safe Use For A Crochet Turtle Lovey
This crochet turtle lovey is best treated like a handmade comfort toy. Check seams often, especially around the head and flippers. If it will be used around babies, embroidered eyes are the better choice. Wash gently in a mesh bag or by hand, then lay flat to dry so the shell keeps its shape.
For sleep spaces, keep comfort items out of the crib during infant sleep and follow current safe sleep guidance from the American Academy of Pediatrics. A handmade toy can still be part of the nursery without being part of the sleep setup.
Safe sleep guidance from the American Academy of Pediatrics
Why This Crochet Turtle Lovey Pattern Works In A Real Nursery
The best thing about this pattern is that it gives you a finished turtle that looks complete without demanding advanced shaping. That matters on a page like this because the goal is not to make ten versions. The goal is to make one turtle that looks right the first time.
I notice that small handmade toys often become part of the room long before they become part of play. They sit on the dresser during newborn days, ride in the diaper bag later, and then somehow end up tucked next to a stack of board books. A compact turtle works well for that kind of everyday movement.
If you want another animal project after this one, the owl lovey pattern is a good next step because the body shaping stays manageable, and the bunny lovey pattern gives you a different silhouette with simple parts. For another soft water-animal lovey, this crochet otter lovey pattern also fits naturally beside turtle, duck, frog, whale, and other handmade baby snuggler projects.
For a chunkier little animal with a more rustic personality and a shaggier finish, this highland cow crochet snuggler lovey pattern gives you a very different look from the smoother turtle shape that will be loved just as much.
Crochet Turtle Lovey Pattern FAQ
Is this crochet turtle lovey pattern good for beginners?
Yes, it is suitable for a confident beginner who is comfortable working in continuous rounds and sewing crocheted pieces together. The smooth-shell version is the easier option. The textured-shell variation adds back-loop-only rounds that leave visible front loops for extra shell detail.
How big is the finished turtle?
Finished size varies with the yarn, hook, tension, and amount of stuffing used. Measure the completed turtle from the front of the head to the tip of the tail for its exact finished length.
Should I use safety eyes for this baby lovey?
No. Because this turtle is intended as a baby lovey, embroider the eyes securely with black yarn or embroidery floss instead of using safety eyes, buttons, beads, or other attached pieces that could come loose.
Can I use blanket yarn instead?
Yes, but the turtle will come out larger and the stitch counts will feel less crisp. If you do that, keep your stuffing light so the shell does not bulge.
Is this a blanket-style lovey?
No. This version is a plush turtle snuggler with a rounded shell and compact body. It is not a flat security blanket.
When you click on links to various merchants on this site and make a purchase, this may result in this site earning a commission. This does not affect the price you pay.

UBGI Gold Standard 2026
Reviewed under the site's
editorial checklist.
Photos, decorating ideas, party setups and reader submissions are shared for inspiration unless a page is specifically presented as a pattern, tutorial, reference guide or step-by-step project. Follow the instructions, measurements, safety guidance and manufacturer directions provided for the particular project or product.
About Jan | Contact | Baby Nursery Ideas (Blog) | Site Map | Privacy Policy | Disclosure Policy | Disclaimer | Affiliate Disclosure | Earnings Disclosure | Facebook | Pinterest
I am a participant in the Amazon Services LLC Associates Program, an affiliate advertising program designed to provide a means for us to earn fees by linking to Amazon. As an Amazon Associate I earn from qualifying purchases.
Copyright © 2006-2026. All Rights Reserved.