Sea Turtle Quilt Pattern for Coastal Nurseries
Sea turtle quilt pattern ideas are popular for coastal nurseries, beach baby rooms, and handmade baby gifts because they combine ocean-inspired color with a relaxed sea-and-sand look. This pattern page includes printable templates, fabric layouts, cutting guides, quilting maps, and beginner-friendly instructions for making the sea turtle quilt shown on this page.
More ocean nursery and quilt ideas:
Browse ocean baby crib quilt patterns
Helpful supplies for making a sea turtle baby quilt:
Jump to:
Why Sea Turtle Quilt Patterns Work So Well in Coastal Nurseries
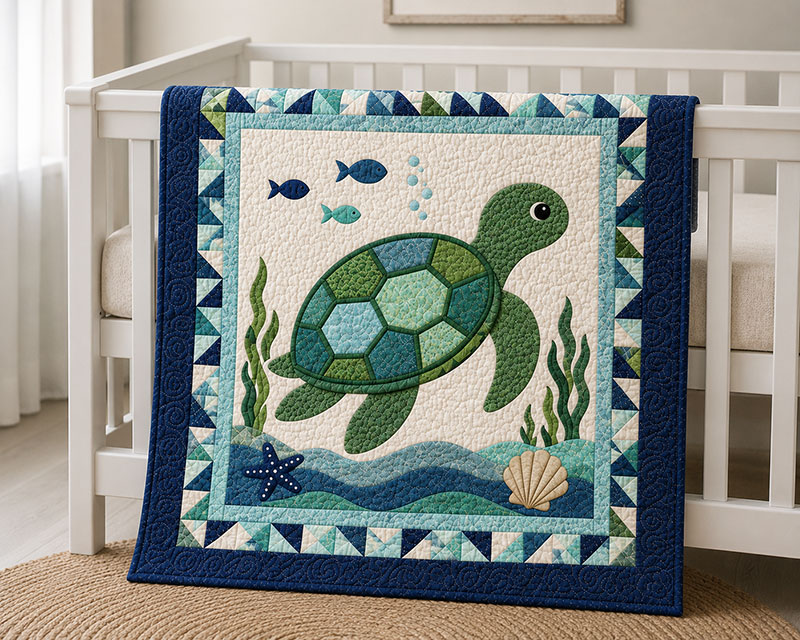
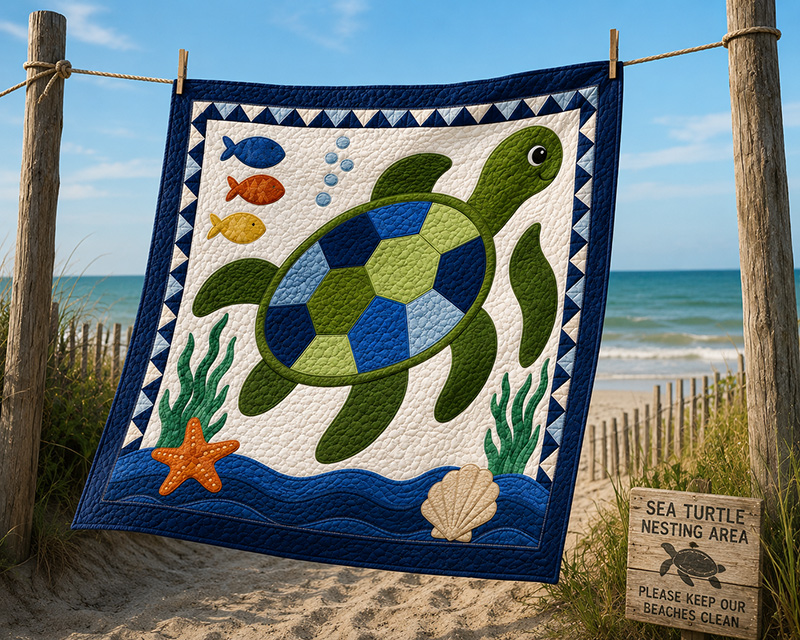
The nursery usually starts changing once the quilt goes into the room. A crib can still look unfinished with bare walls and plain bedding, but the moment a sea turtle quilt gets folded across the rail, the space suddenly starts looking intentional.
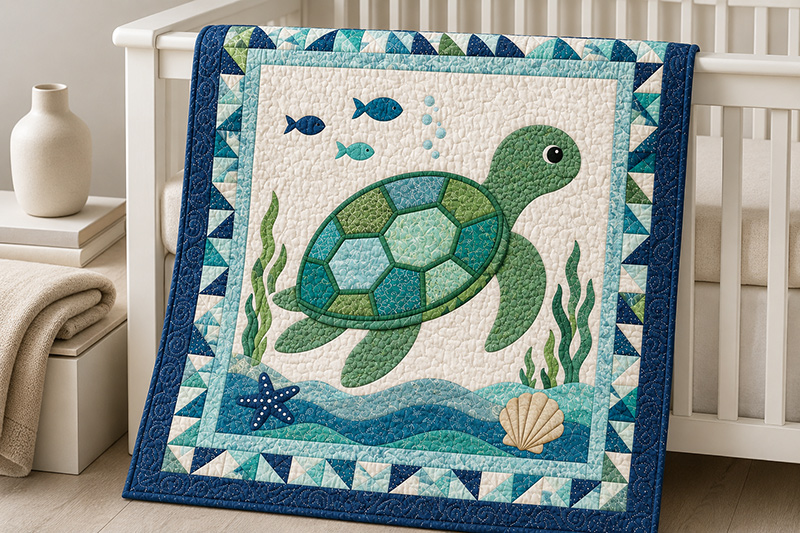
This sea turtle quilt pattern is designed to create the exact quilt shown in the hero image on this page. The shell shape, fish placement, ocean waves, seaweed layout, border sizing, and quilting path are all locked to the featured nursery quilt so the final project matches the photography throughout the tutorial.
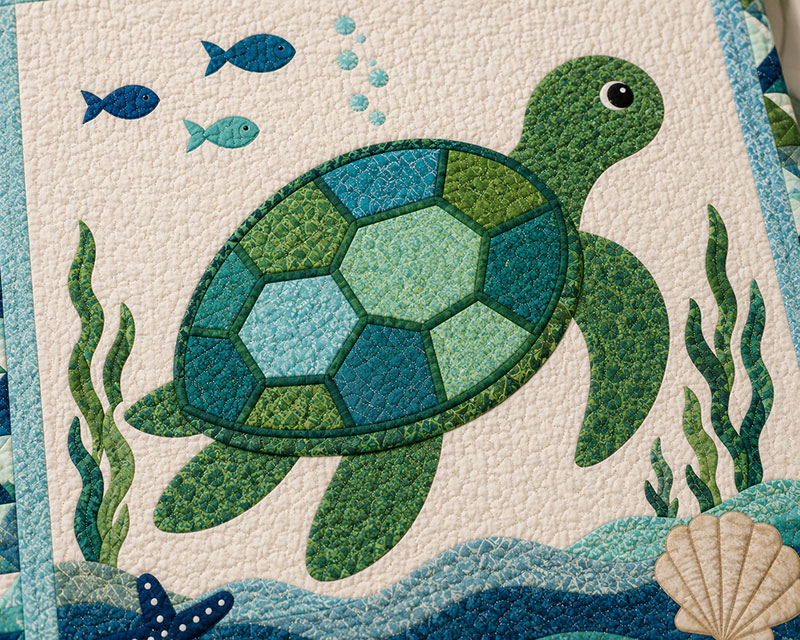
The shell layout is what gives this quilt its high-end look.
The angled shell pieces catch light differently throughout the day, especially near nursery windows. That subtle contrast is one reason ocean quilts photograph so well once they’re finished.
Baby quilt ideas, ocean nursery themes, and ocean nursery decor pair naturally with this pattern because the colors stay timeless once the nursery grows with the child.
Sea Turtle Quilt Pattern Color Placement
The finished quilt shown on this page uses controlled contrast instead of bright beach colors. Too many loud blues can make ocean quilts start looking harsh once they’re placed inside a nursery with white furniture.
- Shell pieces: sea glass green, navy, aqua batiks
- Turtle body: medium aqua
- Background: warm ivory quilting cotton
- Wave border: layered aqua and navy curves
- Outer border: deep navy
- Binding: navy with white flecks
The darker outer frame keeps the center turtle readable from across the room.
Complete Sea Turtle Quilt Pattern Instructions
Finished quilt size: 36" x 42"
Finished turtle size: 22" x 18"
Skill level: Advanced beginner
Seam allowance: 1/4"
Templates already include seam allowance.
Fabric and Supply List
- 1 1/2 yards ivory quilting cotton
- 1/4 yard navy batik
- 1/4 yard sea glass batik
- 1/4 yard aqua batik
- 1/8 yard sand beige quilting cotton
- 1 yard navy border fabric
- 42" x 48" cotton batting
- 42" x 48" backing fabric
- 1/2 yard binding fabric
- Fusible web
- Temporary spray adhesive
- Neutral quilting thread
- Free motion quilting foot
- Rotary cutter and quilting ruler
Exact Cutting Instructions
Background panel:
- Cut one 28" x 34" ivory rectangle
Wave strips:
- Cut 5 curved strips measuring 3" x 28"
Inner border:
- 2 strips 2 1/2" x 34"
- 2 strips 2 1/2" x 32"
Outer border:
- 2 strips 3 1/2" x 42"
- 2 strips 3 1/2" x 36"
Binding strips:
- Cut 7 strips 2 1/2" x width of fabric
Printable Sea Turtle Template Guide
All template pieces should print at 100% scale with no resizing.
Use the 1" test square included in the printable image below before cutting fabric.
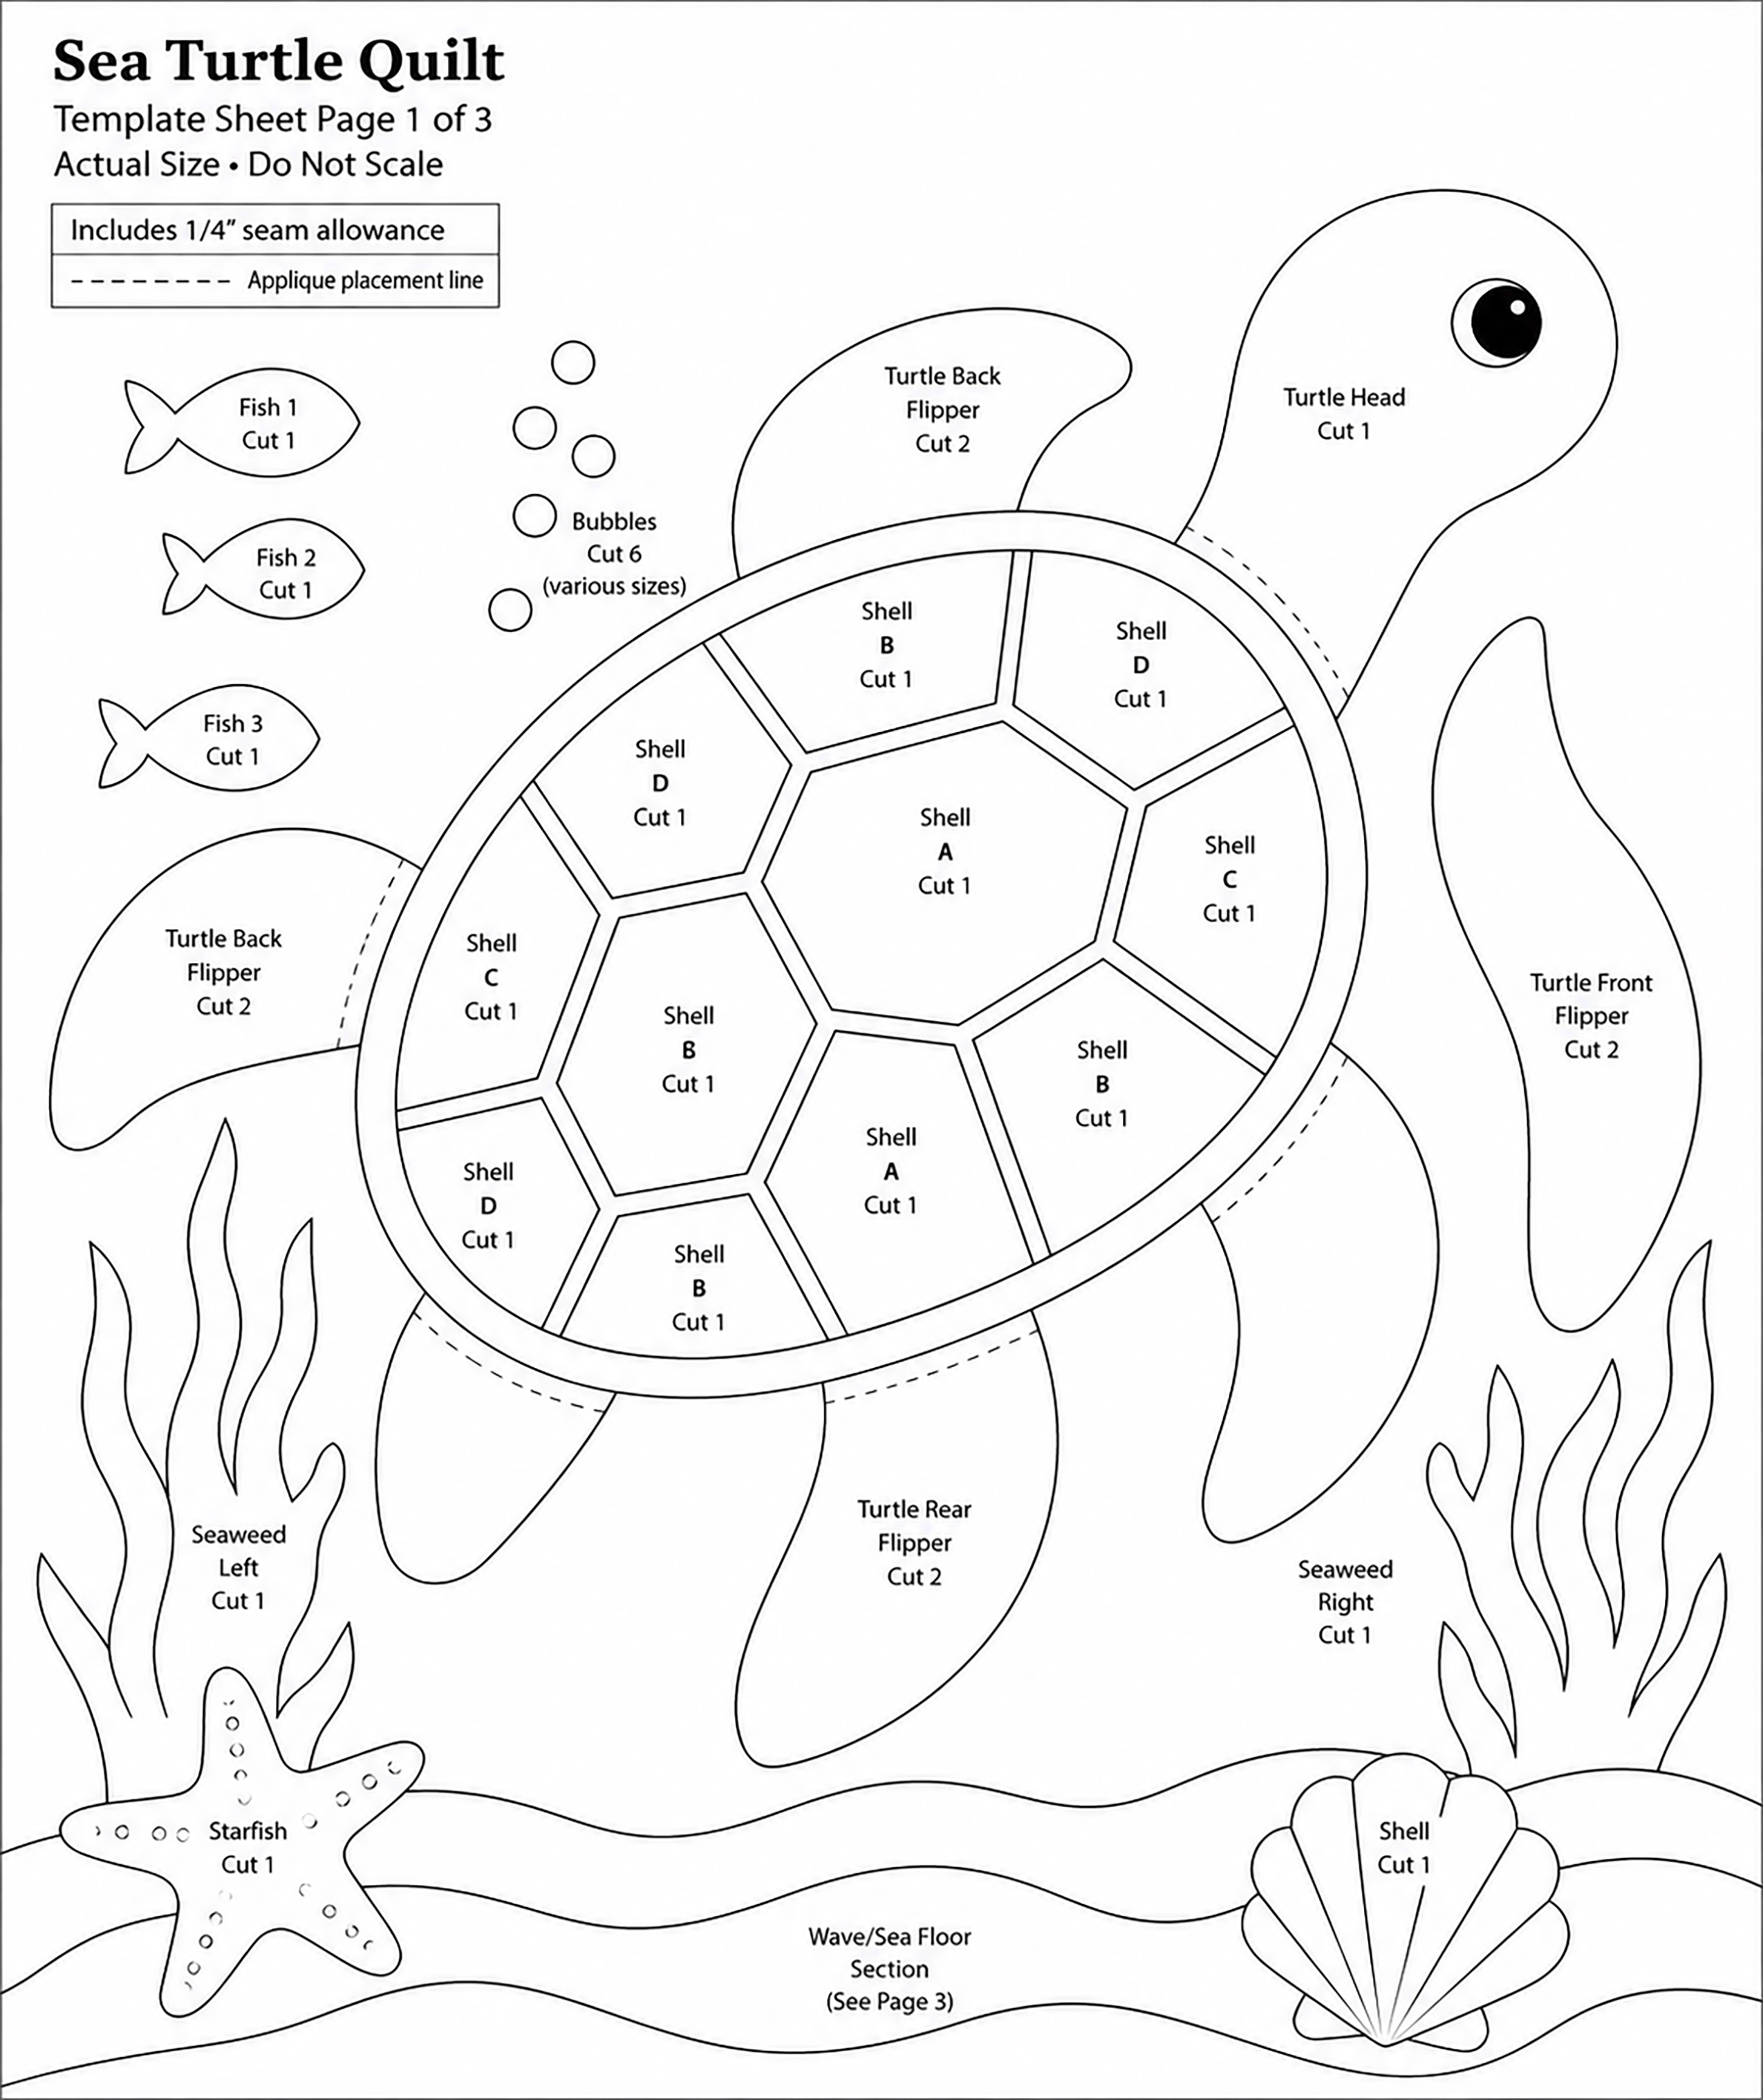
Printable Template Page 1 Instructions:
- Print at 100% scale
- Do not select “fit to page”
- Use the included 1-inch calibration square before cutting templates
- Templates already include 1/4-inch seam allowance
- Cut directly on outer template lines
Page 1 includes:
- Center shell hexagon
- Upper shell hexagons
- Lower shell hexagons
- Rear shell hexagons
- Turtle head template
- Tail template
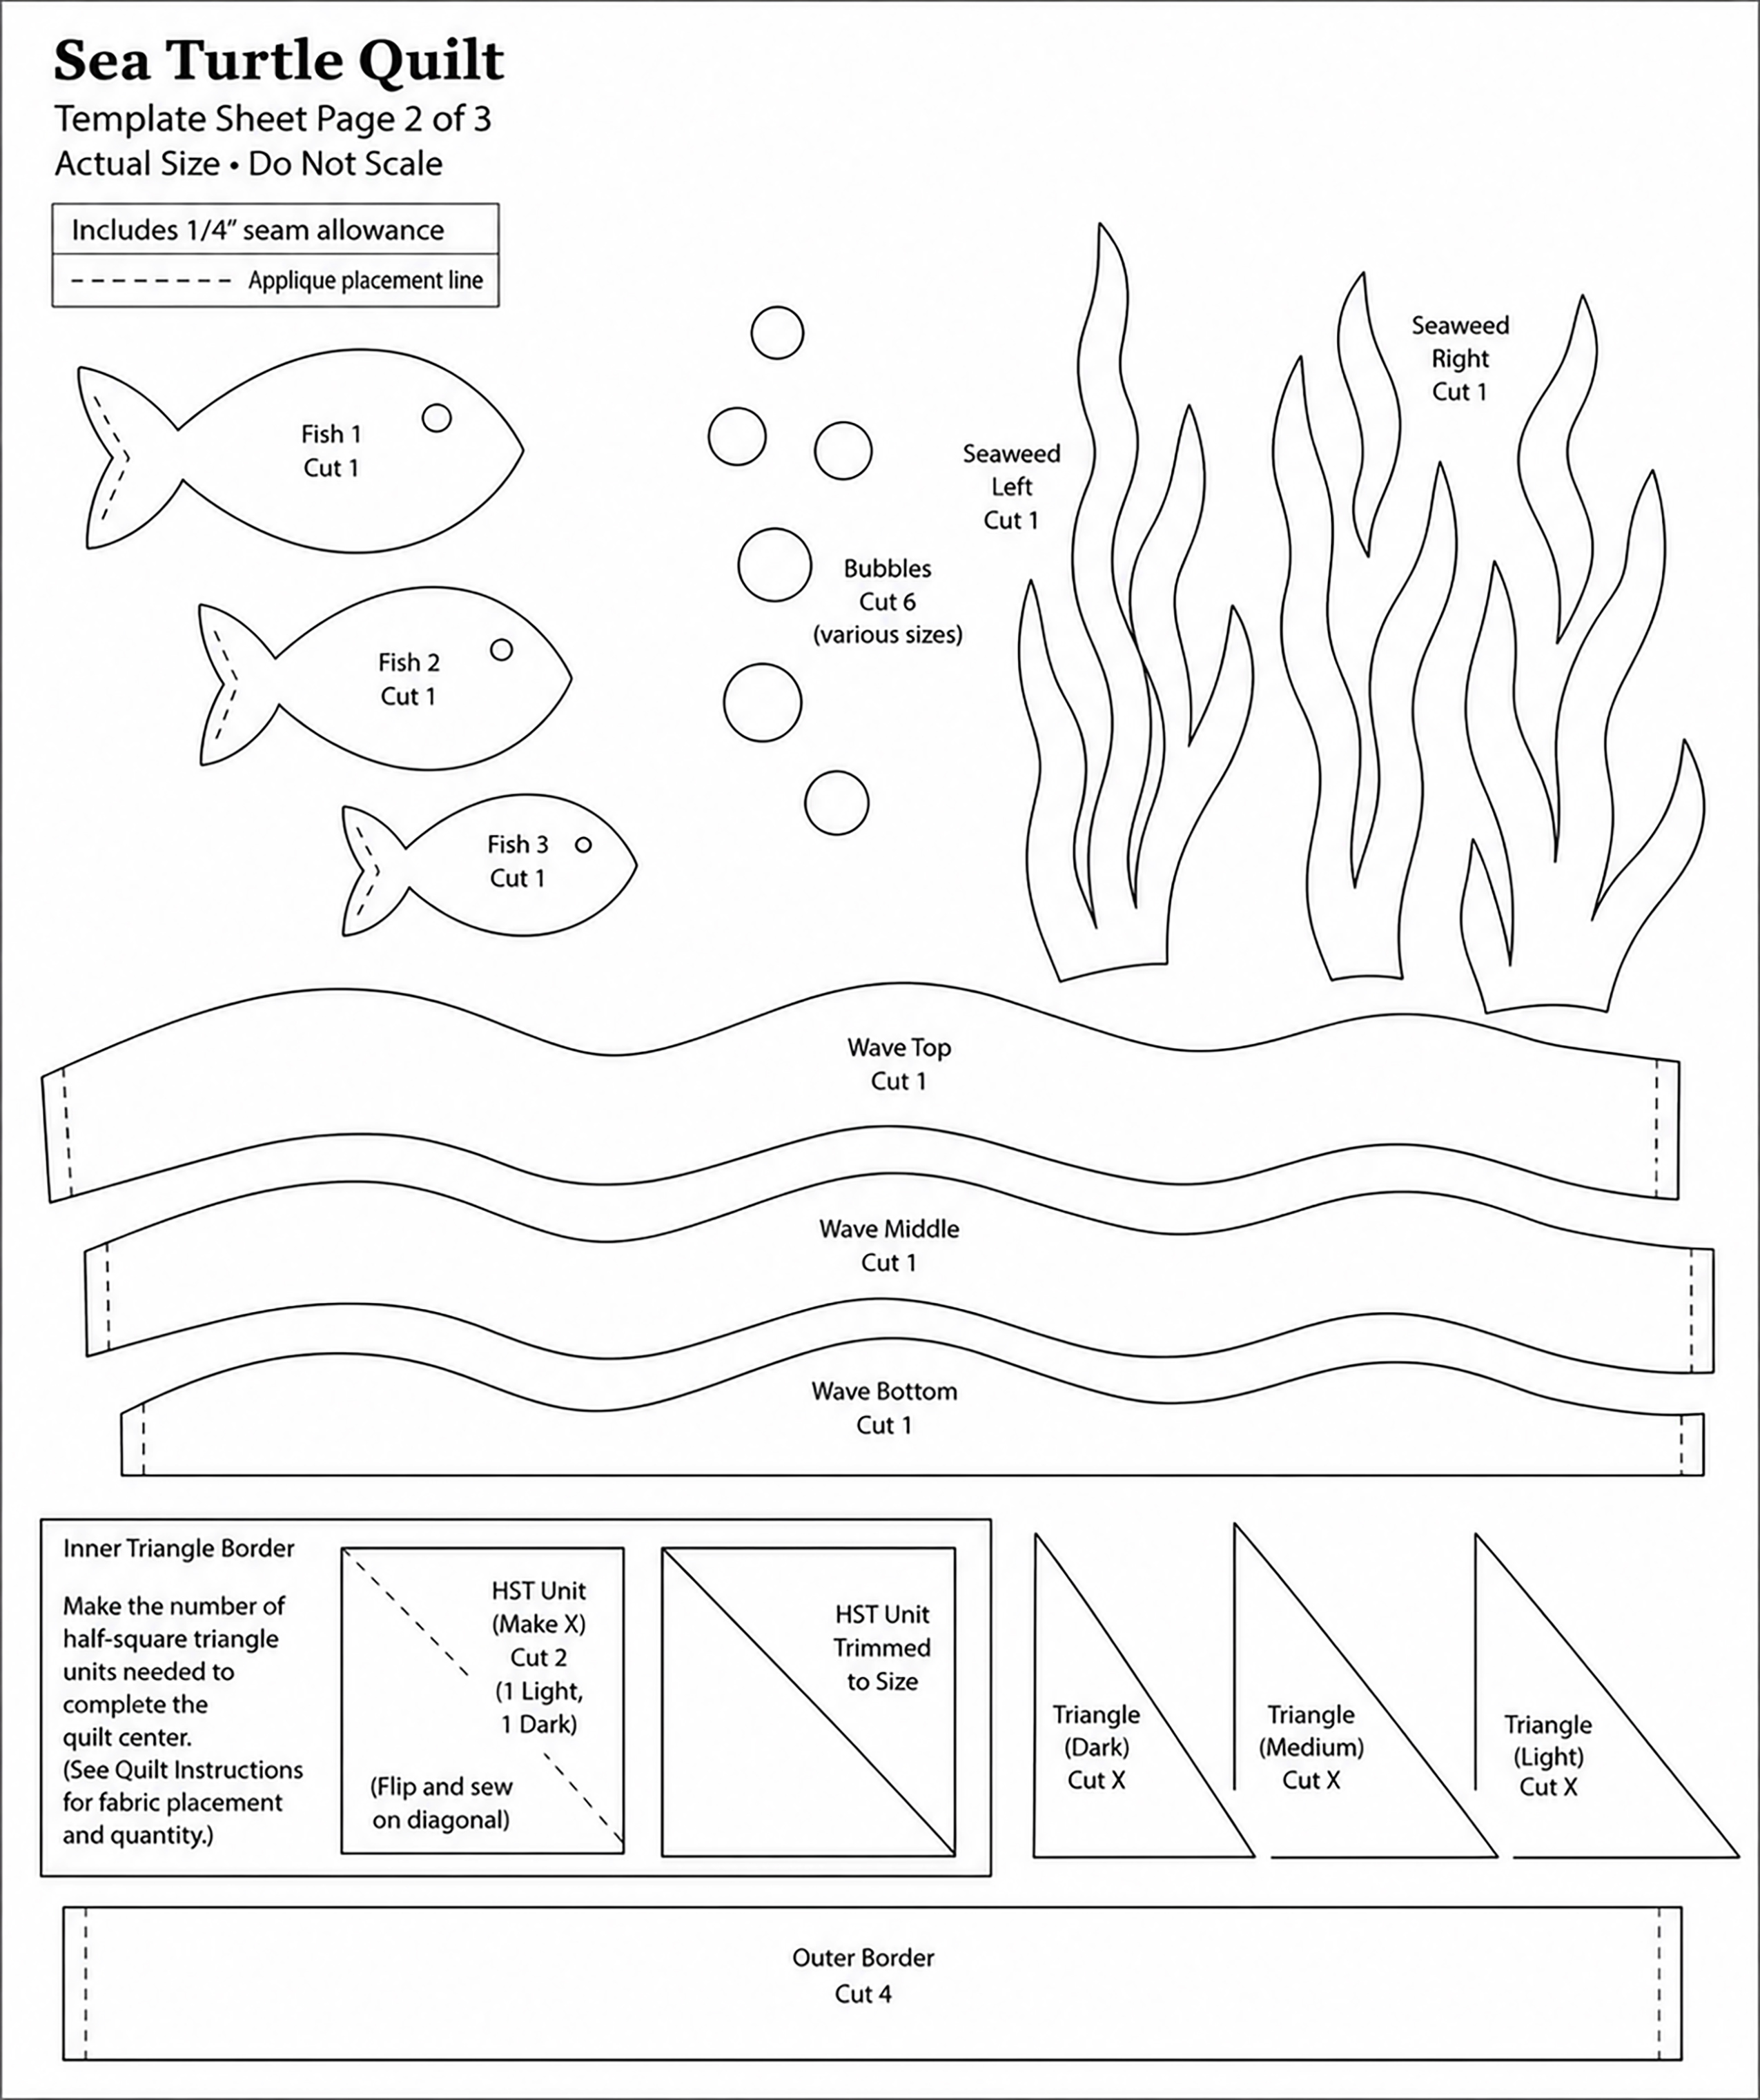
Page 2 includes:
- Front flipper templates
- Rear flipper templates
- Large fish template
- Small fish templates
- Seaweed templates
- Starfish templates
- Shell applique template
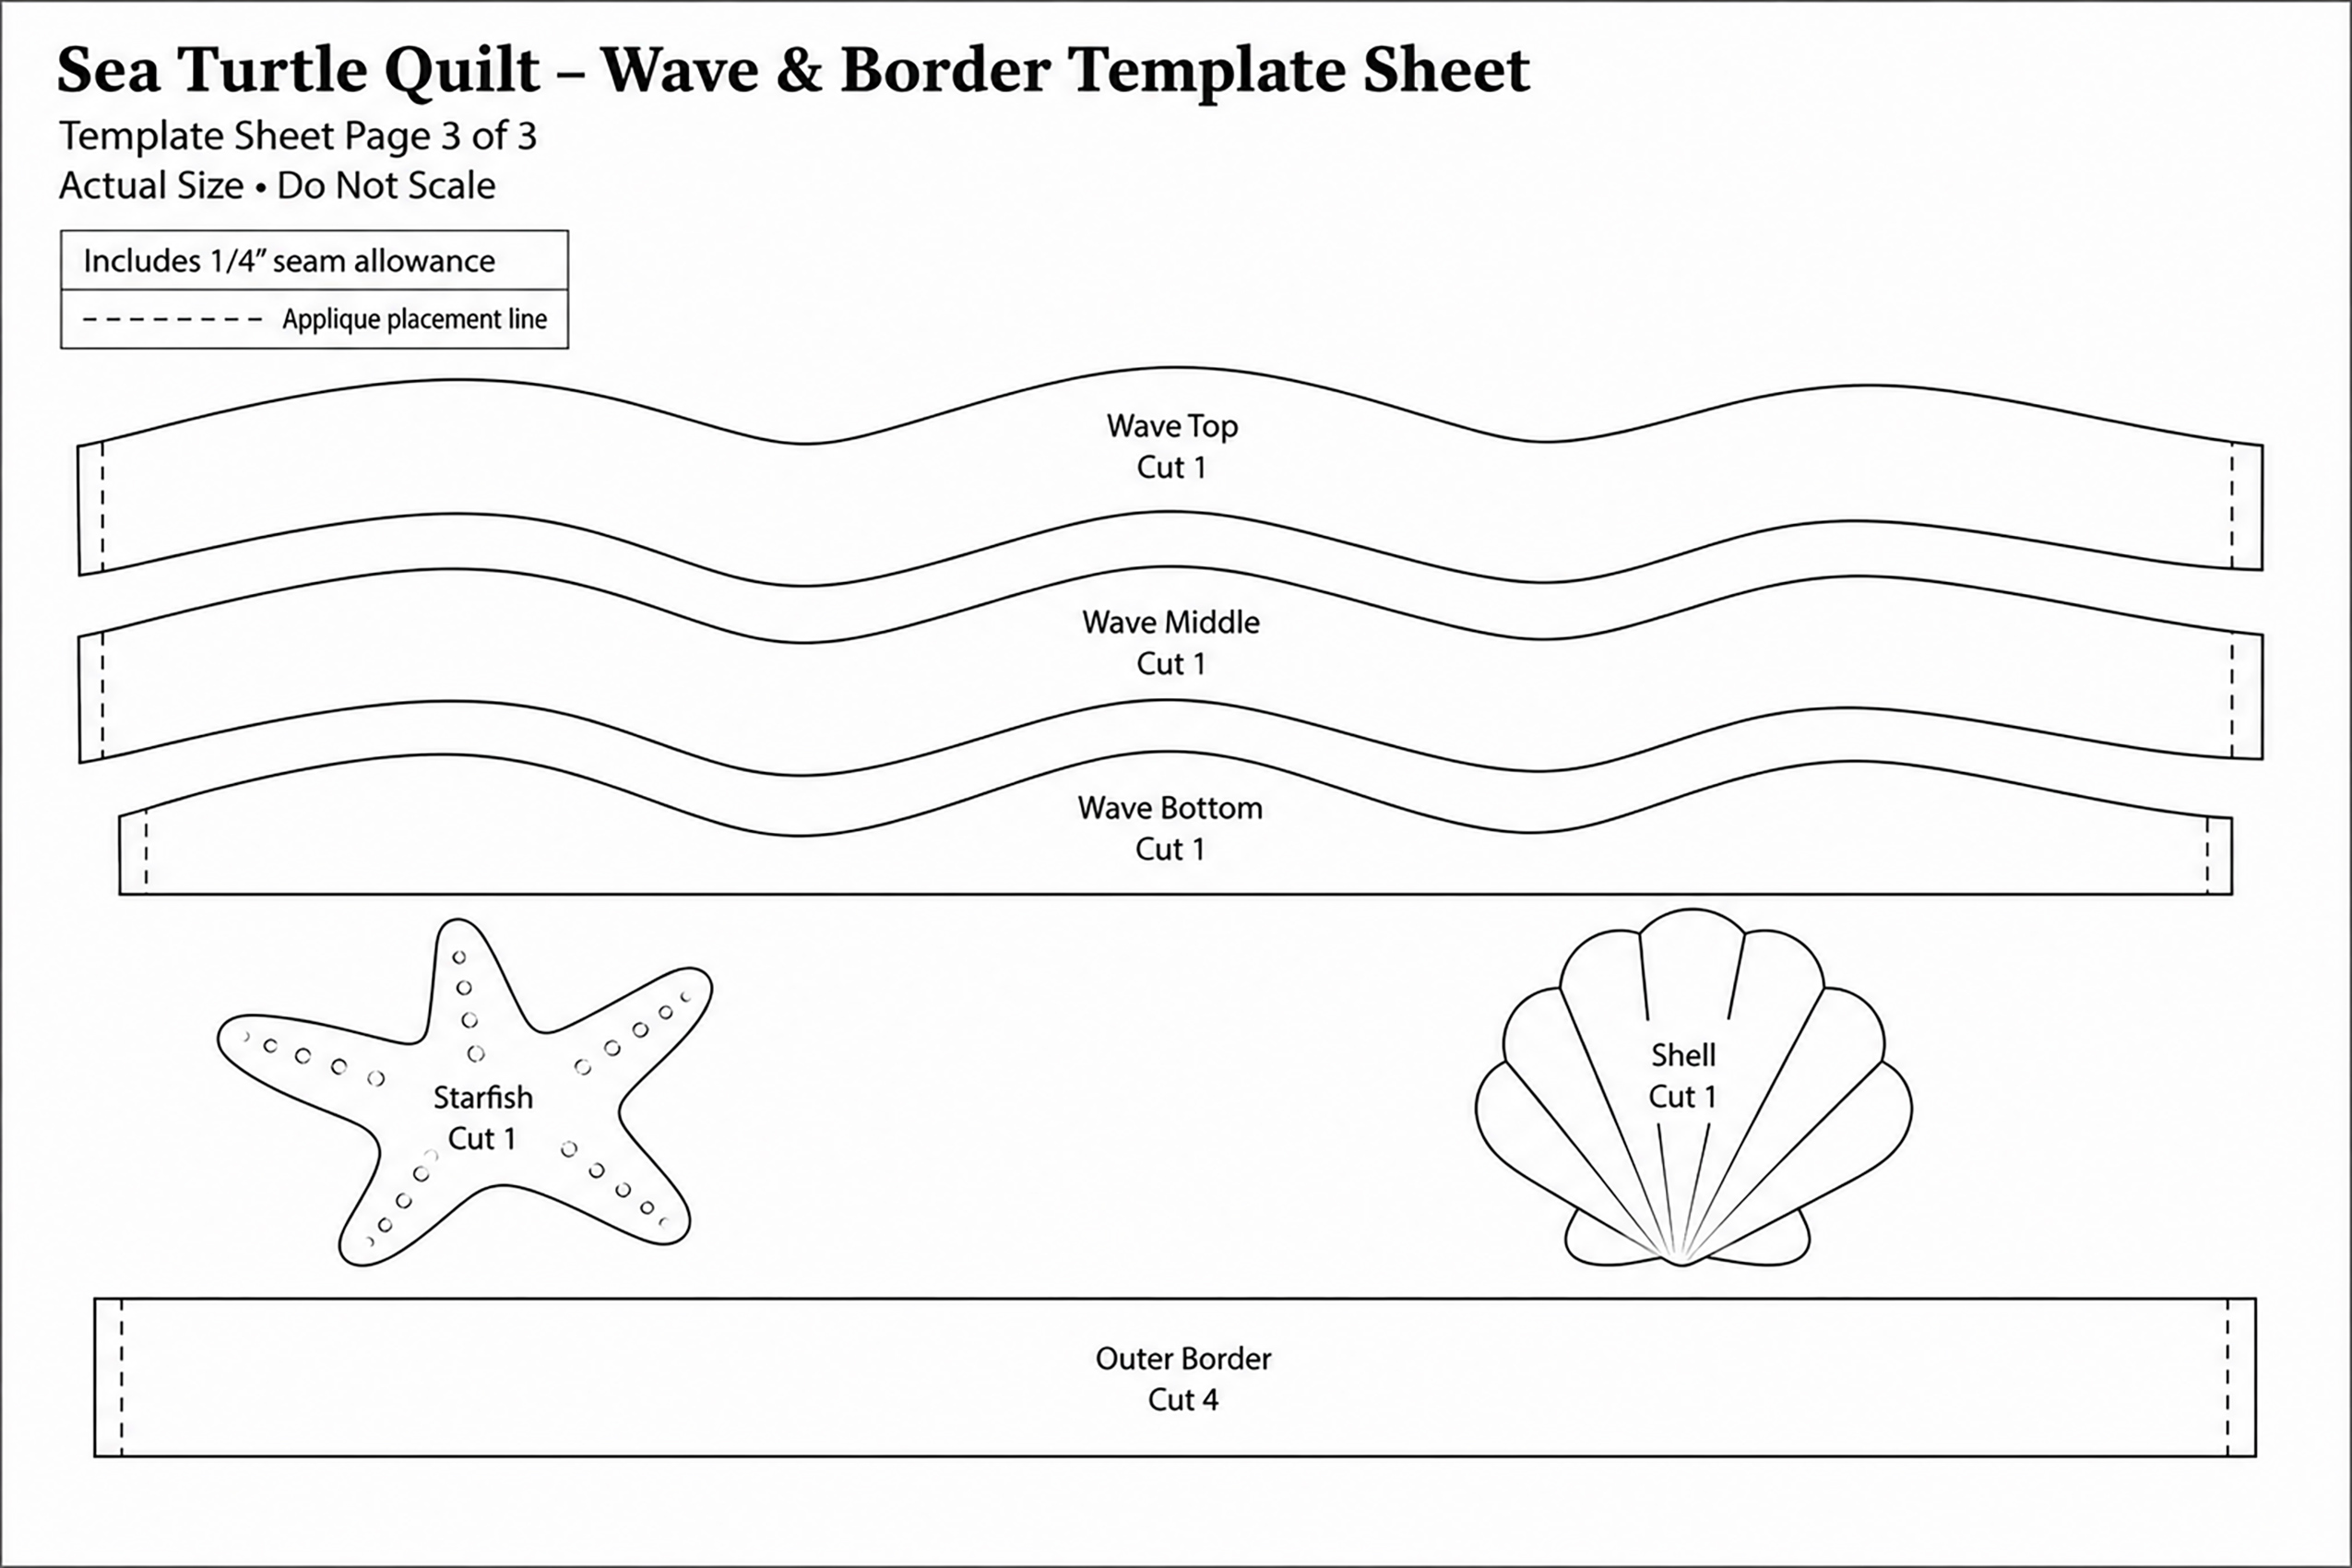
Page 3 includes:
- Layered wave border templates
- Ocean curve guides
- Border corner alignment marks
- Wave overlap trimming guides
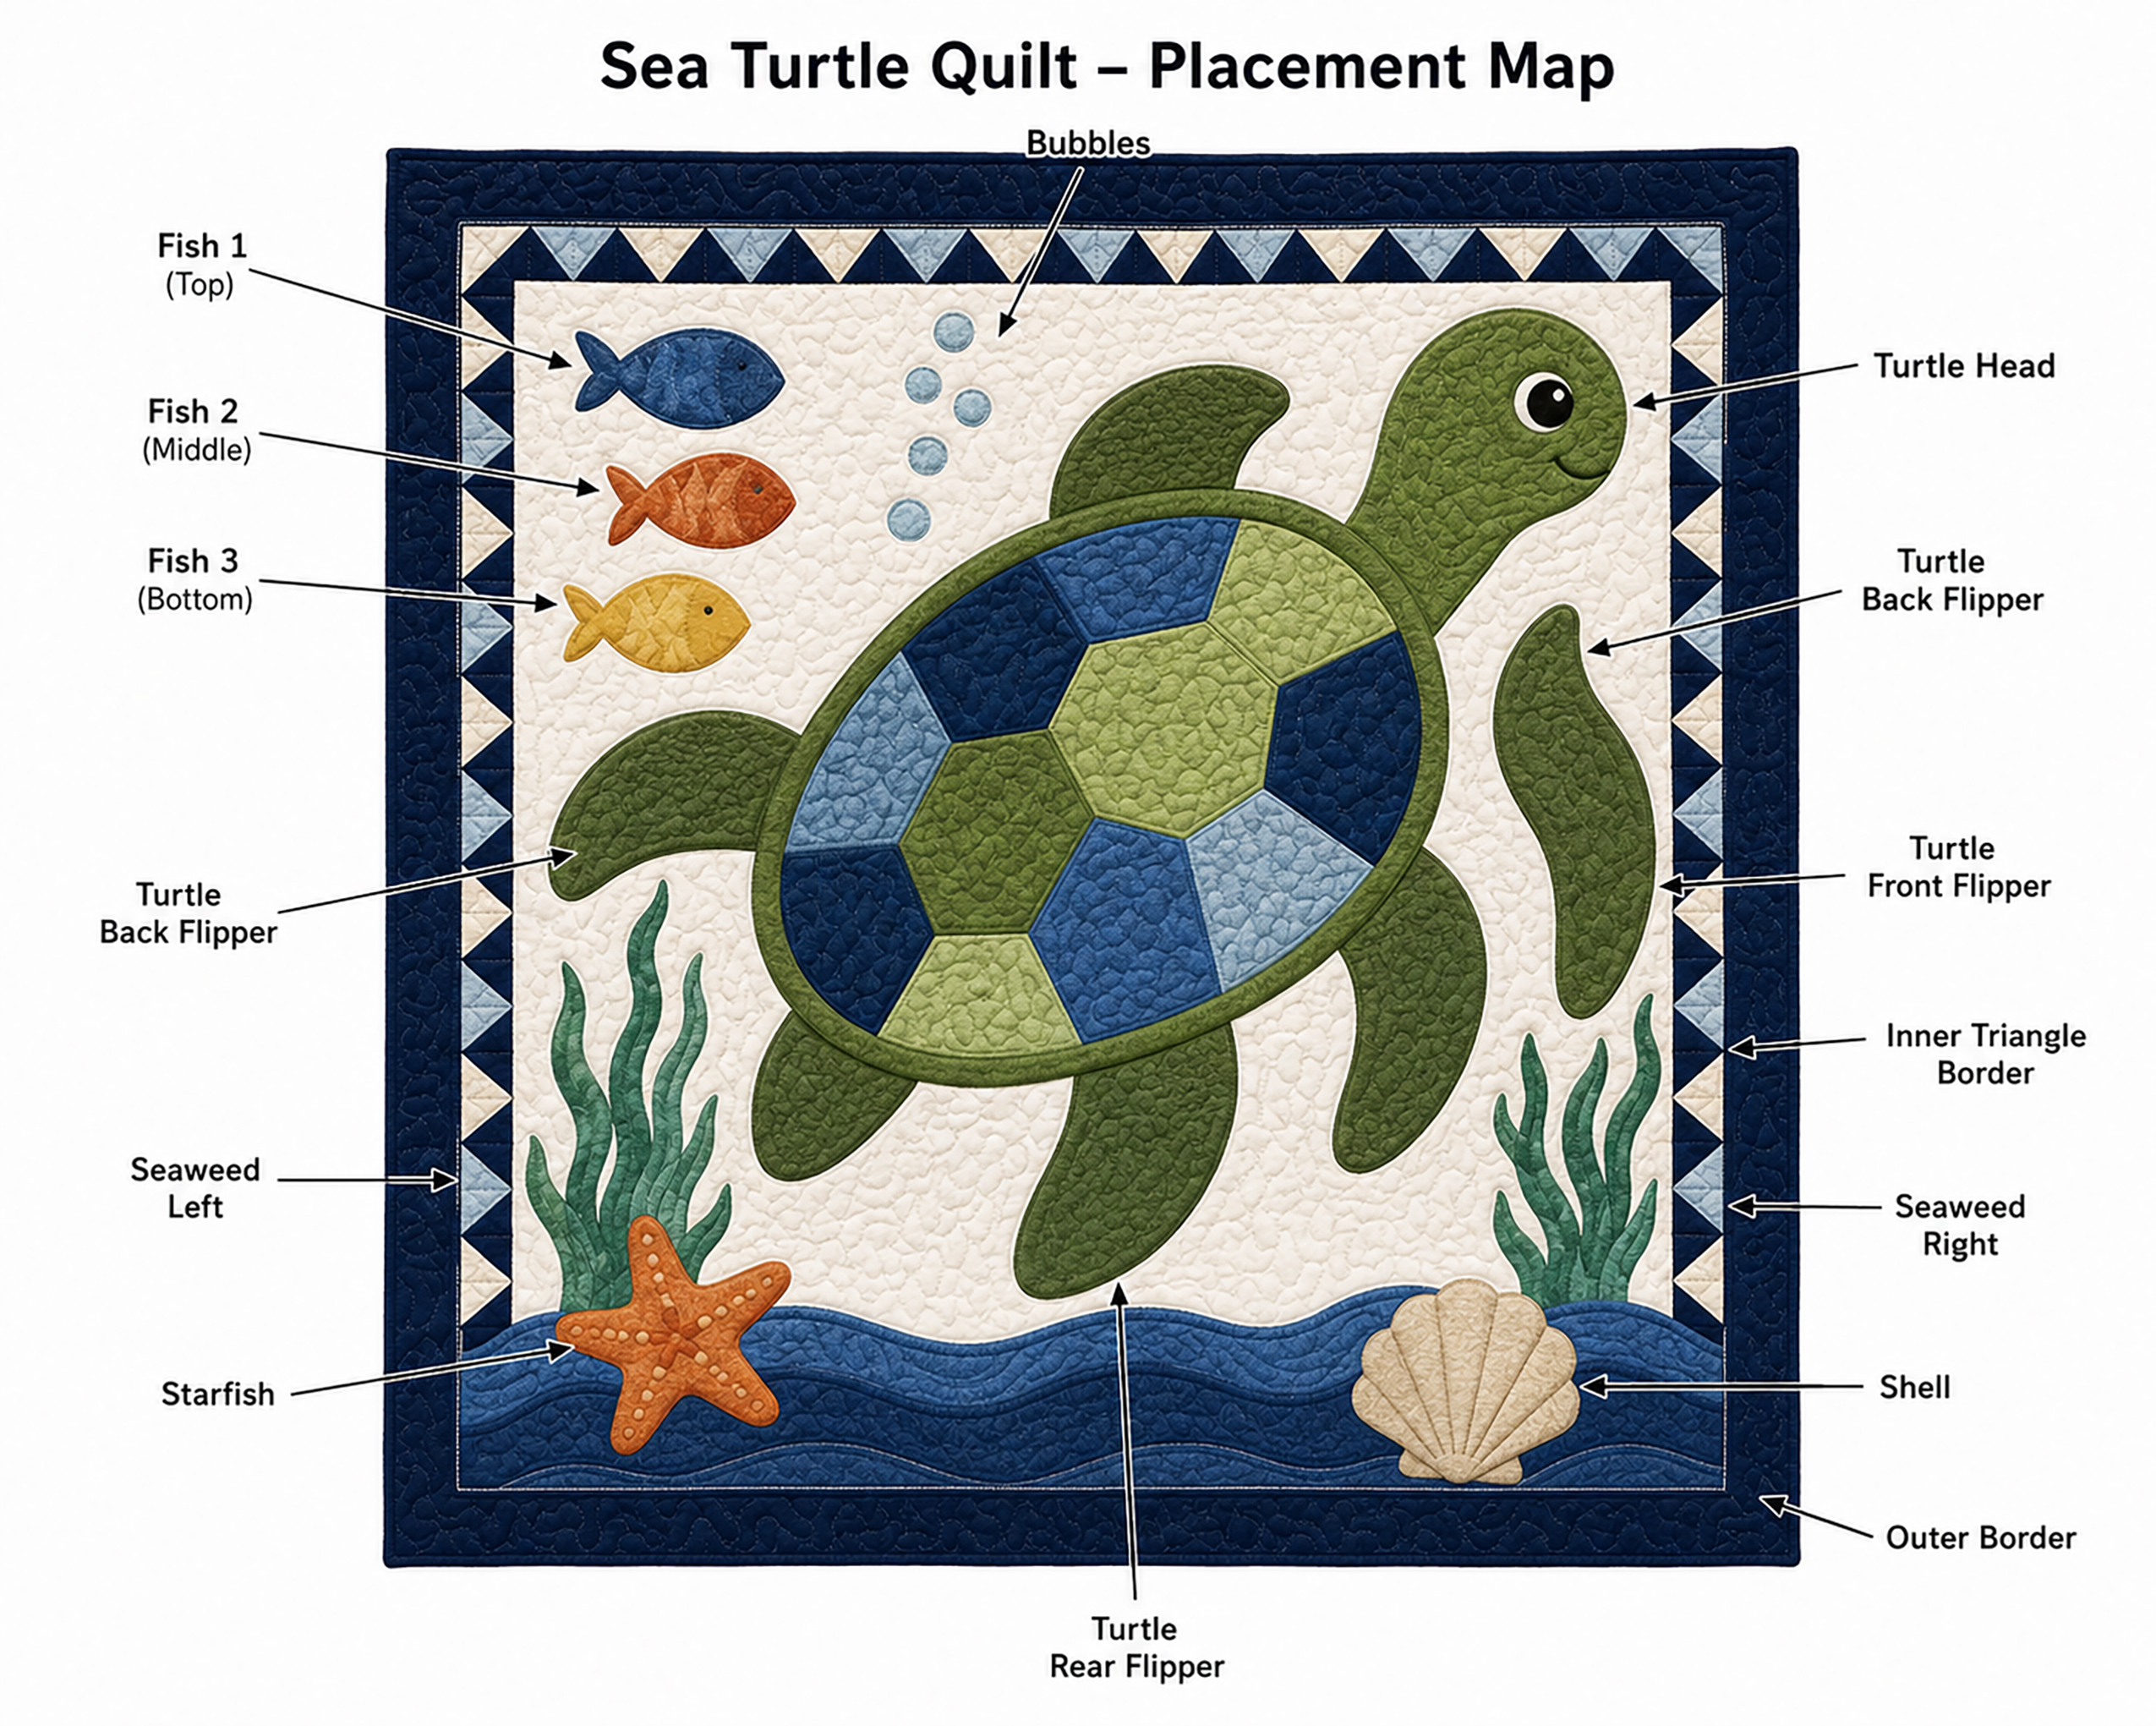
Placement Map Instructions:
- Center turtle shell sits 14 inches from both side edges
- Top of turtle head begins 8 inches below top quilt edge
- Wave border begins 7 inches above lower quilt edge
- Fish placement remains concentrated in upper left section
- Seaweed remains below flipper line
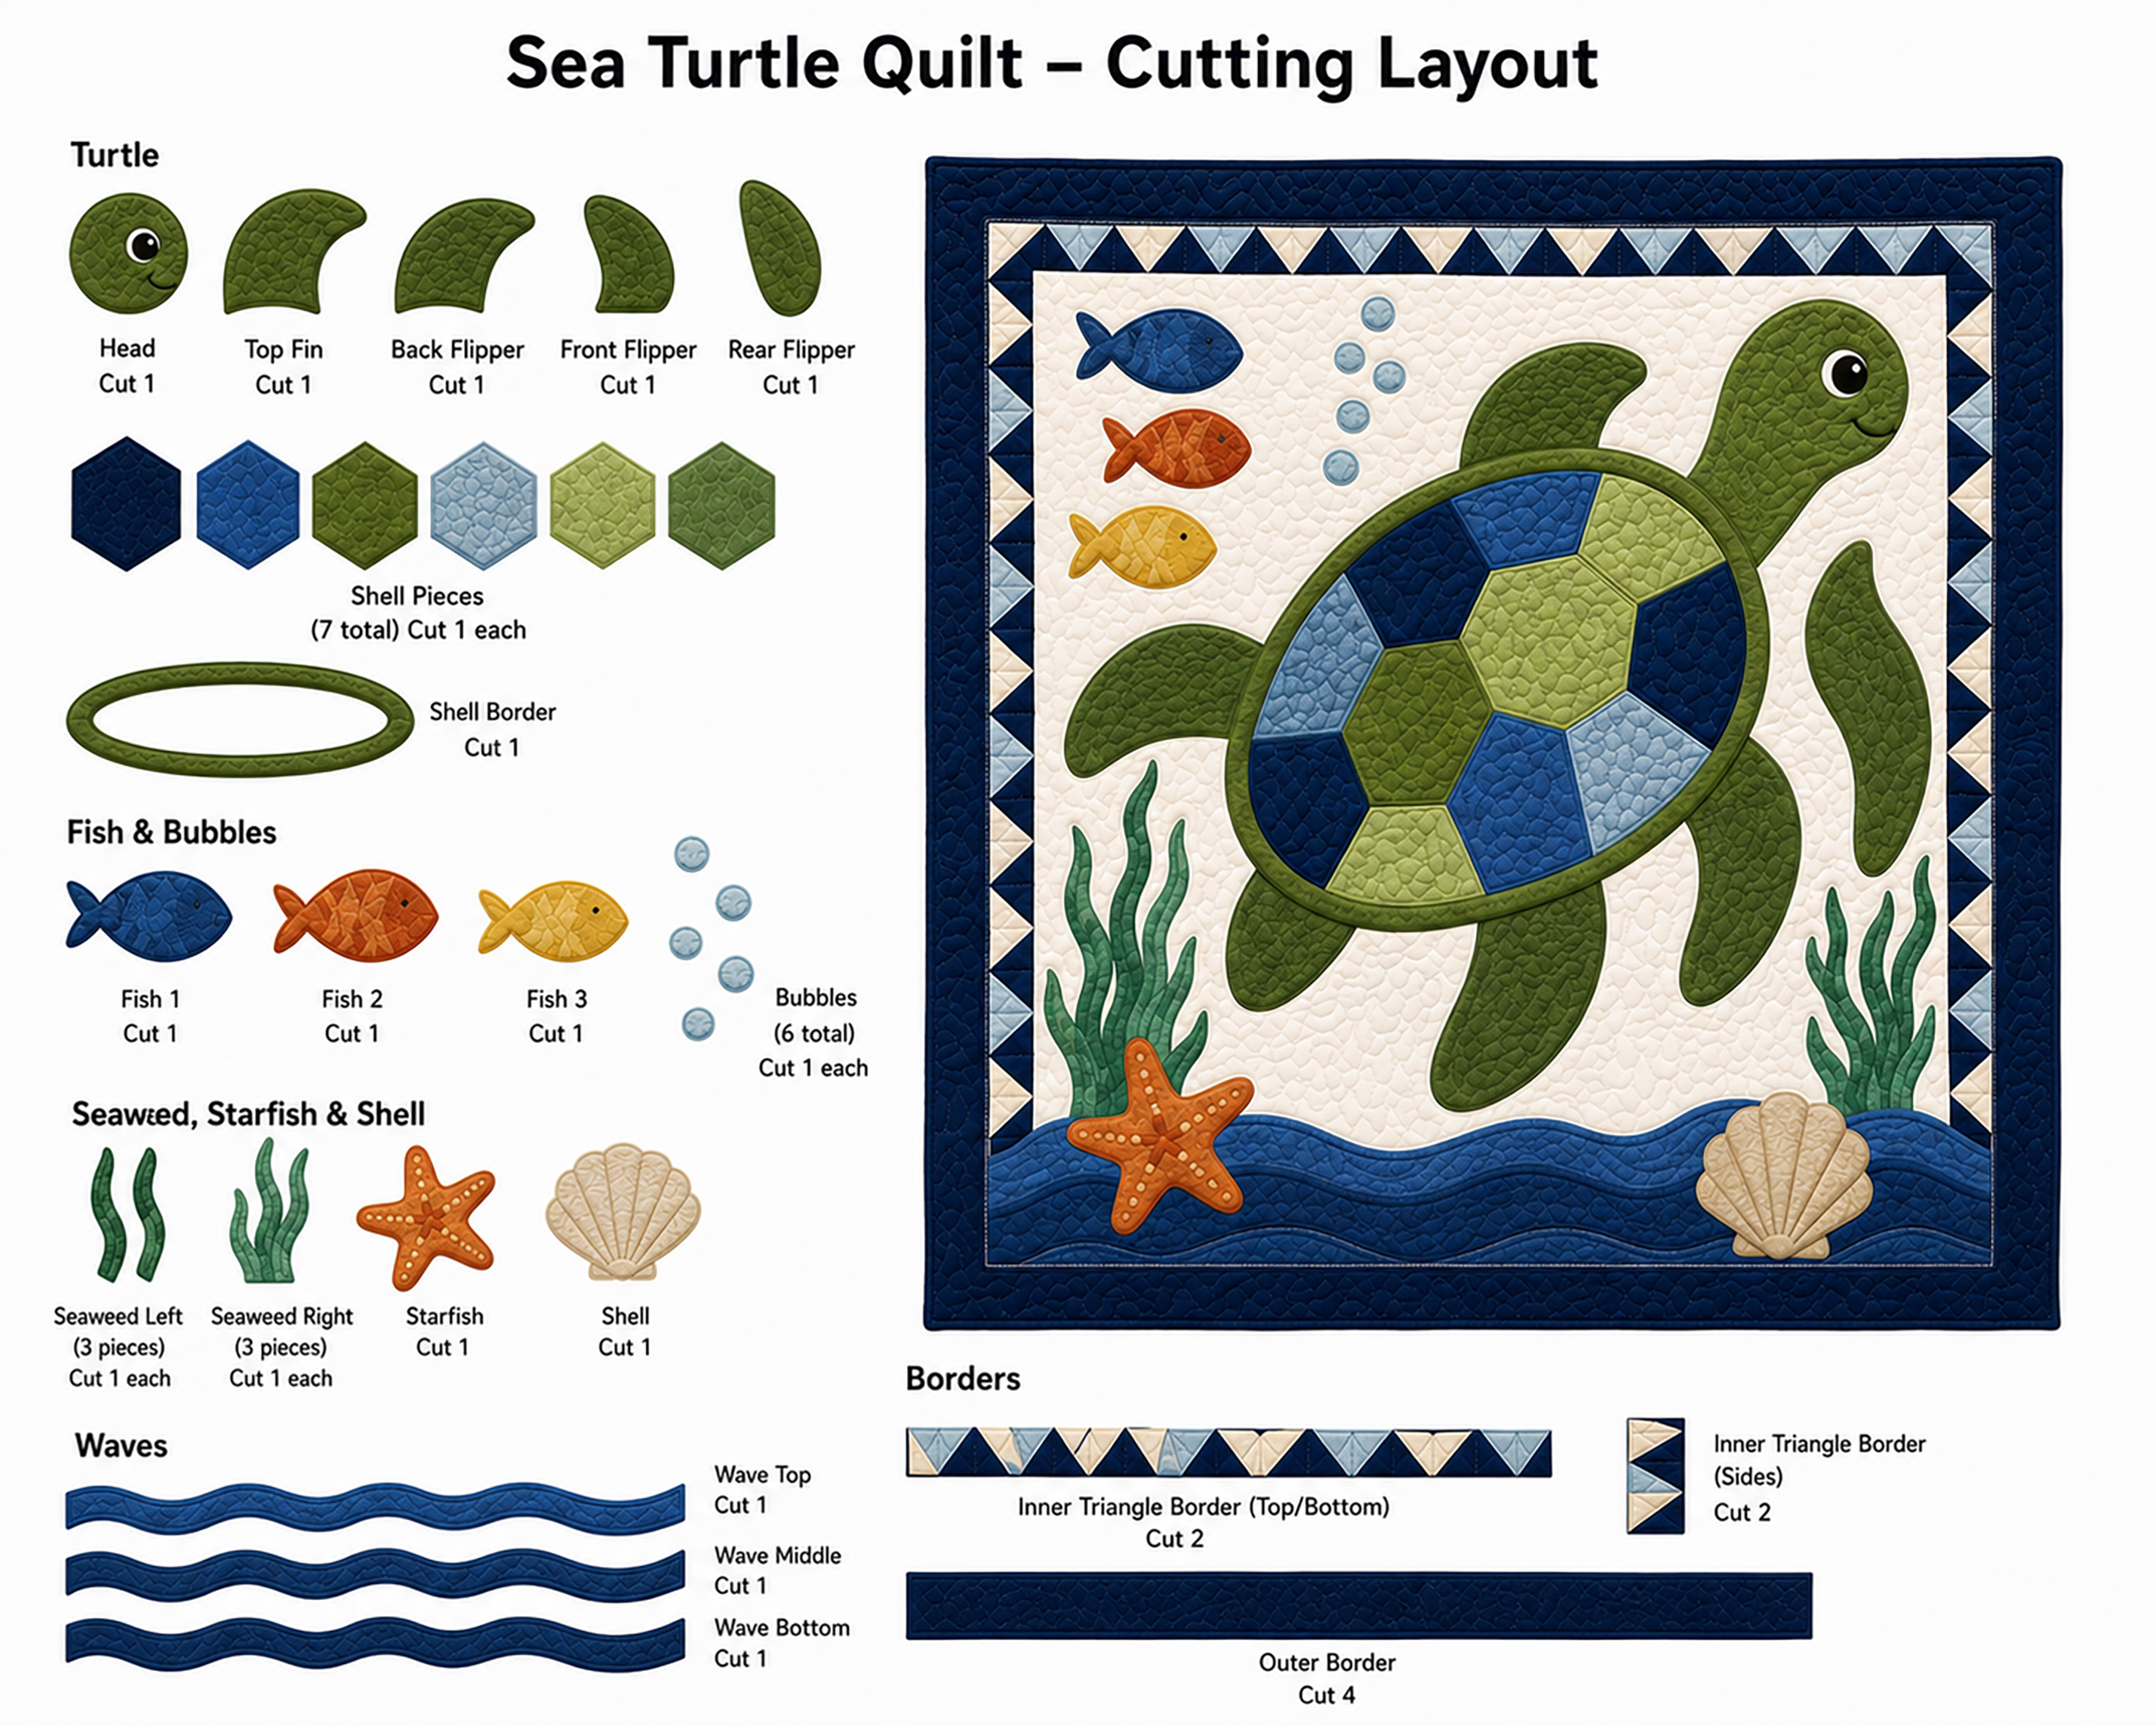
Fabric Cutting Layout Notes:
- Keep shell pieces on straight grain whenever possible
- Wave borders may be cut on slight curve bias for smoother shaping
- Background panel should remain unpieced
- Label all shell sections before assembly
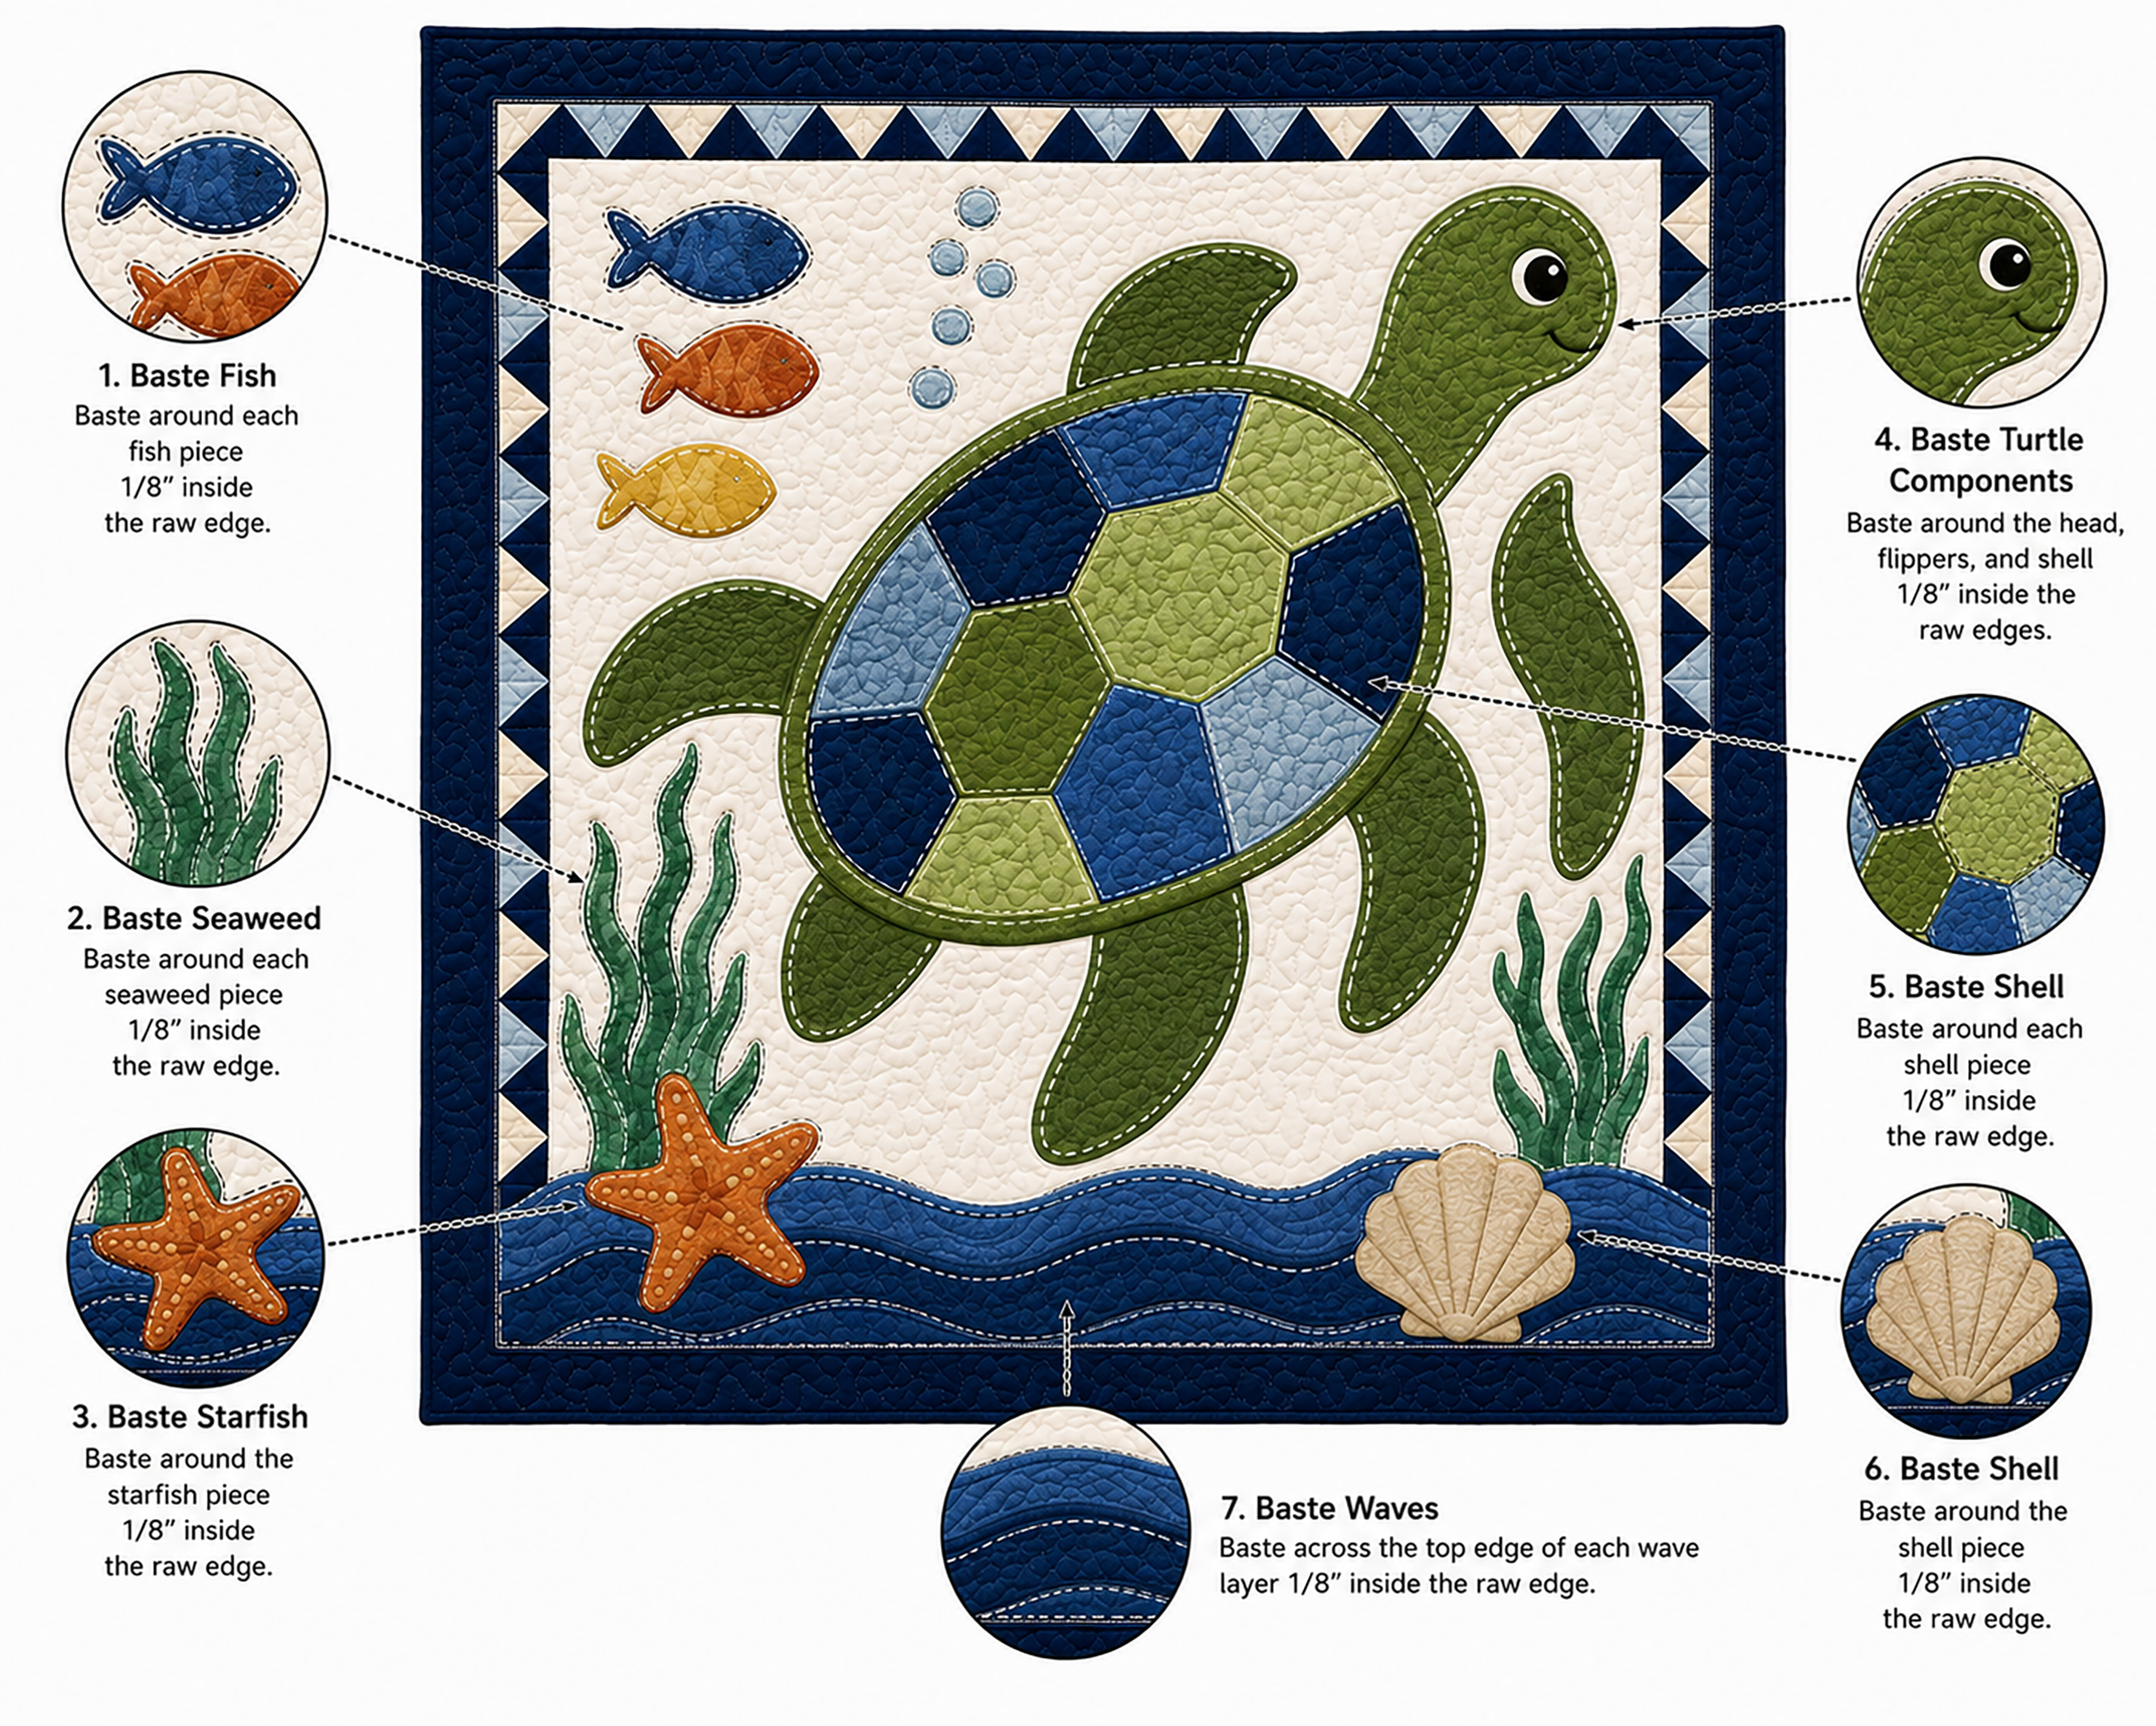
Basting Guide:
- Backing fabric wrong side up
- Batting centered above backing
- Quilt top right side up
- Safety pins every 4 inches
- Smooth layers from center outward before pinning
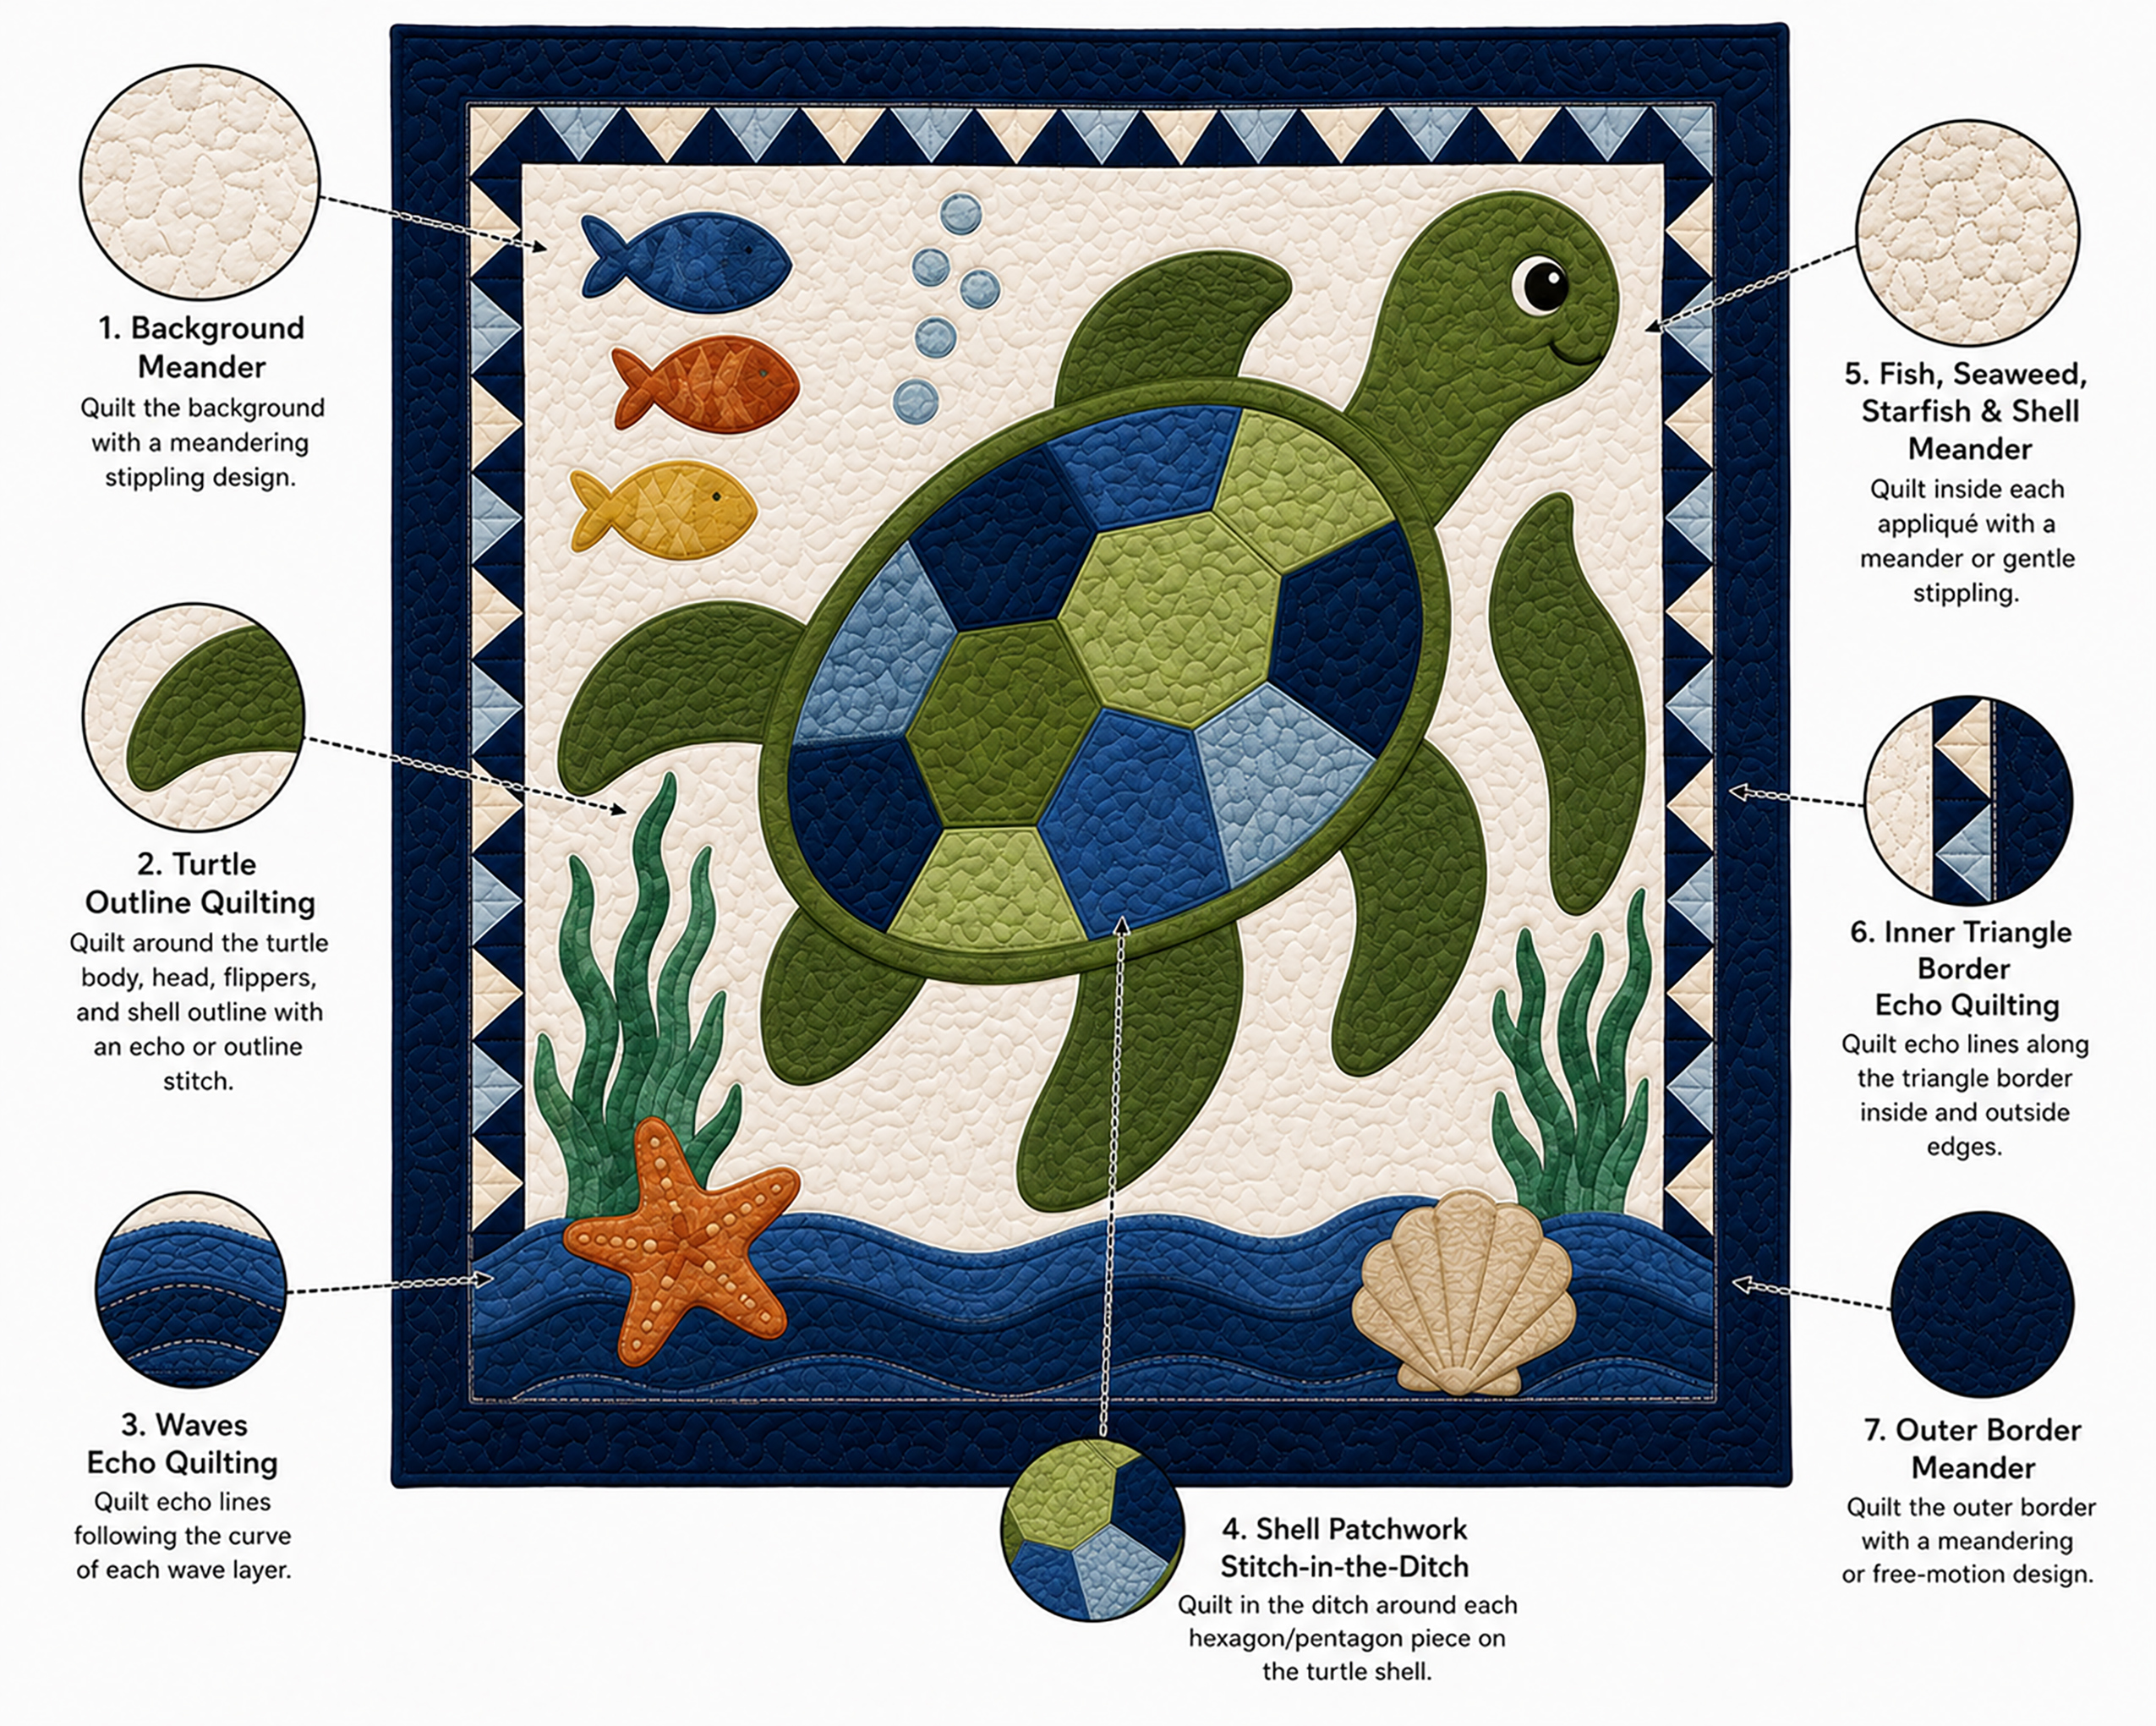
Quilting Path Guide:
- Begin quilting inside shell sections first
- Quilt wave curves second
- Finish with flowing background quilting
- Recommended quilting spacing: 1 inch to 1 1/2 inches
- Recommended stitch length: 2.5

Binding Guide:
- Total binding needed: 160 inches
- Cut 7 strips 2 1/2 inches wide
- Join strips with diagonal seams
- Miter corners carefully before hand finishing
- Press binding away from quilt edge before final stitching
Step 1. Prepare the Background Panel
Press the ivory background thoroughly before positioning applique pieces.
Even small wrinkles become noticeable around the shell once quilting starts because the shell sections create strong visual lines through the center.
Step 2. Build the Turtle Shell
Trace all shell pieces onto fusible web.
Rough cut around the traced shapes first. Fuse onto fabric. Then cut precisely on the final lines.
Arrange shell pieces exactly like the placement map above.
Leave 1/8" spacing between each shell section.
The shell should tilt slightly upward toward the upper right corner exactly like the featured nursery quilt.
Step 3. Attach the Turtle Body Pieces
Place the head 1" from the shell edge.
Slide front flippers slightly underneath the shell before ironing. That overlap creates depth once quilting stitches are added later.
The rear flippers should angle outward instead of straight downward.
Parents often notice the turtle suddenly starts looking realistic once the flippers shift outward slightly.
Step 4. Add Fish, Seaweed, and Ocean Details
Position fish near the upper left section of the quilt.
Place seaweed low near the wave border.
Keep the shell and starfish near the bottom corners instead of floating upward into the center background.
That lower placement keeps the turtle as the visual focus.

Step 5. Iron and Stitch Applique Pieces
Use a dry iron on medium heat.
Allow applique pieces to cool fully before stitching.
Use a short zigzag stitch or blanket stitch around all applique edges.
Recommended zigzag settings:
- Width: 2.0
- Length: 0.8
Match thread colors to each applique piece instead of using one thread color throughout the quilt.
Step 6. Assemble the Wave Border
Layer curved wave strips from bottom upward.
Overlap each strip by 1/2".
Press downward after stitching each wave layer.
The finished wave section should measure 7" tall.
Step 7. Attach Borders
Sew side borders first.
Then attach top and bottom borders.
Press seams toward the darker fabric after each border addition.
The navy outer frame sharpens the turtle shape visually once the quilt is hanging vertically.
Step 8. Build the Quilt Sandwich
Lay backing fabric wrong side up.
Place batting on top.
Position quilt top right side up.
Smooth all layers carefully from center outward.
Place safety pins every 4".
Wrinkles hidden during basting usually become visible after quilting begins.
Step 9. Quilt the Design
Begin quilting inside shell sections first.
Quilt curved organic lines around the turtle body and ocean waves.
Use loose flowing background quilting across the ivory areas.
Recommended stitch length: 2.5
Recommended quilting spacing: 1" to 1 1/2"
The contrast between structured shell quilting and flowing background stitching creates the editorial look visible throughout the nursery images on this page.
Step 10. Trim and Bind the Quilt
Trim quilt edges evenly before binding.
Total binding length needed: 160".
Join binding strips using diagonal seams.
Attach binding to the front first. Fold binding to the back and hand stitch closed.
Miter corners carefully to keep the border looking clean once folded over a crib rail.
Ocean Themed Baby Quilt Ideas That Coordinate Naturally
This quilt pairs especially well with:
- White cribs
- Oak nursery furniture
- Sea glass wall paint
- Navy curtains
- Natural woven rugs
Too many beach accessories can make ocean nurseries start looking crowded quickly. The quilt already creates enough movement once it’s placed inside the room.
Many parents also coordinate the quilt with these sea turtle baby bedding ideas so the crib textiles, nursery colors, and coastal decor all feel visually connected without becoming overly themed.
Ocean baby crib quilt patterns and Crochet sea turtle patterns coordinate especially well with this nursery style.
Sea Turtle Baby Gift Ideas That Last Beyond the Nursery
Quilts like this usually stay in families longer than expected because they still work beautifully outside the nursery years later.
Folded across a reading chair or layered at the foot of a twin bed, the turtle design still looks timeless instead of looking tied to one age.
For current infant sleep guidance in the United States, see the U.S. Consumer Product Safety Commission safe sleep recommendations.
Sea Turtle Quilt Pattern FAQs
What size is the finished sea turtle quilt?
The finished quilt measures approximately 36" x 42".
Do the printable templates include seam allowance?
Yes. All template pieces already include the required 1/4" seam allowance.
Can beginners make this sea turtle quilt pattern?
Yes. Confident beginners can complete this project using fusible applique and basic quilting techniques.
What fabrics work best for sea turtle quilts?
Batik quilting cottons and lightly marbled prints help create more depth inside the shell sections.
Does this quilt work in a gender neutral nursery?
Yes. The navy, aqua, sea glass, and ivory palette blends naturally into many nursery styles.
When you click on links to various merchants on this site and make a purchase, this may result in this site earning a commission. This does not affect the price you pay.
UBGI Gold Standard 2026
Verified for performance, SEO,
and accessibility compliance.
Photos, decorating ideas, party setups, and reader submissions are shared for inspiration only and are not intended as step-by-step decorating, construction, or DIY instructions.
About Jan | Contact | Baby Room Ideas (Blog) | Site Map | Privacy Policy | Disclaimer | Affiliate Disclosure | Earnings Disclosure
I am a participant in the Amazon Services LLC Associates Program, an affiliate advertising program designed to provide a means for us to earn fees by linking to Amazon.
Copyright © 2006-2026. All Rights Reserved.