Free Orange and Blue Pumpkin Quilt Pattern
By Jan Bay
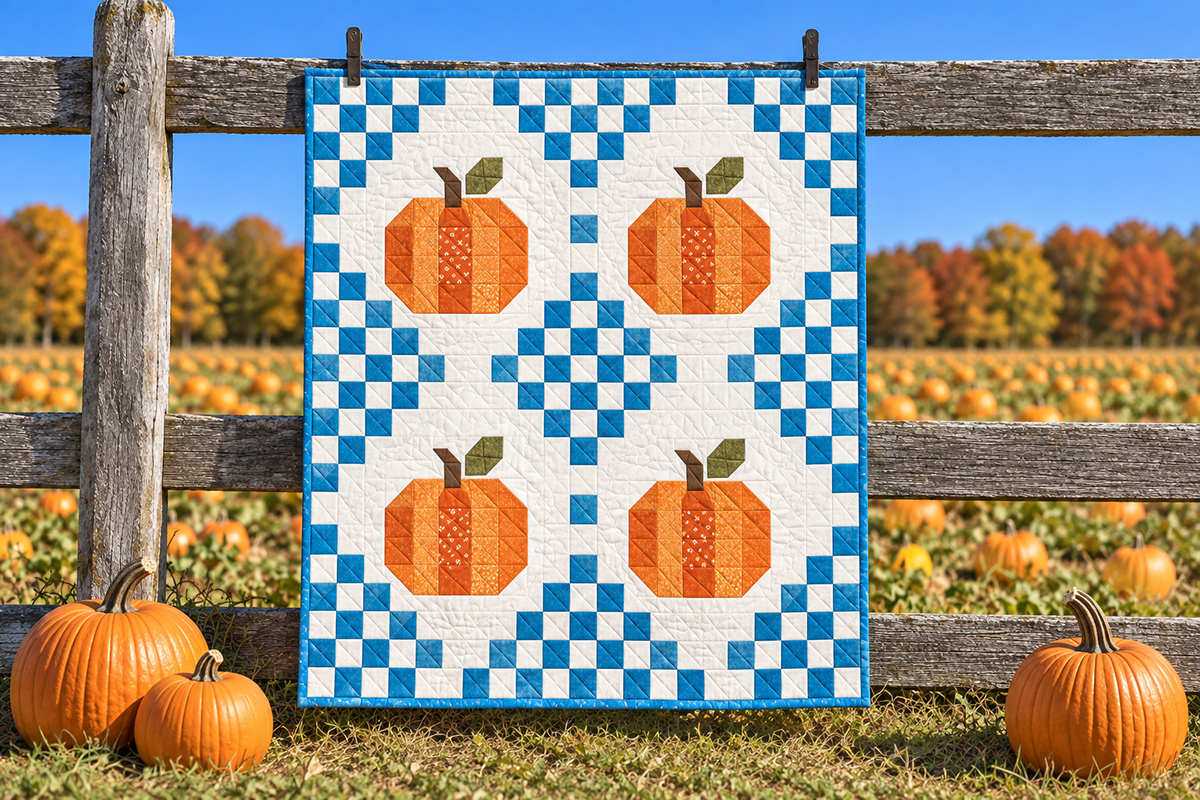
This free orange and blue pumpkin quilt pattern makes a cheerful fall quilt I call the "Orange You Glad It’s Blue, Too?" quilt. The fabric palette pairs bright pumpkin orange, one of my favorite fall colors, with striking sea blue and warm white in an original rotary cut patchwork design. Four pieced pumpkin medallions sit inside a sea-blue Irish-chain-style design that creates a second pattern across the quilt. Instructions are included for a 40 x 50 inch crib-size version and a larger throw, with no appliqué, paper piecing or templates required.
Explore More Free Baby Quilt Patterns
Pieced Pumpkin Quilt Block Pattern
Helpful Quilting Supplies for This Project
Jump to the Pattern
Orange and Blue Pumpkin Quilt Pattern Sizes
The quilt shown in the example image is the crib-size version. It uses four matching pumpkin medallions arranged two across and two down, with the sea-blue chain forming the secondary design around them.
| Version | Planned Finished Size | Grid Unit | Pumpkin Medallion |
|---|---|---|---|
| Crib / Baby | About 40 x 50 inches | 2 inches finished | 14 inches finished |
| Throw | About 50 x 62 1/2 inches | 2 1/2 inches finished | 17 1/2 inches finished |
Use a 1/4-inch seam allowance throughout unless I specifically say otherwise. The dimensions and yardage on this page are calculated from the construction plan. This pattern has not been physically test-made from these written instructions, so I am not calling it a tested pattern. Small differences in seam accuracy, quilting and binding can also change the final measurement slightly.
Materials and Fabric Requirements
I would keep the fabric choices fairly simple here. The orange pumpkins and clear sea blue already give the quilt plenty of color, and the warm white space is what lets both of them stand out.
The example quilt uses several orange prints within each pumpkin and more than one sea-blue print in the chain. You can use one fabric for each color if you prefer, but a small mix of prints gives the patchwork a little more movement without changing the pattern.
The yardage below is calculated from the construction plan and includes a reasonable cutting allowance. It has not been verified by physically making the quilt, so if you like extra room for squaring, directional prints or cutting mistakes, add a little more.
The cutting plan assumes standard 42 to 44-inch quilting cotton with at least 40 inches of usable width after the selvages are removed. If you're using directional prints or fabric with less usable width, buy a little extra rather than trying to squeeze the last pieces out of a strip.
| Fabric | 40 x 50 Crib Size | 50 x 62 1/2 Throw Size |
|---|---|---|
| Warm white background | 2 1/4 yards | 3 1/2 yards |
| Sea blue, including binding | 1 1/4 yards total | 1 1/2 yards total |
| Pumpkin orange prints | 1/2 yard total | 1 yard total |
| Brown for stems | Scrap or fat eighth | Fat eighth |
| Muted olive for leaves | Scrap or fat eighth | Fat eighth |
| Backing, 42 to 44 inches wide | 3 1/2 yards | 4 1/4 yards |
| Batting | At least 48 x 58 inches | At least 58 x 71 inches |
You'll also need coordinating thread, a rotary cutter, cutting mat, quilting ruler, sewing machine and iron. Use an accurate 1/4-inch seam allowance throughout the piecing.
If you're mixing prints, I'd keep most of the orange fabrics close in value rather than slipping in a very dark rust, cinnamon or nutmeg shade. I would do the same with the blue. The color in the example is a fresh sea blue, not navy, denim or gray-blue. Those shades have their place, but they would take this quilt in a drabber direction than I want. The "Orange You Glad It's Blue, Too?" quilt is meant to reflect a visit to the local pumpkin patch on a clear fall day. Navy blue just doesn't fit that picture.
Cutting Instructions for the 40 x 50 Quilt
These cutting measurements are for the 40 x 50 inch version shown in the example image. Cut carefully here because the whole Irish-chain layout is based on 2-inch finished squares, which means the individual patchwork squares are cut at 2 1/2 inches.
From the sea-blue fabric or assorted sea-blue prints, cut:
- 142 squares, 2 1/2 x 2 1/2 inches
- 6 binding strips, 2 1/2 inches x width of fabric
All 142 blue squares belong to the surrounding chain field. The pumpkin medallions themselves have warm-white outer corners.
From the warm white fabric, cut:
- 218 squares, 2 1/2 x 2 1/2 inches
- 8 rectangles, 2 1/2 x 10 1/2 inches
- 4 rectangles, 4 1/2 x 2 1/2 inches
- 4 rectangles, 3 1/2 x 2 1/2 inches
- 8 rectangles, 1 1/2 x 6 1/2 inches
- 16 squares, 2 x 2 inches for the pumpkin corners
- 8 squares, 1 1/2 x 1 1/2 inches for the leaf corners
- 4 rectangles, 10 1/2 x 2 1/2 inches
Of the 218 warm-white 2 1/2-inch squares, 162 belong to the surrounding chain field and 56 make the top and bottom frame rows of the four pumpkin medallions.
From the pumpkin-orange fabrics, cut:
- 16 rectangles, 2 1/2 x 6 1/2 inches
If you're using four orange prints, an easy way to divide them is to cut four rectangles from each print. Then shuffle the strips before sewing the pumpkin bodies so each pumpkin has the same construction without looking exactly alike.
From the brown stem fabric, cut:
- 4 rectangles, 1 1/2 x 2 1/2 inches
From the olive leaf fabric, cut:
- 4 squares, 2 1/2 x 2 1/2 inches
Each olive square becomes one leaf unit. The two stitch-and-flip white corners give the leaf the angled shape shown beside the brown stem in the example quilt.
Keep the 2 1/2-inch blue and white squares in separate stacks after cutting. There are a lot of them, but the assembly is much easier once you treat the quilt as a few repeating bands instead of trying to piece the entire background one square at a time.
Piece the Four Pumpkin Medallions
Make four medallions exactly the same way. Each unfinished medallion should measure 14 1/2 inches square and will finish at 14 inches after it is sewn into the quilt.
1. Piece one pumpkin body.
Choose four orange rectangles measuring 2 1/2 x 6 1/2 inches. Sew them together along the long edges with a 1/4-inch seam allowance.
Press the seams in one direction. The pieced pumpkin body should measure 8 1/2 x 6 1/2 inches unfinished.
2. Clip the four pumpkin corners.
Take four warm-white 2-inch squares. Draw a diagonal sewing line on the wrong side of each square.
Place one square right sides together at each corner of the orange pumpkin body, matching the raw edges. Use these sewing-line directions:
- Upper-left corner: draw the line from the lower-left corner of the white square to its upper-right corner.
- Upper-right corner: draw the line from the upper-left corner of the white square to its lower-right corner.
- Lower-left corner: draw the line from the upper-left corner of the white square to its lower-right corner.
- Lower-right corner: draw the line from the upper-right corner of the white square to its lower-left corner.
Each sewing line should connect the two edges beside the outside corner. It should not run through the outside corner itself.
Sew directly on each drawn line. Trim away the outside corner fabric, leaving a 1/4-inch seam allowance beyond the stitching. Press the white triangles outward.
The pumpkin body should still measure 8 1/2 x 6 1/2 inches. Do not trim the outside edges smaller.
3. Add the white sides.
Sew one warm-white 1 1/2 x 6 1/2-inch rectangle to each side of the pumpkin body.
Press toward the white. The completed body row should measure 10 1/2 x 6 1/2 inches.
4. Make the four leaf units.
For each leaf, place one warm-white 1 1/2-inch square right sides together on the upper-left corner of one olive 2 1/2-inch square. Draw a diagonal line from the lower-left corner of the white square to its upper-right corner.
Sew on the drawn line. Trim the fabric outside the stitching line, leaving a 1/4-inch seam allowance, then press the white triangle outward.
Place the second 1 1/2-inch warm-white square on the lower-right corner. Draw the sewing line from the upper-right corner of the white square to its lower-left corner. Sew on the line, trim away the outside lower-right corner leaving a 1/4-inch seam allowance, and press the white triangle outward. The remaining olive section should run diagonally from the lower-left side of the unit toward the upper-right side, making the little angled leaf shown in the example quilt.
The completed unit should still measure 2 1/2 inches square. Make four.
5. Piece the stem and leaf row.
For each medallion, arrange these pieces from left to right:
- one warm-white 4 1/2 x 2 1/2-inch rectangle
- one brown 1 1/2 x 2 1/2-inch stem rectangle
- one 2 1/2-inch olive-and-white leaf unit
- one warm-white 3 1/2 x 2 1/2-inch rectangle
Position the leaf unit so the olive section angles up and away from the stem, as it does in the finished quilt.
Sew the four pieces together in that order and press. The row should measure 10 1/2 x 2 1/2 inches.
6. Complete the center of the medallion.
Sew the stem-and-leaf row to the top of the pumpkin body row.
Sew one warm-white 10 1/2 x 2 1/2-inch rectangle below the pumpkin.
Press the horizontal seams away from the pumpkin body. The center unit should now measure 10 1/2 inches square.
7. Add the medallion frame.
Make two matching warm-white frame rows for each pumpkin. Each row uses seven warm-white 2 1/2-inch squares.
Sew the seven squares together and press the seams. Each completed frame row should measure 14 1/2 x 2 1/2 inches.
Next, sew one warm-white 2 1/2 x 10 1/2-inch rectangle to each side of the 10 1/2-inch pumpkin center.
That middle section should measure 14 1/2 x 10 1/2 inches.
Sew one warm-white frame row across the top and the other across the bottom. The completed medallion should have warm white at all four corners so the sea-blue chain can travel around it rather than through it.
Your completed medallion should measure 14 1/2 x 14 1/2 inches unfinished.
Repeat until you have four pumpkin medallions. Square all four to the same size before moving on. Keeping these four units equal is what keeps the blue chain aligned later.
Piece the Sea Blue Irish Chain
This is the secondary pattern that gives the quilt its character. The blue squares step around the four warm-white pumpkin medallions, become denser through the center and then repeat in reverse so the top and bottom of the quilt match.
Use B for a 2 1/2-inch sea-blue square and W for a 2 1/2-inch warm-white square.
Top chain band
Row 1: B W B W B W W B W B B W B W W B W B W B
Row 2: W B W B W W W W B B B B W W W W B W B W
Row 3: B W B W W W W W W B B W W W W W W B W B
Sew each row from left to right, then join the three rows in order. The band should measure 40 1/2 x 6 1/2 inches unfinished.
Upper pumpkin band
Make the three narrow chain units below. Each unit is two squares wide and seven squares high.
Upper left unit:
B B
W B
B W
W W
B W
W B
B W
Upper center unit:
B B
W W
W W
B B
W W
B B
B B
Upper right unit:
B B
B W
W B
W W
W B
B W
W B
Each narrow unit should measure 4 1/2 x 14 1/2 inches unfinished.
Join the upper band in this order:
Upper left chain unit | Pumpkin medallion | Upper center chain unit | Pumpkin medallion | Upper right chain unit
The completed upper pumpkin band should measure 40 1/2 x 14 1/2 inches unfinished.
Center chain band
Row 1: W B W B W W W W B B B B W W W W B W B W
Row 2: B W B W B W W B B B B B B W W B W B W B
Row 3: W B W B W W W B B B B B B W W W B W B W
Row 4: B W B W B W W B B B B B B W W B W B W B
Row 5: W B W B W W W W B B B B W W W W B W B W
Sew the five rows together in order. The completed center band should measure 40 1/2 x 10 1/2 inches unfinished.
Lower pumpkin band
The lower chain units reverse the upper units vertically. Don't simply make another copy of the upper band.
Lower left unit:
B W
W B
B W
W W
B W
W B
B B
Lower center unit:
B B
B B
W W
B B
W W
W W
B B
Lower right unit:
W B
B W
W B
W W
W B
B W
B B
Join the lower band in this order:
Lower left chain unit | Pumpkin medallion | Lower center chain unit | Pumpkin medallion | Lower right chain unit
The completed lower pumpkin band should measure 40 1/2 x 14 1/2 inches unfinished.
Bottom chain band
The bottom three rows are the top band in reverse order so the two ends of the quilt match:
Row 1: B W B W W W W W W B B W W W W W W B W B
Row 2: W B W B W W W W B B B B W W W W B W B W
Row 3: B W B W B W W B W B B W B W W B W B W B
The completed bottom band should measure 40 1/2 x 6 1/2 inches unfinished.
Lay all five sections out before joining them. The stepped blue shapes at the top and bottom should mirror one another, the left and right sides should balance, and the denser blue patchwork through the center should meet without an unexpected break. Check that now. Once the long bands are sewn together, correcting one misplaced square becomes a much bigger job.
Assemble the Orange and Blue Pumpkin Quilt Top
At this point you should have five large sections: the top chain band, the upper pumpkin band, the center chain band, the lower pumpkin band and the bottom chain band.
Lay all five sections out in order before you sew anything together. Step back and look at the blue chain first. The two sides should mirror one another, the center should line up from top to bottom and the pyramid shapes along the top and bottom should match.
Don't try to ease a section into place if the blue squares don't meet correctly. Check the seam allowances and the placement of the individual squares instead. A little checking here is much easier than taking apart a completed quilt top.
Before joining, your sections should measure approximately:
| Section | Unfinished Size |
|---|---|
| Top chain band | 40 1/2 x 6 1/2 inches |
| Upper pumpkin band | 40 1/2 x 14 1/2 inches |
| Center chain band | 40 1/2 x 10 1/2 inches |
| Lower pumpkin band | 40 1/2 x 14 1/2 inches |
| Bottom chain band | 40 1/2 x 6 1/2 inches |
Pin the top chain band to the upper pumpkin band, matching the vertical seams in the blue chain wherever they meet. Sew with a 1/4-inch seam allowance.
Add the center chain band below it, followed by the lower pumpkin band and finally the bottom chain band.
I would press these four long joining seams open. There are several places where small patchwork seams meet, and pressing the long seams open keeps those intersections from becoming unnecessarily bulky.
After all five sections are joined, the quilt top should measure approximately 40 1/2 x 50 1/2 inches unfinished. Once the outside seam allowance is enclosed by the binding, the planned finished size is 40 x 50 inches.
Check the quilt from the front before you move on. You should see four matching orange pumpkin medallions in a two-by-two arrangement surrounded by the continuous sea-blue chain shown in the example image. There is no outer border on this design. The narrow sea-blue binding finishes the edge.
Make the Larger 50 x 62 1/2 Inch Throw
The larger version keeps the same four-pumpkin layout and the same Irish-chain arrangement. Nothing is added around the outside to fake a larger size. Instead, the entire construction is enlarged proportionally.
The throw uses the same 20 x 25 master grid as the crib quilt, but each grid square finishes at 2 1/2 inches instead of 2 inches. That gives you a finished quilt measuring 50 x 62 1/2 inches.
Keep the 1/4-inch seam allowance exactly the same. Only the cut sizes change.
From the sea-blue fabric or assorted sea-blue prints, cut:
- 142 squares, 3 x 3 inches
- 7 binding strips, 2 1/2 inches x width of fabric
From the warm white fabric, cut:
- 218 squares, 3 x 3 inches
- 8 rectangles, 3 x 13 inches
- 4 rectangles, 5 1/2 x 3 inches
- 4 rectangles, 4 1/4 x 3 inches
- 8 rectangles, 1 3/4 x 8 inches
- 16 squares, 2 3/8 x 2 3/8 inches for the pumpkin corners
- 8 squares, 1 3/4 x 1 3/4 inches for the leaf corners
- 4 rectangles, 13 x 3 inches
From the pumpkin-orange fabrics, cut:
- 16 rectangles, 3 x 8 inches
From the brown stem fabric, cut:
- 4 rectangles, 1 3/4 x 3 inches
From the olive leaf fabric, cut:
- 4 squares, 3 x 3 inches
Make the pumpkin bodies exactly as you did for the crib quilt, using four orange rectangles for each pumpkin. After sewing the four 3 x 8-inch strips together, the body should measure 10 1/2 x 8 inches unfinished.
Use the 2 3/8-inch warm-white squares to clip the four pumpkin corners with the same stitch-and-flip method and the same four corner orientations used for the crib-size pumpkins.
Add one 1 3/4 x 8-inch white strip to each side. The completed pumpkin body row should measure 13 x 8 inches unfinished.
For each stem-and-leaf row, arrange the pieces from left to right like this:
5 1/2-inch white rectangle | 1 3/4-inch brown stem | 3-inch leaf unit | 4 1/4-inch white rectangle
For each leaf, use one 3-inch olive square and two 1 3/4-inch warm-white squares. Make the leaf exactly as you did for the crib-size quilt, placing one white square at the upper-left corner and the second at the lower-right corner. Sew on the marked diagonals, trim 1/4 inch outside the stitching and press the white triangles open. Each completed leaf unit should still measure 3 x 3 inches. Make four.
Sew the stem-and-leaf row above the pumpkin and one 13 x 3-inch warm-white rectangle below it. The center should measure 13 inches square unfinished.
Add one 3 x 13-inch warm-white rectangle to each side.
For the top and bottom frame rows, sew seven 3-inch squares in this order:
White | White | White | White | White | White | White
Add those rows above and below the pumpkin center. Each completed throw-size pumpkin medallion should measure 18 x 18 inches unfinished and finish at 17 1/2 inches in the quilt.
Use the exact same blue-and-white chain map given for the crib quilt, substituting 3-inch squares everywhere the crib version uses 2 1/2-inch squares.
| Throw Section | Unfinished Size |
|---|---|
| Top chain band | 50 1/2 x 8 inches |
| Upper pumpkin band | 50 1/2 x 18 inches |
| Center chain band | 50 1/2 x 13 inches |
| Lower pumpkin band | 50 1/2 x 18 inches |
| Bottom chain band | 50 1/2 x 8 inches |
Join the five sections in the same order as the crib quilt. The completed throw top should measure approximately 50 1/2 x 63 inches unfinished and finish at about 50 x 62 1/2 inches after binding.
Quilting and Binding
Once the quilt top is complete, press it well and check the outside edges for any seams that need securing before you make the quilt sandwich.
Cut the batting and backing several inches larger than the quilt top on every side. For the crib-size version, a piece at least 48 x 58 inches gives you comfortable working room. For the throw, use at least 58 x 71 inches.
If you're using standard 42 to 44-inch-wide backing fabric, you'll need to piece the backing for either size. For the crib quilt, cut two 60-inch lengths. Keep one panel full width and cut a 9-inch-wide strip from the second panel. Sew that strip to one long side of the full-width panel with a 1/2-inch seam and press the seam open. Trim the backing only after you have at least 48 x 58 inches centered behind the quilt top.
For the throw, cut two 72-inch lengths. Keep one panel full width and cut a 19-inch-wide strip from the second panel. Join it to the long side of the first panel with a 1/2-inch seam, press open and trim only after you have at least 58 x 71 inches available for the quilt sandwich.
The pumpkin and chain design already has plenty going on, so I wouldn't choose quilting that fights with it. A simple allover meander, gentle loops or straightforward diagonal quilting will hold the layers together without hiding the patchwork.
Follow the batting manufacturer's recommended maximum quilting distance. That spacing varies by batting, so use the instructions for the batting you actually buy rather than assuming one spacing works for all of them.
After quilting, trim the batting and backing even with the quilt top.
For the 40 x 50 quilt, join the six 2 1/2-inch binding strips end to end with diagonal seams. Trim the joining seams to 1/4 inch and press them open.
For the larger throw, join seven 2 1/2-inch strips the same way.
Press the long binding strip in half lengthwise with wrong sides together.
Starting along one side of the quilt and leaving a joining tail, sew the binding to the front with a 1/4-inch seam allowance. Miter the four corners as you work around the quilt.
Join the two binding ends, finish attaching the binding, then fold it over the raw edge to the back. Hand stitch it in place for a traditional finish, or machine stitch it if that's the finish you prefer.
The sea-blue binding is deliberately narrow. I wouldn't add another border here. The blue chain already frames the four pumpkin medallions, and another band around the outside would change the look of the finished quilt.
A Note About Crib-Size Baby Quilt Safety
I use "crib size" here to describe the 40 x 50-inch quilt dimensions, not to suggest putting the quilt into an infant's crib for sleep.
The U.S. Consumer Product Safety Commission recommends a bare infant sleep space with a fitted sheet only and says not to add blankets, quilts, pillows or other soft objects. You can read the current guidance on the CPSC Safe Sleep page.
A handmade baby quilt can still be used for supervised floor time, decorating, photographs, cuddling with an awake child or saved for use when the child is older. Just keep it out of an infant's sleep space.
Orange and Blue Pumpkin Quilt Pattern FAQ
What quilting skill level is this pattern?
I would put it at confident beginner to intermediate. The pumpkin construction is straightforward rotary-cut piecing. The part that needs more attention is keeping all of those small blue and white chain squares lined up accurately across the larger sections.
Can I make the pumpkins from one orange fabric?
Yes. The four vertical sections are part of the pumpkin construction, so you can cut all of them from one orange print if you want a quieter look. Using several orange prints simply gives the pumpkins the scrappy appearance shown in the example quilt.
Do I need special templates for the pumpkins or leaves?
No. The pumpkin corners and the angled leaves both use stitch-and-flip corners. Every piece can be cut with a rotary cutter and ruler.
Can I use one blue fabric for the entire Irish chain?
Absolutely. Just keep it in that clear medium sea-blue range if you want the same overall effect as the example. A very dark navy will make the chain much heavier, while a gray or faded denim blue will soften the orange-and-blue contrast considerably.
How do I keep the Irish chain from getting crooked?
Check the individual rows before joining them into bands, then check the bands before joining the quilt top. Match the blue-square intersections with pins instead of pulling one section to fit another. If two sections are noticeably different in length, go back and check the 1/4-inch seam allowances.
Does the throw-size version have more pumpkins?
No. It keeps the same four-pumpkin, two-by-two arrangement shown in the crib-size quilt. The grid units, pumpkin medallions and chain all become larger together, which is why the throw keeps the same proportions instead of looking like a different quilt.
For more pumpkin projects in crochet, quilting and fall decor, browse my pumpkin craft ideas.
When you click on links to various merchants on this site and make a purchase, this may result in this site earning a commission. This does not affect the price you pay.

UBGI Gold Standard 2026
Reviewed under the site's
editorial checklist.
Photos, decorating ideas, party setups and reader submissions are shared for inspiration unless a page is specifically presented as a pattern, tutorial, reference guide or step-by-step project. Follow the instructions, measurements, safety guidance and manufacturer directions provided for the particular project or product.
About Jan | Contact | Baby Nursery Ideas (Blog) | Site Map | Privacy Policy | Disclosure Policy | Disclaimer | Affiliate Disclosure | Earnings Disclosure | Facebook | Pinterest
I am a participant in the Amazon Services LLC Associates Program, an affiliate advertising program designed to provide a means for us to earn fees by linking to Amazon. As an Amazon Associate I earn from qualifying purchases.
Copyright © 2006-2026. All Rights Reserved.