Free Spooky Halloween Quilt Pattern: Patchwork Bats, Pumpkins & Crescent Moon
By Jan Bay
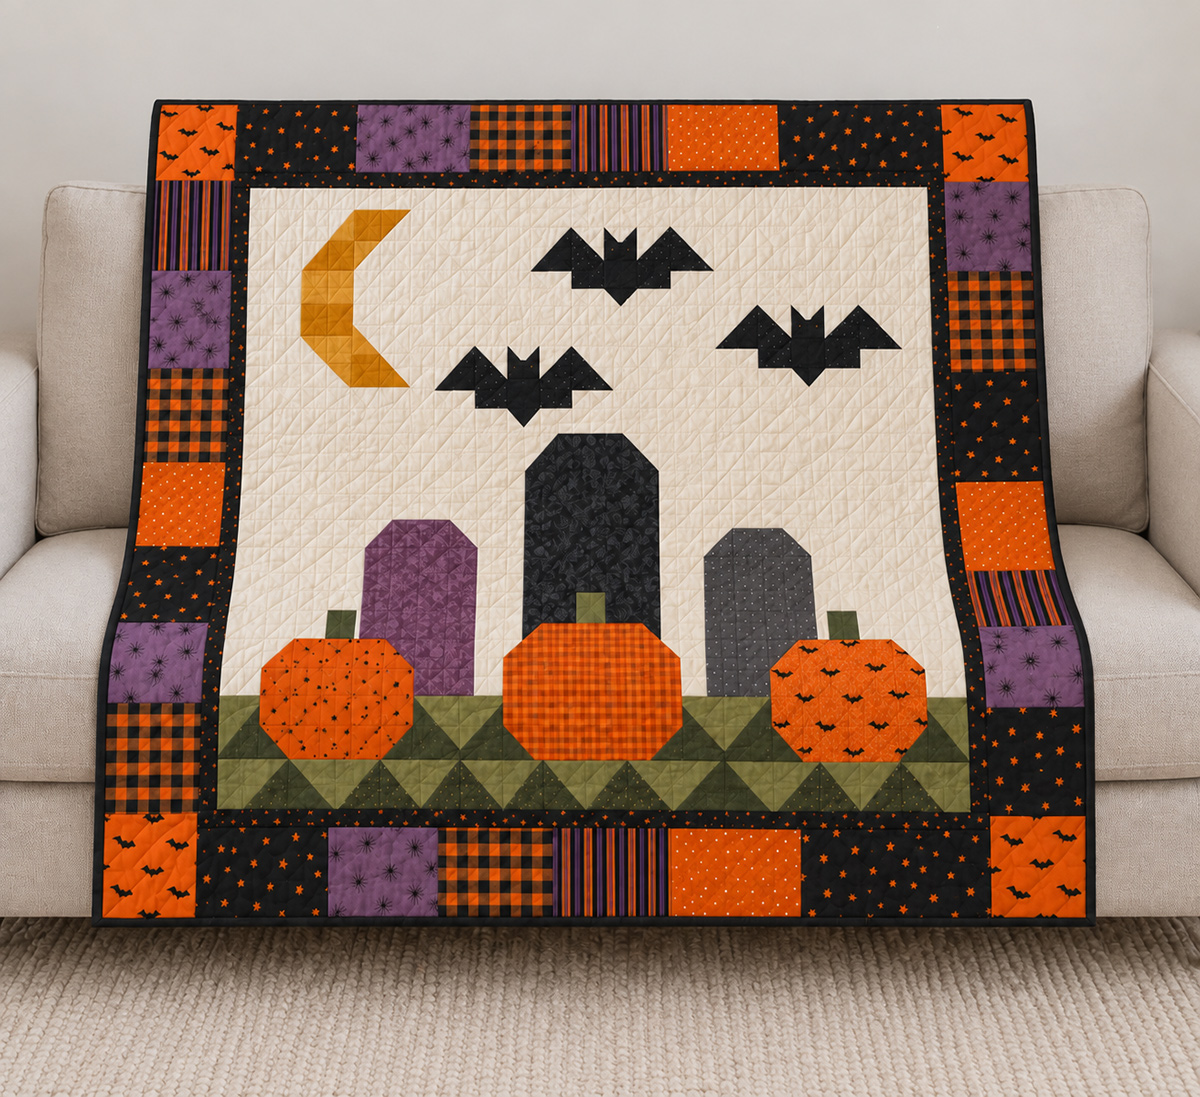
This free spooky Halloween quilt pattern turns simple rotary cut patchwork into a graveyard scene with three oversized tombstones, three pieced bats, a crescent moon and three chunky pumpkins. The large center medallion is a real focal point and helps the quilt come together faster without a lot of small, fussy pieces. Black, orange, muted plum and olive green Halloween print fabrics give the finished quilt plenty of color and creepy style without requiring applique, paper piecing or templates.
Explore More Free Quilt Patterns
See My Preferred Quilting Frame
Jump to the Spooky Halloween Quilt Pattern
Finished Quilt Size and Seam Allowance
Assemble the Graveyard Medallion
Materials for the Free Spooky Halloween Quilt Pattern
This quilt is built around one large 42 by 30 inch graveyard medallion, so most of the pieces are generous in size. The only small pieces are the ones that shape the bat ears and a few corners. I would keep the Halloween prints fairly simple inside the medallion and save the busier checks, stripes, stars and tiny bat prints for the wide outside border.
Fabric amounts:
2 yards warm cream quilting cotton for the background.
3/4 yard charcoal or black quilting cotton for the three bats, tall center tombstone and narrow inner border.
1/4 yard muted plum quilting cotton for the left tombstone.
1/4 yard dark gray quilting cotton for the right tombstone.
1/4 yard mustard or muted gold quilting cotton for the crescent moon.
1/2 yard olive green quilting cotton. Using one lighter olive and one darker olive gives the ground more of the patchwork look shown in the finished quilt.
1/2 yard orange quilting cotton or assorted orange Halloween prints for the three pumpkins.
6 assorted Halloween fat quarters for the wide scrappy border. Black, orange and muted plum prints, checks and narrow stripes work especially well here.
1/2 yard black binding fabric.
3 yards standard 42 to 44 inch wide backing fabric, or about 1 1/2 yards of 108 inch wide backing fabric.
Batting at least 60 by 48 inches.
Coordinating all purpose cotton or polyester quilting thread.
Rotary cutter, acrylic ruler, cutting mat, sewing machine, iron and basic quilting supplies.
The fabric amounts above are calculated with some cutting room built in. This pattern has not been physically test sewn, so I would not cut every border piece before checking the measurements of your completed medallion.
Finished Quilt Size and Seam Allowance
The finished spooky Halloween quilt measures 54 inches wide by 42 inches high.
Use a 1/4 inch seam allowance throughout unless an instruction specifically says otherwise.
The finished center medallion measures 42 by 30 inches. A 1 inch finished black inner border brings the design to 44 by 32 inches. After the scrappy Halloween border is added, the quilt top should measure about 54 1/2 by 42 1/2 inches before quilting and binding. The intended finished design size is approximately 54 by 42 inches after the outer 1/4 inch seam allowance is enclosed in the binding.
The main construction sections finish at these sizes:
Moon block: 12 by 12 inches.
Each bat column: 10 by 12 inches.
Sky row: 42 by 12 inches.
Each tombstone and pumpkin column: 12 by 14 inches.
Graveyard row: 42 by 14 inches.
Olive ground: 42 by 4 inches.
Completed medallion: 42 by 30 inches.
The unfinished measurements in the instructions include seam allowance. I give measurement checkpoints as we go because a small difference early in the medallion can become a much bigger problem when you reach the borders.
Cutting Instructions for the Halloween Patchwork Quilt
WOF means width of fabric. Label the moon, bat and graveyard pieces as you cut them. There aren't hundreds of pieces here, but several cream rectangles are close in size and are easy to mix up.
For the 12 inch crescent moon block, cut:
From mustard: 4 squares, 3 1/2 by 3 1/2 inches.
From mustard: 2 squares, 4 by 4 inches.
From cream: 8 squares, 3 1/2 by 3 1/2 inches.
From cream: 2 squares, 4 by 4 inches.
For each of the three bats, cut:
From black: 2 wing rectangles, 4 1/2 by 5 1/2 inches.
From black: 1 body rectangle, 2 1/2 by 3 1/2 inches.
From black: 2 squares, 2 by 2 inches, one for the ear units and one for the pointed lower body.
From cream: 4 squares, 2 1/2 by 2 1/2 inches, for the outer wing corners.
From cream: 4 squares, 1 1/2 by 1 1/2 inches, for the inner upper and inner lower wing corners.
From cream: 2 squares, 2 by 2 inches, one for the ear units and one for the pointed lower body.
For the cream background around the bats, cut 2 rectangles 10 1/2 by 4 1/2 inches, 2 rectangles 10 1/2 by 3 1/2 inches, 1 rectangle 10 1/2 by 1 1/2 inches and 1 rectangle 10 1/2 by 6 1/2 inches.
For the left plum tombstone and pumpkin column, cut:
1 cream rectangle, 12 1/2 by 2 1/2 inches.
1 plum rectangle, 7 1/2 by 6 1/2 inches.
2 cream rectangles, 3 by 6 1/2 inches.
2 cream squares, 2 1/2 by 2 1/2 inches, for the top tombstone corners.
For the stem row, cut 2 cream rectangles 3 by 1 1/2 inches, 2 plum rectangles 3 by 1 1/2 inches and 1 olive rectangle 2 1/2 by 1 1/2 inches.
For the pumpkin, cut 1 orange rectangle 8 1/2 by 5 1/2 inches, 2 cream rectangles 2 1/2 by 5 1/2 inches and 4 cream squares 2 1/2 by 2 1/2 inches.
For the center black tombstone and pumpkin column, cut:
1 black rectangle, 8 1/2 by 8 1/2 inches.
2 cream rectangles, 2 1/2 by 8 1/2 inches.
2 cream squares, 2 1/2 by 2 1/2 inches, for the upper tombstone corners.
For the stem row, cut 2 cream rectangles 2 1/2 by 1 1/2 inches, 2 black rectangles 3 1/2 by 1 1/2 inches and 1 olive rectangle 2 1/2 by 1 1/2 inches.
For the center pumpkin, cut 1 orange rectangle 10 1/2 by 5 1/2 inches, 2 cream rectangles 1 1/2 by 5 1/2 inches and 4 cream squares 2 1/2 by 2 1/2 inches.
For the right gray tombstone and pumpkin column:
Repeat the cutting measurements for the left column, substituting dark gray for plum and using a different orange print for the pumpkin if you want the scrappy look shown in the example quilt.
For the two spaces between the grave markers, cut:
2 cream rectangles, 3 1/2 by 14 1/2 inches.
For the olive ground, cut:
5 light olive squares, 5 by 5 inches.
5 dark olive squares, 5 by 5 inches.
2 olive rectangles, 1 1/2 by 4 1/2 inches.
For the black inner border:
Wait until the center medallion is assembled and measured. The target cuts are 2 strips 1 1/2 by 30 1/2 inches and 2 strips 1 1/2 by 44 1/2 inches.
For the wide Halloween print border, cut:
16 assorted rectangles, 5 1/2 by 4 1/2 inches, for the two side borders.
16 assorted rectangles, 6 by 5 1/2 inches, for the center portions of the top and bottom borders.
4 orange Halloween print squares, 5 1/2 by 5 1/2 inches, for the cornerstones.
If you're using directional stripes, checks or little bats in the outer border, decide which way you want them to run before cutting. It is much easier to deal with that now than after the border units are sewn together.
Piece the Geometric Crescent Moon
The crescent is deliberately angular. Don't try to smooth it into a curved moon. Those straight edges are what let us keep the whole project in ordinary rotary cut patchwork.
Pair each 4 inch mustard square with a 4 inch cream square. Draw a diagonal line on the wrong side of each cream square. Sew 1/4 inch on both sides of the marked line, cut on the line and press the units open.
Trim the four half square triangle units to exactly 3 1/2 inches square.
Lay out the moon as four rows of four 3 1/2 inch units.
Row 1: cream square, half square triangle with the mustard triangle in the lower right, mustard square, cream square.
Row 2: half square triangle with the mustard triangle in the upper right, mustard square, cream square, cream square.
Row 3: half square triangle with the mustard triangle in the lower right, mustard square, cream square, cream square.
Row 4: cream square, half square triangle with the mustard triangle in the upper right, mustard square, cream square.
Sew the four units in each row together. Press the row seams in alternating directions, then join the four rows.
Measurement checkpoint: the moon block should measure 12 1/2 inches square unfinished.
If it is slightly oversized, trim it evenly. If it is noticeably smaller, check the 1/4 inch seams before moving on. Don't add a random strip around it to make the number work. The moon and three bat columns need to meet cleanly across the sky row.
Make the Three Patchwork Bats with Pointed Ears
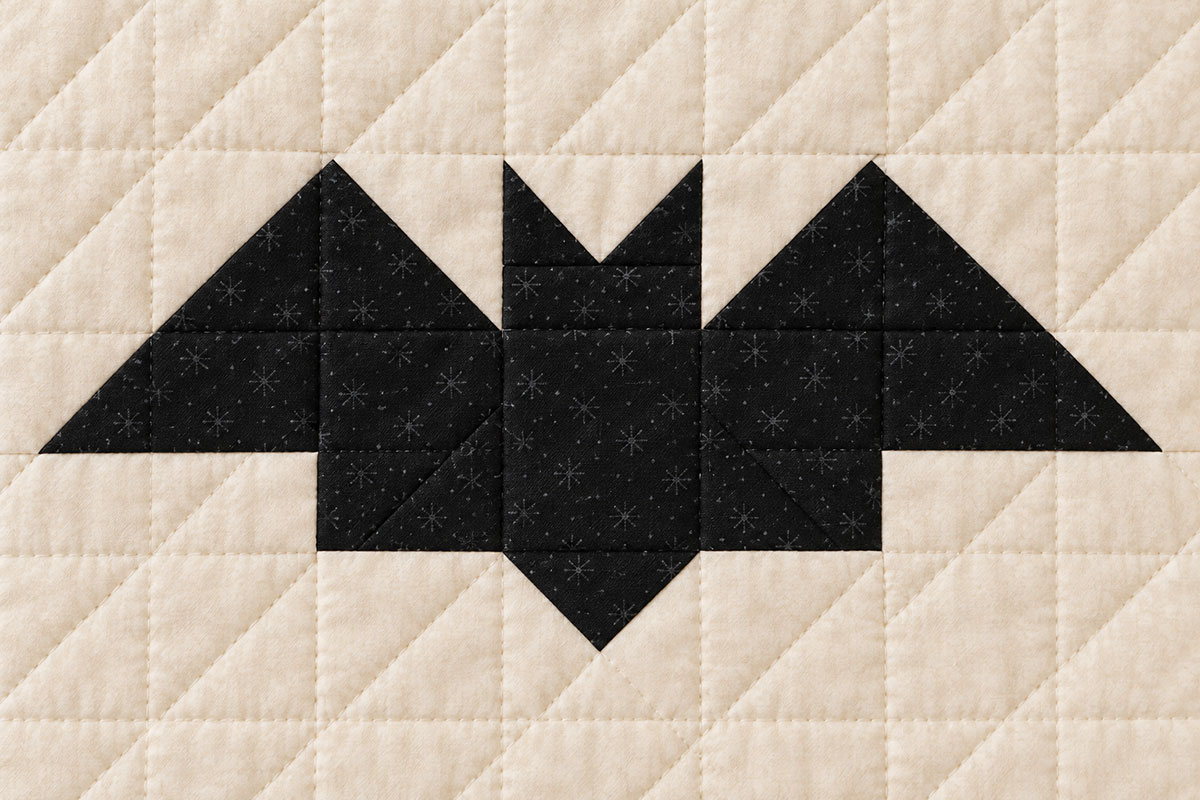
The ears matter here. A plain rectangle across the middle gives the bat a flat head and changes the whole expression of the block. These bats use two small half square triangles to make the pair of pointed ears shown in the finished quilt.
Make one bat completely before chain piecing the other two. Once the first one measures correctly, repeat the same construction twice more.
Make the ears. Pair one 2 inch black square with one 2 inch cream square. Draw a diagonal line on the wrong side of the cream square. Sew 1/4 inch on both sides of the line, cut on the line and press the two units open.
Trim both half square triangles to 1 1/2 inches square.
Place the two ear units side by side. Orient them so the black triangles run along the lower edge and rise to the two upper outside corners. The cream triangles should meet at the upper center to form the small V between the two black ears.
Join the two units. The ear strip should measure 2 1/2 inches wide by 1 1/2 inches high.
Make the pointed lower body. Pair the second 2 inch black square with the second 2 inch cream square. Make two half square triangles the same way and trim them to 1 1/2 inches square.
For this pair, turn the units so the black triangles run along the entire upper edge and meet at the lower center. The cream triangles should sit at the two lower outside corners. Join the two units. This gives the bat one clean black point at the bottom.
Sew the ear strip to the top of the 2 1/2 by 3 1/2 inch black body rectangle. Sew the pointed lower body strip underneath it.
The completed center bat section should measure 2 1/2 inches wide by 5 1/2 inches high unfinished.
Shape the left wing. Take one 4 1/2 by 5 1/2 inch black wing rectangle. Use a 2 1/2 inch cream square to stitch and flip the outer upper corner and another 2 1/2 inch cream square to stitch and flip the outer lower corner.
Use one 1 1/2 inch cream square to stitch and flip the inner upper corner and a second 1 1/2 inch cream square on the inner lower corner. The upper clip drops the shoulder of the wing beside the head so the pointed ear rises clearly above it. The lower clip makes the small notch under the wing.
Shape the right wing. Repeat the same four corner changes as a mirror image so the two wings face each other correctly.
Join the left wing, center bat section and right wing.
Measurement checkpoint: one completed bat should measure 10 1/2 inches wide by 5 1/2 inches high unfinished.
Make two more bats exactly the same way.
Now give the three bats different heights in the sky.
Lower bat column: sew a 10 1/2 by 4 1/2 inch cream rectangle above the bat and a 10 1/2 by 3 1/2 inch cream rectangle below it.
Highest bat column: sew a 10 1/2 by 1 1/2 inch cream rectangle above the bat and a 10 1/2 by 6 1/2 inch cream rectangle below it.
Middle height bat column: sew a 10 1/2 by 3 1/2 inch cream rectangle above the bat and a 10 1/2 by 4 1/2 inch cream rectangle below it.
Each completed bat column should measure 10 1/2 by 12 1/2 inches unfinished.
Join the 12 1/2 inch moon block to the three bat columns. Arrange the bats with the highest one near the top center and the other two lower on either side, matching the finished example.
Measurement checkpoint: the completed sky row should measure 42 1/2 inches wide by 12 1/2 inches high unfinished.
Piece the Three Oversized Tombstones
Keep these tombstones plain. The different heights, colors and clipped corners give the graveyard enough character without adding crosses, lettering or little decorative pieces.
Left plum tombstone: place one 2 1/2 inch cream square on each upper corner of the 7 1/2 by 6 1/2 inch plum rectangle. Sew diagonally from corner to corner, trim away the excess fabric and press the cream corners open.
Sew one 3 by 6 1/2 inch cream rectangle to each side. The tombstone section should measure 12 1/2 by 6 1/2 inches unfinished.
Center black tombstone: repeat the same stitch and flip method on the two upper corners of the 8 1/2 inch black square.
Sew one 2 1/2 by 8 1/2 inch cream rectangle to each side. The center tombstone section should measure 12 1/2 by 8 1/2 inches unfinished.
Right gray tombstone: make it exactly like the plum tombstone, substituting dark gray fabric.
I would keep the center stone almost black, the left one muted plum and the right one charcoal gray. That difference is enough. If all three are the same black print, they start to merge into one dark mass behind the pumpkins.
Make the Three Chunky Patchwork Pumpkins
The pumpkins are intentionally wide and simple. Each one is basically a rectangle with four clipped corners, so you get a recognizable pumpkin shape without adding rows of tiny pieces.
Left pumpkin: place one 2 1/2 inch cream square on each corner of the 8 1/2 by 5 1/2 inch orange rectangle. Draw a diagonal line across each cream square.
Sew on the marked lines. Trim away the excess fabric 1/4 inch beyond each seam, then press the cream corners open.
Sew one 2 1/2 by 5 1/2 inch cream rectangle to each side of the pumpkin.
The completed pumpkin section should measure 12 1/2 by 5 1/2 inches unfinished.
Center pumpkin: repeat the same four corner method on the 10 1/2 by 5 1/2 inch orange rectangle. Sew one 1 1/2 by 5 1/2 inch cream rectangle to each side.
The completed center pumpkin section should also measure 12 1/2 by 5 1/2 inches unfinished.
Right pumpkin: repeat the left pumpkin construction using a second orange Halloween print.
Now make the three stem rows.
For the left column, join a 3 inch cream piece, 3 inch plum piece, 2 1/2 inch olive stem, 3 inch plum piece and 3 inch cream piece in that order.
For the center column, join a 2 1/2 inch cream piece, 3 1/2 inch black piece, 2 1/2 inch olive stem, 3 1/2 inch black piece and 2 1/2 inch cream piece.
For the right column, repeat the left stem row using gray in place of plum.
Each stem row should measure 12 1/2 inches wide by 1 1/2 inches high unfinished.
To assemble the left column, join the 12 1/2 by 2 1/2 inch cream top strip, plum tombstone section, stem row and left pumpkin section.
To assemble the center column, join the tall black tombstone section directly to the center stem row and large center pumpkin. There is no cream strip above this tombstone. It needs the extra height so it remains the main grave marker in the finished medallion.
To assemble the right column, repeat the left column using the gray tombstone and right pumpkin.
Measurement checkpoint: all three completed columns should measure 12 1/2 inches wide by 14 1/2 inches high unfinished.
Piece the Olive Half Square Triangle Ground
The ground only needs to anchor the graveyard. I wouldn't make it taller or add another row. Four finished inches gives the tombstones and pumpkins a base without turning the lower part of the quilt into another competing design.
Pair each 5 inch light olive square with a 5 inch dark olive square.
Draw a diagonal line on the wrong side of each light square. Sew 1/4 inch on each side of the line, cut on the marked line and press the units open.
You will have 10 half square triangles.
Trim every unit to exactly 4 1/2 inches square.
Arrange the 10 units in one row, alternating the direction of the diagonal seams so the light and dark olives create a loose zigzag across the ground.
Add one 1 1/2 by 4 1/2 inch olive rectangle to each end.
Measurement checkpoint: the completed ground row should measure 42 1/2 inches wide by 4 1/2 inches high unfinished.
Assemble the Spooky Graveyard Medallion
Before joining the graveyard row, lay the three completed tombstone and pumpkin columns side by side. The plum column goes on the left, the tall black column in the center and the gray column on the right.
Place one 3 1/2 by 14 1/2 inch cream rectangle between the left and center columns and the second one between the center and right columns.
Join the five sections.
Measurement checkpoint: the graveyard row should measure 42 1/2 by 14 1/2 inches unfinished.
Now place the three major medallion rows in order:
Top: moon and bat sky row.
Middle: tombstone and pumpkin graveyard row.
Bottom: olive half square triangle ground.
Join the sky row to the graveyard row. Press the long seam carefully without stretching it. Add the olive ground below the graveyard.
The completed medallion should measure 42 1/2 inches wide by 30 1/2 inches high unfinished.
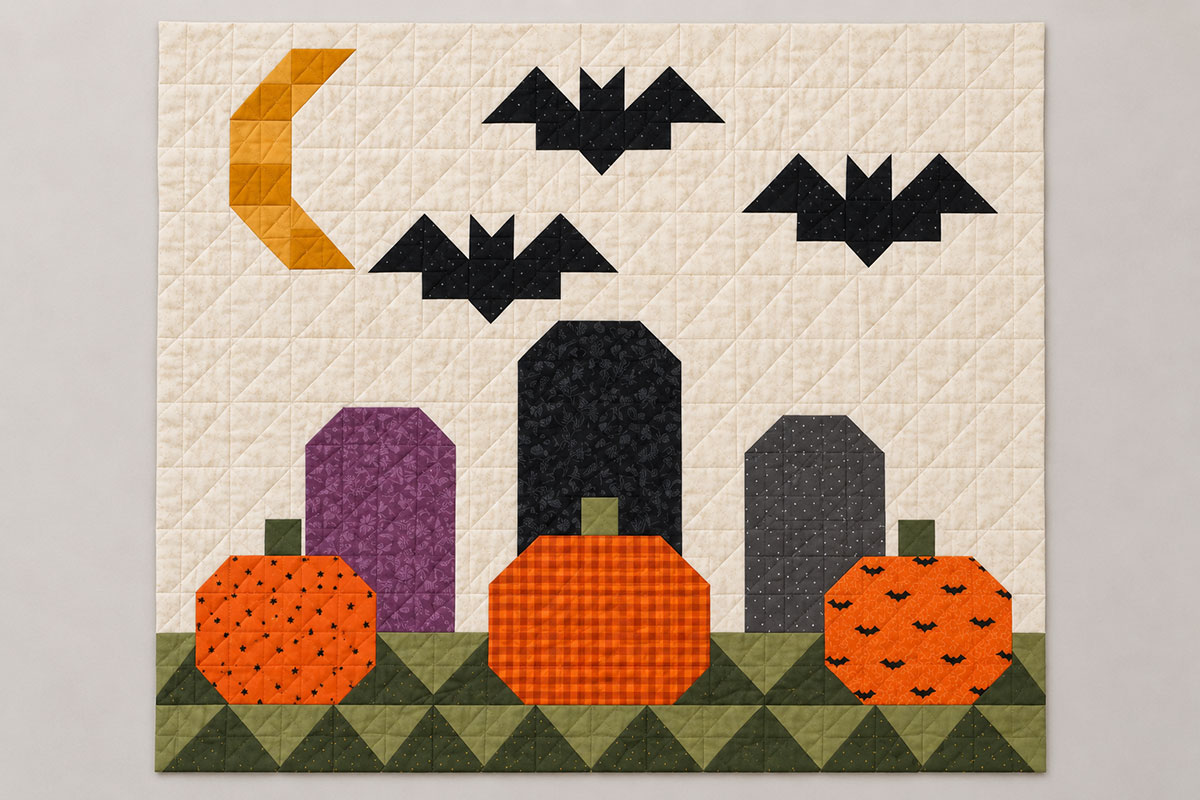
Measure through the center of the medallion both vertically and horizontally before cutting the borders. The target is 42 1/2 by 30 1/2 inches. If yours is off by a small amount, use the actual center measurement when cutting the border strips instead of forcing the quilt top to fit a strip that is too long or too short.
Add the Halloween Patchwork Borders
The cream center is intentionally open, so the outside border is where I'd let the Halloween prints get busy. Mix orange and black checks, plum prints, narrow stripes, black stars and small seasonal prints rather than trying to make every border piece match.
Add the black inner border first.
For a medallion measuring the target 42 1/2 by 30 1/2 inches, sew the two 1 1/2 by 30 1/2 inch black strips to the sides.
Press, then sew the two 1 1/2 by 44 1/2 inch black strips across the top and bottom.
The quilt should now measure 44 1/2 by 32 1/2 inches unfinished.
Make the two side borders.
For each side, arrange eight assorted 5 1/2 by 4 1/2 inch Halloween rectangles in a mix you like. Sew the eight pieces together along their 5 1/2 inch edges.
Each side border should measure 5 1/2 by 32 1/2 inches unfinished.
Sew one border to each side of the quilt.
Make the top and bottom borders.
For each border, arrange eight assorted 6 by 5 1/2 inch Halloween rectangles side by side. Join them along their 5 1/2 inch edges so the completed strip remains 5 1/2 inches high.
The center strip should measure 44 1/2 by 5 1/2 inches unfinished.
Sew one 5 1/2 inch orange Halloween print cornerstone to each end of the strip. Repeat for the second border.
Each completed top and bottom border should measure 54 1/2 by 5 1/2 inches unfinished.
Sew one across the top and one across the bottom.
Final top measurement: the quilt top should measure approximately 54 1/2 by 42 1/2 inches before quilting. After quilting, square only what is necessary to straighten the edges and preserve the outer 1/4 inch seam allowance for the binding.
Quilt and Finish the Spooky Halloween Quilt
Press the completed quilt top from the back and check the outer edges before making the quilt sandwich. Square only what needs squaring. Don't keep trimming just to chase a perfectly identical number at every corner.
Piece the backing if you're using standard width fabric. Cut two backing pieces about 48 inches long, remove the selvages and join them along one long edge. The backing and batting should extend several inches beyond the quilt top on every side before quilting.
Layer the backing, batting and quilt top and baste them using your preferred method.
For the quilting itself, I would keep it simple enough that the large patchwork shapes remain easy to see. Straight lines, a loose diagonal grid or uncomplicated all over quilting would all suit this design. I would not quilt tiny details into the tombstones or bats. They don't need them.
After quilting, square the quilt sandwich only as needed to straighten the outer edges. Keep it as close as practical to the 54 1/2 by 42 1/2 inch quilt-top measurement rather than deliberately trimming 1/4 inch from every side. Then trim the batting and backing even with the squared quilt top.
Cut 6 black binding strips 2 1/2 inches wide by WOF. Join the strips end to end, press the binding in half lengthwise and bind the quilt using your preferred machine or hand finishing method.
The finished quilt should measure about 54 by 42 inches.
If you're making this quilt for a baby, use it as a supervised floor quilt, display quilt or keepsake rather than placing it in an infant sleep space. The U.S. Consumer Product Safety Commission recommends keeping infant sleep spaces bare, with no quilts, blankets, pillows or other soft bedding. You can read the CPSC safe sleep guidance for the current recommendations.
The big medallion is really what makes this pattern different from a Halloween sampler. You get the moon, bats, tombstones and pumpkins in one complete scene, but you aren't making twelve separate little character blocks just to fill the quilt.
If you want another fall quilt with the same straightforward piecing approach but a harvest look instead of a spooky one, see my fall harvest quilt pattern.
When you click on links to various merchants on this site and make a purchase, this may result in this site earning a commission. This does not affect the price you pay.

UBGI Gold Standard 2026
Reviewed under the site's
editorial checklist.
Photos, decorating ideas, party setups and reader submissions are shared for inspiration unless a page is specifically presented as a pattern, tutorial, reference guide or step-by-step project. Follow the instructions, measurements, safety guidance and manufacturer directions provided for the particular project or product.
About Jan | Contact | Baby Nursery Ideas (Blog) | Site Map | Privacy Policy | Disclosure Policy | Disclaimer | Affiliate Disclosure | Earnings Disclosure | Facebook | Pinterest
I am a participant in the Amazon Services LLC Associates Program, an affiliate advertising program designed to provide a means for us to earn fees by linking to Amazon. As an Amazon Associate I earn from qualifying purchases.
Copyright © 2006-2026. All Rights Reserved.