Free Pieced Patchwork Witch Hat Quilt Block Pattern
By Jan Bay
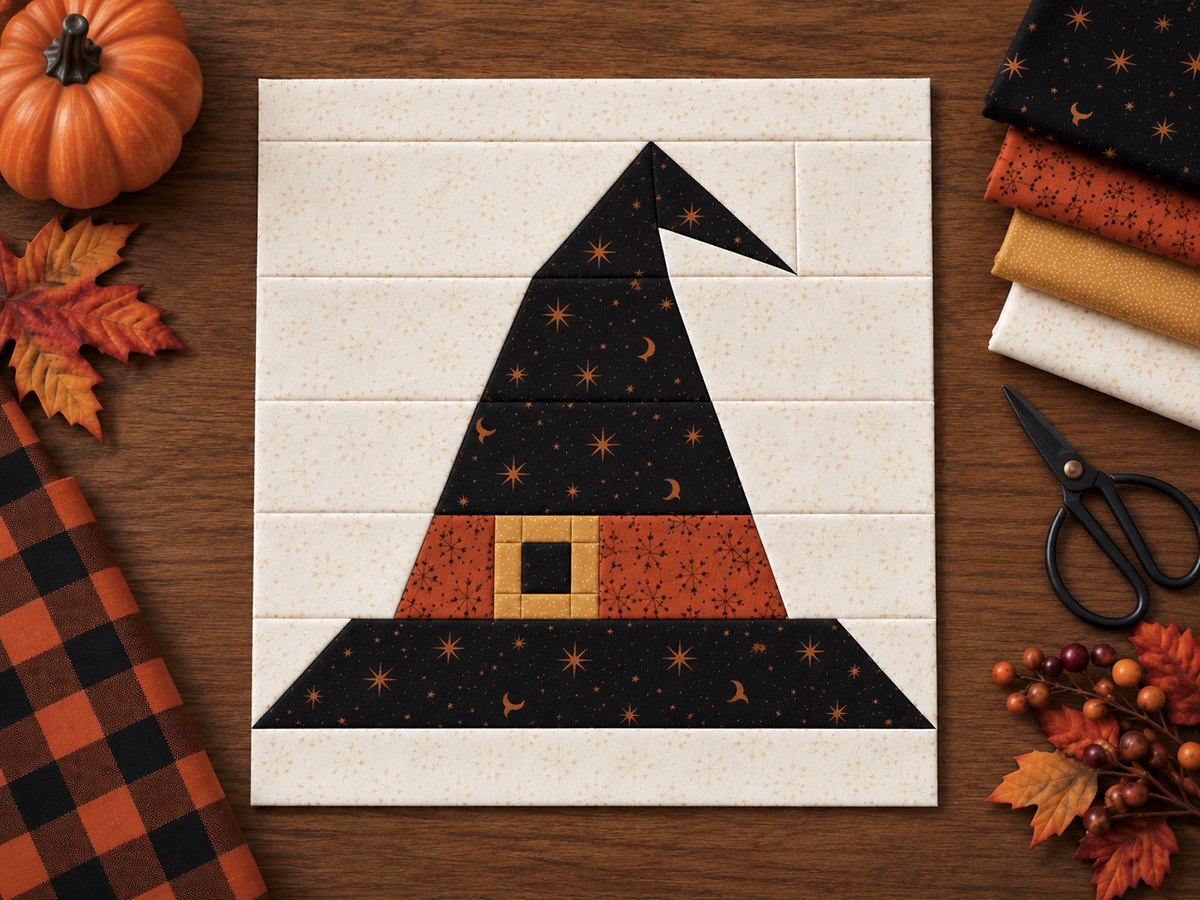
This free witch hat quilt block pattern makes a 12 inch finished Halloween block using simple pieced patchwork construction rather than appliqué, paper piecing or templates. The pointed hat and contrasting hatband make an easy seasonal block for Halloween quilts, wall hangings and other patchwork projects.
Explore More Free Quilt Patterns
Helpful Quilting Supplies for This Project
Jump to the Witch Hat Quilt Block Pattern
Materials for the Witch Hat Quilt Block Pattern
You don't need much fabric for this block, which makes it a good place to use a few Halloween prints you already have. I would keep the background light and let the black hat, rusty orange band and little gold buckle do the work.
Fabric:
- Warm ivory or off-white background: 1/4 yard
- Black or charcoal hat fabric: 1 fat eighth
- Rust or burnt orange fabric: 1 scrap at least 4 inches by 8 inches
- Mustard or muted gold fabric: 1 scrap at least 3 inches by 5 inches
If you're using a directional print like stars, moons or little Halloween motifs, give yourself a little extra black fabric. Several pieces change direction as the crown narrows, and it's much easier to recut one small piece than live with a moon that suddenly turns sideways.
You'll also need:
- Sewing machine
- Neutral cotton piecing thread
- Rotary cutter
- Cutting mat
- Quilting ruler
- Fabric marking pencil or removable marker
- Iron and ironing surface
- Optional 1/4-inch piecing foot
No templates are needed. There is no appliqué and no paper piecing in this block. The brim and crown use simple stitch-and-flip corners. The crooked tip uses two oversized half-rectangle-triangle units that are trimmed to exact size before the rows are joined.
Finished Size and Seam Allowance
The block is calculated to measure 12 1/2 inches square unfinished. Once it is sewn into a quilt with a 1/4-inch seam allowance on all four sides, it finishes at 12 inches square.
Use a consistent 1/4-inch seam allowance throughout the pattern. All cutting measurements below already include the seam allowance.
That 1/4 inch matters more than it might seem here because the hat is built in horizontal rows. A little extra taken from every seam can make the crown too narrow or leave the finished block short. If your machine has a quarter-inch foot, use it. Brother's explanation of a 1/4-inch piecing foot shows how the edge of the foot can be used as a guide for an even seam allowance.
The finished hat narrows from a 10-inch brim to a 7-inch hatband and lower crown, then to 5 inches and 3 inches through the upper crown. The little angled piece at the top is added after that 3-inch section. It is what gives this hat its charming, crooked profile without turning the block into a complicated paper-pieced pattern.
The gold buckle is also intentionally about 1/2 inch left of center. Don't automatically move it to the middle when you lay out the pieces. That slight shift balances the composition with the tip leaning toward the right; it's intentional. Not a pattern blip or mistake. I don't want my version to be just another patchwork witch hat in a sea of witch hats.
Pattern note: These dimensions are based on the cutting and seam calculations for the 12-inch finished block. If one of your completed rows is off by more than about 1/8 inch, check the seam allowance before sewing the whole block together rather than stretching or trimming the row to make it fit.
Cutting Instructions
Cut everything before you start sewing and keep the pieces grouped by section. There are quite a few ivory pieces, but the construction itself is just one row at a time.
From the warm ivory background fabric, cut:
- 1 rectangle, 12 1/2 inches × 1 1/4 inches for the top margin
- 1 rectangle, 12 1/2 inches × 1 1/2 inches for the bottom margin
- 2 rectangles, 1 1/2 inches × 2 1/4 inches for the brim sides
- 2 squares, 2 inches × 2 inches for the angled brim corners
- 2 rectangles, 3 inches × 2 1/2 inches for the hatband background
- 2 rectangles, 3 inches × 3 inches for the lower crown sides
- 2 squares, 1 1/2 inches × 1 1/2 inches for the lower crown corners
- 2 rectangles, 4 inches × 2 1/2 inches for the upper crown sides
- 2 squares, 1 1/2 inches × 1 1/2 inches for the upper crown corners
- 1 rectangle, 4 1/2 inches × 3 1/2 inches for the oversized main-tip half-rectangle triangle
- 1 rectangle, 4 inches × 2 1/2 inches for the oversized flap half-rectangle triangle
- 1 rectangle, 2 1/2 inches × 1 1/2 inches for the ivory section below the flap
- 1 rectangle, 5 inches × 2 1/2 inches for the left side of the tip row
- 1 rectangle, 3 inches × 2 1/2 inches for the right side of the tip row
From the black or charcoal hat fabric, cut:
- 1 rectangle, 10 1/2 inches × 2 1/4 inches for the brim
- 1 rectangle, 7 1/2 inches × 3 inches for the lower crown
- 1 rectangle, 5 1/2 inches × 2 1/2 inches for the upper crown
- 1 rectangle, 4 1/2 inches × 3 1/2 inches for the oversized main-tip half-rectangle triangle
- 1 rectangle, 4 inches × 2 1/2 inches for the oversized flap half-rectangle triangle
- 1 square, 1 1/2 inches × 1 1/2 inches for the buckle center
From the rust or burnt orange fabric, cut:
- 1 rectangle, 2 1/2 inches × 2 1/2 inches for the left side of the hatband
- 1 rectangle, 3 1/2 inches × 2 1/2 inches for the right side of the hatband
Those two rust pieces are deliberately different widths. The wider piece belongs on the right side of the buckle. That's what shifts the buckle 1/2 inch to the left.
From the mustard or gold fabric, cut:
- 2 rectangles, 1 inch × 1 1/2 inches
- 2 rectangles, 2 1/2 inches × 1 inch
Make the Broad Brim
Start with the 10 1/2-inch × 2 1/4-inch black brim rectangle and the two 2-inch ivory squares.
Place one ivory square right sides together on the upper left corner of the black rectangle. Draw a diagonal line from the upper right corner of the square to its lower left corner.
Sew directly on the marked line. Trim the corner 1/4 inch beyond the stitching, then press the ivory triangle open.
Repeat on the upper right corner, this time drawing the line from the upper left corner of the square to its lower right corner.
The black brim now has angled ends at the top. The black portion finishes approximately 10 inches wide along the bottom and 7 inches wide along the top.
Sew one 1 1/2-inch × 2 1/4-inch ivory rectangle to each end of the brim unit.
Press the seams toward the ivory fabric.
The completed brim row should measure 12 1/2 inches × 2 1/4 inches.
Piece the Gold Buckle
The buckle is pieced into the block. It isn't appliquéd on afterward, and you don't need to fuss with a tiny separate square of fabric sitting on top of the band.
Start with the 1 1/2-inch black square.
Sew one 1-inch × 1 1/2-inch gold rectangle to the left side and the second one to the right side. Press both seams toward the gold fabric.
Now sew one 2 1/2-inch × 1-inch gold rectangle across the top and the other across the bottom.
Press those seams away from the black center.
The finished buckle unit should measure 2 1/2 inches square unfinished.
Once it is sewn into the block, the buckle finishes at 2 inches square with a 1-inch black center surrounded by a narrow gold frame.
Make the Rust Hatband
Lay the hatband pieces out before you sew. From left to right, you should have:
3-inch ivory rectangle + 2 1/2-inch rust rectangle + 2 1/2-inch buckle unit + 3 1/2-inch rust rectangle + 3-inch ivory rectangle.
Sew the five pieces together in that order with 1/4-inch seams.
Press the seams away from the buckle where practical. The buckle should now sit a little left of the center of the orange band. That's intentional.
The rust and buckle portion finishes at 7 inches wide × 2 inches high, which matches the 7-inch top of the brim.
The entire hatband row should measure 12 1/2 inches × 2 1/2 inches unfinished.
Make the Lower Crown
Use the 7 1/2-inch × 3-inch black rectangle, two 1 1/2-inch ivory squares and two 3-inch ivory side rectangles.
Place one 1 1/2-inch ivory square on the upper left corner of the black rectangle, right sides together. Draw a diagonal line from the upper right corner of the square to the lower left corner.
Sew on the line, trim 1/4 inch beyond the stitching and press the ivory corner open.
Repeat on the upper right corner, reversing the diagonal.
The black crown now tapers from approximately 7 inches finished across the bottom to 5 inches across the top.
Sew one 3-inch × 3-inch ivory rectangle to each side of the crown.
Press the seams toward the ivory background.
The lower crown row should measure 12 1/2 inches × 3 inches unfinished.
Make the Upper Crown
Use the 5 1/2-inch × 2 1/2-inch black rectangle, the remaining two 1 1/2-inch ivory squares and the two 4-inch ivory rectangles.
Use the same stitch-and-flip method on the two upper corners of the black rectangle.
On the left, draw the diagonal from the upper right corner of the ivory square to the lower left. On the right, reverse it.
Sew on each line, trim 1/4 inch beyond the stitching and press the corners open.
The black portion now narrows from approximately 5 inches finished along the bottom to 3 inches along the top.
Sew one 4-inch × 2 1/2-inch ivory rectangle to each side.
The completed upper crown row should measure 12 1/2 inches × 2 1/2 inches unfinished.
Make the Crooked Two-Piece Witch Hat Tip
The crooked tip is the only section where I'd slow down a little. We're making two oversized half-rectangle-triangle units and trimming them before they go into the block. You don't need a template, paper foundation or special HRT ruler.
Make the main point:
Take the 4 1/2-inch × 3 1/2-inch black rectangle and the matching ivory rectangle.
Place the black rectangle right side up with the 4 1/2-inch edges running horizontally.
On the wrong side of the ivory rectangle, draw a diagonal line from the upper left corner to the lower right corner.
Place the ivory rectangle right side down over the black rectangle. Rotate it so the ivory rectangle's upper left corner meets the black rectangle's upper right corner and its lower right corner meets the black rectangle's lower left corner. The rectangles will look offset. That's correct for a half-rectangle triangle.
Sew a line 1/4 inch on each side of the drawn diagonal.
Cut directly on the drawn line. Open the two units and press the seams toward the black fabric. You now have two matching HRT units. You only need one for this block, so the second one is a spare.
Turn one unit so the diagonal rises from the lower left toward the upper right and the black fabric fills the lower-right side.
Trim it to 3 1/2 inches wide × 2 1/2 inches high. When you position the ruler, the diagonal seam should pass through the points that are 1/4 inch in from both raw edges at the lower-left and upper-right corners.
That 1/4-inch offset protects the two points when the unit is sewn into the block.
The trimmed main-point unit should measure 3 1/2 inches × 2 1/2 inches unfinished. Its black section will finish with a 3-inch base that matches the top of the upper crown.
Make the short angled flap:
Take the 4-inch × 2 1/2-inch black rectangle and the matching ivory rectangle.
Place the black rectangle right side up with the 4-inch edges running horizontally.
On the wrong side of the ivory rectangle, draw a diagonal line from the upper right corner to the lower left corner.
Place the ivory rectangle right side down over the black rectangle. Rotate it so the ivory rectangle's upper right corner meets the black rectangle's upper left corner and its lower left corner meets the black rectangle's lower right corner.
Sew 1/4 inch on both sides of the drawn line, then cut directly on the drawn line.
Open the two HRT units and press toward the black fabric. Again, you only need one and can save the second as a spare.
Turn one unit so its diagonal runs from the upper left toward the lower right with the black fabric on the left side.
Trim the unit to 2 1/2 inches wide × 1 1/2 inches high. Line up the diagonal seam with the ruler points 1/4 inch in from the upper-left and lower-right corners.
The black section should now angle toward the right just like the short flap in the example image.
Sew the 2 1/2-inch × 1 1/2-inch ivory rectangle to the bottom of this flap unit.
The completed flap column should measure 2 1/2 inches × 2 1/2 inches unfinished.
Place the 3 1/2-inch × 2 1/2-inch main-point unit to the left of the flap column. Sew them together with a 1/4-inch seam.
Check the front before you press. Black fabric should meet black fabric along that joining seam, so the main point and short flap read as one continuous crooked hat.
The joined crooked-tip unit should measure 5 1/2 inches × 2 1/2 inches unfinished.
Now arrange the complete tip row from left to right:
5-inch ivory rectangle + 5 1/2-inch crooked-tip unit + 3-inch ivory rectangle.
Sew the three sections together with 1/4-inch seams.
The main point should lean toward the right, with the shorter black flap continuing to the right and ivory showing underneath it.
Press toward the ivory background where practical.
The completed tip row should measure 12 1/2 inches × 2 1/2 inches unfinished.
Assemble the Quilt Block
Now the hat goes together in horizontal rows. Lay everything out first so you can check the shape before sewing.
From top to bottom, arrange:
- 12 1/2-inch × 1 1/4-inch ivory top strip
- Crooked tip row
- Upper crown row
- Lower crown row
- Rust hatband row
- Black brim row
- 12 1/2-inch × 1 1/2-inch ivory bottom strip
Check the important transitions before joining anything. The upper crown should narrow toward the tip, the lower crown should widen cleanly into the band, and the 7-inch bottom of the lower crown should line up with the 7-inch hatband.
The buckle should still sit slightly left of center. The angled tip goes toward the right.
Sew the tip row to the upper crown row with a 1/4-inch seam. Press.
Add the lower crown row and press again.
Sew on the rust hatband row. Check that the edges of the black crown meet the ends of the rust band cleanly before pressing the seam.
Add the broad black brim row.
Finally, sew the ivory strip across the top and the wider ivory strip across the bottom.
I would press the horizontal seams in alternating directions where the fabric naturally wants to lie flat. Around the buckle, press whichever direction keeps that little stack of seams from getting bulky.
Square and Finish the Block
Press the completed block from the front, then check the size with a quilting ruler.
The block should measure 12 1/2 inches × 12 1/2 inches unfinished.
If you only have a thread or two extending past the ruler, trim those. Don't automatically shave the whole block down just because one edge isn't perfectly crisp.
If the block is noticeably smaller than 12 1/2 inches, check the seam allowance before making another one. Trimming an undersized block smaller won't fix the problem.
Once this block is sewn into a quilt, the outer 1/4 inch disappears into the seam allowance and the witch hat block finishes at 12 inches square.
The off-center buckle and crooked two-piece tip are meant to stay a little irregular. I'd keep them that way. If everything is centered and perfectly symmetrical, you lose some of what makes this particular hat different.
If you want to mix it with other autumn patchwork, the pieced pumpkin quilt block gives you another 12-inch seasonal motif, while the free maple leaf quilt pattern carries the same fall colors without making the whole quilt strictly Halloween.
For a second Halloween block to pair with the witch hat, use my free ghost quilt block pattern.
You can also use the witch hat as one of the darker blocks in a larger fall quilt and let the rust band and mustard buckle pick up colors from the surrounding patchwork. You don't need every block to have a Halloween motif for this one to belong.
When you click on links to various merchants on this site and make a purchase, this may result in this site earning a commission. This does not affect the price you pay.

UBGI Gold Standard 2026
Reviewed under the site's
editorial checklist.
Photos, decorating ideas, party setups and reader submissions are shared for inspiration unless a page is specifically presented as a pattern, tutorial, reference guide or step-by-step project. Follow the instructions, measurements, safety guidance and manufacturer directions provided for the particular project or product.
About Jan | Contact | Baby Nursery Ideas (Blog) | Site Map | Privacy Policy | Disclosure Policy | Disclaimer | Affiliate Disclosure | Earnings Disclosure | Facebook | Pinterest
I am a participant in the Amazon Services LLC Associates Program, an affiliate advertising program designed to provide a means for us to earn fees by linking to Amazon. As an Amazon Associate I earn from qualifying purchases.
Copyright © 2006-2026. All Rights Reserved.