Free Pieced Patchwork Ghost Quilt Block Pattern
By Jan Bay
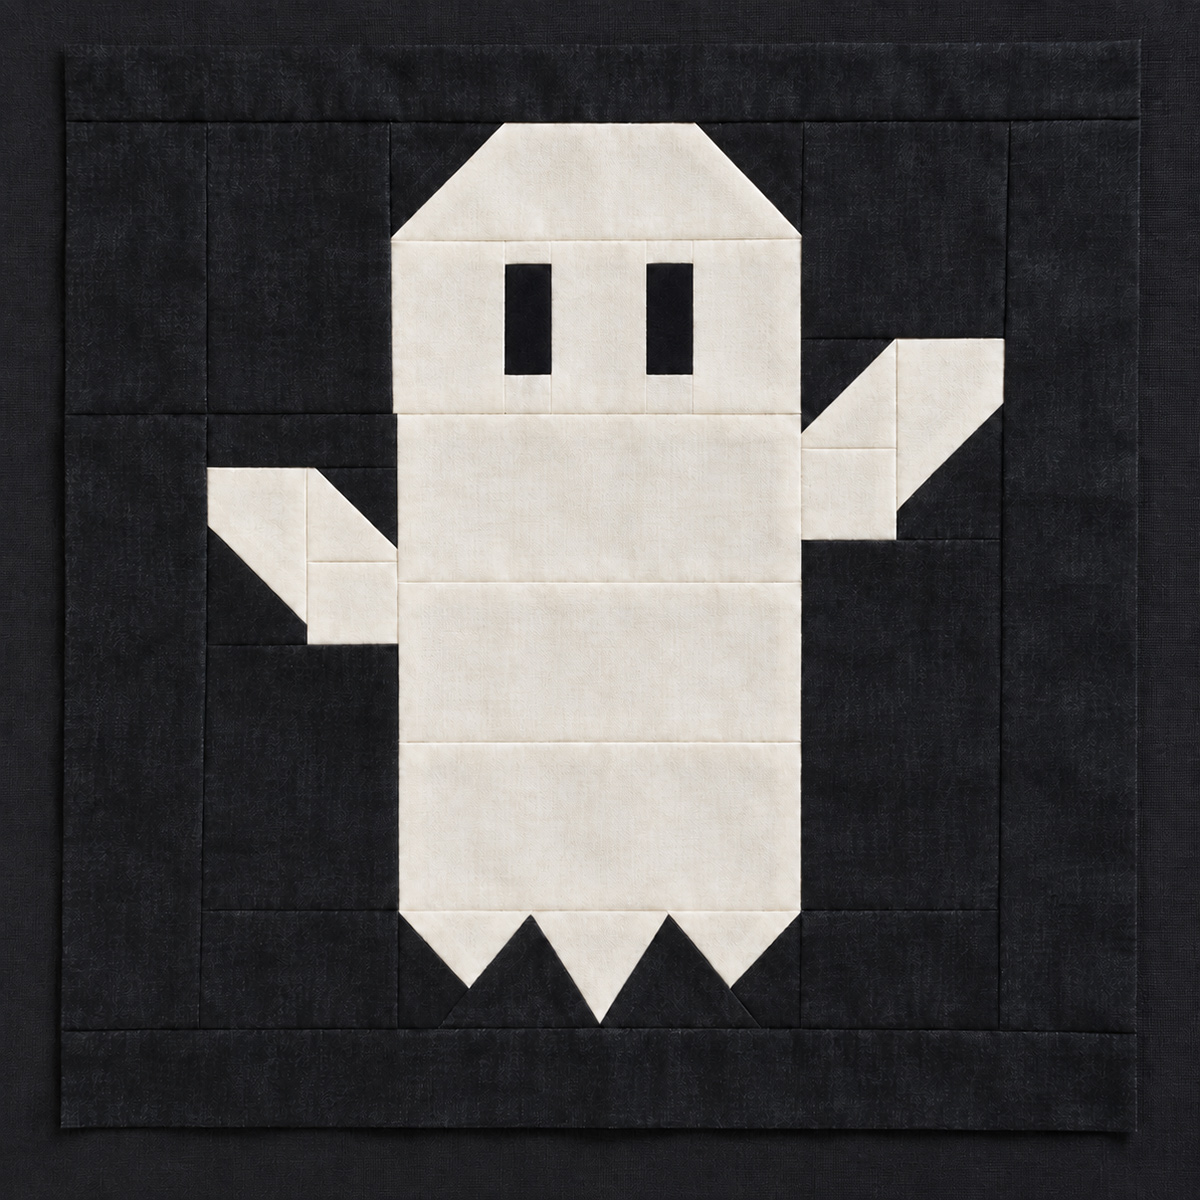
This free ghost quilt block pattern makes a 12 inch finished Halloween block with simple pieced patchwork construction. The white ghost stands out against a dark background. The whole block is designed to be made without appliqué, paper piecing, templates or other complications so quilters can have plenty of time for Trick or Treat!
Explore More Free Quilt Patterns
Helpful Quilting Supplies for This Project
Jump to the Ghost Quilt Block Pattern
Materials for the Free Ghost Quilt Block Pattern
You only need two fabrics for this ghost, and I would keep them high contrast. A warm ivory or soft white makes the ghost easy to see against charcoal or black without giving the block a harsh black-and-white look.
Fabric:
- Charcoal or black background fabric: 1 fat quarter
- Warm ivory or soft white ghost fabric: 1 fat quarter
A fat quarter of each gives you more than the calculated cutting requirement for one block and leaves enough room to recut a small piece if a diagonal goes the wrong direction. That's useful here because the two arms are intentionally different and several of the stitch-and-flip corners are mirrored.
You'll also need:
- Sewing machine
- Neutral cotton piecing thread
- Rotary cutter
- Cutting mat
- Quilting ruler
- Fabric marking pencil or removable marker
- Iron and ironing surface
- Optional 1/4-inch piecing foot
The block uses a regular 1/4-inch seam allowance. There are no appliqué pieces, paper foundations or templates to print. The clipped head, raised arms and three floating points along the bottom are all made from ordinary rectangles and squares with simple diagonal piecing.
I would cut the black and ivory pieces into separate groups before sewing and keep the left-arm pieces apart from the right-arm pieces. They aren't interchangeable. The right arm sits higher in the finished block, while the left arm is deliberately lower, which gives the ghost the slightly waving pose shown in the example image.
Finished Size and Seam Allowance
The cutting and seam math for this ghost is designed to make a 12 1/2-inch square unfinished block. Once the block is sewn into a quilt with a 1/4-inch seam allowance around the outside, it finishes at 12 inches square.
The ghost itself is about 6 inches wide through the main body and about 10 inches tall. The arms extend the silhouette to roughly 10 inches across, but they stop well inside the outside edge of the block.
The top of the head finishes about 3 inches wide before the two clipped corners widen into the 6-inch body. The right arm sits about 1 1/2 inches higher than the left. That difference is intentional. It keeps the ghost from looking stiff and gives him the little waving pose shown in the example image.
Use a consistent 1/4-inch seam allowance throughout. If your machine has a quarter-inch piecing foot, it can make these small geometric units easier to keep consistent. Brother has an example of a 1/4-inch piecing foot and seam guide.
Pattern note: All measurements below are calculated from the cutting dimensions and 1/4-inch seams. Check the stated unit sizes as you go. If a unit is noticeably off, fix the seam allowance before joining it to the next section rather than trimming several later pieces to compensate.
Cutting Instructions
All measurements are listed as width × height and already include the seam allowance.
There are several small black pieces, so I'd keep them grouped by head, arms and hem rather than making one little pile and trying to remember which square goes where.
From the charcoal or black background fabric, cut:
- 2 rectangles, 12 1/2 inches × 1 1/2 inches for the top and bottom margins
- 2 rectangles, 3 1/2 inches × 2 inches for the head-row sides
- 2 squares, 2 inches × 2 inches for the clipped head corners
- 2 rectangles, 1 1/2 inches × 2 inches for the eyes
- 1 rectangle, 3 1/2 inches × 3 inches for the top of the left arm panel
- 1 rectangle, 3 1/2 inches × 2 inches for the bottom of the left arm panel
- 1 rectangle, 1 1/2 inches × 3 1/2 inches for the outside black margin of the left arm
- 2 squares, 1 1/2 inches × 1 1/2 inches for shaping the left arm
- 1 rectangle, 3 1/2 inches × 1 1/2 inches for the top of the right arm panel
- 1 rectangle, 3 1/2 inches × 3 1/2 inches for the bottom of the right arm panel
- 1 rectangle, 1 1/2 inches × 3 1/2 inches for the outside black margin of the right arm
- 2 squares, 1 1/2 inches × 1 1/2 inches for shaping the right arm
- 2 rectangles, 3 1/2 inches × 2 inches for the outside sections of the ghost-bottom row
- 6 squares, 2 inches × 2 inches for shaping the three lower points
From the warm ivory or soft white ghost fabric, cut:
- 1 rectangle, 6 1/2 inches × 2 inches for the head
- 2 squares, 2 inches × 2 inches for the outside portions of the face row
- 1 rectangle, 1 1/2 inches × 2 inches for the center of the face row
- 2 rectangles, 6 1/2 inches × 2 1/2 inches for the upper and lower body
- 1 rectangle, 6 1/2 inches × 2 inches for the middle body
- 2 rectangles, 1 1/2 inches × 3 1/2 inches for the full-height arm columns
- 4 rectangles, 1 1/2 inches × 2 inches for the split arm columns
- 2 rectangles, 2 1/2 inches × 2 inches for the two shorter side points
- 1 rectangle, 2 1/2 inches × 2 1/2 inches for the longer center point
Don't swap the left- and right-arm pieces as you sew. The arms are deliberately constructed and positioned differently.
Piece the Ghost Eyes
The face is just two tall black eyes. No mouth. Keeping it that simple is part of what makes the block read more like a little floating ghost and less like a character face.
Lay out the face-row pieces from left to right:
2-inch ivory square + 1 1/2-inch black eye + 1 1/2-inch ivory center + 1 1/2-inch black eye + 2-inch ivory square.
Sew the five pieces together with 1/4-inch seams.
Press the seams toward the black eye pieces where they lie comfortably.
The completed face row should measure:
6 1/2 inches wide × 2 inches high unfinished.
Once the block is assembled, each black eye finishes about 1 inch wide × 1 1/2 inches tall.
Shape the Ghost Head
Use the 6 1/2-inch × 2-inch ivory head rectangle, the two 2-inch black squares and the two 3 1/2-inch × 2-inch black side rectangles.
Place one black square right sides together on the upper left corner of the ivory head rectangle.
Draw a diagonal line from the upper right corner of the black square to its lower left corner.
Sew directly on the line. Trim away the outside corner, leaving a 1/4-inch seam allowance beyond the stitching. Press the black triangle open.
Place the second black square on the upper right corner of the ivory rectangle.
This time draw the diagonal from the upper left corner of the black square to its lower right corner.
Sew, trim and press in the same way.
The ivory head unit should still measure 6 1/2 inches × 2 inches unfinished. Its two black corners make the flat top of the ghost narrower without requiring a curved seam.
Sew one 3 1/2-inch × 2-inch black rectangle to each side of the head unit.
Press toward the black background fabric.
The completed head row should measure:
12 1/2 inches × 2 inches unfinished.
After the surrounding seams are sewn, the ghost finishes about 6 inches across the bottom of the head and 3 inches across the flat top.
Make the Ghost Body and Asymmetric Arms
The middle of the block is made as three panels: the lower left arm, the center ghost body and the raised right arm. The arms are mirror-image constructions, but they sit at different heights. Each one also keeps a strip of black background between the hand and the outside edge of the block.
First make the center body panel.
Lay out these pieces from top to bottom:
- The completed 6 1/2-inch × 2-inch face row
- 1 ivory rectangle, 6 1/2 inches × 2 1/2 inches
- 1 ivory rectangle, 6 1/2 inches × 2 inches
- 1 ivory rectangle, 6 1/2 inches × 2 1/2 inches
Sew the four sections together with 1/4-inch seams.
Press the horizontal seams in whichever direction keeps the panel flat.
The completed center body panel should measure:
6 1/2 inches × 7 1/2 inches unfinished.
Make the lower left arm.
For the outside half of the arm, use one 1 1/2-inch × 3 1/2-inch ivory rectangle and one 1 1/2-inch black square.
Place the black square right sides together on the lower-left corner of the ivory rectangle.
Draw a diagonal from the upper-left corner of the black square to its lower-right corner.
Sew on the line. Trim away the lower-left outside corner, leaving a 1/4-inch seam allowance beyond the stitching, and press the black corner open.
The shaped column should still measure 1 1/2 inches × 3 1/2 inches.
For the half of the arm nearest the ghost, use two 1 1/2-inch × 2-inch ivory rectangles.
Place the second 1 1/2-inch black square on the upper-right corner of the first rectangle.
Draw a diagonal from the upper-left corner of the black square to its lower-right corner.
Sew on the line. Trim away the upper-right outside corner and press the black corner open.
Sew this shaped rectangle above the remaining plain 1 1/2-inch × 2-inch ivory rectangle.
The completed inside column should measure 1 1/2 inches × 3 1/2 inches unfinished.
Place the full-height shaped column on the left and the split ivory column on the right. Sew them together.
The ivory arm section should measure:
2 1/2 inches × 3 1/2 inches unfinished.
Sew the 1 1/2-inch × 3 1/2-inch black background rectangle to the left side of the arm.
The complete left-arm unit should now measure:
3 1/2 inches × 3 1/2 inches unfinished.
Arrange the left panel from top to bottom:
- 1 black rectangle, 3 1/2 inches × 3 inches
- The completed left-arm unit
- 1 black rectangle, 3 1/2 inches × 2 inches
Sew the sections together.
The completed left panel should measure:
3 1/2 inches × 7 1/2 inches unfinished.
Make the raised right arm.
For the half nearest the ghost, use two 1 1/2-inch × 2-inch ivory rectangles.
Place one 1 1/2-inch black square on the upper-left corner of the first rectangle.
Draw a diagonal from the upper-right corner of the black square to its lower-left corner.
Sew on the line. Trim away the upper-left outside corner and press the black corner open.
Sew this shaped rectangle above the remaining plain 1 1/2-inch × 2-inch ivory rectangle.
The inside column should measure 1 1/2 inches × 3 1/2 inches unfinished.
For the outside half of the arm, use the remaining 1 1/2-inch × 3 1/2-inch ivory rectangle.
Place the remaining 1 1/2-inch black square on its lower-right corner.
Draw a diagonal from the upper-right corner of the black square to its lower-left corner.
Sew on the line. Trim away the lower-right outside corner and press the black corner open.
Place the split ivory column on the left and the full-height shaped column on the right. Sew them together.
The ivory arm section should measure:
2 1/2 inches × 3 1/2 inches unfinished.
Sew the remaining 1 1/2-inch × 3 1/2-inch black background rectangle to the right side of the arm.
The complete right-arm unit should measure:
3 1/2 inches × 3 1/2 inches unfinished.
Arrange the right panel from top to bottom:
- 1 black rectangle, 3 1/2 inches × 1 1/2 inches
- The completed raised right-arm unit
- 1 black rectangle, 3 1/2 inches × 3 1/2 inches
Sew the sections together.
The completed right panel should measure:
3 1/2 inches × 7 1/2 inches unfinished.
Place the three completed panels from left to right:
left arm panel + center ghost body + right arm panel.
Sew the left panel to the ghost body, then sew the right panel to the opposite side.
Before pressing, check the orientation. The right arm should sit about 1 1/2 inches higher than the left. The left arm angles down toward the body and the right arm angles upward. A narrow black background strip should remain outside each hand so neither arm reaches the edge of the block.
Press the long seams toward the black side panels.
The completed middle section should measure:
12 1/2 inches × 7 1/2 inches unfinished.
Piece the Floating Ghost Bottom
The ghost has three lower points, with the center point hanging about 1/2 inch farther down than the two outside points. All three use the same 2-inch corner squares. The center begins with a slightly taller ivory rectangle and is trimmed after piecing, which gives us the extra depth without adding another seam across the ghost.
Make the two shorter side points.
For each side point, use one 2 1/2-inch × 2-inch ivory rectangle and two 2-inch black squares.
Place one black square right sides together on the lower-left corner of the ivory rectangle.
Draw a diagonal from the upper-left corner of the black square to its lower-right corner.
Sew on the line. Trim away the lower-left outside corner, leaving a 1/4-inch seam allowance beyond the stitching, and press the black corner open.
Place the second black square on the lower-right corner.
Draw a diagonal from the upper-right corner of the black square to its lower-left corner.
Sew, trim the lower-right outside corner and press.
The two diagonal seams form the downward ivory point. The tip should sit about 3/4 inch above the lower raw edge.
The completed side-point unit should still measure:
2 1/2 inches × 2 inches unfinished.
Make the second side point the same way.
Make the longer center point.
Use the 2 1/2-inch × 2 1/2-inch ivory rectangle and the remaining two 2-inch black squares.
Place one black square on the lower-left corner. Draw a diagonal from the upper-left corner of the square to its lower-right corner.
Sew on the line, trim away the lower-left outside corner and press.
Place the final black square on the lower-right corner. Draw the mirrored diagonal from the upper-right corner to the lower-left corner.
Sew, trim and press.
The center point now hangs lower because it was formed in a taller unit.
With the unit right side up, trim exactly 1/2 inch from the bottom edge only. Do not trim the top or either side.
After trimming, the center unit should measure:
2 1/2 inches × 2 inches unfinished.
The ivory tip should be centered and sit about 1/4 inch above the new lower raw edge. That 1/4 inch protects the point when the bottom background strip is attached.
Arrange the three units from left to right:
short side point + longer center point + short side point.
Sew the three units together with 1/4-inch seams.
The joined ivory section should measure:
6 1/2 inches × 2 inches unfinished.
Sew one 3 1/2-inch × 2-inch black rectangle to each side.
The completed ghost-bottom row should measure:
12 1/2 inches × 2 inches unfinished.
Check the silhouette before assembly. The center point should extend about 1/2 inch farther down than the two outside points, matching the floating lower edge shown in the example image.
Assemble the Quilt Block
At this point there are only five large sections left to join. Lay them out before sewing so the raised arm and three-point bottom are facing the right directions.
From top to bottom, arrange:
- 12 1/2-inch × 1 1/2-inch black top strip
- Completed ghost head row
- Completed body and arm section
- Completed three-point ghost-bottom row
- 12 1/2-inch × 1 1/2-inch black bottom strip
Check the center alignment before sewing. The 6 1/2-inch unfinished ghost head, body and lower ghost section should line up vertically.
Sew the top black strip to the head row with a 1/4-inch seam.
Add the completed body and arm section.
Sew the three-point bottom row beneath the body.
Finish by sewing the remaining black strip across the bottom.
Press each horizontal seam as you go. There isn't one mandatory pressing direction here. Use the direction that keeps your particular fabrics lying flat and avoids stacking bulky seams on top of each other.
The assembled block should now measure approximately:
12 1/2 inches × 12 1/2 inches unfinished.
The height math is:
1 1/2 + 2 + 7 1/2 + 2 + 1 1/2 = 14 1/2 inches of cut section height.
Four joining seams consume a total of 2 inches, leaving the required 12 1/2-inch unfinished block.
Square and Finish the Block
Give the completed block a final press and place a 12 1/2-inch quilting ruler over it.
The unfinished block is intended to measure 12 1/2 inches square. Once it is sewn into a quilt, the outside 1/4-inch seam allowance disappears and the block finishes at 12 inches square.
If you're only seeing a stray thread or a tiny sliver outside the ruler, clean that up. Don't automatically cut the block smaller to make every edge look perfect.
If the block is noticeably under 12 1/2 inches, check the 1/4-inch seam allowance instead. Several horizontal and vertical seams are doing real work in this pattern, so even a small difference at each seam can add up.
Before calling it finished, check the features that make this particular ghost work:
- The top of the head is narrower than the body.
- There are two tall black eyes and no mouth.
- The right arm is higher than the left.
- Both arms stay inside the block rather than running into the outer edge.
- The center lower point hangs slightly farther than the two side points.
That's really enough. Adding another face piece or trying to make both arms perfectly symmetrical would take away the slightly odd little floating pose that gives this block its personality.
If you're building a Halloween set, pair this ghost with the witch hat quilt block pattern, the cat quilt block pattern in black, and the pumpkin quilt block pattern. All four give you recognizable Halloween motifs without needing appliqué or paper piecing.
If you would rather use a pattern that makes a complete pieced Halloween quilt than try to match up your own blocks from different sources, my spooky Halloween quilt pattern uses bats, tombstones, pumpkins and a geometric moon in a graveyard medallion.
You can also find more projects on the baby quilt patterns page.
When you click on links to various merchants on this site and make a purchase, this may result in this site earning a commission. This does not affect the price you pay.

UBGI Gold Standard 2026
Reviewed under the site's
editorial checklist.
Photos, decorating ideas, party setups and reader submissions are shared for inspiration unless a page is specifically presented as a pattern, tutorial, reference guide or step-by-step project. Follow the instructions, measurements, safety guidance and manufacturer directions provided for the particular project or product.
About Jan | Contact | Baby Nursery Ideas (Blog) | Site Map | Privacy Policy | Disclosure Policy | Disclaimer | Affiliate Disclosure | Earnings Disclosure | Facebook | Pinterest
I am a participant in the Amazon Services LLC Associates Program, an affiliate advertising program designed to provide a means for us to earn fees by linking to Amazon. As an Amazon Associate I earn from qualifying purchases.
Copyright © 2006-2026. All Rights Reserved.