Crochet Woodland Animal Baby Mobile Pattern
By Jan Bay
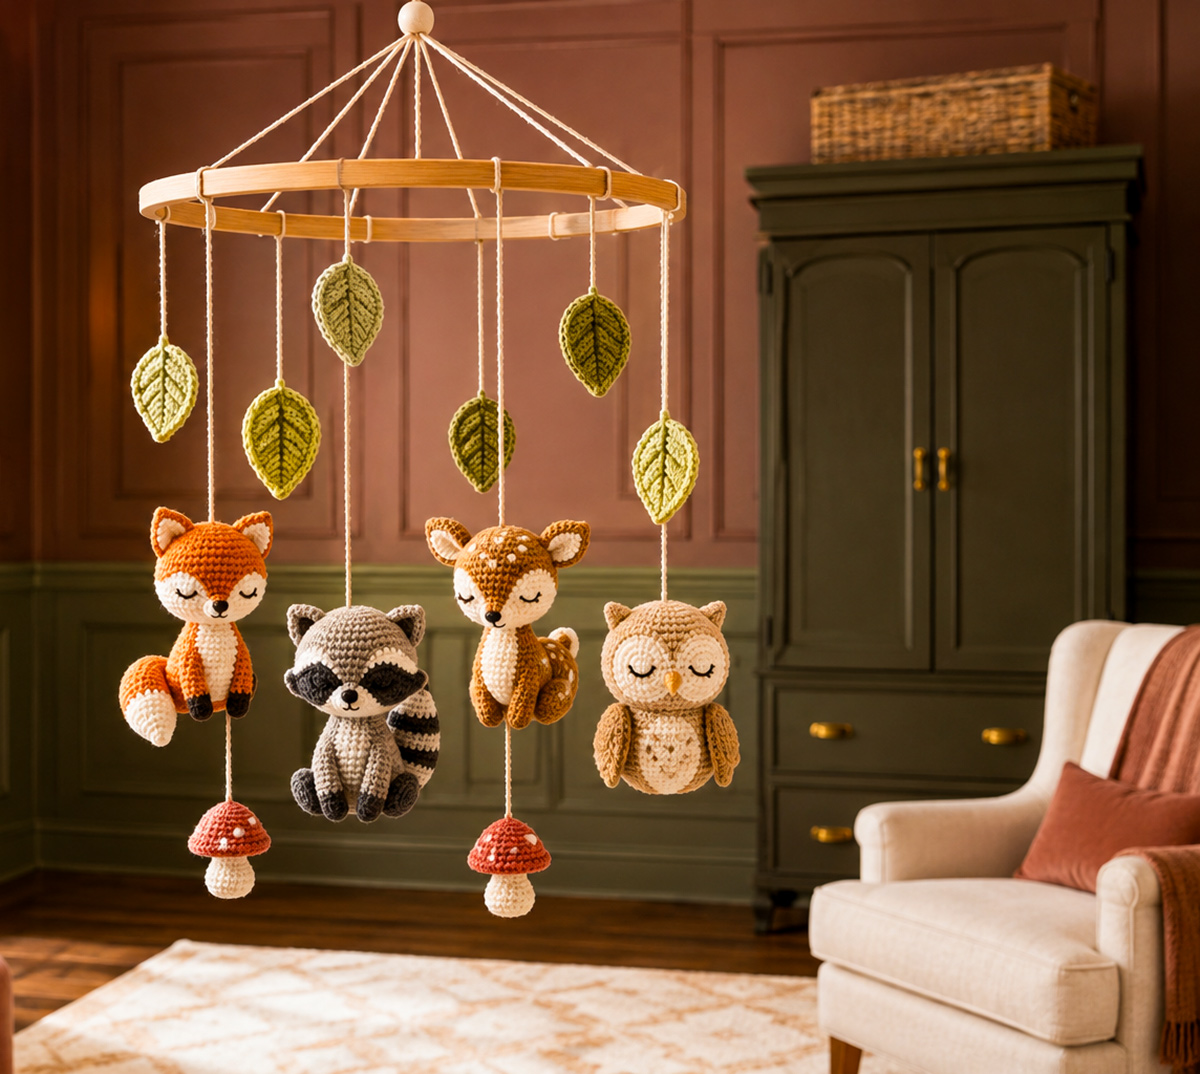
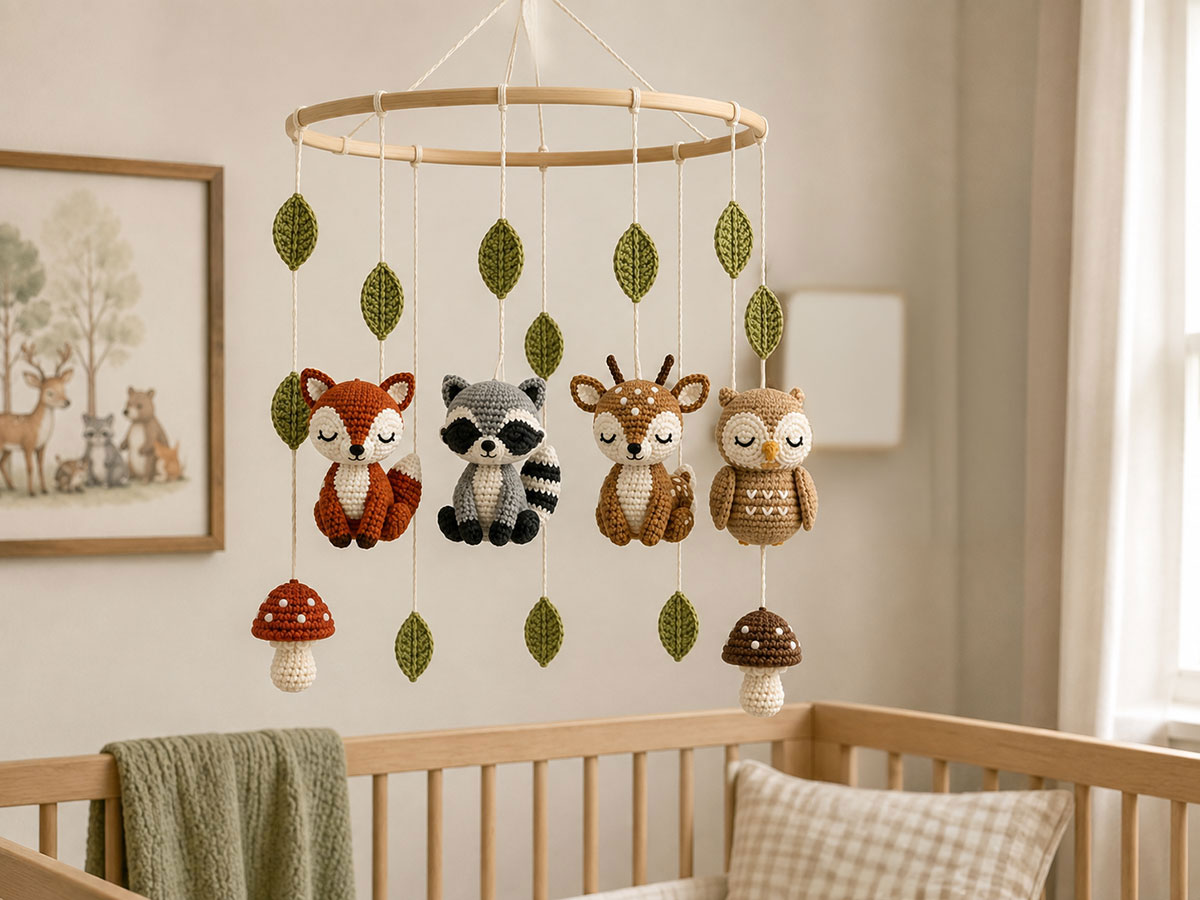
Create a handmade woodland nursery decoration with this free crochet woodland animal baby mobile pattern. The finished design features small forest animals, two mushrooms and simple leaves arranged at different heights for a balanced mobile that adds color and woodland charm to a baby's room.
Explore More Free Crochet Baby Patterns
Woodland Crochet Mushroom Pattern
Mobile-Making Supply
Jump to the Part You Need
What You Will Make with This Crochet Woodland Animal Baby Mobile Pattern
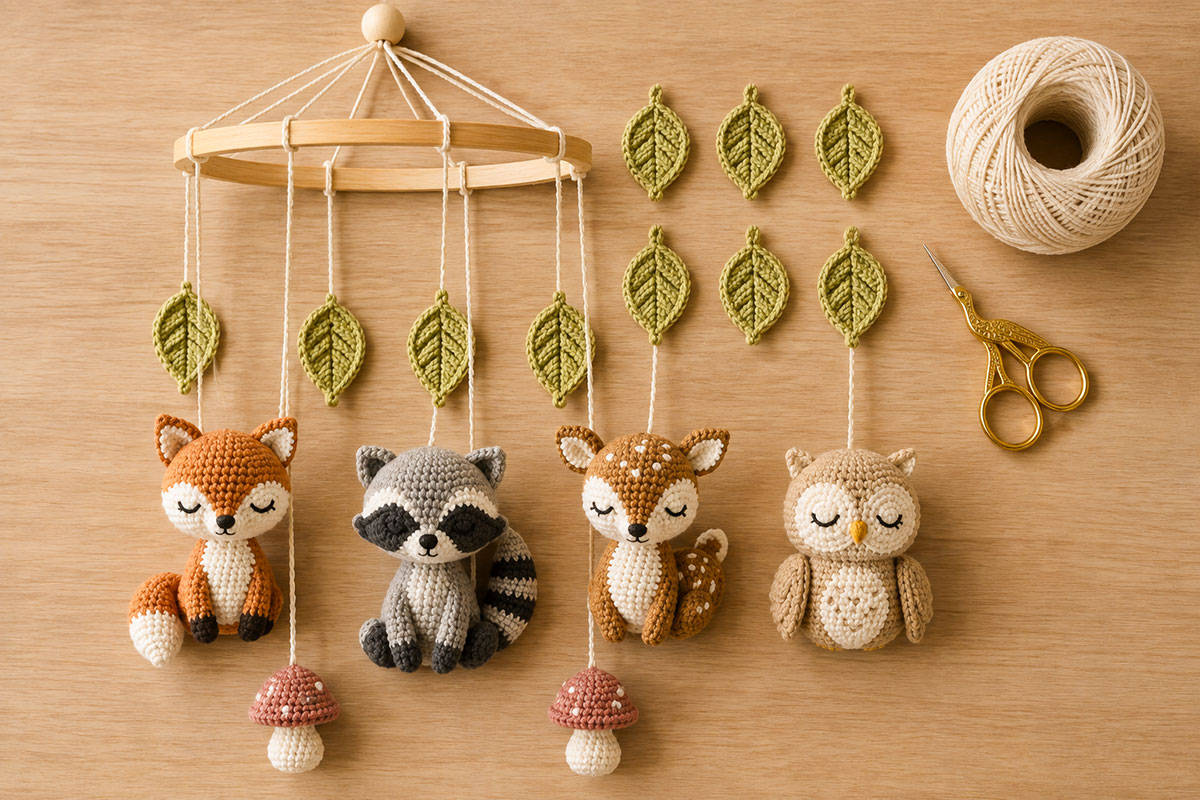
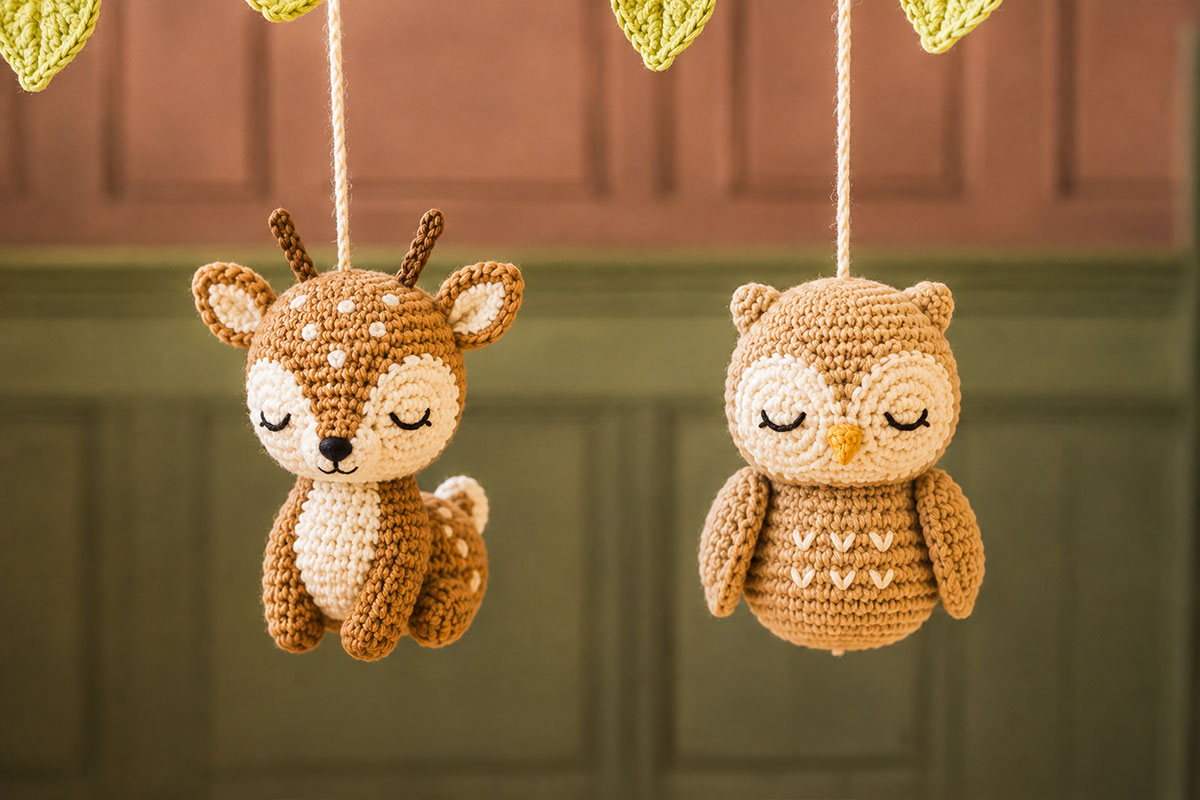
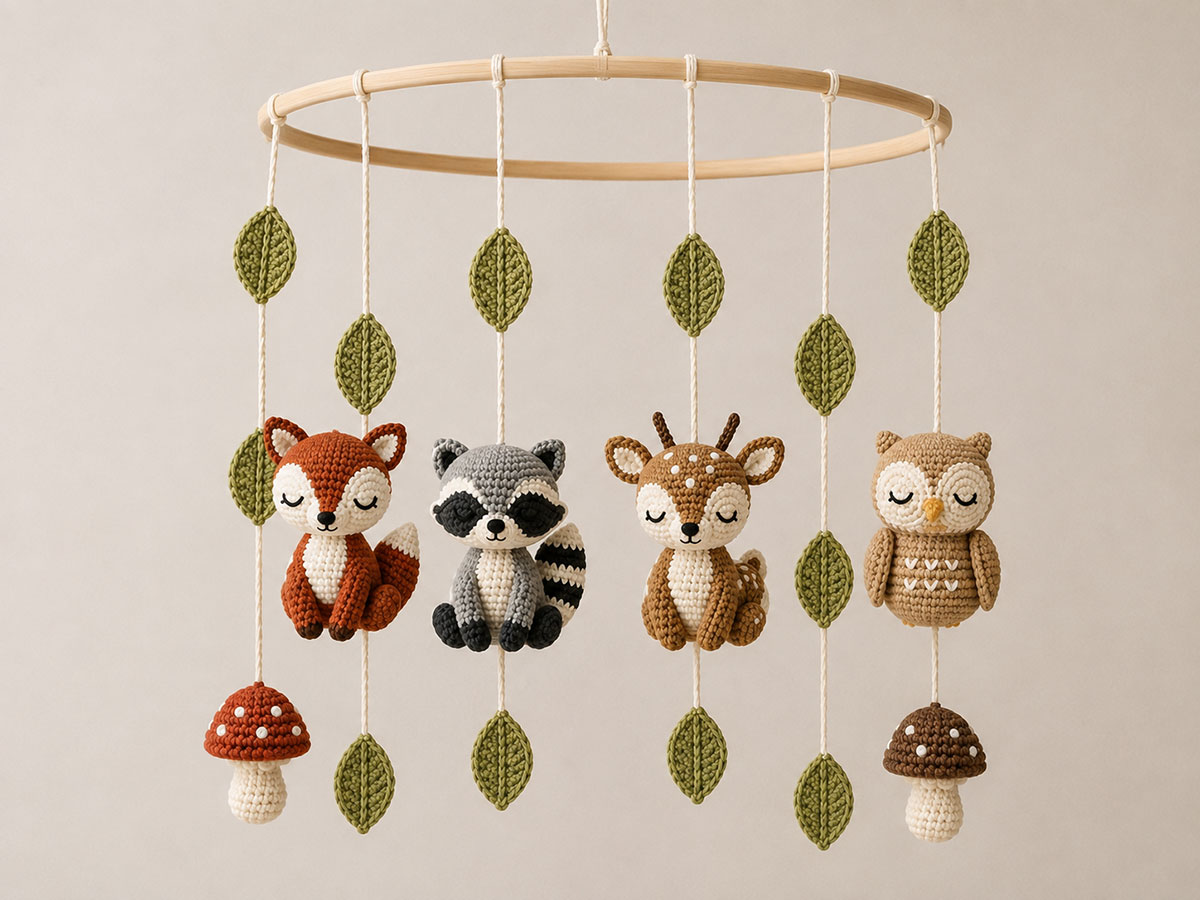
This crochet woodland mobile brings together four small forest animals: a fox, raccoon, fawn and owl. Two miniature mushrooms and six simple leaves fill the spaces between them without making the finished arrangement look crowded.
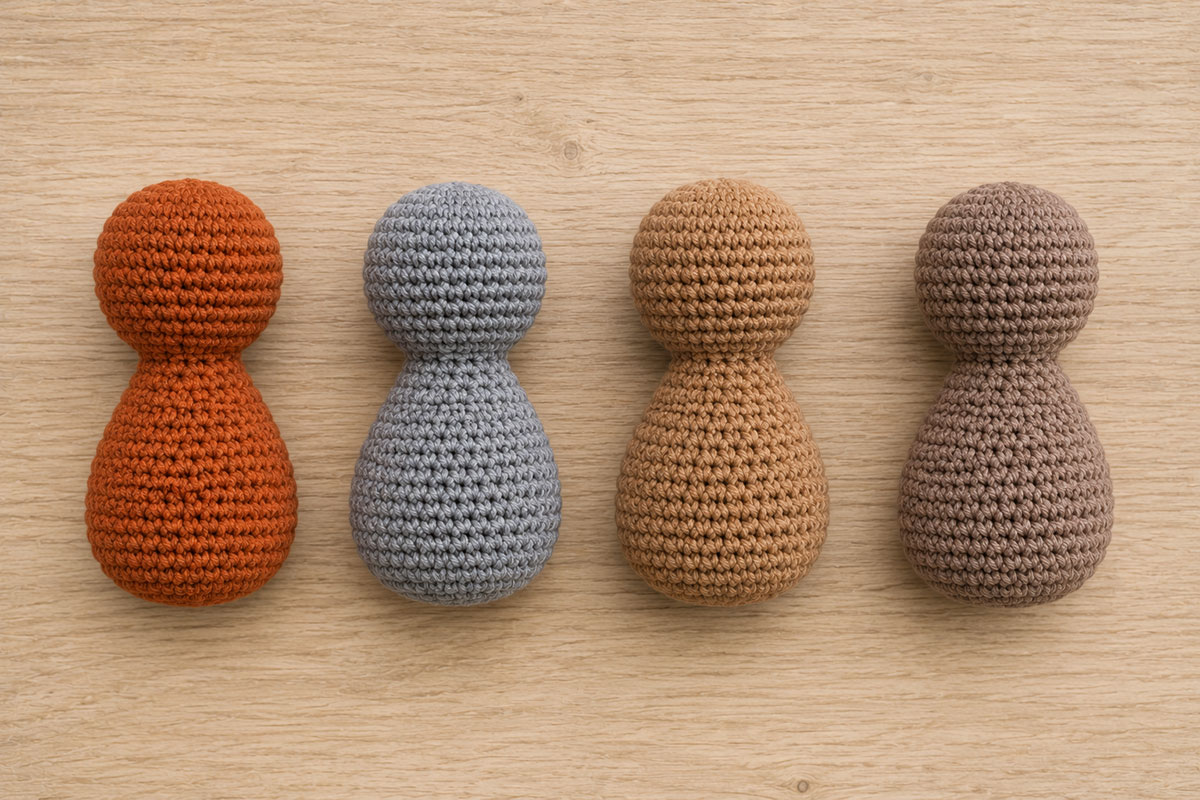
Each animal begins with the same lightly stuffed body shape. The ears, markings, wings and embroidered faces turn that shared shape into four different creatures. Repeating the base keeps the figures close in size and weight, which makes the mobile easier to balance when it is assembled.
The finished pieces hang from a 10-inch wooden hoop at staggered heights. The mushrooms are a smaller mobile-friendly version inspired by the woodland crochet mushroom pattern, while the raccoon coordinates with the larger crochet raccoon pattern.
If you would rather build the mobile around deer instead of a mixed group of forest animals, my crochet deer baby mobile pattern uses three spotted fawns with acorns and sage leaves.
Lay every finished piece out before cutting the hanging cords. A few minutes spent arranging the animals, mushrooms and leaves on a table will save a great deal of adjusting once they are tied to the hoop.
Finished Size, Skill Level and Gauge
Skill level: Advanced beginner. You should be comfortable working single crochet in continuous rounds, increasing, decreasing, changing colors, sewing small pieces in place and embroidering simple facial features.
Finished mobile size: The completed mobile measures about 10 inches across and approximately 28 to 34 inches from the top hanging loop to the lowest figure when made with the cord lengths given in this pattern. The final height depends on the size of the hanging loop and how you stagger the pieces.
Approximate finished sizes:
- Fox: 4 to 4 1/2 inches tall
- Raccoon: 4 to 4 1/2 inches tall
- Fawn: approximately 4 1/2 to 5 1/2 inches tall, including the antlers and legs
- Owl: 3 3/4 to 4 1/4 inches tall
- Mushrooms: approximately 1 3/4 to 2 1/4 inches tall
- Leaves: 1 1/2 to 2 inches long
Gauge: 18 single crochet stitches and 20 rounds measure about 4 inches using the recommended yarn and hook.
Exact gauge is less important than firm, even stitches. The fabric should be tight enough that the stuffing does not show between stitches. Make all four animal bodies with the same hook and tension so their sizes and weights remain close.
If your first animal measures noticeably larger or smaller than the dimensions above, adjust the hook size before making the remaining figures. A larger hook creates a softer, looser fabric, while a smaller hook produces a firmer and more compact piece.
Before You Begin
The animal bodies are worked in continuous rounds without joining. Place a stitch marker in the first stitch of every round and move it upward as you work.
Beginning chains and turning chains do not count as stitches unless the instructions specifically say otherwise. Numbers in parentheses show the stitch count at the end of each row or round.
When changing colors, work the final yarn-over of the last stitch before the change with the new color. For the raccoon tail, carry the unused color loosely inside the tube until it is needed again, taking care not to pull the carried strand tightly enough to narrow the tail. After the final change to charcoal, cut the medium-gray yarn, leaving a 4-inch tail to secure inside the tail. For the fox tail and fawn legs, cut the old color after the change, leaving a 4-inch tail to secure and bury inside the piece.
Stuff each figure lightly and evenly. A mobile piece should hold its shape without becoming hard or heavy. Add the stuffing in small portions, paying special attention to the top and bottom curves.
Leave long sewing tails on ears, wings, muzzles and other attached pieces. Close each animal body as directed before attaching its features. After sewing a feature in place, take one final small stitch beneath its edge, make a secure hidden knot and pass the remaining tail through the stuffed body. Bring the needle out at a different point, pull gently and trim close so the end withdraws inside. Bury embroidery-floss ends in the same way.
Yarn, Hook and Materials
Choose smooth DK-weight yarn that shows the small shapes and embroidered features clearly. Cotton, cotton-blend or a smooth acrylic yarn will work. Avoid fuzzy novelty yarn because it can hide stitches, make sewing more difficult and leave loose fibers around the finished mobile.
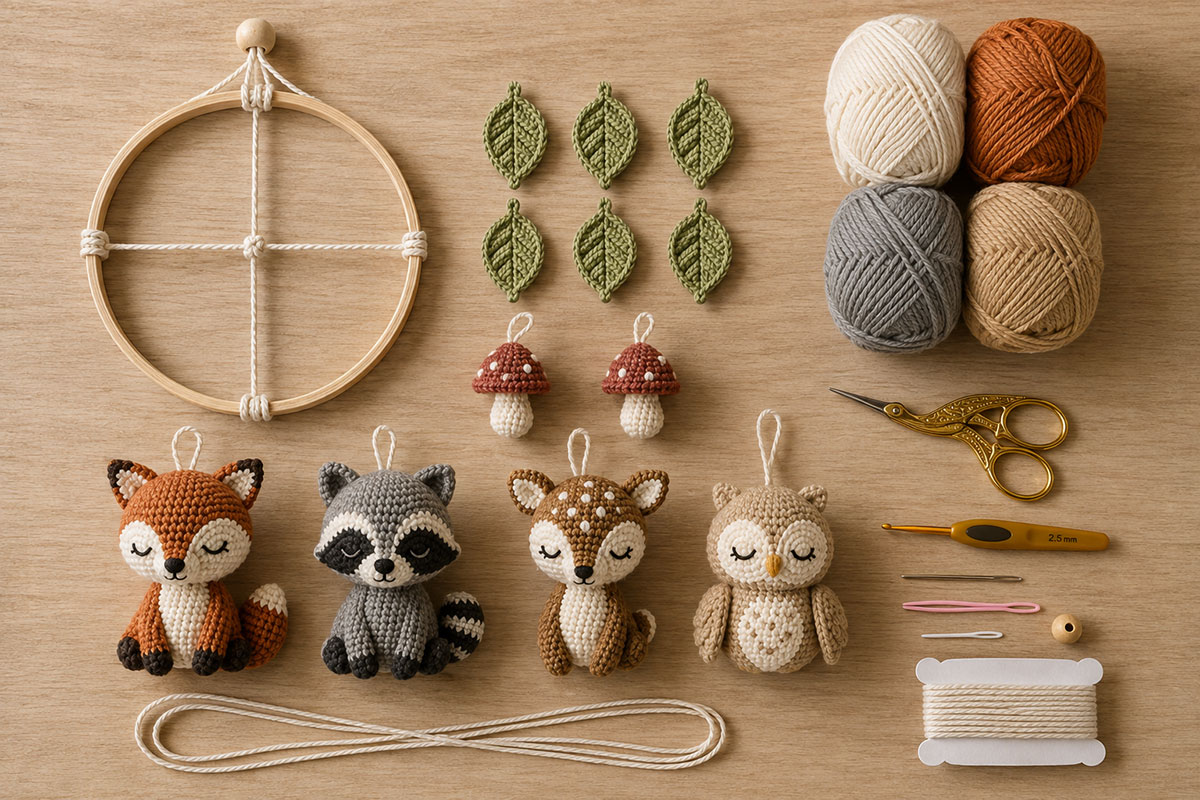
Yarn: Approximately 275 to 325 yards of DK-weight yarn in the following colors:
- Rust or warm orange for the fox
- Medium gray for the raccoon
- Light brown or fawn for the deer
- Soft brown for the owl
- Cream for muzzles, facial markings and the mushroom stems
- Dark brown for antlers, hooves, owl details and mushroom caps
- Muted green for the leaves
- Charcoal or very dark gray for the raccoon eye patches, ear details and tail stripes
You will need about 35 to 45 yards for each animal’s main color and less than 15 yards of each accent color. Small leftover balls from other nursery projects may be enough for the mushrooms, leaves and facial markings.
Hook: US D/3, 3.25 mm crochet hook, or the size needed to produce firm stitches without visible gaps.
Additional materials:
- One 10-inch unfinished wooden mobile hoop or smooth wooden embroidery hoop
- Polyester fiberfill
- Black cotton embroidery floss for the eyes, noses and mouth details
- Blunt yarn needle
- Embroidery needle
- Stitch markers
- Scissors
- Flexible tape measure
- Rustproof straight pins for temporary placement
- Approximately 9 yards of firmly twisted cotton cord for the four animal cords, two mushroom cords and four upper support cords
Do not add plastic safety eyes, buttons, beads, bells or glued decorations. The tiny faces look sweet with simple embroidered features, and there is nothing hard or detachable to compete with the soft crochet work.
Crochet Abbreviations
- ch: chain
- sc: single crochet
- hdc: half double crochet
- dc: double crochet
- sl st: slip stitch
- inc: work 2 single crochet stitches in the same stitch
- dec: single crochet 2 stitches together using an invisible decrease
- st: stitch
- sts: stitches
- rnd: round
- rep: repeat
All instructions use standard US crochet terms.
Shared Woodland Animal Body Pattern
The fox, raccoon, fawn and owl begin with the same head-and-body shape. Make four bodies in the main colors listed below, then add the ears, markings and other features that identify each animal.
- Make one rust or warm orange body for the fox.
- Make one medium gray body for the raccoon.
- Make one light brown or fawn body for the deer.
- Make one soft brown body for the owl.
The body is worked from the top of the head downward in continuous rounds. Do not join at the end of each round.
Round 1: Make a magic ring and work 6 sc into the ring. (6)
Round 2: Inc in each stitch around. (12)
Round 3: [Sc in the next stitch, inc in the next stitch] 6 times. (18)
Round 4: [Sc in each of the next 2 stitches, inc in the next stitch] 6 times. (24)
Rounds 5 through 8: Sc in each stitch around. (24)
Round 9: [Sc in each of the next 2 stitches, dec] 6 times. (18)
Round 10: Sc in each stitch around. (18)
Round 11: [Sc in the next stitch, dec] 6 times. (12)
Round 12: [Sc in the next stitch, inc in the next stitch] 6 times. (18)
Round 13: [Sc in each of the next 2 stitches, inc in the next stitch] 6 times. (24)
Before continuing, add small amounts of stuffing to the head through the open body. Fill the rounded head evenly, but leave Rounds 10 through 12 only lightly filled. Pinch Round 11 between your fingers to define the narrow 12-stitch neck. Do not pack fiberfill across this section, or the neck will lose the cinched shape shown in the finished animals.
Rounds 14 through 18: Sc in each stitch around. (24)
Round 19: [Sc in each of the next 2 stitches, dec] 6 times. (18)
Stuff the body in small amounts, keeping the fiberfill below the narrow neck area. Check Round 11 as you work and pinch it gently between your fingers so the neck remains visibly indented between the rounded head and body. The body should hold its shape without being packed firmly enough to push stuffing into the neck.
Round 20: [Sc in the next stitch, dec] 6 times. (12)
Add the remaining stuffing. Keep the bottom lightly rounded rather than packed into a hard ball.
Round 21: Dec 6 times. (6)
Fasten off, leaving a 10-inch tail. Thread the tail through the front loops of the remaining six stitches, pull the opening closed and secure the yarn inside the body.
Each finished body should measure approximately 3 1/2 to 4 inches from the top of the head to the base before the ears or antlers are added. Compare all four bodies before continuing. A small difference is easy to disguise with the animal features, but one noticeably larger figure may cause the finished mobile to tilt.
Crochet Raccoon Features and Assembly
Use the medium-gray body for the raccoon. Small pointed ears, charcoal eye patches, a cream muzzle and a striped tail create the raccoon markings without adding excessive weight.
Raccoon ears, make two:
Use medium-gray yarn. Work back and forth in rows.
Row 1: Ch 4. Sc in the second chain from the hook and in each of the next 2 chains. Ch 1 and turn. (3)
Row 2: Dec, sc in the remaining stitch. Ch 1 and turn. (2)
Row 3: Dec. (1)
Fasten off, leaving an 8-inch sewing tail. Weave the starting tail into the lower edge.
Use charcoal yarn to embroider two or three short stitches inside each ear. Leave a medium-gray border around the darker center.
Pin the ears to the upper sides of the head with approximately six visible stitches between their inner corners. Angle the tips slightly outward. Sew securely along the lower edge of each ear and add one small anchoring stitch at each lower outer corner.
Raccoon eye patches, make two:
Use charcoal or very dark-gray yarn.
Ch 5. Sc in the second chain from the hook and in each of the next 2 chains. Work 3 sc in the final chain.
Continue along the unused loops on the opposite side of the foundation chain. Sc in each of the next 2 loops and work 2 sc in the final loop. (10)
Sl st in the first stitch and fasten off, leaving an 8-inch sewing tail.
Pin one patch on each side of the face between Rounds 5 and 9. Angle the outer ends slightly upward and leave two or three visible gray stitches between the patches at the center of the face.
Sew around the outer edge of each patch with small stitches. Keep both patches flat against the head and do not add stuffing beneath them.
Raccoon muzzle:
Use cream yarn.
Round 1: Ch 4. Sc in the second chain from the hook and in the next chain. Work 3 sc in the final chain. Continue along the unused loops on the opposite side of the foundation chain. Sc in the next loop and work 2 sc in the final loop. (8)
Round 2: Inc in the first stitch, sc in the next stitch, inc in each of the next 3 stitches, sc in the next stitch and inc in each of the final 2 stitches. (14)
Sl st in the next stitch and fasten off, leaving a 10-inch sewing tail.
Center the muzzle beneath the eye patches with its upper edge near Round 8. Place a very small amount of stuffing beneath the center and sew securely around the edge.
Striped raccoon tail:
Begin with medium-gray yarn and work in continuous rounds.
Round 1: Make a magic ring and work 6 sc into the ring. (6)
Round 2: [Sc in the next stitch, inc in the next stitch] 3 times. (9)
Change to charcoal yarn.
Rounds 3 and 4: Sc in each stitch around. (9)
Change to medium-gray yarn.
Rounds 5 and 6: Sc in each stitch around. (9)
Change to charcoal yarn.
Rounds 7 and 8: Sc in each stitch around. (9)
Change to medium-gray yarn.
Rounds 9 and 10: Sc in each stitch around. (9)
Change to charcoal yarn.
Round 11: [Sc in the next stitch, dec] 3 times. (6)
Round 12: Sc in each stitch around. (6)
Fasten off, leaving a 10-inch sewing tail. Do not stuff the tail. Flatten it lightly and shape it into a gentle curve.
Sew the narrow end of the tail to the lower back of the raccoon between Rounds 16 and 19. Add two small anchoring stitches farther along the tail so it remains close to the body instead of swinging loosely.
Embroidered raccoon face:
Use three strands of black cotton embroidery floss.
- Embroider one small closed eye across the center of each charcoal eye patch.
- Keep both eyes at the same height and approximately four stitches apart.
- Make a small satin-stitched triangular nose near the upper center of the cream muzzle.
- Add one short vertical stitch beneath the nose and two tiny angled stitches for the mouth.
Secure the embroidery floss inside the head. Check that the eye patches lie flat and that the ears, muzzle and tail cannot be pulled away from the body.
Crochet Fox Features and Assembly
Use the rust-colored body for the fox. The pointed ears, cream muzzle and curved tail give this little figure a clear fox shape without adding heavy pieces that could pull the mobile out of balance.
Fox ears, make two:
Work in rust yarn. The ears are worked in rows.
Row 1: Ch 5. Sc in the second chain from the hook and in each remaining chain. Ch 1 and turn. (4)
Row 2: Dec, sc in each of the remaining 2 stitches. Ch 1 and turn. (3)
Row 3: Dec, sc in the remaining stitch. Ch 1 and turn. (2)
Row 4: Dec. (1)
Fasten off, leaving an 8-inch sewing tail. Weave the starting tail through the lower edge.
Using cream yarn, embroider a small inner-ear triangle on the front of each ear. Keep the cream stitches at least one stitch away from the outer edge so the rust border remains visible.
Pin the ears to the top of the head with their lower edges approximately four stitches apart. Angle the tips slightly outward. Sew securely along the lower edge of each ear, then make one small stitch near each lower corner to keep the ears from twisting.
Fox muzzle:
Using cream yarn, ch 5.
Round 1: Sc in the second chain from the hook, sc in each of the next 2 chains, work 3 sc in the final chain. Continue along the unused loops on the opposite side of the foundation chain. Sc in each of the next 2 loops and work 2 sc in the final loop. (10)
Round 2: Inc, sc in each of the next 2 stitches, inc in each of the next 3 stitches, sc in each of the next 2 stitches, inc in each of the final 2 stitches. (16)
Sl st in the next stitch and fasten off, leaving a 10-inch sewing tail.
Pin the muzzle horizontally across the lower front of the head, centered between Rounds 7 and 10. Add a very small amount of stuffing beneath the center before sewing the final few stitches. The muzzle should be softly raised, not bulky.
Fox tail:
Begin with cream yarn.
Round 1: Make a magic ring and work 6 sc into the ring. (6)
Round 2: [Sc in the next stitch, inc in the next stitch] 3 times. (9)
Round 3: Sc in each stitch around. (9)
Change to rust yarn.
Rounds 4 through 8: Sc in each stitch around. (9)
Round 9: [Sc in the next stitch, dec] 3 times. (6)
Rounds 10 through 12: Sc in each stitch around. (6)
Fasten off, leaving a 10-inch sewing tail. Do not stuff the tail. Flatten it gently and curve it along one side of the body.
Sew the narrow end of the tail to the lower back of the fox between Rounds 16 and 19. Add two small anchoring stitches farther along the tail so it rests against the body instead of swinging loosely.
Embroidered fox face:
Use black cotton embroidery floss divided into three strands.
- Embroider each closed eye across approximately two stitches between Rounds 6 and 7.
- Leave about four stitches between the inner ends of the eyes.
- Make a small satin-stitched triangular nose at the center of the cream muzzle.
- Add one short downward stitch and two tiny angled stitches beneath the nose for the mouth.
Secure the embroidery floss inside the head. Check the ears, muzzle and tail by gently pulling each piece before continuing. No attachment should lift away from the body or expose a loose yarn end.
Crochet Fawn Features and Assembly
Use the light-brown body for the fawn. Small ears, short antlers, a cream muzzle and embroidered spots create the woodland deer look while keeping the figure light enough for the mobile.
Fawn ears, make two:
Use light-brown yarn. Work in rows.
Row 1: Ch 5. Sc in the second chain from the hook and in each remaining chain. Ch 1 and turn. (4)
Row 2: Sc in each stitch across. Ch 1 and turn. (4)
Row 3: Dec, sc in each of the remaining 2 stitches. Ch 1 and turn. (3)
Row 4: Dec, sc in the remaining stitch. (2)
Fasten off, leaving an 8-inch sewing tail.
Use cream yarn to embroider two or three short stitches inside each ear. Leave a light-brown border around the cream center.
Fold the lower corners of each ear slightly toward one another and secure the fold with one stitch. Pin the ears near the top sides of the head, leaving enough space between them for the antlers. Sew securely across the folded lower edge.
Fawn antlers, make two:
Use dark-brown yarn. The antlers are made from short chains so they remain light and flexible.
Ch 7. Sl st in the second chain from the hook and in each of the next 2 chains.
Ch 3. Sl st in the second chain from the hook and in the next chain. Sl st into the next unworked chain of the original foundation chain.
Sl st in each of the remaining 2 foundation chains.
Fasten off, leaving an 8-inch sewing tail.
The short chain branch should extend from one side of the main antler stem. Turn one antler over before pinning so the two pieces mirror each other. Pin one antler just inside each ear with both branches facing outward. Sew through the lower two chain stitches several times, then secure each antler to the head with one additional stitch slightly higher on the stem.
The antlers are decorative and should remain short. Do not stiffen them with wire, glue or hidden craft materials.
Fawn muzzle:
Use cream yarn.
Round 1: Ch 4. Sc in the second chain from the hook and in the next chain. Work 3 sc in the final chain. Continue along the unused loops on the opposite side of the foundation chain. Sc in the next loop and work 2 sc in the final loop. (8)
Round 2: Inc in the first stitch, sc in the next stitch, inc in each of the next 3 stitches, sc in the next stitch and inc in each of the final 2 stitches. (14)
Sl st in the next stitch and fasten off, leaving a 10-inch sewing tail.
Pin the muzzle horizontally across the lower front of the head with its upper edge near Round 8. Place a small pinch of stuffing beneath the center and sew around the edge.
Fawn legs, make two:
Begin with dark-brown yarn.
Round 1: Make a magic ring and work 6 sc into the ring. (6)
Round 2: Sc in each stitch around. (6)
Change to light-brown yarn.
Rounds 3 through 6: Sc in each stitch around. (6)
Fasten off, leaving a 10-inch sewing tail. Do not stuff the legs.
Flatten each leg and sew the open upper edge to the lower body between Rounds 18 and 20. Position the legs approximately four stitches apart. Add one small anchoring stitch through each leg and the body so the legs hang neatly instead of twisting.
Fawn tail:
Use light-brown yarn.
Ch 5. Sc in the second chain from the hook, hdc in each of the next 2 chains and work 3 hdc in the final chain. Continue along the unused loops on the opposite side of the foundation chain. Hdc in each of the next 2 loops and sc in the final loop. (9)
Fasten off, leaving an 8-inch sewing tail.
Use cream yarn to embroider a small center section on one side of the tail. Sew the narrow end to the lower back of the body. Add one anchoring stitch near the middle so the tail rests against the figure.
Embroidered fawn face and spots:
Use three strands of black cotton embroidery floss for the face.
- Embroider each closed eye across approximately two stitches between Rounds 6 and 7.
- Leave about four stitches between the inner ends of the eyes.
- Make a small satin-stitched dark-brown or black nose at the center of the cream muzzle.
- Add one short vertical stitch and two tiny angled stitches beneath the nose.
Use cream yarn or three strands of cream embroidery floss to add three or four small spots to each side of the upper body. Each spot may be a short satin stitch or a tiny cluster of two stitches. Keep the spots above Round 17 so they remain visible after the legs are attached.
Secure all embroidery ends inside the body. Gently check the ears, antlers, muzzle, legs and tail before setting the finished fawn aside.
Crochet Owl Features and Assembly
Use the soft-brown body for the owl. Cream eye circles, flat wings and a tiny embroidered beak give the owl plenty of character without adding bulky pieces.
Owl ears, make two:
Use soft-brown yarn. Work back and forth in rows.
Row 1: Ch 4. Sc in the second chain from the hook and in each of the next 2 chains. Ch 1 and turn. (3)
Row 2: Dec, sc in the remaining stitch. Ch 1 and turn. (2)
Row 3: Dec. (1)
Fasten off, leaving an 8-inch sewing tail. Weave the starting tail into the lower edge. Do not stuff the ears.
Pin one ear to each upper side of the owl’s head. Place the straight lower edge across Rounds 3 through 5, with approximately six visible stitches between the inner corners of the ears. Angle the tips slightly outward so they match the small pointed ears shown on the finished owl.
Sew securely along the lower edge of each ear. Add one small anchoring stitch through each lower outer corner so the ears remain upright and do not twist when the owl hangs from the mobile.
Owl eye circles, make two:
Use cream yarn and work in continuous rounds.
Round 1: Make a magic ring and work 6 sc into the ring. (6)
Round 2: Inc in each stitch around. (12)
Sl st in the next stitch and fasten off, leaving an 8-inch sewing tail.
Pin the two circles side by side on the front of the head between Rounds 5 and 9. Allow the inner edges to touch or overlap very slightly at the center. Check that the circles sit at the same height before sewing around their outer edges.
Keep the eye circles flat against the head. Stuffing beneath them would make the face look uneven and add unnecessary weight.
Owl wings, make two:
Use soft-brown yarn or a slightly darker coordinating brown.
Ch 5. Sc in the second chain from the hook, hdc in the next chain, dc in the next chain and work 5 dc in the final chain.
Continue along the unused loops on the opposite side of the foundation chain. Dc in the next loop, hdc in the next loop and sc in the final loop. (11)
Sl st in the first stitch and fasten off, leaving a 10-inch sewing tail.
Pin one wing to each side of the body with the rounded ends near Round 13 and the narrow tips pointing toward Round 18. Sew along the upper half of each wing, leaving the lower portion flat but slightly free from the body.
Add one discreet anchoring stitch near the lower tip of each wing. This keeps the wings from folding backward or catching on a hanging cord.
Owl beak:
Use mustard, golden brown or light-brown yarn threaded through a yarn needle.
Make three or four short satin stitches in a small downward-pointing triangle between the lower inner edges of the cream eye circles. Keep the beak centered and no wider than two crochet stitches.
Embroidered owl eyes:
Use three strands of black cotton embroidery floss.
- Embroider one small closed eye across the middle of each cream circle.
- Keep both eyes at the same height.
- Curve the outer end of each eye slightly upward.
- Secure the floss inside the head without pulling tightly enough to pucker the eye circles.
Owl chest markings:
Use cream yarn or three strands of cream embroidery floss to make five or six small V-shaped stitches across the front of the body between Rounds 13 and 17.
Arrange the markings in two staggered rows. Leave at least one full crochet stitch between the individual V shapes so the chest does not look crowded.
Secure all yarn and embroidery ends inside the body. Check that the eye circles lie flat and that the wings remain evenly placed when the owl is held upright by the top of its head.
Crochet Mushrooms and Leaves
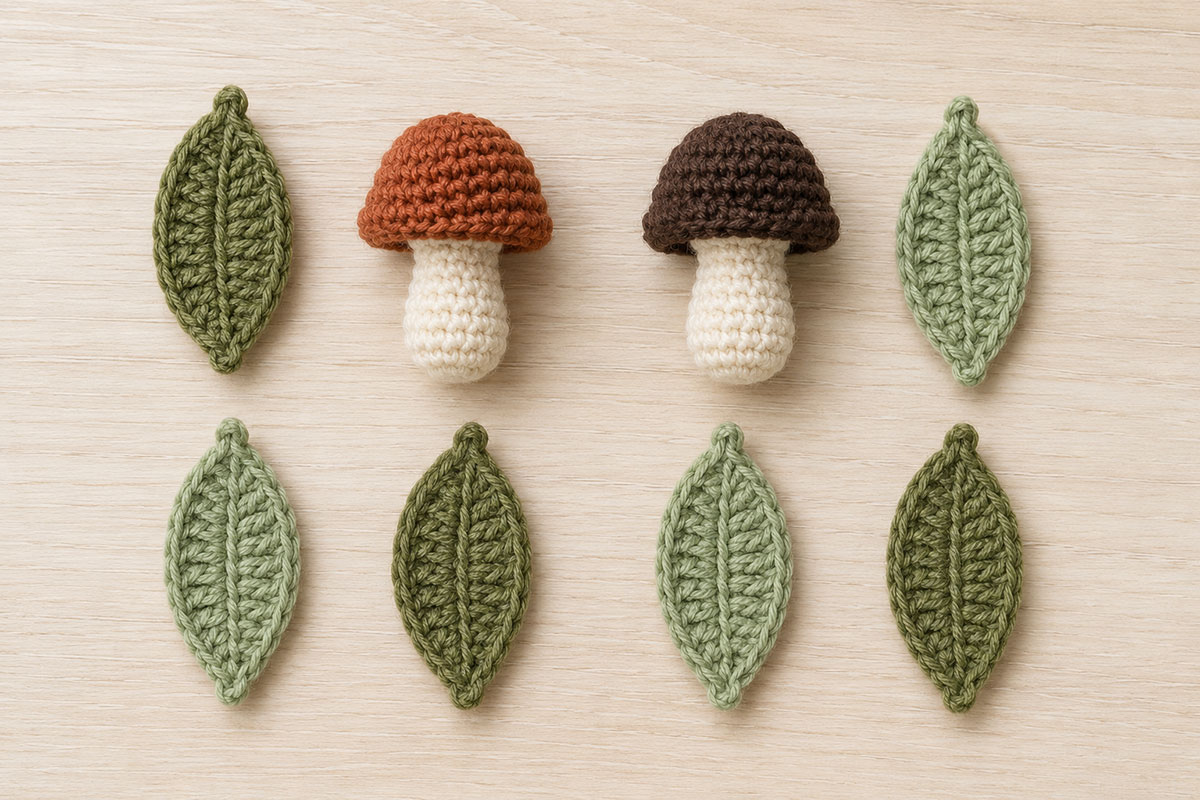
The two mushrooms and six leaves fill the open spaces between the animals and help the finished arrangement feel complete. They should remain smaller and lighter than the four animal figures.
The mushrooms use the same rounded shapes found in the larger woodland crochet mushroom pattern, adjusted here to suit the scale of a baby mobile.
Small Crochet Mushrooms, Make Two
Make one mushroom with a rust-colored cap and one with a dark-brown cap. Use cream yarn for both stems.
Mushroom cap:
Work in continuous rounds using the chosen cap color.
Round 1: Make a magic ring and work 6 sc into the ring. (6)
Round 2: Inc in each stitch around. (12)
Round 3: [Sc in the next stitch, inc in the next stitch] 6 times. (18)
Round 4: Sc in each stitch around. (18)
Round 5: [Sc in the next stitch, dec] 6 times. (12)
Fasten off, leaving a 12-inch sewing tail. Add a small amount of fiberfill beneath the top of the cap. Keep the lower opening accessible for attaching the stem.
Mushroom stem:
Use cream yarn and work in continuous rounds.
Round 1: Make a magic ring and work 6 sc into the ring. (6)
Round 2: Working in the back loops only, sc in each stitch around. (6)
Rounds 3 through 6: Sc in each stitch around. (6)
Fasten off, leaving a 10-inch sewing tail. Place only a tiny amount of stuffing in the lower half of the stem. Leave the upper portion flexible enough to sew beneath the cap.
Center the six-stitch stem opening inside the 12-stitch cap opening. Match each stem stitch with two adjacent cap stitches. Using the cap’s long tail, sew through one stem stitch and its two corresponding cap stitches, then repeat evenly around the opening until all six stem stitches and all 12 cap stitches are secured. Pass through the completed seam a second time as needed so the stem sits upright and no stuffing can escape.
Use the stem tail to close any remaining gap beneath the cap, then secure both tails inside the mushroom.
Optional cap spots:
Use cream yarn or three strands of cream embroidery floss to make three or four small satin-stitched spots on each cap. Keep the spots flat and separated. Do not attach crocheted circles, beads or glued decorations.
Each finished mushroom should measure approximately 1 3/4 to 2 1/4 inches tall and about 1 1/4 to 1 1/2 inches across the cap.
Simple Crochet Leaves, Make Six
Make six leaves in muted green yarn. Using two closely related green shades will add variety without introducing extra shapes or weight.
Ch 7.
Beginning in the second chain from the hook, sl st in the first chain, sc in the next chain, hdc in the next chain, dc in the next chain and hdc in the next chain.
Work 3 sc in the final chain.
Continue along the unused loops on the opposite side of the foundation chain. Hdc in the next loop, dc in the next loop, hdc in the next loop, sc in the next loop and sl st in the final loop. (13)
Fasten off, leaving an 8-inch tail for attaching the leaf to a hanging cord.
Weave the starting tail into the back of the leaf. Stretch the leaf gently lengthwise, then pinch the two ends so the shape looks slightly pointed rather than round.
Each leaf should measure approximately 1 3/4 inches long. Make all six with the same hook and yarn weight, but slight differences in shape are acceptable.
Do not stiffen the leaves with wire or glue. Their natural flexibility allows them to move without adding hard materials to the mobile.
Attach the Hanging Cords and Arrange the Mobile Pieces
Finish every figure, weave in all yarn ends except the six long leaf attachment tails and check each attachment before beginning the mobile assembly. Trying to sew an ear or adjust a mushroom after the pieces are hanging makes the work harder than it needs to be.
Use firmly twisted cotton cord for the four animal cords, two mushroom cords and four upper support cords. Attach the leaves with their six reserved yarn tails. Do not substitute loosely spun or stretchy yarn for any cord that supports a figure or the hoop.
Prepare the Wooden Hoop
- Check the hoop for splinters, rough edges or loose hardware.
- Smooth any rough areas with fine sandpaper and wipe away the dust.
- Place the hoop flat on a table.
- Mark four evenly spaced animal positions at approximately 12, 3, 6 and 9 o’clock.
- Mark one mushroom position halfway between two neighboring animal positions. Mark the second mushroom position directly opposite the first, halfway between the other two neighboring animal positions.
The figures will be easier to balance when the attachment points are measured rather than judged by eye. The marks may be made lightly with a pencil on the inside of the hoop.
Attach a Cord to Each Animal
Cut four cords approximately 30 inches long. After each cord is folded in half, this leaves enough length for the lark’s-head attachment, the planned hanging distance, an adjustable bow and the final knot at the hoop.
- Fold one cord in half and thread the folded end through a blunt yarn needle.
- Pass the needle beneath two or three firm crochet stitches at the top center of the animal’s head, keeping the cord between the ears and clear of all sewn features. On the fawn, place the cord between the two antlers.
- Pull the folded loop through, leaving a loop approximately 1 inch long.
- Pass both loose cord ends through that loop and pull gently to form a lark’s-head attachment.
- Hold the animal by the two cord ends and check that it hangs facing forward.
If the animal leans noticeably forward or backward, remove the cord and move the attachment one stitch in the opposite direction. Do not try to correct a leaning figure later by twisting the cord around the hoop.
Attach cords to the fox, raccoon, fawn and owl in the same way. Leave all cords longer than needed until the entire mobile has been arranged.
Attach Cords to the Mushrooms
Cut two cords approximately 28 inches long so there is enough length for the folded attachment, staggered placement, temporary bows and final knots.
- Fold one cord in half.
- Pass the folded end beneath two firm stitches at the center top of the mushroom cap.
- Pull the two loose ends through the folded loop.
- Tighten the attachment gently and check that the stem hangs directly beneath the center of the cap.
Repeat for the second mushroom. If a mushroom tilts, move the attachment point rather than adding weight to the stem.
Add the Leaves to the Hanging Cords
The leaves may be added singly or in pairs. Keep them several inches above the animals and mushrooms so they do not cover the embroidered faces.
- Lay one animal cord flat on the table.
- Position a leaf approximately 2 to 3 inches above the top of the figure.
- Use the leaf’s long yarn tail to stitch around both strands of the hanging cord three or four times.
- Pass the tail through the back of the leaf, secure it with a small knot and weave the end through several stitches.
- Repeat with the remaining leaves, varying their positions slightly from cord to cord.
Place no more than two leaves on one hanging cord. Distribute the six leaves around the mobile so the extra weight is not concentrated on one side.
Plan the Arrangement Before Tying the Knots
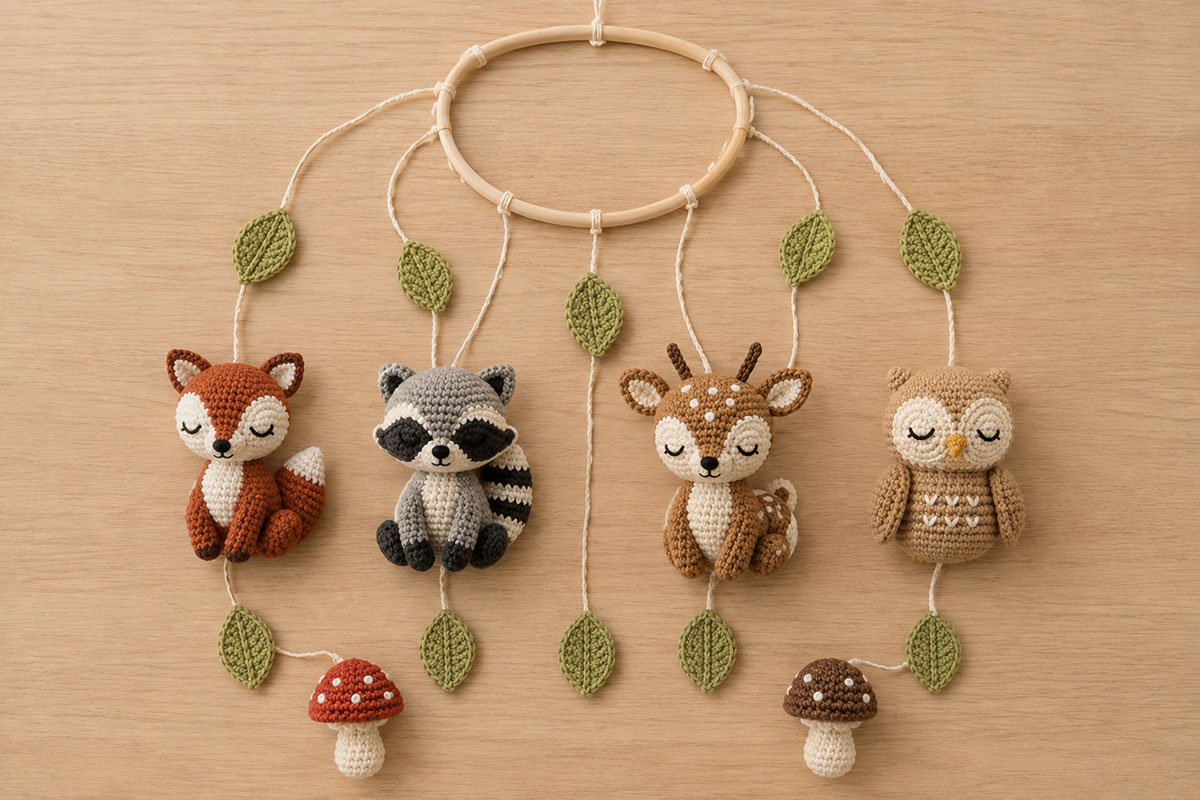
Place the hoop flat on a table and arrange the figures beneath their marked attachment points.
- Position the fox opposite the owl.
- Position the raccoon opposite the fawn.
- Place the two mushrooms on opposite sides of the hoop.
- Keep neighboring figures at different heights.
A useful starting arrangement places the owl closest to the hoop, followed by the raccoon, fox and fawn. Hang one mushroom between the two shorter animal cords and the other between the two longer cords.
Begin with approximately 6 inches between the hoop and the top of the shortest figure. Add about 1 to 1 1/2 inches for each lower level. These are starting measurements only. The final cord lengths will be adjusted after the hoop is suspended.
Balance the Hoop and Add the Top Support Cords
Do not trim any hanging cord until the mobile has been suspended and checked from several angles. A mobile that looks even while lying on a table may tilt once the full weight of the figures is placed on the hoop.
Temporarily tie each animal and mushroom cord to its marked position with an adjustable bow. Keep the knots on the inside or upper edge of the hoop so they are easy to reach during balancing.
- Tie the fox, raccoon, fawn and owl to the four evenly spaced animal marks.
- Tie one mushroom between the fox and raccoon.
- Tie the second mushroom on the opposite side between the fawn and owl.
- Stand back and check that neighboring pieces hang at different heights.
- Turn each figure so its face points outward rather than toward the center of the mobile.
The animals do not have to form a perfect staircase. A slightly irregular arrangement looks more natural, provided no two pieces collide when the hoop turns.
Make the Four-Part Top Support
Cut four pieces of cotton cord, each 30 inches long. These cords support the hoop and meet above it to form the main hanging loop.
- Tie one support cord to the hoop at the 12 o’clock mark.
- Tie the second cord at 3 o’clock, the third at 6 o’clock and the fourth at 9 o’clock.
- Use the same secure knot at all four points.
- Bring the four loose ends together above the center of the hoop.
- Measure upward approximately 12 inches and tie the four cords together in one temporary overhand knot.
Hang the mobile temporarily from a sturdy hook in an open work area. Do not test it above a crib or other baby sleep space.
Use a small level across the hoop if one is available. You can also measure from the floor to the underside of the hoop at four points. Matching measurements show that the hoop is sitting evenly.
Correct a Tilting Mobile
Work through the adjustments in small steps. Moving several knots at once makes it difficult to tell which change corrected the problem.
- If one side of the hoop hangs low, shorten the top support cord on that side by a small amount.
- If one animal hangs much lower than planned, raise its cord at the hoop rather than pulling the figure upward by its head attachment.
- If two figures touch, move one attachment point slightly around the hoop or shorten one cord by about 1/2 inch.
- If the hoop remains uneven, exchange two figures on opposite sides before making major changes to the support cords.
- If a figure turns inward, rotate its cord at the hoop and retie it while the animal is facing outward.
Small weight differences between the figures are normal. The fox tail, fawn legs and owl wings may make one animal slightly heavier than another, which is why the final arrangement should be balanced with all pieces attached.
Secure and Finish the Knots
Once the hoop hangs level and the spacing looks right, replace every temporary bow with a firm double knot.
- Hold each cord in its final position and untie only one temporary knot at a time.
- Retie it with a secure double knot against the hoop.
- Check the height and direction of the figure before tightening fully.
- Thread each cord end through a blunt needle.
- Wrap or weave the end around the standing cord several times above the knot.
- Trim the remaining end to approximately 1/2 inch.
After the hoop hangs level, retie the four support-cord attachments at the hoop one at a time with firm double knots, checking the level after each knot. Replace the temporary overhand knot at the meeting point with a firm double knot without changing the balanced cord lengths, then check the hoop again. Finish each loose end at the hoop as described above. Above the final meeting-point knot, braid or twist the remaining cord ends together for approximately 3 inches. Form a hanging loop, knot it securely and weave each loose end back into the twisted section.
Give every knot a firm pull, then rotate the mobile slowly by hand. The animals, mushrooms and leaves should move freely without striking one another or wrapping around the support cords.
Display and Safety Guidance for the Finished Mobile
Treat this handmade woodland mobile as nursery decoration, not as a toy. The animals and mushrooms should remain completely outside a baby’s reach, including when the baby stretches upward from the mattress.
Do not tie the mobile to crib rails, crib slats or a portable play yard. Suspend it from properly installed ceiling hardware or display it in another secure location. Choose hardware rated to hold more than the total weight of the finished mobile, and follow the hardware manufacturer’s installation directions for the ceiling material in the room.
Before placing the mobile in the nursery:
- Pull firmly on the top loop and each support cord.
- Check every knot and attachment point.
- Confirm that no yarn tails or cord ends have worked loose.
- Make certain the wooden hoop has no splinters or rough edges.
- Rotate the mobile slowly and check that the pieces cannot strike the wall, light fixture or crib.
- Measure from the crib mattress at its highest setting and confirm that every part remains beyond the baby’s reach.
The American Academy of Pediatrics advises that hanging crib toys should remain out of reach and be removed when a baby begins to push up on hands and knees or reaches 5 months old, whichever comes first. You can read its current guidance in How to Buy Safe Toys.
Do not wait for a baby to touch the lowest animal before moving the mobile. Development can change quickly. Once the mobile is no longer suitable above the crib, it can become wall or ceiling decor in a part of the room the child cannot reach.
Inspect the mobile regularly for loosened knots, stretched cords, damaged crochet stitches or shifting ceiling hardware. Remove it from display immediately when any part needs attention.
Cleaning the Crochet Figures
Use a clean, dry cloth or a soft brush to remove light dust. For a small mark, dab the area with a cloth lightly dampened with cool water, then allow it to dry completely before rehanging the mobile.
Do not place the assembled mobile in a washing machine or soak the wooden hoop. If one crochet figure needs more thorough cleaning, remove it from the hoop first and follow the care directions for the yarn used in the project. Reshape the piece while damp and let it dry flat.
Frequently Asked Questions About the Crochet Woodland Mobile
Can I use worsted-weight yarn instead of DK yarn?
Yes, but the animals and mushrooms will finish larger and heavier. Use a hook small enough to create firm fabric, make every piece with the same yarn weight and choose a hoop large enough to leave space between the figures. Recheck the balance and overall hanging length before securing the knots.
Can I substitute different woodland animals?
You can replace one figure with another crocheted animal of a similar size and weight. A rabbit, bear or hedgehog could fit the woodland theme, but a much larger figure may cause the hoop to tilt. Attach the substitute temporarily and rebalance the entire mobile before trimming any cords.
Can I use the larger crochet mushroom pattern on this mobile?
The full-size mushroom would probably look too large beside these four-inch animals. The two miniature mushrooms included on this page were adjusted specifically for the mobile. The larger crochet woodland mushroom pattern is better suited to nursery shelf decor or a separate woodland display.
Why does one crochet animal lean forward when it hangs?
The cord is probably attached too far toward the back of the head. Remove it and move the attachment point forward by one stitch. If the figure leans backward, move the attachment one stitch toward the back. Test the position before tightening the loop.
How can I stop the mobile from tilting?
First confirm that the four upper support cords are equal in length. Then check whether one side holds a heavier figure or more leaves. Move a lightweight decoration, exchange two opposing animals or shorten the upper support cord on the low side in very small increments.
Can I wrap the wooden hoop with yarn?
Yes. Wrap the hoop before marking the attachment positions. Keep the yarn smooth and tight, secure both ends with knots and weave them beneath several wraps. A wrapped hoop adds color, but it can make the hanging cords harder to slide during balancing.
May I use fishing line for an invisible look?
I recommend visible cotton cord because knots and wear are easier to inspect. Clear line can be difficult to see while tying and checking the mobile. Whatever material you choose must hold knots securely and remain in good condition during regular inspections.
Do the crochet figures need to be heavily stuffed?
No. Light, even stuffing is enough to hold their shapes. Firmly packed figures become heavier and may pull the hoop out of level. Overstuffing can also stretch the stitches and make fiberfill visible.
Can the woodland animals be removed and given to the baby as toys?
No. These figures were designed as parts of a decorative hanging mobile. Their cords, attached features and construction have not been presented as a separate baby-toy pattern. Keep the complete mobile and its individual pieces outside a child’s reach.
How many woodland pieces can I add?
The pattern uses four animals, two mushrooms and six leaves. You may add another lightweight leaf, but additional stuffed figures can crowd the hoop and complicate the balance. Leave enough open space for every piece to turn without touching its neighbors.
What should I make next for a woodland nursery?
The crochet raccoon pattern creates a larger coordinating woodland animal, while the crochet hot air balloon mobile pattern offers another handmade nursery-mobile design.
Choose Colors That Suit the Nursery
The woodland animals do not have to follow realistic forest colors. The shapes and markings identify each creature, so you can adjust the palette to coordinate with the room.
A traditional woodland mobile might combine rust, warm brown, gray, cream and muted green. For a lighter nursery, try soft blue-gray, dusty rose, pale sage and oatmeal. Deeper shades such as evergreen, chestnut and charcoal can give the mobile a richer look against a light wall.
Keep enough contrast between each animal’s body and facial pieces. A cream muzzle may disappear against very pale yarn, while dark eye patches need a lighter background to remain visible.
- Use no more than four or five main colors for a coordinated arrangement.
- Repeat one neutral shade across the muzzles, eye circles and mushroom stems.
- Use the same green yarn for all six leaves.
- Place animals with similar colors on opposite sides of the hoop.
- Check every embroidered face in normal room lighting before assembly.
You may also make a simpler mobile with three animals, two mushrooms and four leaves. Mark three animal positions evenly around the hoop at approximately 12, 4 and 8 o’clock. Place each mushroom in a different open space between neighboring animals so both mushroom cords attach directly to the hoop. Distribute the four leaves around the hanging cords, then suspend and balance the reduced arrangement before securing the knots.
For another handmade project featuring small animal faces and soft nursery colors, browse the crochet animal lovey patterns.
Final Woodland Mobile Checklist
Before displaying the finished mobile, confirm each item below:
- All four animal bodies are firmly closed.
- Every face is embroidered without plastic or detachable features.
- Ears, wings, tails, legs and antlers are securely sewn.
- All yarn tails are woven inside the crochet pieces.
- The wooden hoop is smooth and undamaged.
- Every hanging cord is securely knotted.
- The hoop hangs level.
- The figures turn without touching one another.
- The top loop and ceiling hardware support the complete weight.
- The mobile will remain entirely outside the baby’s reach.
Once those checks are complete, the woodland animals, mushrooms and leaves are ready to add a handmade finishing touch to the nursery.
Continue with Another Free Baby Crochet Pattern
When you click on links to various merchants on this site and make a purchase, this may result in this site earning a commission. This does not affect the price you pay.

UBGI Gold Standard 2026
Reviewed under the site's
editorial checklist.
Photos, decorating ideas, party setups and reader submissions are shared for inspiration unless a page is specifically presented as a pattern, tutorial, reference guide or step-by-step project. Follow the instructions, measurements, safety guidance and manufacturer directions provided for the particular project or product.
About Jan | Contact | Baby Nursery Ideas (Blog) | Site Map | Privacy Policy | Disclosure Policy | Disclaimer | Affiliate Disclosure | Earnings Disclosure | Facebook | Pinterest
I am a participant in the Amazon Services LLC Associates Program, an affiliate advertising program designed to provide a means for us to earn fees by linking to Amazon. As an Amazon Associate I earn from qualifying purchases.
Copyright © 2006-2026. All Rights Reserved.