Free Winter Fox Lovey Crochet Pattern
By Jan Bay
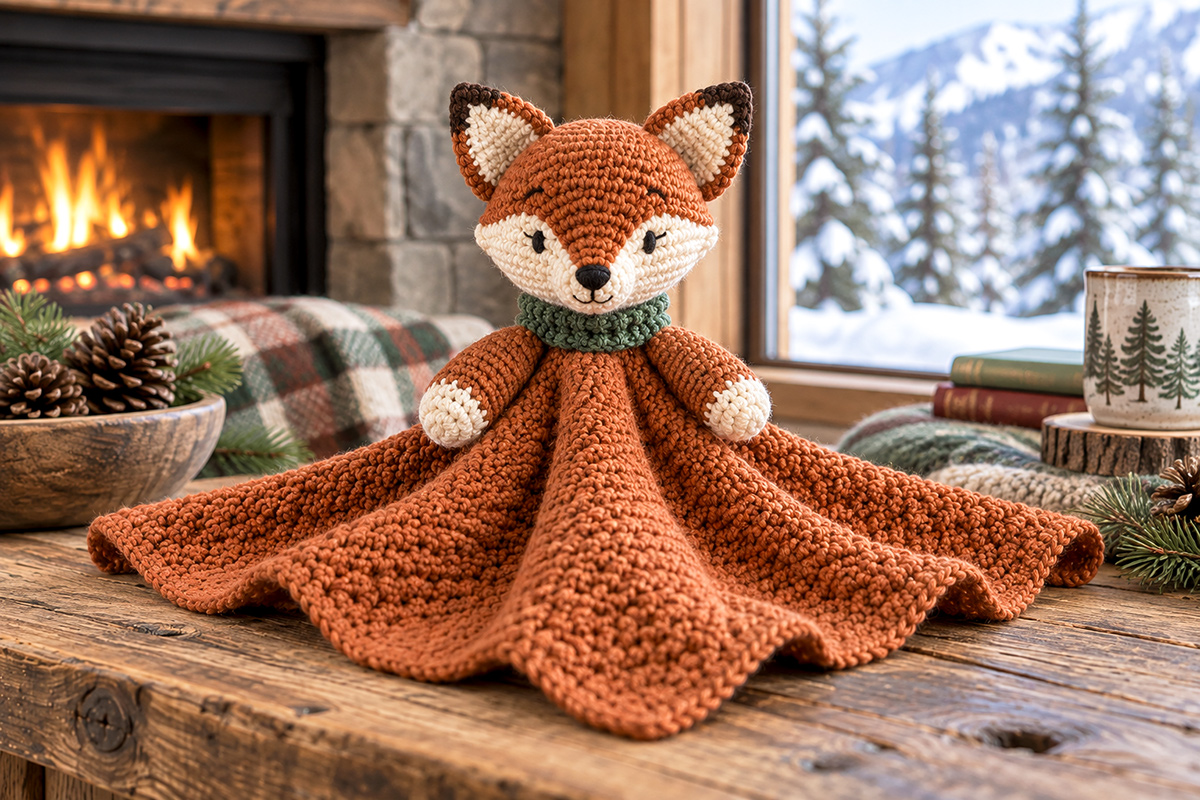
This free winter fox lovey crochet pattern brings a cozy woodland fox to life in warm rust and cream, finished with a deep forest green cowl for a touch of winter color. With its sweet embroidered face, pointed ears and soft draping shape, it feels right at home in a winter woodland nursery without looking overly Christmasy.
Explore More Free Crochet Baby Patterns
Worsted Weight Yarn for This Project
Jump to the Pattern
Winter Fox Lovey Crochet Pattern Supplies and Yarn
I’d use a smooth worsted weight yarn for this fox rather than chenille or another fuzzy yarn. The little pebbled stitches are part of the look, especially across that loose rust-colored body, so I want to be able to see them. A washable acrylic, cotton blend or similar smooth #4 yarn should work well.
The rust is the main color here. Keep it warm and earthy, more cinnamon or burnt orange than bright pumpkin orange. Warm cream softens the face and paws, and the small forest green cowl gives the fox its winter look without pushing it into Christmas territory.
- Worsted weight #4 yarn in rust: allow approximately 450 to 500 yards
- Worsted weight #4 yarn in warm cream: approximately 60 to 75 yards
- Worsted weight #4 yarn in deep forest green: approximately 20 to 25 yards
- Worsted weight #4 yarn in dark brown: approximately 10 yards for the darker ear edging
- Black embroidery floss: for the open satin-stitched eyes, nose and small mouth line
- 4.5 mm crochet hook: for the soft draping lovey body
- 4.0 mm crochet hook: for the head, ears, muzzle, arms and cowl
- Polyester fiberfill: for the head, a small amount in the lower arms and a pinch behind the muzzle
- Yarn needle
- Locking stitch markers
- Scissors
- Straight pins or removable markers: helpful for checking the face and ear placement before sewing
- Measuring tape
Don’t stuff the body. Its loose cape-like drape is intentional. I’d also keep the arms lightly stuffed instead of making them firm. The head needs enough filling to hold the fox shape, but the lower face should stay narrower than the upper part of the head rather than rounding out like a teddy bear.
The yarn amounts are approximate. The rust estimate includes the textured body, head, outer ears and arms, with a little extra so you aren’t trying to finish the last few rounds from scraps.
Gauge, Finished Size and Pattern Notes
The measurements for this fox are calculated from the gauge and construction below. The pattern has not been physically test-made, so check your gauge before you get too far into the body or head.
Body gauge: 15 stitches and 14 rounds = 4 inches in the textured pebble stitch with a 4.5 mm hook, measured with the fabric relaxed.
Head and small-piece gauge: 17 single crochet stitches and 18 rounds = 4 inches with a 4.0 mm hook.
Gauge matters most for the head and neck. The body can vary a little and still drape nicely, but a much tighter body gauge will make the cape feel stiff instead of soft and floppy.
Expected finished measurements:
- Lovey body: about 25 to 26 inches from point to opposite point when laid flat
- Neck opening: about 6 to 6 1/2 inches around before assembly
- Fox head: about 5 to 5 1/2 inches tall, not including the ears
- Finished lovey: about 18 to 19 inches from the top of the ears to the farthest body point when laid flat
The body is worked outward from the neck in six sections. Instead of making a granny square, we're keeping the fabric solid and lining up six increase points. Those increases give the finished body broad handkerchief points and enough extra fabric to fall into soft folds.
Pebble stitch: Alternate 1 single crochet and 1 double crochet across the round. Join and turn after every round. Because you're turning, the short and tall stitches settle into a pleasantly uneven texture instead of forming stiff vertical columns.
Abbreviations: ch = chain, sc = single crochet, dc = double crochet, sc2tog = single crochet 2 stitches together, sc3tog = single crochet 3 stitches together, sl st = slip stitch, st = stitch, sts = stitches.
Chains at the beginning of rounds do not count as stitches unless the instructions specifically say otherwise. For the joined and turned body rounds, do not work into the slip-stitch join. After joining and turning, ch 1 and work the first sc into the last stitch of the previous round, which is the stitch immediately before the slip-stitch join. Continue with dc in the next stitch, then alternate sc and dc around. This places each sc over a dc from the previous round and each dc over a sc, which creates the pebbled texture.
Keep six locking markers in the body as you work and move them up on every round. On an increase round, work 3 stitches into each marked stitch while continuing the sc and dc sequence. If the next stitch in the sequence is a single crochet, work sc, dc, sc in the marked stitch. If the next stitch is a double crochet, work dc, sc, dc. Move the marker to the middle stitch of that group of three. On a no-increase round, when you work into a marked stitch, remove the marker from the stitch below and place it in the new stitch you just made directly above it.
Secure every magic ring: After pulling the ring closed, thread the starting tail through the wrong side of the first-round stitches in two directions before weaving it through several more stitches. Do this before stuffing any piece so the center cannot work open later.
Winter Fox Lovey Pattern at a Glance
Finished size: About 18 to 19 inches from the top of the ears to the farthest body point when laid flat, with a 25 to 26 inch body from point to opposite point.
Yarn: Worsted weight #4 in rust, warm cream, deep forest green and a small amount of dark brown.
Hooks: 4.5 mm for the draping body and 4.0 mm for the head and smaller pieces.
Skill level: Intermediate. You should be comfortable with a magic ring, single crochet, double crochet, decreases, joined turned rounds, continuous rounds and sewing crocheted pieces together.
Terminology: US crochet terms.
Main construction: The body begins at the neck and is worked outward in six sections with alternating increase and even rounds. The fox head, muzzle, ears and arms are made separately and sewn in place.
Body texture: Alternating single crochet and double crochet create the soft pebbled surface shown in the finished fox.
Pieces to make: 12 crocheted pieces total: 1 lovey body, 1 fox head, 2 cream cheek panels, 1 muzzle, 2 outer ears, 2 inner ears, 2 arms and 1 winter cowl.
Face: Black embroidery floss only, with small open satin-stitched eyes and an embroidered nose.
Winter detail: A short forest green crochet cowl is sewn securely around the neck. It has no ties, buttons, tassels or removable parts.
Pattern note: The measurements are calculated from the stated gauge and construction. This pattern has not been physically test-made.
This lovey is intended for supervised awake cuddling and play. Keep it out of an infant sleep space. The U.S. Consumer Product Safety Commission recommends a bare sleep space with only a fitted sheet in the crib, bassinet or play yard. You can read the current CPSC safe sleep guidance here.
Crochet the Soft Pebbled Lovey Body
Use the 4.5 mm hook and rust yarn for the whole body. There isn't a cream border on this one. I like keeping the rust uninterrupted because it lets the fox face and little green cowl do the decorating.
Keep your tension relaxed here. If you're a tight crocheter, this is the place to loosen up a bit. The finished fabric should fold easily when you pick it up rather than holding itself out like a starched mat.
Foundation: Ch 24 loosely. Join with a sl st in the first ch, taking care not to twist the chain.
Round 1: Ch 1. Sc in the same ch and in each ch around. Join with a sl st in the first sc. You should have 24 sts.
Place six markers evenly around the round, spacing them every 4 stitches. Mark stitches 1, 5, 9, 13, 17 and 21. This creates six 4-stitch sections around the neck opening. Turn.
Round 2, increase round: Ch 1. Starting with sc in the last stitch of the previous round, alternate sc and dc around. At each marked stitch, work 3 sts into that stitch while keeping the sc and dc sequence going. Move the marker to the middle stitch of each 3-st group. Join with a sl st to the first stitch. You should have 36 sts. Turn.
Round 3: Ch 1. Starting with sc in the last stitch of the previous round, alternate sc and dc around with 1 st in every st, including the six marked stitches. Move each marker up as described in the Pattern Notes. Join with a sl st to the first stitch. You should still have 36 sts. Turn.
Round 4, increase round: Ch 1. Starting with sc in the last stitch of the previous round, alternate sc and dc around. At each marked stitch, work 3 sts into that stitch, continuing the established sc and dc sequence. Move each marker to the middle stitch of its new 3-st group. Join with a sl st to the first stitch. You should have 48 sts. Turn.
Round 5: Ch 1. Starting with sc, work evenly around in pebble stitch. Join with a sl st to the first stitch. You should have 48 sts. Turn.
Rounds 6 through 40: Ch 1 at the beginning of every round. Start with sc and continue alternating sc and dc. On every even-numbered round, work the established 3-stitch increase into each of the six marked stitches. On every odd-numbered round, work 1 stitch in every stitch with no increases. Join every round with a sl st to the first stitch and turn before beginning the next round.
Your stitch counts after the increase rounds should be:
- Round 6: 60 sts
- Round 8: 72 sts
- Round 10: 84 sts
- Round 12: 96 sts
- Round 14: 108 sts
- Round 16: 120 sts
- Round 18: 132 sts
- Round 20: 144 sts
- Round 22: 156 sts
- Round 24: 168 sts
- Round 26: 180 sts
- Round 28: 192 sts
- Round 30: 204 sts
- Round 32: 216 sts
- Round 34: 228 sts
- Round 36: 240 sts
- Round 38: 252 sts
- Round 40: 264 sts
Round 41: Ch 1. Starting with sc, work 1 st in every st around in pebble stitch with no increases. Join with a sl st to the first stitch. 264 sts. Fasten off, leaving a tail long enough to weave in securely.
Remove all six body markers before continuing.
Lay the body flat without stretching it. From the neck opening to one outer point, it should measure about 11 1/2 to 12 inches at the stated gauge. The six marked increase lines should form broad points rather than sharp little spikes.
Don't block this body into a perfectly flat geometric shape. That would work against the look we're after. Smooth it with your hands, let the stitches relax, and allow the sections between the points to fall into natural folds.
If your body starts to cup noticeably before Round 20, your stitch height is probably shorter than the stated gauge. Move up one hook size for the body. If it begins to ruffle heavily, check that you are increasing only on the even-numbered rounds.
Crochet the Tapered Fox Head
Use the 4.0 mm hook and rust yarn. The head is worked in a continuous spiral, so don't join the rounds. Keep a marker in the first stitch and move it up as you go.
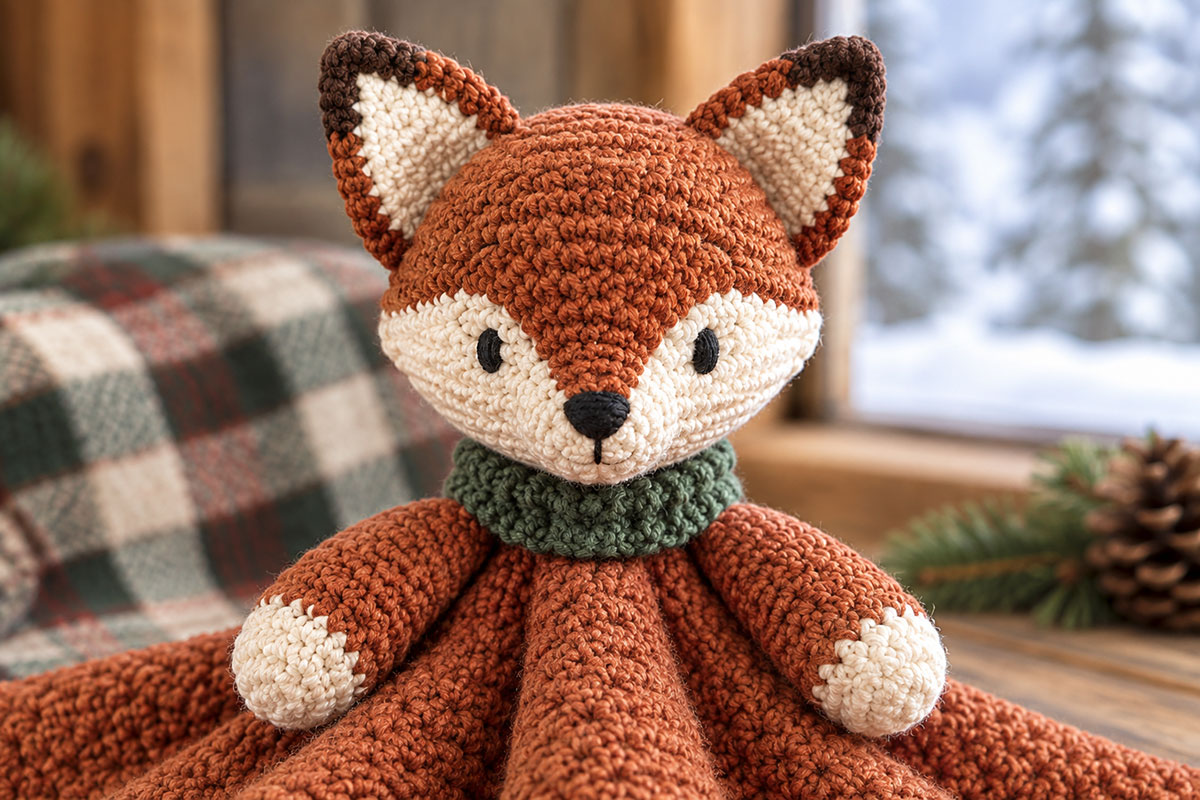
The shaping matters here. The head should look like a fox before the ears go on. Keep the upper part broad, then take width out gradually along the two sides so the cheeks taper toward the muzzle.
Round 1: Make a magic ring and work 6 sc into the ring. 6 sts.
Round 2: 2 sc in each st around. 12 sts.
Round 3: (Sc in next st, 2 sc in next st) 6 times. 18 sts.
Round 4: (Sc in next 2 sts, 2 sc in next st) 6 times. 24 sts.
Round 5: (Sc in next 3 sts, 2 sc in next st) 6 times. 30 sts.
Round 6: (Sc in next 4 sts, 2 sc in next st) 6 times. 36 sts.
Round 7: (Sc in next 5 sts, 2 sc in next st) 6 times. 42 sts.
Round 8: (Sc in next 6 sts, 2 sc in next st) 6 times. 48 sts.
Rounds 9 through 13: Sc in each st around. 48 sts.
After Round 13, lightly flatten the head with the beginning-of-round marker centered at the back. Starting with the stitch immediately after that marker as stitch 1, count 12 sts and place the first side marker in the 12th stitch. Starting with the next stitch as stitch 1, count another 24 sts and place the second side marker in the 24th stitch. The two side markers should sit directly across from each other.
From here on, each shaping round removes two stitches at each side of the head. That narrows the lower face without shortening the front nearly as much as a normal evenly spaced decrease round would.
Round 14: Sc to 2 sts before the first side marker. Sc2tog, sc in the marked st, sc2tog over the next 2 sts. Continue in sc to 2 sts before the second side marker and repeat the same shaping. Sc to the end of the round. 44 sts.
After each side-shaping round, Rounds 14, 16, 18 and 20, move each side marker into the single sc centered between its two decreases. On each plain round that follows, move the marker up again when you work the stitch directly above the marked stitch. This keeps both markers in the current working round so the next pair of decreases stays centered at the sides of the face.
Round 15: Sc around. 44 sts.
Round 16: Repeat the side shaping from Round 14. 40 sts.
Round 17: Sc around. 40 sts.
Round 18: Repeat the side shaping. 36 sts.
Round 19: Sc around. 36 sts.
Round 20: Repeat the side shaping. 32 sts.
Round 21: Sc around. 32 sts.
Round 22: (Sc in next 2 sts, sc2tog) 8 times. 24 sts.
Remove all remaining head markers.
Fasten off, leaving the lower opening unclosed for now.
At the stated gauge, the head should measure about 5 inches from the top center to the lower opening before the ears are added. From the front, the widest part should sit above the cheeks. The lower face should visibly pull inward instead of staying round all the way to the neck.
Before adding the face pieces, place a small amount of fiberfill in the head so it opens into its intended shape, but leave most of the final stuffing for assembly and keep the lower opening easy to reach. Check the head from the front. If it still looks very spherical, don't keep adding fiberfill. The taper should come from the decreases, not from packing the head firmly.
Make the cream cheek panels, 2:
Use warm cream and the 4.0 mm hook.
Row 1: Ch 7. Sc in the second ch from the hook and across. 6 sts. Turn.
Row 2: Ch 1. 2 sc in first st, sc in next 4 sts, 2 sc in last st. 8 sts. Turn.
Row 3: Ch 1. 2 sc in first st, sc in next 6 sts, 2 sc in last st. 10 sts. Turn.
Rows 4 through 6: Ch 1. Sc across. 10 sts. Turn.
Row 7: Ch 1. Sc2tog, sc in next 6 sts, sc2tog. 8 sts. Turn.
Row 8: Ch 1. Sc2tog, sc in next 4 sts, sc2tog. 6 sts.
Fasten off with a long sewing tail.
Pin one cream panel to each lower cheek. Angle the panels slightly so the lower inner edges come toward the center while the upper edges spread outward beneath the eyes. Leave a visible rust-colored wedge between them at the top. That rust wedge is what keeps the face looking fox-like.
Sew around the outside edges of both panels with small stitches. Leave the center clear for the muzzle.
Make the Cream Fox Muzzle
The muzzle should project a little, but keep it small. A large round muzzle will pull the face right back toward teddy bear.
Use warm cream and the 4.0 mm hook. Work in a continuous spiral.
Round 1: Make a magic ring and work 6 sc into the ring. 6 sts.
Round 2: 2 sc in each st around. 12 sts.
Round 3: (Sc in next st, 2 sc in next st) 6 times. 18 sts.
Round 4: Sc in each st around. 18 sts.
Fasten off with a long sewing tail.
Pin the unstuffed muzzle low between the two cream cheek panels, with the bottom of the muzzle sitting close to the lower third of the face. It should look slightly oval once it's sewn down, about 1 1/2 inches wide. You'll add the small amount of fiberfill during the final muzzle attachment.
Don't sew it in place permanently until you've checked the nose and eye positions. Moving the muzzle even half an inch can change the whole expression.
Crochet the Pointed Fox Ears
The ears do a lot of work on this fox. Keep them tall enough to look pointed, but not so large that they turn into floppy bunny ears.
Outer ears, make 2:
Use rust yarn and the 4.0 mm hook.
Row 1: Ch 8. Sc in the second ch from the hook and across. 7 sts. Turn.
Rows 2 and 3: Ch 1. Sc across. 7 sts. Turn.
Row 4: Ch 1. Sc2tog, sc in next 3 sts, sc2tog. 5 sts. Turn.
Rows 5 and 6: Ch 1. Sc across. 5 sts. Turn.
Row 7: Ch 1. Sc2tog, sc in next st, sc2tog. 3 sts. Turn.
Rows 8 and 9: Ch 1. Sc across. 3 sts. Turn.
Row 10: Ch 1. Sc3tog. 1 st.
Fasten off and weave the rust tail securely into the back of the ear.
Join dark brown yarn at one lower corner. Work 10 sc evenly up the first sloping side, 1 sc in the top point and 10 sc evenly down the opposite side. 21 edging sts. Fasten off. Do not edge the bottom because that edge will be sewn to the head.
Inner ears, make 2:
Use warm cream yarn.
Row 1: Ch 6. Sc in the second ch from the hook and across. 5 sts. Turn.
Rows 2 and 3: Ch 1. Sc across. 5 sts. Turn.
Row 4: Ch 1. Sc2tog, sc in next st, sc2tog. 3 sts. Turn.
Rows 5 and 6: Ch 1. Sc across. 3 sts. Turn.
Row 7: Ch 1. Sc3tog. 1 st.
Fasten off with a sewing tail.
Center one cream inner ear on each rust outer ear, leaving a visible rust border and the dark edging around the point. Using the cream sewing tail, sew all the way around the inner ear, securing both sloping sides and the lower edge to the rust outer ear. Fasten securely and weave the tail into the back of the ear.
Pin the finished ears to the upper sides of the head before sewing. From the front, the inner lower corners should sit roughly 8 stitches apart across the top of the head. Tilt the ears only slightly outward. Thread a separate length of rust yarn onto the yarn needle for attaching each ear at its lower edge.
Sew the full lower edge of each ear securely to the head. Then take a few hidden stitches about 1/2 inch up each side of the ear base. That keeps the ears upright without making them look stiff.
Crochet the Fox Arms
Make two. These are short little arms, not long snuggler limbs. The cream paws echo the face without adding another big block of cream to the body.
Use the 4.0 mm hook and start with warm cream. Work in a continuous spiral, keeping a marker in the first stitch and moving it up with each round.
Round 1: Make a magic ring and work 6 sc into the ring. 6 sts.
Round 2: 2 sc in each st around. 12 sts.
Round 3: (Sc in next st, 2 sc in next st) 6 times. 18 sts.
Round 4: Sc around. 18 sts. On the final yarn-over of the last sc, change to rust.
Cut the cream yarn, leaving a tail. Before stuffing and closing the arm, weave the cream tail and the rust starting tail securely into nearby stitches on the inside.
Round 5: (Sc in next st, sc2tog) 6 times. 12 sts.
Rounds 6 through 18: Sc around. 12 sts.
Remove the stitch marker. Lightly stuff the cream paw and the lower few rounds of the rust arm. Leave the upper half mostly unstuffed so it bends naturally against the lovey.
Flatten the top opening.
Closing row: Working through both layers, sc across the opening in 6 sts.
Fasten off with a long sewing tail.
Each finished arm should be about 4 inches long. If yours is noticeably longer, remove a round or two rather than letting the arms hang well down the body. The compact arms are part of the finished fox silhouette.
Make the Short Winter Cowl
This is a little neck warmer, not a scarf. Keep it low, fitted and simple. Three rows are enough to give the fox that forest green winter accent without hiding the neck or turning the cowl into a bulky collar.
Use deep forest green yarn and the 4.0 mm hook.
Row 1: Ch 29. Sc in the second ch from the hook and in each ch across. 28 sts. Turn.
Rows 2 and 3: Ch 1. Sc in each st across. 28 sts. Turn.
Fasten off, leaving a long sewing tail.
Before sewing, lay the strip around the finished neck area. At the stated gauge, it should measure about 6 1/2 inches long and about 3/4 inch high. It should meet comfortably at the back without stretching tightly or overlapping.
If your strip is too long or short, change the beginning chain rather than adding bulk to the cowl. You want a neat fit right around the neck.
Don't join the strip into a ring yet. It would be too small to pull over the finished fox head. We'll wrap it around the neck and sew it closed during assembly.
Embroider the Fox Face
I’d finish the face before attaching the head to the body. It’s much easier to adjust the eyes, nose and muzzle while you can still turn the head in your hands.
The cream cheek panels should already be sewn in place. Pin the muzzle between them and check the fox from straight on before sewing the muzzle permanently. The rust-colored center of the face should still show clearly between the cream cheeks.
Use black embroidery floss for all of the facial details.
Eyes: Place the eyes about 3/4 inch above the top of the muzzle and approximately 1 1/2 inches apart. Make each eye as a small upright satin-stitched oval, about 1/4 inch high. Use several closely packed stitches rather than one heavy straight stitch. Keep them small. Large black eyes will make the face look more cartoonish and will hide some of the fox shaping.
Nose: Center a small black embroidered triangle near the upper center of the cream muzzle. Build the triangle with closely packed satin stitches until the cream yarn no longer shows through.
Mouth: Bring one short strand of black floss straight down from the bottom point of the nose. Add two very short diagonal stitches at the bottom to form the tiny fox mouth shown in the finished design.
Secure the eye-floss tails inside the head with a small knot, then weave each tail through several nearby crochet stitches. Secure the nose and mouth tails on the wrong side of the muzzle in the same way before sewing the muzzle down. Trim the tails only after they are secure.
Once you're happy with the expression, whipstitch the muzzle to the face through all 18 stitches of Round 4. Before closing the last few stitches, add only enough stuffing behind the muzzle to give it a slight projection. Finish the seam securely.
Assemble the Winter Fox Lovey
Take a minute to pin everything before sewing. The fox should look balanced from the front, with the ears upright, the face centered, the arms sitting close to the body and the cowl tucked neatly around the neck.
1. Finish stuffing the head. Add polyester fiberfill a little at a time until the head holds its shape. Fill the upper head enough to support the ears, but don't pack the lower face firmly. The cheek decreases need to stay visible.
2. Join the head to the body. The final head round has 24 stitches, and the body begins with a 24-stitch neck opening. Place the head directly over that opening with the face centered between two of the body's six increase lines.
Using rust yarn and a yarn needle, match each of the 24 head stitches to one of the 24 single crochet stitches from Body Round 1 at the neck opening. Sew through the base of each Round 1 stitch where it meets the foundation chain and through the corresponding head stitch, working one-to-one all the way around. Before closing the final few stitches, add or remove a little stuffing if needed. Finish the seam securely and weave the yarn tail into the head.
The matching 24-stitch counts keep the attachment evenly distributed. Because the body is worked with the larger hook, ease its neck edge gently around the head opening as you sew and keep the sewing tension relaxed. Don't cinch the seam.
3. Attach the arms. Turn the fox to face you. Pin the flattened top of one arm on each side of the body about 1/2 inch below and slightly to the side of the head seam. Angle the arms gently downward so they sit close beneath the cowl as shown in the finished fox.
Sew the flattened 6-stitch top of each arm securely to the body. Go through the arm and the body fabric several times along the full attachment edge. The arms should move softly below the seam, but the attachment itself should not feel loose.
4. Add the cowl. Wrap the forest green strip around the neck so it covers the head-to-body seam without riding up onto the face. Bring the short ends together at the center back.
Sew the two short ends together through all 3 row ends at the center back. Then use green yarn to sew the lower edge of the cowl continuously to the neck all the way around with small hidden stitches. Keep the sewing tension relaxed so the cowl stays low and flat instead of drawing the neck inward.
The cowl should stay in place when the lovey is picked up. Don't leave it as a loose removable ring.
5. Check the finished shape. Set the lovey upright for a moment, then lay it down and let the body relax. The head should remain upright while the rust body falls into loose folds underneath it.
If the body looks too arranged, don't starch it or block the six points into sharp corners. This fox is supposed to look soft and a little rustic.
Weave in every remaining yarn end securely. Remove and account for every straight pin, locking marker and removable marker used during construction. Check the ears, cheek panels, muzzle, arms, cowl and embroidery one final time. No yarn tail, marker, pin or stuffing should remain exposed.
Care and Use
Follow the washing and drying directions for the yarn you chose. After washing, reshape the fox with your hands and let the body settle back into its loose drape instead of stretching the six points flat.
Check the ears, arms, muzzle, cowl and embroidery from time to time. If a seam or embroidered detail begins to loosen, repair it before the lovey is used again.
There are no plastic eyes, buttons, beads, ties or removable decorations in this pattern. The eyes, nose and mouth are embroidered, and the little winter cowl is sewn to the finished lovey.
Use the fox for supervised awake cuddling and play, and keep it out of an infant sleep space.
That's it. Once the head and cowl are in place, I wouldn't add anything else. The rust fox, cream face and bit of forest green already give this one plenty of character.
When you click on links to various merchants on this site and make a purchase, this may result in this site earning a commission. This does not affect the price you pay.

UBGI Gold Standard 2026
Reviewed under the site's
editorial checklist.
Photos, decorating ideas, party setups and reader submissions are shared for inspiration unless a page is specifically presented as a pattern, tutorial, reference guide or step-by-step project. Follow the instructions, measurements, safety guidance and manufacturer directions provided for the particular project or product.
About Jan | Contact | Baby Nursery Ideas (Blog) | Site Map | Privacy Policy | Disclosure Policy | Disclaimer | Affiliate Disclosure | Earnings Disclosure | Facebook | Pinterest
I am a participant in the Amazon Services LLC Associates Program, an affiliate advertising program designed to provide a means for us to earn fees by linking to Amazon. As an Amazon Associate I earn from qualifying purchases.
Copyright © 2006-2026. All Rights Reserved.