Free Winter Woodland Owl Lovey Crochet Pattern
By Jan Bay
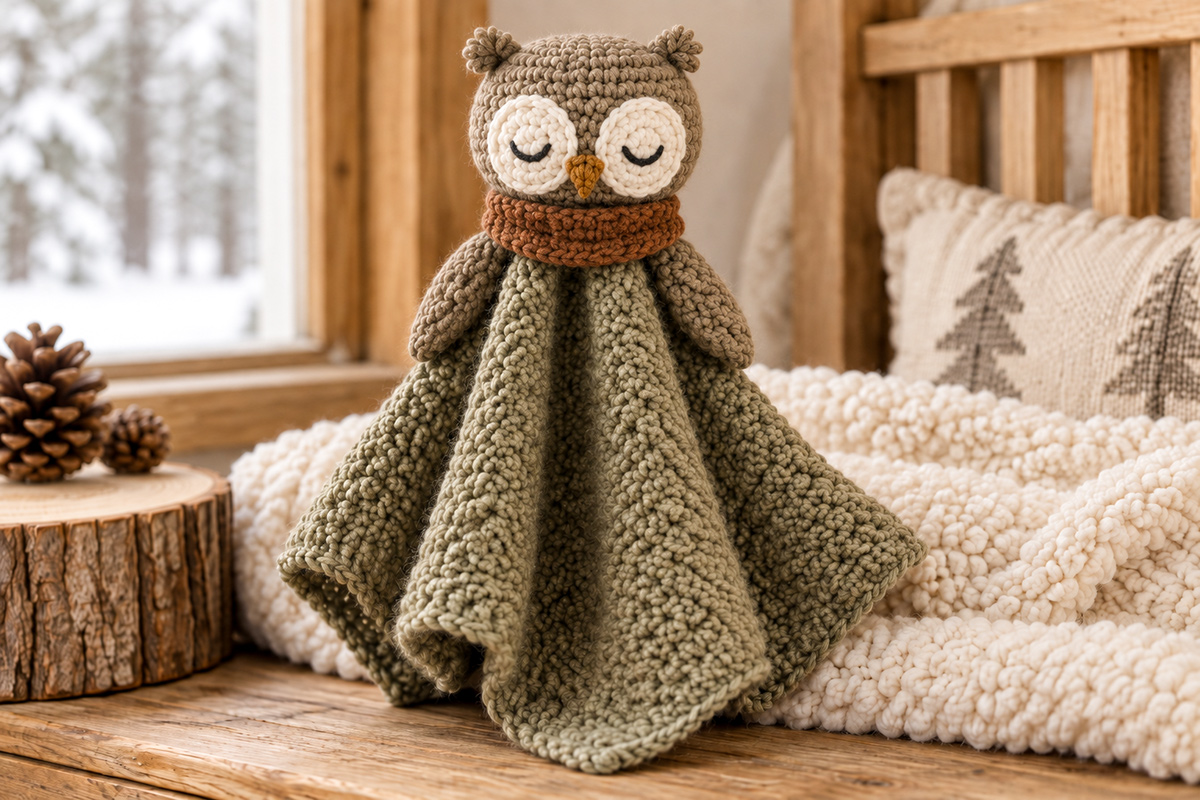
This free winter woodland owl lovey crochet pattern makes the smooth yarn owl from my coordinated woodland collection, with a moss green draping body, mushroom taupe head, oversized cream eye patches, embroidered eyes, a small ochre beak and a securely attached rust cowl for a quiet winter look.
Explore More Free Crochet Baby Patterns
See Smooth Worsted Weight Yarn for This Owl Lovey
Jump to:
Winter Woodland Owl Lovey Pattern at a Glance
Pattern Details
- Skill level: Advanced beginner to intermediate
- Crochet terms: US terminology
- Finished size: About 17 1/2 to 18 inches from the top of the owl's head to the lowest hanging corner
- Lovey body: Approximately 20 inches square
- Yarn weight: Smooth medium worsted weight #4
- Hooks: 5.5 mm for the lovey body, 4 mm for the head and small pieces, and 4.5 mm for the cowl
- Main stitch pattern: Alternating single crochet and double crochet pebbled stitch
- Construction: Square body worked flat in rows; head and wings worked in continuous rounds; face pieces and ear tufts made separately; cowl worked flat and sewn around the neck
- Piece count: 10 crocheted pieces before assembly
- Face: Crocheted eye patches, embroidered sleepy eyes and a small crocheted beak
- Pattern status: Stitch counts and dimensions are calculated from the stated gauge; this pattern has not been physically test-crocheted
Materials and Supplies
I would use a smooth worsted weight yarn for this owl rather than chenille or another fuzzy yarn. The pebbled stitch is part of the look, and you want those little bumps to stay visible instead of disappearing into fluff. The main page image shows a mossy olive body, a mushroom taupe head and wings, cream eye patches, a warm rust cowl and just a small touch of ochre for the beak. Those are the colors the pattern below is calculated to reproduce.
Yarn weight: Medium worsted weight #4 smooth yarn.
Moss or muted olive: About 300 yards for the pebbled lovey body.
Mushroom taupe: About 125 yards for the owl head, ear tufts and wings.
Cream or oatmeal: About 35 yards for the two large eye patches.
Warm rust: About 30 yards for the attached winter cowl.
Muted ochre or mustard: About 10 yards for the small crocheted beak.
Black: A short length of smooth yarn or six-strand embroidery floss for the sleepy embroidered eyes.
The yardage amounts above are estimates rather than physically measured amounts. I would keep a little extra yarn on hand for joining and finishing, especially in the moss color. A looser gauge or a larger lovey body will also use more yarn.
5.5 mm crochet hook: Use this for the pebbled lovey body. The slightly larger hook is intended to give the blanket enough drape for the soft folds shown in the main page image.
4 mm crochet hook: Use this for the head, eye patches, beak and wings. These pieces need a firmer fabric so the stuffing and shaping stay where they belong.
4.5 mm crochet hook: Use this for the rust cowl. It should look soft and substantial without becoming bulky around the owl's neck.
Fiberfill: A small amount for the owl head and just a pinch for the wing tips. Add the stuffing gradually rather than aiming for a particular weight. The head should hold its shape without becoming hard.
Other supplies: Yarn needle, scissors, straight pins, several stitch markers, a removable marker for the beginning of rounds and a tape measure.
You won't need safety eyes, buttons, beads, felt or glued-on pieces for this pattern. The face is made with crocheted pieces and embroidery, and the winter cowl is sewn permanently in place.
Finished Size and Gauge
The finished lovey is expected to measure about 17 1/2 to 18 inches from the top of the owl's head to the lowest hanging blanket corner when the body is allowed to drape naturally.
Pebbled lovey body: Approximately 20 inches square after the edging.
Owl head: Approximately 4 1/2 inches wide and about 3 1/4 to 3 1/2 inches tall after stuffing and shaping.
Eye patches: Approximately 2 inches across.
Wings: Approximately 3 inches long.
Finished cowl: Approximately 1 1/2 inches tall and 7 1/2 inches around the neck.
The main page image is the design target for this original pattern. The dimensions, stitch counts and shaping below are calculated to reproduce that design. The pattern has not been physically test-crocheted, so check the gauge and measurement checkpoints as you work.
Body gauge with 5.5 mm hook: 14 stitches and 12 rows = 4 inches in the pebbled stitch pattern.
Head and small-piece gauge with 4 mm hook: About 17 single crochet stitches and 18 rounds = 4 inches.
Cowl gauge with 4.5 mm hook: About 16 single crochet stitches and 18 rows = 4 inches in back-loop-only single crochet.
Gauge matters most on the head. If that piece comes out much larger, the face proportions and eye-patch placement will change. The blanket is a little more forgiving, but I would still check it after the first 20 rows so you don't end up with a stiff little square instead of the loose drape shown in the main page image.
How This Winter Woodland Owl Lovey Crochet Pattern Is Built
This winter woodland owl lovey crochet pattern uses two different kinds of fabric on purpose. The body is worked loosely enough to drape, while the owl head, wings and face pieces are worked more firmly so they hold their shape.
The lovey body is a flat square made in an alternating single crochet and double crochet pattern. I call it the pebbled stitch here because that's the look we're after. Each single crochet is worked into the previous row's double crochet and each double crochet into the previous row's single crochet. That little change in stitch height gives the body its nubby surface without adding bobbles or heavy texture.
The owl head is crocheted separately in continuous rounds. The two cream eye patches, embroidered sleepy eyes, small ochre beak and tiny rounded ear tufts are added before the head is attached to the body. The wings go on after the head is in place so you can match their height on both sides.
Piece count before assembly: You should have 10 crocheted pieces: 1 lovey body, 1 owl head, 2 ear tufts, 2 eye patches, 1 beak, 2 wings and 1 cowl strip.
This is deliberately different from my original owl baby lovey pattern. This one uses smooth yarn, the pebbled draping woodland body, small close-set wings and the attached winter cowl.
Crochet terms: US terminology.
ch: chain
sc: single crochet
dc: double crochet
sl st: slip stitch
st or sts: stitch or stitches
rnd: round
inc: work 2 single crochet stitches in the same stitch
dec: single crochet 2 stitches together
BLO: back loop only
MR: magic ring
The ch 1 at the beginning of all turned rows and joined eye-patch rounds does not count as a stitch. The head and wings are worked in continuous rounds, so keep a marker in the first stitch and move it up after every round.
Pebbled Stitch Lovey Body
With the 5.5 mm hook and moss or muted olive yarn, ch 69.
Row 1: Sc in the second ch from the hook. Dc in the next ch. Repeat [sc in next ch, dc in next ch] across. You should have 68 sts.
Row 2: Ch 1 and turn. Sc in the first st. Dc in the next st. Repeat [sc in next st, dc in next st] across. 68 sts.
Rows 3 through 58: Repeat Row 2.
If your gauge matches, the body should measure about 6 1/2 to 6 3/4 inches tall after Row 20, about 13 1/4 inches after Row 40 and close to 19 1/2 inches before the edging after Row 58.
Don't stretch it to get those measurements. Lay it flat and let the stitch relax.
Edging: Ch 1. Starting at the corner where Row 58 ended, work 68 sc evenly down the first side edge. Work 3 sc in the corner. Work 68 sc across the foundation edge. Work 3 sc in the next corner. Work 68 sc evenly up the second side edge. Work 3 sc in the next corner. Work 68 sc across the top edge. Work 3 sc in the starting corner. Join with a sl st to the first sc and fasten off. You should have 284 edging stitches total, including all four 3-sc corner groups.
The exact side-edge placement matters less than keeping the edging flat. If 68 stitches along a side makes your edge ripple or pull in noticeably, remove them and space the stitches again more evenly. Don't force an edge count that distorts the square.
Lay the finished body flat. The center falls between Sts 34 and 35 and between Rows 29 and 30. Place a removable marker through that center area. You'll use it when the head is attached.
Owl Head
Use the 4 mm hook and mushroom taupe yarn. Work in continuous rounds.
Rnd 1: Work 6 sc into an MR. 6 sts.
Rnd 2: Inc in each st around. 12 sts.
Rnd 3: Repeat [sc in next st, inc in next st] around. 18 sts.
Rnd 4: Repeat [sc in next 2 sts, inc in next st] around. 24 sts.
Rnd 5: Repeat [sc in next 3 sts, inc in next st] around. 30 sts.
Rnd 6: Repeat [sc in next 4 sts, inc in next st] around. 36 sts.
Rnd 7: Repeat [sc in next 5 sts, inc in next st] around. 42 sts.
Rnd 8: Repeat [sc in next 6 sts, inc in next st] around. 48 sts.
Rnd 9: Repeat [sc in next 7 sts, inc in next st] around. 54 sts.
Rnd 10: Repeat [sc in next 8 sts, inc in next st] around. 60 sts.
Rnds 11 through 14: Sc in each st around. 60 sts.
Rnd 15: Repeat [sc in next 8 sts, dec] around. 54 sts.
Rnd 16: Repeat [sc in next 7 sts, dec] around. 48 sts.
Rnd 17: Repeat [sc in next 6 sts, dec] around. 42 sts.
Rnd 18: Repeat [sc in next 5 sts, dec] around. 36 sts.
Rnd 19: Repeat [sc in next 4 sts, dec] around. 30 sts.
Rnd 20: Repeat [sc in next 3 sts, dec] around. 24 sts.
Fasten off after Rnd 20, leaving a 30-inch mushroom taupe sewing tail at the neck opening. Do not close the opening.
Stuff the head evenly, adding small pieces of fiberfill at a time. It should hold its rounded owl shape without becoming hard. Gently press the front and back between your hands so the finished head is a little wider from side to side than it is from front to back.
The open 24-stitch round becomes the neck and will be sewn directly to the center of the lovey body.
Before attaching the ear tufts, choose the front of the stuffed head. Place one straight pin near the center of the crown and a second straight pin directly below it near the neck opening to mark a vertical face centerline. Keep those two pins in place while you position the tufts and face.
Small owl ear tufts, make 2: With mushroom taupe and the 4 mm hook, leave a 12-inch starting tail, then ch 2.
Tuft: Work a 4-dc bobble into the second ch from the hook: yarn over, insert the hook into the ch, yarn over and pull up a loop, yarn over and pull through 2 loops. Repeat that partial dc 3 more times into the same ch. You should have 5 loops on the hook. Yarn over and pull through all 5 loops, then ch 1 to secure the bobble.
Fasten off and weave the finishing tail into the tuft. The finished piece should form a tiny rounded knob rather than a flat triangle.
Use the 12-inch starting tail to sew one tuft to each upper outer side of the head around Rnds 8 through 10, positioning them symmetrically on opposite sides of the marked face centerline. Sew only the base of each tuft to the head so the rounded bobble remains visible. Do not flatten the tuft against the head.
Eye Patches and Embroidered Eyes
Make two eye patches with cream or oatmeal yarn and the 4 mm hook.
Rnd 1: Work 6 sc into an MR. Join with a sl st. 6 sts.
Rnd 2: Ch 1. Inc in each st around. Join. 12 sts.
Rnd 3: Ch 1. Repeat [sc in next st, inc in next st] around. Join. 18 sts.
Rnd 4: Ch 1. Repeat [sc in next 2 sts, inc in next st] around. Join. 24 sts.
Fasten off with a long sewing tail. Each patch should be close to 2 inches across. If yours is noticeably larger, check the small-piece gauge before sewing it on. Oversized patches will crowd the sides of the head and change the owl's face.
Embroider the sleepy eye before attaching each patch. Using black embroidery floss or smooth black yarn, make a shallow curved line about 3/4 inch wide just below the horizontal center of the cream circle. Use several short backstitches or smooth satin-like stitches instead of one long loose strand.
Secure the embroidery ends on the back of the patch.
Use the front and vertical centerline you already marked with the two straight pins.
Place the two eye patches with their centers level between approximately Rnds 11 and 12 of the head. The centers should be about 2 1/4 inches apart, which leaves the inner cream edges very close together without stacking one patch over the other.
Pin both patches before sewing either one down. Check the face straight on. The top edges should be level and the embroidered eyelids should sit at the same height.
Sew around the full outer edge of each patch with cream yarn. Keep the stitches small enough that they don't pull the circle out of shape.
Crochet Beak
Use muted ochre or mustard yarn and the 4 mm hook.
Ch 4.
Row 1: Sc in second ch from hook and in each remaining ch. 3 sts.
Row 2: Ch 1 and turn. Dec, sc in last st. 2 sts.
Row 3: Ch 1 and turn. Dec. 1 st.
Fasten off with a long sewing tail.
Place the wide top edge of the beak exactly on the face centerline between the lower inner edges of the eye patches. Let the point face straight down. The top corners can tuck slightly beneath the cream patches, which helps the small beak look like it belongs between the eyes instead of sitting on top of the face.
Sew along both sides and across the top edge. Leave the beak flat. It doesn't need stuffing.
Small Owl Wings
Make two with mushroom taupe yarn and the 4 mm hook. Work in continuous rounds.
Rnd 1: Work 6 sc into an MR. 6 sts.
Rnd 2: Inc in each st around. 12 sts.
Rnds 3 through 12: Sc in each st around. 12 sts.
Rnd 13: Repeat [sc in next st, dec] around. 8 sts.
Rnd 14: Sc in each st around. 8 sts.
Add only a small amount of fiberfill. The wing should stay soft and somewhat flattened, not become a firm little arm.
Flatten the open end. Sc through both layers across the opening to make 4 closing stitches. Fasten off with a long sewing tail.
Each wing should measure close to 3 inches long. The rounded magic-ring end points downward and the flattened end becomes the shoulder.
Don't sew the wings on yet. Their final position is easier to judge after the head has been attached to the blanket.
Rust Winter Cowl
Use the 4.5 mm hook and warm rust yarn.
Ch 31.
Row 1: Sc in second ch from hook and in each ch across. 30 sts.
Row 2: Ch 1 and turn. Sc in the BLO of each st across. 30 sts.
Rows 3 through 7: Repeat Row 2.
Fasten off, leaving a 12-inch tail for joining the two short ends of the cowl.
The strip should measure roughly 7 1/2 inches long and about 1 1/2 inches tall. The ridges should run along the length of the strip so they wrap horizontally around the owl's neck.
Leave the cowl flat until final assembly. Since it won't stretch over the stuffed owl head, wrap it around the neck after the head is attached and seam the short ends together at the back.
Assembly and Finishing
Finish the entire face before attaching the head. It's much easier to keep the eye patches and beak even while you can still turn the head freely in your hands.
1. Attach the head to the lovey body.
Lay the pebbled body flat and find the center marker between Rows 29 and 30 and between Sts 34 and 35.
Center the 24-stitch neck opening over that mark. The opening should cover an area about 2 inches across. Pin it first at the front, back and both sides.
Check that the owl's face is looking toward one corner of the square rather than toward the middle of a flat side. That orientation lets the blanket hang with a point centered below the owl when the finished lovey is lifted by the head, which matches the draping silhouette in the main page image.
Thread the 30-inch mushroom taupe tail onto the yarn needle. Sew every stitch of the 24-stitch neck opening securely to the blanket, working all the way around the opening. If any part of the seam still feels loose, use the remaining tail to reinforce that section before weaving it in securely.
2. Position the wings.
Set one wing on each side of the owl. The flattened shoulder edge should begin about 1/2 inch below the future cowl line. Angle each wing slightly downward.
Pin both wings before sewing. Viewed from the front, their top edges should sit at the same height and the rounded ends should finish at about the same level.
Sew the flattened shoulder edge securely to the lovey. Then sew approximately the upper 1 to 1 1/2 inches of the inside edge of each wing to the body. Leave the lower portion free so the wings keep their small folded shape without sticking straight out.
3. Add the cowl.
Wrap the rust strip around the neck with the ridges running horizontally. Bring the two short ends together at the center back and use the 12-inch tail to whipstitch them securely into a ring. Weave in that tail.
Arrange the cowl so it covers the head-to-body seam without covering the bottom of the beak or the wings.
Thread a separate 30-inch length of rust yarn onto the yarn needle and sew the entire lower edge of the cowl to the body around the neck. Fasten that yarn securely. Use a separate short length of rust yarn to add several small securing stitches along the upper edge at the back and sides. The finished cowl should stay put when the lovey is picked up. There should be no loose ties, ends or removable scarf section.
4. Finish the owl.
Remove every straight pin, removable center marker and round marker. Weave in every remaining yarn end through several stitches before trimming it. Check the eye patches, beak, ear tufts, wings, head seam and cowl individually with a gentle tug.
Set the owl upright and look at it straight on. The cream eye patches should be level, the ochre beak should sit on the centerline and the two wings should hang at matching heights. Gently shape the stuffed head with your hands if it needs a little more width across the face.
The pebbled body should be left loose. Don't block it into a stiff square. The soft folds are part of the finished woodland lovey design.
If you want another animal made with the same general collection idea, the free crochet animal lovey patterns page is where I keep the individual animal designs together.
Care and Baby Safety
Before giving the lovey to a baby, check every sewn piece carefully. The eye patches, beak, little ear tufts, wings, head and cowl should all be firmly attached. There are no plastic safety eyes, buttons, beads or glued decorations in this design.
For washing, follow the care instructions on the yarn you used. If the yarn is machine washable, I would still use a mesh laundry bag and a gentle cycle for a finished lovey with this many attached pieces. Reshape the head, wings and body while damp and let the piece dry completely before using it again.
Check the lovey regularly for pulled stitches, loose embroidery or an opening in a seam. Repair any damage before giving it back to a child.
This lovey is for supervised awake cuddling and play. It should not be placed in an infant's crib, bassinet or other sleep space. The U.S. Consumer Product Safety Commission recommends a bare infant sleep space with only a fitted sheet and no blankets, pillows or other soft items. You can read the current CPSC safe sleep guidance here.
Frequently Asked Questions
Can I use chenille or blanket yarn instead?
You can redesign the owl for a different yarn, but I wouldn't make that substitution stitch for stitch. Thick chenille changes the head size, eye-patch proportions and blanket drape, and it hides much of the pebbled texture that gives this version its look. For the owl shown here, smooth worsted yarn makes more sense.
How can I make the lovey body larger?
Keep an even stitch count so the alternating sc and dc pattern works correctly. Add stitches to the starting chain in pairs, then continue the rows until the height matches the new width. Measure instead of relying on a fixed number of extra rows because your personal row gauge determines when the body becomes square. For a larger body, adjust the edging stitch count to fit the new square and mark the new center instead of using the original 68-stitch edging count and Rows 29 and 30 center point.
Can I leave off the rust cowl?
The owl will still function as a lovey without it, but it won't reproduce the finished winter woodland owl shown on this page. The cowl is one of the details that makes this particular version part of the coordinated winter collection, so I would keep it if you're making the pictured design.
How do I keep the two eye patches even?
Mark the vertical face center first. Place both patches before sewing either one down, keep their centers about 2 1/4 inches apart and check that their top edges are level. A difference of even 1/4 inch is easy to see on an owl face, so this is worth checking before you pick up the yarn needle.
Can I use plastic safety eyes instead of embroidery?
Not for the version written here. The sleepy black eyes are embroidered directly onto the cream patches. That keeps the face faithful to the finished owl and avoids adding hard eye pieces to a baby-oriented lovey.
Has this crochet pattern been physically tested?
No. The stitch counts, shaping and dimensions are calculated from the construction and stated gauge to reproduce the pictured design, while the yarn amounts are estimates. The pattern has not been physically crocheted and test-made from these instructions. Check the gauge and measurement checkpoints as you work, especially before attaching the face pieces and assembling the head.
When you click on links to various merchants on this site and make a purchase, this may result in this site earning a commission. This does not affect the price you pay.

UBGI Gold Standard 2026
Reviewed under the site's
editorial checklist.
Photos, decorating ideas, party setups and reader submissions are shared for inspiration unless a page is specifically presented as a pattern, tutorial, reference guide or step-by-step project. Follow the instructions, measurements, safety guidance and manufacturer directions provided for the particular project or product.
About Jan | Contact | Baby Nursery Ideas (Blog) | Site Map | Privacy Policy | Disclosure Policy | Disclaimer | Affiliate Disclosure | Earnings Disclosure | Facebook | Pinterest
I am a participant in the Amazon Services LLC Associates Program, an affiliate advertising program designed to provide a means for us to earn fees by linking to Amazon. As an Amazon Associate I earn from qualifying purchases.
Copyright © 2006-2026. All Rights Reserved.