Free Winter Woodland Deer Lovey Crochet Pattern
By Jan Bay
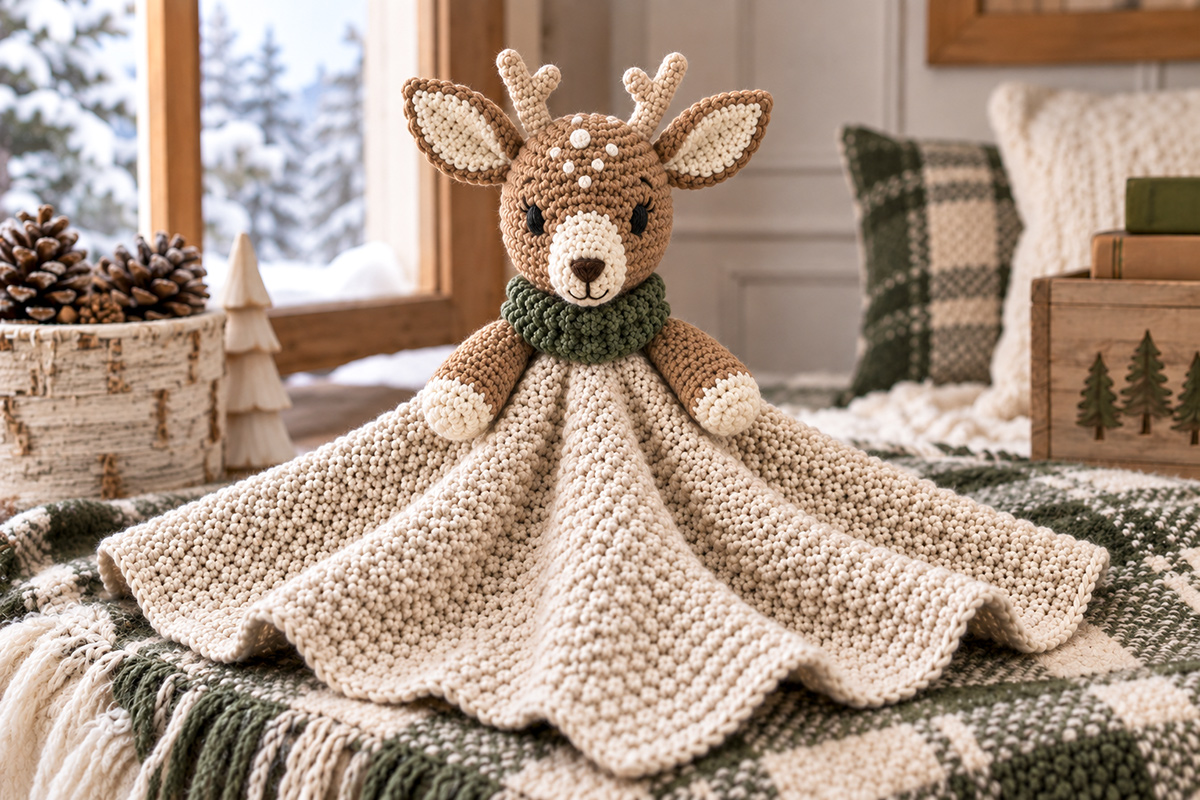
This free winter woodland deer lovey crochet pattern makes a sweet little forest friend with a gentle expression and cozy handmade charm. Its soft woodland colors and flowing blanket-style body give the deer a wintry personality of its own while keeping it right at home with the other animals in my woodland lovey collection.
Explore More Free Crochet Baby Patterns
Jump to:
Materials and Supplies
I’d keep the yarn choices simple for this deer. The pebbled body already gives it plenty of texture, and the forest green cowl is enough color to make the winter version feel special without turning it into a Christmas project.
Yarn: Use a soft, washable worsted weight #4 yarn with good stitch definition.
- Cream or warm ivory: approximately 600 yards for the lovey body, muzzle, inner ears, hooves, antlers and forehead markings
- Woodland brown or soft taupe: approximately 200 yards for the head, outer ears and arms
- Forest green: approximately 50 yards for the cowl
- Black embroidery floss: a small amount for the satin-stitched eyes
- Dark brown embroidery floss: a small amount for the nose and mouth
The yarn amounts above include a little breathing room. They are calculated estimates for this pattern and have not been confirmed by physically crocheting the finished lovey.
Hooks:
- 4 mm crochet hook for the pebbled lovey body and cowl
- 3.5 mm crochet hook for the deer head, muzzle, ears, antlers and arms
You’ll also need:
- approximately 2 to 3 ounces of polyester fiberfill for the head, muzzle and lightly stuffed arms
- tapestry needle
- locking stitch marker
- scissors
- measuring tape
- rustproof straight pins for positioning pieces before sewing
- removable stitch markers for locating the center of the lovey body
Do not use plastic safety eyes or buttons on this project. The finished deer in the example has an entirely embroidered face.
Finished Size and Gauge
At the gauges below, the finished pebbled body is expected to measure about 20 1/2 inches square after the border is added. That gives the lovey enough fabric to fall into the soft handkerchief-like folds shown in the example without turning it into a full baby blanket.
The finished deer pieces are expected to measure approximately:
- Head: 5 1/2 inches tall and about 4 1/4 inches across the widest part
- Muzzle: 2 3/4 inches long and about 2 inches wide
- Outer ears: about 3 1/4 inches long
- Antlers: about 2 1/2 inches tall
- Arms: about 5 1/4 inches long
- Cowl: about 6 1/2 inches around after seaming and approximately 2 inches deep before wrapping around the neck
Lovey body gauge: 16 stitches and 16 rows = 4 inches in the pebbled stitch pattern with the 4 mm hook.
Deer-piece gauge: approximately 18 single crochet stitches and 20 rows or rounds = 4 inches in firm single crochet with the 3.5 mm hook.
The deer pieces need a firm crochet fabric so the stuffing doesn’t show between the stitches. If your head fabric has visible gaps, go down a hook size rather than stuffing more tightly.
The body gauge matters more than the exact amigurumi gauge because it controls the finished size of the lovey blanket. Make a small pebbled-stitch swatch before starting the body. It’s worth doing here.
Skill level: I’d call this an intermediate crochet pattern. You’ll need to be comfortable with alternating single and double crochet texture, continuous rounds, increases and decreases, working around both sides of a starting chain, simple embroidery and sewing separate crochet pieces together.
Winter Woodland Deer Lovey Crochet Pattern Notes
This pattern is written in US crochet terms. The deer is made as separate pieces and assembled over the center of one pebbled-stitch lovey body. The finished design has a narrower deer-shaped head, long cream muzzle, large pointed ears, small antlers, brown arms with cream ends and the forest green cowl that identifies it with the winter woodland collection.
The complete project has 12 crocheted pieces before assembly:
- 1 pebbled lovey body
- 1 deer head
- 1 cream muzzle
- 2 brown outer ears
- 2 cream inner ears
- 2 antlers
- 2 arms
- 1 forest green cowl
The cream forehead spots are added directly to the finished head rather than crocheted as separate pieces.
The head is stuffed firmly enough to hold its deer shape. The muzzle gets only a small amount of fiberfill for gentle dimension, and the arms are lightly stuffed through about Round 20, leaving the final 5 rounds unstuffed so the tops can flatten for attachment. The ears, antlers, cowl and lovey body remain unstuffed.
Important: This pattern has been mathematically developed to reproduce the finished example image, but it has not been physically test-crocheted from these written instructions. Finished measurements are expected measurements based on the stated gauge.
Abbreviations:
- ch = chain
- sc = single crochet
- dc = double crochet
- sl st = slip stitch
- inc = work 2 single crochet stitches in the same stitch
- dec = single crochet 2 stitches together
- st/sts = stitch/stitches
- rnd/rnds = round/rounds
- RS = right side
- WS = wrong side
Pebbled stitch: Work alternating single crochet and double crochet stitches across the row. Because the stitch count is even, each row begins with a single crochet and ends with a double crochet. After turning, each single crochet is worked into the previous row’s double crochet and each double crochet into the previous row’s single crochet.
Working that alternating texture on every row creates the close, all-over pebbled surface shown on the finished lovey. There are no separate bobbles to count or push to one side of the fabric.
Turning chains do not count as stitches unless the instructions specifically say otherwise.
The head, muzzle and arms are worked in continuous rounds. Put a marker in the first stitch of every round and move it up as you work. For the muzzle, place the marker in the first stitch of Round 1 after you have worked around both sides of the starting chain. Don’t skip that little step. The shaping depends on knowing exactly where each round begins.
Leave each sewing tail exactly where the instructions request it. Most separate pieces use a finishing tail for assembly, while each antler uses the long starting tail left at its base. The head’s finishing tail is used to close the final 6 stitches rather than attach the head to the lovey body.
The eyes are embroidered with black embroidery floss using short, closely packed satin stitches. They should lie flat against the crochet surface with visible thread texture and no hard or shiny eye component underneath.
Pebbled Stitch Lovey Body
The lovey body is worked flat as one square. Once it’s attached beneath the deer, the square falls into the soft folds shown in the finished example. Don’t try to crochet those folds into the shape. They come from the drape of the finished fabric.
With cream or warm ivory yarn and the 4 mm hook, ch 81.
Row 1: Sc in the second ch from the hook and in each ch across. Turn. 80 sts.
Row 2: Ch 1. *Sc in the next st, dc in the next st.* Repeat from * to * across. Turn. 80 sts.
Rows 3-80: Repeat Row 2. 80 sts after every row.
Because there are 80 stitches, every textured row begins with a single crochet and ends with a double crochet. After the work is turned, the stitches automatically alternate in height so each single crochet lands in a double crochet and each double crochet lands in a single crochet. This produces the dense little pebbles seen across the finished lovey rather than widely spaced raised bobbles.
After Row 80, do not fasten off.
Border Round: Ch 1. Work 2 sc in the first st. Sc in each of the next 78 sts. Work 3 sc in the final st for the first complete corner. Rotate the work 90 degrees without flipping it so you can crochet down the side edge. Sc once in the end of each of Rows 79 through 2 for 78 sc. Work 3 sc in the end of Row 1 at the bottom corner. Working across the unused loops of the foundation edge, sc in each of the next 78 stitch bases. Work 3 sc in the final foundation stitch at the next corner. Working up the remaining side edge, sc once in the end of each of Rows 2 through 79 for 78 sc. Work 1 more sc in the same first stitch where the round began. This completes the final 3-sc corner. Join with a sl st to the first sc. 324 sts total.
Fasten off and weave in the tail.
The finished border has 78 single crochet stitches between each pair of 3-sc corners, with 324 stitches total. The corner stitches are counted only once, so there is no doubled row end or extra stitch hiding at a corner.
Lay the body flat with the right side facing up. The exact center falls between Stitches 40 and 41 and between Rows 40 and 41. Place removable markers around that center point. You’ll use those markers when the deer is assembled.
At the stated gauge, the body before the border is expected to measure about 20 inches square. The narrow border brings the expected finished measurement to approximately 20 1/2 inches square.
Deer Head and Muzzle
The head is deliberately a little narrower and longer than a round teddy-bear head. Keep the stuffing even as you work so the sides stay smooth and the lower part of the face keeps its gentle taper.
With woodland brown or soft taupe yarn and the 3.5 mm hook, make a magic ring.
Rnd 1: Work 6 sc in the ring. 6 sts.
Rnd 2: Inc in each st around. 12 sts.
Rnd 3: *Sc 1, inc.* Repeat around. 18 sts.
Rnd 4: *Sc 2, inc.* Repeat around. 24 sts.
Rnd 5: *Sc 3, inc.* Repeat around. 30 sts.
Rnd 6: *Sc 4, inc.* Repeat around. 36 sts.
Rnd 7: *Sc 5, inc.* Repeat around. 42 sts.
Rnd 8: *Sc 6, inc.* Repeat around. 48 sts.
Rnd 9: *Sc 7, inc.* Repeat around. 54 sts.
Rnd 10: *Sc 8, inc.* Repeat around. 60 sts.
Rnds 11-15: Sc in each st around. 60 sts.
Rnd 16: *Sc 8, dec.* Repeat around. 54 sts.
Rnd 17: Sc in each st around. 54 sts.
Rnd 18: *Sc 7, dec.* Repeat around. 48 sts.
Rnd 19: Sc in each st around. 48 sts.
Rnd 20: *Sc 6, dec.* Repeat around. 42 sts.
Rnd 21: *Sc 5, dec.* Repeat around. 36 sts.
Rnd 22: Sc in each st around. 36 sts.
Rnd 23: *Sc 4, dec.* Repeat around. 30 sts.
Rnd 24: Sc in each st around. 30 sts.
Begin adding fiberfill. Fill the upper and side areas first, then shape the lower head with smaller amounts. The head should hold its shape without becoming hard or stretched between the stitches.
Rnd 25: *Sc 3, dec.* Repeat around. 24 sts.
Rnd 26: *Sc 2, dec.* Repeat around. 18 sts.
Add the remaining stuffing while the opening is still large enough to reach.
Rnd 27: *Sc 1, dec.* Repeat around. 12 sts.
Rnd 28: Dec around. 6 sts.
Fasten off, leaving a long tail. Thread the tail through the remaining 6 stitches and pull the opening closed. Secure the yarn and weave the tail into the head.
At the stated gauge, the finished head is expected to be about 5 1/2 inches tall and approximately 4 1/4 inches across its widest point.
Make the cream muzzle:
With cream yarn and the 3.5 mm hook, ch 7.
Muzzle Rnd 1: Sc in the second ch from the hook and in each of the next 4 ch. Work 3 sc in the final ch. Turn the foundation chain so you can work along the unused loops on the opposite side. Sc in each of the next 4 ch. Work 2 sc in the final ch. 14 sts.
Muzzle Rnd 2: Inc in the first st, sc in each of the next 4 sts, inc in each of the next 3 sts, sc in each of the next 4 sts, inc in each of the final 2 sts. 20 sts.
Muzzle Rnd 3: Sc 1, inc, sc in each of the next 4 sts, *sc 1, inc* 3 times, sc in each of the next 4 sts, *sc 1, inc* 2 times. 26 sts.
Muzzle Rnd 4: Sc in each of the first 2 sts, inc, sc in each of the next 4 sts, *sc 2, inc* 3 times, sc in each of the next 4 sts, *sc 2, inc* 2 times. 32 sts.
Join with a sl st and fasten off, leaving a long sewing tail.
Pin the muzzle vertically to the center front of the head with its longer axis running up and down. Position the upper tip around Round 12 and the lower tip around Round 24, keeping the muzzle centered between the eyes. Begin sewing around the outer edge. When about 1 inch remains open, add a very small amount of fiberfill, just enough to give the muzzle the gentle raised shape shown in the finished deer without making it round or bulky. Finish sewing the remaining edge securely closed.
That longer placement matters. A short round muzzle pulls the design back toward a bear face, and that isn’t the deer we’re making.
Embroider the nose and mouth:
Use dark brown embroidery floss to make a small filled triangular nose near the lower half of the cream muzzle. Build the triangle with closely packed satin stitches, then bring one straight stitch down from the center bottom of the nose.
From the bottom of that stitch, make one short curved mouth line toward the left and one toward the right. Keep the mouth small.
Embroider the eyes:
Mark the vertical center of the face before you begin. Position the eyes beside the upper part of the muzzle at approximately Round 14, with the center of each eye about 4 stitches to the left or right of the face center.
Using black embroidery floss, build each open eye with several short, closely packed satin stitches so the finished eye forms a small upright oval. The eye should span roughly 2 crochet stitches in width and about 2 rounds in height.
Keep the embroidery flat against the crochet fabric. There should be no bead, safety-eye post or other hard component beneath it.
Add the forehead markings:
Use cream yarn or cream embroidery thread to make 7 rounded forehead spots between the antlers and the upper edge of the muzzle. Build each spot with short, closely packed satin stitches laid in several directions so it reads as a little round cream dot rather than a straight embroidered line.
- 1 small spot on the face center near Round 5
- 1 larger center spot near Round 6, about 3 crochet stitches across
- 2 small spots near Round 7, approximately 3 stitches to either side of center
- 2 small spots near Round 9, approximately 2 stitches to either side of center
- 1 small spot on the face center near Round 10
The 6 smaller spots should be about 1 to 2 crochet stitches across. Layer an extra pass or two of cream thread over the larger Round-6 center spot so it is noticeably fuller than the others. Keep all 7 markings securely embroidered directly into the head rather than attaching separate beads, buttons or loose pieces.
Ears and Antlers
The ears do a lot of the work here. Make them large and pointed and don’t round off the tips. Once they’re attached with a shallow fold at the base, the head should read as deer before the antlers are even added.
Outer Ear, make 2 in woodland brown:
With the 3.5 mm hook, ch 2.
Row 1: Sc in the second ch from the hook. Turn. 1 st.
Row 2: Ch 1. Work 2 sc in the st. Turn. 2 sts.
Row 3: Ch 1. Inc in each st. Turn. 4 sts.
Row 4: Ch 1. Sc 1, inc in each of the next 2 sts, sc 1. Turn. 6 sts.
Row 5: Ch 1. Sc 1, inc, sc in each of the next 2 sts, inc, sc 1. Turn. 8 sts.
Rows 6-10: Ch 1. Sc in each st across. Turn. 8 sts.
Row 11: Ch 1. Sc in each of the first 2 sts, dec, dec, sc in each of the final 2 sts. Turn. 6 sts.
Rows 12-16: Ch 1. Sc in each st across. Turn. 6 sts.
Fasten off, leaving a long sewing tail.
Inner Ear, make 2 in cream:
With the 3.5 mm hook, ch 2.
Row 1: Sc in the second ch from the hook. Turn. 1 st.
Row 2: Ch 1. Work 2 sc in the st. Turn. 2 sts.
Row 3: Ch 1. Inc in each st. Turn. 4 sts.
Row 4: Ch 1. Sc 1, inc in each of the next 2 sts, sc 1. Turn. 6 sts.
Rows 5-8: Ch 1. Sc in each st across. Turn. 6 sts.
Row 9: Ch 1. Sc 1, dec, dec, sc 1. Turn. 4 sts.
Rows 10-12: Ch 1. Sc in each st across. Turn. 4 sts.
Fasten off, leaving a sewing tail.
Center one cream inner ear on each brown outer ear. Keep an even brown border visible around the cream section and leave the lower brown base uncovered. Sew the inner ear securely to the outer ear.
Do not stuff either layer.
Antlers, make 2 in cream:
The antlers are flat and deliberately small. There is no wire inside them.
With the 3.5 mm hook, leave a long starting tail for sewing the antler to the head, then ch 5.
Rows 1-5: Beginning in the second ch from the hook on Row 1, work 4 sc across. Ch 1 and turn after each row. 4 sts.
Row 6: Sc in each of the 4 sts. Do not turn yet. Ch 4. Beginning in the second ch from the hook, sc in each of the next 3 ch. Sl st into the side of the last sc made on Row 6. This forms the small side tine.
Ch 1 and turn the main stem, leaving the side tine free.
Rows 7-9: Sc in each of the 4 main-stem sts. Ch 1 and turn after each row. 4 sts.
Row 10: Dec twice. Ch 1 and turn. 2 sts.
Row 11: Sc in each of the 2 sts. Ch 1 and turn. 2 sts.
Row 12: Sc in each of the 2 sts. 2 sts.
Fasten off and weave in the final top tail. Keep the long starting tail at the base for attachment.
Make the second antler the same way, then flip it over during assembly so the side tines point outward in opposite directions.
The expected finished antler height is approximately 2 1/2 inches. If your antlers are considerably taller, check your row gauge before attaching them. Oversized antlers change the whole expression of the deer.
Arms
Make 2.
The arms have cream ends and brown upper sections just like the finished deer. Lightly stuff most of each arm so it stays softly rounded, but leave the final 5 rounds unstuffed. That keeps the brown section full while leaving a flexible top that can be flattened and sewn securely to the lovey body.
With cream yarn and the 3.5 mm hook, make a magic ring.
Rnd 1: Work 6 sc in the ring. 6 sts.
Rnd 2: Inc in each st around. 12 sts.
Rnd 3: *Sc 1, inc.* Repeat around. 18 sts.
Rnds 4-5: Sc in each st around. 18 sts.
Change to woodland brown or soft taupe. Cut the cream yarn, leaving enough tail to secure the color change inside the arm.
Rnd 6: Sc in each st around. 18 sts.
Rnd 7: *Sc 4, dec.* Repeat around. 15 sts.
Rnds 8-11: Sc in each st around. 15 sts.
Lightly stuff the cream end and the brown rounds worked so far. Keep the stuffing soft and even rather than firm.
Rnd 12: *Sc 3, dec.* Repeat around. 12 sts.
Rnds 13-20: Sc in each st around. 12 sts.
Continue adding small amounts of fiberfill as needed through Round 20. The arm should stay softly rounded without becoming firm or rigid.
Rnds 21-25: Sc in each st around. 12 sts.
Do not stuff these final 5 rounds. They need to remain flexible so the top of the arm can be flattened for attachment.
Flatten the top of the arm so 6 stitches lie along the front edge and 6 along the back.
Closing Row: Working through both layers, sc across the top using 6 sc.
Fasten off, leaving a long sewing tail.
At the stated gauge, each finished arm is expected to measure approximately 5 to 5 1/4 inches long.
Forest Green Cowl
The green cowl may seem like a small, insignificant detail but I wouldn’t skip it on this version. It’s the detail that gives the deer its winter look and helps tie it to the rest of the woodland collection.
The cowl is worked as a small pebbled rectangle and wrapped around the neck during assembly. Using the same kind of raised texture here keeps the cowl in the same visual family as the lovey body while giving the forest green enough presence to read as the winter detail.
With forest green yarn and the 4 mm hook, ch 9.
Row 1: Sc in the second ch from the hook and in each ch across. Turn. 8 sts.
Row 2: Ch 1. *Sc in the next st, dc in the next st.* Repeat from * to * across. Turn. 8 sts.
Rows 3-26: Repeat Row 2. 8 sts after every row.
At the stated lovey-body gauge, the rectangle is expected to measure approximately 2 inches wide and about 6 1/2 inches long.
Cowl fit checkpoint: Before fastening off, wrap the rectangle around the lower part of the finished head near Round 24 with the pebbled side facing outward. The short ends should meet with light stretch but should not pull the head inward. If the strip needs a small adjustment, add or remove plain single crochet rows at the end one at a time until the ends meet comfortably.
Once the fit is correct, fasten off, leaving a long sewing tail.
Do not seam the ends together yet. The cowl is wrapped around the neck after the head, body and arms are joined. That lets you place the seam neatly at the back and adjust the fit before closing it.
Assembly and Finishing
I’d assemble the head before attaching anything to the lovey body. It’s much easier to judge the deer’s expression while you can still turn the head in your hands.
1. Attach the antlers.
Use the muzzle as the center front of the face. Position one antler on each side of that center line with the 4-stitch base lying across approximately Rounds 5-7 of the upper head. Keep the antlers fairly close together and angle the small side tines outward.
Sew across the entire 4-stitch base of each antler, then sew back across it a second time. The antlers should stand upright without wire or another stiffener.
2. Shape and attach the ears.
At the 6-stitch base of each brown outer ear, bring the first and last stitch slightly toward the center and take two small securing stitches through the base. This makes a shallow fold without closing the ear.
Position the ears outside the antlers with the bases spanning approximately Rounds 8-12 of the head. Angle the pointed tips slightly outward rather than straight up.
Sew all the way across each folded base and back again. The ears should remain flat and unstuffed.
Look at the head from the front before tying off. The muzzle should run vertically down the center, the eyes should sit at the same height, the antlers should be balanced and the ear tips should angle outward at roughly the same amount.
If the head looks round like a bear at this stage, don’t try to fix that by moving the antlers. Check the ear angle and the long muzzle placement first.
3. Mark the attachment area on the lovey body.
Lay the pebbled body right side up. The center falls between Stitches 40 and 41 and between Rows 40 and 41.
Use four removable markers to outline an attachment area approximately 8 stitches wide by 8 rows tall, centered over that point. The marked area will run roughly from Stitches 37-44 and Rows 37-44.
4. Attach the arms.
Lay the two arms on the lovey body before sewing. The flattened 6-stitch top of each arm should sit just outside the marked center area, with the arms pointing diagonally down and outward.
Place the left arm so its flattened top begins about 1 stitch outside the left edge of the marked head area. Mirror that placement on the right.
Using the long brown sewing tail, sew through all 6 stitches of the flattened arm top and through the lovey body beneath it. Sew back across the same 6-stitch path once more.
The cream ends should point toward the lower corners of the lovey when the body is lying flat.
5. Attach the deer head.
Center the bottom closure of the head over the exact center of the marked 8-stitch by 8-row area.
Thread a tapestry needle with a separate length of matching brown yarn. Sew through the head fabric around approximately Round 24, then through the lovey body beneath it. Continue around the entire base of the head in a complete circle.
Make a second pass around the same attachment path. The head should feel secure from every direction without the stitches pulling deeply enough to distort the face.
Remove the four center markers after the head is secure.
6. Add the forest green cowl.
Wrap the pebbled green rectangle around the base of the head with the textured side facing outward and the rows running vertically. Bring the two short ends together at the center back.
The cowl should sit over the head-to-body seam and the upper edges of the arms without covering the muzzle.
Use the long green tail to seam the two short ends together from bottom to top.
Do not leave the cowl loose or removable. Tack it permanently in place with several small green stitches at the center back, both sides and center front. Catch only enough of the brown head or cream body fabric to hold the cowl securely without flattening the pebbled texture.
Once the cowl is attached, arrange the arms over the pebbled body and let the corners of the lovey fall naturally. The folds in the finished example come from the fabric itself. Nothing needs to be gathered or sewn into pleats.
Final construction check:
- The deer has 2 matching arms with cream ends.
- Both arms are securely sewn through all 6 stitches of the flattened top.
- The head is attached around a complete circular seam.
- Both ears are sewn securely across their folded bases.
- Both antlers are securely attached and contain no wire.
- The cowl is seamed closed and tacked permanently in place.
- The eyes, nose, mouth and forehead markings are embroidery only.
- All positioning pins and removable stitch markers have been removed.
- All yarn tails have been secured and woven in.
Care and Baby Safety
For a baby, use this lovey during supervised awake time. Check it regularly for loose yarn, damaged seams, pulled embroidery or loosened attachments, and remove it from use until any damage has been repaired.
This lovey is a handmade comfort item, not sleep bedding. Keep it out of a crib, bassinet or other infant sleep space. The U.S. Consumer Product Safety Commission recommends a bare sleep space with only a fitted sheet. You can read the current CPSC safe sleep guidance.
Because the pattern can be made with different washable worsted-weight yarns, follow the care directions on the yarn label rather than assuming every finished lovey can be washed the same way.
If the yarn allows machine washing, a mesh laundry bag can help protect the antlers, ears and embroidery from being pulled during the wash. Reshape the head, cowl and pebbled body while damp and let the lovey dry completely before using it again.
I would avoid hanging the wet lovey from one corner. The weight of the water can stretch the body out of square.
Before the lovey is used again, check the antlers, ear bases, arm seams, head attachment and cowl seam. Repair anything that has loosened before returning it to a child.
Frequently Asked Questions
What creates the pebbled texture on the lovey body?
The body uses alternating single crochet and double crochet stitches on every row. After each turn, the shorter stitches fall into the previous row’s taller stitches and the taller stitches fall into the shorter ones. That creates the close, all-over pebbled texture without separate bobbles.
Can I use chenille or blanket yarn for this deer?
You can make a different version with another yarn, but I wouldn’t substitute thick chenille if you want the deer shown here. The smooth worsted-weight yarn keeps the little forehead markings, muzzle shaping and pebbled body easy to see. A bulky fuzzy yarn would also change the gauge and every finished measurement.
Can I leave off the forest green cowl?
Yes, but that would be a variation rather than the winter woodland deer shown in the example. The cowl is part of this finished design and is included in the pattern because it gives the deer its cool-season woodland look.
Does this deer use plastic safety eyes?
No. The eyes are made entirely with black embroidery floss using closely packed satin stitches. The nose, mouth and forehead details are embroidered too.
Is this the same deer as the doe and fawn lovey pattern?
No. This winter deer has its own pebbled lovey body, single deer head, long muzzle, small antlers and forest green cowl. If you want the other style, you can see my free doe and fawn deer lovey pattern.
Can I make the lovey body larger?
You can, but the 80-stitch, 80-row body is the version calculated to match the finished deer shown here. A larger body requires more than adding stitches in multiples of 4. You would also need to recalculate both bobble-row repeat counts, the number of rows, the yarn amount and the center attachment area. If you want the proportions shown in this pattern, keep the body at 80 stitches and 80 rows before the border.
Has this pattern been physically test-crocheted?
No. The stitch counts, shaping and expected finished measurements have been developed and mathematically checked to match the finished example, but the written pattern has not been physically test-crocheted. I’d rather tell you that plainly than imply a test that didn’t happen.
If this deer has you thinking about another little woodland friend, you can browse the full crochet animal lovey pattern collection and choose the one you want to make next.
When you click on links to various merchants on this site and make a purchase, this may result in this site earning a commission. This does not affect the price you pay.

UBGI Gold Standard 2026
Reviewed under the site's
editorial checklist.
Photos, decorating ideas, party setups and reader submissions are shared for inspiration unless a page is specifically presented as a pattern, tutorial, reference guide or step-by-step project. Follow the instructions, measurements, safety guidance and manufacturer directions provided for the particular project or product.
About Jan | Contact | Baby Nursery Ideas (Blog) | Site Map | Privacy Policy | Disclosure Policy | Disclaimer | Affiliate Disclosure | Earnings Disclosure | Facebook | Pinterest
I am a participant in the Amazon Services LLC Associates Program, an affiliate advertising program designed to provide a means for us to earn fees by linking to Amazon. As an Amazon Associate I earn from qualifying purchases.
Copyright © 2006-2026. All Rights Reserved.