Free Crochet Deer Baby Mobile Pattern with Three Spotted Fawns
By Jan Bay
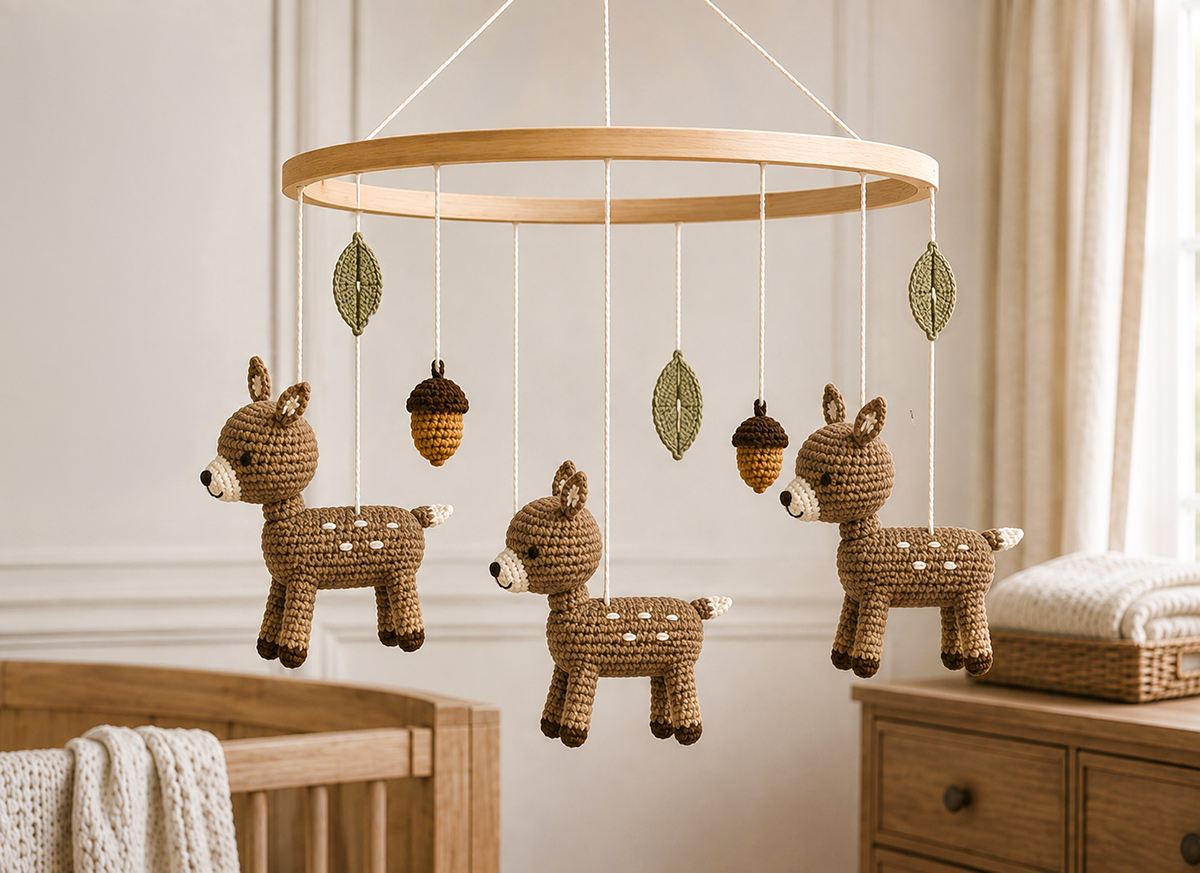
This free crochet deer baby mobile pattern shows you how to make three little spotted fawns with embroidered faces, plus simple acorns and leaves to hang from a wooden mobile ring. Use the finished mobile as woodland nursery decor or make it as a handmade baby gift.
Explore More Free Crochet Baby Patterns
Free Crochet Baby Mobile Patterns
Mobile Supply
Jump to the Pattern
Supplies for the Crochet Deer Baby Mobile Pattern
For this crochet deer baby mobile pattern, I’d use the same yarn weight and hook for all three fawns. That keeps the deer the same size even though we’ll hang them at different heights. The acorns and leaves use the same yarn too, so you don’t need to buy several different weights just to finish the mobile.
Finished Size and Mobile Layout
With worsted weight yarn and a 3.5 mm hook, expect each finished fawn to be roughly 4 to 5 inches from the nose to the back of the body and about 4 1/2 to 5 inches from the bottom of the legs to the tips of the ears. The acorns are expected to finish at about 1 3/4 inches tall, and the leaves at about 2 inches long.
These are expected finished measurements based on the stated yarn, hook and gauge rather than physically test-measured dimensions. Your finished size may vary slightly with yarn choice, stuffing and tension.
- Finished fawns: 3
- Expected fawn length: about 4 to 5 inches each
- Expected fawn height: about 4 1/2 to 5 inches to the ear tips
- Expected acorn height: about 1 3/4 inches
- Expected leaf length: about 2 inches
- Wooden mobile ring: about 10 inches in diameter
Yarn
A smooth worsted weight yarn works well here because the little cream spots and embroidered faces need to stay easy to see. I’d skip fuzzy yarn for the deer. It can hide the shaping around the face and make those small details disappear.
- Fawn tan: about 100 yards total for three deer
- Cream or warm ivory: about 25 yards for the muzzles, tail tips, ear stitches and spots
- Dark brown: about 20 yards for the hoof tips, acorn caps and stems, plus a small amount for the embroidered noses and mouths
- Caramel or medium brown: about 15 yards for the acorn bodies
- Sage green: about 15 yards for three leaves
- Black embroidery floss or smooth black yarn: a small amount for the eyes
The yarn amounts are approximate and include a little room for tails, joining and normal tension differences. You do not need a separate full skein for every accent color. Scraps are plenty for the leaves, acorns and face details.
Other Materials
- 3.5 mm crochet hook
- Polyester fiberfill
- 10-inch unfinished wooden mobile ring
- About 12 yards of strong cotton yarn or cotton cord for hanging the pieces and supporting the ring
- Yarn needle
- Embroidery needle if you are using embroidery floss
- Stitch marker
- Scissors
- Straight pins for positioning the ears, muzzle and legs before sewing
- Ruler or measuring tape
Keep the stuffing light in the legs and fairly firm in the body and head. The deer need enough stuffing to hold their shape, but packing them rock hard only adds weight to a hanging mobile.
Gauge and Skill Level
Gauge: about 5 single crochet stitches and 5 to 6 rounds per inch in firmly worked single crochet.
Exact gauge isn’t critical for this project. A firm fabric is. If you can see obvious gaps between your stitches after stuffing, go down a hook size. If the stitches are so tight that getting the hook into them is a struggle, go up slightly.
I’d call this a confident beginner pattern. The crochet itself uses basic stitches. The extra attention comes from working small pieces, sewing the legs and ears into matching positions and embroidering three faces that look like they belong together.
Abbreviations
- ch: chain
- sc: single crochet
- hdc: half double crochet
- dc: double crochet
- inc: work 2 sc in the same stitch
- dec: single crochet decrease over the next 2 stitches
- sl st: slip stitch
- st/sts: stitch/stitches
- rnd: round
- MR: magic ring
This pattern uses U.S. crochet terminology. If you need to check a stitch abbreviation, the Craft Yarn Council crochet abbreviations guide lists the standard U.S. terms used in crochet patterns.
Before You Start the First Fawn
The head, body and legs are worked in continuous rounds. Do not join at the end of a round unless the instructions specifically tell you to. Put a stitch marker in the first stitch and move it up after every round.
Make the first deer completely before starting the other two. Check its proportions, then use that finished fawn as your reference while you make Fawns 2 and 3. The stitch counts do not change between them. Their different look on the finished mobile comes from where they hang, not from making three different deer patterns.
Use cream yarn for the fawn spots rather than sewing on separate little circles. That keeps the body lighter and gives you much better control over where the spots land. The eyes are embroidered too. There are no plastic safety eyes, beads or buttons on these deer.
Crochet Deer Baby Mobile Pattern: Make the Spotted Fawns
Make three fawns from the instructions below. I’d finish the first one completely before starting the other two. Once you like the ear position, leg spacing and face on Fawn 1, you have a good reference sitting beside you for the next two.
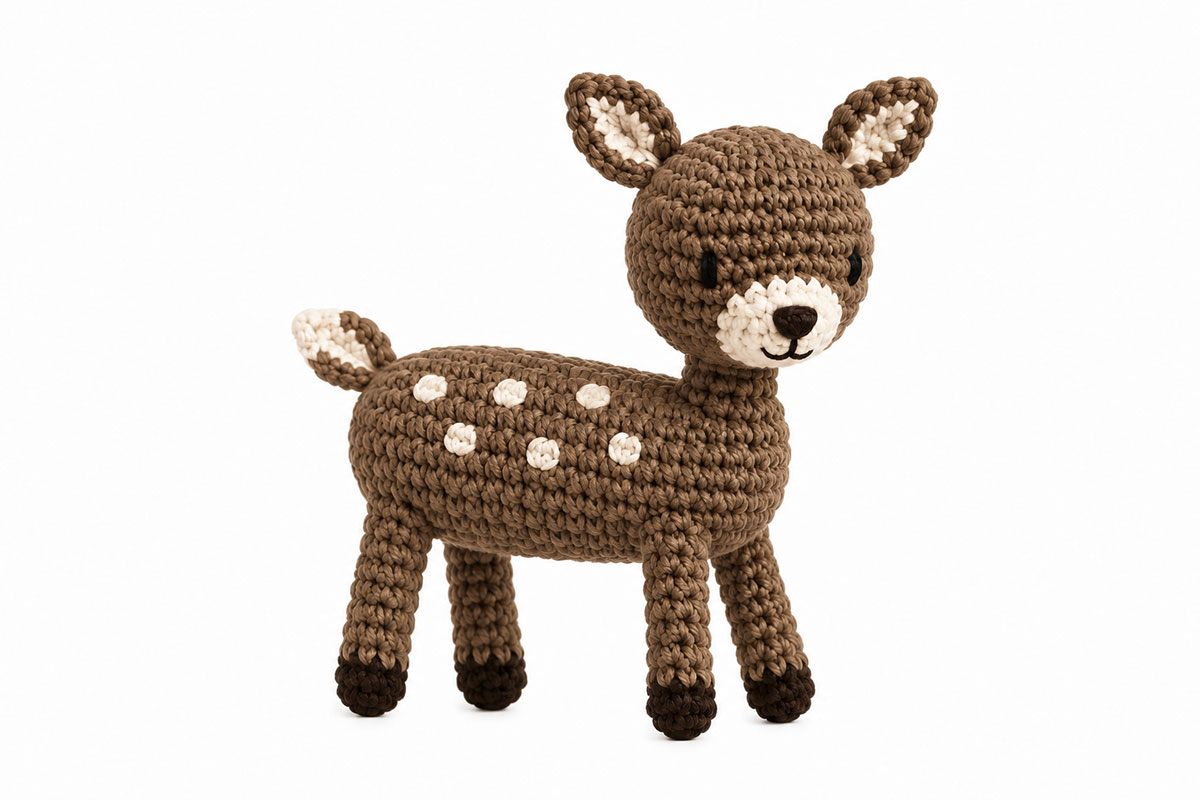
The body is worked from the rump toward the chest. A very short two-round neck is made separately and sewn upright to the upper front of the body, then the head is attached on top. Four narrow legs, two pointed ears, a cream muzzle and a tiny tipped tail finish the fawn shape. The spots are embroidered directly onto the body instead of crocheting and sewing on a pile of little circles.
Fawn Body
With fawn tan yarn, make an MR.
Rnd 1: Work 6 sc in MR. (6)
Rnd 2: Inc in each st around. (12)
Rnd 3: [Sc in next st, inc in next st] 6 times. (18)
Rnd 4: [Sc in next 2 sts, inc in next st] 6 times. (24)
Rnds 5 through 12: Sc in each st around. (24)
Rnd 13: [Sc in next 2 sts, dec over next 2 sts] 6 times. (18)
Rnd 14: Sc in each st around. (18)
Rnd 15: [Sc in next st, dec over next 2 sts] 6 times. (12)
Stuff the body now. Fill the rounded rump and the middle first, then add a little more toward the chest. Keep the shape firm enough to stay oval without packing it hard.
Rnd 16: Dec 6 times. (6)
Fasten off, leaving a tail. Thread the tail through the remaining 6 stitches and pull the opening closed. Weave in the end.
The beginning MR is the rump and the closed end of Round 16 is the chest. The short neck is made separately and sewn upright to the upper front of the body.
Add the Cream Fawn Spots
Do the spots before sewing on the legs. It’s much easier to hold the body and place them evenly while there’s nothing dangling from the underside.
Thread a yarn needle with cream yarn. Make eight small spots on each fawn: three along one upper side, three along the opposite upper side and two near the top of the back. For each spot, make two or three short parallel satin stitches over an area about one crochet stitch wide.
Keep the spots small. A few clearly separated cream marks read more like a young fawn than large white patches covering half the body.
After finishing each group of spot stitches, weave the cream yarn back and forth beneath several tan crochet stitches on the body. Reverse direction and weave beneath several more stitches before trimming the yarn close to the surface.
Fawn Legs
Make four legs for each fawn, for a total of twelve.
Begin with dark brown yarn for the little hoof.
Rnd 1: Work 6 sc in MR. (6)
Rnd 2: Sc in each st around. (6)
Change to fawn tan.
Rnds 3 through 7: Sc in each st around. (6)
Fasten off, leaving a long tail for sewing. Add only a tiny amount of stuffing. The legs should stay narrow rather than turning into four little stuffed tubes that look too heavy for the body.
Leave the upper edge open.
Attach the Legs
Choose the underside of the body and mark it if necessary. Sew one rear leg to each side of the underside around Body Rounds 5 and 6. Place the front pair around Body Rounds 11 and 12.
Keep about four body stitches between the left and right legs in each pair. Sew all the way around the open top of each leg so it stays round where it meets the body.
Set the fawn on the table before weaving in the sewing tails. The four legs should point generally downward and sit in two clear pairs. They do not have to support the deer like a freestanding toy. They just need to look even when the fawn hangs from the mobile.
Fawn Head
With fawn tan yarn, make an MR.
Rnd 1: Work 6 sc in MR. (6)
Rnd 2: Inc in each st around. (12)
Rnd 3: [Sc in next st, inc in next st] 6 times. (18)
Rnds 4 through 7: Sc in each st around. (18)
Rnd 8: [Sc in next st, dec over next 2 sts] 6 times. (12)
Stuff the head firmly enough to hold its rounded shape, but leave the 12-stitch opening at the bottom accessible.
Fasten off and weave in the yarn end. Do not close the 12-stitch opening. It will be joined directly to the 12-stitch upper edge of the neck.
Cream Muzzle
With cream yarn, ch 5.
Rnd 1: Starting in the second ch from the hook, sc in next 3 ch, work 3 sc in last ch. Continue along the opposite side of the starting chain, sc in next 2 ch, then work 2 sc in the final ch. (10)
Rnd 2: Inc in first st, sc in next 2 sts, inc in next 3 sts, sc in next 2 sts, inc in last 2 sts. (16)
Fasten off, leaving a long sewing tail. Do not stuff the muzzle.
Choose the front of the head. Pin the cream oval across the lower half with the longer direction running from side to side. Sew around the outer edge, keeping it flat against the head.
Fawn Ears
Make two ears for each deer.
With fawn tan, ch 2.
Row 1: Work 2 sc in second ch from hook. (2)
Row 2: Ch 1 and turn. Inc in each st. (4)
Rows 3 and 4: Ch 1 and turn. Sc in each st across. (4)
Fasten off, leaving a sewing tail.
Row 1 is the narrow tip of the ear and Row 4 is the wider base that will be sewn to the head.
Thread a short length of cream yarn through the needle and make two straight stitches inside each ear, beginning near the Row 4 base and stopping before the narrow Row 1 tip. Weave in the cream ends.
Pin the ears to the upper sides of the head with the narrow Row 1 tips angled slightly outward. Leave about four stitches between their inside edges. Sew the Row 4 edge of each ear firmly to the head.
Embroider the Fawn Face
Use black embroidery floss or a thin strand of smooth black yarn for the eyes. Place each eye about two rounds above the upper edge of the cream muzzle and about three stitches to either side of the center line.
Make each eye with two short vertical satin stitches. Keep them short. Long black lines can change the expression quickly on a face this small.
Use dark brown yarn or embroidery floss for the nose. Make three short horizontal satin stitches near the center of the cream muzzle. Add one short vertical stitch beneath the nose and two tiny diagonal stitches for the mouth.
I’d finish the entire face before attaching the head to the body. It’s much easier to keep the eyes level when you can turn the head in your hand.
Fawn Tail
Make one tail for each deer.
With cream yarn, ch 2.
Row 1: Work 2 sc in second ch from hook. (2)
Row 2: Ch 1 and turn. Inc in each st. (4)
Change to fawn tan.
Rows 3 and 4: Ch 1 and turn. Sc in each st across. (4)
Fasten off, leaving a sewing tail.
Sew the tan end of the tail to the center of the rump between and slightly above the rear legs. Leave the cream tip free and angle it slightly upward.
Short Fawn Neck
Make one short neck for each fawn.
Leave about a 10-inch starting tail, then ch 12. Join with a sl st in the first ch to form a ring, taking care not to twist the chain.
Rnd 1: Ch 1; this does not count as a stitch. Sc in the same ch as the join and in each remaining ch around. Join with a sl st in the first sc. (12)
Rnd 2: Ch 1; this does not count as a stitch. Sc in each st around. Join with a sl st in the first sc. (12)
Fasten off, leaving about a 12-inch tail for attaching the head. The finished neck is a very short two-round tube with both ends open.
Attach the Neck and Head
With the legs pointing down, position the lower edge of the neck on the upper front of the body. Center the 12-stitch neck opening over Body Round 13. The front edge should sit near Body Round 15 and the back edge near Body Round 11. The little tube should stand upward rather than point forward.
Use the 10-inch starting tail to sew each of the 12 stitches around the lower neck edge to the body. Work all the way around the opening so the neck is attached evenly. Add only a tiny pinch of fiberfill through the open top. The neck should stay narrow rather than becoming a thick stuffed column.
Place the 12-stitch opening at the bottom of the head directly over the 12-stitch upper edge of the neck. The muzzle should face forward and slightly down.
Match the 12 head stitches to the 12 neck stitches one for one. Use the finishing tail from the neck to sew completely around the join, taking one stitch through each matched pair.
Check the fawn from the front and both sides before tightening the final stitches. Both neck rounds should form a very short upright throat between the body and head. Do not push the head down against the body, and do not stretch the neck taller.
Make Fawns 2 and 3
Repeat the complete fawn pattern twice more. Use the same number of spots, the same leg placement and the same face spacing on all three.
Before moving on to the acorns, set the three deer side by side. Check the ear angles, head height and leg positions. Small handmade differences are fine, but none of the three should look noticeably taller or heavier than the others.
If you want to keep working with the deer instead of making a mobile, the crochet deer lovey pattern makes a larger blanket-style project. The crochet deer applique pattern gives you a flat deer motif for another kind of project.
Crochet Acorn Pattern
Make two acorns. I’d keep these noticeably smaller than the deer. They’re there to fill a couple of gaps around the ring, not compete with the fawns.
Begin with caramel or medium brown yarn.
Rnd 1: Work 6 sc in MR. (6)
Rnd 2: Inc in each st around. (12)
Rnd 3: [Sc in next st, inc in next st] 6 times. (18)
Rnds 4 through 6: Sc in each st around. (18)
Rnd 7: [Sc in next st, dec over next 2 sts] 6 times. (12)
Add a small amount of fiberfill. Keep the lower acorn plump but not hard.
Change to dark brown for the cap.
Rnd 8: Working in back loops only, sc in each st around. (12)
Rnd 9: [Sc in next st, inc in next st] 6 times. (18)
Rnd 10: Sc in each st around. (18)
Rnd 11: [Sc in next st, dec over next 2 sts] 6 times. (12)
Add a final small pinch of fiberfill if needed so the brown cap holds its rounded shape without becoming hard.
Rnd 12: Dec 6 times. (6)
Fasten off. Pull the remaining stitches closed and weave in the tail.
Acorn Stem
With dark brown yarn, ch 4.
Starting in the second ch from the hook, sl st in each of the next 3 ch.
Fasten off, leaving a sewing tail. Sew the bottom of the stem securely to the center of the brown cap.
Make the second acorn the same way.
Simple Crochet Leaf Pattern
Make three sage leaves. These are flat and unstuffed, so they add shape without adding much weight to the ring.
With sage green yarn, ch 9.
Starting in the second ch from the hook, work 1 sl st, 1 sc, 1 hdc, 1 dc, 1 dc, 1 hdc and 1 sc. Work 3 sc in the last ch.
Now work along the opposite side of the starting chain: 1 sc, 1 hdc, 1 dc, 1 dc, 1 hdc, 1 sc and 1 sl st.
Do not fasten off yet.
Ch 3 for the little stem. Starting in the second ch from the hook, sl st in each of the next 2 ch. Sl st back into the base of the leaf.
Fasten off and weave in the end.
If you want a visible center vein, thread a short length of sage yarn through a needle and make one loose running stitch from the base toward the tip. Keep it subtle. The shape of the leaf should still do most of the work.
Make two more leaves the same way.
Assemble the Crochet Deer Baby Mobile
Before tying anything to the wooden ring, put all eight hanging pieces on the table: three fawns, two acorns and three leaves. Check every seam and weave in every loose yarn end now. Remove every straight pin and stitch marker before anything is attached to the mobile. Once everything is hanging at different heights, finding one little unfinished tail becomes annoying fast.
Attach a Hanging Cord to Each Fawn
Do not hang a deer by its head, ear or neck. The suspension point belongs on the upper back where the weight of the body can support it.
Cut a 36-inch length of strong cotton yarn or cotton cord for each fawn. Thread it through a yarn needle if the cord is thin enough. Pass the center of the cord under several crochet stitches across the upper middle of the fawn's back, around Body Rounds 8 and 9. Take a second pass through nearby stitches before bringing both cord ends upward.
Lift the fawn by the two cord ends. Move the attachment point one stitch toward the chest or rump if the deer tips badly forward or backward. Once it hangs nearly level, knot the two strands securely above the body.
Repeat with the other two deer.
Attach Cords to the Acorns and Leaves
Cut one 36-inch length of cord for each acorn. Pass the center of the cord through the crocheted brown cap near the base of the stem, then bring both ends upward. Do not rely on the little stem itself to hold the weight.
Cut one 36-inch length of cord for each leaf. Pass the center of the cord through the base where the leaf and stem meet, then bring both ends upward. That keeps the leaf hanging with its point downward or slightly sideways instead of flipping upside down.
Arrange the Eight Pieces Around the Ring
I’d spread the pieces around the ring instead of clustering all three deer on one side. An easy starting arrangement is:
- 12 o'clock: Fawn 1
- About 1:30: Leaf 1
- 3 o'clock: Acorn 1
- About 4:30: Fawn 2
- 6 o'clock: Leaf 2
- About 7:30: Fawn 3
- 9 o'clock: Acorn 2
- About 10:30: Leaf 3
Those positions give you a fairly even starting point around a 10-inch ring. They do not have to land on an exact clock position.
Stagger the Hanging Heights
The three deer should not form one straight row. Start with the top of Fawn 1 about 8 inches below the ring, Fawn 2 about 11 inches below it and Fawn 3 about 14 inches below it.
Try the acorns at about 7 and 10 inches below the ring. The three leaves can start around 5, 8 and 11 inches below the ring.
Treat those as starting drops rather than fixed measurements. Yarn weight, stuffing and the exact knot position can change how the mobile balances. Move a piece an inch or two if the arrangement looks crowded or leaves a large empty gap.
Once you like a hanging height, tie the cord securely to the wooden ring with a firm double knot. Do not trim the cord ends until the whole mobile has been balanced.
Add the Three Upper Support Cords
Cut three equal lengths of strong cotton cord, each about 24 inches long. Tie one end of each cord to the wooden ring with a firm double knot, placing the three attachment points evenly around the ring.
Bring the three free ends together above the center of the ring and tie them into one secure upper loop. Before lifting the finished mobile, pull firmly on each support cord to make sure none of the three ring attachments slips.
If the wooden ring tilts, shorten the support cord on the low side or lengthen the one on the high side until the ring hangs level. Do this before tightening and trimming the final knots.
The bottom pieces can turn a little when the mobile moves. That's fine. What you do not want is a ring that hangs noticeably crooked or three deer knocking into each other every time it turns.
Once everything is level, tighten every knot again and trim the extra cord, leaving enough of a tail that the knot cannot work loose easily. I would not depend on glue as the only thing holding a hanging piece or support cord together.
If you'd rather make a mobile with several different woodland animals, see the woodland animal crochet baby mobile pattern. For more hanging designs, the free crochet baby mobile patterns page gathers the other mobile projects in one place.
Baby Mobile Safety
This handmade deer mobile is nursery decoration, not a toy for a baby to hold or play with. Keep the deer, acorns, leaves and every hanging cord completely out of a baby's reach.
I would not tie a handmade mobile to crib rails or a play yard. Hang it from a secure location where the entire mobile stays well beyond reach, and check the attachment point, upper loop, knots and crocheted pieces regularly.
The U.S. Consumer Product Safety Commission age guidance for toys notes that mobiles can become a strangulation hazard when babies begin pushing up on their hands and knees or sitting, at about five months. Treat that as the latest point to remove or relocate a mobile from the crib area, not as a reason to put one within reach before then.
If a cord stretches, a knot loosens or a crocheted piece begins pulling apart, take the mobile down until it has been repaired. The embroidered faces also avoid detachable plastic eyes or buttons on the hanging deer.
Crochet Deer Baby Mobile Pattern FAQ
Can I make the crochet fawns larger?
Yes, but changing to a heavier yarn and larger hook changes more than the deer size. It also increases the weight hanging from the wooden ring. If you enlarge the fawns, recheck the strength of the suspension cords and the balance of the finished mobile rather than assuming the original setup will work unchanged.
Can I make three different sizes of deer?
You can, but the example mobile uses three deer made from the exact same pattern. I prefer that here. The different hanging heights already give you plenty of variation, and using one size makes balancing the ring much easier.
Do I need safety eyes for the fawns?
No. The eyes in this pattern are embroidered with short black satin stitches. The nose and mouth are embroidered too, so there are no plastic facial pieces to attach.
Can I leave off the brown hooves?
Yes. If you want an even simpler fawn, work all seven leg rounds in tan. The leg shape and stitch counts stay the same. The dark brown first two rounds are only a color detail.
Can I use a different size wooden ring?
A ring close to 9 to 12 inches should still give the three fawns enough room if you adjust the spacing. A much smaller ring can crowd the deer together, while a much larger ring leaves more empty space and may need additional accents or longer support cords.
Can I use different woodland accents instead of acorns and leaves?
Yes, but keep them small and light. I would swap one accent for another rather than adding more and more pieces to the ring. The deer are supposed to be the focus of this mobile.
Is this crochet deer mobile meant to hang where a baby can touch it?
No. It is decorative nursery decor and should remain completely out of reach. Do not attach it to crib rails or give the crocheted hanging pieces to a baby as toys.
When you click on links to various merchants on this site and make a purchase, this may result in this site earning a commission. This does not affect the price you pay.

UBGI Gold Standard 2026
Reviewed under the site's
editorial checklist.
Photos, decorating ideas, party setups and reader submissions are shared for inspiration unless a page is specifically presented as a pattern, tutorial, reference guide or step-by-step project. Follow the instructions, measurements, safety guidance and manufacturer directions provided for the particular project or product.
About Jan | Contact | Baby Nursery Ideas (Blog) | Site Map | Privacy Policy | Disclosure Policy | Disclaimer | Affiliate Disclosure | Earnings Disclosure | Facebook | Pinterest
I am a participant in the Amazon Services LLC Associates Program, an affiliate advertising program designed to provide a means for us to earn fees by linking to Amazon. As an Amazon Associate I earn from qualifying purchases.
Copyright © 2006-2026. All Rights Reserved.