Woodland Nursery Crochet Mushroom Pattern for Baby Crib Mobile Decorations
This free woodland nursery crochet mushroom pattern is an easy project that adds hand stitched charm to a baby's room. The pattern collection includes several mushroom styles you can mix together to create a woodland crib mobile, nursery garland, shelf decorations, or hanging accents inspired by a forest nursery theme.Explore more woodland and crochet ideas:
Woodland Forest Animals Nursery Theme
Supplies used for this woodland nursery crochet mushroom pattern:
Jump to a section:
Woodland Nursery Crochet Mushroom Pattern Quick Answer
A woodland nursery crochet mushroom pattern is a small stuffed mushroom worked in continuous rounds and suspended from a mobile hoop using cotton cord. Most mushrooms on this page take less than an hour to complete and can be mixed in different sizes to create a woodland crib mobile, nursery decorations, or hanging accents.
Use odd numbers of mushrooms.
Five or seven hanging pieces often balance better than six because the arrangement looks more natural from different viewpoints around the room.
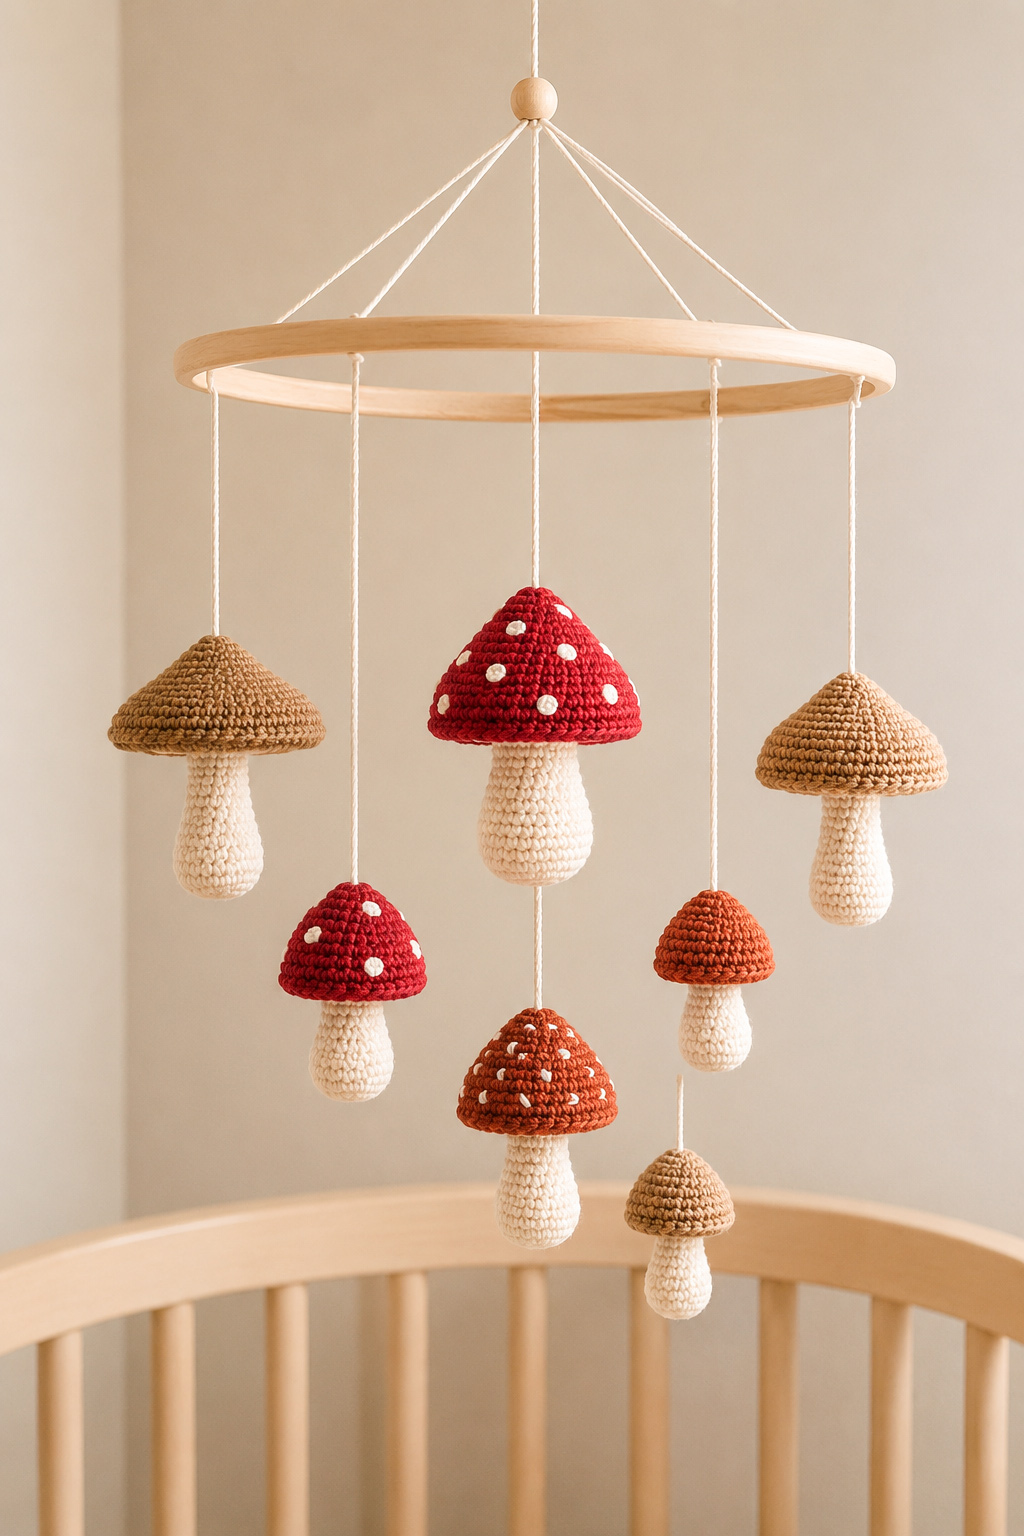
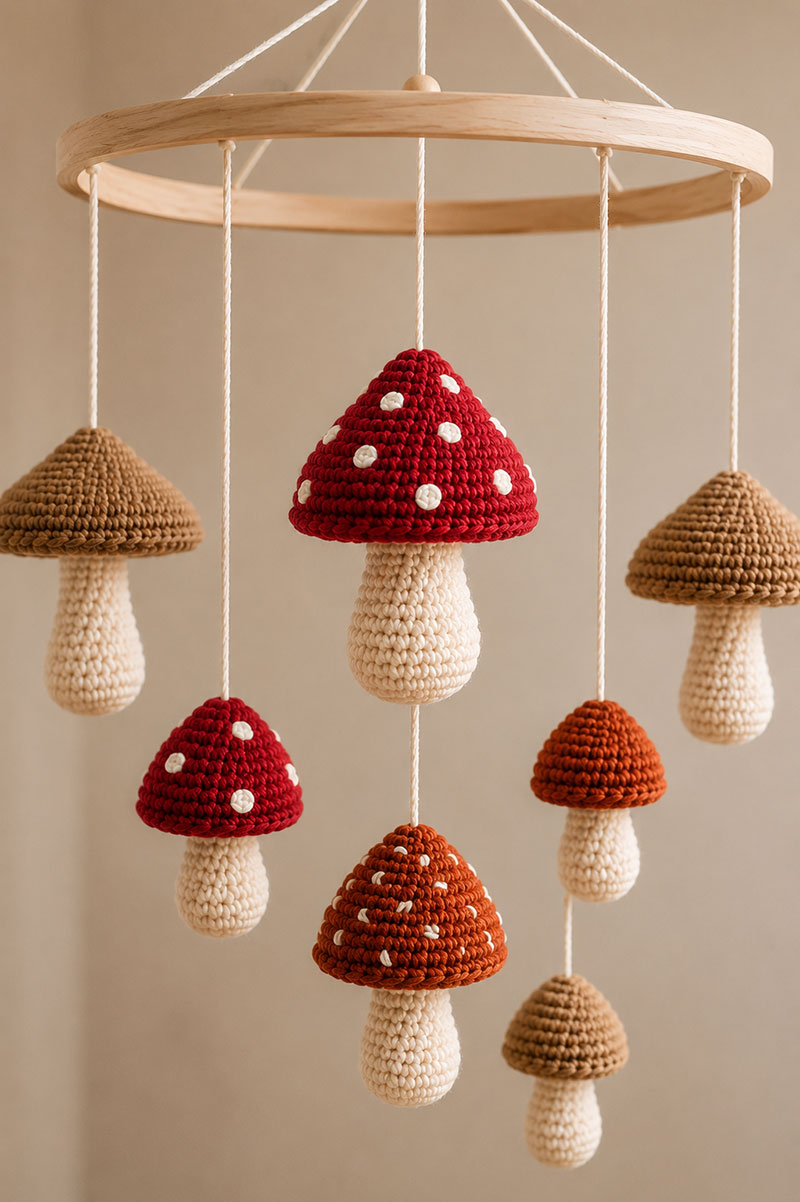
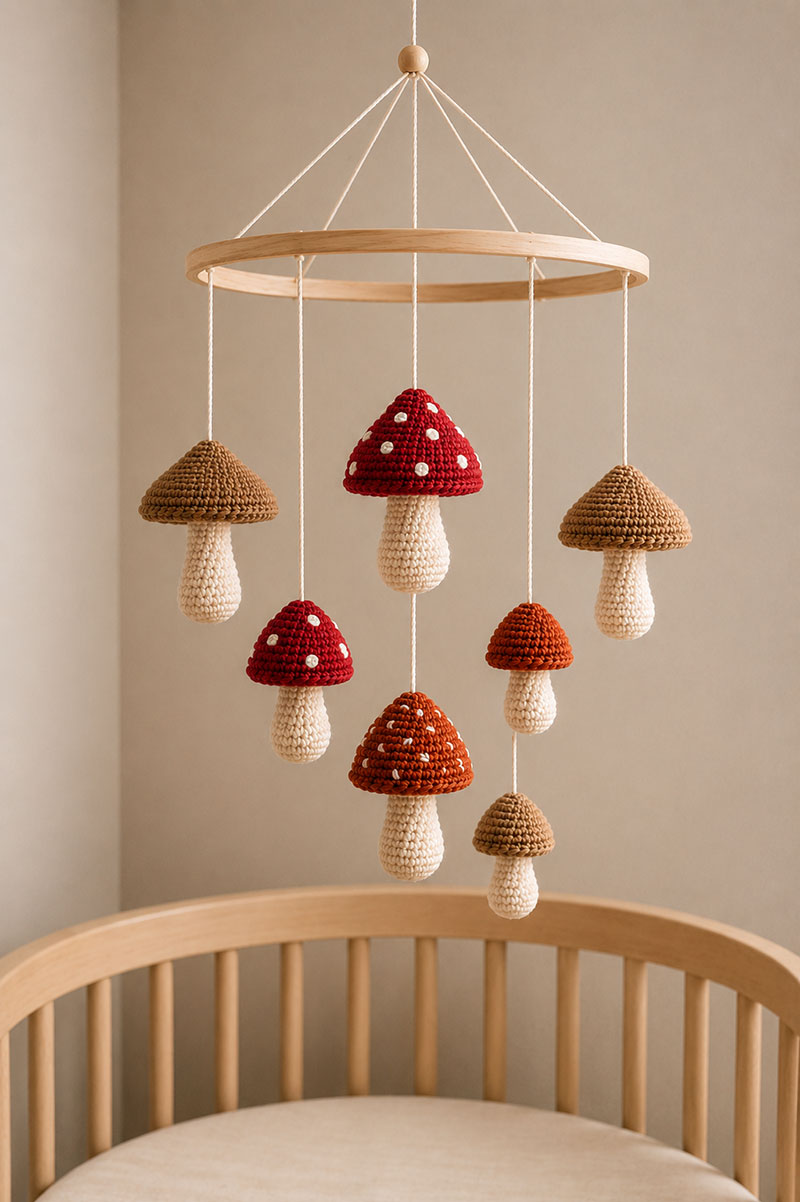
This woodland nursery crochet mushroom pattern is designed for a seven piece mobile with three finished sizes.
Skill Level and Supplies for This Crochet Mushroom Pattern
Small nursery decorations can look simple until the pieces start twisting, leaning, or hanging unevenly. That is why this woodland nursery crochet mushroom pattern includes exact stitch counts, finished sizes, stuffing notes, and hanging instructions instead of leaving the mobile assembly to guesswork.
This pattern is written for a confident beginner, not a first-day crocheter. You should already know how to make a magic ring, single crochet, increase, decrease, work in continuous rounds, and sew two crochet pieces together. If those skills are new, practice on one test mushroom before making the full mobile.
The woodland nursery crochet mushroom pattern below keeps the cap, stem, stuffing, and hanging loop steps separated so the project is easier to follow.
Pattern notes before you begin:
- Use US crochet terms.
- Work in continuous spiral rounds. Do not join at the end of each round unless a step says to do so.
- Place a stitch marker in the first stitch of every round and move it up as you work.
- Keep your stitches snug so the stuffing does not show through.
- Gauge is not critical, but your finished mushrooms should match the size chart below if you want the same mobile proportions.
Yarn and supplies for seven mushrooms:
- Worsted weight number 4 cotton yarn, red, about 25 yards
- Worsted weight number 4 cotton yarn, rust, about 25 yards
- Worsted weight number 4 cotton yarn, light brown, about 30 yards
- Worsted weight number 4 cotton yarn, cream, about 50 yards
- Small amount of white or cream yarn for cap dots
- 3.5 mm crochet hook
- Polyfill stuffing
- Yarn needle
- Stitch marker
- Scissors
- Cotton hanging cord
- 9 to 12 inch wooden mobile hoop
Abbreviations:
- MR means magic ring
- ch means chain
- sc means single crochet
- inc means 2 single crochet in the same stitch
- dec means single crochet 2 stitches together
- sl st means slip stitch
- st means stitch
If you are making this for a full forest themed room, the handmade look pairs naturally with the ideas on DIY Woodland Crib Mobile and Woodland Nursery Ideas.
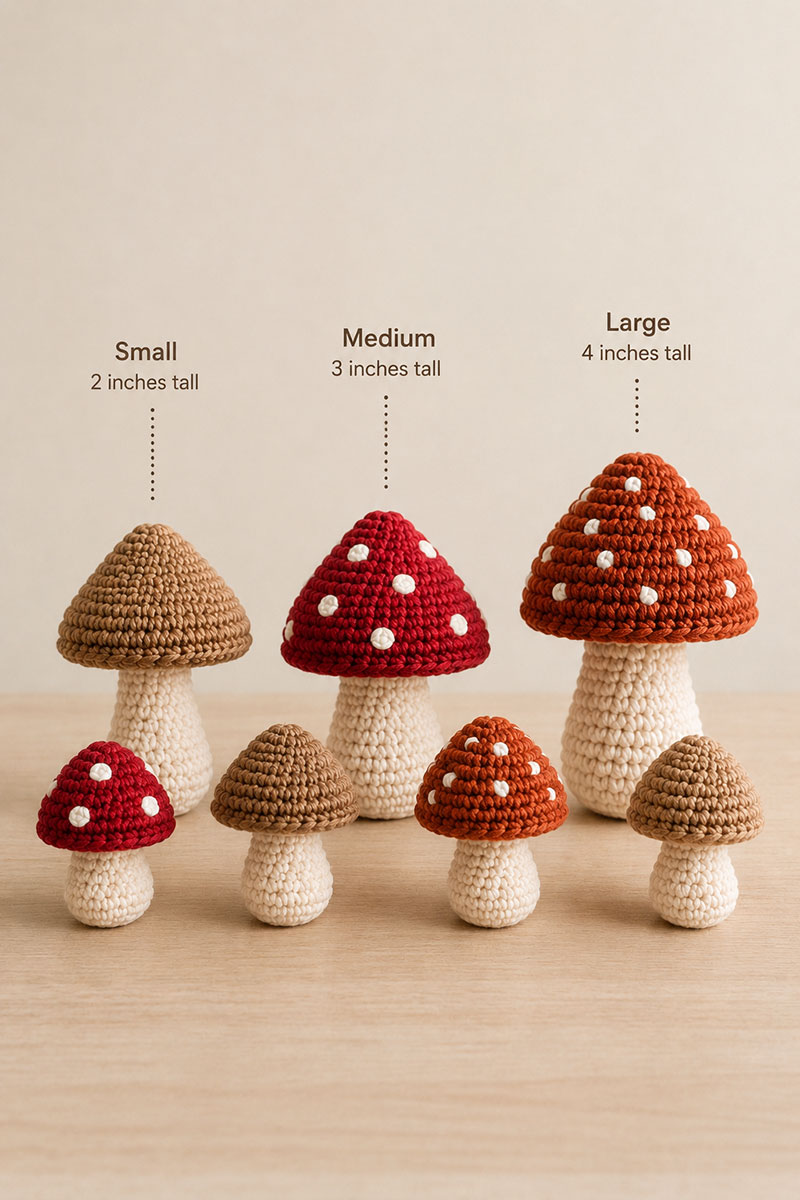
Finished Size Chart for a Crochet Mushroom Mobile
The mobile in the main page image uses three mushroom sizes. Real nursery mobiles look better when every piece is not lined up like a row of matching ornaments.
- Small mushroom: about 2 inches tall, 1 1/2 inch cap width
- Medium mushroom: about 3 inches tall, 2 inch cap width
- Large mushroom: about 4 inches tall, 2 1/2 inch cap width
Suggested seven piece mobile layout:
- 3 large mushrooms
- 2 medium mushrooms
- 2 small mushrooms
Use odd numbers of mushrooms.
Five or seven hanging pieces balance better visually because the eye does not split the mobile into two equal halves. I believe that is why some handmade nursery mobiles look finished while others look a little stiff, even when the crochet work is neat.
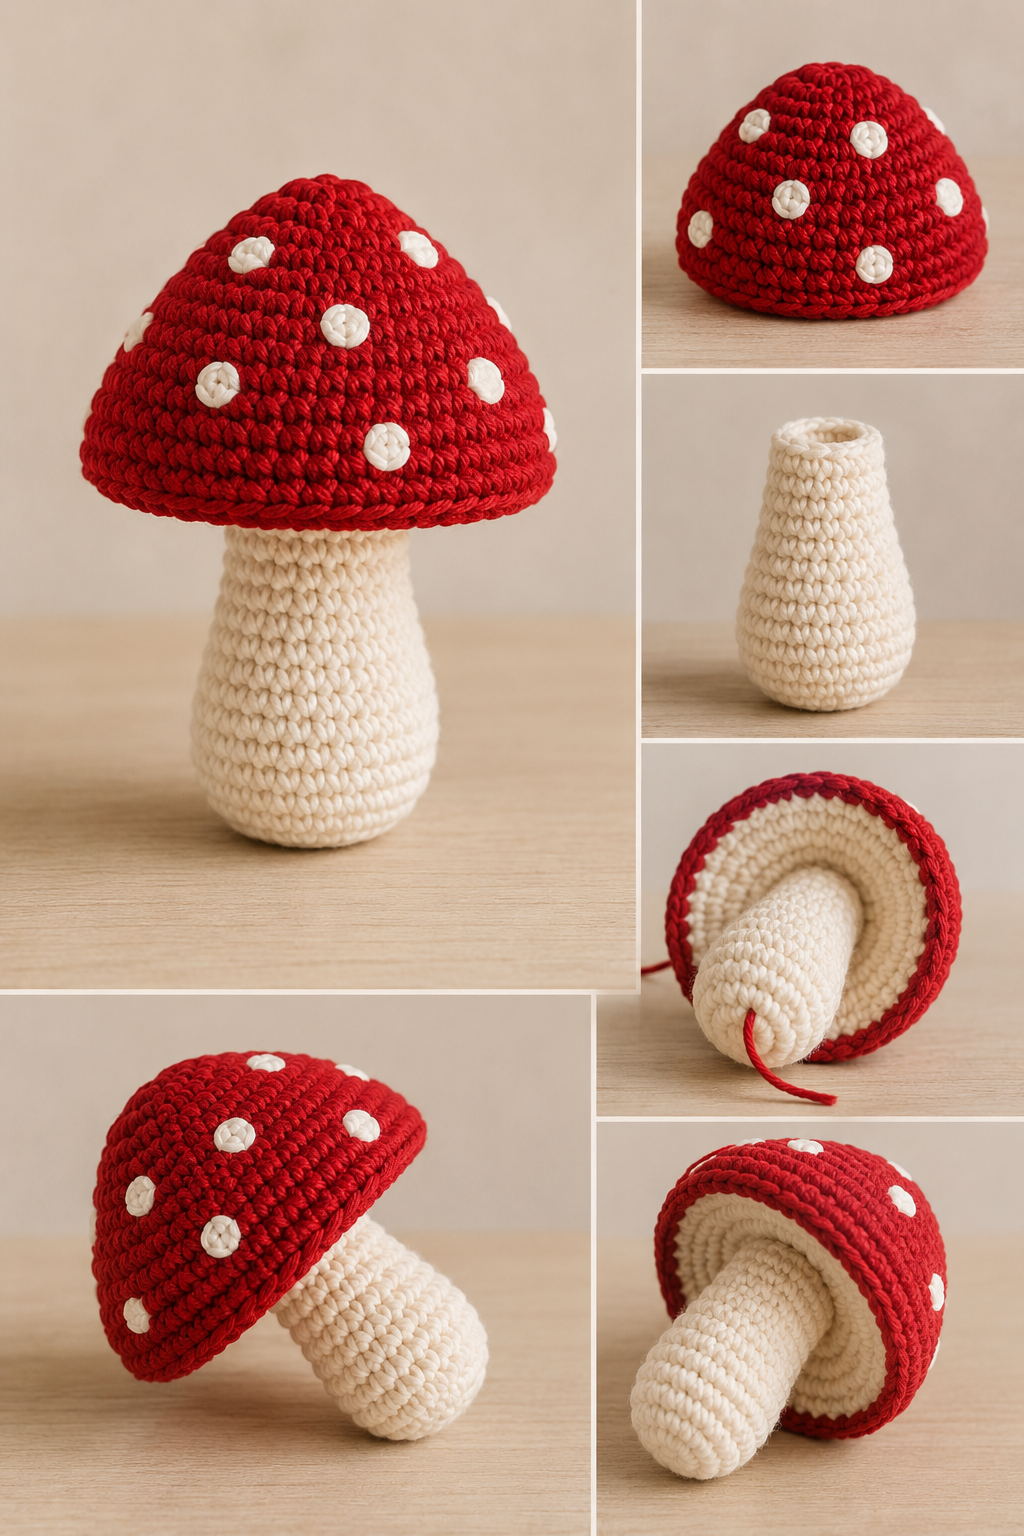
Classic Toadstool Crochet Mushroom Pattern
The classic toadstool is the easiest mushroom to recognize from across a nursery. It gives the mobile a clear woodland look without needing extra decorations.
This woodland nursery crochet mushroom pattern starts with the toadstool because it becomes the main visual piece in the mobile.
Finished size: about 4 inches tall.
Make 2 large toadstools for the mobile.
Cap, using red yarn:
Round 1: Make a MR. Work 6 sc into the ring. Pull the ring closed. (6)
Round 2: Work 2 sc in each stitch around. (12)
Round 3: Work 1 sc in the next stitch, then 2 sc in the next stitch. Repeat around. (18)
Round 4: Work 1 sc in each of the next 2 stitches, then 2 sc in the next stitch. Repeat around. (24)
Round 5: Work 1 sc in each of the next 3 stitches, then 2 sc in the next stitch. Repeat around. (30)
Round 6: Work 1 sc in each of the next 4 stitches, then 2 sc in the next stitch. Repeat around. (36)
Rounds 7 through 10: Work 1 sc in each stitch around. (36)
Round 11: Work 1 sc in each of the next 4 stitches, then dec. Repeat around. (30)
Fasten off, leaving a 14 inch tail for sewing. Do not close the opening yet.
Stem, using cream yarn:
Round 1: Make a MR. Work 6 sc into the ring. Pull the ring closed. (6)
Round 2: Work 2 sc in each stitch around. (12)
Round 3: Work 1 sc in the next stitch, then 2 sc in the next stitch. Repeat around. (18)
Rounds 4 through 6: Work 1 sc in each stitch around. (18)
Round 7: Work 1 sc in each of the next 4 stitches, then dec. Repeat around. (15)
Rounds 8 through 12: Work 1 sc in each stitch around. (15)
Stuff the stem until it stands upright when placed on the table. It should press back slightly when squeezed, but it should not bend in the middle.
Round 13: Work 1 sc in the next stitch, then dec. Repeat around. (10)
Fasten off, leaving a 12 inch tail for sewing.
Add the cap dots:
- Thread a yarn needle with cream yarn.
- Bring the needle up through the inside of the cap to the outside.
- Make one short straight stitch on the cap surface.
- Bring the needle back inside the cap.
- Repeat 8 to 12 times, spacing the dots unevenly so they do not look like a grid.
- Knot the yarn inside the cap and trim the end.
Assemble the toadstool:
- Add stuffing to the cap until the top looks rounded and does not cave in when held from the sides.
- Place the stem inside the cap opening.
- Center the stem so the mushroom stands straight when held upright.
- Use the cap tail to sew the cap edge to the top of the stem.
- Stitch slowly around the stem twice for a firm join.
- Hide the yarn tail inside the mushroom.
A small lean may not show on the table, but it becomes obvious once the mushroom is hanging. Hold the finished piece by the top of the cap before tying it to the mobile hoop.
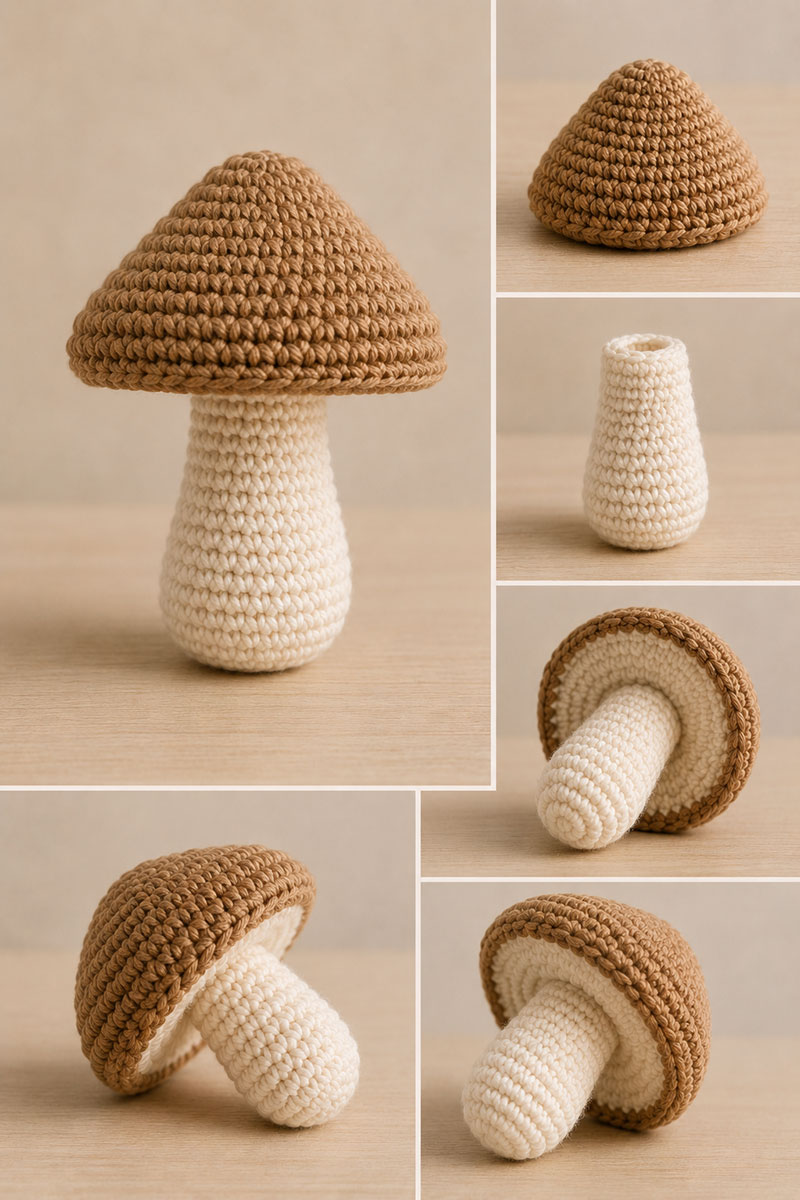
Tall Forest Woodland Nursery Crochet Mushroom Pattern
The tall forest mushroom adds height variation to the mobile. In a real nursery, that little change matters because the mobile is seen from the doorway, the crib side, and the rocking chair, not just straight on.
Finished size: about 3 inches tall.
Make 2 medium forest mushrooms for the mobile.
Cap, using light brown yarn:
Round 1: Make a MR. Work 6 sc into the ring. Pull closed. (6)
Round 2: Work 2 sc in each stitch around. (12)
Round 3: Work 1 sc in the next stitch, then 2 sc in the next stitch. Repeat around. (18)
Round 4: Work 1 sc in each of the next 2 stitches, then 2 sc in the next stitch. Repeat around. (24)
Round 5: Work 1 sc in each of the next 3 stitches, then 2 sc in the next stitch. Repeat around. (30)
Rounds 6 through 8: Work 1 sc in each stitch around. (30)
Round 9: Work 1 sc in each of the next 3 stitches, then dec. Repeat around. (24)
Fasten off, leaving a 12 inch sewing tail.
Stem, using cream yarn:
Round 1: Make a MR. Work 6 sc into the ring. Pull closed. (6)
Round 2: Work 2 sc in each stitch around. (12)
Rounds 3 through 10: Work 1 sc in each stitch around. (12)
Stuff the stem in small pinches. Push the filling down with the blunt end of the hook after every few rounds so the stem does not collapse.
Round 11: Work 1 sc in each of the next 2 stitches, then dec. Repeat around. (9)
Fasten off, leaving a 12 inch sewing tail.
Assemble the forest mushroom:
- Stuff the cap until the top keeps a rounded shape.
- Place the stem into the cap opening.
- Sew the cap edge to the stem using the cap tail.
- Check that the stem is centered before closing the last few stitches.
- Add a little extra stuffing into the cap before finishing the seam if the top looks flat.
- Knot securely and hide the yarn tail inside.
Use this taller mushroom near the outside edge of the hoop. It creates movement without making the center of the mobile look heavy.
Speckled Crochet Mushroom Pattern for Nursery Decor
The speckled mushroom gives the mobile a handmade collected look. The cap is made almost the same way as the toadstool, but the color and stitched markings keep it from looking copied.
Finished size: about 3 1/2 inches tall.
Make 1 speckled mushroom for the mobile.
Cap, using rust yarn:
Round 1: Make a MR. Work 6 sc into the ring. Pull closed. (6)
Round 2: Work 2 sc in each stitch around. (12)
Round 3: Work 1 sc in the next stitch, then 2 sc in the next stitch. Repeat around. (18)
Round 4: Work 1 sc in each of the next 2 stitches, then 2 sc in the next stitch. Repeat around. (24)
Round 5: Work 1 sc in each of the next 3 stitches, then 2 sc in the next stitch. Repeat around. (30)
Round 6: Work 1 sc in each of the next 4 stitches, then 2 sc in the next stitch. Repeat around. (36)
Rounds 7 through 9: Work 1 sc in each stitch around. (36)
Round 10: Work 1 sc in each of the next 4 stitches, then dec. Repeat around. (30)
Fasten off, leaving a 14 inch sewing tail.
Stem, using cream yarn:
Round 1: Make a MR. Work 6 sc into the ring. Pull closed. (6)
Round 2: Work 2 sc in each stitch around. (12)
Rounds 3 through 9: Work 1 sc in each stitch around. (12)
Stuff the stem so it is firm enough to stand, but do not pack it so tightly that the stitches stretch open.
Round 10: Work 1 sc in each of the next 2 stitches, then dec. Repeat around. (9)
Fasten off, leaving a 12 inch sewing tail.
Add speckles:
- Cut an 18 inch strand of cream yarn.
- Thread the yarn needle.
- Bring the yarn up through the inside of the cap.
- Make a short straight stitch across one crochet stitch.
- Move to another spot on the cap and repeat.
- Add 10 to 14 speckles total.
- Keep the spacing uneven so the cap looks handmade rather than dotted in rows.
- Knot the yarn inside the cap.
Assemble the speckled mushroom:
- Stuff the cap in small amounts.
- Set the stem into the cap opening.
- Sew around the stem using the cap tail.
- Check the angle before the final stitches are tightened.
- Hide the yarn end inside the cap.
I notice speckles show up best when they are not too tiny. If the dots disappear from arm's length away, make them slightly longer on the next mushroom.
Small Crochet Mushroom Pattern for Filling Gaps
The small mushrooms keep the mobile from looking too heavy. They are also helpful when one side needs a little visual weight without adding another large piece.
Finished size: about 2 inches tall.
Make 2 small mushrooms for the mobile.
Cap, using red, rust, or brown yarn:
Round 1: Make a MR. Work 6 sc into the ring. Pull closed. (6)
Round 2: Work 2 sc in each stitch around. (12)
Round 3: Work 1 sc in the next stitch, then 2 sc in the next stitch. Repeat around. (18)
Round 4: Work 1 sc in each of the next 2 stitches, then 2 sc in the next stitch. Repeat around. (24)
Rounds 5 through 7: Work 1 sc in each stitch around. (24)
Round 8: Work 1 sc in each of the next 2 stitches, then dec. Repeat around. (18)
Fasten off, leaving a 10 inch sewing tail.
Stem, using cream yarn:
Round 1: Make a MR. Work 6 sc into the ring. Pull closed. (6)
Round 2: Work 2 sc in each stitch around. (12)
Rounds 3 through 6: Work 1 sc in each stitch around. (12)
Stuff lightly but evenly.
Round 7: Work 1 sc in each of the next 2 stitches, then dec. Repeat around. (9)
Fasten off, leaving a sewing tail.
Assemble the small mushroom:
- Stuff the cap until rounded.
- Place the stem in the cap opening.
- Sew the cap to the stem all the way around.
- Pull the final stitch snug.
- Hide the yarn tail inside.
Small mushrooms are the pieces I would check twice before hanging. Because they weigh less, they can turn more easily once the air moves around the room.
How to Add Hanging Loops to Each Crochet Mushroom
A nursery mobile needs secure hanging loops, not loose yarn tucked through the cap. This step is what turns the mushrooms into the exact hanging decorations shown in the example image.
The hanging method is part of the woodland nursery crochet mushroom pattern because the mushrooms need to sit straight once they are suspended from the hoop.
For each mushroom:
- Cut one 18 inch piece of cotton cord.
- Thread the cord onto a yarn needle.
- Insert the needle through the very center top of the mushroom cap.
- Push the needle down through the cap and out near the bottom edge.
- Remove the needle.
- Tie a double knot at the lower end of the cord.
- Pull the top cord gently until the knot disappears inside the stuffed cap.
- Tug lightly to make sure the knot is seated inside the stuffing.
- Leave the upper cord long until you attach it to the mobile hoop.
If the mushroom tilts forward, move the cord one stitch backward on the cap. If it tilts sideways, move the cord one stitch toward the opposite side.
How to Assemble the Woodland Mushroom Crib Mobile
Lay every mushroom on a table before tying anything to the hoop. This is the part that saves the finished mobile from looking lopsided once it is above the crib.
Cut the hanging lengths:
- Center mushroom: 16 inches
- Two large outer mushrooms: 12 inches each
- Two medium mushrooms: 14 inches each
- Two small mushrooms: 10 inches each
Assembly steps:
- Place the wooden hoop flat on a table.
- Position the largest mushroom in the center.
- Place the two remaining large mushrooms across from one another.
- Place the two medium mushrooms in the open spaces between them.
- Place the two small mushrooms where the mobile still needs balance.
- Tie each hanging cord to the hoop with a double knot.
- Lift the hoop by the center hanger and check whether one side dips.
- If one side dips, slide one mushroom slightly around the hoop until the mobile levels out.
- When the layout is balanced, tighten every knot.
- Trim excess cord to 1/2 inch and tuck the ends toward the inside of the hoop.
For crib safety, keep handmade mobiles completely out of the baby's reach and remove them once a baby can push up on hands and knees or by about 5 months old, whichever comes first. The CPSC also recommends keeping the crib sleep space bare, with only a fitted sheet in the crib, bassinet, or play yard. CPSC Safe Sleep guidance
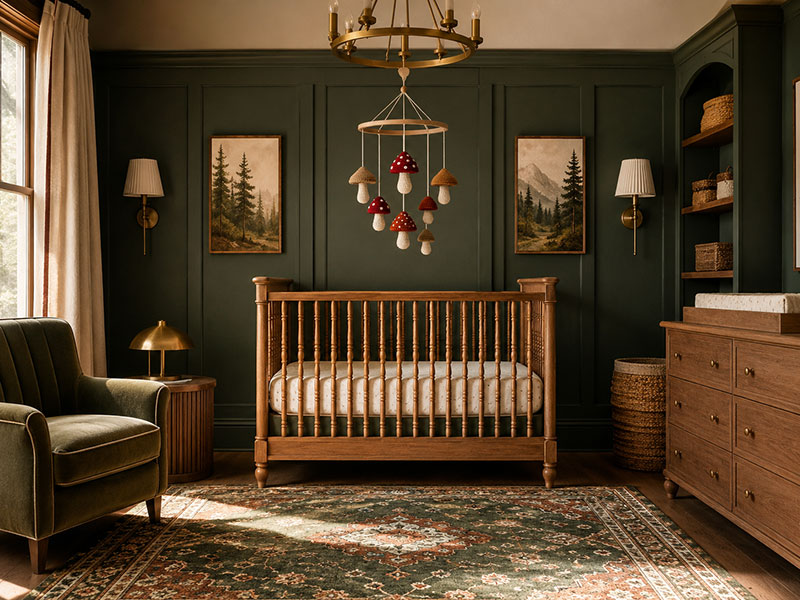
Woodland Nursery Decorating Ideas With Crochet Mushrooms
A crochet mushroom mobile does not need the whole room to match it. In a real nursery, a few repeated forest details usually look more intentional than covering every wall and shelf with the same theme.
This woodland nursery crochet mushroom pattern can also be used for shelf accents, nursery garlands, or small handmade decorations.
Try pairing the mobile with one woodland print, one crib sheet, and one wall detail. That gives the room a clear direction without making the crib area look busy.
The crochet mushrooms also fit naturally with Woodland Nursery Decor Ideas and Woodland Nursery Wallpaper, especially when the room already uses forest colors or animal artwork.
If you want more projects with the same theme, Crochet Animal Lovey Patterns can help connect this mushroom mobile to fox, owl, and woodland animal projects without drifting away from the nursery look.
Woodland Nursery Crochet Mushroom Pattern FAQ
Can these mushrooms be used as nursery shelf decorations?
Yes. Simply omit the hanging cords and place the finished mushrooms directly on a shelf or dresser.
What yarn works best?
Cotton yarn tends to hold its shape well and provides consistent stitch definition for smaller decorative pieces.
Can I make the mushrooms larger?
Yes. Continue adding increase rounds to the cap and additional rounds to the stem while maintaining the same stitch pattern.
Are crochet mobiles safe above a crib?
Mobiles should always remain completely out of a child's reach and should be removed when a child begins pushing up on hands and knees. For current nursery safety guidance, see the Consumer Product Safety Commission Safe Sleep recommendations.
Can these mushrooms be used in a garland?
Yes. String the mushrooms onto a length of cotton cord instead of attaching them to a mobile hoop.
Can beginners make this pattern?
Yes. Anyone comfortable with single crochet, increasing, decreasing, and working in the round should be able to complete the mushrooms by following the stitch counts provided above.
When you click on links to various merchants on this site and make a purchase, this may result in this site earning a commission. This does not affect the price you pay.
UBGI Gold Standard 2026
Verified for performance, SEO,
and accessibility compliance.
Photos, decorating ideas, party setups, and reader submissions are shared for inspiration only and are not intended as step-by-step decorating, construction, or DIY instructions.
About Jan | Contact | Baby Room Ideas (Blog) | Site Map | Privacy Policy | Disclosure Policy | Disclaimer | Affiliate Disclosure | Earnings Disclosure | Facebook | Pinterest
I am a participant in the Amazon Services LLC Associates Program, an affiliate advertising program designed to provide a means for us to earn fees by linking to Amazon.
Copyright © 2006-2026. All Rights Reserved.