Crochet Raccoon Pattern for a Cute Woodland Animal Baby Gift
Crochet raccoon pattern projects are perfect when you want a small woodland animal amigurumi that can be used as a handmade baby shower gift, nursery shelf decoration, or cute crochet animal for a woodland baby room.
More crochet animal patterns you may like:
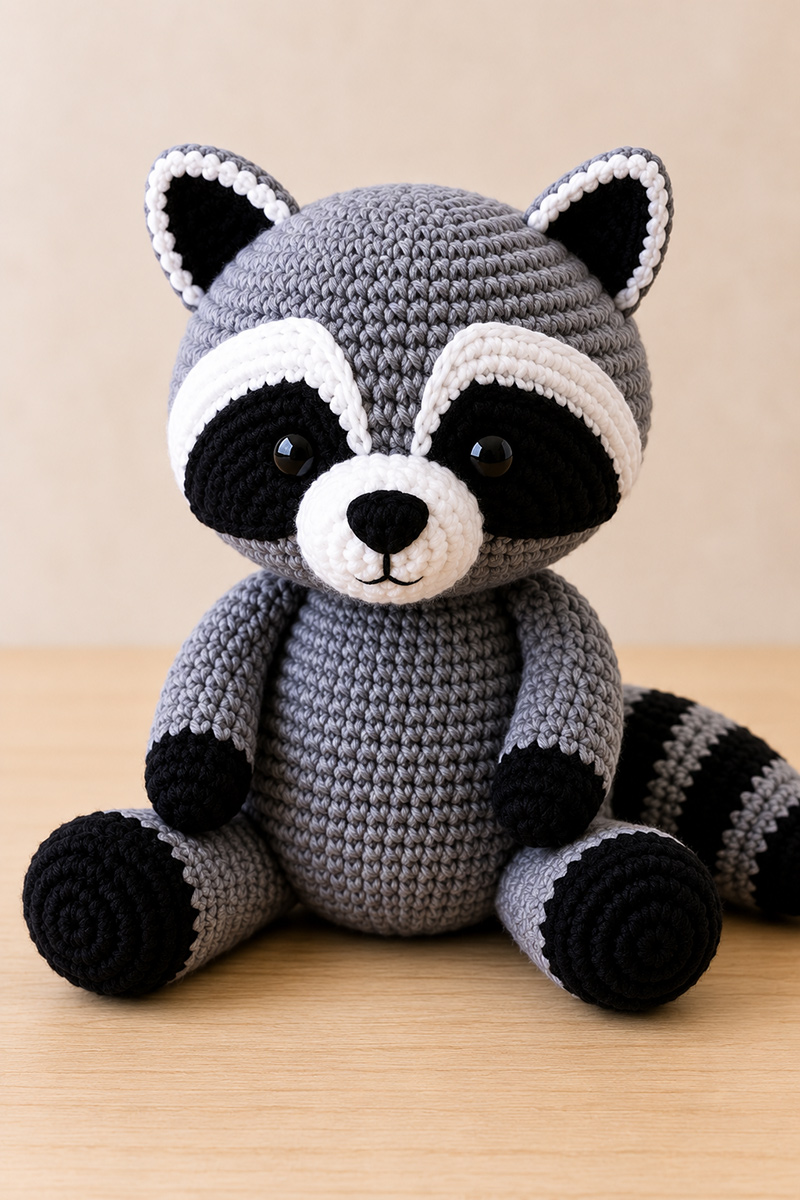
This crochet raccoon pattern makes a small woodland amigurumi raccoon with a rounded body, tiny ears, mask face and striped tail.
Quick crochet raccoon pattern guide:
What This Crochet Raccoon Pattern Makes
Quick answer: This crochet raccoon pattern makes the seated woodland amigurumi forest animal shown in the example image, with a large gray head, smaller rounded body, curved white brow patches, black mask panels, raised white muzzle, pointed ears with black centers and white trim, black paws, oversized black feet and a thick striped tail resting behind the right side.
The finished raccoon measures about 8 inches tall with worsted weight yarn and a 3.5 mm hook. The head is deliberately larger than the body. That scale is what gives the raccoon the baby gift look instead of making it look like a narrow toy animal.
If you searched specifically for a raccoon crochet pattern, this design keeps the classic mask face and ringed tail while remaining simple enough for an advanced beginner.
Fact: This raccoon crochet pattern produces a decorative raccoon, not a crib sleep toy.
This pattern is written in separate pieces because that gives a beginner more control. You will crochet the head, face pieces, body, arms, feet, ears and tail, then pin the whole animal together before sewing. I would rather have a beginner use extra pins than sew a sweet little face one stitch crooked and have to pull it all apart.
For more handmade baby projects, visit my free baby crochet patterns page. If you want a blanket style project after this one, the crochet animal lovey patterns page is the natural next step.
If you want the same mask face and striped tail in a flat decoration instead of a stuffed animal, use my crochet raccoon applique pattern for blankets, banners and nursery decor.
Supplies, Gauge and Size Checks

Use gray, black and white yarn in the same weight so the mask, paws and trim stay in proportion.
Materials:
- Gray worsted weight yarn, about 95 yards
- Black worsted weight yarn, about 45 yards
- White worsted weight yarn, about 40 yards
- 3.5 mm crochet hook
- Polyester fiberfill
- Yarn needle
- Stitch marker
- Scissors
- Straight pins
- Black embroidery thread for baby safer eyes
- Optional 10 mm safety eyes for display only
Finished size: About 8 inches tall seated, 5 inches wide across both feet and about 4 inches deep from belly to tail.
Gauge: About 5 single crochet stitches per inch with worsted weight yarn and a 3.5 mm hook. Gauge does not have to match exactly, but your fabric must be tight enough to hide the stuffing.
Part measurement checklist before assembly:
- Head: about 3.75 to 4 inches across
- Body: about 3.25 inches tall
- Each arm: about 3 inches long
- Each foot: about 1.75 inches wide at the black front
- Each outer ear: about 1.75 inches tall
- Each black inner ear: about 1.25 inches tall
- Tail: about 3.5 inches long and about 1.5 inches thick
- White muzzle: about 1.5 inches wide
- Black mask panel: about 1.75 inches wide
- White brow patch: about 2 inches long before sewing
Skill level: Advanced beginner. You need magic ring, single crochet, increase, invisible decrease, simple color changes, slip stitch, fastening off and hand sewing.
Abbreviations:
- MR means magic ring
- ch means chain
- sc means single crochet
- inc means 2 single crochet in the same stitch
- dec means invisible single crochet decrease
- sl st means slip stitch
- st means stitch
- R means round
- FO means fasten off
Work in continuous rounds unless the directions say to turn or join. A turning chain does not count as a stitch. Work the first single crochet into the first stitch of each turned row. Move your stitch marker to the first stitch of every round. I notice that small amigurumi pieces rarely fail because the stitches are hard. They fail because the first stitch wanders and the maker does not catch it soon enough.
If this raccoon may be handled near a baby, embroider the eyes and sew every piece securely. Check current toy safety guidance from the U.S. Consumer Product Safety Commission toy safety guide before gifting handmade toys to children.
Crochet the Large Raccoon Head
Before beginning the head: If you plan to use the optional safety eyes for a display-only raccoon, crochet both black mask panels from the face section before making the head. Work the head through R22, then temporarily pin the mask panels in position. Install each eye through its black mask panel and the head between head R14 and R15, with 6 to 7 stitches between the eyes. Secure the washers inside the head, remove the remaining pins, finish stuffing and closing the head, and sew around the mask panels and the other face pieces afterward. Skip this advance step when using embroidered eyes.

The head should be a full round shape and noticeably larger than the body.
Head, make one with gray yarn:
- R1: 6 sc in MR. 6 st.
- R2: inc in each st around. 12 st.
- R3: sc in next st, inc in next st, repeat around. 18 st.
- R4: sc in next 2 st, inc in next st, repeat around. 24 st.
- R5: sc in next 3 st, inc in next st, repeat around. 30 st.
- R6: sc in next 4 st, inc in next st, repeat around. 36 st.
- R7: sc in next 5 st, inc in next st, repeat around. 42 st.
- R8: sc in next 6 st, inc in next st, repeat around. 48 st.
- R9: sc in next 7 st, inc in next st, repeat around. 54 st.
- R10 through R18: sc in each st around. 54 st.
- R19: sc in next 7 st, dec, repeat around. 48 st.
- R20: sc in next 6 st, dec, repeat around. 42 st.
- R21: sc in next 5 st, dec, repeat around. 36 st.
- R22: sc in next 4 st, dec, repeat around. 30 st.
- Begin stuffing. Fill the top and sides first so the head stays round.
- R23: sc in next 3 st, dec, repeat around. 24 st.
- R24: sc in next 2 st, dec, repeat around. 18 st.
- Add more stuffing. The head should feel full but not hard.
- R25: sc in next st, dec, repeat around. 12 st.
- R26: dec around. 6 st.
- FO, leaving a 6 inch tail. Thread through the front loops of the remaining 6 stitches, pull closed and weave in.
Head checkpoint: The head should measure about 3.75 to 4 inches across. The closing point will become the lower back of the head. The face goes on the smooth side opposite that closing point.
Make the Curved Raccoon Face

The white pieces curve over the black mask panels, which is what gives the raccoon face the look shown in the example image.
Right white brow patch, make one with white yarn:
- Ch 10.
- Row 1: sc in 2nd ch from hook, sc in next 8 ch. Ch 1, turn. 9 st.
- Row 2: inc in first st, sc in next 6 st, dec over last 2 st. Ch 1, turn. 9 st.
- Row 3: sc in first st, inc in next st, sc in next 5 st, dec over last 2 st. Ch 1, turn. 9 st.
- Row 4: sc in next 7 st, dec over last 2 st. Ch 1, turn. 8 st.
- Row 5: sc in next 6 st, dec over last 2 st. 7 st.
- Sc evenly around the outside edge, placing 2 sc in the upper curved corner. Count and record the total number of edging stitches so you can use the same total on the left brow patch. Sl st to join.
- FO, leaving a 16 inch sewing tail.
Left white brow patch, make one with white yarn:
- Ch 10.
- Row 1: sc in 2nd ch from hook, sc in next 8 ch. Ch 1, turn. 9 st.
- Row 2: dec over first 2 st, sc in next 6 st, inc in last st. Ch 1, turn. 9 st.
- Row 3: dec over first 2 st, sc in next 5 st, inc in next st, sc in last st. Ch 1, turn. 9 st.
- Row 4: dec over first 2 st, sc in next 7 st. Ch 1, turn. 8 st.
- Row 5: dec over first 2 st, sc in next 6 st. 7 st.
- Sc evenly around the outside edge, placing 2 sc in the upper curved corner. Use the same total number of edging stitches recorded for the right brow patch. Sl st to join.
- FO, leaving a 16 inch sewing tail.
Black mask panels, make two with black yarn:
- Ch 8.
- R1: sc in 2nd ch from hook, sc in next 5 ch, 3 sc in last ch. Working on the other side of the chain, sc in next 5 ch, 2 sc in last ch. 16 st.
- R2: inc in first st, sc in next 5 st, inc in next 3 st, sc in next 5 st, inc in last 2 st. 22 st.
- R3: sc in each st around. 22 st.
- Sl st into next st and FO, leaving a 16 inch sewing tail.
White muzzle, make one with white yarn:
- Ch 6.
- R1: sc in 2nd ch from hook, sc in next 3 ch, 3 sc in last ch. Working on the other side of the chain, sc in next 3 ch, 2 sc in last ch. 12 st.
- R2: inc in first st, sc in next 3 st, inc in next 3 st, sc in next 3 st, inc in last 2 st. 18 st.
- R3: sc in each st around. 18 st.
- Sl st into next st and FO, leaving a 16 inch sewing tail.
Face placement map:
- Set the head down with the closing point at the lower back.
- The center forehead line is the vertical line halfway between the two eyes.
- White brow patches sit from head R9 down to R17.
- The fuller ends of the brow patches sit high and outward, near the ear area.
- The tapered brow ends angle toward the center forehead and stop 1 to 2 gray stitches apart.
- Black mask panels sit below the brows from head R13 down to R20.
- Each black mask panel should sit lower on the outside edge than on the inside edge.
- The white brow should remain thick and visible above each black panel, like the curved white bands in the example image.
- The muzzle sits centered from head R16 through R21.
- The top edge of the muzzle overlaps the lower inner corners of the black panels.
- Embroidered eyes sit on the black panels between head R14 and R15.
- Leave 6 to 7 stitches between the eyes.
For safety eyes on a display piece: If you followed the advance installation note before the head instructions, confirm that the eyes are positioned through the black mask panels and the head between head R14 and R15, with 6 to 7 stitches between them. Do not use safety eyes for a raccoon intended to be handled by a baby or young child.
For embroidered eyes: Use black embroidery thread and make 4 small satin stitches in the same spot on each black mask panel between R14 and R15. Keep the eyes round, not tall.
Nose and mouth:
- Use black embroidery thread.
- Make a rounded triangle nose at the top center of the muzzle.
- Work 4 short horizontal stitches, then fill downward with 2 shorter stitches.
- Make one short vertical stitch below the nose.
- Add two tiny curved mouth stitches, one on each side.
Do not sew any face piece until all pieces are pinned. Look at the head from straight ahead and from slightly above. The white brow patches should look like curved eyebrows over the black mask, not like plain white ovals.
Crochet the Body, Arms and Feet

The body is smaller than the head, and the black feet are large enough to help the raccoon sit.
Body, make one with gray yarn:
- R1: 6 sc in MR. 6 st.
- R2: inc in each st around. 12 st.
- R3: sc in next st, inc in next st, repeat around. 18 st.
- R4: sc in next 2 st, inc in next st, repeat around. 24 st.
- R5: sc in next 3 st, inc in next st, repeat around. 30 st.
- R6: sc in next 4 st, inc in next st, repeat around. 36 st.
- R7: sc in next 5 st, inc in next st, repeat around. 42 st.
- R8: sc in next 6 st, inc in next st, repeat around. 48 st.
- R9 through R18: sc in each st around. 48 st.
- R19: sc in next 6 st, dec, repeat around. 42 st.
- R20: sc in next 5 st, dec, repeat around. 36 st.
- R21: sc in next 4 st, dec, repeat around. 30 st.
- Begin stuffing. Add a little extra stuffing to the lower body.
- R22: sc in next 3 st, dec, repeat around. 24 st.
- R23: sc in next 2 st, dec, repeat around. 18 st.
- R24: sc in next st, dec, repeat around. 12 st.
- R25: dec around. 6 st.
- FO, close the remaining 6 stitches and weave in.
Body checkpoint: The body should measure about 3.25 inches tall and should be a little narrower than the head. Press the bottom gently flat before the final closing so the raccoon can sit.
Arms, make two:
- With black yarn, R1: 6 sc in MR. 6 st.
- R2: sc in next st, inc in next st, repeat around. 9 st.
- R3 through R5: sc in each st around. 9 st.
- Change to gray yarn.
- R6 through R14: sc in each st around. 9 st.
- Stuff the black paw only. Leave the gray arm nearly flat.
- R15: flatten the opening, placing the unmatched ninth stitch at one side. Sc through both layers across for 4 sc.
- FO, leaving a 14 inch sewing tail.
Feet, make two:
- With black yarn, R1: 6 sc in MR. 6 st.
- R2: inc in each st around. 12 st.
- R3: sc in next st, inc in next st, repeat around. 18 st.
- R4: sc in next 2 st, inc in next st, repeat around. 24 st.
- R5 through R7: sc in each st around. 24 st.
- Change to gray yarn.
- R8: sc in each st around. 24 st.
- R9: sc in next 2 st, dec, repeat around. 18 st.
- Stuff the black foot firmly. Add less stuffing to the gray ankle.
- R10: sc in next st, dec, repeat around. 12 st.
- Sl st into next st and FO, leaving a 20 inch sewing tail. Leave the 12-stitch gray ankle opening unclosed because the entire opening will be sewn directly to the body during assembly.
The feet should look oversized before they are sewn on. That is correct. The example raccoon has large round black feet facing forward, with gray ankles tucked partly behind them. Those big feet help the animal balance once the large head is attached.
Make the Trimmed Ears and Striped Tail

The ears use three visible layers, gray outside, black center and white trim.
Outer ears, make two with gray yarn:
- Ch 2.
- Row 1: 2 sc in 2nd ch from hook. Ch 1, turn. 2 st.
- Row 2: inc in each st across. Ch 1, turn. 4 st.
- Row 3: inc in first st, sc in next 2 st, inc in last st. Ch 1, turn. 6 st.
- Row 4: inc in first st, sc in next 4 st, inc in last st. Ch 1, turn. 8 st.
- Row 5: inc in first st, sc in next 6 st, inc in last st. Ch 1, turn. 10 st.
- Row 6: sc in each st across. 10 st.
- Do not fasten off. Ch 1. Sc evenly down the first slanted side toward Row 1, place 2 sc in the pointed tip, sc evenly up the other slanted side, then sc across the Row 6 base. Count the edging stitches and repeat the same distribution on the second outer ear.
- Sl st to the first edging stitch. FO, leaving a 14 inch sewing tail.
Inner ears, make two with black yarn:
- Ch 2.
- Row 1: 2 sc in 2nd ch from hook. Ch 1, turn. 2 st.
- Row 2: inc in each st across. Ch 1, turn. 4 st.
- Row 3: inc in first st, sc in next 2 st, inc in last st. Ch 1, turn. 6 st.
- Row 4: sc in each st across. 6 st.
- FO, leaving a 10 inch sewing tail.
White ear trim clarification:
- Sew one black inner ear centered on each gray outer ear.
- Thread white yarn onto a yarn needle.
- Start at the lower left corner of the black inner ear.
- Use short whip stitches over the edge of the black inner ear and into the gray outer ear.
- Work up one side, around the top point and down the other side.
- Do not stitch across the bottom edge. The hero image shows white trim around the sides and top, not a full white triangle outline.
- Keep each white stitch close to the black edge so a narrow gray border remains visible outside the trim.
- Knot and hide the yarn ends on the back of the ear.
Striped tail:
At each color change, begin the final single crochet of the old-color round with the old color, then complete its final yarn-over with the new color. Cut the old yarn, leaving a 4-inch end, and secure the two yarn ends together inside the tail. Do not carry unused yarn along the outside.
- With black yarn, R1: 6 sc in MR. 6 st.
- R2: inc in each st around. 12 st.
- R3: sc in next st, inc in next st, repeat around. 18 st.
- R4: sc in next 2 st, inc in next st, repeat around. 24 st.
- R5 through R6: sc in each st around with black. 24 st.
- Change to gray yarn.
- R7 through R8: sc in each st around with gray. 24 st.
- Change to black yarn.
- R9 through R10: sc in each st around with black. 24 st.
- Change to gray yarn.
- R11 through R12: sc in each st around with gray. 24 st.
- Change to black yarn.
- R13 through R14: sc in each st around with black. 24 st.
- Change to gray yarn.
- R15 through R18: sc in each st around with gray. 24 st.
- Sl st into next st and FO, leaving an 18 inch sewing tail.
- Stuff the tail lightly. Leave the open end flatter than the rounded tip.
Before finishing the stuffing, check that every color-change end is secured inside the tail and that no carried yarn is visible on the outside.
Beginner Assembly Map

Assembly reference guide showing ear placement, face positioning, tail angle and final proportions for the finished crochet raccoon.
Pin the full raccoon together before sewing so the head, feet and tail balance.
Beginner assembly map:
- Head front: smooth side opposite the closing point
- Head back: closing point at lower back
- Body top: body closing point sits under the head
- Body front: smooth rounded belly faces forward
- Feet: black rounds face forward, gray ankle section touches body
- Arms: black paws point downward and slightly inward
- Tail: attaches to back right side and rests behind the right foot
- Ears: bottom edges sit on head R8 and R9
Assembly order:
- Sew the white brow patches to the head first. Use small whip stitches through the outer loops of the patch and the surface stitches of the head.
- Sew the black mask panels below the white brow patches. Keep the white curved edge visible above each black panel.
- If you are using embroidered eyes, make them now with black embroidery thread, placing them between head R14 and R15 with 6 to 7 stitches between the eyes. Skip this step if the optional display-only safety eyes are already installed.
- Sew the white muzzle centered below the eyes. Add a tiny pinch of stuffing under the muzzle before closing the last few stitches.
- Embroider the nose and mouth.
- Pin the ears to the top sides of the head. The bottom edge of each ear should sit around head R8 and R9.
- The inner edges of the ears should be about 8 stitches apart across the top of the head.
- Sew through the bottom edge of each ear twice so the ears stand upright.
- Place the body under the head with the body closing point at the top.
- Pin the head to the body. The face should tilt slightly forward.
- Sew around the neck twice with gray yarn. Each stitch should catch one body stitch and one head stitch.
- Pin the arms to the side front of the body between body R14 and R20.
- The black paws should hang beside the belly and stop just above the feet.
- Sew the flattened top of each arm to the body.
- Pin the feet to the lower front of the body between body R6 and R12.
- Leave about 5 stitches between the inner edges of the feet.
- Using the long sewing tail, sew all the way around each 12-stitch gray ankle opening and into the body so no part of the stuffed opening remains exposed. Keep the rounded black section facing forward as you sew.
- Pin the tail to the back right side of the body between body R8 and R15.
- Angle the tail about 35 to 45 degrees away from the body so it rests behind the right foot instead of sticking straight back.
- The lower edge of the tail opening should touch the surface when the raccoon is seated.
- Sew around the open end of the tail twice.
- Weave in every yarn end.
I’ve learned to set the raccoon down after sewing the head, then again after sewing the feet. If it leans forward, move the feet a little higher. If it falls backward, move the tail lower or remove some stuffing from the tail.
Final check before gifting:
- The head is larger than the body.
- The white brow patches curve over the black mask panels.
- The muzzle is centered and slightly raised.
- The ears stand at the same height.
- The black paws hang evenly.
- The feet sit forward and touch the table.
- The tail rests behind the right side of the body.
- No yarn ends are loose.
- No safety eyes are used for a baby handled version.
This raccoon pairs well with woodland handmade gifts. The fox crochet pattern makes a good companion animal, while this crochet deer lovey pattern adds a gentle fawn-themed blanket for woodland baby showers and nursery gift baskets. If you'd like a second blanket project, the crochet owl lovey pattern rounds out the collection with another woodland favorite.
Another animal option for a nursery keepsake is my koala lovey crochet pattern, especially for Australian animal themes, eucalyptus colors, and handmade baby gift baskets.
Use the finished raccoon on a dresser, shelf, book ledge or baby photo area. Keep handmade animals, pillows, loose blankets and other extras out of the crib during sleep.
Troubleshooting for Beginners
If the head looks too small: Check that you increased to 54 stitches and worked R10 through R18 even. The head needs those 9 rounds at 54 stitches to match the example image.
If the white brow pieces look like plain ovals: Rotate them so the fuller end sits high and outward, then angle the tapered end down toward the middle of the face.
If the face looks crowded: Move the black mask panels slightly lower and outward. The white brow patches must show above them.
If the raccoon will not sit: The body may be stuffed too firmly at the top. Press the lower body flatter, move the feet closer together and let the tail rest on the surface behind the right side.
If the ears flop: Sew across the bottom edge twice. Add one hidden stitch from the lower back of each ear into the head.
If the tail pulls the raccoon backward: Remove some stuffing from the tail. It should be padded, not packed tight.
Crochet Raccoon FAQ
Is this crochet raccoon pattern beginner friendly?
Yes, for an advanced beginner. The stitches are basic, but the face placement and assembly need careful pinning before sewing.
Can I use safety eyes?
Use safety eyes only for a display piece. For a raccoon that may be handled near a baby, embroider the eyes instead.
Can I make this raccoon into a lovey?
Not by simply attaching this finished head to a blanket. A raccoon lovey needs a compatible blanket base, a planned head attachment and complete joining instructions so the stuffed head remains secure. Use a complete pattern from my crochet animal lovey patterns page rather than improvising the conversion.
Can I use plush yarn?
Yes, but the raccoon will turn out larger and the face pieces will be harder to place. Worsted weight yarn is easier for a first try.
Why does my raccoon not look like the example image?
The most common reason is scale. The head should be larger than the body, the feet should be oversized, and the black mask panels should sit low enough to leave white showing above them.
Can I sell finished raccoons made from this pattern?
Small handmade sales are generally fine when you make the finished item yourself. Do not copy my photos, page text or pattern wording, and add your own small changes so your finished raccoon has its own hand.
When you click on links to various merchants on this site and make a purchase, this may result in this site earning a commission. This does not affect the price you pay.

UBGI Gold Standard 2026
Reviewed under the site's
editorial checklist.
Photos, decorating ideas, party setups and reader submissions are shared for inspiration unless a page is specifically presented as a pattern, tutorial, reference guide or step-by-step project. Follow the instructions, measurements, safety guidance and manufacturer directions provided for the particular project or product.
About Jan | Contact | Baby Nursery Ideas (Blog) | Site Map | Privacy Policy | Disclosure Policy | Disclaimer | Affiliate Disclosure | Earnings Disclosure | Facebook | Pinterest
I am a participant in the Amazon Services LLC Associates Program, an affiliate advertising program designed to provide a means for us to earn fees by linking to Amazon. As an Amazon Associate I earn from qualifying purchases.
Copyright © 2006-2026. All Rights Reserved.