Free Crochet Baby Booties Pattern
By Jan Bay
This free crochet baby booties pattern makes a simple pair of soft crib booties for a newborn or young baby. I designed the booties with a rounded sole, closed toe and plain ankle, so beginners can focus on basic stitches, careful counting and neat shaping without adding buttons, ties or detachable decorations.
Explore More Free Crochet Baby Patterns
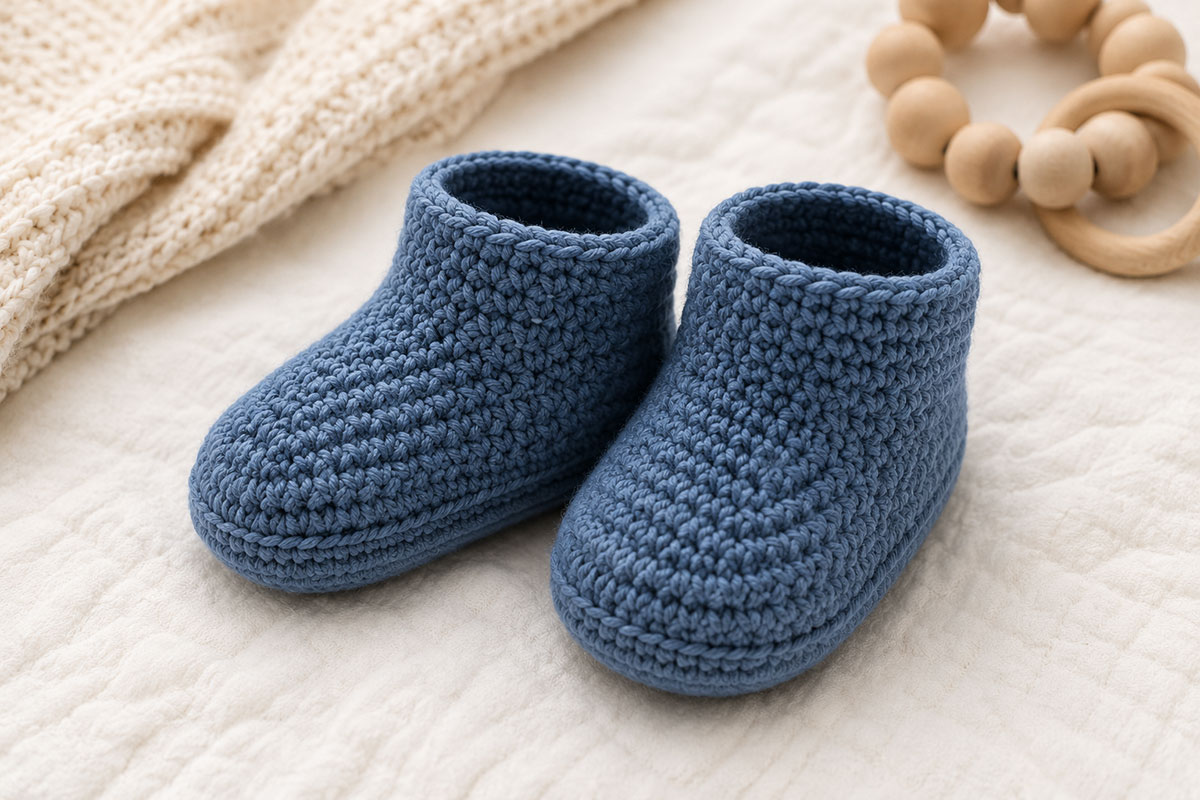
This image illustrates the intended shape and proportions of the finished booties. The pattern and stitch counts have been mathematically reviewed, but the booties have not yet been physically sample-tested. The exact stitch appearance and finished proportions may vary with the yarn, hook size and crochet tension used.
Yarn for This Pattern
Smooth Baby Yarn for Crochet Booties
Choose a soft, smooth and washable yarn that makes it easy to see and count each stitch. Check the yarn label for fiber content and care instructions.
Jump to the Crochet Baby Booties Pattern
- Pattern Summary and Finished Size
- Yarn, Hook and Supplies
- Abbreviations and Pattern Notes
- Crochet the Bootie Sole
- Crochet the Bootie Sides
- Shape the Closed Toe
- Crochet the Ankle
- Finish the First and Second Booties
- Size and Gauge Guidance
- Troubleshooting
- Baby Bootie Safety and Care
- Frequently Asked Questions
Easy Crochet Baby Booties Pattern for Newborns
This pattern makes two matching crochet baby booties with rounded soles, closed toes and plain ankle openings. Each bootie is worked in one piece from the sole upward, so there are no separate straps, cuffs or decorations to attach.
The instructions use joined rounds in standard U.S. crochet terms. A stitch marker placed at the back of the heel identifies the beginning of each round, while two additional markers keep the toe decreases centered. The same directions are used for both booties.
Pattern at a Glance
- Skill level: Beginner familiar with basic stitches and simple decreases
- Size: Newborn to approximately 0–3 months
- Construction: Worked from the sole upward in joined rounds
- Finished sole length: Approximately 3¾ inches
- Finished sole width: Approximately 1¾ inches at the widest point
- Yarn weight: DK or light worsted, Craft Yarn Council size 3
- Hook: 3.5 mm crochet hook or size needed to obtain gauge
- Main stitches: Chain, slip stitch, single crochet, half double crochet and decrease stitches
- Fastening: None
Baby feet vary, so age is only a general size guide. Measure the finished sole before making the second bootie and compare it with the baby’s foot when possible. These are soft crib booties and are not designed for standing or walking.
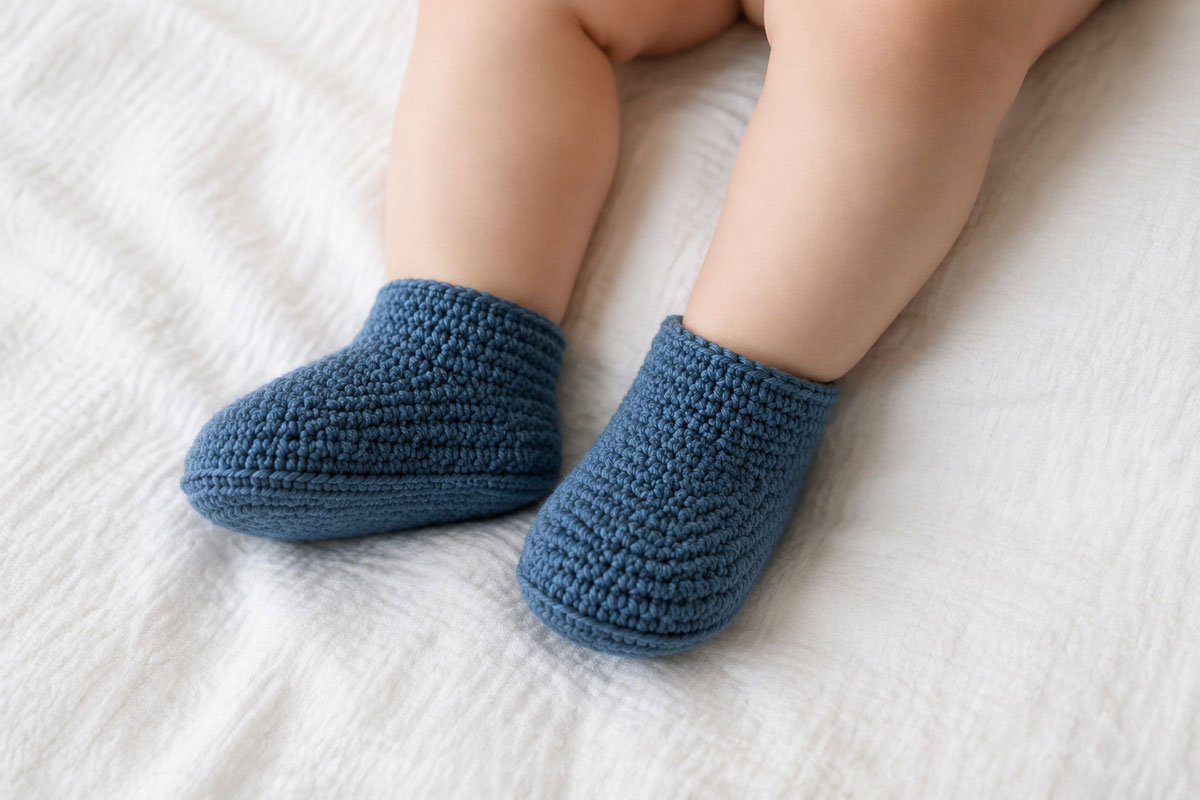
This image illustrates how the finished booties are intended to look when worn. The pattern and stitch counts have been mathematically reviewed, but the booties have not yet been physically sample-tested. The finished fit and proportions may vary with yarn, hook size and crochet tension.
Yarn, Hook and Supplies for the Baby Booties
Choose a smooth DK or light worsted yarn that lets you see each stitch clearly. A tightly twisted yarn is easier to count than fuzzy, chenille or heavily textured yarn. Check the label to be sure the yarn can be washed in a way that is practical for baby clothing.
Materials
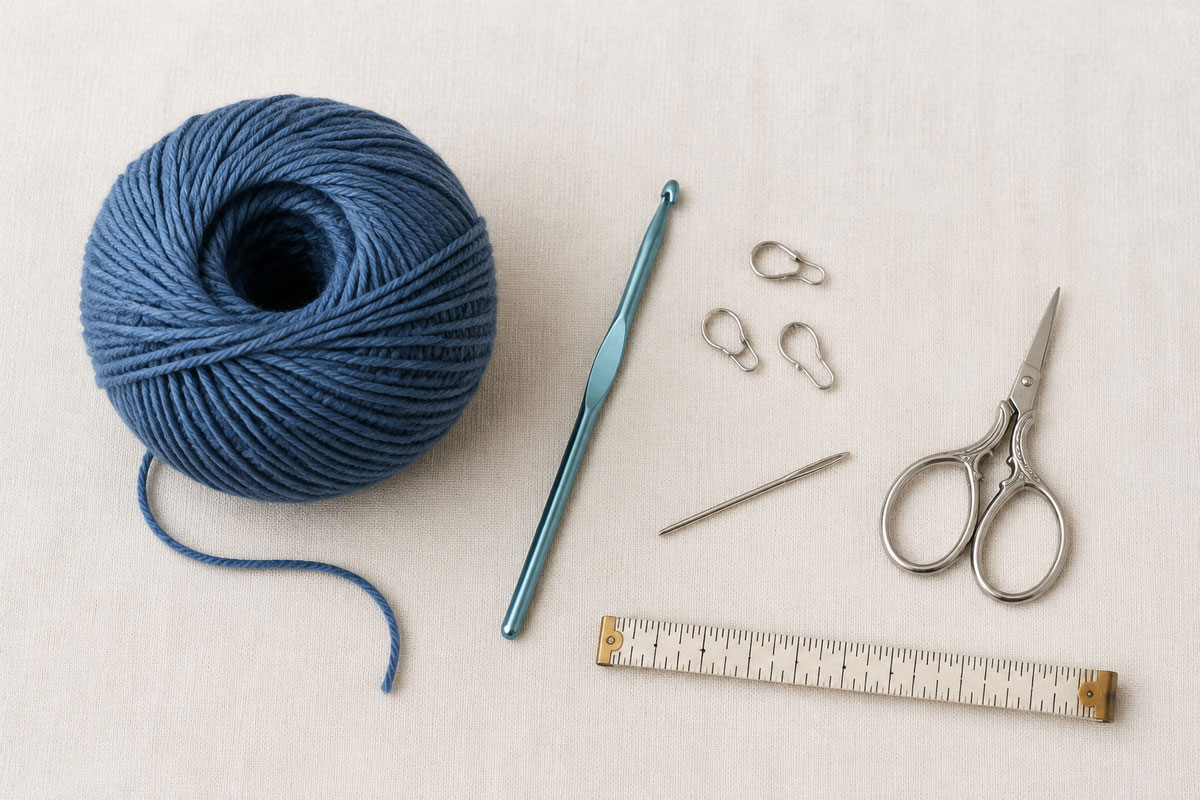
- Approximately 75 yards of DK or light worsted yarn, Craft Yarn Council size 3
- 3.5 mm crochet hook, or the size needed to obtain gauge
- Three locking stitch markers
- Yarn needle with a blunt tip
- Scissors
- Flexible measuring tape or ruler
Use one yarn color throughout both booties. Switching yarn weight, fiber or hook size between booties can change their length, width and stretch even when the stitch counts are identical.
Gauge
Using half double crochet worked in rows, 20 stitches and 16 rows should measure approximately 4 inches after the swatch is relaxed and laid flat. Do not stretch the swatch while measuring it.
Sole size is the more important check for this project. After completing the sole rounds, the piece should measure approximately 3¾ inches long and 1¾ inches across its widest point. Change hook size and begin again if your sole differs noticeably from those measurements.
A larger hook or looser tension will make a longer, wider bootie with a larger ankle opening. A smaller hook or tighter tension will make the entire bootie smaller and may make the ankle difficult to pull over a baby’s heel. Changing only the ankle rounds will not correct a sole that is the wrong size.
U.S. Crochet Abbreviations and Pattern Notes
Abbreviations
- ch: chain
- st: stitch
- sts: stitches
- sl st: slip stitch
- sc: single crochet
- hdc: half double crochet
- sc2tog: single crochet two stitches together
- hdc2tog: half double crochet two stitches together
- BLO: back loop only
- rep: repeat
Special Stitches
Need a little help reading pattern shorthand or measuring a swatch? The Crocheting For Dummies cheat sheet provides a useful review of common abbreviations, crochet symbols and gauge.
Single crochet two together, sc2tog: Insert the hook into the next stitch and pull up a loop. Insert the hook into the following stitch and pull up another loop. Yarn over and pull through all three loops on the hook. Two stitches have been joined into one single crochet.
Half double crochet two together, hdc2tog: Yarn over and insert the hook into the next stitch. Pull up a loop. Yarn over, insert the hook into the following stitch and pull up another loop. Yarn over and pull through all five loops on the hook. Two stitches have been joined into one half double crochet.
Important Pattern Notes
- The pattern uses standard U.S. crochet terminology.
- Both booties are made from the same instructions.
- Work in joined rounds without turning unless an instruction specifically says otherwise.
- The chain 1 at the beginning of a round does not count as a stitch.
- Work the first stitch of each round into the same stitch that holds the beginning chain 1.
- Join each round with a slip stitch to the first stitch of that round, not to the beginning chain.
- Place a locking marker in the first stitch of every round and move it upward as you work.
- Do not crochet into the joining slip stitch. It is not included in the stitch count.
- Numbers shown in parentheses at the end of a round give the total number of stitches after that round is complete.
- When the pattern says to work along the opposite side of the foundation chain, insert the hook into the remaining loops of the same chains.
- Count every round before continuing. A missed stitch near the join can shift the toe and make the two booties look different.
How to Crochet the Baby Bootie Sole
Begin at the center back of the sole. The first round is worked along one side of the foundation chain, around the toe and back along the opposite side. Keep the chain loose enough that you can insert the hook into each remaining loop when working back toward the heel.
Foundation Chain
Chain 15.
Sole Round 1
Hdc in the second ch from the hook. Hdc in each of the next 12 ch. Work 5 hdc in the last ch.
Rotate the foundation chain so the unworked loops are facing upward. Working along the opposite side of the chain, hdc in each of the next 12 ch. Work 4 hdc in the same foundation ch that holds the first hdc.
Join with a sl st to the first hdc. Place the beginning-of-round marker in that first hdc. (34 sts)
Sole Round 2
Ch 1. Work 2 hdc in the first st. Hdc in each of the next 12 sts. Work 2 hdc in each of the next 5 sts around the toe. Hdc in each of the next 12 sts. Work 2 hdc in each of the final 4 sts around the heel.
Join with a sl st to the first hdc. (44 sts)
Count the round before continuing. You should have 12 straight stitches along each side, 10 stitches around the toe and 10 stitches around the heel.
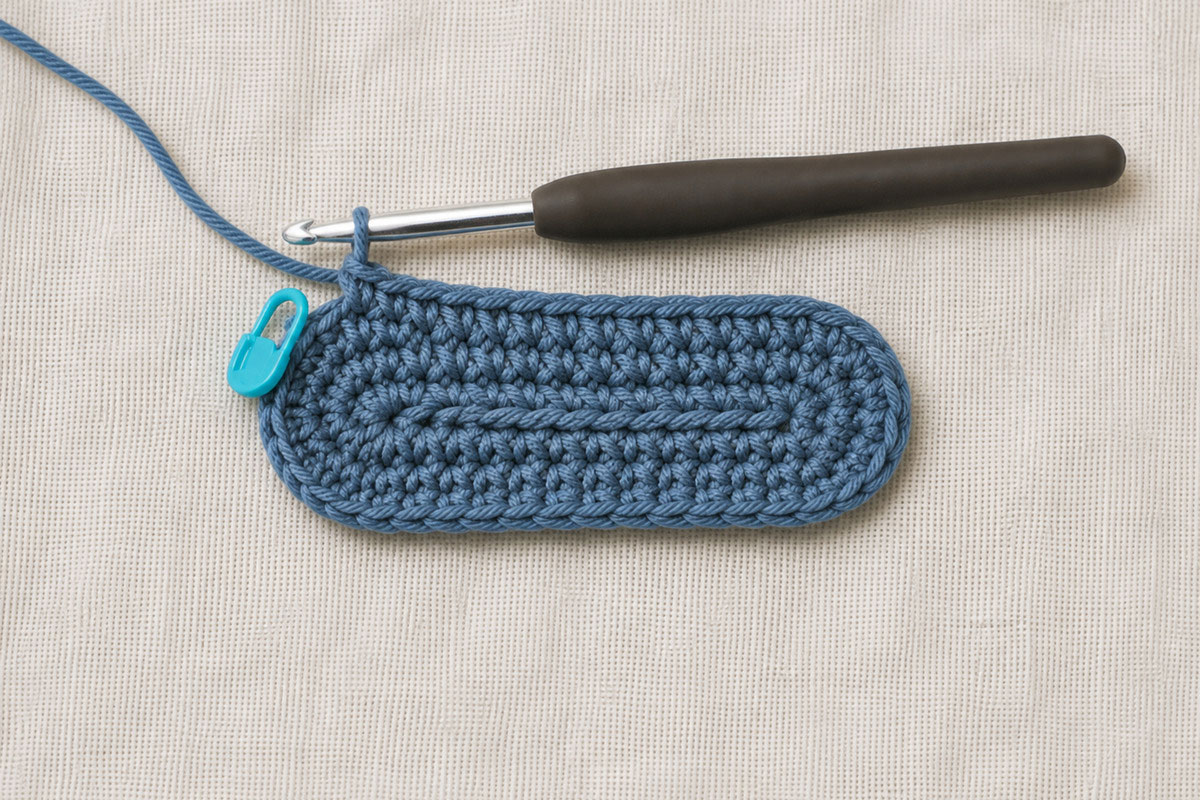
Lay the sole flat without stretching it. It should measure approximately 3¾ inches from heel to toe and approximately 1¾ inches across the widest part. A slight curve at the edge is acceptable, but the center should not cup or form a ruffle.
Crochet the Sides of the Baby Bootie
The next round creates the turn between the flat sole and the upper part of the bootie. Working through the back loops leaves a clear ridge around the edge of the sole.
Side Round 1
Ch 1. Working in the BLO, sc in each st around. Join with a sl st to the first sc. (44 sts)
Side Round 2
Ch 1. Working through both loops, sc in each st around. Join with a sl st to the first sc. (44 sts)
Side Round 3
Ch 1. Sc in each st around. Join with a sl st to the first sc. (44 sts)
The sole should now sit beneath a short, even sidewall. The marked first stitch remains at the center back of the heel. Flatten the bootie gently with the heel marker at one end and the center of the toe directly opposite it.
Beginning with the first stitch of the next round, count 14 stitches and leave them unmarked. Place a marker in the following stitch. Counting that marked stitch as stitch 1, count 16 stitches across the front and place the second marker in stitch 16. Fourteen unmarked stitches should remain between the second toe marker and the heel join.
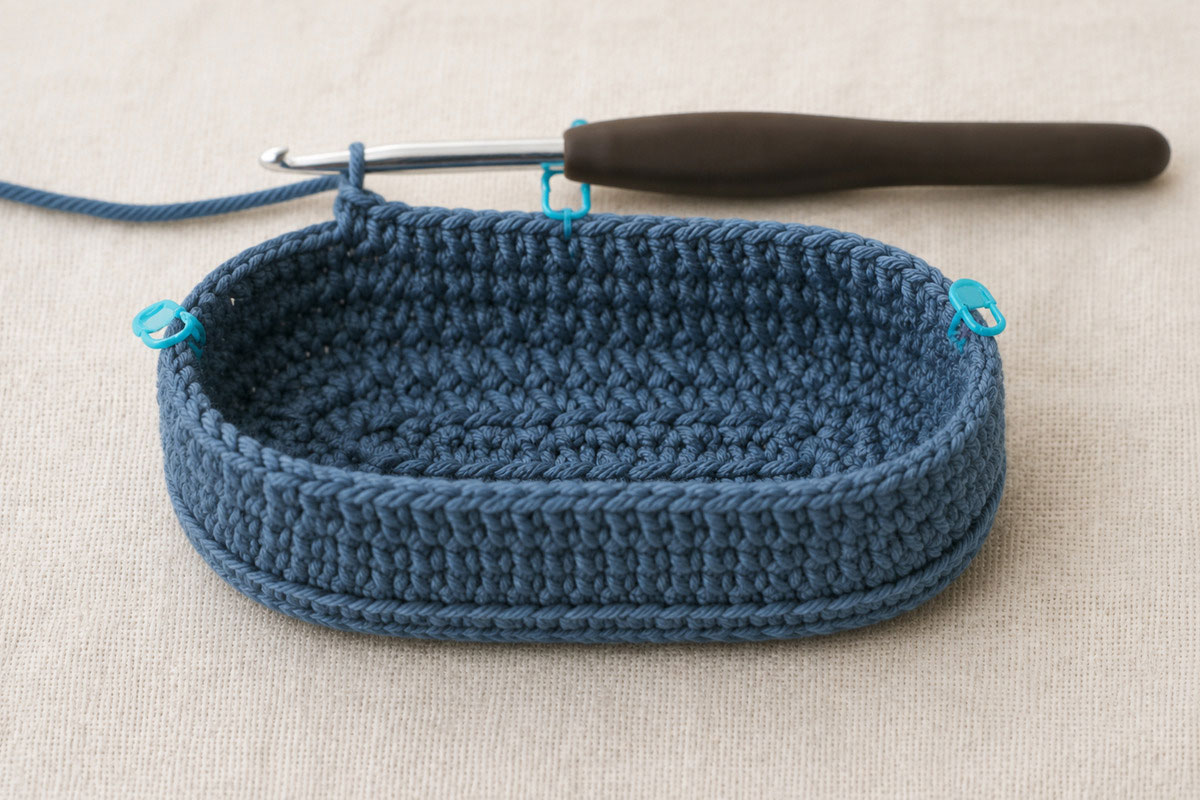
If the toe markers are not directly opposite the heel marker, recount before beginning the decreases. Correct marker placement keeps the toe shaping centered and prevents the bootie from leaning to one side.
Shape the Closed Toe
The toe is shaped with two centered decrease rounds. Keep the decreases relaxed so the stitches remain easy to work in the following round. Remove the two toe markers after completing the first decrease round, but keep the beginning-of-round marker at the heel.
Toe Decrease Round 1
Ch 1. Sc in each of the first 14 sts. Work hdc2tog 8 times across the 16 marked toe sts. Sc in each of the final 14 sts.
Join with a sl st to the first sc. Remove the two toe markers. (36 sts)
Toe Decrease Round 2
Ch 1. Sc in each of the first 12 sts. Work hdc2tog 6 times across the next 12 sts. Sc in each of the final 12 sts.
Join with a sl st to the first sc. (30 sts)
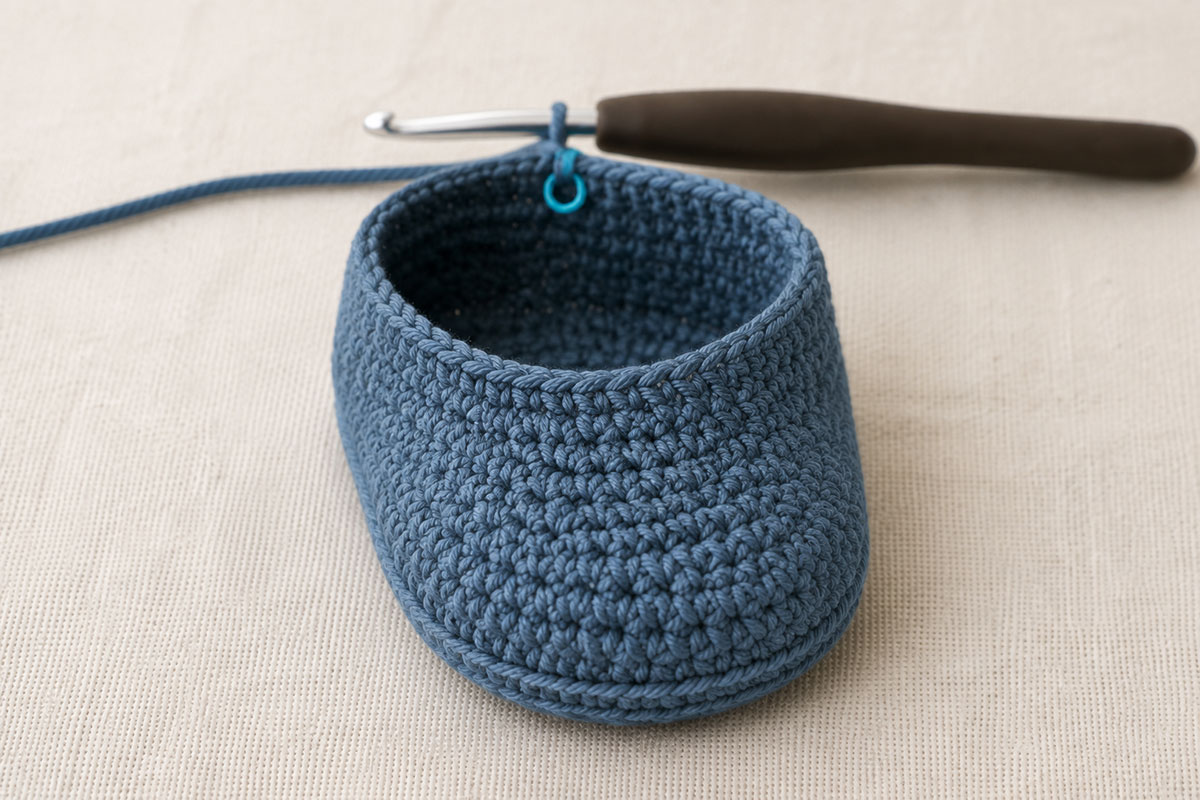
The toe should curve upward without twisting to either side. Six decreases in the second round sit directly over the center of the first decrease section. If the toe points away from the heel marker, undo the decrease rounds and check the placement of the original 16-stitch toe section.
Crochet the Plain Ankle
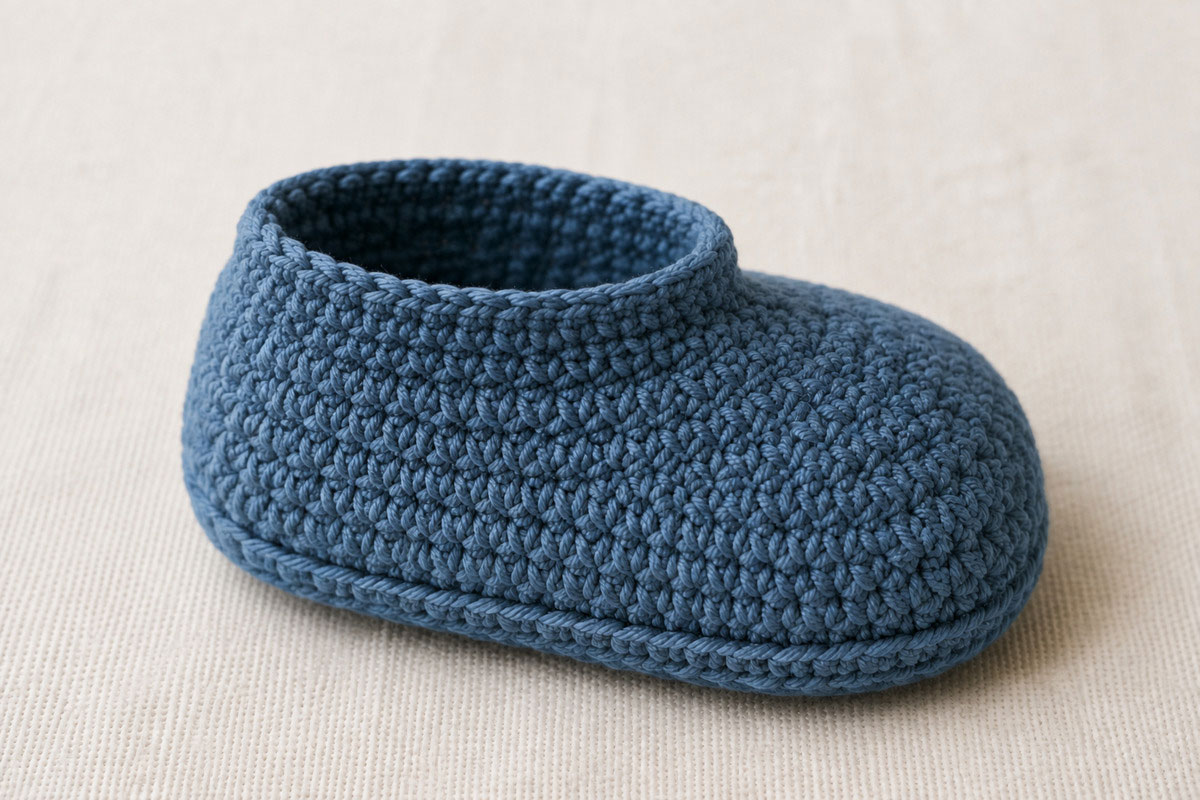
The ankle is worked without ties, straps or a separate cuff. Keep your tension even, especially around the join at the back, so the opening can stretch over the baby’s heel.
Ankle Round 1
Ch 1. Sc in each st around. Join with a sl st to the first sc. (30 sts)
Ankle Round 2
Ch 1. Sc in each st around. Join with a sl st to the first sc. (30 sts)
Ankle Round 3
Ch 1. Sc in each st around. Join with a sl st to the first sc. (30 sts)
Before fastening off, gently stretch the ankle opening and make sure it opens comfortably without straining the stitches. If it feels too tight, undo the ankle rounds and work them again with more relaxed tension. Do not try to force a tight opening into shape with blocking.
Do not add a tight slip-stitch edging around the opening. A firmly worked decorative edge can remove the stretch needed to pull the bootie comfortably over the heel.
Finish the First and Second Booties
Finish the First Bootie
After joining the final ankle round, cut the yarn and leave a tail about 6 inches long. Pull the tail through the last loop and tighten it gently.
Thread the tail onto the yarn needle. Weave it through several stitches on the inside of the ankle, change direction and weave it through a second set of stitches. Trim the yarn close to the fabric only after the tail feels secure.
Weave in the foundation-chain tail along the inside of the sole in the same way. The ends should not form hard knots or bumps against the baby’s foot.
Make the Second Bootie
Repeat the complete pattern from the foundation chain through the final ankle round. The construction is the same for both booties, so there are no separate left-foot and right-foot instructions.
Before weaving in the final ends, place the two booties side by side and compare:
- Sole length and width
- Number of side and ankle rounds
- Toe position and height
- Ankle opening
- Location of the back join
If one bootie is noticeably larger, count the stitches and check the gauge before finishing it. Blocking will not reliably correct a missing stitch, an extra increase or a different hook size.
Size and Gauge Guidance
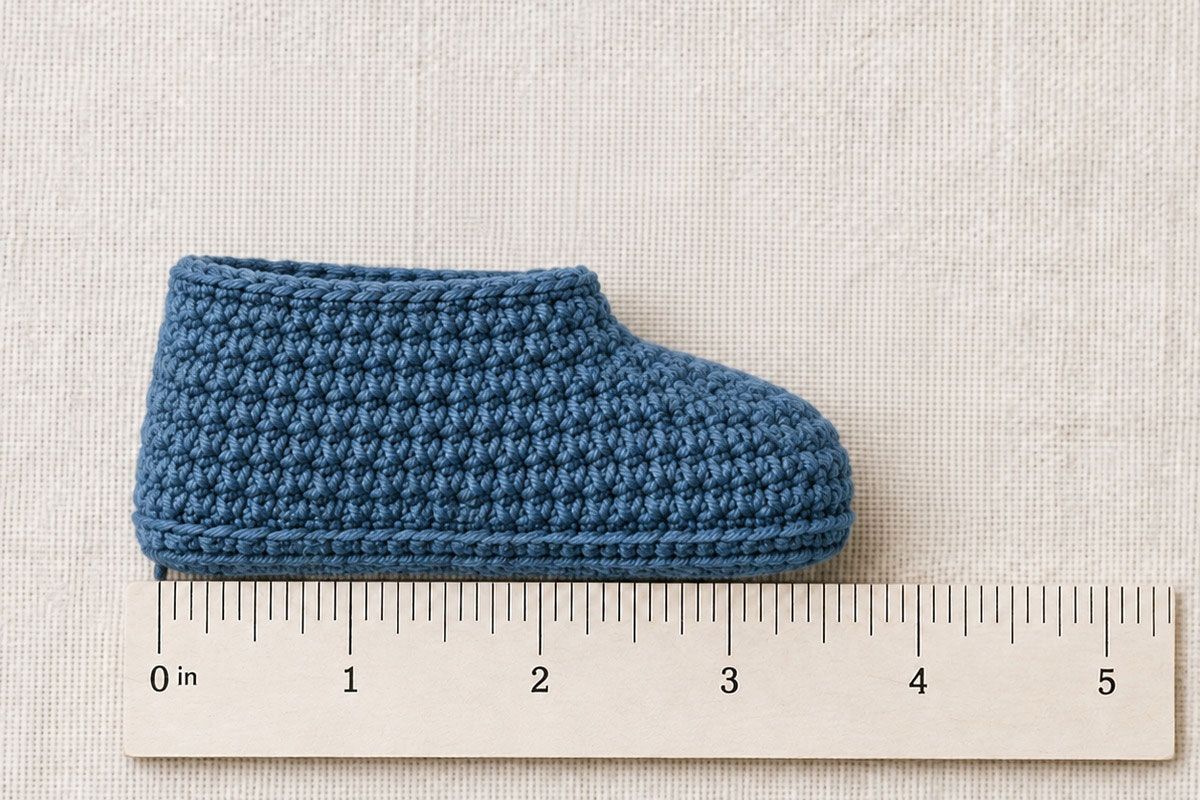
This pattern is written for a sole measuring approximately 3¾ inches long and 1¾ inches wide. The stated age range is a general guide because babies of the same age may have different foot lengths.
Make a Small Gauge Adjustment
If the completed sole is only slightly too large or too small, begin again with a hook one size smaller or larger. Crochet the two sole rounds and measure again before continuing up the sides.
Changing the hook affects more than the sole. It also changes the height of the toe, the amount of stretch in the fabric and the size of the ankle opening. Use the same hook and the same yarn for both booties.
Do Not Add Foundation Chains Without Recalculating the Pattern
Adding chains to the foundation changes the stitch total and moves the center of the toe. The side rounds, toe sections and decreases would all need new counts. For that reason, I do not recommend adding or removing foundation chains as a quick size adjustment.
Use this pattern only when the finished sole and ankle opening suit the intended baby. A larger size needs a separately calculated pattern rather than extra ankle rounds added to this one.
Troubleshooting the Crochet Baby Booties Pattern
Why Does the Sole Curl Into a Cup?
Check that Round 1 has 34 stitches and Round 2 has 44 stitches. A missed increase can pull the edge inward. Tight foundation chains can also shorten the center of the sole and make it curl. Begin again with a looser chain if the center will not lie reasonably flat.
Why Is the Sole Ruffling?
Ruffling can result from an extra increase, loose outer stitches or a hook that is too large for the yarn. Count all 44 stitches in the second sole round. Make sure you did not crochet into the joining slip stitch.
Why Is the Toe Off Center?
The first toe decrease round must begin with 14 single crochet stitches, followed by eight hdc2tog decreases and 14 single crochet stitches. The second decrease round begins and ends with 12 single crochet stitches. An extra stitch near the back join will shift the entire decrease section.
Why Are There Large Holes Between the Toe Decreases?
Keep the loops used for each hdc2tog close to the hook shaft. Do not pull them tall before completing the decrease. A smaller hook may help if the entire fabric is loose, but changing hooks midway through one bootie can alter its size.
Why Is the Ankle Opening Too Tight?
Confirm that 30 stitches remain after the second toe decrease round. Work the three ankle rounds with relaxed tension and do not add a tight slip-stitch border. If the opening still will not stretch comfortably over the heel, the bootie should not be used.
Why Are the Two Booties Different Sizes?
Check that both were made with the same yarn, hook and stitch counts. It is easy to tighten the second bootie after becoming familiar with the pattern. Measure each sole after Round 2 instead of waiting until both booties are finished.
Baby Bootie Safety and Care
These are soft crib booties, not walking shoes. They do not provide the structure, traction or protection needed for standing or walking.
- Check that all yarn ends are woven in securely before the booties are worn.
- Do not add buttons, beads, bells, pom-poms, ribbon ties or other detachable decorations.
- Make sure the ankle opening stretches comfortably over the heel and does not leave a tight mark.
- Remove the booties if they become wet, damaged, too tight or loose enough to slip off.
- Inspect the stitches regularly for pulled loops, broken yarn or unraveling ends.
- Use the booties only when they fit properly. Decorative booties are not required for a baby’s health or development.
Washing and Drying
Follow the care instructions printed on the yarn label. Fiber content matters. Cotton, acrylic, wool and blended yarns may require different water temperatures and drying methods.
Place the booties in a small mesh laundry bag if the yarn label permits machine washing. Reshape them while damp and make sure they are completely dry before the baby wears them again. Stop using a bootie if washing causes it to shrink, stretch out of shape or develop loose stitches.
Frequently Asked Questions About Crochet Baby Booties
Is this crochet baby booties pattern suitable for beginners?
Yes, it uses chains, slip stitches, single crochet, half double crochet and two basic decreases. Beginners should be comfortable counting stitches and identifying the first stitch of a joined round before starting.
What size does this free crochet baby booties pattern make?
The pattern is designed to make a sole approximately 3¾ inches long and 1¾ inches wide, which may fit a newborn or a baby approximately 0–3 months old. Measure the finished sole because age alone does not guarantee fit.
Are these one-piece crochet baby booties?
Yes. Each bootie is worked from the sole upward without making a separate cuff, strap or upper. Only the beginning and ending yarn tails need to be woven in.
Can I use worsted-weight yarn?
A heavier worsted-weight yarn will usually produce a larger and thicker bootie with the stated hook and stitch counts. Use DK or light worsted yarn that meets the pattern gauge. Do not rely on the yarn name alone because thickness varies among manufacturers.
Why does the pattern use joined rounds?
Joined rounds provide a clear beginning point at the center back of the bootie. That makes it easier to count the stitches on each side of the centered toe decreases.
Do I need separate instructions for the left and right booties?
No. Both booties use the same construction and stitch placement. Make the second bootie by repeating the complete pattern.
Can these booties be used as first walking shoes?
No. They are soft crib booties without a structured or slip-resistant sole. Remove them when the baby is standing, cruising or walking.
Where can I find other crochet baby bootie styles?
The crochet baby booties pattern collection organizes additional designs by style, season, size and difficulty. The separate crochet baby cowboy boots pattern is available for readers looking for a specialty design.
A Simple Pair of Handmade Baby Booties
Small projects leave very little room for uneven counting, which is why I recommend checking each round before moving ahead. That extra moment with a stitch marker and a ruler can save quite a bit of unraveling later.
Make the second bootie while the first one is nearby. Compare the soles, toes and ankle openings as you work instead of waiting until both are finished. A matching pair depends as much on steady tension as it does on using the correct stitch totals.
These plain booties can be made in any suitable color without changing the construction. Their simple shape also makes them easy to pair with another handmade project. The handmade baby blanket size chart can help if you are planning a coordinating knit or crochet blanket.
There are more practical projects to browse in my free baby crochet patterns, including blankets, loveys, hats, mobiles and nursery decorations.


When you click on links to various merchants on this site and make a purchase, this may result in this site earning a commission. This does not affect the price you pay.

UBGI Gold Standard 2026
Reviewed under the site's
editorial checklist.
About Jan | Contact | Baby Nursery Ideas (Blog) | Site Map | Privacy Policy | Disclosure Policy | Disclaimer | Affiliate Disclosure | Earnings Disclosure | Facebook | Pinterest
I am a participant in the Amazon Services LLC Associates Program, an affiliate advertising program designed to provide a means for us to earn fees by linking to Amazon. As an Amazon Associate I earn from qualifying purchases.
Copyright © 2006-2026. All Rights Reserved.