Crochet Safari Animal Mobile Pattern (Lion, Elephant, Giraffe & Monkey)
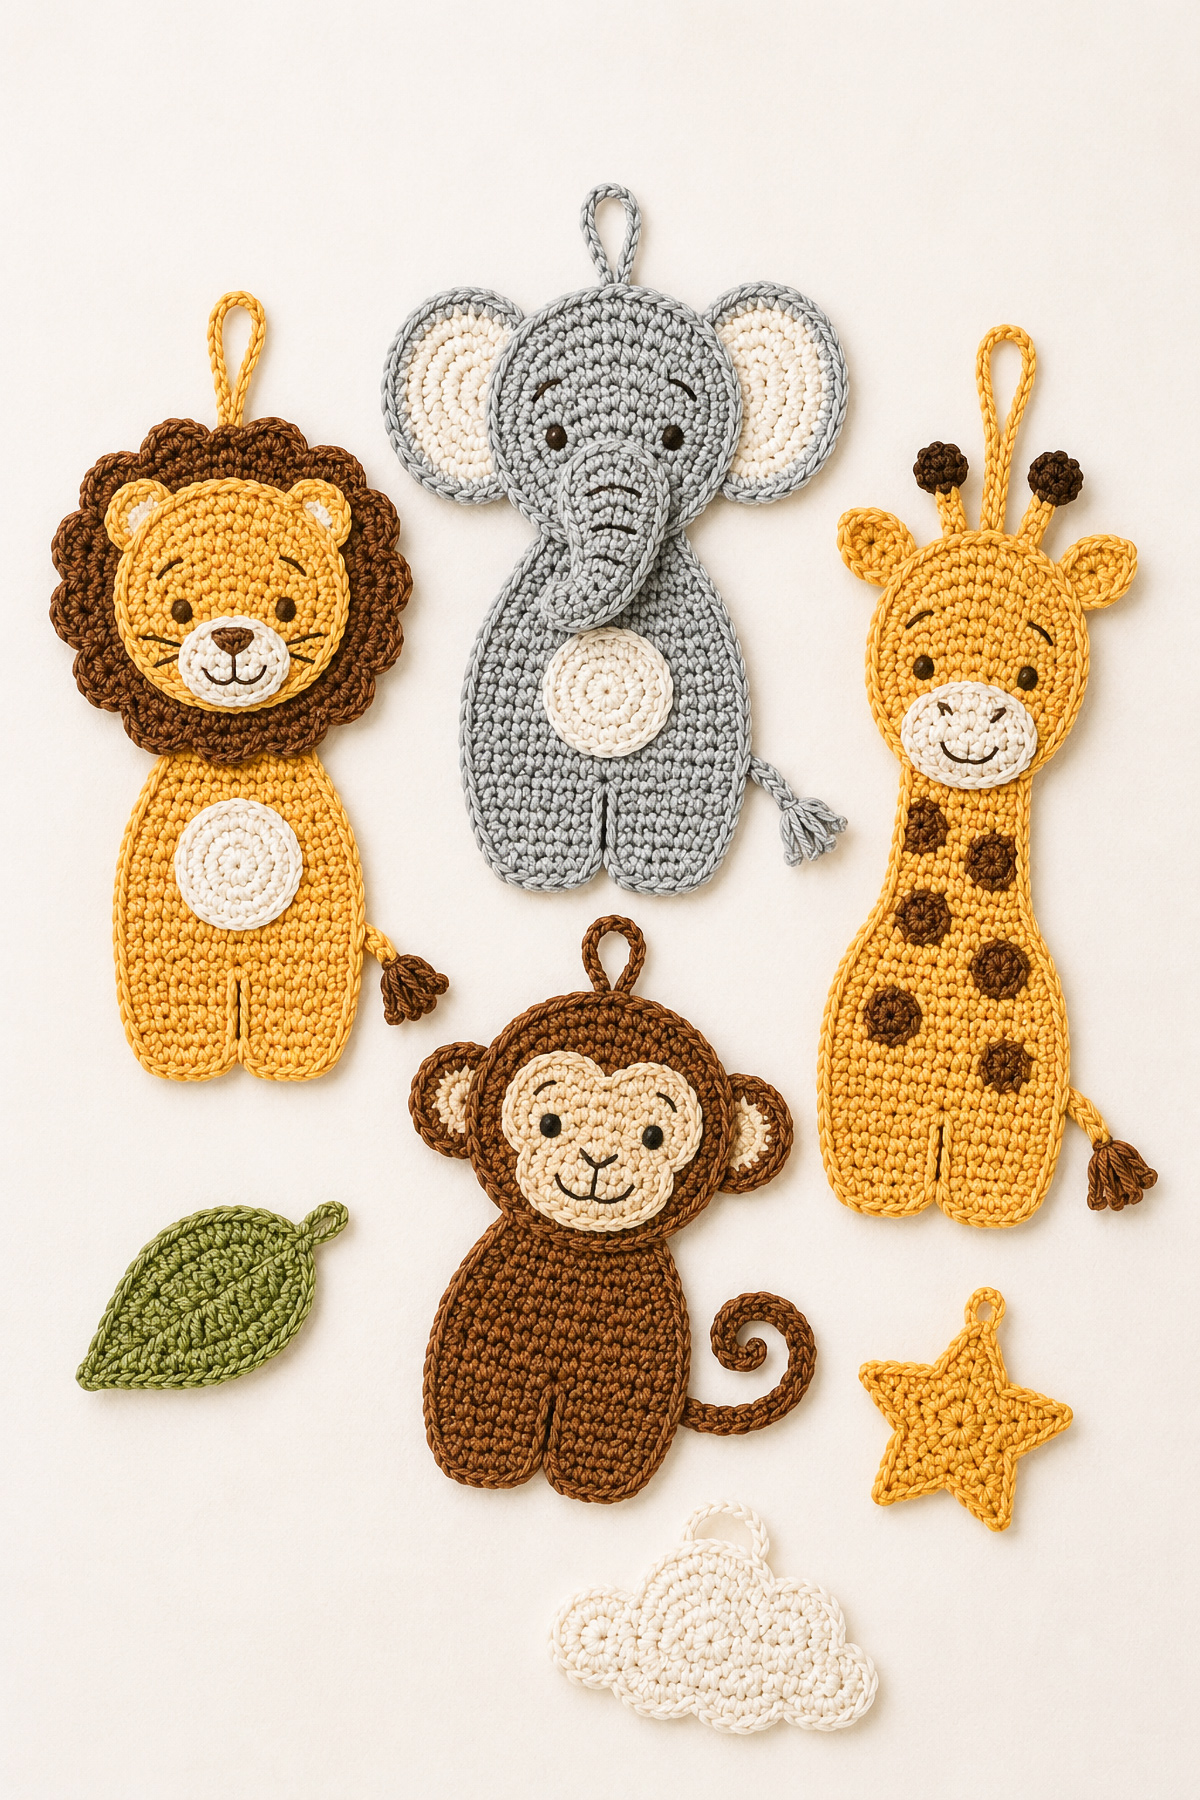
This is a crochet safari animal mobile pattern featuring lion, elephant, giraffe, and monkey in a handmade nursery mobile design. This baby crib mobile pattern uses flat amigurumi construction to create lightweight hanging safari animals with coordinating leaves, stars, and clouds for a complete jungle nursery mobile.
Crochet Safari Animal Mobile Pattern includes step-by-step instructions for lion, elephant, giraffe, and monkey components designed for a handmade nursery mobile.
By Jan Bay
More crochet baby pattern ideas:
Helpful supply list:
Jump to the crochet safari animal mobile pattern sections:
Crochet Safari Animal Mobile Pattern – Lion Section
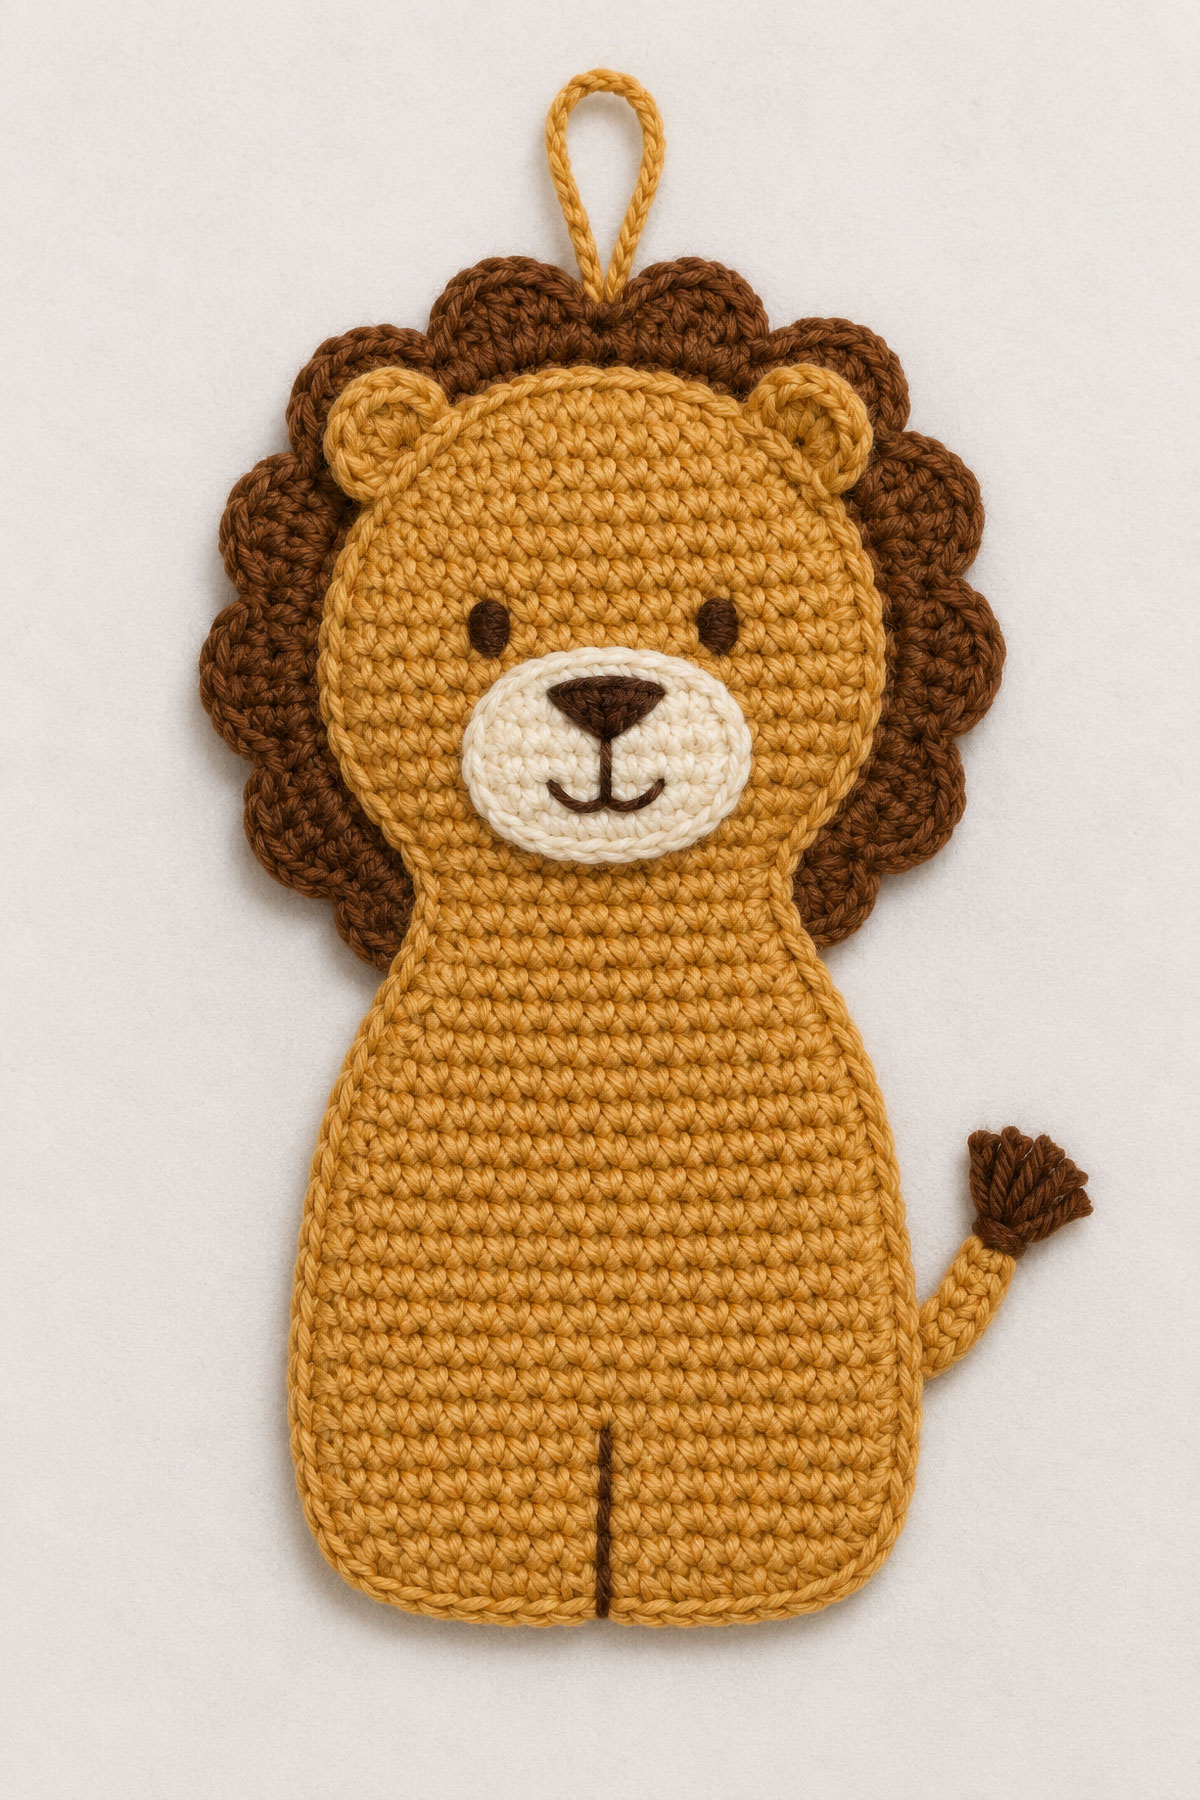
The lion is the visual anchor of this crochet safari animal mobile pattern because the mane gives the arrangement its shape before anyone studies the smaller details. Hang the lion from one quarter point of the mobile ring and position it slightly higher than the other animals so its round outline remains the main focal point.
This lion is made as a flat amigurumi piece with two identical body panels, light stuffing, a separate mane on the front and back, four ears, one muzzle, one tail and embroidered features. Finished size is about 5 1/2 inches tall from the top of the mane to the bottom of the body when made with worsted weight cotton yarn and a 4.0 mm hook.
Quick answer: This crochet lion is a 5 1/2 inch flat amigurumi safari animal made with two matching body panels joined around the edge, lightly stuffed, then finished with a round mane, ears, muzzle, tail and embroidered face.
Do not use safety eyes on a baby mobile. This lion is intended as a decorative hanging piece only, not as a toy for a baby to hold, mouth or sleep with. For current nursery safety guidance in the United States, check the CPSC Safe Sleep page.
If you are building the full mobile, keep this lion with your other handmade pieces from the crochet baby mobile patterns page so the animals stay close in scale. For a project intended to be handled as a lovey or toy, use one of the separate crochet animal lovey patterns rather than adapting this decorative mobile piece.
Finished Lion Size
- Finished height: about 5 1/2 inches
- Finished width across mane: about 4 inches
- Construction: flat amigurumi
- Main body: two identical panels
- Stuffing: light only
- Face: embroidered features
Materials for One Lion
- Worsted weight cotton yarn in golden tan for body
- Worsted weight cotton yarn in caramel or rust for mane
- Small amount of cream yarn for muzzle and belly patch
- Small amount of dark brown embroidery thread or yarn for eyes, nose and mouth
- 4.0 mm crochet hook
- Yarn needle
- Stitch marker
- Small amount of fiberfill
- Strong cotton cord for the hanging loop
- Scissors
Abbreviations
- ch: chain
- sc: single crochet
- hdc: half double crochet
- dc: double crochet
- tr: treble crochet
- sl st: slip stitch
- inc: 2 sc in the same stitch
- dec: single crochet 2 stitches together
- st: stitch
- sts: stitches
- FO: fasten off
Turning-chain note: Unless a section specifically states otherwise, the beginning ch 1 used before turning or beginning a round does not count as a stitch. Work the first stitch into the first actual stitch of the previous row or round.
Joining-edge note: When a joining section directs you to work 2 sc at a corner, those 2 sc are the total stitches worked into that corner anchor. Do not work 1 regular edge stitch and then add 2 more stitches into the same point. On the giraffe, the outside corners of the body are the two bottom corners. The two shoulder corners are listed separately.
Size-check note: No formal gauge is provided, so use the stated panel and component measurements as checkpoints. Make every repeated piece with the same yarn, hook and tension, then lay matching pieces together before assembly. Their edges, shaping rows and finished dimensions should match. Block or remake a noticeably different piece before joining.
Panel-orientation note: These flat row-worked panels do not have a required right side. Before attaching details, choose and mark one side of each completed panel as the right side. Sew the front details to the marked side of the front panel and any back details to the marked side of the back panel. For joining, place the unmarked wrong sides together so both marked right sides face outward.
Lion Body Panel, Make 2 Identical Pieces
Use golden tan yarn. Ch 9.
Row 1: Sc in 2nd ch from hook and in each ch across. Ch 1, turn. (8 sts)
Row 2: Inc in first st, sc in next 6 sts, inc in last st. Ch 1, turn. (10 sts)
Row 3: Sc in each st across. Ch 1, turn. (10 sts)
Row 4: Inc in first st, sc in next 8 sts, inc in last st. Ch 1, turn. (12 sts)
Row 5: Sc in each st across. Ch 1, turn. (12 sts)
Row 6: Inc in first st, sc in next 10 sts, inc in last st. Ch 1, turn. (14 sts)
Rows 7 through 10: Sc in each st across. Ch 1, turn. (14 sts)
Row 11: Dec, sc in next 10 sts, dec. Ch 1, turn. (12 sts)
Row 12: Dec, sc in next 8 sts, dec. Ch 1, turn. (10 sts)
Row 13: Sc in each st across. Ch 1, turn. (10 sts)
Row 14: Inc in first st, sc in next 8 sts, inc in last st. Ch 1, turn. (12 sts)
Row 15: Inc in first st, sc in next 10 sts, inc in last st. Ch 1, turn. (14 sts)
Row 16: Inc in first st, sc in next 12 sts, inc in last st. Ch 1, turn. (16 sts)
Row 17: Inc in first st, sc in next 14 sts, inc in last st. Ch 1, turn. (18 sts)
Rows 18 through 24: Sc in each st across. Ch 1, turn. (18 sts)
Row 25: Dec, sc in next 14 sts, dec. Ch 1, turn. (16 sts)
Row 26: Dec, sc in next 12 sts, dec. Ch 1, turn. (14 sts)
Row 27: Dec, sc in next 10 sts, dec. (12 sts)
FO on both panels and weave in the starting and ending tails. Use a separate length of golden tan yarn for joining as directed later. Rows 1 through 12 form the body. Row 13 forms the neck. Rows 14 through 27 form the head. Before assembly, each flat body panel should measure about 4 3/4 inches tall. The added mane brings the finished lion close to 5 1/2 inches. The finished head is intentionally wider than the neck and remains rounded across the top to create a recognizable lion profile once the mane is attached.
Lion Mane, Make 2
Use caramel or rust yarn. The mane sits behind the head on the front and back of the lion so the mobile still looks finished if it turns. The beginning chain at the start of each round does not count as a stitch.
Round 1: Make a magic ring. Work 6 sc into the ring. Join with sl st to the first sc. (6 sts)
Round 2: Ch 1. Inc in each st around. Join. (12 sts)
Round 3: Ch 1. *Sc in next st, inc in next st.* Repeat from * to * around. Join. (18 sts)
Round 4: Ch 1. *Sc in next 2 sts, inc in next st.* Repeat from * to * around. Join. (24 sts)
Round 5: Ch 1. *Sc in next 3 sts, inc in next st.* Repeat from * to * around. Join. (30 sts)
Round 6: Ch 1. *Sc in next 4 sts, inc in next st.* Repeat from * to * around. Join. (36 sts)
Round 7: Ch 1. *Sc in next 5 sts, inc in next st.* Repeat from * to * around. Join. (42 sts)
Round 8: Ch 1. *Sc in next 6 sts, inc in next st.* Repeat from * to * around. Join. (48 sts)
Round 9: Ch 1. *Sc in next 7 sts, inc in next st.* Repeat from * to * around. Join. (54 sts)
Round 10: Ch 1. *Sc in next 8 sts, inc in next st.* Repeat from * to * around. Join. (60 sts)
Round 11: Ch 1. *Work (sc, ch 2, sc) in next st, sl st in next st.* Repeat from * to * around, using two stitches for each scallop. Join with sl st and FO. (30 scallops)
Make the second mane the same way. Each completed mane should have 30 evenly spaced scallops and measure about 3 3/4 to 4 inches across before sewing. Leave a long sewing tail on each mane piece for assembly.
Lion Ears, Make 4
Use golden tan yarn.
Row 1: Ch 4. Sc in 2nd ch from hook and in next 2 ch. Ch 1, turn. (3 sts)
Row 2: Inc in first st, sc in next st, inc in last st. Ch 1, turn. (5 sts)
Row 3: Sc in each st across. Ch 1, turn. (5 sts)
Row 4: Dec, sc in next st, dec. (3 sts)
FO, leaving a long sewing tail. Fold the two bottom corners of the ear slightly toward each other and secure them with one small stitch before sewing the ear to the head.
Make four ears because this lion has a front ear pair and a back ear pair. A mobile is not a wall appliqué. It moves, and the back should not look forgotten.
Lion Muzzle, Make 1
Use cream yarn.
Round 1: Ch 5. Sc in 2nd ch from hook, sc in next 2 ch, 3 sc in last ch. Working along the opposite side of the foundation chain, sc in next 2 ch, 2 sc in last ch. Join with sl st. (10 sts)
Round 2: Ch 1. Inc in first st, sc in next 3 sts, inc in each of the next 2 sts, sc in next 3 sts, inc in last st. Join with sl st to first sc. (14 sts)
Round 3: Ch 1. Sc in each st around. Join with sl st. FO, leaving a long sewing tail. (14 sts)
This muzzle should look like a small oval, not a large snout. If it covers too much of the face, the lion starts looking more like a bear, and that shows up fast once it is hanging.
Lion Belly Patch, Make 1
Use cream yarn.
Round 1: Make a magic ring. Work 8 sc into the ring. Join with sl st to the first sc. (8 sts)
Round 2: Ch 1. Inc in each st around. Join with sl st. (16 sts)
Round 3: Ch 1. Sc in next st, inc in next st. Repeat around. Join with sl st and FO, leaving a long sewing tail. (24 sts)
Before joining the body panels, center the belly patch on the front body panel so it spans approximately Rows 4 through 10. Tack it at the top, bottom and both sides, then sew securely around the outer edge. Keep the patch flat and centered over the middle of the body.
Lion Tail, Make 1
Use golden tan yarn.
Ch 10. Sl st in the 2nd ch from hook and in each remaining ch across. FO, leaving a sewing tail. The finished tail should extend about 1 inch beyond the body before the tuft is added.
For the tail tuft, use caramel or rust yarn. Attach yarn to the end of the tail, ch 3, sl st back into the same end stitch, ch 3, sl st back into the same end stitch again. FO and trim tails after sewing.
Prepare the Front and Back Before Joining
Fold the mane in half to locate the top center and mark it with a stitch marker. Fold the head in half and mark its center in the same way. Align the two center marks before sewing. Position Row 27 about 1/2 inch below the top scallop of the mane so at least one full round of mane color shows around the head before the scalloped edge begins. Tack the mane to the head with four small stitches at the top, bottom and both sides first. Then sew between those points, alternating from one side to the other instead of sewing all the way around in one direction. This keeps the mane centered and prevents the scallops from pulling to one side.
On the back panel, embroider two small eyes on Row 23, about 5 stitches apart and centered on the head. Do not add a second muzzle to the back, because the extra layer can make the lion hang unevenly.
Sew the front ears between Rows 24 and 25, positioning each ear about 2 stitches in from the outer edge of the head. Sew the remaining ears in the matching positions on the back head before joining the body panels.
Place the muzzle on the front head so it spans approximately Rows 18 through 21. Center it across the middle 8 to 10 stitches of the face, leaving an even amount of head showing on both sides. Tack the muzzle in place with 3 or 4 small stitches first. After the nose and mouth are embroidered, sew the muzzle securely around the edge.
Embroider the Lion Face
With dark brown yarn or embroidery thread, stitch two small eyes on Row 23, about 5 stitches apart and centered above the muzzle. Stitch a small triangle nose near the top center of the muzzle. Add one short vertical line below the nose and a tiny curved mouth.
Keep the face simple. Tiny stitched features read cleaner from crib height than fussy details that disappear once the mobile is moving.
Join and Stuff the Flat Crochet Lion
Place the front and back body panels together with wrong sides facing. The mane pieces should already be sewn to the outside of each head panel, one on the front and one on the back. Match the bottom, neck and head edges carefully before joining.
Before joining the panels, use golden tan yarn to stitch one short vertical leg divider on the front body panel. Place it at the center of the lowest body edge and stitch upward for about 4 rows, stopping before the body begins to widen. Repeat on the back panel if you want the lion to look finished from both sides.
With the front panel facing up, insert the tail between the two body panels on the viewer's left side between Rows 3 and 4, about one stitch in from the outer edge. This becomes the lion's right side when the lion faces forward. The tuft should point outward and slightly downward before the panels are joined. When you crochet around the body edge, catch the tail end securely between the two panels.
Join golden tan yarn on the lower left side of the body, about 2 rows above the bottom edge. Working through both body panels only, sc evenly around the joined body and head. Do not work through the outer mane scallops. Place approximately one sc in the end of each row and one sc in each stitch across the top and bottom edges. Work 2 sc in each outside corner of the body and at the top corners of the head to keep the outline rounded. The exact edge stitch count is not critical, but the edge should lie flat without rippling or drawing inward.
When you reach the neck and head area, continue joining through the two body panels only. Work 2 sc at each neck corner where Row 13 meets Row 14 so the join does not pinch inward. Across the top of Row 27, work 1 sc in each stitch and keep your tension relaxed so the head stays rounded instead of pulling flat. Do not crochet through the outer mane scallops. Let the mane sit free around the head edge.
Leave the final 2 inches open along one lower side of the body, not near the mane. Add a thin layer of stuffing, about 1 tablespoon total for the body and head. Spread it evenly with your fingers instead of packing it into the corners. The lion should have a little lift, but it should not puff into a toy shape. Flatten the piece gently with your palm before finishing the seam.
Finish closing with sc. Join with sl st and FO. Weave every yarn tail through the inside of the lion at least twice before trimming. Do not leave short loose ends near the hanging cord, ears, tail or mane.
Lay the finished lion flat and gently shape the mane, ears and body with your fingers. If the edges curl, pin the lion flat on a towel while dry and let it rest overnight before adding the hanging cord.
Before adding the hanging cord, give the ears, tail, mane and muzzle a gentle tug to make sure every sewn piece is secure. If anything shifts, sew through that area again before the lion is added to the mobile.
If the lion tips forward after assembly, move the hanging cord slightly lower through the joined head area so it catches both body panels securely without pulling on the loose mane scallops.
Hanging Loop for the Lion
Cut a 24-inch working length of strong cotton cord and fold it in half. The extra working length allows room for the finished drop, wrapping the wooden ring, tying two secure knots and leaving at least 1 inch of cord beyond the final knot. Pass the folded midpoint through two adjacent joined stitches at the top center of the head, just below the mane, catching both body panels without pulling through the loose scalloped edge. Pull the two free ends through the folded midpoint and tighten gently. Hold the lion up to test its balance. If it leans, move the cord anchor one stitch to the left or right. Leave both free ends untrimmed so they can be tied to the mobile ring at a finished drop of about 7 inches.
After the lion is shaped, measure from the top of the mane to the bottom of the body. The finished lion should be close to 5 1/2 inches tall. A small difference is fine, but if the lion is much taller or shorter, adjust the hanging cord later so it still lines up with the other safari animals.
The finished lion should feel lightweight in your hand. If it feels heavy or pulls forward, carefully reopen a short section of the lower joining seam, remove a little stuffing and close the seam again. Continue using the same strong cotton hanging cord.
For the finished mobile layout, hang the lion from one quarter point of the wooden ring and position it slightly higher than the other safari animals. Hang the giraffe opposite the lion, with the elephant opposite the monkey. This arrangement distributes the four animals evenly around the ring while keeping the lion visually prominent.
For the same animal as a separate blanket or banner motif, use my crochet lion applique pattern, which keeps the lightly padded body and scalloped mane without the mobile hanging cord.
Crochet Safari Animal Mobile Pattern: Elephant Body Panel
Use light gray yarn. Ch 9.
Row 1: Sc in 2nd ch from hook and in each remaining ch. Ch 1, turn. (8 sts)
Row 2: Inc in first st, sc in next 6 sts, inc in last st. Ch 1, turn. (10 sts)
Row 3: Sc in each st across. Ch 1, turn. (10 sts)
Row 4: Inc in first st, sc in next 8 sts, inc in last st. Ch 1, turn. (12 sts)
Row 5: Sc in each st across. Ch 1, turn. (12 sts)
Row 6: Inc in first st, sc in next 10 sts, inc in last st. Ch 1, turn. (14 sts)
Rows 7 through 11: Sc in each st across. Ch 1, turn. (14 sts)
Row 12: Dec, sc in next 10 sts, dec. Ch 1, turn. (12 sts)
Row 13: Dec, sc in next 8 sts, dec. Ch 1, turn. (10 sts)
Row 14: Sc in each st across. Ch 1, turn. (10 sts)
Row 15: Inc in first st, sc in next 8 sts, inc in last st. Ch 1, turn. (12 sts)
Row 16: Inc in first st, sc in next 10 sts, inc in last st. Ch 1, turn. (14 sts)
Row 17: Inc in first st, sc in next 12 sts, inc in last st. Ch 1, turn. (16 sts)
Row 18: Inc in first st, sc in next 14 sts, inc in last st. Ch 1, turn. (18 sts)
Rows 19 through 25: Sc in each st across. Ch 1, turn. (18 sts)
Row 26: Dec, sc in next 14 sts, dec. Ch 1, turn. (16 sts)
Row 27: Dec, sc in next 12 sts, dec. Ch 1, turn. (14 sts)
Row 28: Dec, sc in next 10 sts, dec. (12 sts)
FO on both panels and weave in the starting and ending tails. Use a separate length of light gray yarn for joining as directed later. Rows 1 through 13 form the body. Row 14 forms the neck. Rows 15 through 28 form the head.
Before assembly, each flat body panel should measure about 5 inches tall. The ears increase the finished width, while the trunk remains within the body silhouette, so the completed elephant should remain approximately 5 inches tall.
The two body panels remain identical. The trunk, ears and tail are added during assembly so the finished elephant stays balanced when hanging from the mobile.
Elephant Ears, Make 4
Use light gray yarn. The ears are intentionally oversized because they define the elephant's silhouette from across the room, even while the mobile is gently turning.
Row 1: Ch 6. Sc in 2nd ch from hook and in each remaining ch. Ch 1, turn. (5 sts)
Row 2: Inc in first st, sc in next 3 sts, inc in last st. Ch 1, turn. (7 sts)
Row 3: Inc in first st, sc in next 5 sts, inc in last st. Ch 1, turn. (9 sts)
Row 4: Inc in first st, sc in next 7 sts, inc in last st. Ch 1, turn. (11 sts)
Rows 5 through 8: Sc in each st across. Ch 1, turn. (11 sts)
Row 9: Dec, sc in next 7 sts, dec. Ch 1, turn. (9 sts)
Row 10: Dec, sc in next 5 sts, dec. Ch 1, turn. (7 sts)
Row 11: Dec, sc in next 3 sts, dec. (5 sts)
FO, leaving a long sewing tail. Fold the lower edge of the ear inward about 1/4 inch and secure it with one small stitch before attaching it to the head. This creates a gentle cup without adding bulk.
Each finished ear should measure about 2 1/4 inches tall and about 2 inches wide.
The narrower 5-stitch edge is the top of the ear. The wider rounded edge becomes the lower outside edge after sewing.
Inner Ear Patches, Make 2
Use pale pink yarn.
Row 1: Ch 5. Sc in 2nd ch from hook and in each remaining ch. Ch 1, turn. (4 sts)
Row 2: Inc in first st, sc in next 2 sts, inc in last st. Ch 1, turn. (6 sts)
Rows 3 through 5: Sc in each st across. Ch 1, turn. (6 sts)
Row 6: Dec, sc in next 2 sts, dec. (4 sts)
FO, leaving a sewing tail.
Sew one inner ear patch to each front ear before attaching the ears to the elephant. Leave approximately 1/4 inch of gray showing around every edge. Leave the two back ears plain to reduce bulk.
Elephant Trunk, Make 1
Use light gray yarn.
Row 1: Ch 7. Sc in 2nd ch from hook and in each remaining ch. Ch 1, turn. (6 sts)
Rows 2 through 6: Sc in each st across. Ch 1, turn. (6 sts)
Row 7: Dec, sc in next 2 sts, dec. Ch 1, turn. (4 sts)
Rows 8 through 12: Sc in each st across. Ch 1, turn. (4 sts)
Row 13: Sc in each st across. FO, leaving a long sewing tail. (4 sts)
After sewing the trunk to the head, curve the lower third slightly toward one side and secure it with one small hidden stitch. This creates the natural trunk curl without adding bulk.
The finished trunk should measure about 2 inches long and approximately 1 inch wide where it joins the head.
Elephant Tail, Make 1
Use light gray yarn.
Ch 10. Sl st in the 2nd ch from hook and in each remaining ch across. FO, leaving a sewing tail.
Attach two short strands of gray yarn to the end of the tail, knot securely, then trim the tuft to about 3/8 inch long.
Prepare the Front and Back Before Joining
Lay the two body panels side by side with the right sides facing up.
Sew one completed front ear, including its inner ear patch, to each side of the front head. Position the top edge of each ear across Rows 23 and 24. Begin each ear about one stitch in from the outer edge so the rounded lower portion extends beyond the sides of the head evenly.
Sew the remaining two plain ears to the back body panel in the matching locations. The inner ear patches should face outward on the finished front of the elephant.
Join and Stuff the Flat Crochet Elephant
Before placing the panels together, use light gray yarn and a yarn needle to embroider one short vertical body divider on the front panel. Begin at the center of the lowest body edge and stitch upward for approximately 4 rows. Repeat on the back panel so the elephant looks finished as the mobile turns.
Place the front and back body panels together with wrong sides facing. The ears should already be attached to each panel.
With the front panel facing up, insert the tail between the two body panels on the viewer's left side between Rows 3 and 4, about one stitch in from the outer edge. This becomes the elephant's right side when the elephant faces forward. Catch the tail securely as you crochet around the edge.
Join light gray yarn on the lower left side of the body about 2 rows above the bottom edge. Working through both body panels only, sc evenly around the joined body and head. Place approximately one sc in the end of each row and one sc in every stitch across the top and bottom edges.
Work 2 sc at each outside corner of the body and at both neck corners where Row 14 meets Row 15. Across the top of Row 28, work one sc in each stitch using a relaxed tension so the head keeps its rounded shape.
Do not crochet through the ears. Let them remain free outside the joined body panels.
Leave the final 2 inches open along one lower side of the body, not near the head. Add about 1 tablespoon of fiberfill, placing slightly more in the body than the head. Spread it evenly with your fingers. The elephant should remain flat rather than becoming rounded like a stuffed toy.
Finish closing with single crochet. Join with a slip stitch and fasten off. Weave every yarn tail through the inside of the elephant at least twice before trimming.
Lay the elephant flat and gently shape the body and ears with your fingers. If the edges curl, pin it flat on a towel while dry and let it rest overnight before adding the remaining pieces.
Attach the Trunk
Center the trunk on the front head after the body has been joined and stuffed. Position the top edge of the trunk between Rows 18 and 19, centered over the middle stitches of the face.
Sew only the top edge and the upper third of each side of the trunk. Leave the lower half unattached so it hangs naturally. Curve the lower third slightly toward one side and secure it with one small hidden stitch.
Embroider the Elephant Face
With dark gray embroidery thread, stitch two small eyes on Row 22 about 5 stitches apart and centered above the trunk.
If desired, stitch one short curved eyebrow above each eye on Row 23 using a single strand of dark gray yarn.
Keep the facial details simple. Small embroidered features remain easy to recognize from below once the mobile is hanging.
Before adding the hanging cord, gently tug on both ears, the trunk and the tail. If any piece shifts, reinforce it with another line of stitching before continuing.
Hanging Loop for the Elephant
This elephant is intended as a decorative mobile piece only. It is not designed to be used as a toy or attached where a baby can reach it.
Cut a 24-inch working length of strong cotton cord and fold it in half. The extra working length allows room for the finished drop, wrapping the wooden ring, tying two secure knots and leaving at least 1 inch of cord beyond the final knot.
Pass the folded midpoint through two adjacent joined stitches at the top center of the head, catching both body panels securely. Pull the two free ends through the folded midpoint and tighten gently. Hold the elephant up to test its balance. If it leans, move the cord anchor one stitch to the left or right. Leave both free ends untrimmed for attachment to the mobile ring.
View the elephant from the front while testing the hanging cord. Both ears should hang evenly and the trunk should point slightly downward. If one ear sits higher than the other, adjust the cord anchor before tying the free ends to the mobile ring.
After shaping, the finished elephant should measure about 5 inches from the top of the head to the bottom of the body and about 5 inches across the ears. A variation of approximately 1/4 inch is normal depending on yarn and individual tension.
When assembling the mobile, adjust the hanging cord so the elephant hangs about 8 inches below the mobile ring, slightly lower than the lion.
For a separate elephant motif instead of a hanging mobile piece, my crochet elephant applique pattern includes a lightly padded safari version plus the flatter circus elephant.

Crochet Safari Animal Mobile Pattern: Giraffe Body Panel
Use golden yellow yarn. Ch 9.
Row 1: Sc in 2nd ch from hook and in each remaining ch. Ch 1, turn. (8 sts)
Row 2: Inc in first st, sc in next 6 sts, inc in last st. Ch 1, turn. (10 sts)
Row 3: Sc in each st across. Ch 1, turn. (10 sts)
Row 4: Inc in first st, sc in next 8 sts, inc in last st. Ch 1, turn. (12 sts)
Row 5: Sc in each st across. Ch 1, turn. (12 sts)
Row 6: Inc in first st, sc in next 10 sts, inc in last st. Ch 1, turn. (14 sts)
Rows 7 through 11: Sc in each st across. Ch 1, turn. (14 sts)
Row 12: Dec, sc in next 10 sts, dec. Ch 1, turn. (12 sts)
Row 13: Dec, sc in next 8 sts, dec. Ch 1, turn. (10 sts)
Rows 14 through 18: Sc in each st across. Ch 1, turn. (10 sts)
Row 19: Inc in first st, sc in next 8 sts, inc in last st. Ch 1, turn. (12 sts)
Row 20: Inc in first st, sc in next 10 sts, inc in last st. Ch 1, turn. (14 sts)
Row 21: Inc in first st, sc in next 12 sts, inc in last st. Ch 1, turn. (16 sts)
Rows 22 through 26: Sc in each st across. Ch 1, turn. (16 sts)
Row 27: Dec, sc in next 12 sts, dec. Ch 1, turn. (14 sts)
Row 28: Dec, sc in next 10 sts, dec. Ch 1, turn. (12 sts)
Row 29: Sc in each st across. (12 sts)
FO on both panels and weave in the starting and ending tails. Use a separate length of golden yellow yarn for joining as directed later. Fold each body panel in half lengthwise and place a removable stitch marker at the center of the neck. This makes it easier to align the ears, muzzle and ossicones during assembly.
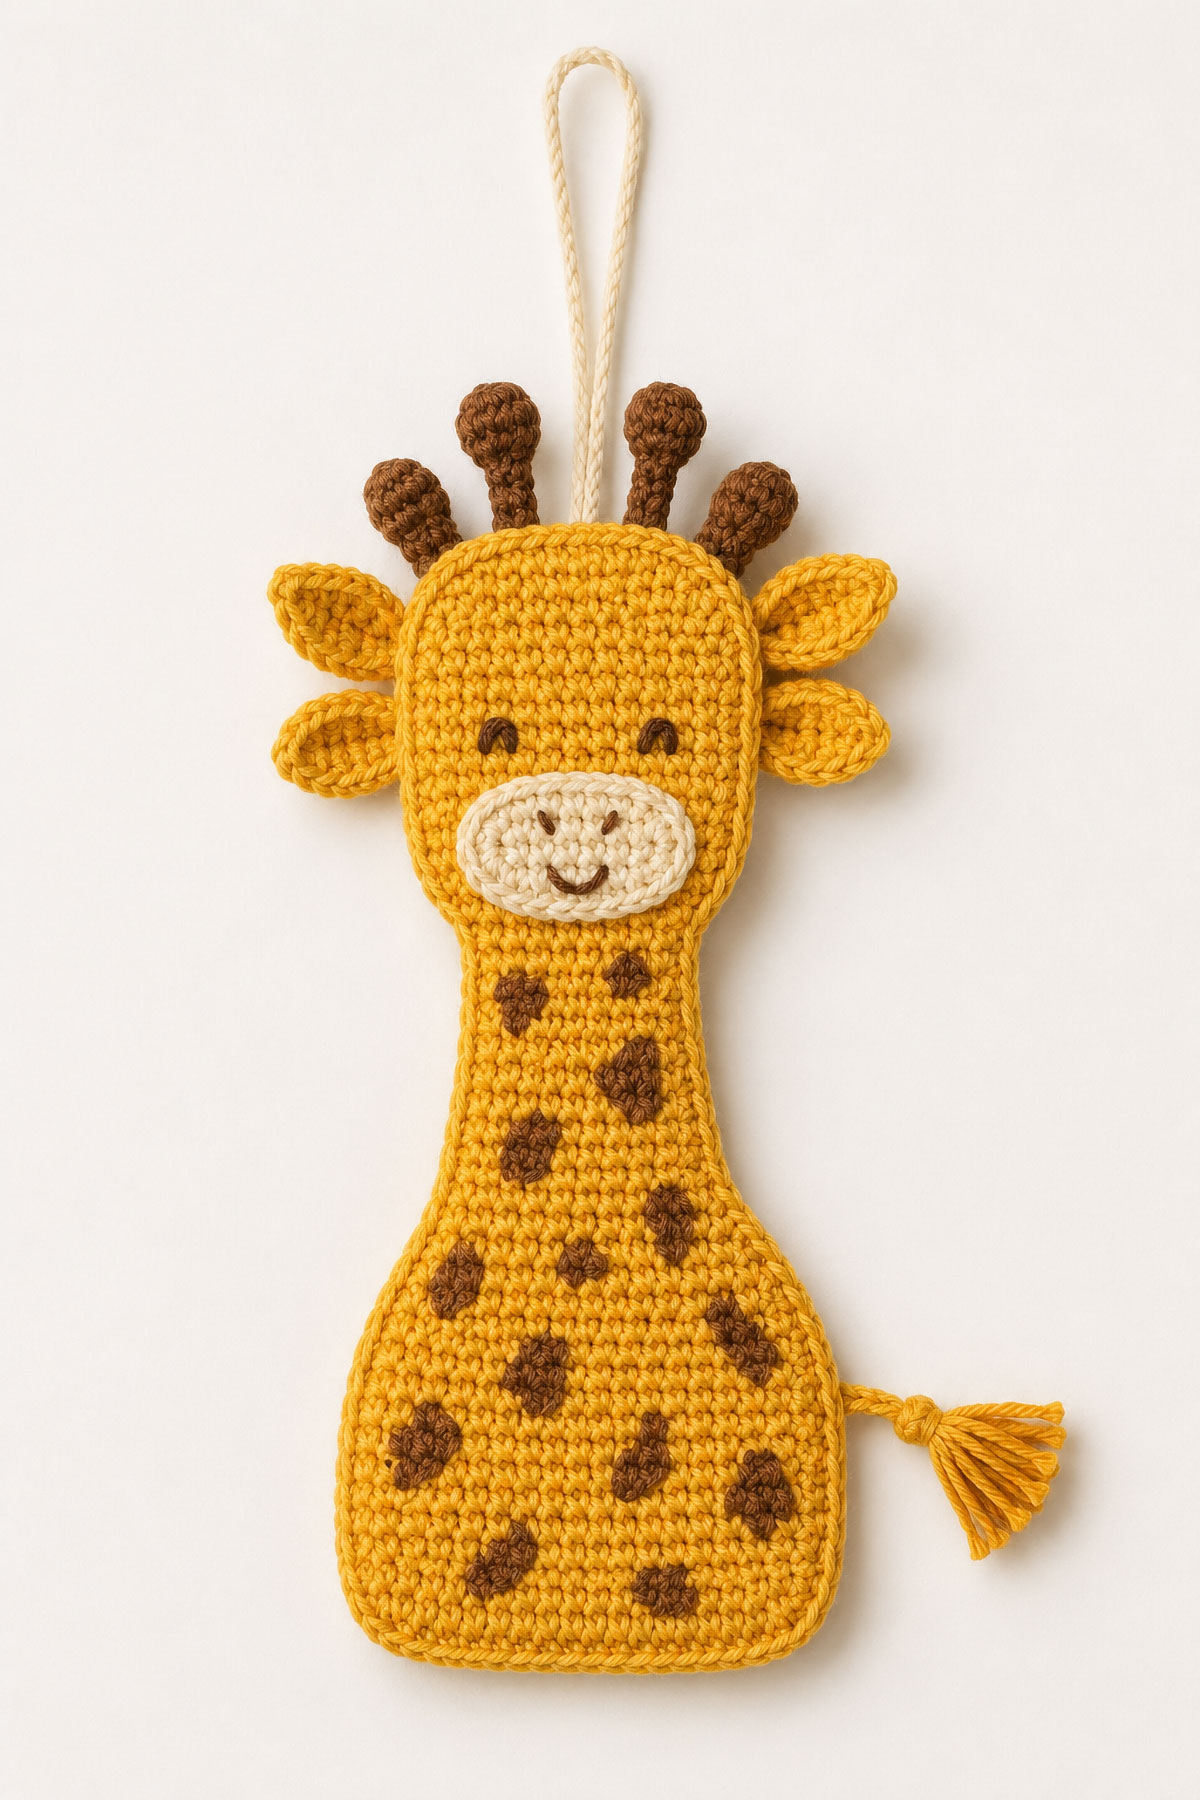
Rows 1 through 11 form the body. Rows 12 and 13 create the shoulder transition into the neck. Rows 14 through 18 form the narrower neck. Rows 19 through 29 form the head. The finished head should resemble a rounded rectangle rather than a circle or triangle, giving the giraffe a recognizable profile before the ears and ossicones are added.
Before assembly, each body panel should measure about 5 inches tall. After the ears and ossicones are attached, the finished giraffe should measure about 6 inches from the tops of the ossicones to the bottom of the body. A variation of approximately 1/4 inch is normal depending on yarn and individual tension.
The neck should measure approximately 1 3/4 to 2 inches wide through Rows 14 through 18. If it is noticeably wider or narrower, check your tension before making the remaining pieces.
The two body panels remain identical. Do not designate one as the front until assembly begins. The ears, ossicones, muzzle, embroidered spots and tail are added afterward so both panels stay symmetrical and the finished giraffe hangs straight from the mobile.
Giraffe Ears, Make 4
Use golden yellow yarn. The ears are slightly smaller than the elephant's so the longer neck remains the feature that catches the eye first.
Row 1: Ch 5. Sc in 2nd ch from hook and in each remaining ch. Ch 1, turn. (4 sts)
Row 2: Inc in first st, sc in next 2 sts, inc in last st. Ch 1, turn. (6 sts)
Row 3: Inc in first st, sc in next 4 sts, inc in last st. Ch 1, turn. (8 sts)
Rows 4 through 6: Sc in each st across. Ch 1, turn. (8 sts)
Row 7: Dec, sc in next 4 sts, dec. Ch 1, turn. (6 sts)
Row 8: Dec, sc in next 2 sts, dec. (4 sts)
FO, leaving a long sewing tail. Fold the center of the lower edge inward about 1/8 inch and secure it with one small stitch before attaching it to the head. This creates a shallow cup while keeping both ears identical.
Each finished ear should measure about 1 3/4 inches tall and about 1 1/2 inches wide.
The narrower 4-stitch edge is the top of the ear. The rounded edge becomes the lower outside edge after sewing.
Ossicones, Make 4
Use brown yarn.
Row 1: Ch 4. Sc in 2nd ch from hook and in each remaining ch. Ch 1, turn. (3 sts)
Rows 2 through 4: Sc in each st across. Ch 1, turn. (3 sts)
Row 5: Sc in each st across. FO, leaving a long sewing tail. (3 sts)
Fold the lower edge of each ossicone inward about 1/8 inch before sewing. Stitch through the folded base only. This helps the ossicones stand upright while remaining flexible.
Each finished ossicone should measure about 7/8 inch tall.
Two ossicones are sewn to the front panel and two to the back panel so the giraffe looks finished from every viewing angle as the mobile turns.
Do not stuff the ossicones. Stitch only through the folded base when attaching them so the flat strips can stand upright with a slight natural bend rather than becoming rigid.
Giraffe Muzzle, Make 1
Use cream yarn.
Round 1: Ch 5. Sc in 2nd ch from hook, sc in next 2 ch, 3 sc in last ch. Working along the opposite side of the foundation chain, sc in next 2 ch, 2 sc in last ch. Join with sl st. (10 sts)
Round 2: Ch 1. Inc in first st, sc in next 3 sts, inc in each of the next 2 sts, sc in next 3 sts, inc in last st. Join with sl st. (14 sts)
Round 3: Ch 1. Sc in each st around. Join with sl st and FO, leaving a long sewing tail. (14 sts)
The finished muzzle should measure about 1 1/4 inches wide and about 7/8 inch tall. Keep the shape slightly oval rather than round.
Leave the sewing tail untrimmed. The muzzle will be centered on the lower head during assembly using the neck center marker established on the body panels.
Giraffe Tail, Make 1
Use golden yellow yarn.
Ch 10. Sl st in the 2nd ch from hook and in each remaining ch across. FO, leaving a sewing tail.
Attach two short strands of brown yarn to the end of the tail. Knot securely, trim the tuft to approximately 3/8 inch, then lightly separate the strands with a yarn needle so the tuft spreads naturally.
During assembly, angle the tail slightly downward rather than straight out so the finished giraffe hangs naturally.
Giraffe Spots
Use brown yarn and a yarn needle to embroider the giraffe's spots after the body has been joined and lightly stuffed but before attaching the hanging cord.
Stitch 8 to 10 irregular spots on the front and another 8 to 10 spots on the back. Space the spots evenly, leaving more open background than filled area. Place slightly smaller spots on the neck and larger spots on the body. Keep every spot at least 1/4 inch away from the outside edge so the joining stitches remain clear.
Work the spots as shallow surface embroidery through the outer panel only, completing one side at a time. Do not pass the needle through both stuffed panels, because that would pull the front and back together and flatten the giraffe unevenly.
Prepare the Front and Back Before Joining
Lay the two body panels side by side with the right sides facing up.
Sew one completed front ear to each side of the front head. Position the top edge of each ear across Rows 24 and 25, beginning about one stitch in from the outer edge so the rounded lower edge extends naturally beyond the sides of the head. This leaves room above for the ossicones while keeping the ears proportionate to the head.
Sew the remaining two ears to the matching positions on the back body panel. Compare both panels before continuing to be sure the ears are mirror images of one another.
Sew two ossicones to the top of the front head along Row 29. Position each ossicone about 2 stitches in from the outer edge so they sit evenly on either side of the head center. Repeat with the remaining two ossicones on the back panel.
Check that all four ossicones lean slightly outward at matching angles before joining the body panels. Minor adjustments are much easier now than after assembly.
Join and Stuff the Flat Crochet Giraffe
Before placing the panels together, use golden yellow yarn and a yarn needle to embroider one short vertical body divider on the front panel. Begin at the center of the lowest body edge and stitch upward for approximately 4 rows. Repeat on the back panel so the giraffe looks finished as the mobile turns.
Place the front and back body panels together with wrong sides facing. Match the neck and head carefully so both panels align evenly.
With the front panel facing up, insert the tail between the two body panels on the viewer's left side between Rows 3 and 4, about one stitch in from the outer edge. This becomes the giraffe's right side when facing forward.
Join golden yellow yarn near the lower left side of the body. Working through both body panels only, sc evenly around the entire giraffe. Work approximately one sc in the end of each row and one sc in every stitch across the top and bottom edges.
Work 2 sc at each outside corner of the body, both shoulder corners where the neck begins, and both top head corners to maintain smooth curves.
Do not crochet through the ears or ossicones. Leave those pieces free outside the joined body panels. When you reach the tail attachment point, work through both body panels and the short tail base caught between them so the tail is secured in the joining seam. Leave the remaining tail free outside the panels.
Leave the final 2 inches open along one lower side of the body. Add approximately 1 tablespoon of fiberfill, placing slightly more in the body than the neck and head. Spread the stuffing evenly with your fingers so the giraffe remains flat instead of becoming rounded.
Finish closing with single crochet. Join with a slip stitch, fasten off and weave every yarn tail securely through the inside of the body before trimming.
Lay the giraffe flat and gently shape the neck with your fingers before attaching the remaining pieces. The neck should remain straight without twisting toward either side.
Check the finished giraffe from the front and back. Both sides should remain symmetrical, the neck should stay vertical and no section of the joined edge should pucker or flare.
Attach the Muzzle and Embroider the Face
Center the muzzle on the lower head using the neck center marker established earlier. Position the top edge of the muzzle between Rows 22 and 23 so the lower portion of the muzzle rests near the base of the head.
Sew the muzzle completely around its outer edge using small whip stitches. Catch only the front panel whenever possible so the sewing stitches do not show on the back.
With dark brown embroidery thread, stitch two small eyes on Row 25 approximately 5 stitches apart and centered above the muzzle.
Embroider a small nose near the upper center of the muzzle. Add one short vertical stitch below the nose and a slight curved smile.
View the giraffe from the front before tying off the embroidery. Both eyes should sit level and the muzzle should remain centered over the neck.
Embroider the Spots
Use brown yarn and a yarn needle to embroider the giraffe's spots after the body has been joined and lightly stuffed but before attaching the hanging cord.
Avoid placing spots directly beneath the ears or ossicones so the facial features remain the focal point.
Follow the placement guidance from the previous section, keeping the neck spots smaller and the body spots slightly larger. Leave more background showing than stitched area for a natural appearance.
Before adding the hanging cord, gently tug on the ears, ossicones, muzzle and tail. Reinforce any piece that shifts before continuing.
Hanging Loop for the Giraffe
This giraffe is intended as a decorative mobile piece only. It is not designed to be used as a toy or attached where a baby can reach it.
Cut a 24-inch working length of strong cotton cord and fold it in half. The extra working length allows room for the finished drop, wrapping the wooden ring, tying two secure knots and leaving at least 1 inch of cord beyond the final knot.
Pass the folded midpoint through two adjacent joined stitches at the top center of the head, just below the ossicones, catching both body panels securely. Pull the two free ends through the folded midpoint and tighten gently. Hold the giraffe up to test its balance. If it leans, move the cord anchor one stitch to the left or right. Leave both free ends untrimmed for attachment to the mobile ring.
View the giraffe from the front after hanging. Both ears should sit evenly, the ossicones should stand upright, the neck should remain vertical without twisting, and the tail should angle gently downward.
After shaping, the finished giraffe should measure about 6 inches from the tops of the ossicones to the bottom of the body. A variation of approximately 1/4 inch is normal depending on yarn and individual tension.
When assembling the finished mobile, hang the giraffe opposite the lion and adjust its cord until it hangs level with the elephant and slightly below the lion.
For a separate motif that can be sewn onto another project, use my crochet giraffe applique pattern with its long neck, small ossicones, stitched spots and lightly padded body.
Monkey Body Panel, Make 2 Identical Pieces
Use medium brown yarn. Ch 9.
Row 1: Sc in 2nd ch from hook and in each remaining ch. Ch 1, turn. (8 sts)
Row 2: Inc in first st, sc in next 6 sts, inc in last st. Ch 1, turn. (10 sts)
Row 3: Sc in each st across. Ch 1, turn. (10 sts)
Row 4: Inc in first st, sc in next 8 sts, inc in last st. Ch 1, turn. (12 sts)
Row 5: Sc in each st across. Ch 1, turn. (12 sts)
Row 6: Inc in first st, sc in next 10 sts, inc in last st. Ch 1, turn. (14 sts)
Rows 7 through 11: Sc in each st across. Ch 1, turn. (14 sts)
Row 12: Dec, sc in next 10 sts, dec. Ch 1, turn. (12 sts)
Row 13: Sc in each st across. Ch 1, turn. (12 sts)
Row 14: Inc in first st, sc in next 10 sts, inc in last st. Ch 1, turn. (14 sts)
Row 15: Inc in first st, sc in next 12 sts, inc in last st. Ch 1, turn. (16 sts)
Rows 16 through 22: Sc in each st across. Ch 1, turn. (16 sts)
Row 23: Dec, sc in next 12 sts, dec. Ch 1, turn. (14 sts)
Row 24: Dec, sc in next 10 sts, dec. Ch 1, turn. (12 sts)
Row 25: Sc in each st across. (12 sts)
FO on both panels and weave in the starting and ending tails. Use a separate length of medium brown yarn for joining as directed later.
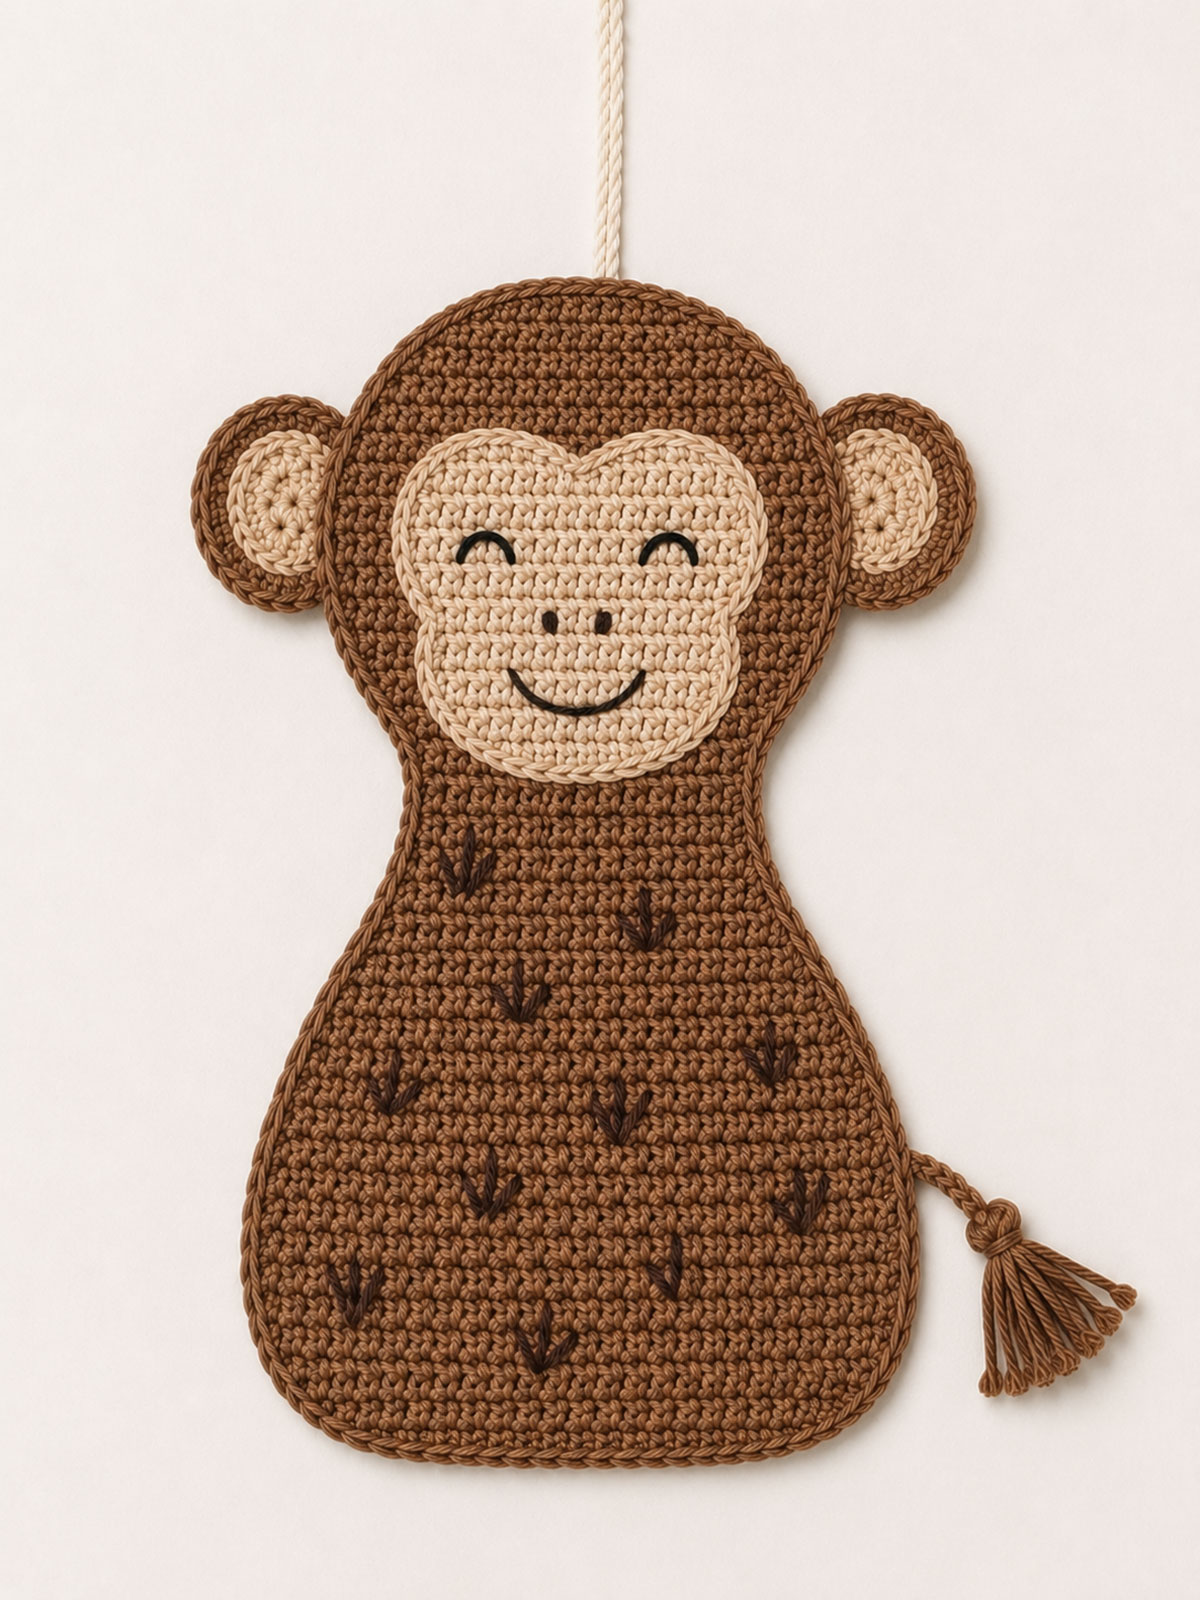
Rows 1 through 12 form the body. Row 13 creates the shoulder transition. Rows 14 through 25 form the head. The finished head should appear slightly rounded without becoming oversized.
Before assembly, each body panel should measure about 4 1/2 inches tall. The ears extend beyond the sides of the head and do not increase the height. After joining and edging, the finished monkey should measure approximately 4 3/4 inches tall. A variation of approximately 1/4 inch is normal depending on yarn and individual tension.
Fold each body panel in half lengthwise and place a removable stitch marker at the center of the neck before assembly. The two body panels remain identical. The ears, muzzle and curled tail are added afterward so both panels remain symmetrical and the finished monkey hangs evenly from the mobile.
Monkey Ears, Make 4
Use medium brown yarn for the outer ear and tan yarn for the inner ear patch.
Outer Ear (Make 4)
Row 1: Ch 5. Sc in 2nd ch from hook and in each remaining ch. Ch 1, turn. (4 sts)
Row 2: Inc in first st, sc in next 2 sts, inc in last st. Ch 1, turn. (6 sts)
Row 3: Inc in first st, sc in next 4 sts, inc in last st. Ch 1, turn. (8 sts)
Rows 4 and 5: Sc in each st across. Ch 1, turn. (8 sts)
Row 6: Dec, sc in next 4 sts, dec. Ch 1, turn. (6 sts)
Row 7: Dec, sc in next 2 sts, dec. (4 sts)
FO, leaving a long sewing tail.
Inner Ear Patch (Make 2)
Using tan yarn, Ch 4.
Row 1: Sc in 2nd ch from hook and in each remaining ch. Ch 1, turn. (3 sts)
Row 2: Inc in first st, sc in next st, inc in last st. Ch 1, turn. (5 sts)
Row 3: Sc in each st across. Ch 1, turn. (5 sts)
Row 4: Sc in each st across. (5 sts)
FO, leaving a sewing tail.
Sew one tan ear patch to each of the two front ears, centering it evenly and leaving a narrow brown border visible all the way around. Begin stitching at the bottom center of the patch and work around both sides to help keep it symmetrical.
Fold the center of the lower edge of each ear inward about 1/8 inch and secure with one small stitch to create a shallow cup before assembly.
Each completed ear should measure approximately 1 1/2 inches tall and 1 1/4 inches wide.
The narrower 4-stitch edge forms the top of the ear. The rounded edge becomes the lower outside edge after the ear is sewn in place.
Monkey Muzzle, Make 1
Use tan yarn.
Round 1: Ch 5. Sc in 2nd ch from hook, sc in next 2 ch, 3 sc in last ch. Working along the opposite side of the foundation chain, sc in next 2 ch, 2 sc in last ch. Join with sl st. (10 sts)
Round 2: Ch 1. Inc in first st, sc in next 3 sts, inc in each of the next 2 sts, sc in next 3 sts, inc in last st. Join with sl st. (14 sts)
Round 3: Ch 1. Sc in each st around. Join with sl st and FO, leaving a long sewing tail. (14 sts)
The muzzle should measure approximately 1 1/4 inches wide by 7/8 inch tall and remain slightly oval.
Leave the sewing tail untrimmed. The muzzle will later be centered on the neck marker established on the body panels during assembly.
Monkey Tail, Make 1
Use medium brown yarn.
Ch 21.
Row 1: Work 2 sc in the 2nd ch from hook and 2 sc in each remaining chain across. (40 sts)
FO, leaving a long sewing tail.
The tail will naturally curl into a spiral. If necessary, wrap it gently around a crochet hook or your finger once before sewing it in place to encourage an even, relaxed curl. Do not pull the spiral tightly closed.
The finished curled tail should measure approximately 2 inches from the body to the outer tip of the spiral.
Monkey Face Patch, Make 1
Use tan yarn. Ch 7.
Row 1: Sc in 2nd ch from hook and in each remaining ch. Ch 1, turn. (6 sts)
Row 2: Inc in first st, sc in next 4 sts, inc in last st. Ch 1, turn. (8 sts)
Row 3: Sc in each st across. Ch 1, turn. (8 sts)
Row 4: Inc in first st, sc in next 6 sts, inc in last st. Ch 1, turn. (10 sts)
Rows 5 and 6: Sc in each st across. Ch 1, turn. (10 sts)
Row 7: Dec, sc in next 6 sts, dec. Ch 1, turn. (8 sts)
Row 8: Dec, sc in next 4 sts, dec. (6 sts)
FO, leaving a long sewing tail.
Before joining the body panels, center the face patch on the front head panel so it spans approximately Rows 17 through 24 and lies across the middle 10 stitches of the head. Tack it at the top, bottom and both sides, then sew securely around the outer edge. Keep the patch flat and centered.
Prepare the Front and Back Before Joining
Lay the two body panels side by side with the right sides facing up.
Sew one completed front ear, including its tan inner ear patch, to each side of the front head. Position the top edge of each ear across Rows 18 and 19, beginning about one stitch in from the outer edge so the rounded lower edge extends naturally beyond the sides of the head.
Sew the remaining two plain ears to the matching positions on the back body panel. Compare both panels before continuing to be sure the ears are mirror images of one another.
Lay the front and back panels together before joining to confirm that both ears extend the same distance beyond the head and that the tail opening will fall on the same side of both panels.
Join and Stuff the Flat Crochet Monkey
Before placing the panels together, use medium brown yarn and a yarn needle to embroider one short vertical body divider on the front panel. Begin at the center of the lowest body edge and stitch upward for approximately 4 rows. Repeat on the back panel so the monkey looks finished as the mobile turns.
Place the front and back body panels together with wrong sides facing. Match the body and head carefully so both panels align evenly.
With the front panel facing up, insert the tail between the two body panels on the viewer's left side between Rows 3 and 4, about one stitch in from the outer edge. This becomes the monkey's right side when facing forward. Let the curled tail point downward before joining.
Join medium brown yarn near the lower left side of the body. Working through both body panels only, sc evenly around the entire monkey. Work approximately one sc in the end of each row and one sc in every stitch across the top and bottom edges.
Work 2 sc at each outside corner of the body and both top head corners to maintain smooth curves.
Do not crochet through the ears or through the curled length of the tail. When you reach the tail attachment point, work through both body panels and the short tail base caught between them so the tail is secured in the seam. Leave the remaining curled tail free outside the joined panels.
Leave the final 2 inches open along one lower side of the body. Add approximately 1 tablespoon of fiberfill, placing slightly more in the body than the head. Spread the stuffing evenly with your fingers so the monkey remains flat instead of becoming rounded.
Gently pinch the body closed before finishing the seam. If the sides bulge outward, remove a small amount of stuffing until the monkey lies flat.
Finish closing with single crochet. Join with a slip stitch, fasten off and weave every yarn tail securely through the inside of the body before trimming.
Lay the monkey flat and gently shape the head and body with your fingers. The body should remain symmetrical with no puckering along the joined edge.
Compare both ears before continuing. They should sit at matching heights and project outward by the same amount.
Attach the Muzzle and Embroider the Face
Center the muzzle on the lower half of the front head using the neck center marker established earlier. Position the top edge of the muzzle between Rows 18 and 19, with the lower edge resting near the bottom of the head.
Sew the muzzle completely around its outer edge using small whip stitches. Catch only the front body panel whenever possible so the stitches do not show on the back of the monkey.
Check the muzzle from the front before tying off the final stitch. The left and right sides should sit evenly on either side of the neck center marker. A visible border of the tan face patch should remain around the sides and upper edge of the muzzle.
With dark brown embroidery thread, stitch two small eyes on Row 21 approximately 5 stitches apart and centered above the muzzle.
Embroider a small oval nose near the upper center of the muzzle. Add one short vertical stitch below the nose and a gentle curved smile.
View the monkey from the front before tying off the embroidery. Both eyes should sit level, the muzzle should remain centered and the tan face patch should lie flat without rippling.
Hanging Loop for the Monkey
This monkey is intended as a decorative mobile piece only. It is not designed to be used as a toy or attached where a baby can reach it.
Cut a 24-inch working length of strong cotton cord and fold it in half. The extra working length allows room for the finished drop, wrapping the wooden ring, tying two secure knots and leaving at least 1 inch of cord beyond the final knot.
Pass the folded midpoint through two adjacent joined stitches at the top center of the head, catching both body panels securely. Pull the two free ends through the folded midpoint and tighten gently. Hold the monkey up to test its balance. If it leans, move the cord anchor one stitch to the left or right. Leave both free ends untrimmed for attachment to the mobile ring.
View the monkey from the front after hanging. Both ears should sit evenly, the muzzle should remain centered, the curled tail should hang naturally below the body, and the monkey should remain upright without rotating to either side.
After shaping, the finished monkey should measure about 4 3/4 inches from the top of the head to the bottom of the body. A variation of approximately 1/4 inch is normal depending on yarn and individual tension.
When assembling the finished mobile, adjust the hanging cord until the monkey hangs level with the giraffe and elephant. Leave enough space for the curled tail to move freely without wrapping around the other safari animals.
If you want the monkey without the mobile construction, my crochet monkey applique pattern makes a flat layered motif with a rounded head and curled tail for blankets, banners and nursery projects.
For a nursery-mobile version centered only on monkeys, see these monkey mobile ideas for another way to use playful hanging animals in a jungle baby room.
Crochet Leaves, Stars and Clouds
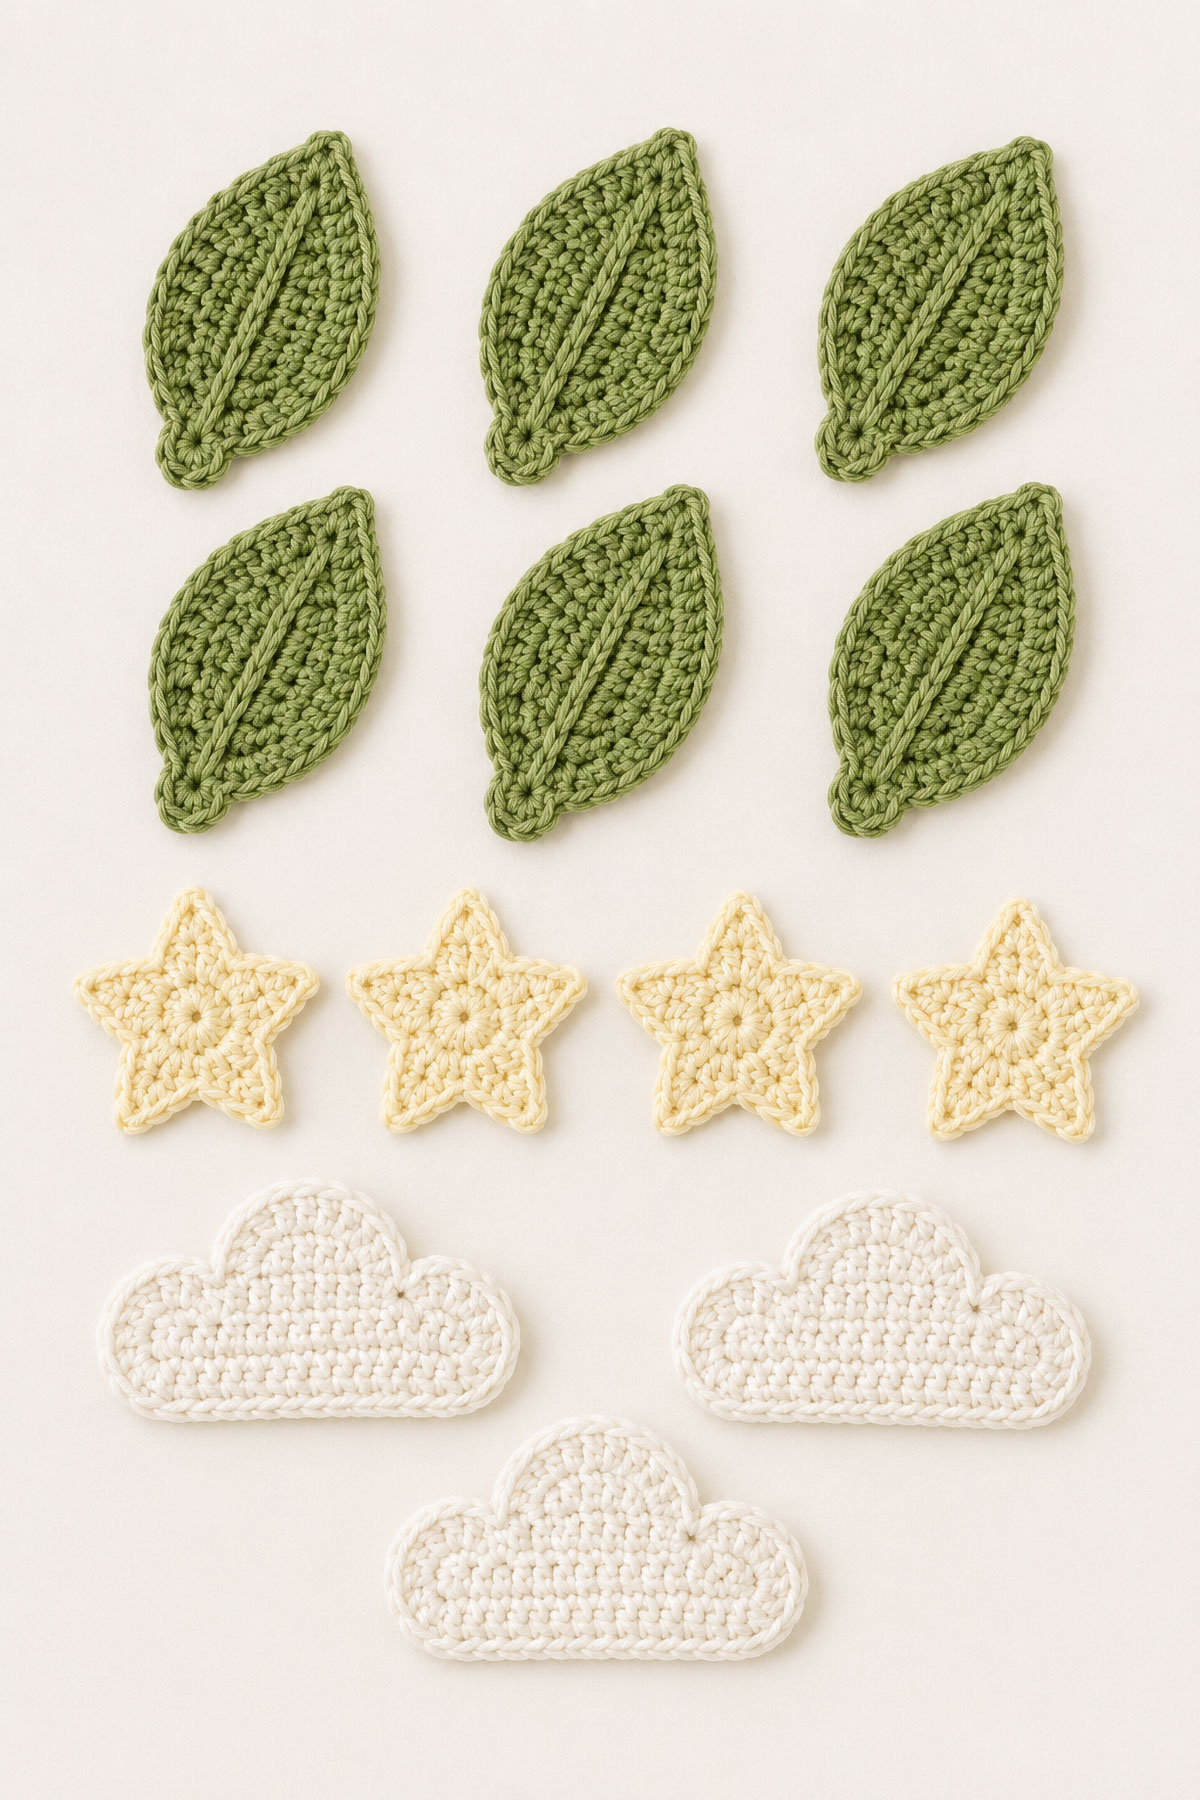
The leaves, stars and clouds fill the open spaces between the safari animals without making the mobile crowded. These accent pieces stay flat and light so the lion, elephant, giraffe and monkey remain the main focus.
A safari mobile can also borrow softer flying details, and these bird nursery mobile ideas show how lightweight birds, wings and natural movement can work as gentle accents in a handmade nursery mobile.
Make the accents using the same 4.0 mm hook and worsted weight cotton yarn used throughout the mobile.
Quick answer: Crochet 6 leaves, 4 stars and 3 clouds to fill the spaces between the safari animals. The leaves should finish about 3 inches long, the stars about 2 1/2 inches across and the clouds about 3 1/2 inches wide.
Crochet Leaves, Make 6
Use leaf green yarn.
Ch 11.
Round 1: Sc in 2nd ch from hook, hdc in next ch, dc in next 2 ch, tr in next 2 ch, dc in next 2 ch, hdc in next ch, 3 sc in last ch. Working along the opposite side of the foundation chain, hdc in next ch, dc in next 2 ch, tr in next 2 ch, dc in next 2 ch, hdc in next ch, sc in last ch. Join with sl st. (21 sts)
Fasten off and weave in the construction tail securely. Add a separate hanging cord during assembly.
Each finished leaf should measure about 3 inches long. Pinch the leaf slightly at the center before hanging so it has a simple vein-like shape without adding extra stitching.
The wider rounded end is the top attachment end. The pointed end faces downward when the leaf is hung.
Both sides of the leaf should mirror each other. If one side appears wider, gently stretch the narrower side before weaving in the tail.
Crochet Stars, Make 4
Use cream yarn.
Round 1: Make a magic ring. Ch 1, work 10 sc into the ring. Join with sl st to first sc. (10 sts)
Round 2: *Ch 5, sl st in 2nd ch from hook, sc in next ch, hdc in next ch, dc in next ch, skip next sc of Round 1, sl st in next sc.* Repeat from * to * 5 times to create 5 points.
Fasten off and weave in the construction tail securely. Add a separate hanging cord during assembly.
Each finished star should measure about 2 1/2 inches across from point to point. Pull the magic ring tight and weave the center tail securely so the star does not open while hanging.
Shape each point with your fingers before weaving in the tail. All five points should be similar in length for the most balanced appearance.
Crochet Clouds, Make 3
Use cream or white yarn.
Ch 14.
Row 1: Sc in 2nd ch from hook and in each remaining ch across. Ch 1, turn. (13 sts)
Row 2: Sc in first 4 sts, work 5 dc in next st, sl st in next st, work 7 dc in next st, sl st in next st, work 5 dc in next st, sc in last 4 sts. (27 sts)
FO and weave in the construction tail securely.
Row 1 forms the flatter lower edge of the cloud. The three groups of double crochet in Row 2 form two smaller side lobes and one larger center lobe.
Each finished cloud should measure approximately 3 1/2 inches wide. Shape the three upper lobes with your fingers and keep the foundation-chain edge facing downward when the cloud is hung.
Finishing the Accent Pieces
Weave in every construction tail securely. Do not use a fasten-off tail as the hanging cord.
Lay the leaves, stars and clouds flat and shape them with your fingers before adding them to the mobile. If any piece curls, pin it flat on a towel while dry and let it rest overnight.
Cut an approximately 24-inch working length of strong cotton cord for each accent piece and fold it in half. Pass the folded midpoint through at least two crochet stitches at the top of the piece: the rounded end of each leaf, one point of each star or the center top lobe of each cloud. Pull the two free ends through the folded midpoint and tighten gently without distorting the crochet fabric. The extra working length allows the accent to be adjusted before the ring wrap, two final knots and 1-inch cord tails are completed.
Leave both free cord ends untrimmed so they can be tied to the wooden mobile ring after the accent piece has been positioned.
Distribute the leaves, stars and clouds evenly around the four safari animals. Avoid placing several accent pieces in one location. Leave enough open space around each animal for the pieces to move without touching or tangling.
Hold the mobile ring at eye level before trimming any hanging cords. Rotate it slowly and check that no side appears noticeably heavier than the others.
If the yarn care label permits steaming, lightly steam the finished accent pieces from the back without allowing the iron or steamer to touch the crochet fabric directly. Let them cool completely before attaching them to the mobile. Do not steam yarn that is not approved for heat treatment.
Assemble the Safari Baby Mobile
Now that all four safari animals and the accent pieces are complete, it's time to assemble the finished mobile. Taking a little extra time during this step will help the mobile hang evenly and rotate smoothly.
Quick answer: Attach the lion, elephant, giraffe and monkey first, then fill the open spaces with the leaves, stars and clouds. Adjust every hanging cord before trimming so the mobile hangs level from every direction.
Materials for Assembly
- Purpose-built wooden mobile ring or complete mobile frame, approximately 10 inches
- Small closed upper hanging ring
- Strong cotton crochet thread or cotton cord
- Mobile arm or ceiling mounting hardware appropriate for the installation location
- Yarn needle
- Sharp scissors
- Clear ruler or measuring tape
- Removable stitch markers or small clips
Create the Hanging Support
Cut four equal 30-inch working lengths of strong cotton cord. The extra length allows room for leveling and adjustment and is not the required finished distance between the wooden ring and the upper hanging ring.
Tie one end of each cord securely at a quarter point of the wooden ring. Use two firm knots at every attachment point.
Determine the finished support length required by the selected mobile arm or ceiling mounting hardware. Tie each cord to the small closed upper hanging ring at the point that creates that finished length, leaving the unused cord as a temporary tail.
Suspend the mobile by the closed upper ring. Adjust the four upper knots until every support cord remains under equal tension and the wooden ring hangs level.
Once the wooden ring is level, tighten every knot securely. Do not trim the excess support-cord tails until the complete mobile has been balanced and its installation height has been confirmed. When trimming after the final inspection, leave at least 1 inch of cord beyond every final knot.
The closed upper ring is the attachment point for the selected mobile arm or ceiling mounting hardware. Install that hardware according to its manufacturer's instructions.
Gently pull downward on each quarter of the wooden ring before adding the crochet pieces. No cord, knot or ring component should slip or change position.
Mark one point on the wooden ring with a removable stitch marker before attaching the animals. This makes it easier to keep the planned layout consistent while the ring is rotated during assembly.
Position the Safari Animals
Mark four evenly spaced quarter points around the wooden ring.
Position the lion at the first quarter point and the giraffe directly opposite it. Position the elephant and monkey at the two remaining quarter points so they hang opposite one another.
Attach the lion first and position it slightly higher than the other animals. Use its hanging height as the visual reference when adjusting the elephant, giraffe and monkey.
Adjust the giraffe so its longer neck has open space and the monkey so its curled tail hangs freely without touching another animal.
At the animals' hanging height, leave approximately 3 to 4 inches of clear space between neighboring animals so they do not touch while the mobile rotates. Keep the four attachment points evenly spaced at the marked quarter points on the ring.
Use removable stitch markers or small clips to temporarily position every animal before tying permanent knots.
Hold the ring at eye level and compare the hanging heights before tying permanent knots. Small adjustments of even 1/2 inch can noticeably improve the balance of the finished mobile.
After the positions and hanging heights are correct, remove one temporary clip at a time. Wrap the two free cord ends for that animal around the wooden ring and tie one firm overhand knot. Leave both ends untrimmed. The second locking knot will be added after the entire mobile has been balanced.
Add the Accent Pieces
Hang the leaves first to fill the spaces between the animals.
Add the stars next, placing them slightly higher or lower than nearby leaves to avoid a repetitive appearance.
Finish with the clouds, using them to balance any side that appears visually lighter.
After positioning each accent piece, wrap its two free cord ends around the wooden ring and tie one firm overhand knot. Leave the ends untrimmed until the entire mobile has been balanced and the final locking knots have been added.
Rotate the ring after adding each accent piece. This helps prevent several lightweight pieces from collecting on one side of the mobile.
Avoid placing several accent pieces at the same height. Small variations in hanging height create a more natural appearance while allowing each piece to move independently.
Balance the Mobile
Suspend the completed mobile from its closed upper hanging ring before trimming any cords.
Rotate the ring slowly several times.
Allow the mobile to come to rest naturally after each rotation. If the same side consistently settles noticeably lower than the others, make small adjustments to the upper support cords until the wooden ring hangs level.
If one side of the wooden ring hangs lower, shorten the upper support cord on that lower side by moving its knot upward at the closed hanging ring. Suspend and test the mobile again after every adjustment. Do not attempt to level the wooden ring by shortening an animal or accent cord on the opposite side.
Check the mobile from the front, both sides and directly underneath. Every animal should remain clearly visible without overlapping another piece.
After the balance and spacing are satisfactory, tie a second firm overhand knot directly against the first knot at every animal and accent attachment. Also tie a second firm overhand knot directly against the first at each support-cord attachment on the closed upper hanging ring. Tighten every pair of knots securely. Leave at least 1 inch of cord beyond every final knot and do not trim the cords closer to the knots.
Final Inspection
Confirm that every knot is tight and every yarn tail has been woven in securely.
Check that every hanging cord passes cleanly through its attachment point without crossing another cord. Straight cords help the mobile rotate more smoothly.
Check each animal by gently tugging on the ears, tails, ossicones, muzzle and other attached pieces to confirm they are firmly sewn.
Verify that the hanging cords move freely without twisting around one another.
The completed mobile should rotate smoothly with gentle air movement while remaining visually balanced from every viewing angle.
If the mobile will be stored before use, lay it flat or hang it freely rather than folding the hanging cords around the animals. This helps the accent pieces and tails keep their intended shape.
Safety Reminder: This crochet mobile is intended for decorative use only. Keep every cord, crochet piece, knot and frame component completely out of the baby's reach. Remove the mobile when the baby first begins to push up on hands and knees, can reach any part of it or reaches 5 months of age, whichever comes first. Install the mounting hardware according to its manufacturer's instructions.

Safari Crochet Mobile Pattern FAQ
How long does it take to crochet the entire safari mobile?
Most crocheters can complete the full mobile in about 18 to 25 hours, depending on experience and how much time is spent on assembly and finishing. Working on one animal at a time makes the project easier to manage.
Can I use acrylic yarn instead of cotton?
Yes. Cotton produces crisp stitch definition and helps the animals hold their shape, while acrylic creates a softer appearance. If you substitute yarn, use a hook size that gives a firm fabric with very little stretching.
Can I change the safari animals?
Yes. You can replace one animal with another flat crochet design that is close in finished size and weight to the animal being replaced. Suspend and rebalance the complete mobile before tightening the final knots.
How high should the mobile hang above the crib?
Install the mobile according to the mounting-hardware manufacturer's instructions, with every cord and hanging piece completely out of the baby's reach. Remove the mobile when the baby first begins to push up on hands and knees, can reach any part of it or reaches 5 months of age, whichever comes first.
Can I wash the finished mobile?
Spot cleaning is recommended. If the mobile becomes heavily soiled, remove it from the wooden ring, hand wash the crochet pieces in cool water with a mild detergent, reshape them while damp and allow them to air dry completely before reassembling.
Can I make matching nursery decorations?
Yes. The lion, elephant, giraffe and monkey can also be displayed individually as nursery wall decorations, garlands or framed crochet art to coordinate with a safari-themed nursery.
What skill level is this pattern?
This pattern is best suited for advanced beginners and intermediate crocheters who are comfortable working single crochet, basic increases and decreases, simple embroidery and flat amigurumi construction.
Can I sell finished mobiles made from this pattern?
You may sell finished handmade mobiles made from this pattern in small quantities. Please do not redistribute, copy or resell the written pattern itself.
Printable Pattern Summary
Safari Baby Mobile Pattern Overview
This printable summary provides a quick reference for all four safari animals and accent pieces used in the crochet baby mobile. It is designed for easy printing and workspace reference during assembly.
Materials Summary
- Worsted weight cotton yarn in brown, tan, cream, gray, yellow, and accent colors
- 4.0 mm crochet hook
- Fiberfill stuffing (light use only)
- Yarn needle for sewing and assembly
- Embroidery needle and dark embroidery thread or yarn for facial details
- Purpose-built wooden mobile ring or complete mobile frame, approximately 10 inches
- Small closed upper hanging ring, if not included with the mobile frame
- Cotton cord or strong crochet thread
- Mobile arm or ceiling mounting hardware suitable for the installation location
- Scissors
- Stitch markers
Finished Sizes
- Lion: approx. 5 1/2 inches
- Elephant: approx. 5 inches tall and 5 inches across the ears
- Giraffe: approx. 6 inches (to top of ossicones)
- Monkey: approx. 4 3/4 inches
- Leaves: approx. 3 inches
- Stars: approx. 2 1/2 inches
- Clouds: approx. 3 1/2 inches
Construction Method
All animals are constructed as flat amigurumi using two identical body panels joined with single crochet. Light stuffing is added before closing to maintain a flat, structured shape suitable for hanging.
Abbreviations
- ch: chain
- sc: single crochet
- hdc: half double crochet
- dc: double crochet
- tr: treble crochet
- sl st: slip stitch
- inc: increase (2 sc in one stitch)
- dec: decrease (single crochet 2 together)
- st(s): stitch(es)
- FO: fasten off
Yarn Color Guide
- Lion: golden tan body and ears, caramel or rust mane and tail tuft, cream muzzle and belly patch, dark brown face details
- Elephant: light gray body, ears, trunk and tail, pale pink inner ears, dark gray face details
- Giraffe: golden yellow body, ears and tail, brown ossicones, spots and tail tuft, cream muzzle, dark brown face details
- Monkey: medium brown body, ears and tail, tan inner ears, face patch and muzzle, dark brown face details
- Accents: leaf green leaves, cream stars, cream or white clouds
Assembly Summary
Animals are attached to a wooden ring using cotton cords of varying lengths. The lion is used as the primary visual reference point, with other animals spaced evenly around the ring. Accent pieces are distributed last to balance visual weight and movement.
Pattern Copyright and Usage Notice
The written crochet safari baby mobile pattern is for personal use only. You may use it to create finished items for personal use, handmade gifts or small-quantity sales as described below.
You may sell small quantities of finished items made from this pattern, provided they are handmade by the individual crafter. Mass production, commercial manufacturing, redistribution of instructions, or reproduction of the written pattern in full or in part is not permitted.
Do not copy, repost, or republish this pattern text, diagrams, or instructions on any website, marketplace, or printed material.
When sharing finished work online, credit to the original pattern source is appreciated but not required.
More Safari Nursery Crochet Patterns
If you enjoyed this safari mobile, you may also like these matching nursery crochet patterns:
- Crochet Lion Lovey Pattern
- Crochet Elephant Lovey Pattern
- Crochet Giraffe Lovey Pattern
- Crochet Monkey Lovey Pattern
- Safari Nursery Ideas
Final Note
This safari baby mobile is designed to create a balanced, handmade focal point for a nursery while maintaining soft movement and visual interest. Adjust spacing, tension, and hanging lengths slightly as needed to suit your yarn choice and personal style.
Safari Mobile SEO Closing Section
This crochet safari baby mobile brings together four coordinated handmade animals and soft accent pieces to create a balanced nursery focal point. Each element is designed to work together in scale, color, and proportion for a cohesive finished look.
The flat amigurumi construction keeps the animals lightweight while maintaining structure, making the mobile suitable for decorative nursery display. The addition of leaves, stars, and clouds helps fill visual space without overwhelming the main safari characters.
For best results, use consistent yarn weight and maintain even tension across all pieces. Small variations in stitch size are normal and will not affect the overall finished appearance.
Pair this project with matching safari nursery decor such as wall art, crib quilts, or crochet loveys to create a coordinated handmade nursery theme.
If you add another animal or accent, keep its finished size and weight close to the existing pieces. Suspend and rebalance the complete mobile before tightening the final knots, because every added piece changes the weight distribution.
Troubleshooting & Common Fixes
Pieces look uneven or stretched
This usually happens when tension varies between rows. Lightly block the pieces by laying them flat and shaping with your hands before assembly. Avoid pulling tightly during joining.
Mobile tilts to one side
Recheck cord lengths on the wooden ring. Even a 1/4 inch difference can affect balance. Adjust knot positions before trimming excess cord.
Animals twist when hanging
This is typically caused by uneven stuffing or off-center hanging cords. Reposition the attachment point one stitch left or right until the piece hangs straight.
Accent pieces cluster together
Redistribute leaves, stars, and clouds evenly around the ring. Avoid placing multiple lightweight pieces on the same quadrant of the mobile.
Pieces appear too large or too small
Yarn weight and hook size affect final dimensions. Maintain consistent materials across all animals to preserve scale relationships in the design.
Final Finishing Tips
Always complete a full dry layout of the mobile before final tying. This allows you to adjust spacing, height, and balance visually before securing knots permanently.
Check the mobile from multiple angles—front, side, and underneath—to ensure all animals remain visible and evenly distributed.
Once fully assembled, avoid repeated handling of the hanging pieces to preserve shape and prevent stretching over time.
The finished safari mobile should feel balanced, lightweight, and gently mobile with natural air movement.
Care and Storage Instructions
Proper care will help maintain the shape and appearance of each crochet piece in the safari mobile over time.
Cleaning
Spot cleaning with a damp cloth and mild soap is preferred. If deeper cleaning is necessary, remove the crochet pieces from the wooden ring, hand wash them in cool water with mild detergent, reshape them while damp and allow them to air dry completely before reassembling the mobile.
Drying
If any piece becomes damp, lay it flat on a towel and reshape it by hand. Allow it to air dry completely before reassembly.
Storage
Store the mobile disassembled or loosely hanging in a dry location. Avoid folding or compressing the hanging cords, as this can affect the balance and rotation of the finished mobile.
Shape Maintenance
If pieces begin to curl or lose definition, lightly reshape them by hand or pin them flat until they return to their original form. If the yarn care label permits steaming, apply light steam from a distance without allowing the iron or steamer to touch the crochet fabric.
Project Completion Checklist
- All four safari animals completed and securely assembled
- All accent pieces blocked and evenly distributed
- Mobile ring balanced and hanging level
- All knots secured and yarn tails woven in
- No loose or accessible small parts remaining
- Mobile rotates freely without tangling
Once all items are checked, the safari baby mobile is complete and ready for display.
Mobile Safety Guidelines
This crochet safari baby mobile is designed as a decorative nursery item only and must be installed with care to ensure safe use.
Placement
Hang the mobile securely above the crib or changing area, well out of reach of the baby at all times. The mobile should never be positioned where a child can grab or pull on any part of it.
Supervision
Supervision does not make a reachable mobile safe. Every cord, crochet piece and frame component must remain completely out of the baby's reach, and the mobile must be removed at the age or developmental milestone stated below.
Age Considerations
Remove the mobile when the baby first begins to push up on hands and knees, can reach any part of the mobile or reaches 5 months of age, whichever comes first.
Hardware Security
Check all knots, cords, ring connections and mounting points regularly. Install the mobile arm or ceiling mounting hardware according to its manufacturer's instructions. Remove the mobile immediately if any cord frays or any knot, ring component or mounting point loosens or shows wear.
Final Pattern Summary
The safari baby mobile combines four main animals and lightweight accent pieces into a coordinated hanging design. Each component is sized and shaped to maintain balance while allowing gentle movement.
The construction method uses flat amigurumi panels joined with light stuffing, making each piece stable yet flexible enough for hanging display.
When assembled correctly, the mobile rotates smoothly and maintains visual balance from all viewing angles, creating a soft focal point for nursery décor.

Author Notes
This safari baby mobile was designed as a coordinated crochet set where all animals share the same construction method, proportions, and visual scale. The goal is consistent sizing across all pieces so the finished mobile rotates evenly and maintains balance from every angle.
Each animal is built using two flat panels joined with light stuffing rather than fully three-dimensional amigurumi. This keeps the mobile lightweight while preserving shape definition for hanging display.
Accent pieces are intentionally simplified so they do not compete visually with the main animals. They are used only to fill space and guide movement within the mobile structure.
Small variations in yarn, hook size, or tension are expected and will not affect the overall design as long as relative proportions between pieces are maintained.
Pattern Index
- Lion: centerpiece safari animal
- Elephant: balanced opposite anchor
- Giraffe: extended vertical focal piece
- Monkey: movement and visual contrast element
- Leaves, Stars, Clouds: spacing and balance accents
- Assembly: full mobile construction guide
End of Pattern
This completes the crochet safari baby mobile pattern set. All sections are designed to be used together as a single coordinated project.
When you click on links to various merchants on this site and make a purchase, this may result in this site earning a commission. This does not affect the price you pay.

UBGI Gold Standard 2026
Reviewed under the site's
editorial checklist.
Photos, decorating ideas, party setups and reader submissions are shared for inspiration unless a page is specifically presented as a pattern, tutorial, reference guide or step-by-step project. Follow the instructions, measurements, safety guidance and manufacturer directions provided for the particular project or product.
About Jan | Contact | Baby Nursery Ideas (Blog) | Site Map | Privacy Policy | Disclosure Policy | Disclaimer | Affiliate Disclosure | Earnings Disclosure | Facebook | Pinterest
I am a participant in the Amazon Services LLC Associates Program, an affiliate advertising program designed to provide a means for us to earn fees by linking to Amazon. As an Amazon Associate I earn from qualifying purchases.
Copyright © 2006-2026. All Rights Reserved.