Crochet Giraffe Applique Pattern for Baby Blankets, Nursery Items and Gifts
By Jan Bay
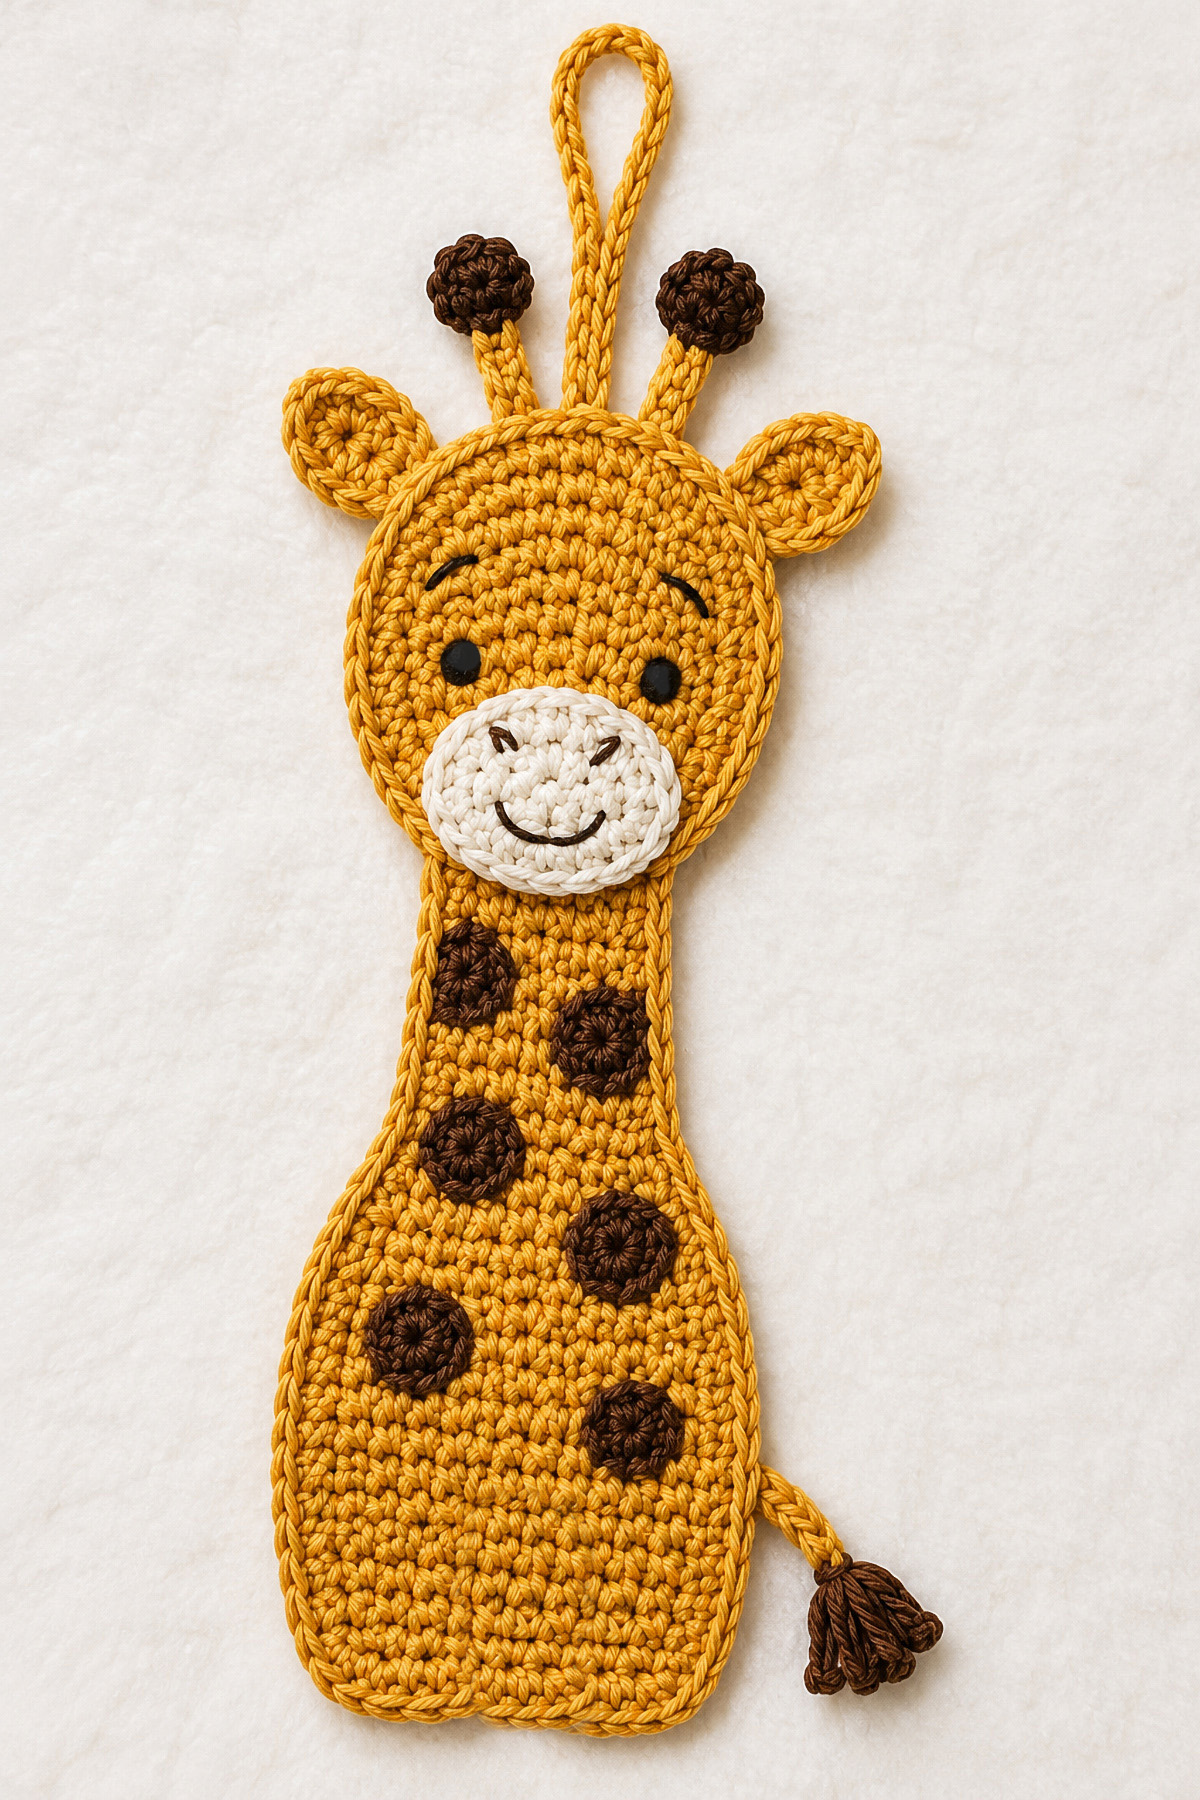
This crochet giraffe applique pattern makes a lightly padded safari giraffe with a long neck, rounded head, small ears, capped ossicones, crochet spots, a muzzle, tail and embroidered face. Sew the finished giraffe onto a baby blanket, nursery wall hanging, banner or another securely sewn handmade nursery project.
Explore More Free Crochet Baby Patterns
Crochet Animal Applique Patterns
Crochet Elephant Applique Pattern
Crochet supplies for this project:
See supplies for this and other small animal crochet projects
Jump to the Crochet Giraffe Applique Pattern
Crochet Giraffe Applique Pattern
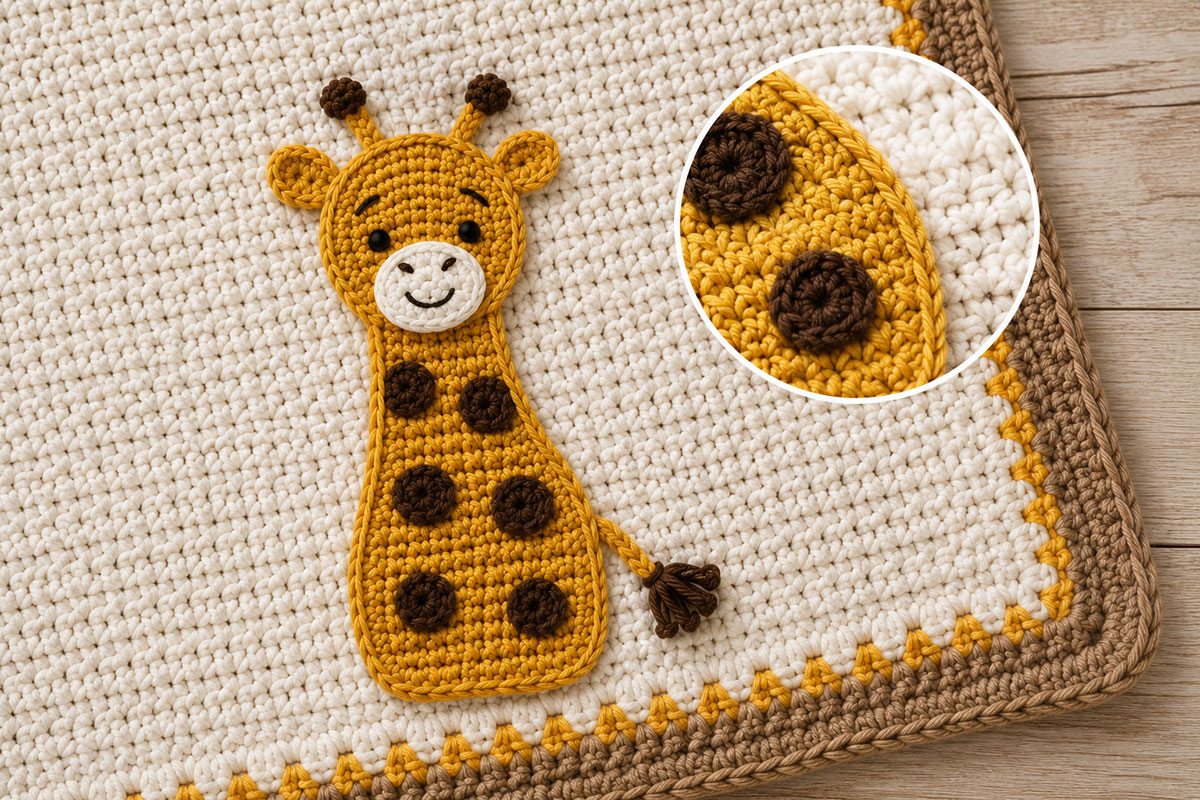
This giraffe is made as a lightly padded flat crochet motif rather than a stuffed animal. The long neck, rounded head, small ears, capped ossicones and brown crochet spots give it a clear giraffe shape while keeping the finished piece suitable for sewing onto a baby blanket, nursery wall hanging or banner.
Quick answer: This crochet giraffe applique finishes at about 6 inches tall when made with worsted weight cotton yarn and a 4.0 mm hook. It is lightly padded so the neck and body hold their shape without becoming bulky like a stuffed toy.
Materials for the Crochet Giraffe Applique
- Worsted weight cotton yarn in golden yellow for the body, ears, ossicone stems and tail
- Small amount of brown yarn for the ossicone caps, tail tuft and crochet spots
- Small amount of pale pink yarn for the inner ear patches
- Small amount of cream yarn for the muzzle
- Small amount of dark brown embroidery thread or yarn for the eyes and facial features
- 4.0 mm crochet hook
- Yarn needle
- Stitch marker
- Small amount of fiberfill
- Scissors
Abbreviations and Pattern Notes
- magic ring: adjustable starting loop worked in the round
- ch: chain
- sc: single crochet
- sl st: slip stitch
- inc: 2 sc in the same stitch
- dec: single crochet 2 stitches together
- st: stitch
- sts: stitches
- FO: fasten off
Terminology: This pattern uses standard US crochet terms. See the Craft Yarn Council crochet abbreviations for a reference to standard crochet terminology.
Right side and wrong side: For pieces worked back and forth in rows, either surface may be used as the right side. Choose the smoother-looking surface and keep that choice consistent. Before sewing on the muzzle, pink ear patches or brown spots, designate one matching body panel as the front and the other as the back.
Stitch-count convention: A turning ch 1 does not count as a stitch. When working joined rounds, the beginning ch 1 also does not count as a stitch. Join each round to the first sc unless the instructions state otherwise.
Joining the body panels: When the two body panels are joined later, work 1 sc through both panels in each pair of matching row ends along the sides and 1 sc in each stitch across the foundation and final rows. Work the additional corner stitches only where the joining instructions specify them. Match the two panels row for row so the neck and head do not twist.
Skill level: Advanced beginner to intermediate. The stitches are basic, but the giraffe uses shaping, matching pieces, joined rounds, light stuffing, embroidery and detailed assembly.
Gauge and Finished Size
Gauge is not critical, but consistent tension is important. With worsted weight cotton yarn and a 4.0 mm hook, the crochet fabric should be firm enough that the small amount of stuffing does not show between the stitches.
- Finished height: about 6 inches from the tops of the ossicones to the bottom of the body
- Finished width across the head, excluding ears: about 3 inches
- Flat body-panel height before assembly: about 5 inches
- Construction: two matching body panels joined and lightly padded
- Stuffing: light only
- Face: embroidered
Make the first body panel and lay it flat without stretching. If reaching the listed finished size matters and the panel differs by more than about ¼ inch from the 5-inch checkpoint, adjust your hook size before making the second panel. The two panels need to match each other closely so the joined neck and head lie flat.
For baby projects: Use embroidered eyes and facial details only. Do not use plastic safety eyes, buttons, beads or other hard embellishments. Every ear, ossicone, spot, muzzle and tail must be sewn securely. Keep blankets and other soft items out of an infant's crib, bassinet or other sleep space.
Crochet Giraffe Applique Pattern Pieces
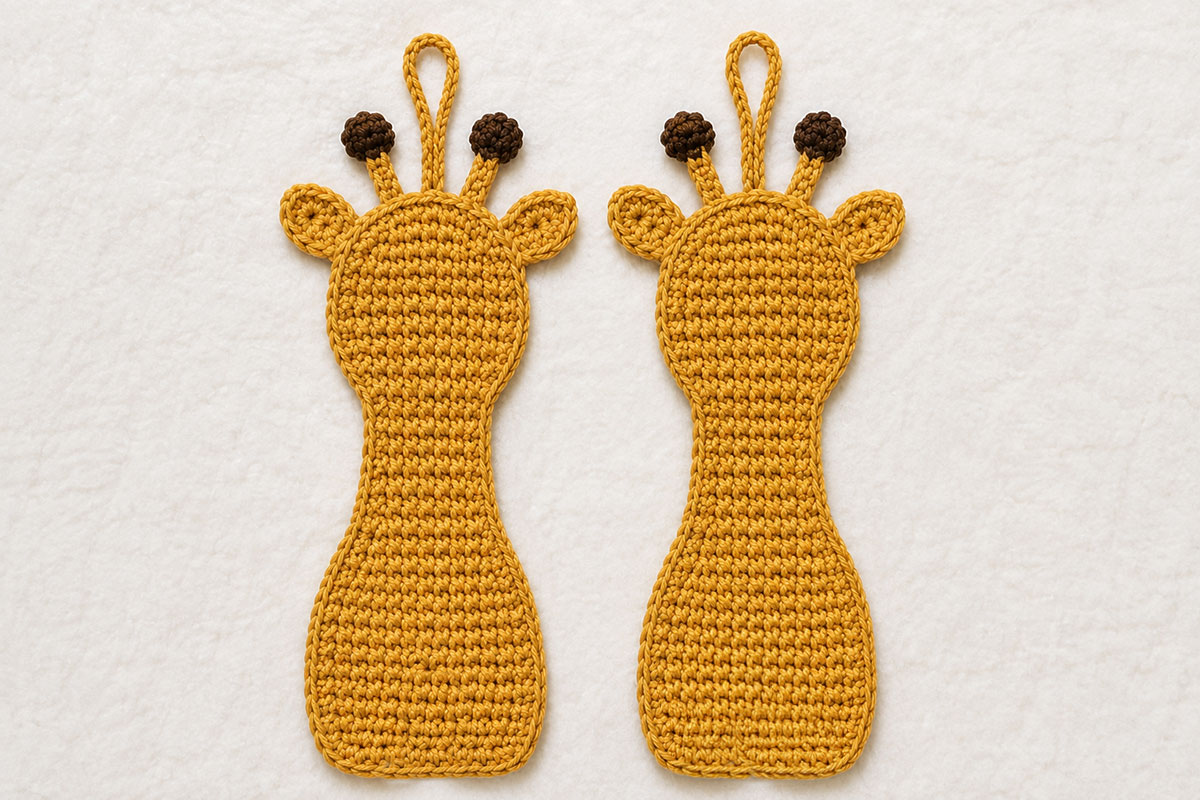
Giraffe Body Panels, Make 2
Use golden yellow yarn. Ch 9.
Row 1: Sc in 2nd ch from hook and in each remaining ch. Ch 1, turn. (8 sts)
Row 2: Inc in first st, sc in next 6 sts, inc in last st. Ch 1, turn. (10 sts)
Row 3: Sc in each st across. Ch 1, turn. (10 sts)
Row 4: Inc in first st, sc in next 8 sts, inc in last st. Ch 1, turn. (12 sts)
Row 5: Sc in each st across. Ch 1, turn. (12 sts)
Row 6: Inc in first st, sc in next 10 sts, inc in last st. Ch 1, turn. (14 sts)
Rows 7 through 11: Sc in each st across. Ch 1, turn. (14 sts)
Row 12: Dec, sc in next 10 sts, dec. Ch 1, turn. (12 sts)
Row 13: Dec, sc in next 8 sts, dec. Ch 1, turn. (10 sts)
Rows 14 through 18: Sc in each st across. Ch 1, turn. (10 sts)
Row 19: Inc in first st, sc in next 8 sts, inc in last st. Ch 1, turn. (12 sts)
Row 20: Inc in first st, sc in next 10 sts, inc in last st. Ch 1, turn. (14 sts)
Row 21: Inc in first st, sc in next 12 sts, inc in last st. Ch 1, turn. (16 sts)
Rows 22 through 26: Sc in each st across. Ch 1, turn. (16 sts)
Row 27: Dec, sc in next 12 sts, dec. Ch 1, turn. (14 sts)
Row 28: Dec, sc in next 10 sts, dec. Ch 1, turn. (12 sts)
Row 29: Sc in each st across. (12 sts)
FO on both panels. Weave in the starting and ending yarn tails on both panels before continuing.
Fold each body panel in half lengthwise and place a removable stitch marker at the center of the neck. Keep this marker in place for now. It will help you center the muzzle and position the head pieces evenly.
Rows 1 through 11 form the body. Rows 12 and 13 create the shoulder transition into the neck. Rows 14 through 18 form the narrower neck. Rows 19 through 29 form the head.
Before continuing, lay both panels flat and stack them together. The outside edges, shoulder shaping, neck and head should line up. Each panel should measure about 5 inches tall before the ears and ossicones are added.
Giraffe Ears, Make 4
Use golden yellow yarn.
Row 1: Ch 5. Sc in 2nd ch from hook and in each remaining ch. Ch 1, turn. (4 sts)
Row 2: Inc in first st, sc in next 2 sts, inc in last st. Ch 1, turn. (6 sts)
Row 3: Inc in first st, sc in next 4 sts, inc in last st. Ch 1, turn. (8 sts)
Rows 4 through 6: Sc in each st across. Ch 1, turn. (8 sts)
Row 7: Dec, sc in next 4 sts, dec. Ch 1, turn. (6 sts)
Row 8: Dec, sc in next 2 sts, dec. (4 sts)
FO, leaving a long sewing tail on each ear.
Fold the center of the lower edge inward about ⅛ inch and secure it with one small stitch. This slight fold shapes the base while leaving the wider rounded part of the ear free.
Each finished ear should measure about 1¾ inches tall and about 1½ inches wide.
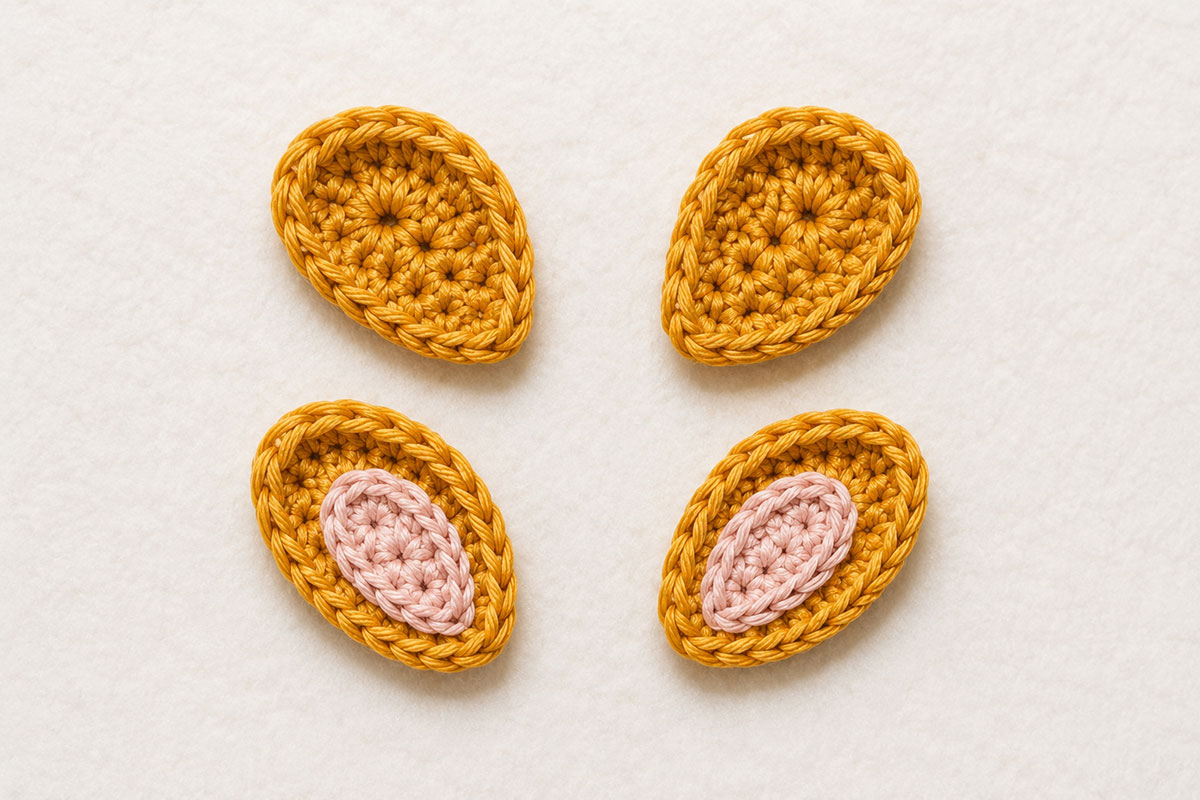
Giraffe Inner Ear Patches, Make 2
Use pale pink yarn.
Row 1: Ch 4. Sc in 2nd ch from hook and in each remaining ch. Ch 1, turn. (3 sts)
Row 2: Inc in first st, sc in next st, inc in last st. Ch 1, turn. (5 sts)
Rows 3 and 4: Sc in each st across. Ch 1, turn. (5 sts)
Row 5: Dec, sc in next st, dec. (3 sts)
FO, leaving a long sewing tail.
Choose two of the four golden-yellow ears for the front of the giraffe. Center one pink patch on each front ear and sew completely around the patch with small stitches. Leave an even golden-yellow border visible around the pink section.
Ossicone Stems, Make 4
Use golden yellow yarn.
Row 1: Ch 4. Sc in 2nd ch from hook and in each remaining ch. Ch 1, turn. (3 sts)
Rows 2 through 4: Sc in each st across. Ch 1, turn. (3 sts)
Row 5: Sc in each st across. FO, leaving a long sewing tail. (3 sts)
Use the foundation-chain edge as the lower attachment base. Fold this edge inward about ⅛ inch and secure the fold with one small stitch.
Ossicone Caps, Make 4
Use brown yarn.
Round 1: Make a magic ring. Work 6 sc into the ring. Join with sl st to the first sc and FO, leaving a long sewing tail. (6 sts)
Sew one brown cap to the free Row 5 edge of each golden-yellow ossicone stem. Shape the cap into a small round disc as you sew.
Giraffe Muzzle, Make 1
Use cream yarn.
Round 1: Ch 5. Sc in 2nd ch from hook, sc in next 2 ch, 3 sc in last ch. Working along the opposite side of the foundation chain, sc in next 2 ch, 2 sc in last ch. Join with sl st. (10 sts)
Round 2: Ch 1. Inc in first st, sc in next 2 sts, inc in each of the next 3 sts, sc in next 2 sts, inc in each of the final 2 sts. Join with sl st to the first sc and FO, leaving a long sewing tail. (16 sts)
The finished muzzle should measure about 1¼ inches wide and about ⅞ inch tall. Keep the shape slightly oval rather than round.
Giraffe Tail, Make 1
Use golden yellow yarn.
Ch 10. Sl st in the 2nd ch from hook and in each remaining ch across. FO, leaving a sewing tail.
For the tail tuft, attach brown yarn to the free end of the tail. Ch 3 and sl st back into the same end stitch. Repeat twice more to form three small loops. FO.
Weave both brown yarn ends back through at least four tail stitches before trimming. Do not use loose cut strands for the tail tuft on an appliqué intended for a baby item.
Crochet Giraffe Spots
Use brown yarn. Make 4 small spots and 3 large spots for the front of the giraffe.
Small Spot, Make 4
Round 1: Make a magic ring. Work 6 sc into the ring. Join with sl st to the first sc and FO, leaving a long sewing tail. (6 sts)
Large Spot, Make 3
Round 1: Make a magic ring. Work 6 sc into the ring. Join with sl st to the first sc. (6 sts)
Round 2: Ch 1. Inc in each st around. Join with sl st to the first sc and FO, leaving a long sewing tail. (12 sts)
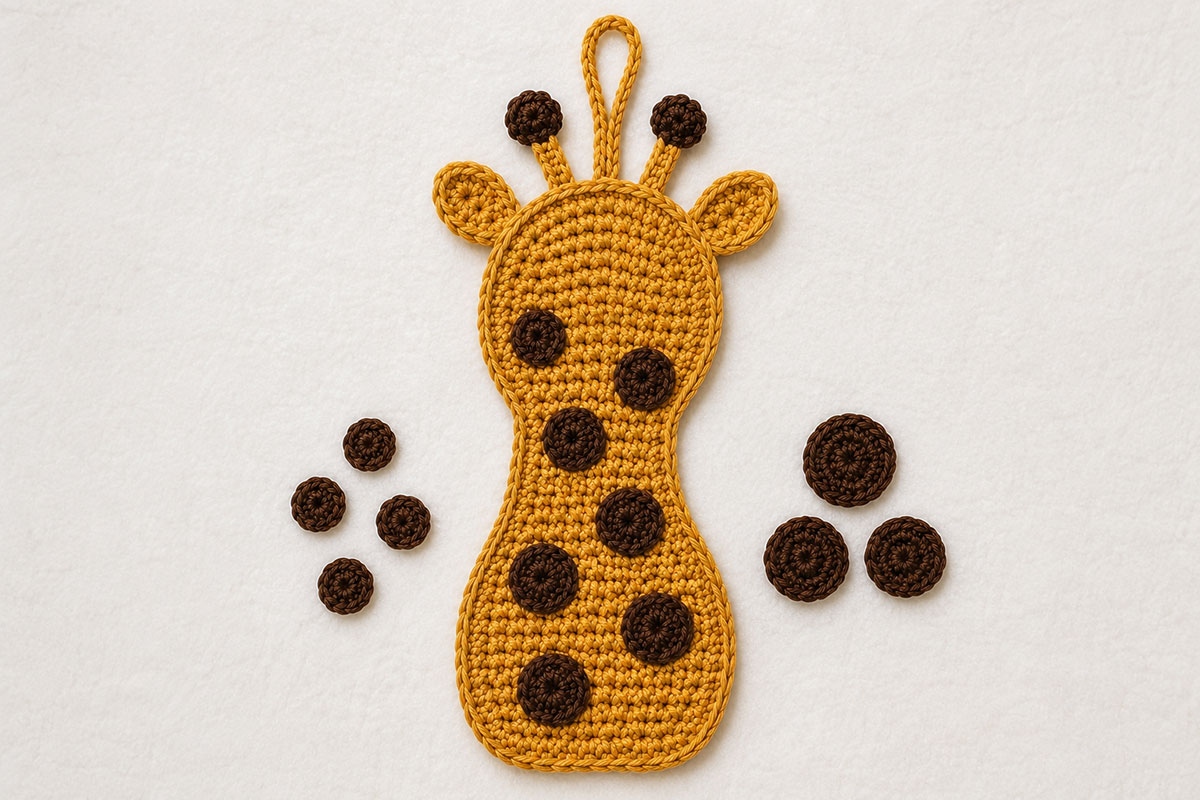
Lay the front body panel flat with its right side facing up. Arrange all seven spots before sewing any of them in place.
Place two or three small spots on the neck and upper body. Stagger the remaining small and large spots across the wider lower body so they do not form straight rows.
I would leave a little golden-yellow space between the spots instead of filling every open area. The giraffe reads better when the spots feel scattered, not lined up like polka dots.
Keep each spot at least ¼ inch from the outside edge and away from the muzzle area. Sew completely around each spot with small whip stitches. Keep the spots flat as you sew.
Weave each brown yarn tail securely across several stitches on the wrong side of the front panel before trimming.
Leave the back body panel plain when the giraffe will be sewn onto a blanket or other project as an appliqué. If you are making a two-sided banner or hanging motif instead, you may make a second set of spots for the back panel.
How to Assemble the Crochet Giraffe Applique
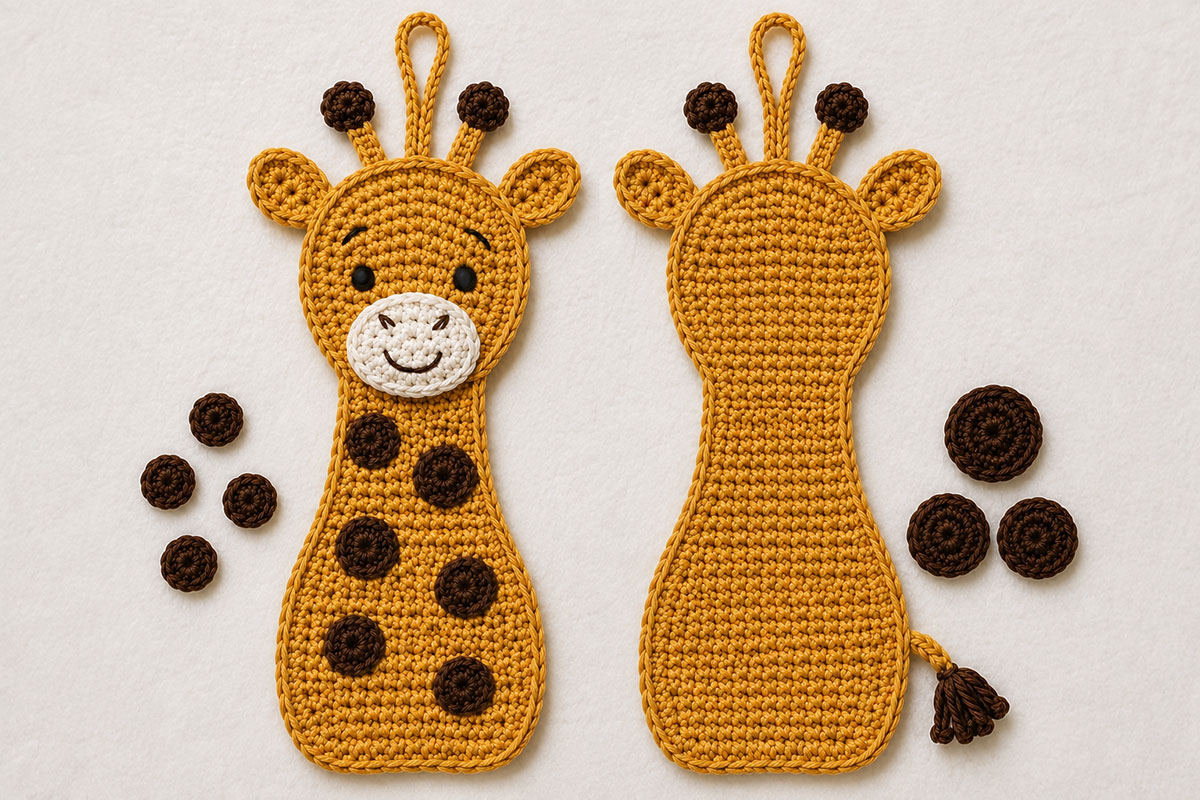
Lay the two body panels side by side with the right sides facing up. Keep the front panel with the pink inner ears and crochet spots separate from the plain back panel while you position the remaining head pieces.
Attach the Ears
Use the folded 4-stitch foundation-chain edge of each ear as its attachment base.
Sew one completed front ear to each side of the front head. Position each folded base across Rows 24 and 25, beginning about one stitch in from the outer edge. Leave the wider rounded portion of the ear free.
Sew the remaining two ears to the matching positions on the back body panel, using the same folded foundation-chain edges as the attachment bases.
Lay the two panels side by side again and compare the ear placement. The matching ears should extend about the same distance from each side of the head.
Attach the Ossicones
Sew two completed ossicones to the top of the front head along Row 29.
Position each ossicone about 2 stitches in from the outer edge so the pair sits evenly on either side of the center of the head.
Repeat with the remaining two ossicones on the back body panel. Compare the two panels before continuing so the front and back ossicones line up when the panels are joined.
Secure the Tail
Before placing the body panels together, position the tail base on the wrong side of the back body panel between Rows 3 and 4, about one stitch in from the outer edge.
When the front panel is facing up, the tail should extend from the viewer's left side.
Use the long golden-yellow sewing tail to stitch the tail base securely to the back panel. Pass through the tail base and body panel at least three times.
Weave the remaining yarn tail across several stitches on the wrong side before trimming. Tug gently on the tail to make sure the base does not move.
Join and Lightly Stuff the Giraffe
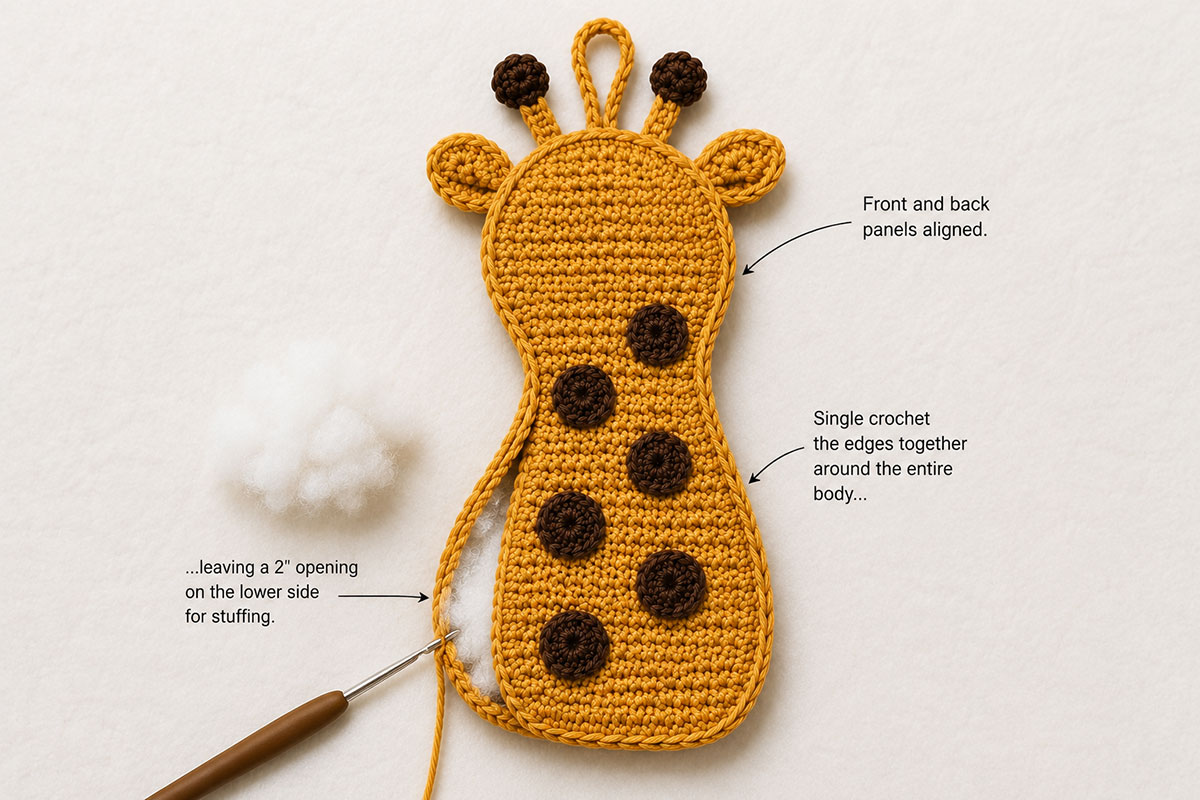
Place the front and back body panels together with wrong sides facing. Match the lower body, shoulders, neck and head carefully so the two panels line up evenly. The ears and ossicones should remain outside the body panels.
Join golden yellow yarn near the lower left side of the body.
Working through both body panels only, sc evenly around the entire giraffe. Work 1 sc in each pair of matching row ends along the sides and 1 sc in every stitch across the top and bottom edges.
At each of the six corners, work 2 sc total instead of the single sc normally worked there: in the first and last foundation stitches at the two lower body corners, in the Row 11 row-end at each shoulder corner where the neck begins, and in the first and last stitches of Row 29 at the two top head corners. Do not work a regular sc plus 2 additional sc at these corners. When the joining round is complete, there are 84 sc around the joined body before the closing sl st.
Do not crochet through the ears or ossicones. Keep every attached piece free outside the joined body panels.
Leave the final 2 inches open along one lower side of the body.
Add approximately 1 tablespoon of fiberfill. Place slightly more stuffing in the wider body than in the neck and head.
Spread the fiberfill evenly with your fingers. The giraffe should have a little lift and enough support to hold the long neck straight, but it should remain relatively flat rather than becoming rounded like a stuffed animal.
Finish closing the opening with single crochet. Join with a sl st and FO.
Align each front ear with its matching back ear and use matching yarn to sew the two layers together around the free outer edge, leaving the base already attached to the head undisturbed. Repeat with each front-and-back ossicone pair, joining the matching stems and brown caps around their free outer edges. Do not add stuffing to the ears or ossicones. When finished, the giraffe should have two layered ears and two layered ossicones rather than four separate loose pieces.
Bury the body-joining yarn tail securely inside the stuffed body before trimming. Weave the yarn tails used to join each layered ear and ossicone securely between the matching crochet layers or through their attachment bases before trimming.
Lay the giraffe flat and gently shape the neck with your fingers. The neck should remain straight without twisting toward either side.
Attach the Muzzle and Embroider the Face
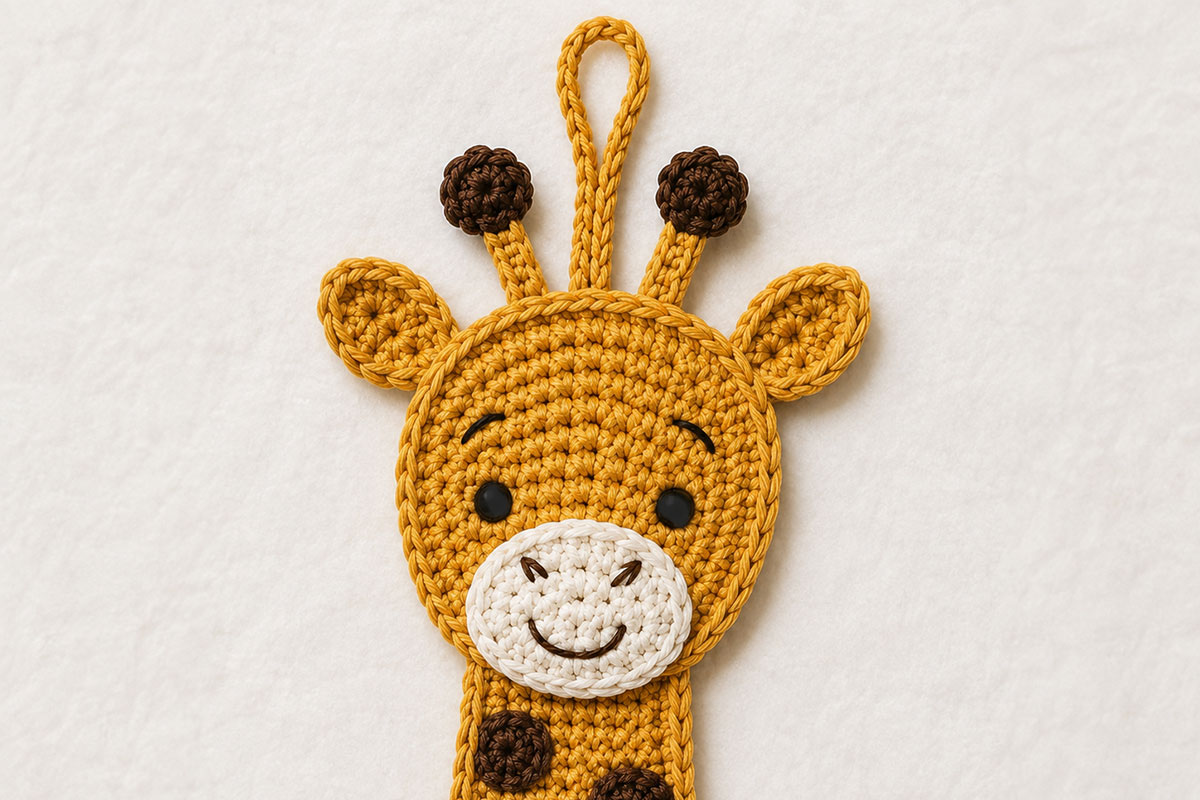
Center the cream muzzle on the lower part of the front head using the neck center marker as a guide.
Position the top of the muzzle between Rows 21 and 22.
Sew completely around the outer edge of the muzzle with small whip stitches. Take shallow stitches through the front body panel only so the needle does not pass through the back panel or compress the stuffing.
Remove the neck-center stitch marker once the muzzle is centered and securely sewn in place. Do not leave the removable marker attached to the finished appliqué.
With dark brown embroidery thread or yarn, stitch two small eyes on Row 24 approximately 5 stitches apart and centered above the muzzle.
Embroider a small nose near the upper center of the muzzle. Add one short vertical stitch below the nose and finish with a slight curved smile.
Keep every facial embroidery stitch in the front panel and muzzle only. Do not pass the needle through the back panel or pull the embroidery tightly enough to compress the stuffing.
Use embroidered facial details only. Do not substitute plastic safety eyes, buttons or beads.
Weave the remaining embroidery and muzzle yarn tails securely through several stitches before trimming.
Lay the finished giraffe flat and check the outline from the front. Gently straighten the neck, shape the ears and ossicones and smooth the muzzle and spots. If the outer edge curls, lightly block the appliqué and allow it to dry flat before attaching it to another project.
How to Attach the Giraffe Applique to a Baby Blanket
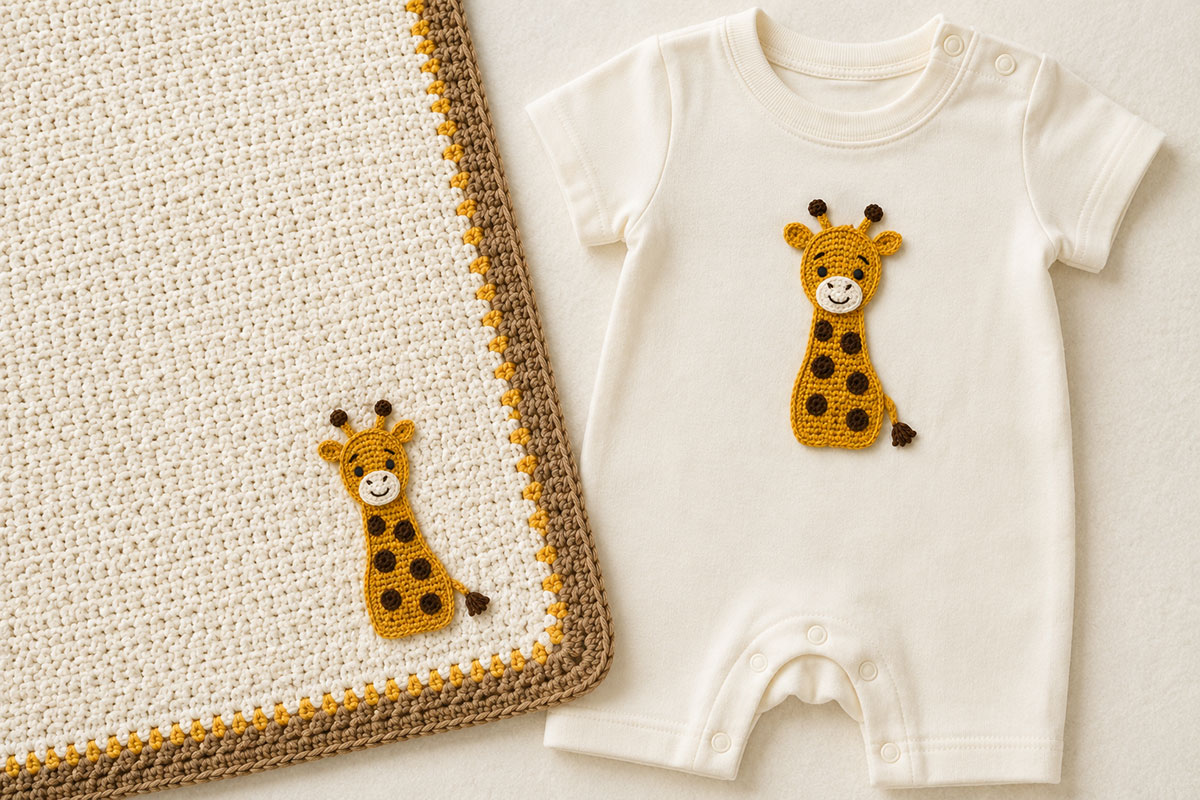
Finish shaping and blocking the giraffe before sewing it to the blanket or other project. Lay the appliqué in position and temporarily hold it with locking stitch markers or rustproof pins.
Check the placement before sewing. The body should sit straight, the long neck should not lean to one side and the outer pieces should lie in the positions you want them to keep.
Thread a yarn needle with yarn that matches the golden-yellow joining edge.
Beginning along the lower body, whipstitch through the back loop of the outer joining round and through the blanket or project beneath it. Do not push the needle through the front body panel of the giraffe.
Space the attachment stitches about ¼ inch apart and work completely around the main body, neck and head.
For a baby blanket or another project that may be handled by a child, add separate hidden tacking stitches beneath the ears, ossicones, muzzle edge and tail. These projecting pieces should not remain loose enough to be pulled away from the blanket.
Check each crochet spot as well. If an edge lifts or shifts when gently rubbed, reinforce it before the blanket is used.
After the appliqué is attached, look at the front of the blanket for puckering. Loosen and restitch any section that pulls the blanket fabric out of shape.
Weave the final attachment yarn tail through several stitches on the back of the project in two directions before trimming.
Remove every locking stitch marker or rustproof pin used to position the appliqué. Check both the front and back of the project to make sure none remain before the blanket or nursery item is used.
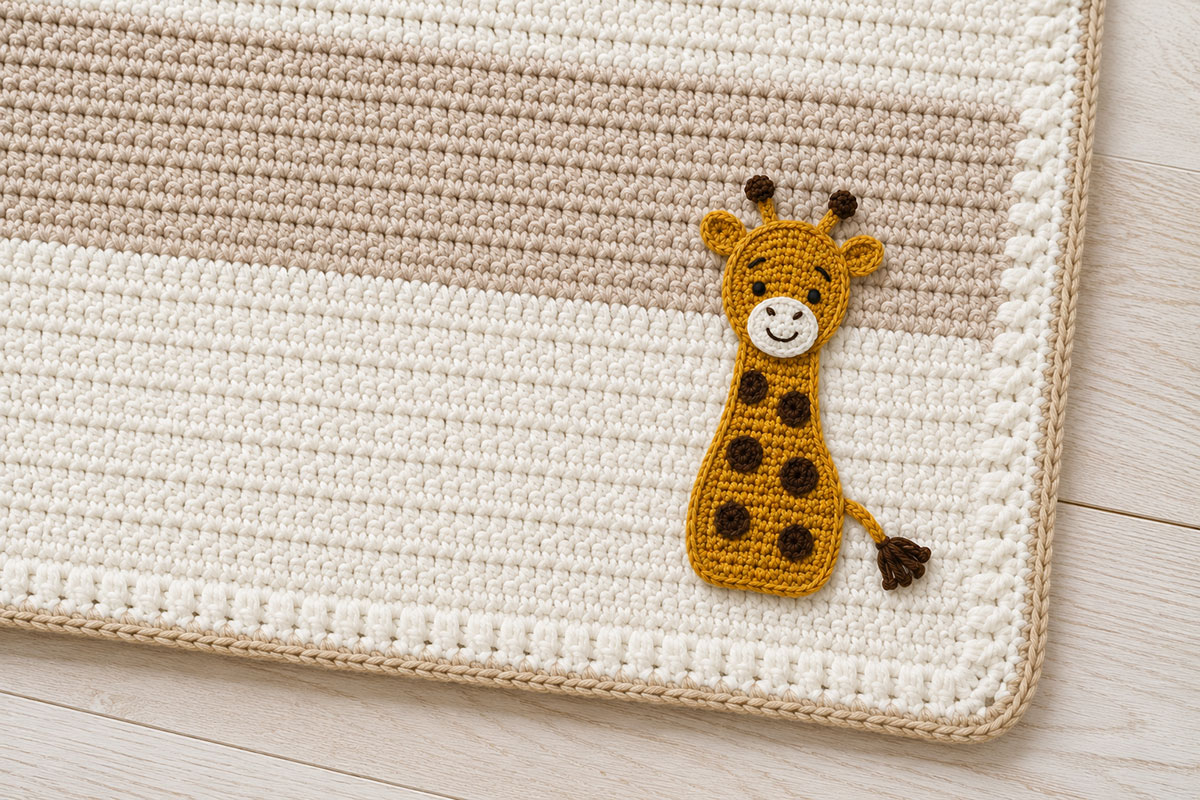
Jan's note: One thing I keep coming back to with my nursery projects is scale. I would place this roughly six-inch giraffe near a corner or edge of a baby blanket instead of letting it dominate the center. It should read as a handmade detail, not take over the whole blanket.
If you would like to make coordinating animals for the same blanket, see the crochet animal applique patterns collection.
Final Shape and Safety Check
Before using the finished giraffe on a baby blanket or nursery project, check every part of the appliqué one more time.
- Gently tug each ear to make sure the attachment base does not move.
- Check both layered ossicones, including their joined outer edges and all four brown cap pieces.
- Run a finger around every crochet spot and reinforce any lifting edge.
- Check the cream muzzle all the way around.
- Tug gently on the tail and its three-loop brown tuft.
- Make sure every yarn end is woven in securely and trimmed.
- Confirm that the eyes, nose and mouth are embroidered rather than attached with plastic or hard pieces.
- Check that the neck lies straight and that the stuffing remains thin and evenly distributed.
The finished giraffe should measure about 6 inches from the tops of the ossicones to the bottom of the body. A small variation is normal depending on yarn, hook size and crochet tension.
For baby projects, do not add plastic safety eyes, buttons, beads, loose fringe or other small embellishments. Secure all projecting pieces with additional hidden stitches when necessary.
Keep loose blankets, wall hangings and other soft handmade items out of an infant's crib, bassinet or other sleep space.
Frequently Asked Questions About the Crochet Giraffe Applique
How big is the finished crochet giraffe applique?
With worsted weight cotton yarn and a 4.0 mm hook, the finished giraffe is about 6 inches tall from the tops of the ossicones to the bottom of the body. The head measures about 3 inches wide before the ears are included.
Is this giraffe flat or stuffed?
It is a lightly padded appliqué. The two matching body panels are joined and filled with about 1 tablespoon of fiberfill. The stuffing gives the neck and body some shape without making the giraffe bulky like a stuffed animal.
How many crochet spots does the giraffe have?
The front uses seven brown crochet spots: 4 small spots and 3 large spots. The back can remain plain when the giraffe is sewn onto a blanket or other project.
Can I put spots on both sides?
Yes. For a two-sided banner or hanging motif, make a second set of spots and sew them to the back panel. A giraffe being used as an appliqué does not need spots on the hidden back panel.
Can I use plastic safety eyes?
No. For a giraffe intended for a baby blanket or nursery item, use embroidered eyes and facial details. Do not substitute plastic safety eyes, buttons or beads.
Do the ears and ossicones stay loose?
The wider portions may remain free while the giraffe is being assembled, but when the appliqué is attached to a baby blanket, tack down projecting pieces securely with hidden stitches so they cannot be pulled away from the blanket.
What if my giraffe neck curls or twists?
First check that the two body panels were matched row for row during joining and that the stuffing is distributed evenly. Gently shape the neck while the appliqué is flat. If the edge still curls, lightly block the finished giraffe before attaching it to the project.
Can I use this giraffe with other safari crochet patterns?
Yes. It is part of the same safari animal group as the other crochet animal applique patterns. For another coordinated nursery project, see the crochet safari animal mobile pattern.
Care for a Crochet Giraffe Applique
Follow the care instructions for the yarn and the finished project the giraffe is attached to. Because the appliqué is lightly padded, reshape the neck, ears and ossicones after washing and allow the piece to dry in its intended shape.
Check the appliqué from time to time if it is attached to a baby blanket or another item that is handled often. Reinforce any spot, ear, ossicone, muzzle edge or tail attachment that begins to loosen.
If the giraffe is used on a nursery wall hanging or banner, store the project flat or supported so the long neck and projecting pieces do not become sharply folded.
More Crochet Animal Patterns for Baby Projects
This giraffe works well as one animal in a larger safari crochet collection. You can use the same general scale to mix several animal appliqués across a blanket, banner or nursery wall hanging.
- Crochet Animal Applique Patterns
- Crochet Elephant Applique Pattern
- Crochet Safari Animal Mobile Pattern
- Crochet Animal Lovey Patterns
- Free Baby Crochet Patterns
Before you finish: Check that every yarn end is woven in, the two body panels are securely joined, the spots lie flat and the ears, ossicones, muzzle and tail are firmly attached. For a baby project, keep all facial details embroidered and do not add buttons, beads, plastic eyes or loose yarn embellishments.
When you click on links to various merchants on this site and make a purchase, this may result in this site earning a commission. This does not affect the price you pay.

UBGI Gold Standard 2026
Reviewed under the site's
editorial checklist.
Photos, decorating ideas, party setups and reader submissions are shared for inspiration unless a page is specifically presented as a pattern, tutorial, reference guide or step-by-step project. Follow the instructions, measurements, safety guidance and manufacturer directions provided for the particular project or product.
About Jan | Contact | Baby Nursery Ideas (Blog) | Site Map | Privacy Policy | Disclosure Policy | Disclaimer | Affiliate Disclosure | Earnings Disclosure | Facebook | Pinterest
I am a participant in the Amazon Services LLC Associates Program, an affiliate advertising program designed to provide a means for us to earn fees by linking to Amazon. As an Amazon Associate I earn from qualifying purchases.
Copyright © 2006-2026. All Rights Reserved.