Free Crochet Monkey Applique Pattern for Baby Blankets and Nursery Items
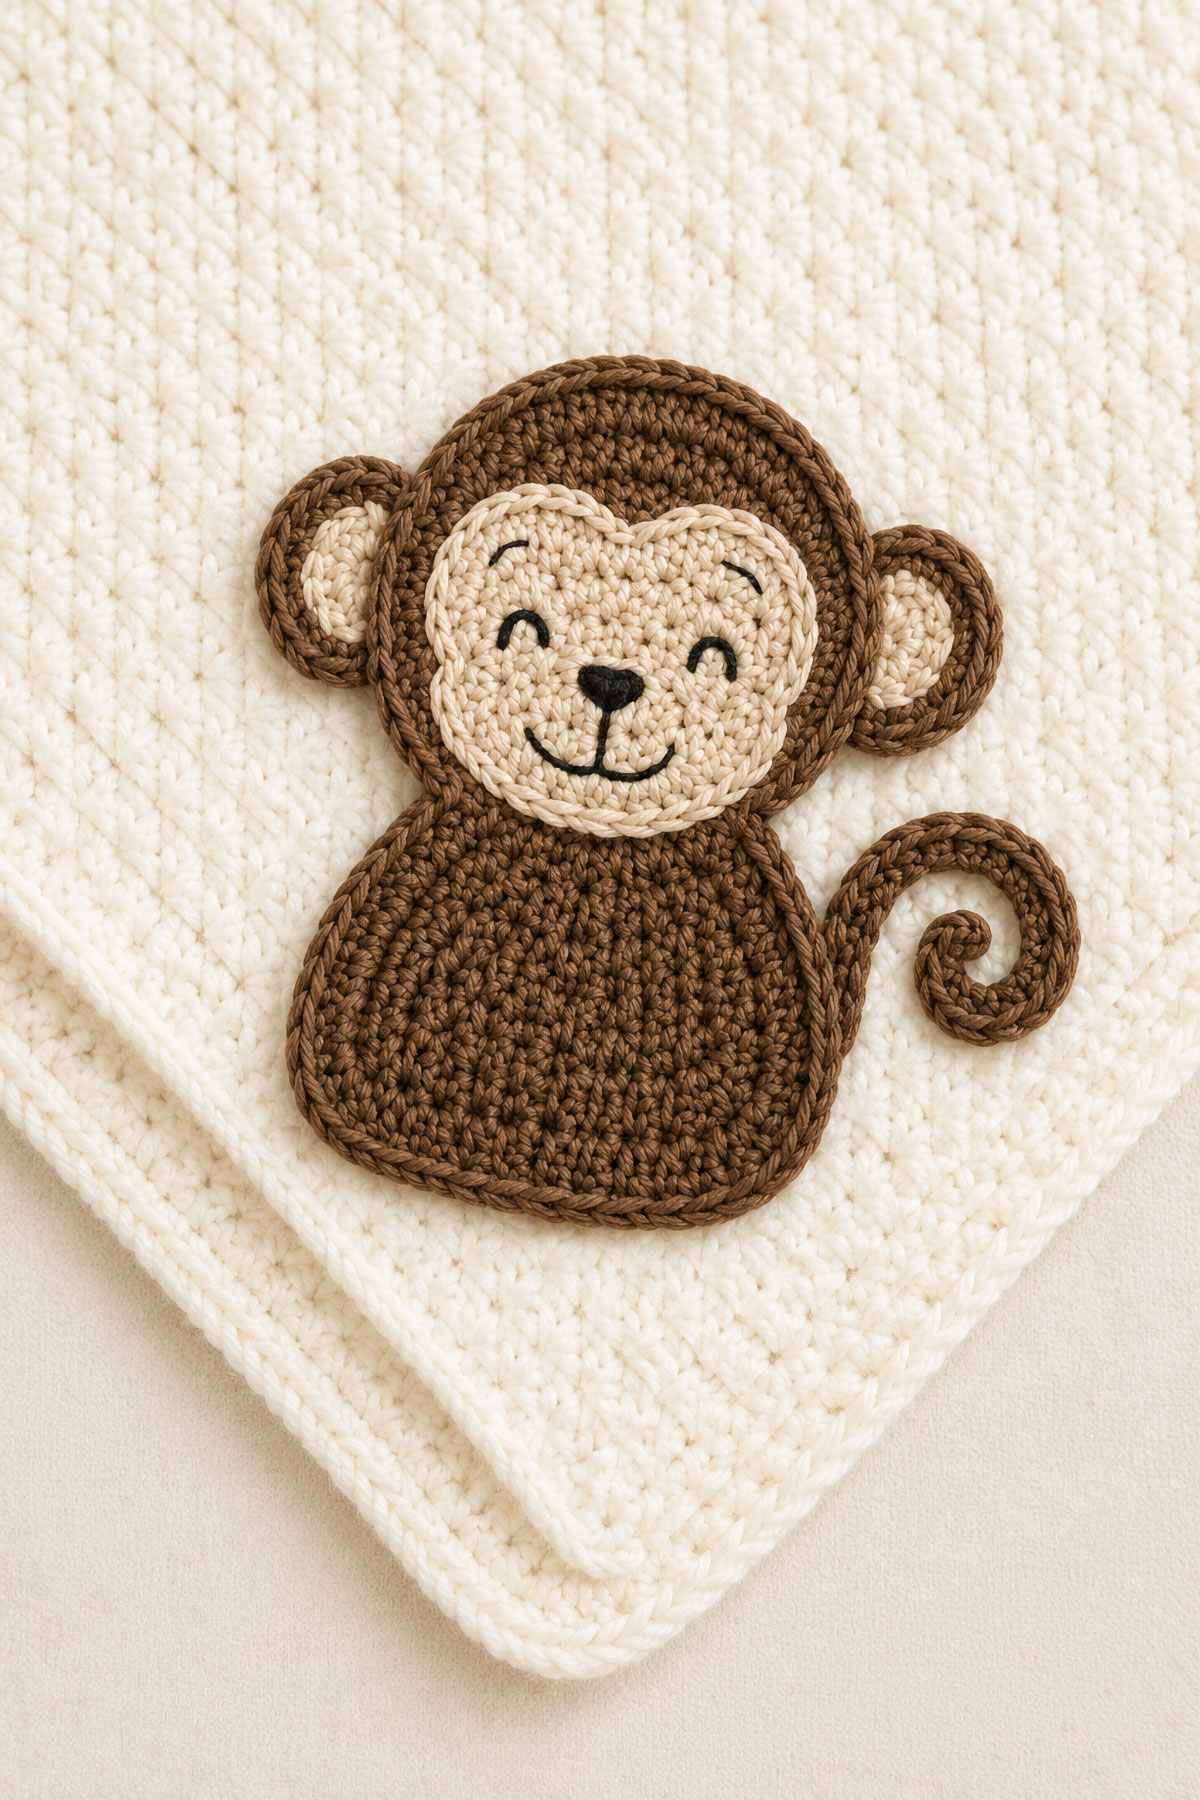
This free crochet monkey applique pattern makes a flat, layered monkey with a separate rounded head, pear-shaped body, small ears, a tan face patch, curled tail and embroidered features. Sew the finished monkey securely onto a crocheted baby blanket, nursery wall hanging, banner or other handmade nursery project.
By Jan Bay
Explore More Free Crochet Baby Patterns
Crochet Animal Applique Patterns
Crochet Elephant Applique Pattern
Crochet Giraffe Applique Pattern
Crochet supplies for this project:
Jump to the Crochet Monkey Applique Pattern
Free Crochet Monkey Applique Pattern for Baby Blankets
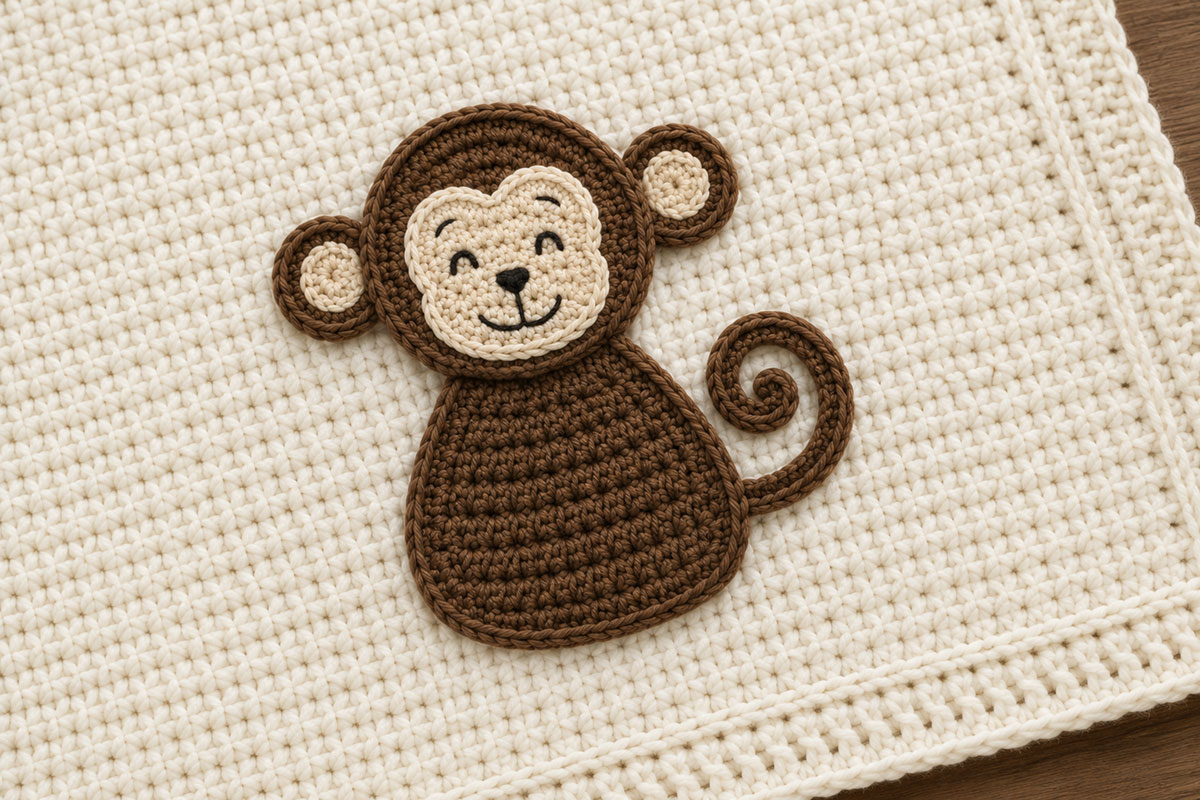
This monkey is made from separate flat crochet pieces that are layered together at the end. The round head overlaps the narrower top of the body, the ears sit behind the head, and the curled tail extends from the side of the body.
This is an appliqué, not a stuffed monkey toy. There is no fiberfill inside the finished piece.
If you are making several safari animals for one project, this monkey can be paired with the designs on the Crochet Animal Applique Patterns page.
Quick answer: This crochet monkey appliqué is a flat layered motif made with worsted weight cotton yarn and a 4.0 mm hook. The body, head, ears, face patch and curled tail are crocheted separately, then sewn together to create the finished monkey shown in the example image.
Materials and Pattern Notes
Finished Monkey
- Finished height: about 5 inches
- Finished width across ears: approximately 4½ to 5½ inches
- Construction: flat layered crochet appliqué
- Body: 1 pear-shaped piece
- Head: 1 round piece
- Outer ears: 2
- Inner ear patches: 2
- Face patch: 1
- Tail: 1
- Face: embroidered
- Stuffing: none
- Skill level: advanced beginner to intermediate
Materials for One Monkey Applique
- Worsted weight cotton yarn in medium brown for the body, head, ears and tail
- Small amount of tan or warm cream worsted weight cotton yarn for the face patch and inner ears
- Small amount of black or very dark brown embroidery thread or yarn for the eyes, brows, nose and mouth
- 4.0 mm crochet hook
- Yarn needle
- Stitch marker
- Scissors
- Locking stitch markers or rustproof pins for positioning the pieces before sewing
The color contrast does some useful work here. Medium brown defines the monkey's silhouette while the lighter face and inner ears make the expression easy to see. You can change the colors, but I would keep enough contrast between the face and head so the features do not disappear into the crochet.
Abbreviations
- magic ring: adjustable starting loop
- ch: chain
- sc: single crochet
- sl st: slip stitch
- inc: 2 sc in the same stitch
- dec: single crochet 2 stitches together
- st: stitch
- sts: stitches
- FO: fasten off
Terminology: This pattern uses standard US crochet terms.
Turning chains: A turning ch 1 does not count as a stitch. For joined rounds, the beginning ch 1 also does not count as a stitch.
Right side and wrong side: Choose the smoother-looking side of the body as the right side. The head, ears and face patch are worked in rounds. Keep the visible joins toward the back when possible.
Gauge: Exact gauge is not critical. What matters is firm, even fabric and proportions that match from piece to piece. The finished appliqué should remain flat enough to sew securely to another project.
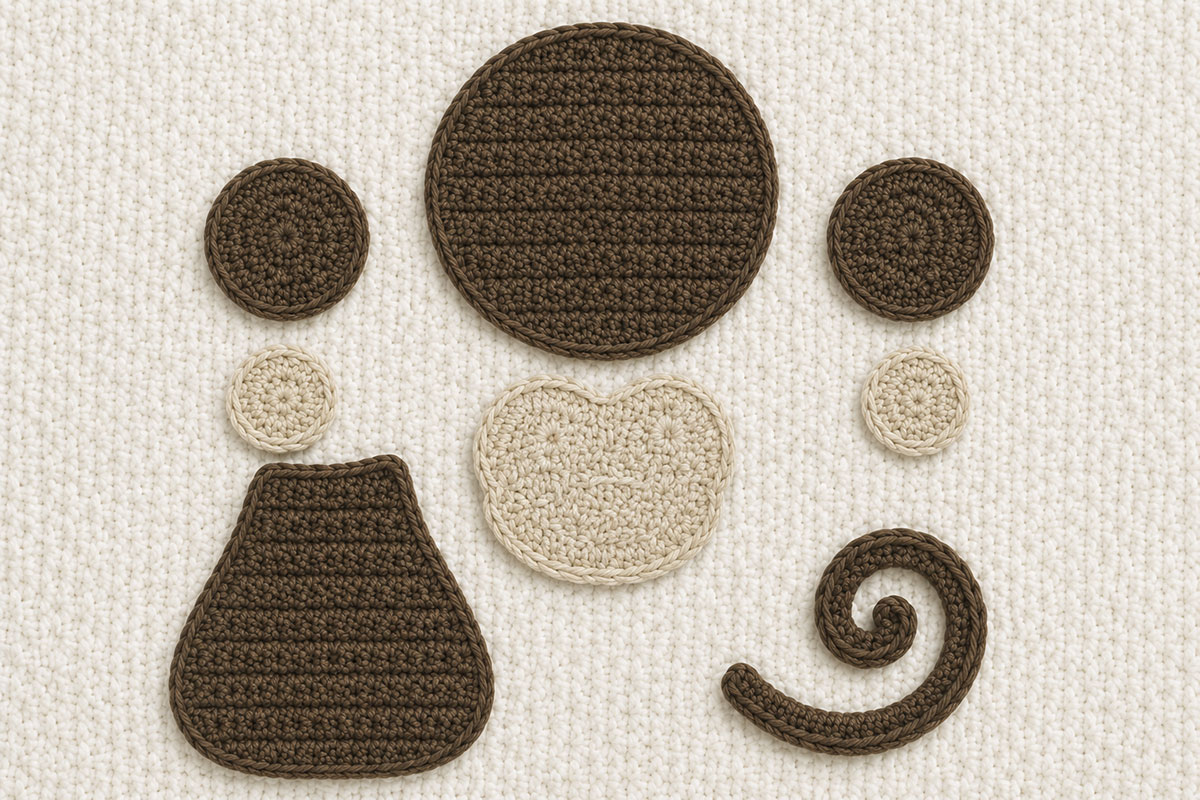
Crochet the Monkey Body and Head
Pear-Shaped Monkey Body, Make 1
Use medium brown yarn. The body is worked from a slightly narrower lower edge upward in rows, then finished with a simple single-crochet edging.
Ch 11.
Row 1: Sc in 2nd ch from hook and in each remaining ch. Ch 1, turn. (10 sts)
Row 2: Inc in first st, sc in next 8 sts, inc in last st. Ch 1, turn. (12 sts)
Row 3: Inc in first st, sc in next 10 sts, inc in last st. Ch 1, turn. (14 sts)
Row 4: Inc in first st, sc in next 12 sts, inc in last st. Ch 1, turn. (16 sts)
Rows 5 through 10: Sc in each st across. Ch 1, turn. (16 sts)
Row 11: Dec, sc in next 12 sts, dec. Ch 1, turn. (14 sts)
Row 12: Sc in each st across. Ch 1, turn. (14 sts)
Row 13: Dec, sc in next 10 sts, dec. Ch 1, turn. (12 sts)
Row 14: Sc in each st across. Ch 1, turn. (12 sts)
Row 15: Sc in each st across. (12 sts)
FO.
The lower body should begin slightly narrower than its widest point, then flare gradually to 16 stitches. The upper section narrows back to 12 stitches so the round head can overlap it without creating a wide shoulder line.
Edge the Body
With the right side facing, join medium brown yarn at one upper corner.
Ch 1. Sc in each stitch across the top edge. Work 1 sc in each row end down the first side.
Work 2 sc in the lower corner, 1 sc in each of the 10 worked foundation-chain stitches across the bottom and 2 sc in the second lower corner. Do not work into the skipped chain from the original ch 11.
Work 1 sc in each row end up the remaining side. Join with a sl st to the first sc.
FO and weave in the edging tail.
The edging should smooth the body outline without making it ruffle. If the edge begins to wave, remove the extra stitch at a lower corner rather than adding more stitches.
Round Monkey Head, Make 1
Use medium brown yarn. Work in joined rounds.
Round 1: Make a magic ring. Ch 1 and work 6 sc into the ring. Join with sl st. (6 sts)
Round 2: Ch 1. Inc in each st around. Join. (12 sts)
Round 3: Ch 1. *Sc in next st, inc in next st.* Repeat around. Join. (18 sts)
Round 4: Ch 1. *Sc in next 2 sts, inc in next st.* Repeat around. Join. (24 sts)
Round 5: Ch 1. *Sc in next 3 sts, inc in next st.* Repeat around. Join. (30 sts)
Round 6: Ch 1. *Sc in next 4 sts, inc in next st.* Repeat around. Join. (36 sts)
Round 7: Ch 1. *Sc in next 5 sts, inc in next st.* Repeat around. Join. (42 sts)
Round 8: Ch 1. Sc in each st around. Join. (42 sts)
FO, leaving a long sewing tail.
Lay the head flat. It should form a smooth round disc without cupping or ruffling.
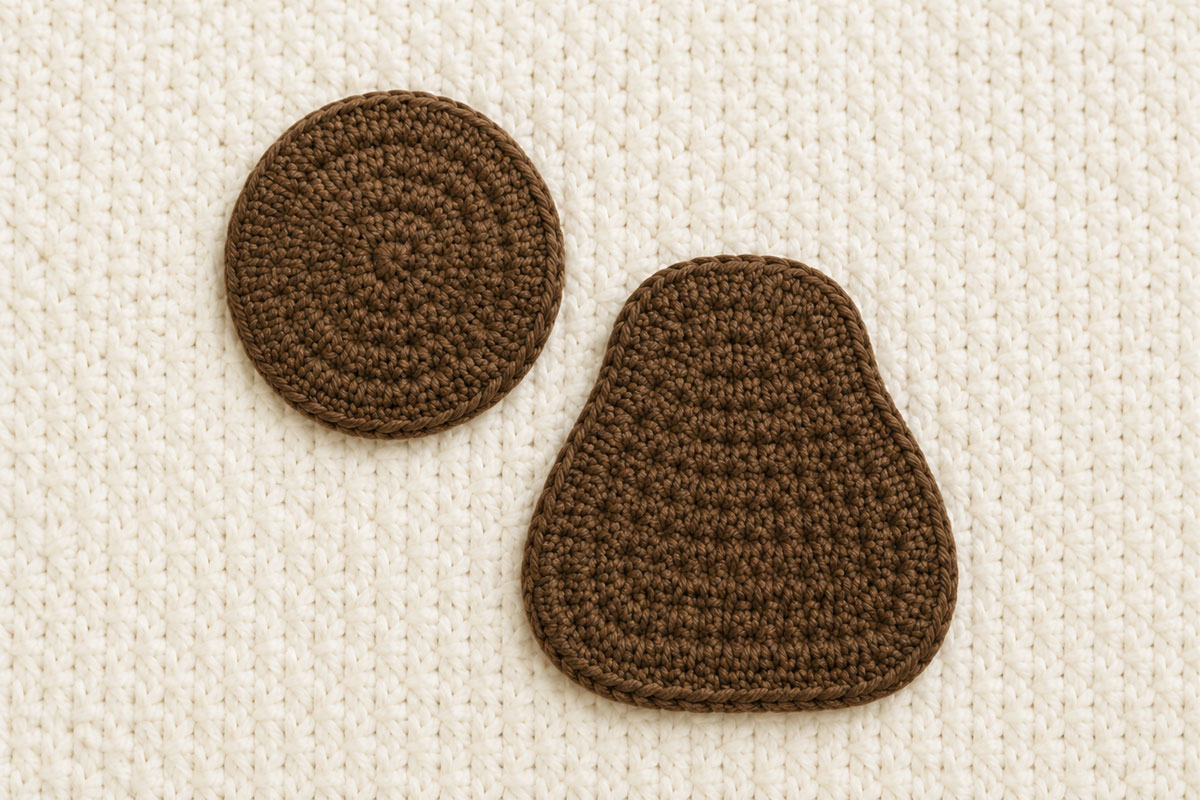
Crochet the Monkey Ears and Inner Ear Patches
Brown Outer Ear, Make 2
Use medium brown yarn.
Round 1: Make a magic ring. Ch 1 and work 6 sc into the ring. Join. (6 sts)
Round 2: Ch 1. Inc in each st around. Join. (12 sts)
Round 3: Ch 1. *Sc in next st, inc in next st.* Repeat around. Join. (18 sts)
Round 4: Ch 1. Sc in each st around. Join. (18 sts)
FO, leaving a long sewing tail.
Inner Ear Patch, Make 2
Use tan or warm cream yarn.
Round 1: Make a magic ring. Ch 1 and work 6 sc into the ring. Join. (6 sts)
Round 2: Ch 1. Inc in each st around. Join. (12 sts)
FO, leaving a sewing tail.
Center one light inner patch on each brown ear. Sew around the patch with small stitches, leaving an even brown border visible.
The head will cover part of each ear during assembly, which gives the finished ears the rounded side-facing shape shown in the example image.
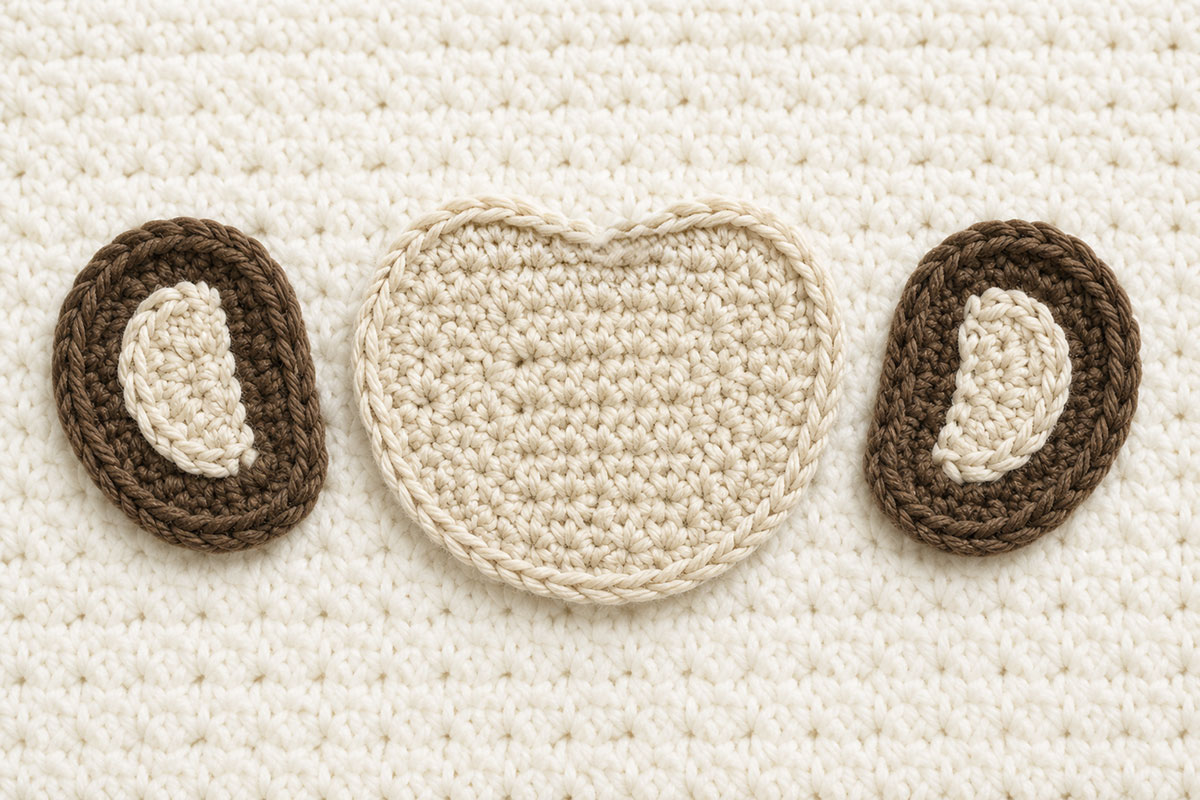
Crochet and Embroider the Monkey Face
Light Face Patch, Make 1
Use tan or warm cream yarn. Ch 7.
Round 1: Sc in 2nd ch from hook and in next 4 ch, 3 sc in last ch. Working along the opposite side of the foundation chain, sc in next 4 ch and 2 sc in the final ch. Join with sl st to the first sc. (14 sts)
Round 2: Ch 1. Inc in first st, sc in next 4 sts, inc in each of the next 3 sts, sc in next 4 sts and inc in each of the final 2 sts. Join. (20 sts)
Round 3: Ch 1. Sc in first st, inc in next st, sc in next 4 sts, *sc in next st, inc in next st* 3 times, sc in next 4 sts, then *sc in next st, inc in next st* 2 times. Join. (26 sts)
Round 4: Ch 1. Sc in next 2 sts, inc in next st, sc in next 4 sts, *sc in next 2 sts, inc in next st* 3 times, sc in next 4 sts, then *sc in next 2 sts, inc in next st* 2 times. Join. (32 sts)
FO, leaving a long sewing tail.
Lay the patch flat and shape it into a broad oval.
Create the Dip at the Top of the Face
Fold the face patch lightly in half to find its upper center.
Use the sewing tail to pull the upper-center edge downward about ¼ inch. Secure that point with two small stitches on the wrong side.
Do not fold the patch in half. You are creating only the shallow center dip visible above the monkey's forehead.
Position the Face Patch
Lay the brown head right side up. Center the light face patch on it with an even brown border visible around the sides and lower edge.
The top dip should point toward the center of the head. Pin the patch in place, then use the remaining sewing tail or a separate length of tan or warm cream yarn to whipstitch completely around its outer edge. Secure and weave the sewing yarn into the wrong side of the head before embroidering the face.
Embroider the Face
Use black or very dark brown embroidery thread or yarn.
Embroider two small curved closed eyes in the upper half of the face patch. Keep them evenly spaced from the center.
Add one short curved brow above each eye.
Embroider a small dark nose at the center of the face below the eyes. Add one short vertical stitch beneath the nose.
Finish with a curved smile that extends to both sides of the vertical stitch.
Secure all embroidery tails on the wrong side of the head before final assembly.
The expression should come from the embroidery and the shaped face patch. No plastic eyes, buttons or beads are needed.
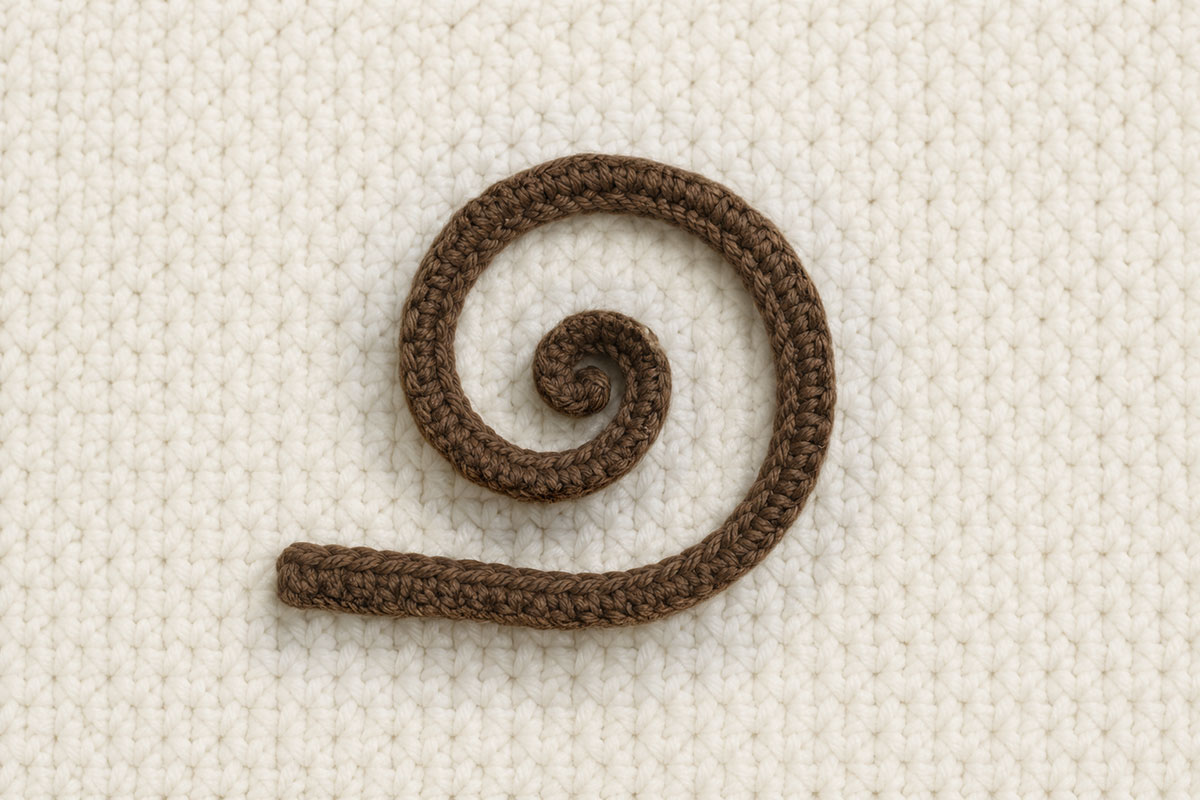
Make the Curled Crochet Monkey Tail
Use medium brown yarn. Leave a starting yarn tail about 12 inches long, then ch 23.
Row 1: Sl st in 2nd ch from hook and in each remaining ch across. (22 sl sts)
FO, leaving a second yarn tail at least 12 inches long.
Arrange the chain-tip end of the tail into an open spiral. Use approximately the first 10 to 12 slip stitches for the curl.
Cut a separate 12-inch strand of medium brown yarn and thread it onto a yarn needle.
Working from the back, place two or three small stitches between neighboring sections of the spiral. These stitches hold the curl without closing the open center.
Keep the final 3 to 4 slip stitches at the opposite end straight. This is the attachment base.
Weave in the two ends of the separate shaping strand. Keep the two original long yarn tails for attaching the tail to the monkey.
Assemble the Crochet Monkey Applique
Before assembly, weave in any yarn tails that are no longer needed for sewing. Keep the long brown head tail, both brown outer-ear tails and the two original tail ends available for the assembly steps below. After each assembly seam is secure, weave the used sewing tail through several stitches on the wrong side before trimming.
Attach the Ears Behind the Head
Place the brown head right side up.
Position one finished ear behind each side of the head at approximately the 9 o'clock and 3 o'clock positions.
Slide about one-third of each ear behind the head. The cream inner patches should remain visible from the front.
Compare the ears before sewing. They should project about the same distance from each side.
Turn the head over carefully. Use the long brown sewing tails to stitch each ear securely to the wrong side of the head.
Keep the stitches within the overlapping area so they do not show across the front of the head.
Join the Head to the Body
Place the body right side up with its narrow 12-stitch end at the top.
Center the head over that upper end. Overlap the head and body by approximately ¾ inch.
The body should appear to emerge from behind the lower part of the round head. Do not place the head completely above the body with a visible gap between the pieces.
Pin or mark the overlap before sewing.
Using the long brown tail from the head, sew the overlapping lower arc of the head securely to the upper body. Take shallow stitches through both pieces.
Add two or three hidden tacking stitches through the center of the overlapping area so the head cannot pivot on the body.
Turn the appliqué over and weave the sewing tail through several stitches on the wrong side before trimming.
Position and Secure the Tail
Lay the assembled monkey right side up.
The tail belongs on the viewer's right side, matching the example image.
Position the straight tail base behind the right side of the body around Rows 9 through 11. Let the tail extend outward before curving into its open spiral.
Use one original long tail end to stitch through the straight attachment base and the body at least three times.
Use the second long yarn tail to reinforce the attachment from the opposite direction.
Weave the two tails separately through stitches on the wrong side of the body before trimming.
Turn the monkey right side up and check the overall silhouette. The head should remain centered, both ears should project evenly and the tail should curl away from the body without pulling the body edge out of shape.
How to Attach the Monkey Applique to a Baby Blanket
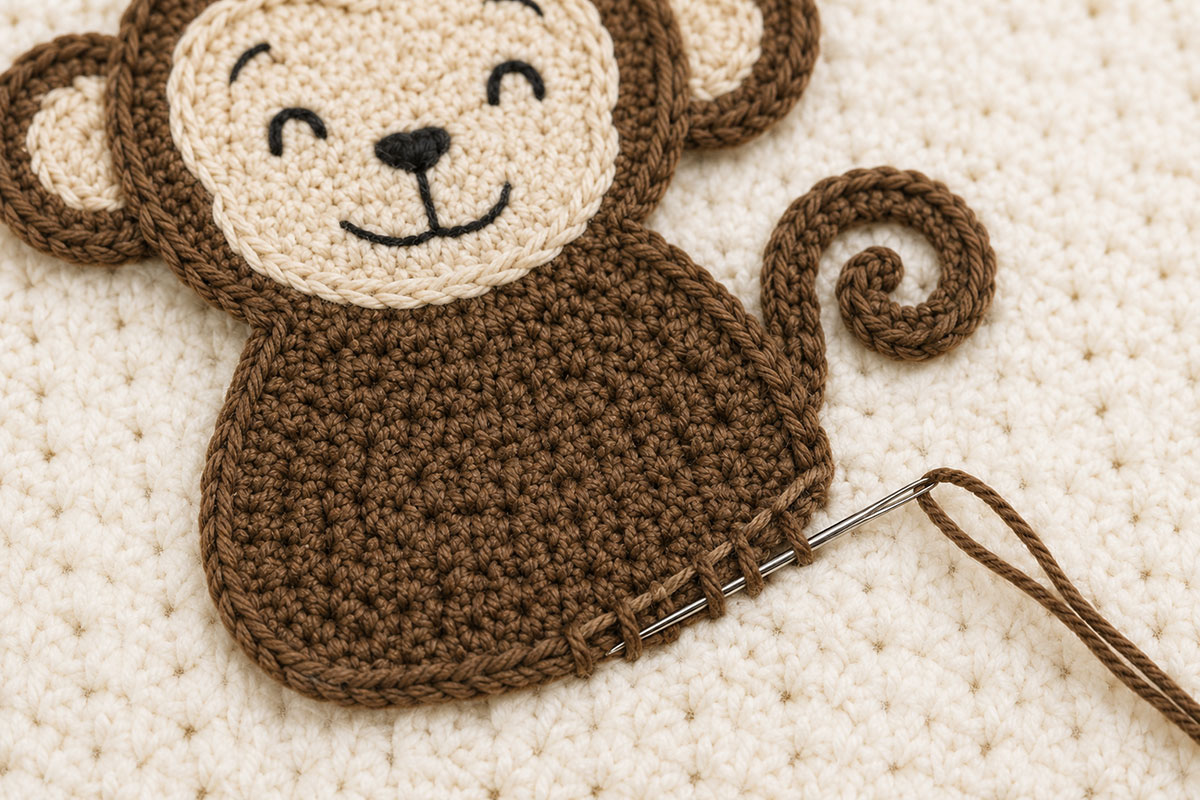
Finish assembling and shaping the entire monkey before attaching it to the blanket or nursery project.
Lay the appliqué in position and secure it temporarily with locking stitch markers or rustproof pins.
Thread a yarn needle with matching medium brown yarn.
Beginning at the lower body, sew around the outer body edge with small whip stitches. Take shallow stitches through the blanket so the attachment yarn does not dominate the back of the project.
Continue by securing the exposed outer edge of the head.
Add separate hidden stitches around the ears. For a baby-use blanket, do not leave the ears as loose flaps.
Secure the base of the curled tail separately.
For a blanket a baby may handle, add hidden tacking stitches at several points along the curved tail. Preserve the open spiral shape, but do not leave a large loose loop that can be pulled away from the blanket.
After sewing, secure and weave all attachment-yarn ends through several stitches on the wrong side of the blanket before trimming. Lay the blanket flat and check for puckering around the body and head. Ease any attachment stitch that is pulling the blanket fabric out of shape.
If you would rather use these safari shapes in a hanging nursery project, the Crochet Safari Animal Mobile Pattern gives you another way to carry the animal theme through the room.
Final Shape and Baby-Safety Check
After the monkey is attached, gently tug each ear and the tail and press around the face patch. Reinforce anything that shifts.
The facial embroidery should already be securely anchored, with the thread ends woven into the wrong side of the head before the appliqué was attached.
For a baby-use project, use embroidered facial features only. Do not replace them with plastic safety eyes, buttons, beads or other hard attachments.
Run a finger around the outer edges and over every seam and sewn-on piece. There should be no loose yarn loops or unsecured ends that can be pulled free.
The completed monkey should measure approximately 5 inches tall and about 4½ to 5½ inches wide across the ears. Yarn, hook size, tension and ear placement can change those measurements slightly.
A decorated baby blanket is still a blanket. Keep blankets and other soft items out of an infant's crib, bassinet and other sleep space. The U.S. Consumer Product Safety Commission recommends a bare infant sleep space with only a fitted sheet. You can read the current CPSC safe sleep guidance for more information.
Ways to Use the Finished Crochet Monkey Applique
The scale of this monkey gives you more options than a tiny motif. A single monkey can become the focal point of one corner of a blanket, while several safari animals can be spaced across a larger design.
On a nursery banner, sew the monkey to a separate crocheted or fabric pennant rather than hanging the appliqué itself from the ears or tail. That keeps the shaped pieces decorative instead of making them carry the weight of the project.
For framed nursery art, mount the finished appliqué to a secure textile background with the ears and tail arranged before you sew them down. The overlapping head, body, ears and face patch give the design enough dimension to read clearly without turning it into a stuffed crochet animal.
You can also pair the monkey with the lion, elephant and giraffe from the free crochet animal appliqué pattern collection. Their shared construction style makes the group feel intentional when several animals appear on the same nursery project.
Frequently Asked Questions About the Crochet Monkey Applique
Is this a flat crochet monkey applique or an amigurumi monkey?
It is a flat layered appliqué. The body, head, ears, face patch and tail are crocheted separately and sewn together without stuffing. The finished monkey is intended to be attached to a blanket, wall hanging, banner or similar project rather than used as a freestanding toy.
How big is the finished crochet monkey?
With worsted weight cotton yarn and a 4.0 mm hook, the pattern gives a finished height of about 5 inches. The width across the ears is approximately 4½ to 5½ inches.
How many crochet ear pieces does the monkey need?
Make two brown outer ears and two smaller light inner ear patches. Sew one inner patch to each outer ear, then place the finished ears behind the round head during assembly.
Does the face patch have stuffing under it?
No. The light face patch is sewn flat to the brown head. Its shallow upper-center dip comes from shaping the patch with the sewing tail before it is attached.
How does the crochet monkey tail stay curled?
The tail begins as a chain worked back with slip stitches. The first 10 to 12 slip stitches are arranged into an open spiral. A separate strand of brown yarn holds adjacent sections of the curl together with two or three small stitches worked from the back.
Can I leave the curled tail loose on a baby blanket?
For a blanket a baby may handle, tack down sections of the curl with hidden stitches while preserving the visible spiral shape. Also reinforce the attachment base and check it again after the appliqué is sewn to the blanket.
Can I use plastic safety eyes instead of embroidery?
No plastic eyes are needed for this design. Embroidered eyes keep the face flat and avoid adding small hard pieces to an appliqué intended for a baby project.
Can I make the monkey with another yarn weight?
The pattern is written for worsted weight cotton yarn and a 4.0 mm hook. A different yarn weight will change the size of every piece. If you substitute yarn, use the same yarn weight and hook for the body, head and ears so their proportions stay coordinated.
Can this pattern be used to make a stuffed monkey toy?
No. This construction is designed as a flat appliqué. It does not include paired body pieces, stuffing space or the structural construction needed for a freestanding stuffed monkey.
For more designs made specifically for baby crochet projects, browse the Free Baby Crochet Patterns collection.
When you click on links to various merchants on this site and make a purchase, this may result in this site earning a commission. This does not affect the price you pay.

UBGI Gold Standard 2026
Reviewed under the site's
editorial checklist.
Photos, decorating ideas, party setups and reader submissions are shared for inspiration unless a page is specifically presented as a pattern, tutorial, reference guide or step-by-step project. Follow the instructions, measurements, safety guidance and manufacturer directions provided for the particular project or product.
About Jan | Contact | Baby Nursery Ideas (Blog) | Site Map | Privacy Policy | Disclosure Policy | Disclaimer | Affiliate Disclosure | Earnings Disclosure | Facebook | Pinterest
I am a participant in the Amazon Services LLC Associates Program, an affiliate advertising program designed to provide a means for us to earn fees by linking to Amazon. As an Amazon Associate I earn from qualifying purchases.
Copyright © 2006-2026. All Rights Reserved.