Crochet Lion Lovey Pattern Free
This free crochet lion lovey pattern creates a soft baby security blanket with a sweet lion face, rounded ears and a textured mane, designed as a handmade safari nursery gift, jungle baby shower present or cuddly animal lovey for a little one.
More free crochet patterns:
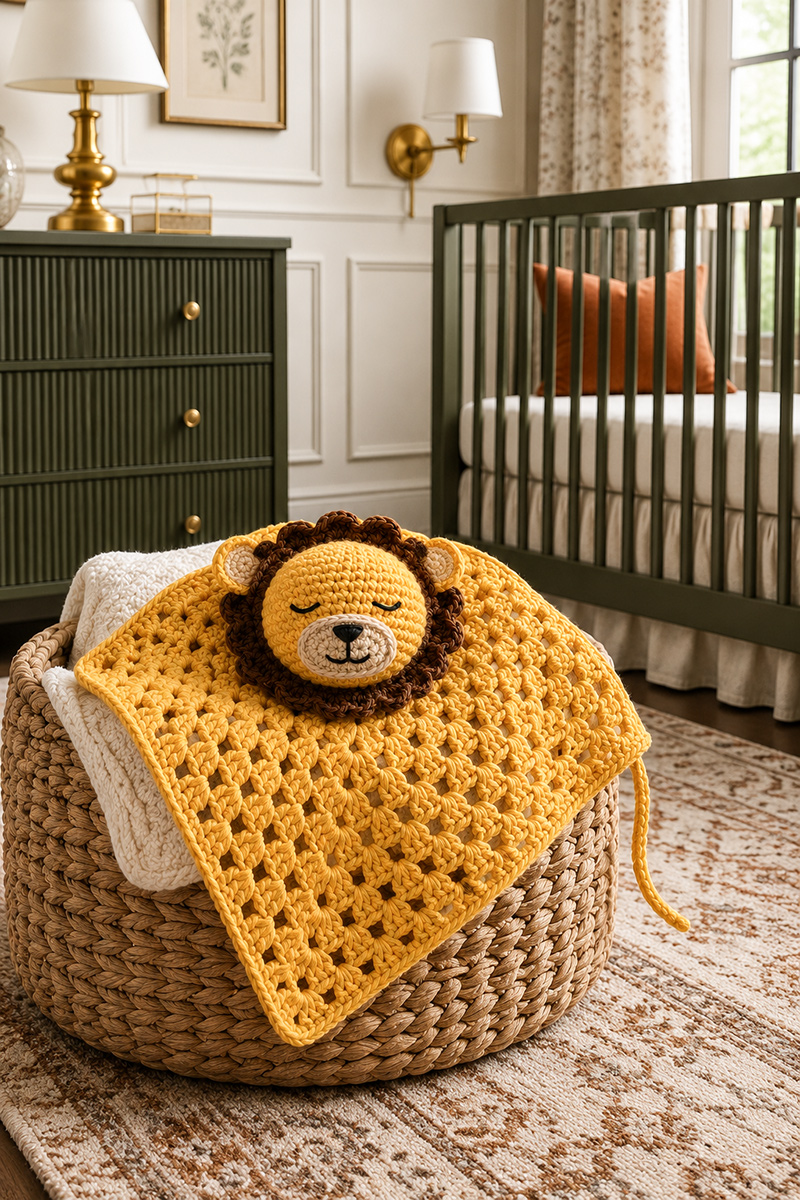
A crochet lion lovey pattern with a soft baby blanket body, sweet lion face and textured mane for safari nursery gifts.
Supplies for this crochet lion lovey:
For this project, choose a soft, washable medium-weight (4) yarn, crochet hooks that give tight stitches, stitch markers, fiberfill for the lion head and black embroidery floss for securely embroidered eyes without plastic parts.
Crochet Lion Lovey Pattern Information
This crochet lion lovey pattern is designed as a beginner-friendly baby security blanket with a small stuffed lion head, rounded ears, a soft scalloped mane and a simple granny-style blanket body. The pieces are made separately, then sewn together with clear placement steps so the finished lovey looks balanced instead of crooked or top-heavy.
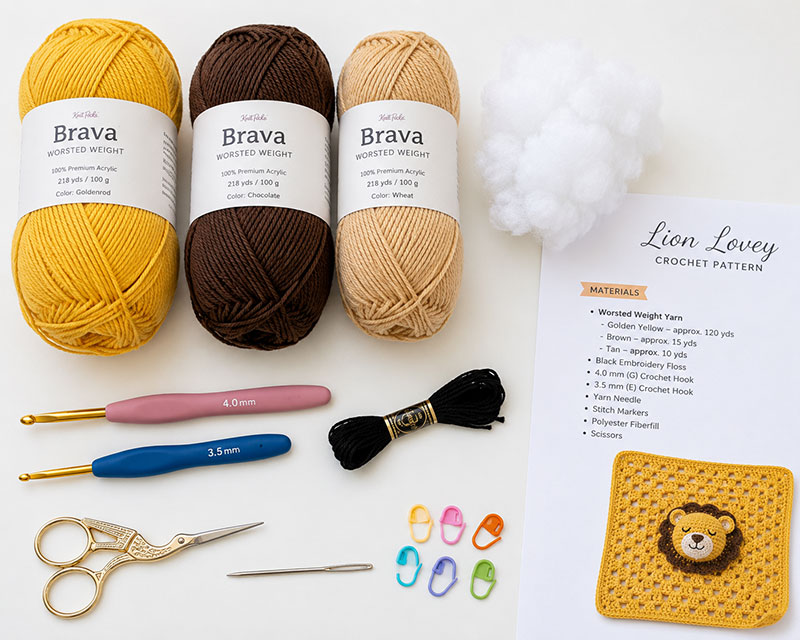
Gather soft yarn, a smaller hook for the stuffed lion head, stitch markers and fiberfill before starting this crochet lion lovey pattern.
This crochet lion lovey pattern uses simple pieces, clear stitch counts and beginner-friendly assembly steps.
Skill Level: Confident beginner
Finished Size: About 10 to 12 inches square after the border, excluding the optional tail, depending on yarn, hook size and tension. The lion head measures about 3 inches wide after stuffing.
Gauge: Gauge is not critical for this lovey. The most important thing is that your amigurumi stitches are tight enough that stuffing does not show through the lion head. If you can see stuffing between the stitches, go down one hook size for the head, ears and muzzle.
Construction: The blanket is worked first as a small granny square. The lion head is worked in continuous rounds. The muzzle, ears, mane and tail are made separately and sewn on during assembly.
Before starting the crochet lion lovey pattern, gather every color and tool so you do not have to stop in the middle of a small piece.
Materials
- Worsted-weight yarn in golden yellow, approximately 80 yards
- Worsted-weight yarn in brown, approximately 20 yards
- Worsted-weight yarn in tan, approximately 10 yards
- Small amount of black cotton yarn or embroidery floss for the face
- 4.0 mm crochet hook for the blanket
- 3.5 mm crochet hook for the stuffed head and small parts
- Yarn needle
- Stitch markers
- Straight pins or locking stitch markers for assembly
- Fiberfill stuffing
- Scissors
Baby Safety Notes
For a baby lovey, embroider the eyes instead of using plastic safety eyes. Safety eyes are not recommended for items intended for infants because they can loosen with chewing, washing or heavy use.
Sew every attached piece securely. The head, ears, mane, muzzle and tail should all be tug-tested before gifting. Weave every yarn tail through the work in at least three different directions before trimming close to the fabric.
Do not add buttons, beads, loose fringe, long tassels, bells, ribbons or removable decorations to a baby lovey. Keep the finished piece soft, washable and free of small parts.
Use and sleep safety: This handmade lovey is for supervised awake use only. Do not place it in a crib, bassinet, play yard or other infant sleep space, and remove it if the baby falls asleep.
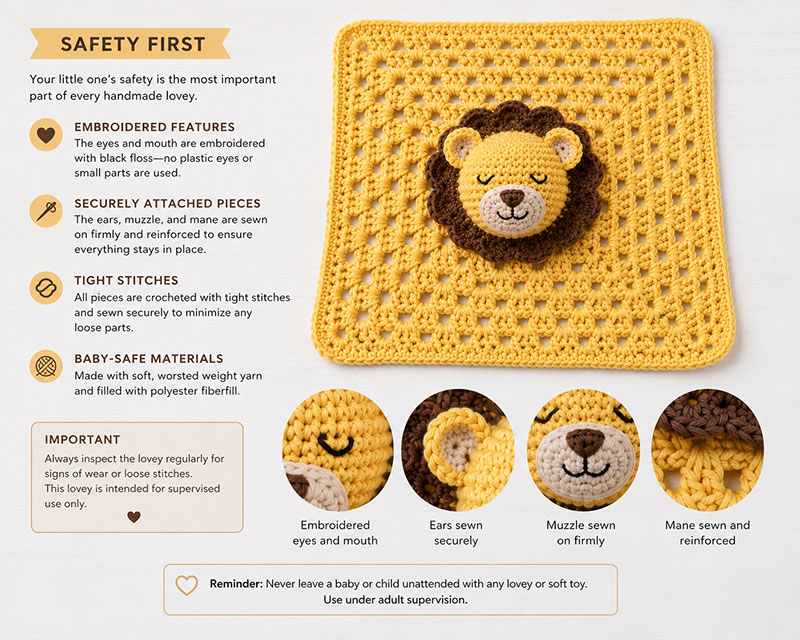
For a baby-safe crochet lion lovey, embroider the eyes and sew each small piece securely before gifting.
Crochet Lion Lovey Pattern Notes Before You Start
- The blanket is joined at the end of each round.
- The lion head, muzzle and ears are worked in continuous rounds without joining.
- Place a stitch marker in the first stitch of each continuous round and move it up as you work.
- Use the 3.5 mm hook for the head, muzzle, ears, mane and tail. Use the 4.0 mm hook only for the blanket and border.
- This free crochet lion lovey pattern uses standard US crochet terms.
- When a round says “repeat around,” complete the instruction evenly until you return to the marker.
- Stuff the head firmly enough to hold a round shape, but not so tightly that the stitches stretch open.
- Pin all face pieces before sewing. Small placement changes make a big difference in the final expression.
Abbreviations
- ch = chain
- sl st = slip stitch
- sc = single crochet
- hdc = half double crochet
- dc = double crochet
- inc = increase, work 2 single crochet stitches in the same stitch
- dec = decrease, single crochet 2 stitches together
- MR = magic ring
- st = stitch
- sts = stitches
Beginner Stitch Help
Magic ring: If the magic ring is difficult, chain 2 and work the starting stitches into the second chain from the hook. Pull the starting tail firmly before continuing.
Invisible decrease: For the neatest lion head, insert your hook through the front loop only of the next 2 stitches, yarn over and pull through both front loops, yarn over again and pull through the 2 loops on your hook. This keeps the decrease from making a bulky bump.
Joining the blanket rounds: When joining a granny square round, slip stitch into the top of the beginning chain 3. Then slip stitch across the next stitches until you reach the next corner space before starting the following round.
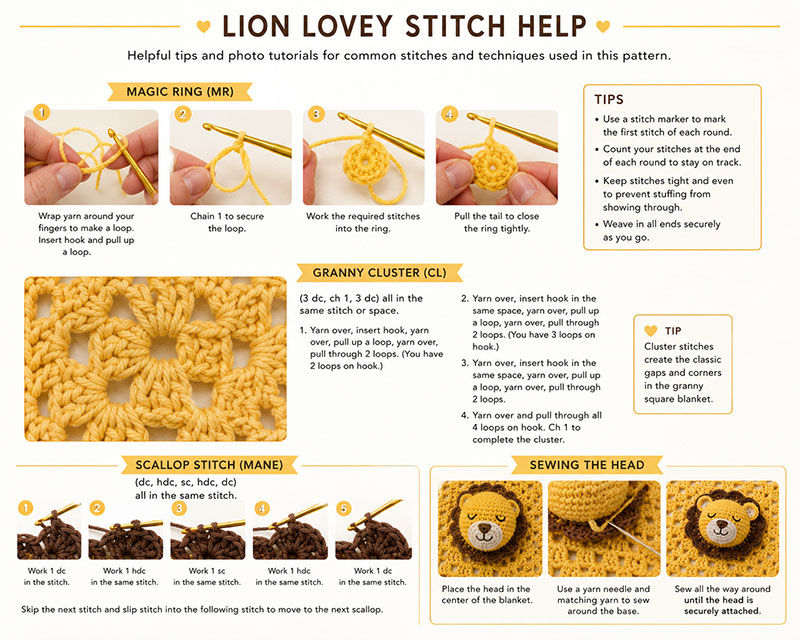
Use a stitch marker for the lion head rounds and keep the amigurumi stitches tight enough that the stuffing does not show.
Part 1: Crochet Lion Lovey Blanket
The blanket for this crochet lion lovey pattern is a small granny square. It gives the lovey a soft, drapey body without needing a complicated stitch pattern. Work the blanket with the 4.0 mm hook unless your tension is very loose.
Round 1
With golden yellow yarn, make a magic ring.
Ch 3. This counts as the first dc.
Work 2 dc into the ring.
Ch 2.
Work the following into the ring 3 more times: 3 dc, ch 2.
Pull the magic ring closed.
Join with a sl st to the top of the beginning ch 3.
Round 1 stitch count: 12 dc and 4 ch-2 corner spaces.
Checkpoint: You should have four groups of 3 dc. The ch-2 spaces are the corners. If you only see three corners, you missed one repeat before joining.
Round 2
Sl st across the next 2 dc and into the first ch-2 corner space.
Ch 3. This counts as the first dc.
In that same corner space, work 2 dc, ch 2, 3 dc.
In each of the next 3 corner spaces, work 3 dc, ch 2, 3 dc.
Join with a sl st to the top of the beginning ch 3.
Round 2 stitch count: 24 dc and 4 ch-2 corner spaces.
Checkpoint: Each corner should now have two 3-dc clusters separated by a ch-2 space.
Round 3
Sl st across the next 2 dc and into the first ch-2 corner space.
Ch 3. This counts as the first dc.
In that same corner space, work 2 dc, ch 2, 3 dc.
Work 3 dc in the space between the two corner clusters along the next side.
In the next corner space, work 3 dc, ch 2, 3 dc.
Repeat this sequence around: 3 dc in the side space, then 3 dc, ch 2, 3 dc in the next corner.
Join with a sl st to the top of the beginning ch 3.
Round 3 stitch count: 36 dc and 4 ch-2 corner spaces.
Checkpoint: Each side should have one 3-dc group between the corners.
Helpful Tip: Lay the square flat after every round. The right side should remain facing upward throughout the blanket section. If your corners start twisting, stop and confirm that every corner contains 3 dc, ch 2, 3 dc.
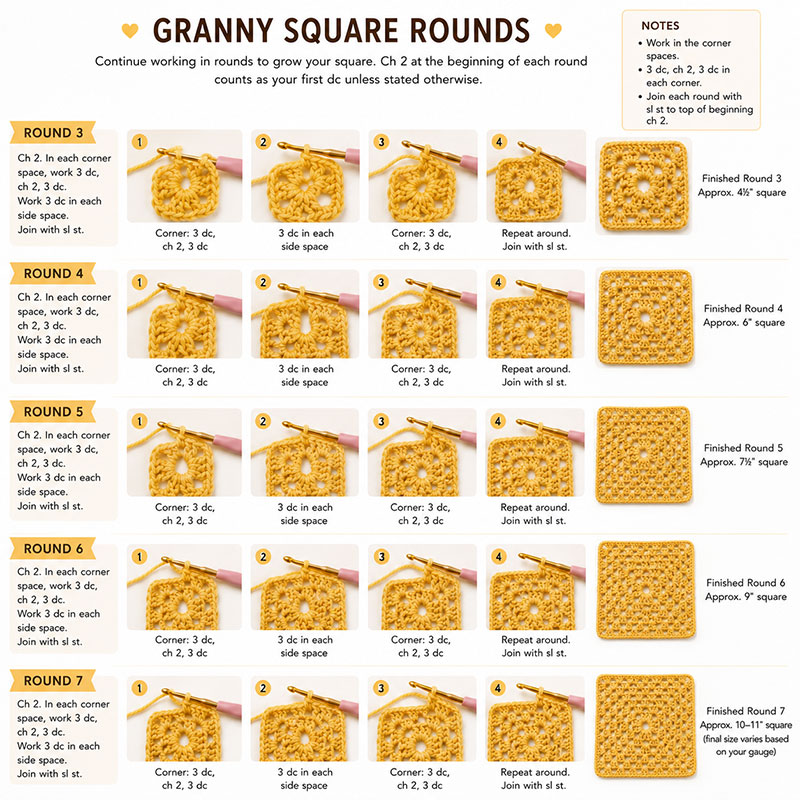
As the granny square grows, keep placing corner groups in the ch-2 spaces and one 3-dc cluster in each side space.
Round 4
Sl st across the next 2 dc and into the first ch-2 corner space.
Ch 3. This counts as the first dc.
In that same corner space, work 2 dc, ch 2, 3 dc.
Work 3 dc in each side space across to the next corner. You should work 3 dc in 2 side spaces on each side.
In each corner space, work 3 dc, ch 2, 3 dc.
Continue around, working 3 dc in every side space and 3 dc, ch 2, 3 dc in every corner space.
Join with a sl st to the top of the beginning ch 3.
Round 4 stitch count: 48 dc and 4 ch-2 corner spaces.
Checkpoint: Looking at any side of the square, you should see 2 separate groups of 3 dc between the two corner spaces.
Round 5
Repeat the same granny-square pattern.
In each corner, work 3 dc, ch 2, 3 dc.
In each side space, work 3 dc.
Join with a sl st to the top of the beginning ch 3.
Round 5 stitch count: 60 dc and 4 ch-2 corner spaces.
Checkpoint: Looking at any side of the square, you should see 3 separate groups of 3 dc between the two corner spaces.
Round 6
Repeat the same granny-square pattern.
In each corner, work 3 dc, ch 2, 3 dc.
In each side space, work 3 dc.
Join with a sl st to the top of the beginning ch 3.
Round 6 stitch count: 72 dc and 4 ch-2 corner spaces.
Checkpoint: Looking at any side of the square, you should see 4 separate groups of 3 dc between the two corner spaces.
Round 7
Repeat the same granny-square pattern one more time.
In each corner, work 3 dc, ch 2, 3 dc.
In each side space, work 3 dc.
Join with a sl st to the top of the beginning ch 3.
Round 7 stitch count: 84 dc and 4 ch-2 corner spaces.
Checkpoint: Looking at any side of the square, you should see 5 separate groups of 3 dc between the two corner spaces.
Simple Border for the Lovey Blanket
Ch 1.
Work 1 sc in every dc stitch around.
When you reach a corner ch-2 space, work 2 sc into that corner space. Do not place additional stitches around the corner chains.
Continue around the entire blanket.
Join with a sl st to the first sc.
Fasten off and weave in the yarn tail.
Border stitch count: 92 sc total.
Math check: Round 7 has 84 dc. The 4 corners each receive 2 sc, adding 8 border stitches. 84 + 8 = 92 sc.
Size Check: The blanket will usually measure between 9 and 11 inches across before the border. Exact size is not important as long as the square remains flat and even.
Tip: A simple single crochet border gives the lion lovey blanket a neat edge without making it stiff.
Finished Blanket Checklist
- The square lies flat on a table.
- All 4 corners look the same.
- Each side contains the same number of granny clusters.
- The center ring is fully closed.
- No yarn tails remain loose.
Blanket Troubleshooting
If the center will not close: Pull the magic ring tail firmly before weaving it in. If it still leaves a hole, use the yarn tail to sew the center closed from the back.
If the blanket curls upward: Your corner chains may be too tight. Try making the ch-2 corner spaces a little looser on the next round.
If the blanket ripples: Your corner stitches may be too loose, or your hook may be too large. A little softness is fine for a lovey, but strong rippling usually means the corners are spreading too much.
If the square looks twisted: Check that every corner has 3 dc, ch 2, 3 dc. Missing one corner increase will pull the square out of shape.
Before Moving to the Lion Head
Weave in the starting tail from the magic ring and the finishing tail from the border. Thread each tail through the backs of several stitches, change direction, then weave through several more stitches before trimming.
Do not leave yarn tails hanging loose. Once the lion head is attached, reaching the center of the blanket becomes more difficult.
Tip: The completed blanket should lie flat with even corners before attaching the lion head and facial pieces.
Crochet Lion Head
The head section of this crochet lion lovey pattern creates the small stuffed lion face that will later be sewn to the center of the blanket.
The lion head is worked in continuous rounds without joining. Place a stitch marker in the first stitch of every round and move it up as you work. This helps keep the stitch count accurate and prevents accidentally adding or losing stitches. Keep the right side facing out as the head begins to cup; the smooth side of the stitches should be on the outside.
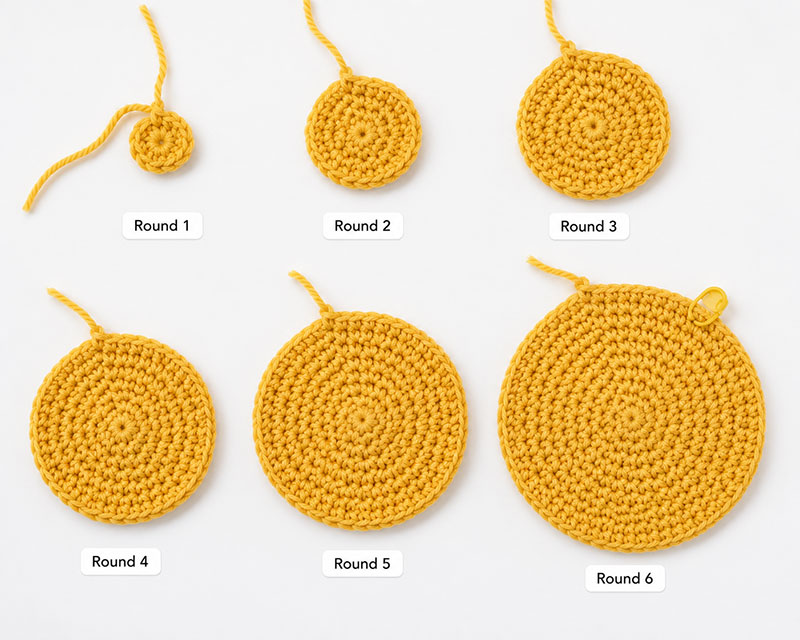
The first six rounds create a flat circle that will become the front of the lion's face.
Round 1
Using golden yellow yarn and a 3.5 mm hook, make a magic ring.
Work 6 sc into the ring.
Stitch Count: 6
Round 2
Work 2 sc in each stitch around.
Stitch Count: 12
Round 3
(Sc in next stitch, inc in next stitch) around.
Stitch Count: 18
Round 4
(Sc in next 2 stitches, inc in next stitch) around.
Stitch Count: 24
Round 5
(Sc in next 3 stitches, inc in next stitch) around.
Stitch Count: 30
Round 6
(Sc in next 4 stitches, inc in next stitch) around.
Stitch Count: 36
Checkpoint: The circle should be flat and evenly rounded. Exact measurement is less important than stitch count. If your circle curls, your tension may be too tight. If it ripples, your tension may be too loose.
Count Check: Count your stitches now. This is the easiest place to fix mistakes before the head begins curving.
Tip: The straight rounds transform the flat circle into a rounded lion head shape.
Rounds 7-11
Sc in each stitch around.
Stitch Count: 36 stitches in every round.
Checkpoint: After Round 11, the piece should resemble a shallow bowl. The sides should curve downward naturally. If the piece still looks flat, check that all increases were completed correctly in the earlier rounds.
Helpful Tip: Place the piece on a table with the opening facing upward. The sides should stand up slightly without collapsing.
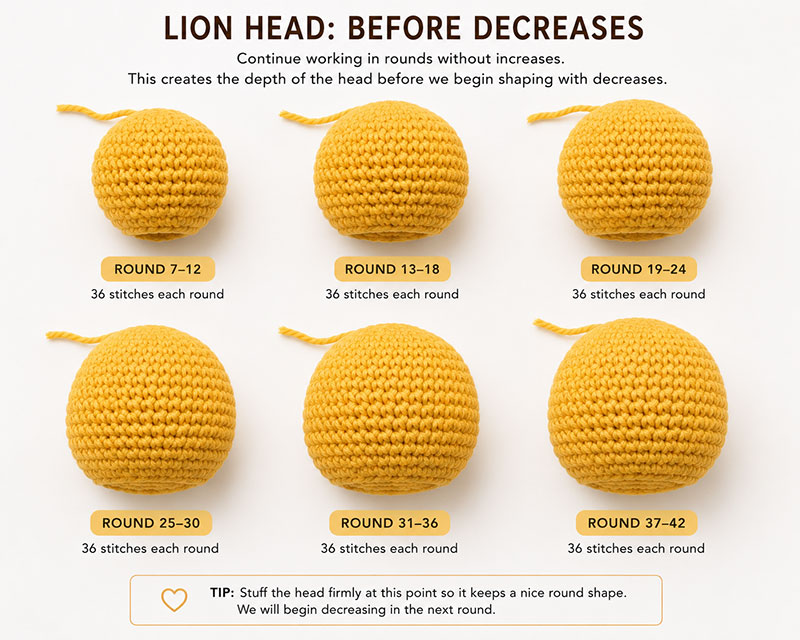
Before beginning the decrease rounds, the lion head should have a smooth rounded bowl shape.
Round 12
(Sc in next 4 stitches, dec) around.
Stitch Count: 30
Round 13
(Sc in next 3 stitches, dec) around.
Stitch Count: 24
Round 14
(Sc in next 2 stitches, dec) around.
Stitch Count: 18
Checkpoint: The opening should now be noticeably smaller while still leaving enough room to add stuffing.
Count Check: You should have exactly 18 stitches remaining before stuffing. Count carefully now because it becomes difficult to correct missed decreases after the head is stuffed.
Tip: Add stuffing before the final decrease rounds while the opening is still easy to reach.
Stuffing the Head
Add small pieces of fiberfill one at a time.
Avoid placing one large ball of stuffing inside the head because it creates lumps.
The head should feel firm enough to hold a round shape but soft enough to compress slightly when squeezed.
Do not overstuff. If the stitches begin stretching apart and showing gaps, remove a little stuffing before continuing.
Round 15
(Sc in next stitch, dec) around.
Stitch Count: 12
Round 16
Dec around.
Stitch Count: 6
Fasten off, leaving a tail about 10 inches long.
Thread the yarn tail onto a yarn needle.
Insert the needle through the front loops of the remaining 6 stitches.
Pull tightly to close the opening.
Take a few small stitches across the opening to secure it.
If you want to use the same tail later for extra anchoring when sewing the head to the blanket, do not trim it yet. Otherwise, weave the yarn tail through the head in several directions and trim close to the fabric.
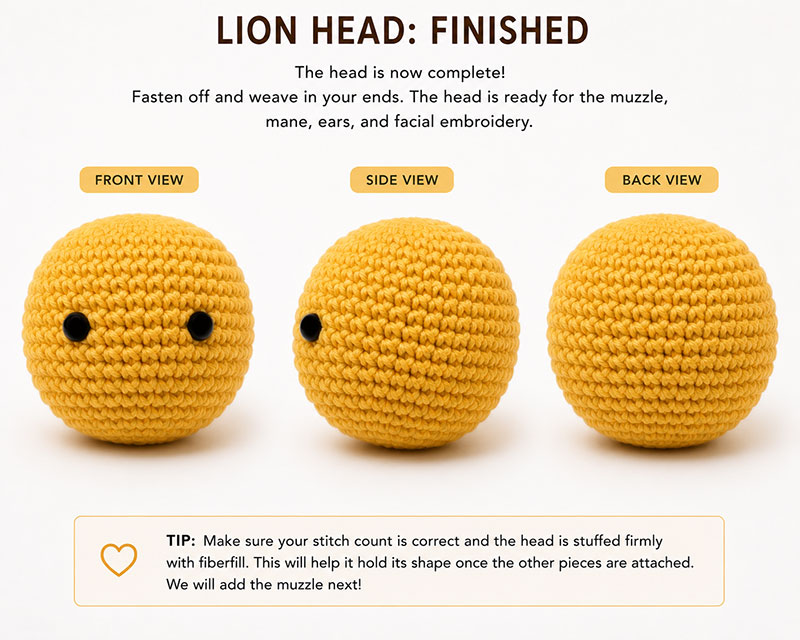
The finished lion head should be smooth, round and evenly stuffed before adding the facial features.
Lion Head Checklist
- The head is round and evenly stuffed.
- No stuffing is visible through the stitches.
- The closing hole is completely sealed.
- The stitch count remained correct through every round.
- The head sits upright without collapsing.
Common Beginner Mistakes
The head looks pointy: Too much stuffing or missed increases.
The head looks flat: One or more increase rounds may have been skipped.
The head has visible holes: Use a smaller hook or tighter tension.
The head leans to one side: Stuffing is uneven. Remove some stuffing and redistribute it before closing completely.
Crochet Lion Muzzle
The muzzle is a small but important part of this crochet lion lovey pattern because it controls the final expression of the lion face.
The muzzle gives the lion its expression. Take your time with this piece because even small placement changes can make the finished face look very different.
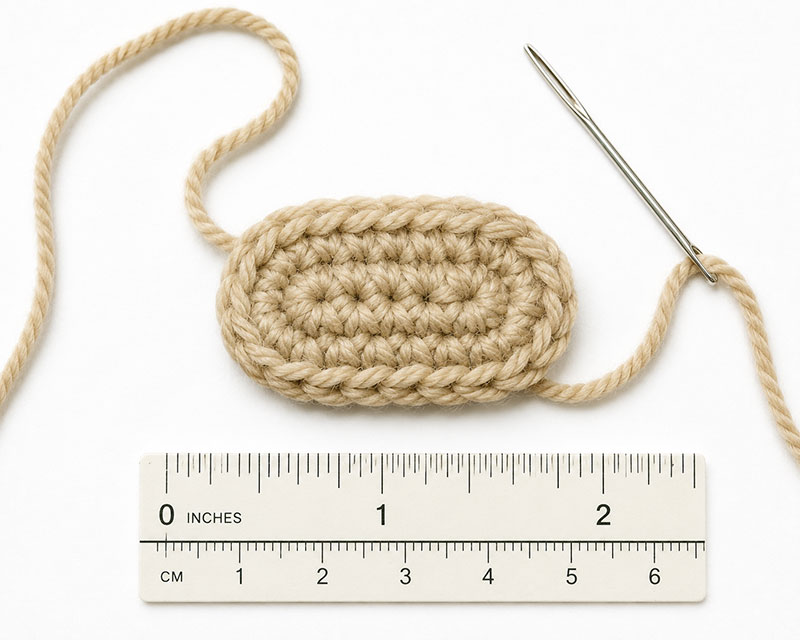
The muzzle is worked as a small oval that will later be sewn to the center of the lion face.
Round 1
Using tan yarn, ch 5.
Sc in the 2nd chain from hook.
Sc in next 2 chains.
Work 3 sc in the last chain.
Rotate your work and continue along the opposite side of the foundation chain.
Sc in next 2 loops.
Work 2 sc in the final loop.
Stitch Count: 10
Round 2
Work 2 sc in the first stitch.
Sc in the next 2 stitches.
Work 2 sc in each of the next 3 stitches around the curved end of the oval.
Sc in the next 2 stitches.
Work 2 sc in each of the final 2 stitches around the opposite curved end.
Stitch Count: 16
Round 3
Sc in every stitch around.
Stitch Count: 16
Fasten off leaving a 16-inch sewing tail.
Checkpoint: The muzzle should measure approximately 1½ inches wide and have a smooth oval shape.
Shape Check: The muzzle should look wider than it is tall. If it looks round instead of oval, recount the stitches before continuing.
Tip: After Round 3, the muzzle should form a shallow oval cup. It should not ruffle, twist or fold sharply.
Inner Ears (Make 2)
The inner ears in this crochet lion lovey pattern add contrast without using buttons, beads or unsafe decorations.
The inner ears add contrast and help the lion look more finished.
Tip: Small tan circles become the inner ear details.
Round 1
Using tan yarn, make a magic ring.
Work 6 sc into ring.
Stitch Count: 6
Round 2
Inc around.
Stitch Count: 12
Fasten off leaving a sewing tail.
Checkpoint: Each inner ear should measure about 1 inch across.
Outer Ears (Make 2)
The outer ears are slightly larger than the inner ears and are folded before attaching.
Tip: The outer ears are worked first as circles and folded during assembly.
Round 1
Using golden yellow yarn, make a magic ring.
Work 6 sc into ring.
Stitch Count: 6
Round 2
Inc around.
Stitch Count: 12
Round 3
(Sc, inc) around.
Stitch Count: 18
Fasten off leaving an 18-inch sewing tail.
Checkpoint: The outer ears should be noticeably larger than the inner ears.
Prepare the Ears
Center one tan inner ear on one yellow outer ear.
Sew the inner ear to the outer ear using small whip stitches.
Repeat for the second ear.
Fold each completed ear gently in half with the tan inner-ear side visible on the outside front of the fold.
Keep the folded edge at the bottom and the rounded edge at the top when holding the ear against the head.
Checkpoint: Hold the folded ear against the lion head. The ear should cover approximately the height of Rounds 4 through 8 on the finished head.
Do not sew the fold closed yet.
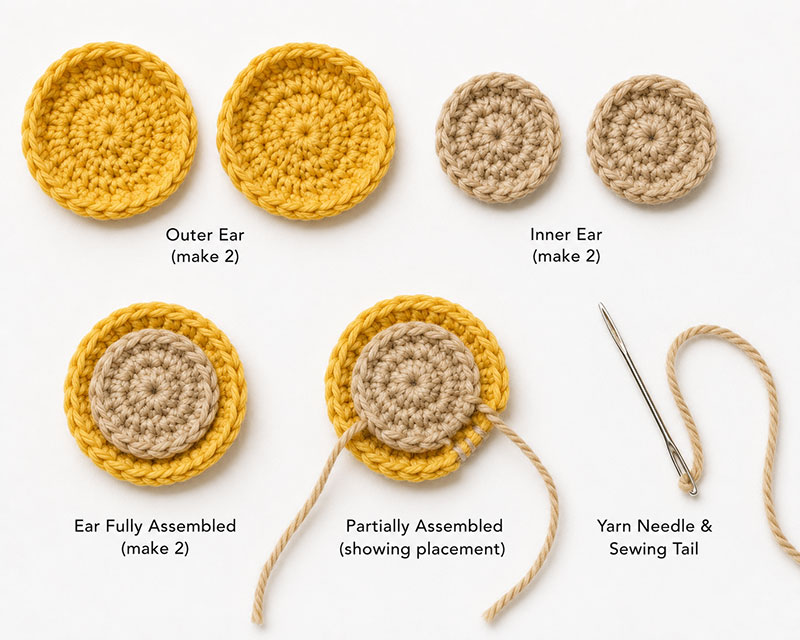
Attach the inner ears before folding the finished ears for assembly.
Scalloped Lion Mane
The scalloped mane is what makes this crochet lion lovey pattern read clearly as a lion rather than a plain animal lovey.
The mane frames the face and is sewn to the head before the ears are attached.
Tip: The mane is worked as a ring and later sewn around the lion face.
Foundation Ring
Using brown yarn, ch 36.
Join with a sl st to form a ring.
Be careful not to twist the chain.
Round 1
Ch 1.
Sc in every chain around.
Join with a sl st to the first sc.
Stitch Count: 36 sc for the standard mane.
Round 2
Work sc, hdc, dc, hdc, sc in the first stitch.
Sl st in the next stitch.
Repeat this two-stitch sequence around.
Finished Count: 18 scallops for the standard 36-stitch mane.
Fit Check: Place the mane around the front of the lion head. The inner ring should sit comfortably around the face opening without stretching. If the mane pulls tightly, remake it with 40 foundation chains, 40 sc in Round 1 and 20 scallops in Round 2. If it hangs loosely, remake it with 32 foundation chains, 32 sc in Round 1 and 16 scallops in Round 2.
Fasten off leaving a long sewing tail.
Checkpoint: The mane should fit comfortably around the lion face without stretching.

The finished mane should remain flexible and slightly ruffled.
Lion Tail
The tail is optional but helps reinforce the lion theme.
Tip: Attach the lion tail to one corner of the blanket during final assembly.
Tail
Using golden yellow yarn, ch 21.
Sc in the second chain from hook and in every chain across.
Stitch Count: 20
Fasten off leaving a sewing tail.
Keep the Baby Lovey Tail Plain
Do not add a loose yarn tuft, fringe or tassel to the tail. Leave the crocheted tail plain for this baby lovey pattern.
Tip: The lion lovey pieces are now completed and ready for final assembly.
Before Moving to Assembly
Place the finished head, muzzle, ears, mane and tail together on a table.
Compare the size of each piece before sewing anything in place.
Keep the sewing tails attached to the muzzle, ears and mane. These tails will be used during assembly and help reduce the number of yarn ends that must be woven in later.
Do not trim any sewing tails until all pieces have been attached and checked for placement.
Section 4 Checklist
- Muzzle stitch count is 16.
- Inner ears stitch count is 12 each.
- Outer ears stitch count is 18 each.
- Mane contains 18 scallops, or 16 to 20 scallops if the foundation ring was resized for fit.
- Tail contains 20 single crochet stitches.
- All pieces are finished and ready for assembly.
Final Assembly
Final assembly is where this crochet lion lovey pattern needs the most careful placement, especially when centering the head on the blanket.
This is the stage where the lion comes to life. Before sewing anything permanently, pin every piece in place and look at the face from several angles. Small adjustments can dramatically improve the finished expression.

Lay out all pieces before sewing to check placement and balance.
Step 1: Attach the Mane
Place the lion head face-up on a table.
Center the mane around the front of the head with the scallops facing outward.
Pin the mane at the top, bottom, left side and right side before sewing.
The inner edge of the mane should sit just outside the face area, leaving the center of the face open for the muzzle and eyes.
Sew the inner edge of the mane to the head using small whip stitches.
Catch the sc stitches from the inner edge of the mane and the surface stitches of the head. Do not sew through the loose scallop tips.
Work all the way around the inner ring of the mane.
Fasten securely and weave the tail into the back of the head.
Checkpoint: The mane should frame the face evenly without twisting, pulling or covering the center of the face.
Tip: Attach the mane first so the ears can sit neatly behind it.
Step 2: Attach the Muzzle
Place the muzzle on the lower center front of the lion head.
Place the muzzle so its top edge sits approximately 1 inch below the top center of the lion head.
The muzzle should sit slightly below the middle of the face, leaving enough room above it for the embroidered eyes.
Placement Check: Before sewing, position both eyes temporarily with straight pins. The muzzle should leave enough space for the eyes to sit comfortably above it without touching the muzzle.
Pin the top, bottom, left side and right side of the muzzle before sewing.
Step back and check that the muzzle is centered between the sides of the mane.
Sew around the outside edge of the muzzle using small whip stitches.
Catch the outer loops of the muzzle and the surface stitches of the head.
Before closing the final inch, add only a tiny pinch of fiberfill behind the muzzle.
Finish sewing the muzzle closed and weave the tail into the head.
Checkpoint: The muzzle should sit slightly below the center of the face and should not pull the head flat.
Tip: The muzzle should sit low enough to leave room for embroidered eyes above it.
Step 3: Embroider the Face
Use black cotton yarn or embroidery floss.
Embroider the nose near the upper center of the muzzle.
Make the nose as a small horizontal oval or soft triangle, about 3 stitches wide.
Bring the yarn down from the center of the nose and make one short vertical stitch.
Add a small curved mouth on each side of that vertical stitch.
Embroider the eyes above the muzzle, placing them about halfway between the top of the muzzle and the top edge of the face opening.
Leave about 5 to 6 visible stitches between the eyes. Check both eyes from the front before securing the yarn ends.
Keep the eyes simple and secure. A short horizontal stitch or small curved sleepy eye works well for a baby lovey.
Baby Safety Note: Do not use plastic safety eyes for a baby lovey. Embroidered eyes are the safer choice.

Simple embroidered eyes, nose and mouth keep the lion face soft and baby-safe.
Step 4: Attach the Ears
Place one folded ear on each side of the head.
The ears should sit slightly behind the mane, not directly on top of the face.
Position each ear so the folded base covers approximately Rounds 4-8 of the head.
Pin both ears before sewing.
Check from the front to make sure the ears are level and equally spaced from the center of the face.
Placement Check: The lower edge of each ear should sit slightly behind the mane, with the top of the ear extending just above the top of the mane.
Sew through both folded layers of the ear and into the head using whip stitches.
Make several stitches across the base of each ear so it does not wobble.
After sewing, tug each ear gently. If an ear moves easily, add more stitches across the base.
Checkpoint: The ears should look balanced and should sit partly tucked behind the mane.
Tip: Sew through both folded layers so the ears stay secure and upright.
Step 5: Attach the Head to the Blanket
Lay the granny-square blanket flat with the right side facing up.
Find the center of the blanket by folding it lightly in half one direction, then the other direction. Mark the center point with a stitch marker.
Place the closed decrease end of the finished lion head against the center point of the blanket.
Angle the embroidered face toward one corner of the blanket, not toward one flat side. This keeps the face visible when the lovey is held.
Placement Check: Before sewing, pick up the blanket carefully by two nearby corners. The lion face should still point outward and not twist sideways.
Pin the head to the blanket at the front, back, left side and right side.
Use golden yellow yarn and a yarn needle.
Begin sewing at the back of the head so the join is less visible from the front.
Sew around the base of the head using firm whip stitches.
Catch the lower stitches of the head and the solid dc stitches of the granny square underneath.
Do not sew only through chain spaces, because that can make the head wobble.
After the first full round of sewing, make a second full round around the base of the head for reinforcement.
Strength Check: Before weaving in the yarn tail, hold the lovey gently by the head and allow the blanket to hang. If the head shifts, tips or pulls away from the blanket, add another round of reinforcement stitches.
Weave the yarn tail through the blanket in several directions before trimming.
Checkpoint: Hold the blanket gently by the lion head. The head should stay firmly attached without tipping forward or leaning to one side.

Use two full rounds of sewing around the head base so the lovey can handle normal washing and use.
Step 6: Attach the Tail
Choose one corner of the blanket for the tail.
For the neatest look, attach the tail to the corner behind the lion head.
Thread the tail's sewing end onto a yarn needle.
Sew the base of the tail securely to the corner ch-2 space and nearby border stitches.
Make several stitches through the base of the tail and through at least 2 nearby border stitches so it cannot twist loose.
Tail Safety Check: Tug the tail gently from several directions before weaving in the yarn end.
Weave the yarn tail through the blanket in at least three directions before trimming.
Checkpoint: Tug the tail gently. It should not pull away from the blanket.
Tip: Sew the tail through the corner and nearby border stitches so it stays secure.
Final Safety Check
Use this final safety check before gifting the crochet lion lovey pattern to a baby or young child.
- The head is sewn to the blanket with two full rounds of stitching.
- The mane is sewn around the inner ring, not just through the scallops.
- The ears are sewn through both folded layers.
- The muzzle is fully sewn down with no gaps around the edge.
- The eyes are embroidered, not attached as small plastic parts.
- No yarn tails are loose.
- No stuffing shows through the head or muzzle.
- All straight pins, stitch markers and temporary assembly markers have been removed.
- The plain tail is firmly attached or omitted.
- The lovey will be used only during supervised awake time and kept out of the baby's sleep space.

The finished crochet lion lovey should be soft, secure and balanced, with all pieces firmly sewn in place.
Finishing and Care
After completing the crochet lion lovey pattern, check every seam and yarn tail before washing or photographing the finished project.
Weave in any remaining yarn tails. For baby items, weave each tail through the stitches in several directions before trimming so the ends do not work loose during washing.
Lightly shape the blanket with your hands. If additional blocking is needed, follow the yarn manufacturer's care directions. Do not apply steam or direct heat unless the yarn label confirms that it is suitable for that fiber.
Let the lovey dry completely before gifting, storing or photographing it.
Hand wash or machine wash gently according to the yarn label. Place the lovey in a mesh laundry bag if machine washing. Lay flat to dry.
Final Troubleshooting
If your crochet lion lovey pattern looks uneven after assembly, most issues can be fixed by repinning the head, muzzle or ears before trimming the yarn tails.
The face looks crooked: Remove only the stitches holding the muzzle, re-pin the top, bottom, left side and right side of the muzzle, then check the face from the front before sewing again.
The mane covers too much of the face: Reposition the inner ring slightly farther back from the center of the face and sew again.
The head wobbles: Add another full round of stitches around the base of the head, making sure to catch solid blanket stitches instead of only chain spaces.
The ears flop too much: Add several extra stitches through the folded base of each ear.
The lovey does not lie flat after assembly: Smooth the blanket by hand and check that the head is sewn to the true center rather than pulling one side of the square upward.
This crochet lion lovey pattern is finished when the blanket lies flat, the head is firmly attached, and every small piece has been tug-tested.
The same lion theme can be carried into a larger handmade nursery project with my lion baby quilt pattern, which includes a crib-size layout and appliqué pieces for a coordinated safari quilt.
For smaller animal accents that can be added to blankets, nursery banners, wall hoops, or handmade safari gift sets, see my crochet animal applique patterns.
If you want this animal as a separate motif instead of a security blanket, the crochet lion applique pattern makes a lightly padded lion with a scalloped mane that can be sewn onto another project.
A finished lion lovey can also inspire the larger room theme. These lion wall mural ideas show ways to carry the same lion and safari look onto the nursery walls without changing the crochet pattern itself.
When you click on links to various merchants on this site and make a purchase, this may result in this site earning a commission. This does not affect the price you pay.

UBGI Gold Standard 2026
Reviewed under the site's
editorial checklist.
Photos, decorating ideas, party setups and reader submissions are shared for inspiration unless a page is specifically presented as a pattern, tutorial, reference guide or step-by-step project. Follow the instructions, measurements, safety guidance and manufacturer directions provided for the particular project or product.
About Jan | Contact | Baby Nursery Ideas (Blog) | Site Map | Privacy Policy | Disclosure Policy | Disclaimer | Affiliate Disclosure | Earnings Disclosure | Facebook | Pinterest
I am a participant in the Amazon Services LLC Associates Program, an affiliate advertising program designed to provide a means for us to earn fees by linking to Amazon. As an Amazon Associate I earn from qualifying purchases.
Copyright © 2006-2026. All Rights Reserved.