Free Crochet Lion Applique Pattern for Baby Blankets and Nursery Items
By Jan Bay
This free crochet lion applique pattern makes a small, lightly padded lion with a scalloped mane, rounded head, simple body, little ears, a cream muzzle and an embroidered face. Sew the finished lion onto a baby blanket, nursery banner, wall hanging, handmade toy, clothing or another crochet project that needs a friendly safari animal accent.
More free crochet patterns:
Crochet Animal Applique Patterns Crochet Animal Lovey Patterns Crochet Safari Animal Mobile Pattern Free Baby Crochet Patterns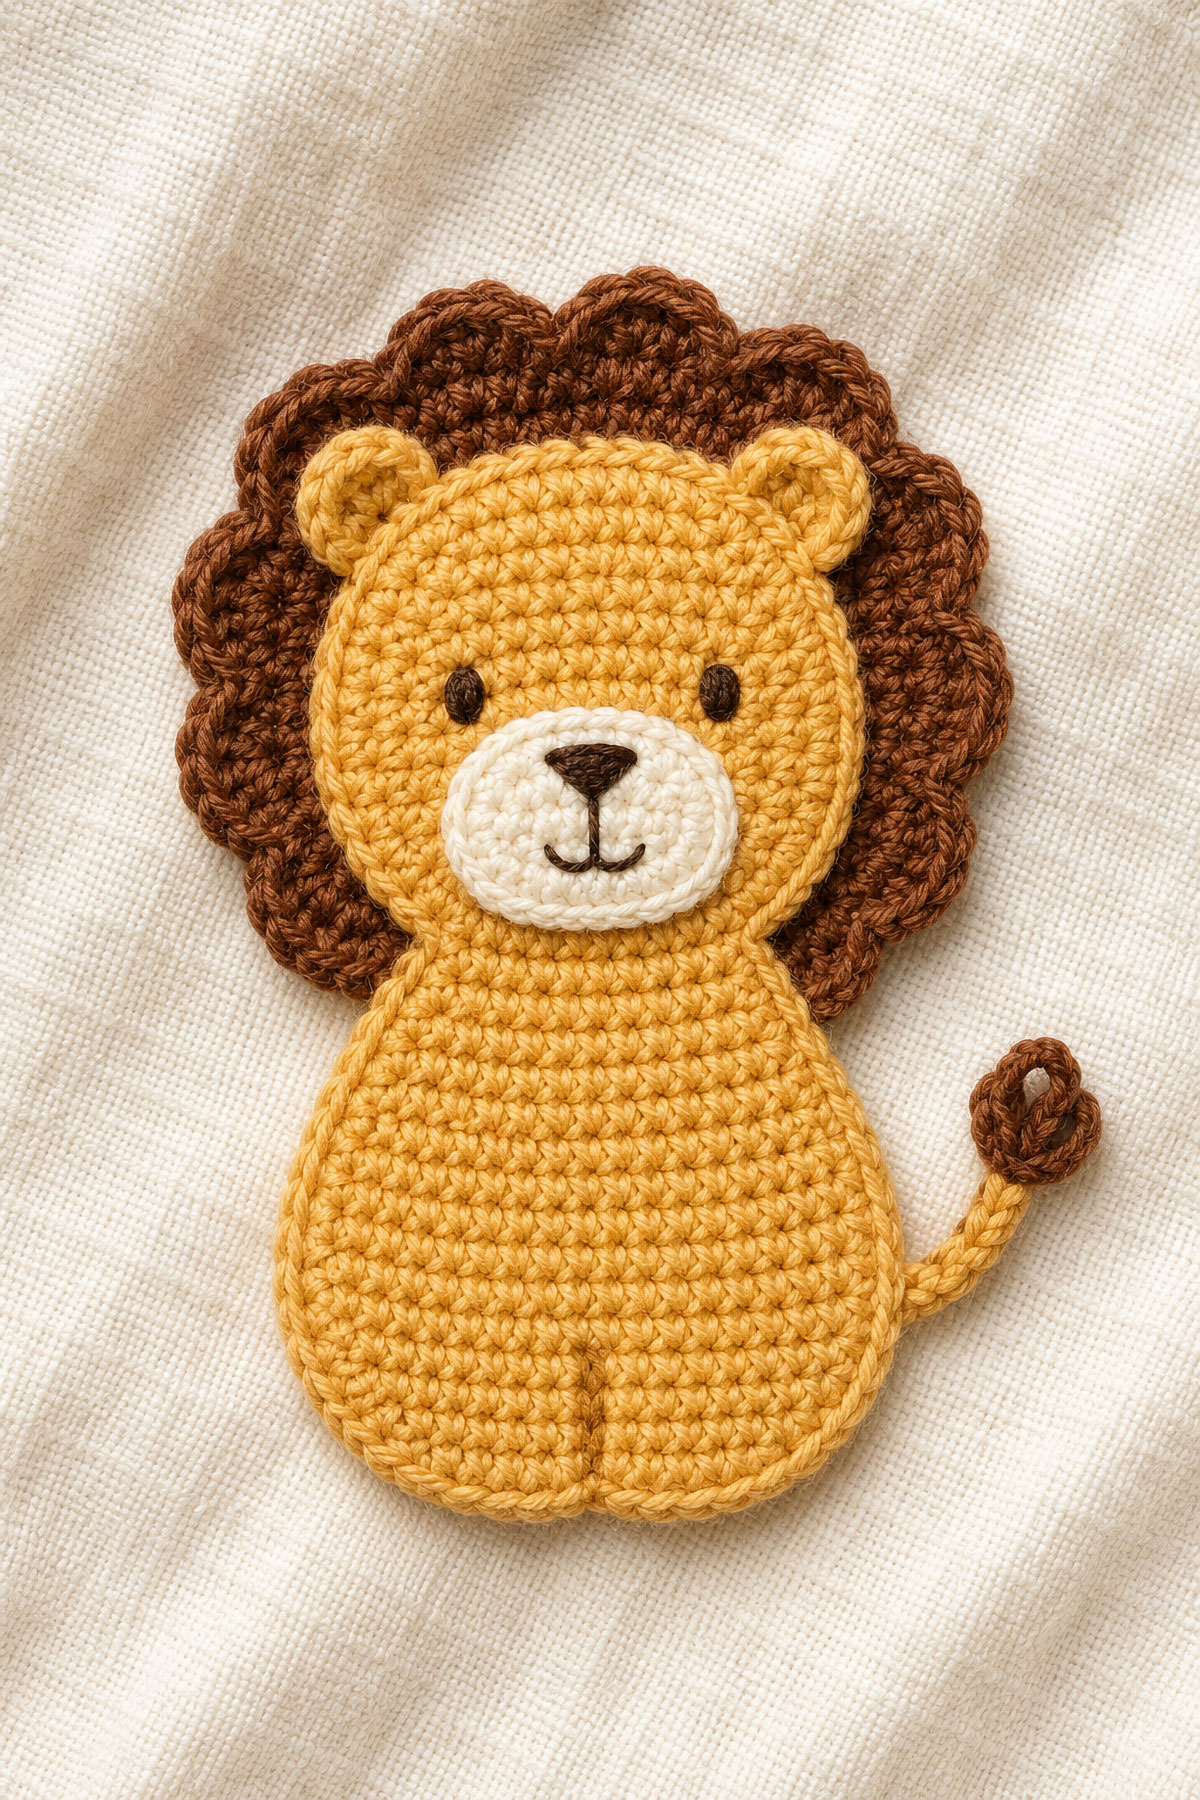
Crochet supplies for this project:
The finished crochet lion is lightly padded for a little shape while staying flat enough to sew securely onto blankets and other handmade projects.
Quick answer: This crochet lion applique finishes at about 5 1/2 inches tall and about 4 inches wide across the mane when made with worsted weight cotton yarn and a 4.0 mm hook. It has a lightly stuffed body, two matching mane pieces and embroidered facial features.
This pattern makes a decorative applique, not a stuffed lion toy. The small amount of fiberfill gives it a little shape while keeping it flat enough to sew securely onto another project.
Jump to the lion pattern:
Finished Size Materials Body Panels Mane Ears, Muzzle and Tail Assembly Embroidered Face Finishing
Before You Start the Crochet Lion Applique
Abbreviations
- magic ring: adjustable starting loop worked in the round
- ch: chain
- sc: single crochet
- sl st: slip stitch
- inc: 2 sc in the same stitch
- dec: single crochet 2 stitches together
- st: stitch
- sts: stitches
- FO: fasten off
Terminology and orientation: This pattern uses standard US crochet terms. The body panels and ears are worked back and forth in rows. Either surface may be used as the right side. Choose the smoother looking surface and keep that choice consistent. Before adding the muzzle and embroidered face, designate one body panel as the front and the other as the back.
Stitch count: A turning ch 1 does not count as a stitch. For the mane and muzzle, the beginning ch 1 also does not count as a stitch. Join each round to the first sc unless the instructions say otherwise.
Gauge and Size
Exact gauge is not critical, but consistent tension is important. Worsted weight cotton yarn and a 4.0 mm hook should produce a firm crochet fabric that does not allow the stuffing to show between the stitches.
Make the first body panel and lay it flat without stretching. It should measure about 4 3/4 inches tall before the mane is added. If you want the finished lion to remain close to the listed 5 1/2 inch height and your first panel differs by more than about 1/4 inch, adjust your hook size and remake the first panel. Then make the second panel with the same hook, yarn and tension so the two panels match.
Make the second body panel with the same yarn, hook and tension. Before assembly, stack the two body panels, the two mane pieces and the matching ears to make sure repeated pieces are the same size.
Skill level: Advanced beginner to intermediate. The stitches are basic, but the lion requires increases, decreases, joined rounds, matching repeated pieces, embroidery, light stuffing and careful assembly.
Baby use safety: Use embroidered eyes, nose and mouth only. Do not use plastic safety eyes, buttons, beads or other hard or loose attachments. Sew the mane, ears, muzzle, tail and finished applique securely and inspect them before use. Keep blankets, appliqued soft items and other loose items out of an infant's crib, bassinet or other sleep space.
Crochet Lion Applique Pattern Size and Details
- Finished height: about 5 1/2 inches
- Finished width across the mane: about 4 inches
- Flat body panel before adding the mane: about 4 3/4 inches tall
- Construction: lightly padded flat crochet applique
- Main body: two identical panels
- Stuffing: light only
- Face: embroidered features only
The finished lion should stay fairly flat even after stuffing. The small amount of fiberfill gives the head and body a little shape without turning the applique into a stuffed toy.
Materials for One Crochet Lion Applique
- Worsted weight cotton yarn in golden tan for the body, ears and tail
- Worsted weight cotton yarn in caramel or rust for the mane and tail tuft
- Small amount of cream yarn for the muzzle
- Small amount of dark brown embroidery thread or yarn for the eyes, nose and mouth
- 4.0 mm crochet hook
- Yarn needle
- Stitch marker
- Small amount of fiberfill
- Scissors
You do not need much yarn for one lion. This is a useful pattern for small amounts of worsted weight cotton left from baby blankets and other crochet projects, provided the yarn weights are similar enough to keep the pieces in proportion.
Crochet the Lion Body Panels, Make 2
Use golden tan yarn. Ch 9.
Row 1: Sc in 2nd ch from hook and in each ch across. Ch 1, turn. (8 sts)
Row 2: Inc in first st, sc in next 6 sts, inc in last st. Ch 1, turn. (10 sts)
Row 3: Sc in each st across. Ch 1, turn. (10 sts)
Row 4: Inc in first st, sc in next 8 sts, inc in last st. Ch 1, turn. (12 sts)
Row 5: Sc in each st across. Ch 1, turn. (12 sts)
Row 6: Inc in first st, sc in next 10 sts, inc in last st. Ch 1, turn. (14 sts)
Rows 7 through 10: Sc in each st across. Ch 1, turn. (14 sts)
Row 11: Dec, sc in next 10 sts, dec. Ch 1, turn. (12 sts)
Row 12: Dec, sc in next 8 sts, dec. Ch 1, turn. (10 sts)
Row 13: Sc in each st across. Ch 1, turn. (10 sts)
Row 14: Inc in first st, sc in next 8 sts, inc in last st. Ch 1, turn. (12 sts)
Row 15: Inc in first st, sc in next 10 sts, inc in last st. Ch 1, turn. (14 sts)
Row 16: Inc in first st, sc in next 12 sts, inc in last st. Ch 1, turn. (16 sts)
Row 17: Inc in first st, sc in next 14 sts, inc in last st. Ch 1, turn. (18 sts)
Rows 18 through 24: Sc in each st across. Ch 1, turn. (18 sts)
Row 25: Dec, sc in next 14 sts, dec. Ch 1, turn. (16 sts)
Row 26: Dec, sc in next 12 sts, dec. Ch 1, turn. (14 sts)
Row 27: Dec, sc in next 10 sts, dec. (12 sts)
FO on both panels. Weave in the short starting tail. Leave a long yarn tail on one panel if you want to use it during assembly.
Rows 1 through 12 form the body. Row 13 forms the narrow neck. Rows 14 through 27 form the head.
Size checkpoint: Lay each completed panel flat without stretching it. Each body panel should measure about 4 3/4 inches tall. Stack the two panels and check that the outside edges, neck and head shape match before continuing.
If one panel is noticeably different from the other, correct the tension or remake the mismatched panel now. Matching body panels will make the lion much easier to join neatly later.
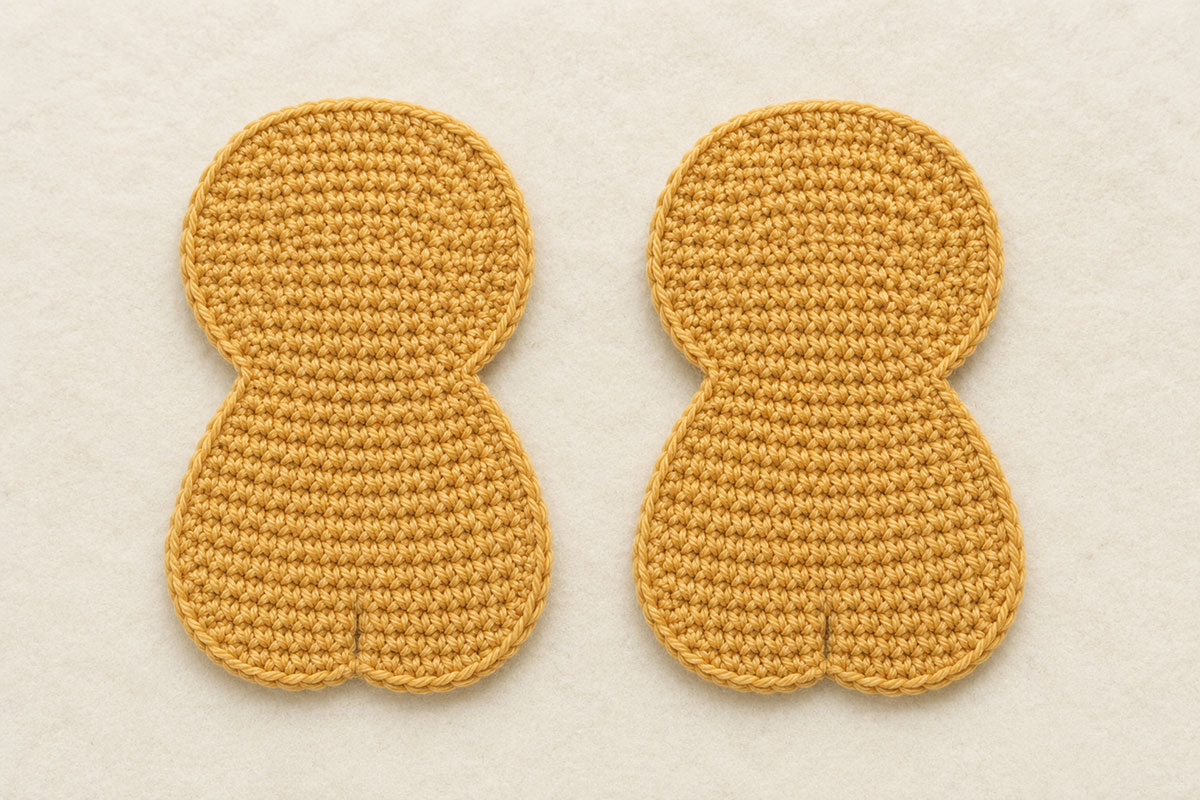
The two lion body panels should match closely before the mane, ears and other details are added.
Crochet the Lion Mane, Make 2
Use caramel or rust yarn. The mane sits behind the head on both the front and back of the lion. Make the first mane and compare it directly with one completed head panel before making the second mane.
Round 1: Make a magic ring. Work 6 sc into ring. Join with sl st to first sc. (6 sts)
Round 2: Ch 1. Inc in each st around. Join. (12 sts)
Round 3: Ch 1. *Sc in next st, inc in next st.* Repeat around. Join. (18 sts)
Round 4: Ch 1. *Sc in next 2 sts, inc in next st.* Repeat around. Join. (24 sts)
Round 5: Ch 1. *Sc in next 3 sts, inc in next st.* Repeat around. Join. (30 sts)
Round 6: Ch 1. *Sc in next 4 sts, inc in next st.* Repeat around. Join. (36 sts)
Round 7: Ch 1. *Sc in next 5 sts, inc in next st.* Repeat around. Join. (42 sts)
Round 8: Ch 1. *Sc in next 6 sts, inc in next st.* Repeat around. Join. (48 sts)
Mane fit checkpoint: Lay the completed head panel in the center of the mane. Before adding the scalloped round, the mane should extend at least 1/4 inch beyond the widest part of the head on both sides.
I would rather add one more increase round than force a mane that barely shows around the head. The mane is the detail that makes this simple shape read as a lion from across the room.
Center the head panel over the mane before adding the scalloped edge. The mane should extend at least 1/4 inch beyond the widest part of the head on both sides.
If the mane is still too small, continue with the following increase rounds.
Round 9, if needed: Ch 1. *Sc in next 7 sts, inc in next st.* Repeat around. Join. (54 sts)
Round 10, if needed: Ch 1. *Sc in next 8 sts, inc in next st.* Repeat around. Join. (60 sts)
If another increase round is needed because of your gauge, continue the same sequence by adding one more sc between each increase. Every increase round adds 6 stitches. Stop when the mane passes the fit checkpoint.
Even Round: Ch 1. Sc in each st around. Join with sl st. Keep the final stitch count from your last increase round.
Scallop Round: Ch 1. *Work (sc, ch 2, sc) in next st, sl st in next st.* Repeat around. Join with sl st and FO, leaving a long sewing tail for attaching the mane to the head panel. The final stitch count will produce half as many scallops.
Make the second mane with exactly the same number of increase rounds, the same final stitch count and the same scallop round as the first mane.
Before setting the mane pieces aside, stack them together and check that the outer scallops and overall diameter match. The two mane pieces will be attached separately to the front and back head panels during assembly.
Crochet the Lion Ears, Muzzle and Tail
Lion Ears, Make 4
Use golden tan yarn.
Row 1: Ch 4. Sc in 2nd ch from hook and in next 2 ch. Ch 1, turn. (3 sts)
Row 2: Inc in first st, sc in next st, inc in last st. Ch 1, turn. (5 sts)
Row 3: Sc in each st across. Ch 1, turn. (5 sts)
Row 4: Dec, sc in next st, dec. (3 sts)
FO, leaving a long sewing tail.
Fold the two bottom corners of each ear slightly toward each other and secure them with one small stitch before sewing the ear to the head. This gives the ear a little shape without adding stuffing.
Make all four ears the same way. Two ears will be attached to the front head panel and two will be attached in matching positions on the back panel.
Lion Muzzle, Make 1
Use cream yarn.
Round 1: Ch 5. Sc in 2nd ch from hook, sc in next 2 ch, 3 sc in last ch. Working along the opposite side of the foundation chain, sc in next 2 ch, 2 sc in last ch. Join with sl st. (10 sts)
Round 2: Ch 1. Inc in first st, sc in next 2 sts, inc in each of the next 3 sts, sc in next 2 sts, inc in each of the final 2 sts. Join with sl st to first sc. FO, leaving a long sewing tail. (16 sts)
The finished muzzle should look like a small oval rather than a large snout. It needs to leave plenty of golden tan head visible around it. If the muzzle covers too much of the face, the finished lion can begin to look more like a bear.
I keep the muzzle a little smaller than I first think it needs to be. Once it gets too wide, the face starts reading as a bear instead of a lion.
Do not stuff the muzzle. It will be sewn flat to the front head panel during assembly.
Lion Tail, Make 1
Use golden tan yarn.
Ch 10. Sl st in the 2nd ch from hook and in each remaining ch across. FO, leaving a sewing tail.
Tail tuft: Use caramel or rust yarn. Attach yarn to the free end of the tail, ch 3 and sl st back into the same end stitch. Repeat once more to form a second loop. FO.
Thread each yarn end onto the yarn needle and weave it back through at least four tail stitches before trimming. Do not leave loose cut strands at the end of the tail.
Set the tail aside until the body panels are joined. It will be secured between the two panels so the attachment point is enclosed inside the finished applique.
Assemble the Crochet Lion Applique
Before joining the two body panels, attach the mane pieces, ears and muzzle. Work with the front and back panels separately so each piece can be positioned accurately and sewn flat.
Attach the Lion Mane
Fold one mane in half to locate the top center and mark it with a stitch marker. Fold the front head panel in half and mark its center the same way. Align the two center marks before sewing.
Position Row 27 about 1/2 inch below the top scallop of the mane. At least one full round of mane color should show around the head before the scalloped edge begins.
Tack the mane to the head with four small stitches first, placing one stitch at the top, bottom and each side. Check that the mane is centered before continuing.
Sew between those four points, alternating from one side to the other as you work. This helps keep the head centered instead of pulling the mane toward one side.
Repeat with the second mane and the back head panel. Position it at the same height as the first mane so the two pieces line up when the body panels are stacked.
Attach the Lion Ears
Sew the two front ears between Rows 24 and 25. Position each ear about 2 stitches in from the outer edge of the head.
Attach the remaining two ears to the back head panel in matching positions.
Before securing the final stitches, stack the front and back panels and check that the ears sit at approximately the same height and angle.
Attach the Lion Muzzle
Place the cream muzzle on the front head panel so it spans approximately Rows 18 through 21.
Center it across the middle 8 to 10 stitches of the face, leaving an even amount of golden tan head showing on both sides.
Sew the muzzle completely around its outer edge using small whip stitches and the long cream yarn tail.
Keep the muzzle flat. Do not add stuffing beneath it.
After the muzzle is secure, weave the remaining cream yarn tail through several stitches on the wrong side of the front panel before trimming.
Assembly checkpoint: Lay the front and back panels side by side. The mane pieces should be centered at the same height, the ears should match, and the muzzle should sit evenly in the lower half of the front face. Make any small positioning corrections now, before the panels are joined.
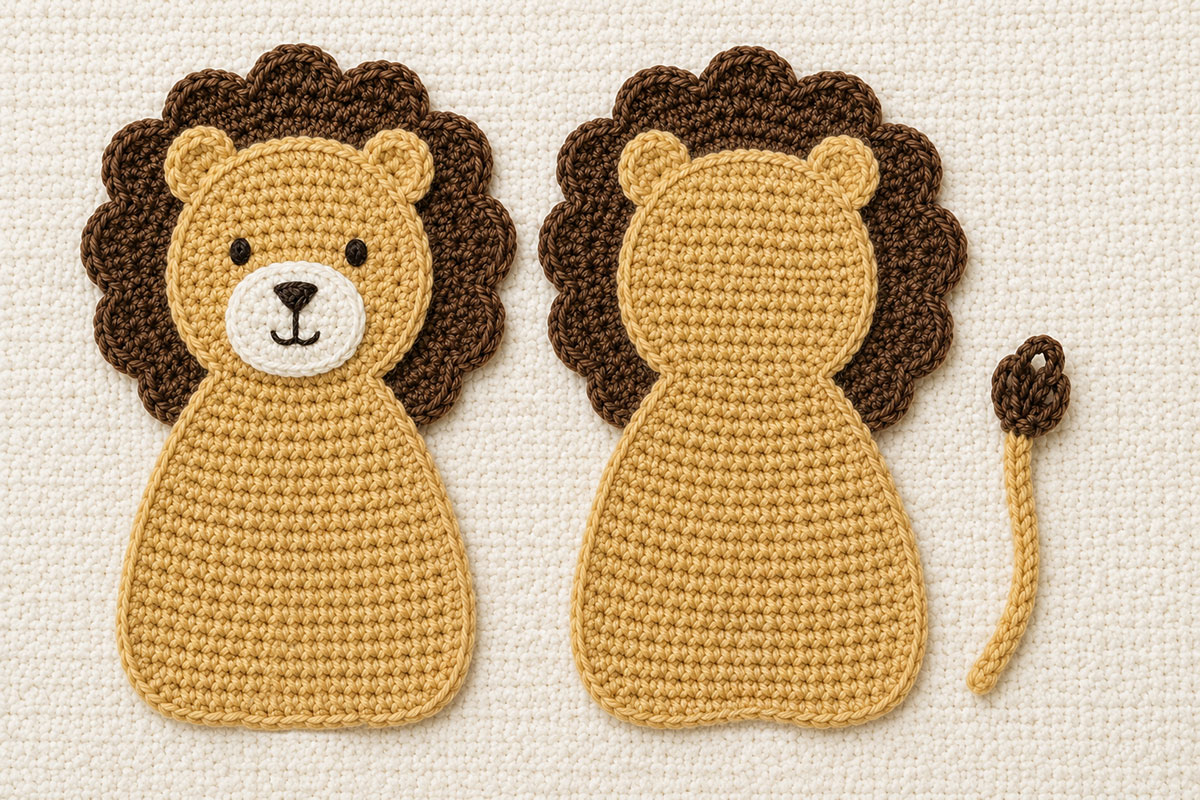
Before joining, compare the front and back panels and check that the manes and ears line up. The tail is added between the panels during joining.
Embroider the Lion Face
Use dark brown yarn or embroidery thread for all facial details. Keep the stitches small and flat against the crochet fabric.
Stitch two small eyes on Row 23, about 5 stitches apart and centered directly above the muzzle.
Stitch a small triangle nose near the top center of the cream muzzle.
Add one short vertical line below the nose, then stitch a tiny curved mouth beneath it.
Keep the expression simple. The lion should remain easy to recognize when it is sewn onto a baby blanket, banner, wall hanging or other nursery item.
Baby use safety: Use embroidered facial features only. Do not substitute plastic safety eyes, buttons, beads or other hard attachments.
Join and Lightly Stuff the Crochet Lion
Place the front and back body panels together with wrong sides facing. The mane pieces should already be sewn to the outside of each head panel. Match the bottom, neck and head edges carefully before joining.
Before joining the panels, use golden tan yarn to stitch one short vertical leg divider on the front body panel. Start at the center of the lowest body edge and surface stitch straight upward through about the first 4 rows. Keep the lower body edge continuous and rounded. Do not split, notch or pull the bottom edge inward. Repeat the divider on the back panel if desired.
Before continuing, separate the panels long enough to secure and weave in any remaining yarn or embroidery tails on their wrong sides, including the tails from the mane, ears, face and leg divider. Trim them only after they are secure, then place the panels together again with wrong sides facing. These ends will be enclosed inside the finished lion.
With the front panel facing up, insert the tail between the two body panels on the viewer's right side between Rows 3 and 4, about one stitch in from the outer edge. Catch the tail securely as you crochet around the body edge.
Join golden tan yarn on the lower left side of the body, about 2 rows above the bottom edge.
Working through both body panels only, sc evenly around the joined body and head. Do not work through the outer mane scallops.
Work 1 sc in each row-end space along the sides and 1 sc in each stitch across the top and bottom edges. At each of the two bottom body corners, the two top head corners and the two neck turns where Row 13 meets Row 14, work 2 sc in that corner or turn space total instead of 1 sc. Do not add another sc in the same corner space.
Leave the final 2 inches open along one lower side of the body. Keep this opening away from the mane.
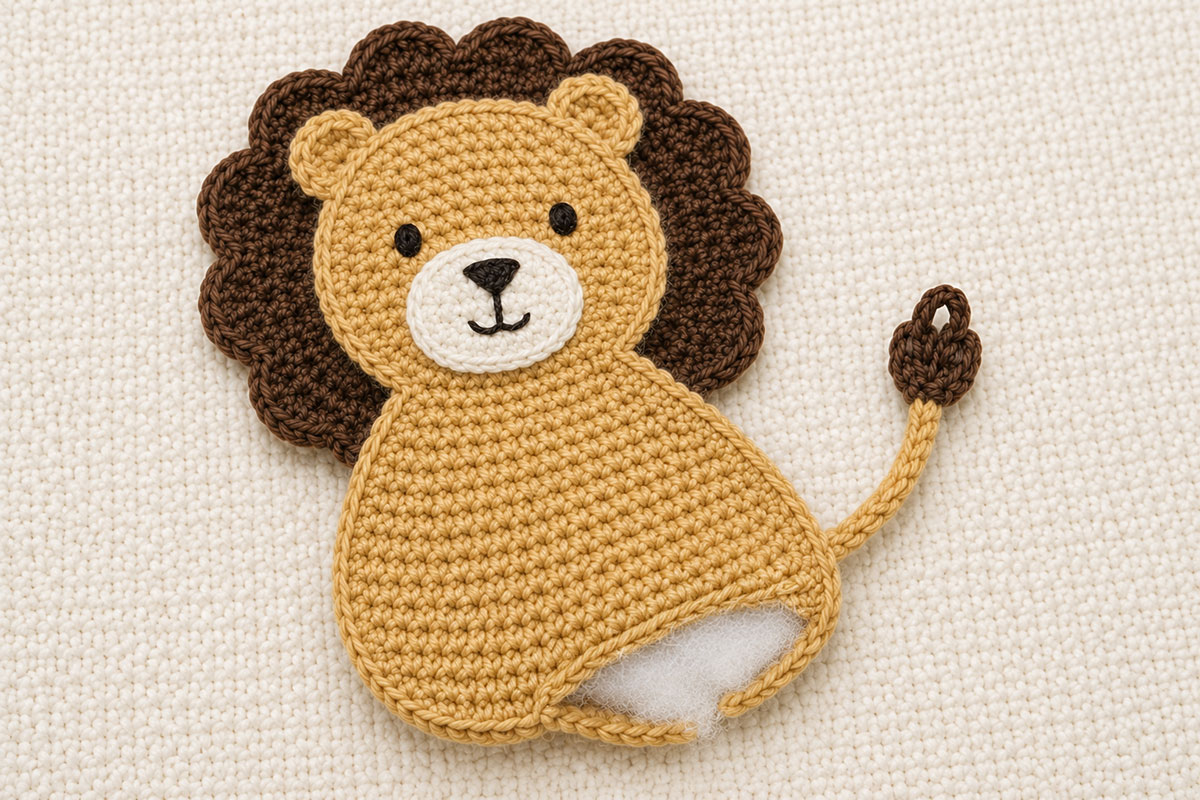
Leave about 2 inches open along one lower side and add only a thin layer of fiberfill. The lion should have a little lift while remaining flat enough to use as an applique.
Add a thin layer of fiberfill, about 1 tablespoon total for the body and head. Spread it lightly through both areas rather than packing it into one spot. The lion should have a little lift, but it should not puff into a toy shape.
I use just enough fiberfill to lift the stitches off the background. If the body starts rounding outward, I take some back out.
Finish closing the opening with sc. Join with sl st and FO.
Weave the final joining yarn tail securely through several stitches of the outer joining round in two directions before trimming.
Shape and Finish the Lion Applique
Lay the finished lion flat and gently shape the mane, ears and body with your fingers.
If the edges curl, lightly block the applique until it dries flat.
Before attaching the lion to the finished project, gently tug on the ears, tail, mane and muzzle. Reinforce any loose piece with additional stitching.
If you are sewing the lion onto a blanket, clothing, toy, banner or other nursery item, stitch securely around the body and any raised edges that could catch during use.
The finished lion should measure close to 5 1/2 inches tall from the top of the mane to the bottom of the body. A small variation is normal depending on yarn weight, hook size and individual crochet tension.
Final safety check: Inspect all edges, ears, tail, mane and muzzle before use. Keep blankets, appliqued soft items and other loose items out of an infant's crib, bassinet or other sleep space.
How to Attach the Crochet Lion Applique
Finish shaping or lightly blocking the lion before sewing it to another project. Lay the applique in position and secure it temporarily with locking stitch markers or rustproof pins. Check that the body is straight, the mane is centered and the ears and tail sit where you want them.
Thread a yarn needle with yarn that matches the golden tan outer joining round.
Beginning along the lower body, whipstitch through the back loop of the lion's outer joining round and through the project beneath it. Do not pass the needle through the front body panel. Space the attachment stitches about 1/4 inch apart and work completely around the main body and head.
Use matching yarn to secure the outer joining edge to the project beneath it. Keep the attachment stitches firm enough to hold the lion flat without pulling or puckering the blanket.
Add separate hidden tacking stitches beneath the mane, ears and tail anywhere they lift away from the project.
If the lion is attached to a wall hanging or nursery banner that will remain out of a baby's reach, some of the outer mane scallops may remain free to give the applique more dimension.
If the lion is attached to a baby blanket, clothing, soft toy or another item a baby may handle, securely tack down the projecting ears, mane scallops, tail and tail tuft loops with closely spaced hidden stitches.
After the lion is attached, check the front for puckering. If the fabric pulls around the applique, loosen any attachment stitches that are too tight.
Weave the final yarn tail through several stitches on the back of the project in two directions before trimming it.
Gently tug on the body, mane, ears, muzzle and tail one final time. Nothing should shift or lift away from the project.
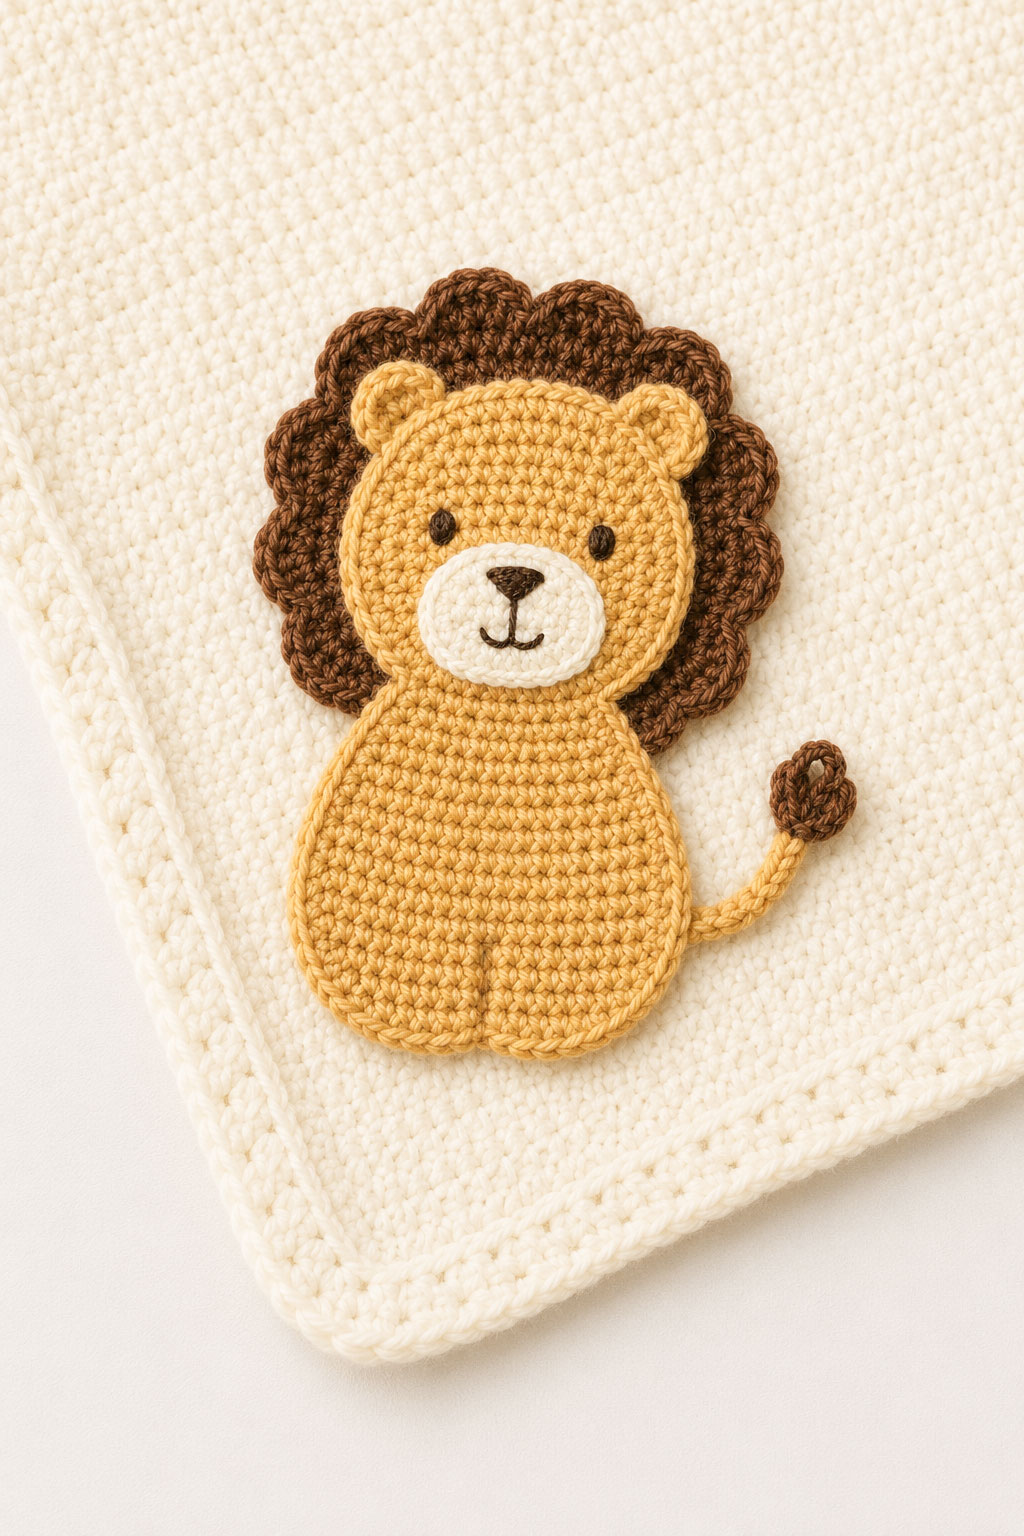
The lion can be used by itself or combined with other safari animal appliques on a handmade blanket or nursery project.
For baby items: Check the applique regularly for loose stitching, especially around the mane, ears, muzzle and tail. Keep blankets, soft toys and other loose items out of an infant's crib, bassinet or other sleep space.
Ways to Use a Crochet Lion Applique
This lion is small enough to use as a single accent or combine with other safari animals from the Crochet Animal Applique Patterns collection.
Baby Blankets
Sew one lion near a blanket corner for a simple focal point, or repeat the motif across a larger blanket. It can also be paired with an elephant, giraffe or monkey to create a full safari theme.
For a blanket that may be handled by a baby, tack down the mane scallops, ears and tail securely so no raised edge can easily catch on little fingers.
Baby Clothes and Accessories
The lion can be used on handmade sweaters, cardigans, hats, bibs, diaper covers or fabric accessories if the size works with the item.
Because this version is lightly padded, it works best on pieces that can support a little extra thickness. Use very light stuffing or omit most of the stuffing if you want a flatter applique for clothing.
Handmade Toys
A lion applique can decorate the outside of a handmade cloth or crochet toy, activity cube or soft nursery item.
Keep all facial features embroidered and sew every edge securely. Do not add plastic eyes, buttons, beads or other loose decorative pieces.
Nursery Banners and Garlands
Use one lion as the center of a safari banner, or alternate lions with other animal motifs. The scalloped mane gives the design enough detail to stand out even when viewed from across the room.
For decorative pieces that remain safely out of a baby's reach, a few outer mane scallops may remain free for added texture.
Nursery Wall Hangings
Sew the lion onto a crocheted or fabric background and frame or hang the finished piece as nursery wall decor. A single lion works well for a simple animal theme, while several coordinated safari animals can create a larger wall display.
Pillows and Other Nursery Items
The lion can also be added to decorative pillows, storage bags, tote bags and other handmade nursery items.
Keep decorative pillows and other soft items out of an infant's crib, bassinet or sleep space.
Make a Coordinating Safari Crochet Set
If you want more than one animal, use this lion with the other patterns on the Crochet Animal Applique Patterns page. The animals were designed at a similar scale so they can be mixed on blankets, banners and nursery projects.
You can also use the same safari theme for a larger hanging project with the Crochet Safari Animal Mobile Pattern.
Crochet Lion Applique Questions and Answers
How big is the finished crochet lion applique?
With worsted weight cotton yarn and a 4.0 mm hook, the finished lion should measure about 5 1/2 inches tall from the bottom of the body to the top of the mane. The mane should measure about 4 inches across. Your finished size may vary slightly with yarn, hook size and tension.
Can I make the lion applique completely flat?
Yes. The pattern uses only about 1 tablespoon of fiberfill to give the body and head a little lift. If you need a flatter lion for clothing or another lightweight project, use less stuffing or leave it out. Keep the front and back panels aligned carefully as you join them.
What if my crochet lion mane is too small?
After Round 8, place the completed head panel in the center of the mane. The mane should extend at least 1/4 inch beyond the widest part of the head on both sides before you add the final even round and scallops.
If it does not, work Round 9. If necessary, work Round 10. You can continue the same increase sequence by adding one more sc between increases until the mane reaches the correct size.
Once the first mane fits, make the second mane with exactly the same number of rounds and stitches.
Can I use different colors for the lion?
Yes. Golden tan, caramel and cream give the lion a traditional safari look, but the construction does not depend on those exact colors. You can change the body or mane colors to coordinate with a blanket, nursery theme or handmade gift.
For the clearest lion shape, choose a mane color that contrasts enough with the body for the scalloped edge to remain visible.
Can I use this lion with the other safari animal appliques?
Yes. This lion was designed as part of the Crochet Animal Applique Patterns collection, so it can be paired with the elephant, giraffe and monkey on blankets, banners and other safari nursery projects.
Can I put the crochet lion applique on baby clothes?
Yes, if the finished size and thickness suit the garment. For clothing, use very little stuffing or leave it out so the applique stays flatter. Sew the complete outer edge securely and tack down the mane scallops, ears and tail.
Can I use safety eyes on the crochet lion?
No. For baby items, keep the eyes, nose and mouth embroidered as written in the pattern. Do not substitute plastic safety eyes, buttons, beads or other hard or loose attachments.
Is this crochet lion applique a toy?
No. This pattern is designed as a decorative applique rather than a stuffed animal. The small amount of fiberfill gives the lion shape while allowing it to remain flat enough to sew onto another project.
Troubleshooting the Crochet Lion Applique
If the Two Body Panels Do Not Match
Stack the two panels before assembly and compare the bottom edge, body width, neck and head. Small differences can usually be eased together during joining, but noticeably different panels should be corrected before you continue.
Check that the turning ch 1 was not counted as a stitch and that every increase and decrease row has the listed stitch count.
If the Lion Mane Does Not Show Around the Head
Do not add the scalloped edge until the mane extends at least 1/4 inch beyond the widest part of the head on both sides.
If Round 8 is too small, add Round 9 and then Round 10 if needed. Continue the same increase sequence only if your gauge requires it. Once the first mane fits, make the second one with exactly the same number of rounds.
If the Mane Ruffles Too Much
Check the stitch count from the last increase round and make sure the even round contains exactly that many stitches. The scallop round should then be worked consistently around the edge.
A little movement in the scallops is expected, but the main part of the mane should still lie flat behind the head.
If the Lion Looks More Like a Bear
Check the muzzle first. It should be a small cream oval centered across the lower part of the face, with plenty of golden tan head visible around it.
Also make sure the scalloped mane extends clearly beyond the head. The combination of the visible mane, small muzzle and little ears gives the finished applique its lion shape.
If the Finished Lion Is Too Puffy
Remove some fiberfill before closing the final opening. About 1 tablespoon total is enough for the head and body.
The stuffing is only meant to give the applique a little lift. The finished lion should remain relatively flat rather than becoming rounded like a stuffed toy.
If the Joined Edge Puckers at the Neck
Check the transition where Row 13 meets Row 14. Work the specified 2 sc at each neck corner so the joining edge has enough room to follow the change from the narrow neck into the wider head.
If the Mane Shifts During Assembly
Mark the top center of both the mane and head before sewing. Tack the mane at the top, bottom and both sides first. Once those four points are secure, sew between them while alternating sides.
This is easier than sewing continuously around the mane from one starting point, which can gradually pull the head off center.
If the Applique Puckers After You Sew It to a Blanket
The attachment stitches may be too tight. The lion should be held securely against the blanket without pulling the blanket fabric inward.
Ease any tight stitches, then continue with evenly spaced attachment stitches around the body. Add separate hidden tacking stitches beneath the mane, ears and tail instead of pulling the main attachment stitches tighter.
Finished Crochet Lion Applique
Once the lion is shaped, securely attached and checked for loose pieces, it is ready to become part of a baby blanket, nursery banner, wall hanging, handmade gift or another crochet project.
For more animals made to coordinate with this lion, visit the free Crochet Animal Applique Patterns collection.
More crochet animal projects:
Free Crochet Animal Applique Patterns
Make the coordinating elephant, giraffe and monkey appliques to create a complete safari collection.
Crochet Animal Lovey Patterns
Find more handmade animal projects designed for baby gifts and nursery themes.
Crochet Safari Animal Mobile Pattern
Use the safari theme in a larger handmade nursery project.
Free Baby Crochet Patterns
Browse more blankets, loveys, appliques and crochet projects for babies.
When you click on links to various merchants on this site and make a purchase, this may result in this site earning a commission. This does not affect the price you pay.

UBGI Gold Standard 2026
Reviewed under the site's
editorial checklist.
Photos, decorating ideas, party setups and reader submissions are shared for inspiration unless a page is specifically presented as a pattern, tutorial, reference guide or step-by-step project. Follow the instructions, measurements, safety guidance and manufacturer directions provided for the particular project or product.
About Jan | Contact | Baby Nursery Ideas (Blog) | Site Map | Privacy Policy | Disclosure Policy | Disclaimer | Affiliate Disclosure | Earnings Disclosure | Facebook | Pinterest
I am a participant in the Amazon Services LLC Associates Program, an affiliate advertising program designed to provide a means for us to earn fees by linking to Amazon. As an Amazon Associate I earn from qualifying purchases.
Copyright © 2006-2026. All Rights Reserved.