Free Crochet Elephant Applique Pattern for Baby Blankets
By Jan Bay
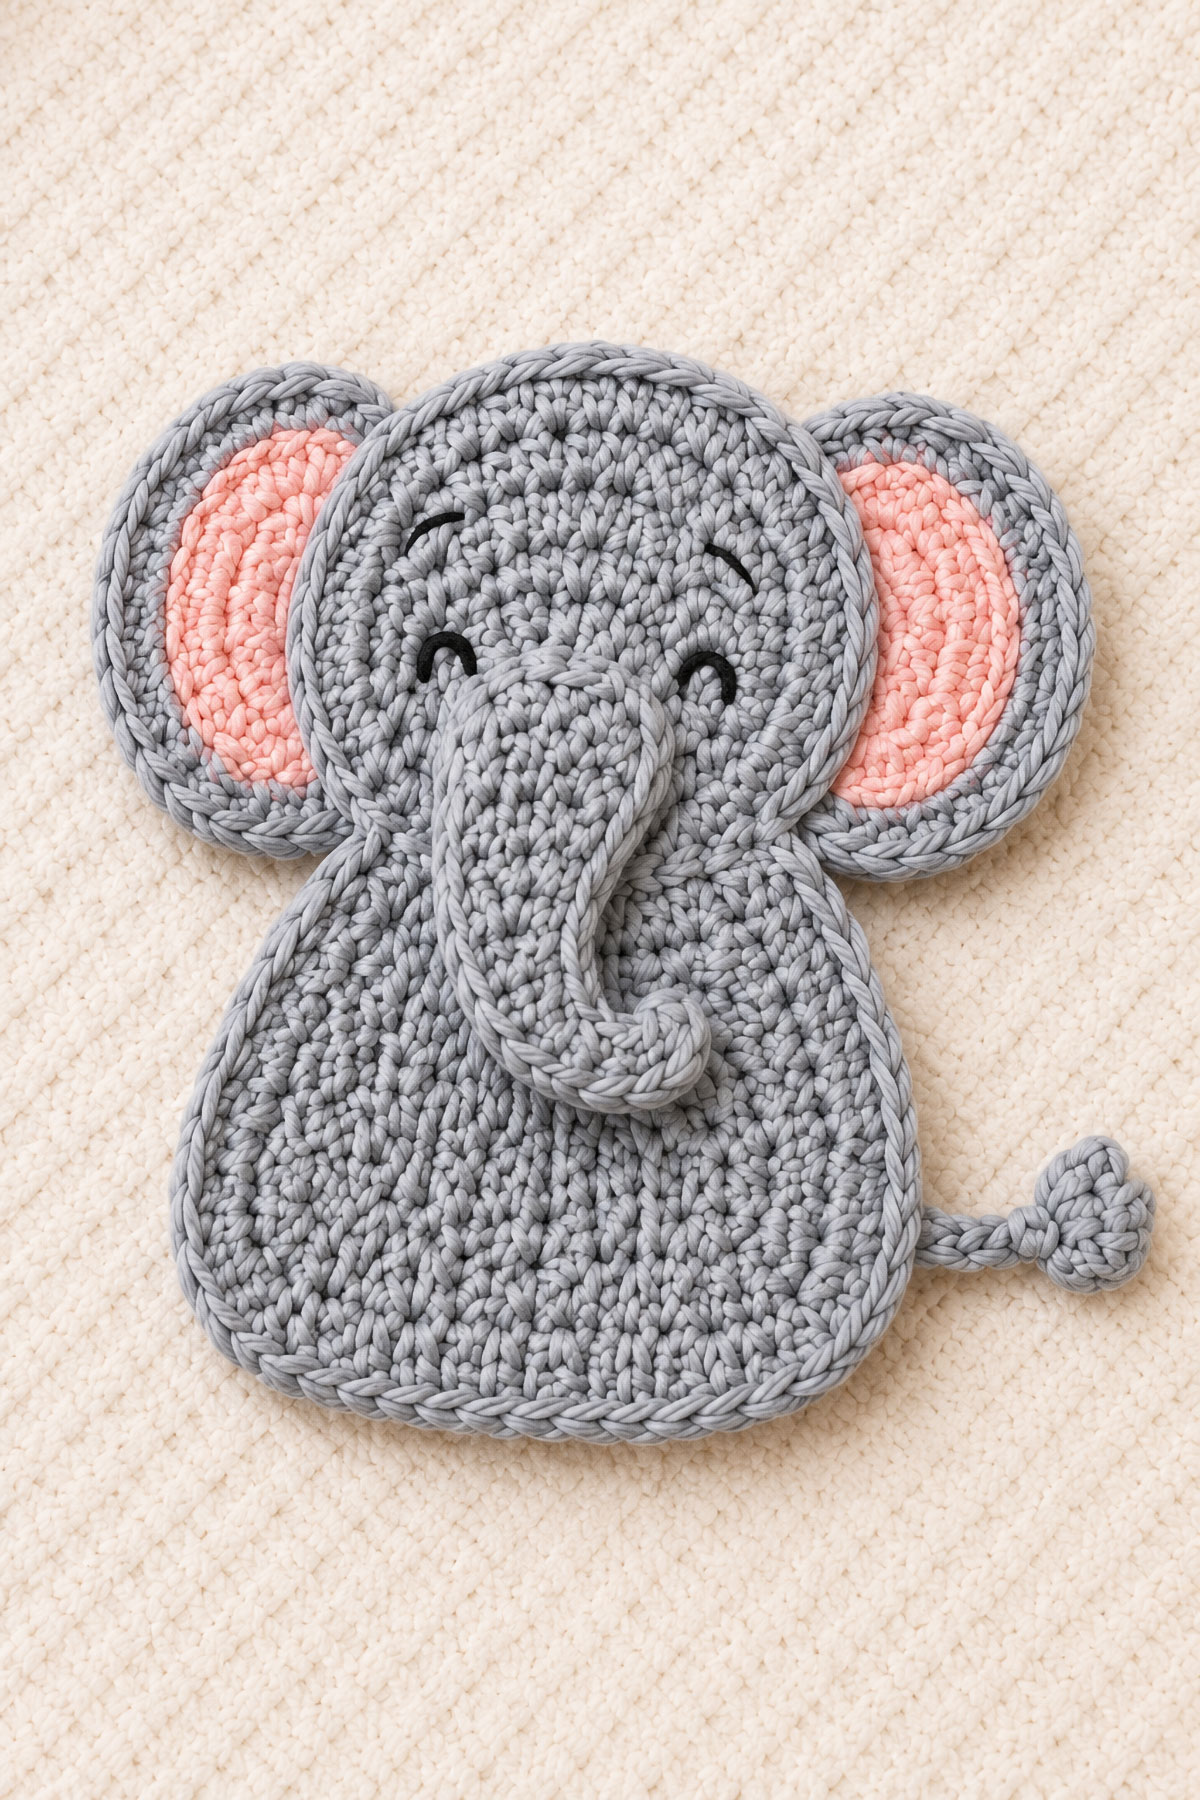
This free crochet elephant applique pattern includes two ways to make an elephant motif for baby blankets and nursery projects. Make the flat circus elephant used with the circus drum baby blanket, or choose the lightly padded safari elephant with oversized ears and a softly shaped body. Both versions use embroidered facial details and can be sewn securely to blankets, nursery wall hangings, banners and other handmade projects.
Explore More Free Crochet Baby Patterns
Crochet Animal Applique Patterns
Circus Drum Baby Blanket Pattern
Supplies for the Crochet Elephant Appliques:
Jump to the Crochet Elephant Applique Pattern
Lightly Padded Safari Elephant Applique
Materials and Crochet Supplies
The two elephant appliqués on this page use different construction methods. The circus elephant is built from separate flat pieces and has no stuffing. The safari elephant farther down the page uses two matching body panels with a small amount of fiberfill.
Materials for the Flat Circus Elephant
- Worsted weight cotton yarn in light or medium gray for the elephant
- Worsted weight cotton yarn in rust red for the circus hat and saddle blanket
- Small amount of antique gold or warm golden yellow yarn for the trim, hat brim and decorative medallion
- Black embroidery floss or thin black yarn for the eye
- 4.0 mm crochet hook
- Yarn needle
- Stitch markers
- Scissors
- Blocking mat and rustproof pins if needed
Abbreviations
- ch: chain
- sc: single crochet
- hdc: half double crochet
- sl st: slip stitch
- inc: 2 sc in the same stitch
- dec: single crochet 2 stitches together
- st: stitch
- sts: stitches
- FO: fasten off
Terminology and orientation: This pattern uses standard US crochet terms. For pieces worked back and forth in rows, either surface may be used as the right side. Choose the smoother-looking surface and keep that choice consistent during assembly. A magic ring is an adjustable starting loop worked in the round. A surface slip stitch is a slip stitch worked through the surface of a completed crochet piece.
Stitch-count convention: A turning ch 1 does not count as a stitch. When working joined rounds, the beginning ch 1 also does not count as a stitch. Join each round to the first sc unless the instructions state otherwise.
Full gray-piece edgings: When a gray piece has already been fastened off and the next instruction says to work sc around the entire outer edge, rejoin the same gray yarn at a convenient edge before beginning. Unless the individual instruction says otherwise, join the completed edging with a sl st to the first sc, FO and weave in the edging tail.
Safari panel joining: When joining the two safari elephant body panels, work 1 sc through both panels in each pair of matching row ends along the sides and 1 sc in each stitch across the foundation and final rows. Work 2 sc total in each specified corner placement. Join the panels row for row without skipping or doubling a row end.
Skill level: Advanced beginner to intermediate. The stitches are basic, but the patterns include shaping, joined rounds, matching pieces, assembly, embroidery and light stuffing in the safari version.
Gauge and Finished Size
For the circus elephant, aim for approximately 18 sc and 20 rows in 4 inches with worsted weight cotton yarn and a 4.0 mm hook. Exact gauge is less important than making a firm, even fabric that holds its outline when the appliqué is sewn flat.
The completed circus elephant should measure approximately 7 to 8 inches from the curled tip of the trunk to the back of the body and about 5 to 5½ inches from the bottom of the feet to the top of the hat. Small differences are expected because the final size depends on yarn, tension, blocking and the amount of curve placed in the trunk.
Baby use safety: Use embroidered facial details only. Do not substitute plastic safety eyes, buttons, beads or a loose pompom. The gold piece at the top of the hat in this pattern is a flat crocheted circle that is sewn securely in place. Tack down the trunk, ear, tail and decorative pieces securely if the elephant is attached to a baby blanket. Keep blankets and other soft items out of an infant's crib, bassinet or sleep space. See the American Academy of Pediatrics safe sleep guidance for current infant sleep recommendations.
Crochet Elephant Applique Pattern: Flat Circus Elephant
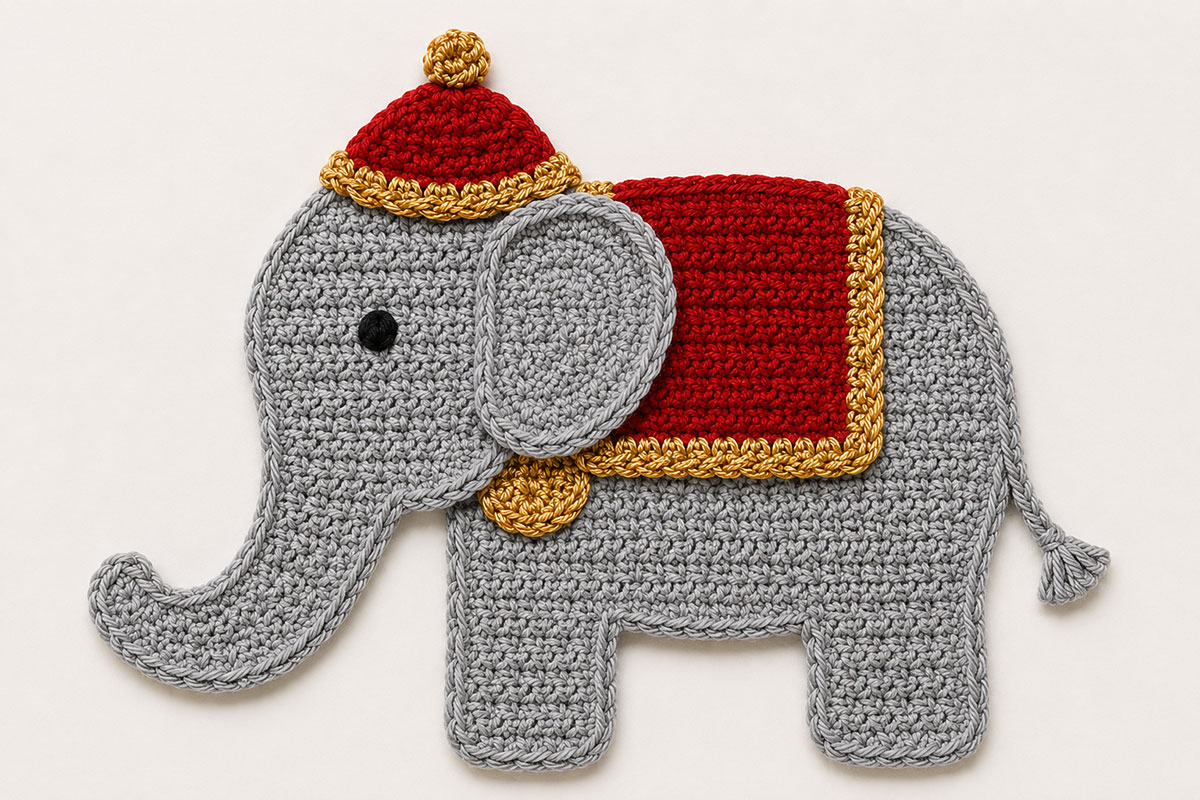
This is the elephant shown with the free crochet circus drum baby blanket pattern. The broad ear, curled trunk, low red saddle blanket and small circus hat do most of the visual work, so keep those shapes easy to see after assembly.
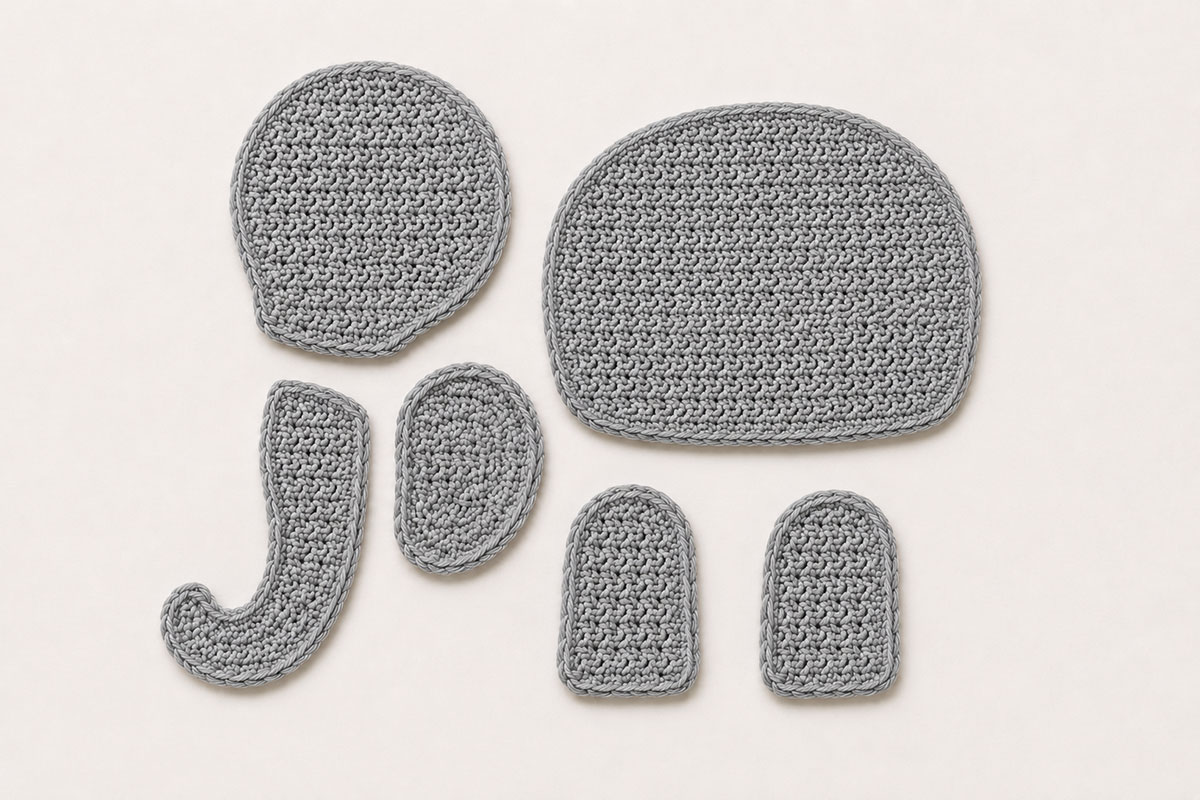
The gray elephant is made from six main flat pieces: body, head, ear, trunk, front leg and back leg. The saddle blanket, hat and small gold medallion are added after the elephant shape is assembled.
Circus Elephant Body, Make 1
Use gray yarn. Ch 19.
Row 1: Sc in 2nd ch from hook and in each remaining ch. Ch 1, turn. (18 sts)
Row 2: Inc in first st, sc in next 16 sts, inc in last st. Ch 1, turn. (20 sts)
Row 3: Inc in first st, sc in next 18 sts, inc in last st. Ch 1, turn. (22 sts)
Rows 4 through 11: Sc in each st across. Ch 1, turn. (22 sts)
Row 12: Dec, sc in next 18 sts, dec. Ch 1, turn. (20 sts)
Row 13: Dec, sc in next 16 sts, dec. Ch 1, turn. (18 sts)
Row 14: Sc in each st across. FO. (18 sts)
With the body lying horizontally, the wider Rows 3 through 11 form the full center of the torso. The narrower first and final rows soften the shoulder and rump instead of leaving a square block.
Work one round of sc evenly around the entire outer edge. Place 2 sc in each outside corner. Join with sl st and FO. Do not pull the edging tightly.
The blocked body should measure approximately 4¾ to 5 inches wide and 3 inches tall.
Circus Elephant Head, Make 1
Use gray yarn. Ch 10.
Row 1: Sc in 2nd ch from hook and in each remaining ch. Ch 1, turn. (9 sts)
Row 2: Inc in first st, sc in next 7 sts, inc in last st. Ch 1, turn. (11 sts)
Row 3: Inc in first st, sc in next 9 sts, inc in last st. Ch 1, turn. (13 sts)
Row 4: Inc in first st, sc in next 11 sts, inc in last st. Ch 1, turn. (15 sts)
Rows 5 through 10: Sc in each st across. Ch 1, turn. (15 sts)
Row 11: Dec, sc in next 11 sts, dec. Ch 1, turn. (13 sts)
Row 12: Dec, sc in next 9 sts, dec. Ch 1, turn. (11 sts)
Rows 13 through 16: Sc in each st across. Ch 1, turn. (11 sts)
Row 17: Dec, sc in next 7 sts, dec. Ch 1, turn. (9 sts)
Row 18: Sc in each st across. FO. (9 sts)
Work sc evenly around the outside edge. Work 2 sc in the upper corners and keep the lower edge smooth rather than sharply squared. Join and FO.
For assembly, treat Row 1 as the top of the head and Row 18 as the lower face where the trunk will be attached. Rows 4 through 10 form the broadest part of the forehead and face, while Rows 11 through 18 taper toward the trunk. After blocking, the head should be approximately 3 to 3¼ inches wide at its widest point and about 3½ inches tall.
Large Circus Elephant Ear, Make 1
Use gray yarn. Ch 8.
Round 1: Sc in 2nd ch from hook and in next 5 ch, 3 sc in last ch. Working along the opposite side of the foundation chain, sc in next 5 ch and 2 sc in the same chain that holds the first sc. Join with sl st to first sc. (16 sts)
Round 2: Ch 1. Inc in first st, sc in next 5 sts, inc in each of the next 3 sts, sc in next 5 sts, inc in each of the final 2 sts. Join. (22 sts)
Round 3: Ch 1. Sc in next st, inc in next st, sc in next 5 sts, *sc in next st, inc in next st* 3 times, sc in next 5 sts, *sc in next st, inc in next st* 2 times. Join. (28 sts)
Round 4: Ch 1. Sc in next 2 sts, inc in next st, sc in next 5 sts, *sc in next 2 sts, inc in next st* 3 times, sc in next 5 sts, *sc in next 2 sts, inc in next st* 2 times. Join. (34 sts)
Round 5: Ch 1. Sc in each st around. Join with sl st and FO, leaving a long sewing tail. (34 sts)
Gently block the ear into a tall oval with the foundation-chain direction running from top to bottom when the ear is placed on the elephant.
The finished ear should measure approximately 2½ inches tall and about 2 inches wide. The concentric rounds should remain visible because that stitch direction is part of the look of the example elephant.
Circus Elephant Trunk, Make 1
Use gray yarn. Ch 9.
Row 1: Sc in 2nd ch from hook and in each remaining ch. Ch 1, turn. (8 sts)
Row 2: Sc in each st across. Ch 1, turn. (8 sts)
Row 3: Dec over first 2 sts, sc in next 5 sts, inc in last st. Ch 1, turn. (8 sts)
Row 4: Sc in each st across. Ch 1, turn. (8 sts)
Row 5: Dec over first 2 sts, sc in next 5 sts, inc in last st. Ch 1, turn. (8 sts)
Row 6: Sc in each st across. Ch 1, turn. (8 sts)
Row 7: Dec over first 2 sts, sc in next 5 sts, inc in last st. Ch 1, turn. (8 sts)
Row 8: Dec, sc in next 4 sts, dec. Ch 1, turn. (6 sts)
Row 9: Sc in each st across. Ch 1, turn. (6 sts)
Row 10: Inc in first st, sc in next 3 sts, dec over last 2 sts. Ch 1, turn. (6 sts)
Row 11: Sc in each st across. Ch 1, turn. (6 sts)
Row 12: Inc in first st, sc in next 3 sts, dec over last 2 sts. Ch 1, turn. (6 sts)
Row 13: Sc in each st across. Ch 1, turn. (6 sts)
Row 14: Dec, sc in next 2 sts, dec. Ch 1, turn. (4 sts)
Row 15: Sc in each st across. Ch 1, turn. (4 sts)
Row 16: Inc in first st, sc in next st, dec over last 2 sts. Ch 1, turn. (4 sts)
Row 17: Sc in each st across. Ch 1, turn. (4 sts)
Row 18: Inc in first st, sc in next 2 sts, inc in last st. Ch 1, turn. (6 sts)
Row 19: Sc in each st across. FO. (6 sts)
The repeated decrease at one edge and increase at the opposite edge builds the curve into the fabric. The decreased edge becomes the inside of the curl. If the trunk naturally curves in the opposite direction from the elephant layout, turn the piece over and use the other surface as the visible side.
Work sc evenly around the trunk without pulling the edging tight. Across the 6 stitches of Row 19 at the rounded tip, work 2 sc in the first st, 1 sc in each of the next 4 sts, and 2 sc in the last st. (8 sc across the tip) Continue the edging evenly along the opposite side. Block the finished trunk into a broad open J shape with the tip pointing upward.
Front Leg, Make 1
Use gray yarn. Ch 6.
Row 1: Sc in 2nd ch from hook and in each remaining ch. Ch 1, turn. (5 sts)
Row 2: Inc in first st, sc in next 3 sts, inc in last st. Ch 1, turn. (7 sts)
Rows 3 through 8: Sc in each st across. Ch 1, turn. (7 sts)
Row 9: Dec, sc in next 3 sts, dec. Ch 1, turn. (5 sts)
Row 10: Sc in each st across. FO. (5 sts)
Work sc evenly around the leg. Work 3 sc around each lower corner to soften the foot. Keep the upper edge flatter because it will be hidden beneath the body.
Back Leg, Make 1
Use gray yarn. Ch 7.
Row 1: Sc in 2nd ch from hook and in each remaining ch. Ch 1, turn. (6 sts)
Row 2: Inc in first st, sc in next 4 sts, inc in last st. Ch 1, turn. (8 sts)
Rows 3 through 8: Sc in each st across. Ch 1, turn. (8 sts)
Row 9: Dec, sc in next 4 sts, dec. Ch 1, turn. (6 sts)
Row 10: Sc in each st across. FO. (6 sts)
Work sc evenly around the leg. Work 3 sc around each lower corner to round the foot.
Circus Elephant Tail, Make 1
Use gray yarn. Ch 11. Sl st in the 2nd ch from hook and in each remaining ch. FO, leaving a long sewing tail at the body end.
At the free end, attach gray yarn. Ch 3 and sl st back into the same end stitch. Repeat twice more to make three very small loops. FO.
Thread both short yarn ends back through at least four stitches of the tail before trimming. The finished tail should have a small secure tuft, not loose cut strands.
Rust Red Circus Saddle Blanket
Use rust red yarn. Ch 16.
Row 1: Sc in 2nd ch from hook and in each remaining ch. Ch 1, turn. (15 sts)
Rows 2 through 12: Sc in each st across. Ch 1, turn. (15 sts)
At the end of Row 12, FO and weave in the rust yarn tails.
Block the rectangle before adding the trim. It should measure approximately 3¼ inches wide and 2¼ to 2½ inches tall.
Gold Saddle Trim
The example elephant has a decorative gold edge along the lower and rear edges of the red saddle blanket. Keeping the top edge plain also prevents the trim from competing with the hat and ear.
Lay the red rectangle with Row 12 at the top and the foundation edge at the bottom. With the right side facing, join antique gold yarn at the lower left corner.
Across the 15 stitches of the lower foundation edge: *sl st in next st, 3 hdc in next st.* Repeat 7 times, then sl st in the final st. This makes 7 lower scallops and uses all 15 lower-edge stitches.
Continue up the 12 row ends along the right rear edge: *3 hdc in next row end, sl st in next row end.* Repeat 6 times. FO and weave the ends into the back of the saddle blanket.
Small Gold Circus Medallion
This is the small gold oval that peeks out beneath the ear near the front of the saddle blanket.
Use antique gold yarn. Ch 4.
Round 1: Sc in 2nd ch from hook, sc in next ch, 3 sc in last ch. Working along the opposite side of the foundation chain, sc in next ch and 2 sc in the final ch. Join with sl st. (8 sts)
Round 2: Ch 1. Inc in first st, sc in next st, inc in each of the next 3 sts, sc in next st, inc in each of the final 2 sts. Join with sl st. FO, leaving a sewing tail. (14 sts)
Gently shape the piece into an oval rather than a circle.
Rust Red Circus Hat
Use rust red yarn. The cap is worked in turned rows from a magic ring so the top forms a rounded dome instead of a pointed triangle.
Row 1: Make a magic ring. Work 4 sc into the ring. Do not join. Ch 1, turn. (4 sts)
Row 2: Inc in each st across. Ch 1, turn. (8 sts)
Row 3: *Sc in next st, inc in next st.* Repeat across. Ch 1, turn. (12 sts)
Rows 4 through 5: Sc in each st across. Ch 1, turn. (12 sts)
Row 6: Sc in each st across. FO. (12 sts)
Pull the magic ring closed firmly. Gently shape the cap into a shallow dome. The straight lower edge remains uncovered until the gold brim is sewn in place.
Gold Hat Brim
Use antique gold yarn. Ch 14.
Row 1: Sc in 2nd ch from hook and in each remaining ch. Ch 1, turn. (13 sts)
Row 2: Sl st in first st. *Work 3 hdc in next st, sl st in next st.* Repeat from * to * across. FO, leaving a long sewing tail.
Lay the brim horizontally across the lower edge of the rust cap. The scalloped edge should point downward. Sew the straight first row of the brim to the cap and leave the small scallops visible.
Flat Gold Hat Topper
Use antique gold yarn. Make a magic ring. Work 6 sc into the ring. Join with sl st and FO, leaving a sewing tail.
Pull the center closed firmly. Sew this small flat circle to the top center of the hat. Do not substitute a loose yarn pompom on an appliqué intended for a baby project.
How to Assemble and Finish the Circus Elephant
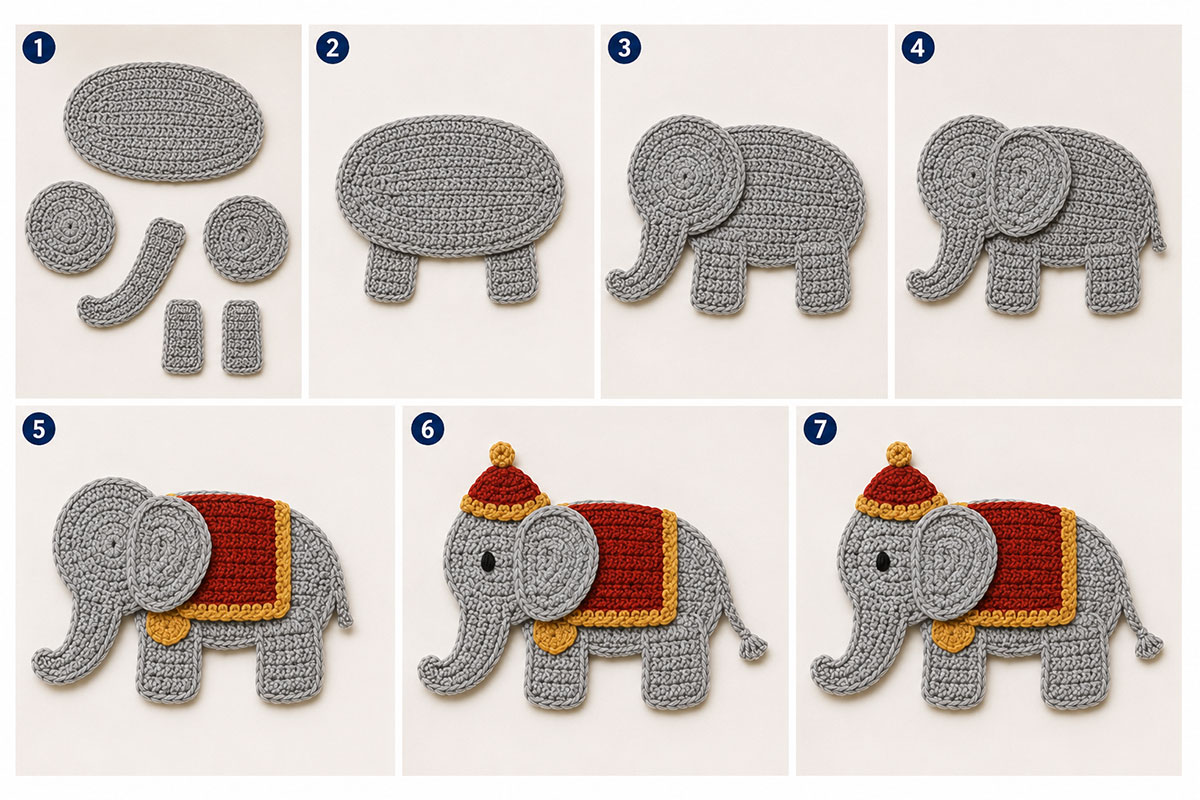
Block all six gray pieces before sewing. The body should lie horizontally with the rounded rump on the viewer's right. The elephant faces toward the viewer's left.
Attach the Legs to the Body
Place the front leg behind the lower left portion of the body. Overlap approximately ½ inch of the leg beneath the body so the join disappears.
Place the back leg behind the lower right portion of the body. Keep a clear opening between the two legs. In the finished elephant, the lower body line should remain visible between them instead of looking like one solid block.
Check that both feet rest on the same imaginary horizontal line. Sew the hidden upper portion of each leg securely to the wrong side of the body.
Attach the Circus Elephant Tail
With the elephant facing toward the viewer's left, place the sewn end of the tail at the midpoint of the viewer's right body edge. Angle the free end slightly downward so the small looped tuft extends beyond the rump, as shown in the example.
Sew about ½ inch of the tail base securely to the wrong side of the body with gray yarn. Keep the remaining tail free while the elephant is assembled. If the finished appliqué will be attached to a baby blanket, tack the small tuft loops securely to the blanket when the appliqué is sewn in place.
Position the Head
Place the head over the front left portion of the body. The upper half of the head should rise above the elephant's back, while the lower portion drops below the body line.
Overlap the body by approximately ¾ to 1 inch. Keep Row 1 at the top beneath the circus hat and Row 18 toward the lower face and trunk. The broad Rows 4 through 10 form the forehead and upper face.
Tack the head at the top, center and lower edge before completing the seam. Step back and check the silhouette before sewing all the way around the overlapping area. The forehead should be broad and gently rounded, not narrow or pointed.
Attach the Curved Trunk
Position the wide end of the trunk against the lower front of the head. Overlap approximately ½ inch and sew that upper section securely to the head.
Let the shaped trunk follow its natural curve downward and toward the viewer's left. The final section should turn upward into the broad open curl shown in the example.
Do not force the trunk into a tight spiral. If the curve needs adjustment, reshape it with your fingers or lightly block it before attaching the elephant to its finished project.
When the appliqué is sewn to a blanket, add small hidden tacking stitches along the inside of the trunk curve so the shape stays secure without flattening the outer edge.
Place the Large Ear
Center the ear over the seam where the head overlaps the body. The top of the ear should sit slightly below the top of the head. The lower end should reach close to the shoulder area above the front leg.
Tilt the ear very slightly backward rather than placing it perfectly vertical. This gives the elephant the same relaxed profile as the example.
Sew the front and upper portion of the ear to the elephant with matching gray yarn. Leave the rear and lower rear edge unsewn for now so the front edge of the saddle blanket and part of the gold medallion can fit beneath the ear. Finish securing the ear after those pieces are attached.
Embroider the Eye
The circus elephant is shown in profile, so embroider one visible eye.
Use black embroidery floss or thin black yarn. Place the eye on the upper half of the head, forward of the ear and well above the trunk attachment.
Work several short satin stitches until the eye forms a compact oval about ¼ inch wide. Keep the stitches flat. Weave the thread securely through the wrong side of the head before trimming.
Attach the Saddle Blanket
Place the red saddle blanket across the upper center of the gray body. The front edge should disappear slightly beneath the large ear. The rear gold trimmed edge should stop before the curve of the rump.
The lower gold scalloped edge should run horizontally across the elephant's side. Keep the red rectangle level rather than tipping it with the slope of the back.
Sew the saddle blanket securely around all four sides. Add several hidden stitches through the center so the larger flat piece cannot lift away from the elephant.
Place the small gold medallion on the gray body directly below the front lower corner of the saddle blanket. Slide the upper portion beneath the still-unsewn lower rear edge of the large ear so about half of the oval remains visible below the ear. Sew the medallion completely around its outer edge before finishing the ear attachment.
Return to the large ear. Smooth its rear edge over the front of the saddle blanket and the portion of the gold medallion that belongs beneath it. Sew the remaining ear edge securely in place with gray yarn. If the elephant will be attached to a baby blanket, secure the complete ear so no large section remains as a free flap.
Add the Circus Hat
Center the hat on the crown of the head. The gold brim should follow the upper curve of the elephant's head and extend slightly beyond the rust cap on each side.
Sew the rust cap flat first. Then secure the gold brim, including each small scallop. Finish by checking the flat gold topper at the crown.
Final Shape Check
Lay the entire elephant flat before attaching it to another project. The back should have a gentle arch, the two legs should end at nearly the same level, and the large ear should cover most of the head and body join.
The trunk deserves an extra look. It should sweep downward from the head, curve forward and finish with a clearly visible upward tip. If the curve is too tight or too open, reshape and lightly block the trunk before the appliqué is attached permanently.
Gently tug the hat, ear, saddle blanket, medallion, legs, trunk and tail. Reinforce any area that shifts.
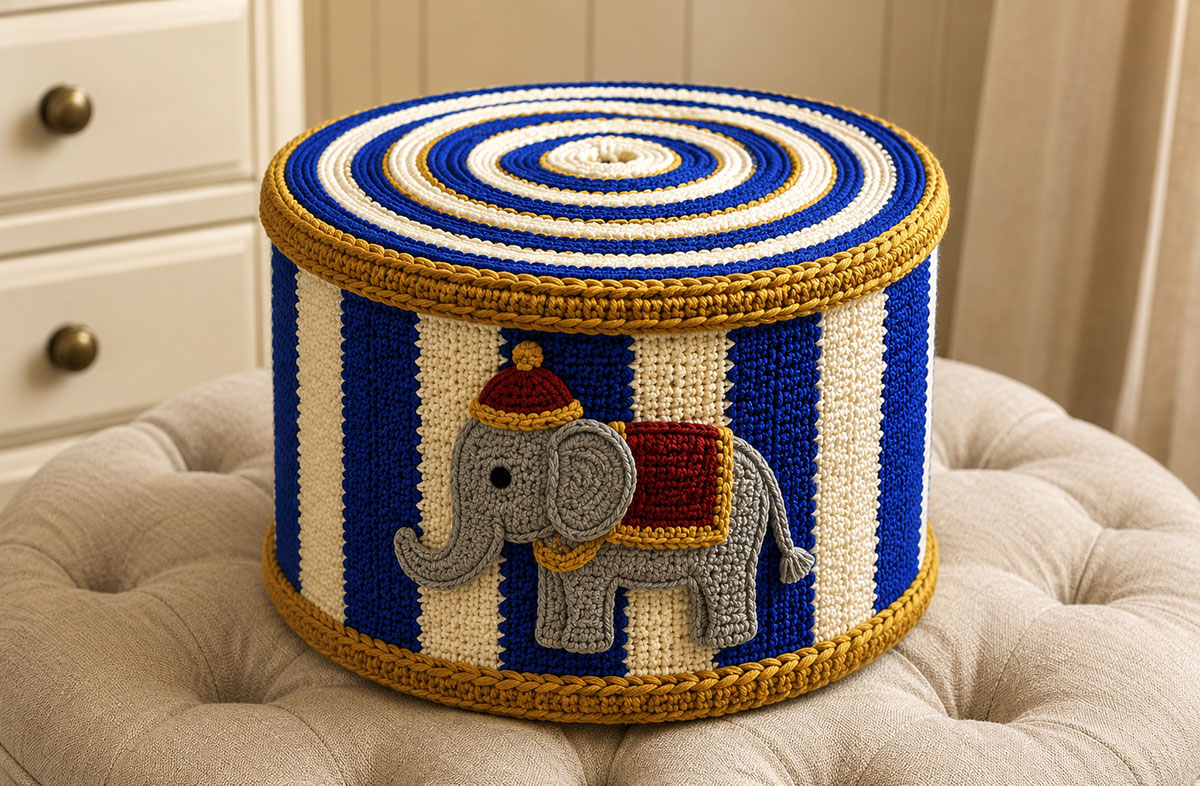
The circus version can stand on its own as a blanket appliqué, but the red and gold details were chosen to coordinate especially well with the crochet circus drum baby blanket. The elephant still reads clearly as an elephant even when the surrounding project uses different colors.
Lightly Padded Safari Elephant Applique Pattern
This second crochet elephant appliqué is the lightly padded version from the Crochet Animal Applique Patterns collection. It uses two matching body panels, oversized layered ears, a separate trunk, a secure tail and embroidered facial details.
Quick answer: The safari elephant finishes at about 5¾ inches tall when made with worsted weight yarn and a 4.0 mm hook. A thin layer of fiberfill gives it a little dimension without turning it into a stuffed toy.
Finished Safari Elephant Size
- Finished height: about 5¾ inches
- Finished width across ears: approximately 6 to 7 inches
- Construction: lightly padded crochet motif
- Main body: two identical panels
- Stuffing: light only
- Face: embroidered features
Materials for One Safari Elephant
- Worsted weight cotton yarn in light gray for the body, ears, trunk and tail
- Small amount of pale pink yarn for the inner ear patches
- Small amount of dark gray embroidery thread or yarn for the eyes
- 4.0 mm crochet hook
- Yarn needle
- Stitch marker
- Small amount of fiberfill
- Scissors
Elephant Body Panels, Make 2
Use light gray yarn. Ch 9.
Row 1: Sc in 2nd ch from hook and in each remaining ch. Ch 1, turn. (8 sts)
Row 2: Inc in first st, sc in next 6 sts, inc in last st. Ch 1, turn. (10 sts)
Row 3: Sc in each st across. Ch 1, turn. (10 sts)
Row 4: Inc in first st, sc in next 8 sts, inc in last st. Ch 1, turn. (12 sts)
Row 5: Sc in each st across. Ch 1, turn. (12 sts)
Row 6: Inc in first st, sc in next 10 sts, inc in last st. Ch 1, turn. (14 sts)
Rows 7 through 11: Sc in each st across. Ch 1, turn. (14 sts)
Row 12: Dec, sc in next 10 sts, dec. Ch 1, turn. (12 sts)
Row 13: Dec, sc in next 8 sts, dec. Ch 1, turn. (10 sts)
Row 14: Sc in each st across. Ch 1, turn. (10 sts)
Row 15: Inc in first st, sc in next 8 sts, inc in last st. Ch 1, turn. (12 sts)
Row 16: Inc in first st, sc in next 10 sts, inc in last st. Ch 1, turn. (14 sts)
Row 17: Inc in first st, sc in next 12 sts, inc in last st. Ch 1, turn. (16 sts)
Row 18: Inc in first st, sc in next 14 sts, inc in last st. Ch 1, turn. (18 sts)
Rows 19 through 25: Sc in each st across. Ch 1, turn. (18 sts)
Row 26: Dec, sc in next 14 sts, dec. Ch 1, turn. (16 sts)
Row 27: Dec, sc in next 12 sts, dec. Ch 1, turn. (14 sts)
Row 28: Dec, sc in next 10 sts, dec. (12 sts)
FO on both panels and weave in the yarn tails. Rows 1 through 13 form the body. Row 14 forms the neck. Rows 15 through 28 form the head.
Before assembly, each flat body panel should measure about 5 inches tall. After the panels are joined and the trunk is attached, the finished elephant should measure approximately 5¾ inches tall.
Safari Elephant Ears, Make 4
Use light gray yarn.
Row 1: Ch 6. Sc in 2nd ch from hook and in each remaining ch. Ch 1, turn. (5 sts)
Row 2: Inc in first st, sc in next 3 sts, inc in last st. Ch 1, turn. (7 sts)
Row 3: Inc in first st, sc in next 5 sts, inc in last st. Ch 1, turn. (9 sts)
Row 4: Inc in first st, sc in next 7 sts, inc in last st. Ch 1, turn. (11 sts)
Rows 5 through 8: Sc in each st across. Ch 1, turn. (11 sts)
Row 9: Dec, sc in next 7 sts, dec. Ch 1, turn. (9 sts)
Row 10: Dec, sc in next 5 sts, dec. Ch 1, turn. (7 sts)
Row 11: Dec, sc in next 3 sts, dec. (5 sts)
FO and weave in the yarn tail. Fold the 5-stitch foundation-chain edge of each ear inward about ¼ inch. Secure the fold with a few small stitches using a separate length of gray yarn. This folded foundation edge is the attachment base used during assembly.
Each finished ear measures about 2¼ inches tall by 2 inches wide.
Inner Ear Patches, Make 2
Use pale pink yarn.
Row 1: Ch 5. Sc in 2nd ch from hook and in each remaining ch. Ch 1, turn. (4 sts)
Row 2: Inc in first st, sc in next 2 sts, inc in last st. Ch 1, turn. (6 sts)
Rows 3 through 5: Sc in each st across. Ch 1, turn. (6 sts)
Row 6: Dec, sc in next 2 sts, dec. (4 sts)
FO, leaving a sewing tail.
Sew one inner ear patch to each front ear, leaving about ¼ inch of gray showing around every edge.
Safari Elephant Trunk, Make 1
Use light gray yarn.
Row 1: Ch 7. Sc in 2nd ch from hook and in each remaining ch. Ch 1, turn. (6 sts)
Rows 2 through 6: Sc in each st across. Ch 1, turn. (6 sts)
Row 7: Dec, sc in next 2 sts, dec. Ch 1, turn. (4 sts)
Rows 8 through 12: Sc in each st across. Ch 1, turn. (4 sts)
Row 13: Sc in each st across. FO and weave in the yarn tail. (4 sts)
After sewing the trunk in place, curve the lower third slightly toward one side and secure it with one small hidden stitch.
Safari Elephant Tail, Make 1
Use light gray yarn.
Ch 10. Sl st in the 2nd ch from hook and in each remaining ch across. FO, leaving a sewing tail.
For a secure tail tuft, attach gray yarn to the free end of the tail. Ch 3 and sl st back into the same end stitch. Repeat twice more to form three small loops. FO. Weave both yarn ends back through at least four tail stitches before trimming.
Assemble the Safari Elephant
Lay the two body panels side by side with the right sides facing up.
Use the narrow 5 stitch foundation chain edge of each ear as its attachment base. Position one completed front ear behind each side of the front head with the pink inner ear patch facing forward. Place the folded base diagonally along the outside head edge so it spans approximately Rows 21 through 24. Overlap the head by about 2 stitches and sew through the folded base and the inner third of the ear only.
Attach the two plain ears to the back body panel in the same positions. Compare the panels before continuing and confirm that the upper and lower edges of each corresponding ear align.
Place the front and back body panels together with wrong sides facing. Align each pink-front ear with the corresponding plain back ear. With gray yarn, whipstitch around the exposed outer edge of each matching ear pair, leaving the folded attachment bases as they are. This joins the four ear pieces into two layered ears. FO and weave the sewing tails securely into the ear edges.
With the front panel facing up, insert the tail between the body panels on the viewer's left side between Rows 3 and 4, about one stitch in from the outer edge. Catch the tail base securely while joining the panels.
Join light gray yarn through both body panels along one lower side. Working through both panels, sc evenly around the outside edge. Work 2 sc at each outside corner and neck corner.
Leave a 2 inch opening along one lower side of the body. Add about 1 tablespoon of fiberfill. Spread it into a thin layer rather than filling the elephant firmly.
Finish closing the opening with sc. Join with sl st, FO and weave in all yarn tails securely.
Attach the Safari Elephant Trunk
Use the wider 6 stitch foundation chain edge as the top of the trunk. Center this edge on the front of the head between Rows 18 and 19. Thread a yarn needle with a separate length of matching light gray yarn for sewing.
Sew the top edge and the upper third of each side to the head. Take shallow stitches through the front body panel only so the needle does not pass through the back panel or compress the stuffing.
Leave the narrower lower section free so the trunk hangs naturally. Curve the lower third toward one side and secure the curve with one small hidden stitch through the back of the trunk and the front panel only.
Embroider the Safari Elephant Face
With dark gray embroidery thread, stitch two small eyes on Row 21 about five stitches apart and centered above the attached top edge of the trunk.
If desired, add one short curved eyebrow above each eye.
Keep every embroidery stitch in the front body panel only. Do not pull the thread tightly enough to dent the lightly stuffed head.
Before attaching the finished safari elephant to another project, gently tug on the ears, trunk and tail. Reinforce anything that shifts.
How to Attach a Crochet Elephant Applique
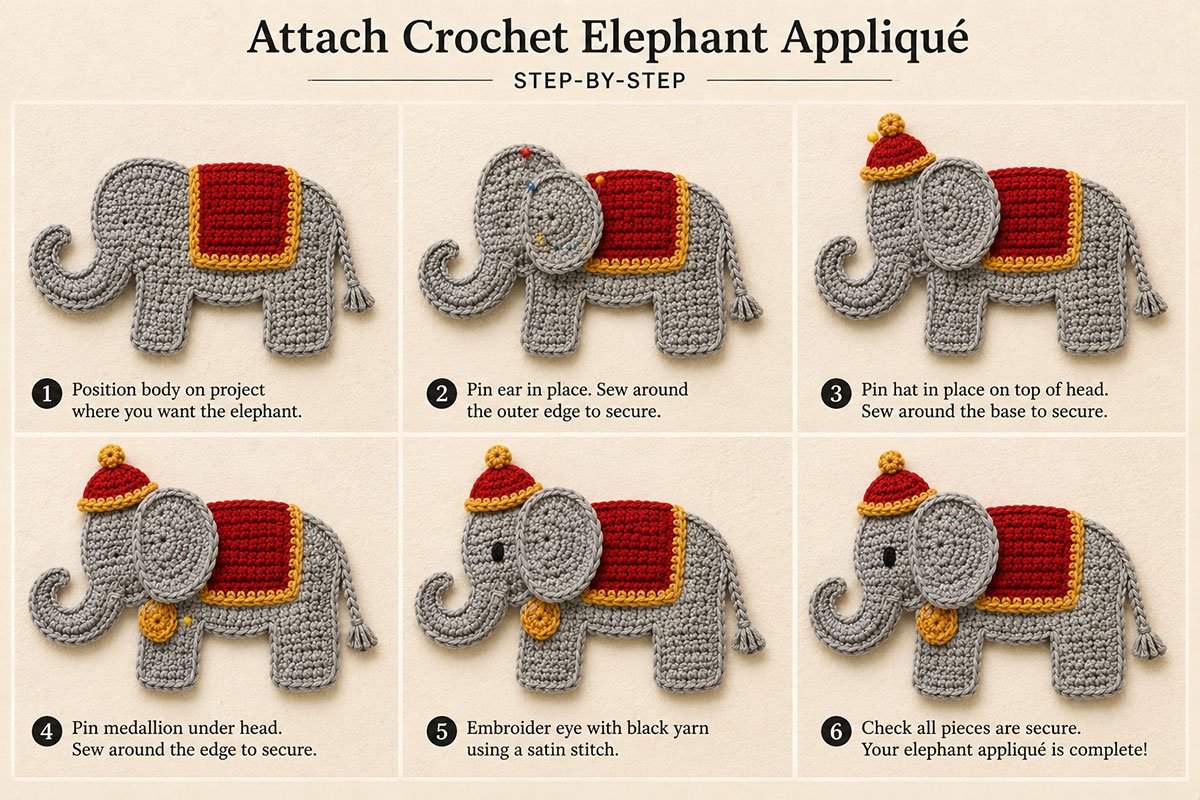
Finish blocking and shaping the elephant before sewing it to a blanket or nursery project. Lay the appliqué in position and secure it temporarily with locking stitch markers or rustproof pins.
Thread a yarn needle with matching yarn. Beginning along the lower body, take small stitches through the back portion of the appliqué edging and through the project beneath it. Keep the attachment yarn out of sight from the front whenever possible.
Work completely around the main body. Then add separate hidden tacking stitches beneath pieces that extend beyond the body.
For the circus elephant, secure the trunk along the inside curve, the complete outer edge of the ear, both legs, the tail base, the saddle blanket, gold medallion and hat. If the item may be handled by a baby, tack down the small tail loops and every hat scallop as well.
For the lightly padded safari elephant, secure the main body first. Then tack the ears, trunk and tail wherever they could lift away from the blanket.
Check the front after every few inches of sewing. The blanket beneath the appliqué should remain flat. If the fabric begins to pucker, loosen the last few attachment stitches before continuing.
Two Crochet Elephant Styles for Different Projects
The circus and safari elephants reach the same destination in very different ways. The circus elephant gets its depth from overlapping flat pieces. The large ear hides the head and body join, while the saddle and hat add another layer without stuffing.
The safari elephant has a softer rounded profile because its two body panels hold a thin layer of fiberfill. Its ears remain dimensional, but the main silhouette is simpler.
For a blanket where I want the elephant to behave like a traditional sewn appliqué, I would choose the flat circus version. For a nursery banner or wall hanging where a little more relief is welcome, the lightly padded version is a good alternative.
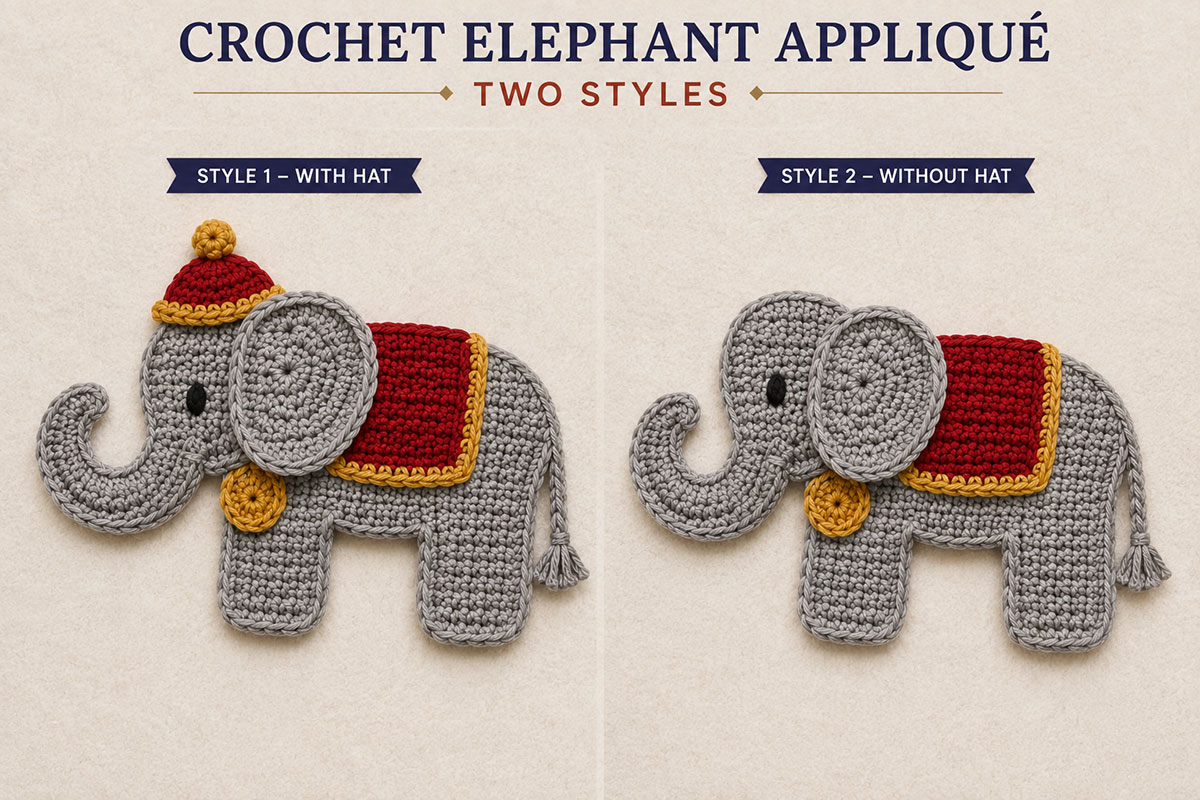
Both elephants belong with the growing collection of free crochet animal applique patterns, where additional animals can be mixed and matched for baby blankets and nursery projects.
Frequently Asked Questions About the Crochet Elephant Applique
Which elephant pattern should I use for the circus drum blanket?
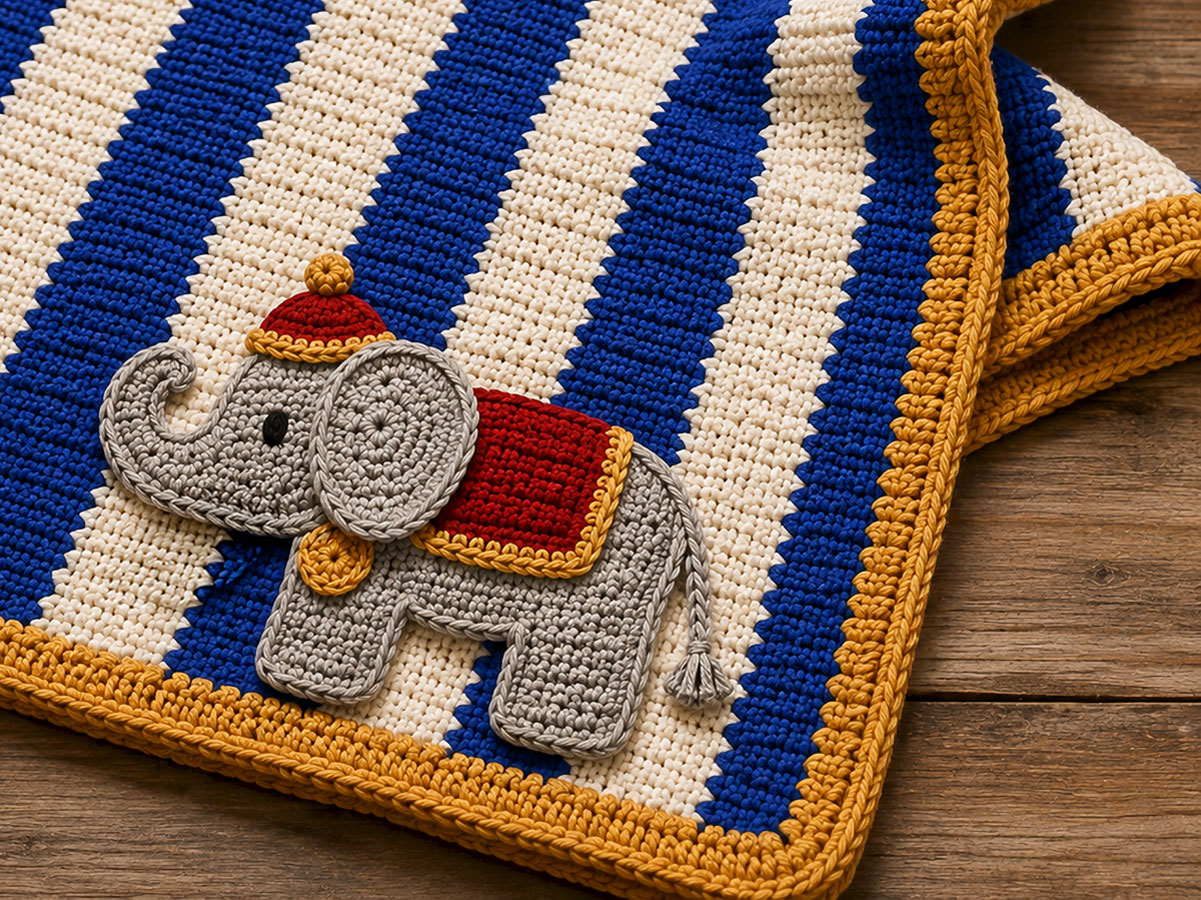
Use the flat circus elephant. Its rust red saddle, antique gold trim and matching hat were designed to coordinate with the circus drum baby blanket. The flat construction also makes it easier to sew securely to the blanket surface.
Does the circus elephant need stuffing?
No. The circus elephant is completely flat. Its shape comes from six separate gray pieces layered during assembly. The ear, saddle blanket and hat create visual depth without fiberfill.
How does the circus elephant trunk keep its curved shape?
The curve is built into the crochet by decreasing along one edge while increasing along the opposite edge. Light blocking refines the shape, and small hidden tacking stitches keep the curve secure after the appliqué is sewn to a blanket or other project.
Can I make the circus elephant face the other direction?
Yes. Crochet the pieces exactly as written, then flip the layout before assembly. Place the head at the opposite end of the body and curve the trunk in the opposite direction. Move the visible ear, eye and front edge of the saddle blanket to match the new orientation.
Can I use acrylic yarn instead of cotton?
Yes, if the yarn makes a firm fabric with clear stitches. Cotton gives the flat pieces a crisp outline, but a smooth worsted weight acrylic can also work. Adjust the hook size if the fabric becomes loose enough to show gaps.
Can the lightly padded safari elephant be made without stuffing?
It can, but the result will look flatter than the version shown here. If you omit the fiberfill, align the two body panels carefully before closing them so they do not ripple against each other.
Can I use a plastic safety eye on the elephant?
No plastic eye is needed for either version. An embroidered eye stays flat and avoids adding a small hard component to an appliqué that may be used on a baby project.
How should I wash a blanket with the elephant attached?
Follow the washing directions for the yarn used in both the blanket and appliqué. Before washing, check every attached piece. After washing, reshape the ear, trunk, hat and saddle while damp if necessary and let the project dry completely before inspecting the seams again.
Before You Call the Elephant Finished
Check the silhouette first. The circus elephant should have a rounded back, two clearly separated legs, one large visible ear and a trunk that sweeps down before curling upward. The saddle should sit low enough to look like a blanket rather than a block balanced on the elephant's back.
Then check the sewing. Tug gently on every separate piece. Run a finger beneath the edges of the ear, hat, saddle and trunk to find any area that can lift farther than intended.
Those last few stitches are worth doing. A well secured appliqué should still look playful and dimensional without relying on loose pieces to create the effect.
Weave all remaining yarn and embroidery tails securely through several stitches on the wrong side before trimming them. If the elephant has already been attached to another project, secure the final sewing tails on the back of that project so no loose ends remain beneath or around the appliqué.
When you click on links to various merchants on this site and make a purchase, this may result in this site earning a commission. This does not affect the price you pay.

UBGI Gold Standard 2026
Reviewed under the site's
editorial checklist.
Photos, decorating ideas, party setups and reader submissions are shared for inspiration unless a page is specifically presented as a pattern, tutorial, reference guide or step-by-step project. Follow the instructions, measurements, safety guidance and manufacturer directions provided for the particular project or product.
About Jan | Contact | Baby Nursery Ideas (Blog) | Site Map | Privacy Policy | Disclosure Policy | Disclaimer | Affiliate Disclosure | Earnings Disclosure | Facebook | Pinterest
I am a participant in the Amazon Services LLC Associates Program, an affiliate advertising program designed to provide a means for us to earn fees by linking to Amazon. As an Amazon Associate I earn from qualifying purchases.
Copyright © 2006-2026. All Rights Reserved.