Free Pumpkin Crochet Blanket Pattern for Babies
By Jan Bay
This pumpkin crochet blanket pattern combines a softly textured baby blanket with flat pumpkin appliqués for a handmade fall gift that is perfect for fall. The cream blanket, warm orange pumpkins and simple green stems work beautifully for a little pumpkin nursery, autumn baby shower or supervised stroller blanket, and the separate appliqués make the design easier to assemble than a complicated tapestry or graph pattern.
Explore More Free Crochet Baby Patterns
Turkey Crochet Patterns for Thanksgiving
Crochet Dinosaur Baby Blanket Pattern
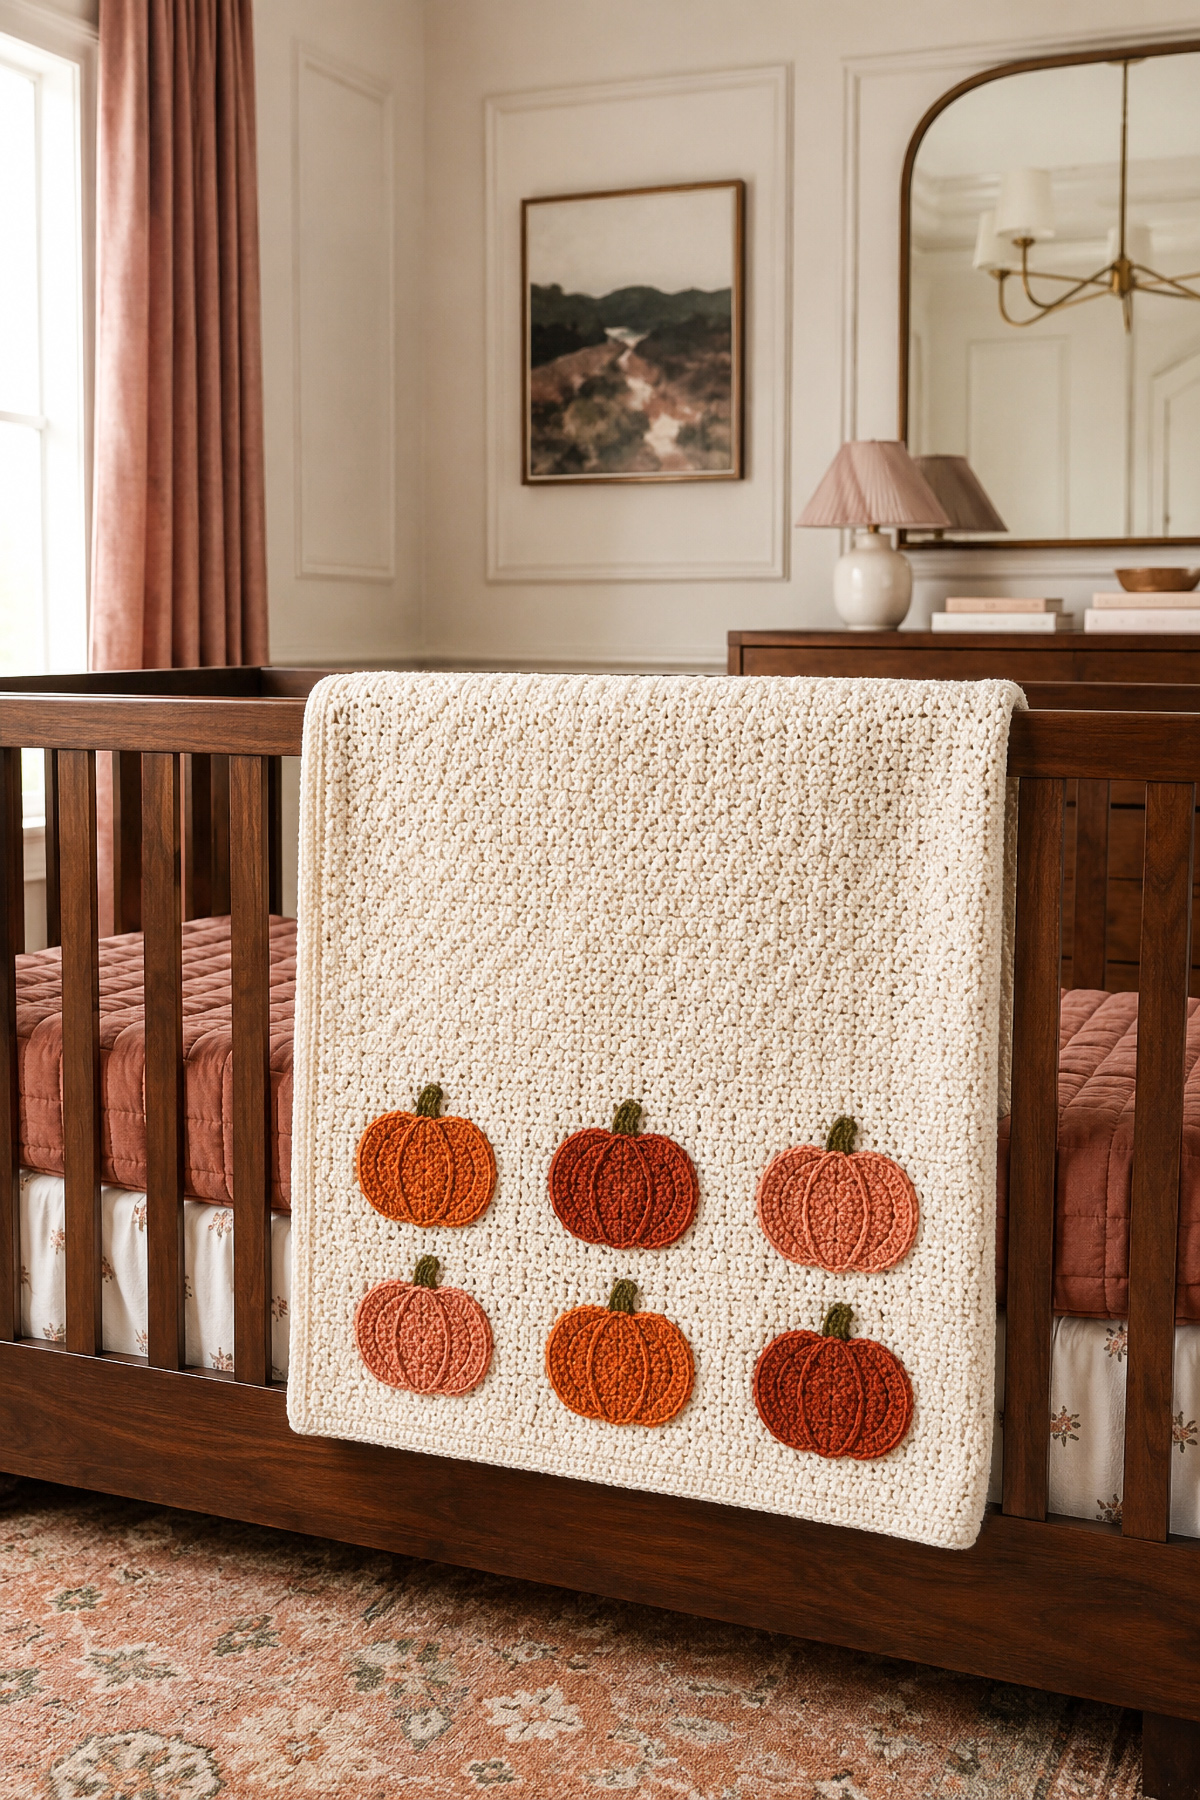
This pumpkin crochet blanket uses a simple textured base with securely sewn flat pumpkin appliqués in warm fall nursery colors.
Soft Washable Baby Yarn for This Pumpkin Blanket
Jump to the Pumpkin Crochet Blanket Pattern
Finished Size and Measurements
Pumpkin Crochet Blanket Pattern Overview
This free pumpkin crochet blanket pattern is made in two manageable parts. First, you crochet a simple rectangular baby blanket in an easy alternating single crochet and double crochet texture. Then you make six flat pumpkins, add their stems and stitched ridges, and sew every edge securely to the blanket.
Think of it as a soft fall baby blanket first, then a pumpkin design second. The warm seasonal details are noticeable, but the finished blanket does not have to look like Halloween decor. Cream, oatmeal, soft tan or pale sage can all be used for the background, depending on the nursery and the yarn already waiting in your basket.
The completed blanket measures approximately 33 by 38 inches, including the border. That size is useful for supervised tummy time, stroller rides, photographs and gifting. It is also large enough to remain useful after the newborn stage without becoming as bulky as a full-size throw.
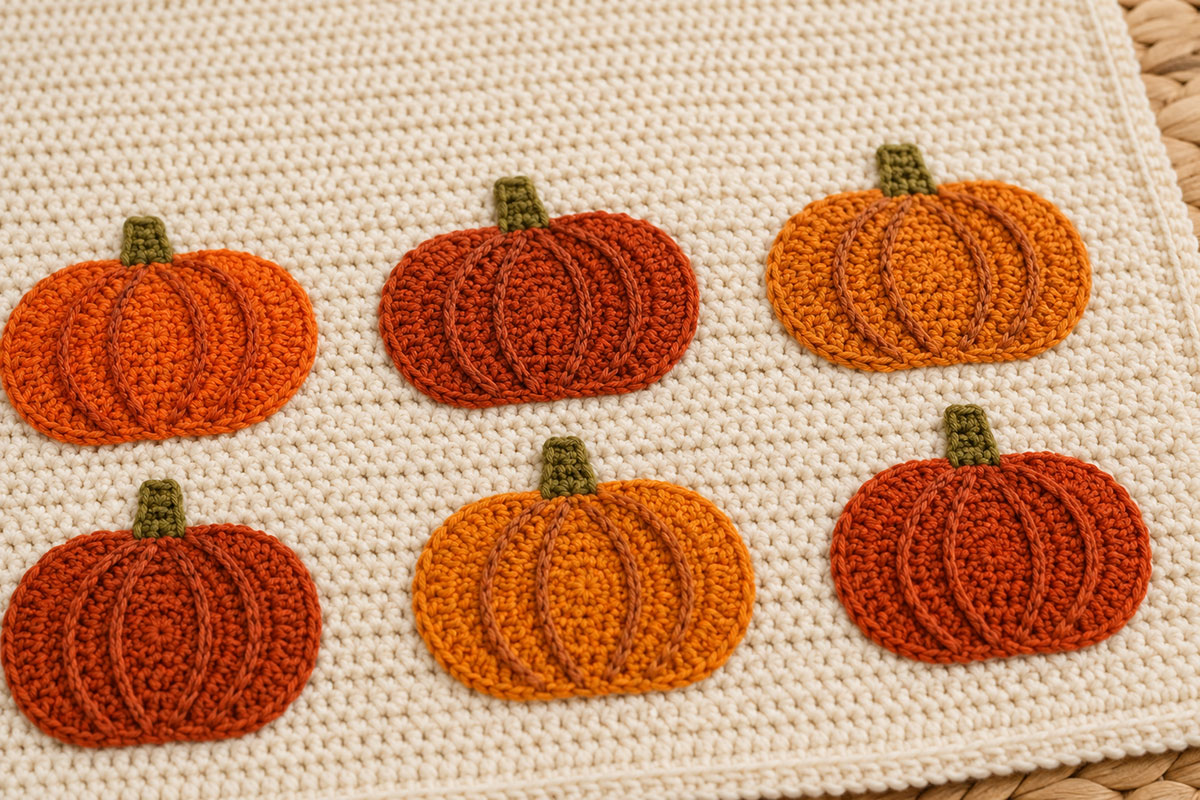
A closer look at the flat pumpkin appliqués, embroidered ridges and textured blanket stitches.
Pattern at a Glance
- Skill level: Confident beginner
- Finished size: Approximately 33 by 38 inches
- Yarn weight: Medium weight, category 4
- Main hook: 5.5 mm crochet hook
- Blanket construction: Worked back and forth in rows
- Pumpkin construction: Six flat appliqués worked separately
- Main stitches: Chain, single crochet, double crochet, slip stitch and increases
- Special equipment: None
The alternating stitch pattern gives the blanket enough texture to feel interesting without hiding the pumpkins. It also keeps the instructions repetitive enough for an easy evening project. Once the first few rows are established, there is very little counting until you reach the border.
The pumpkins are intentionally flat rather than stuffed. Their edges, stems and decorative ridges will all be stitched firmly to the blanket, so there are no buttons, plastic eyes or loose embellishments. The finished blanket should still be checked regularly for loose yarn ends or damaged stitching, especially when it is being used around a baby.
Finished Size and Measurements
The finished pumpkin crochet blanket measures approximately 33 inches wide by 38 inches long after the border is added and the blanket is gently shaped. Small differences are normal because yarn thickness, hand tension and washing can all affect the final measurements.
The blanket base should measure close to 32 by 37 inches before the border. The border adds approximately one-half inch around each side.
| Blanket Part | Approximate Measurement |
|---|---|
| Blanket base before border | 32 by 37 inches |
| Finished blanket with border | 33 by 38 inches |
| Each pumpkin appliqué | About 5 inches wide by 4 inches tall, including the stem |
| Space between pumpkins | Approximately 2 to 3 inches |
Measure the blanket while it is lying flat without stretching it. If the width is noticeably different after the first eight to ten rows, it is easier to adjust the hook size at that point than to discover the difference after the entire blanket is finished.
The pumpkins are arranged in two rows of three near one end of the blanket. This keeps the design visible when the blanket is folded over a stroller or displayed across the back of a nursery chair. A scattered arrangement also works, but pin every pumpkin in place before sewing so the spacing does not drift from one side to the other.
Yarn, Hook and Materials
Choose a smooth, washable medium-weight yarn that shows the textured stitches clearly. Very fuzzy yarn can soften the pumpkin outlines, while an unusually stiff yarn may make the appliqués feel heavier than the blanket beneath them.
- Main blanket color: Approximately 1,400 to 1,500 yards of category 4 medium-weight yarn in cream, oatmeal, pale tan or another light background color
- Pumpkin color: Approximately 180 to 220 yards of category 4 medium-weight yarn in muted orange, rust, terracotta or a combination of fall shades
- Stem color: Approximately 30 yards of category 4 medium-weight yarn in olive, moss or brown
- Pumpkin ridge color: Approximately 20 yards of category 4 medium-weight yarn in a slightly darker orange or brown
- Main crochet hook: 5.5 mm, size I-9
- Appliqué crochet hook: 5 mm, size H-8
- Yarn needle: Blunt-tip tapestry needle with an eye large enough for the chosen yarn
- Stitch markers: At least four
- Scissors
- Flexible measuring tape
- Rustproof pins or locking stitch markers: For positioning the pumpkins before sewing
- Blocking mats and rustproof pins: Optional, but helpful for straightening the blanket before the appliqués are attached
Yarn Planning Tip
Buy the main blanket yarn from the same dye lot whenever possible. The cream or oatmeal background covers far more area than the pumpkins, so a slight color change will be easier to spot there. Keep one unused skein until the border is complete, then return it only if the store permits returns and you are certain it is not needed.
You may use one orange shade for all six pumpkins or divide them among two or three coordinating colors. Keeping the yarn weight and fiber content similar will help the appliqués lie evenly after washing.
Do not use buttons, beads, plastic eyes or glued decorations on this baby blanket. The pumpkin ridges are embroidered with yarn, and every appliqué edge will be sewn down completely.
Gauge, Stitch Pattern and Abbreviations
Make a gauge swatch before beginning the blanket, especially if you are substituting yarn. The exact stitch count matters less than producing a soft fabric that lies flat, but a large difference in gauge will change both the finished size and the amount of yarn required.
Gauge: 13 stitches and 12 rows measure approximately 4 inches in the alternating single crochet and double crochet pattern.
To check the gauge, chain 23. Work 1 sc in the second chain from the hook and 1 dc in the next chain. Continue working 1 sc in the next chain and 1 dc in the following chain across. You should have 22 stitches and finish with a dc. Chain 1 and turn. The chain 1 does not count as a stitch. Work 1 sc in the first stitch and 1 dc in the next stitch, then continue alternating sc and dc across. Repeat this row until the swatch measures at least 6 inches tall. Measure a 4-inch section near the center rather than including the foundation chain or outer edges.
- If you have more than 13 stitches within 4 inches, try a larger hook.
- If you have fewer than 13 stitches within 4 inches, try a smaller hook.
- If the fabric feels stiff, move up a hook size even when the measurement is close.
- If the fabric looks loose enough for fingers to catch easily, move down a hook size.
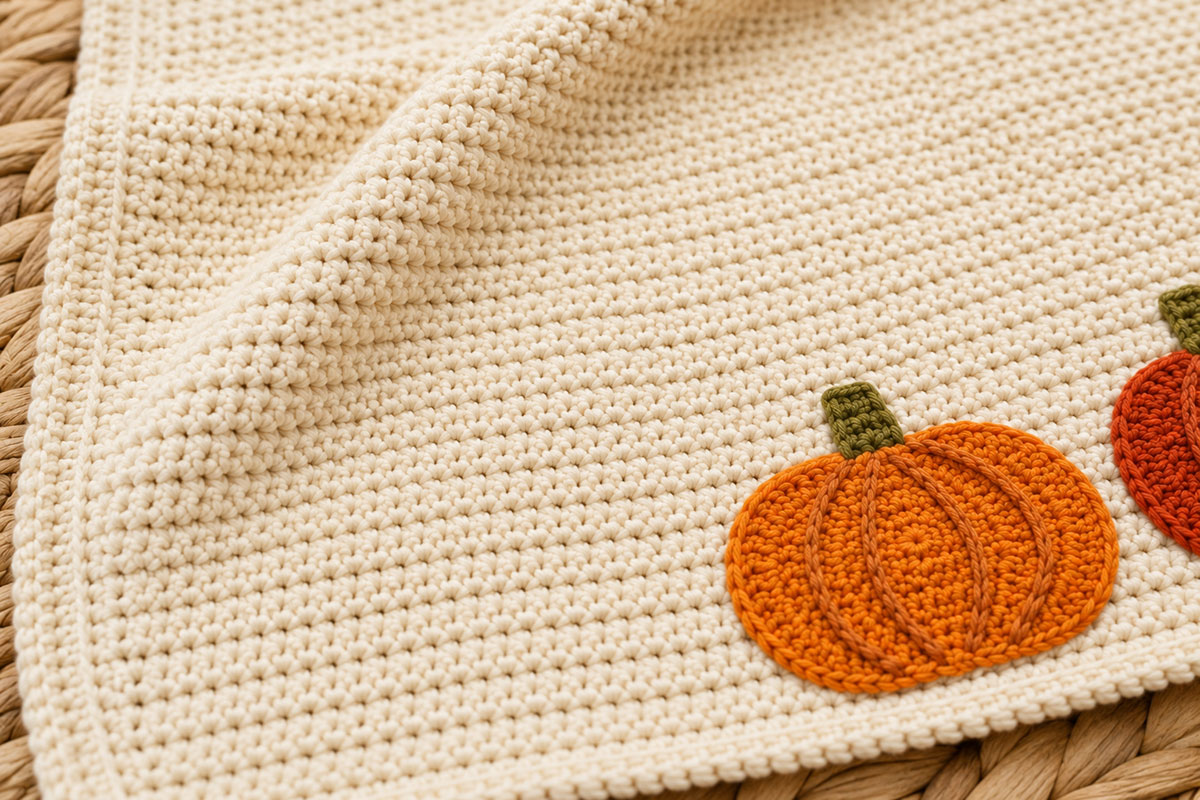
Alternating single crochet and double crochet stitches create a soft pebbled texture without competing with the pumpkin appliqués.
Alternating Single Crochet and Double Crochet Pattern
The blanket base uses a simple two-stitch repeat that is sometimes called lemon peel stitch. A single crochet is worked into each double crochet from the previous row, and a double crochet is worked into each single crochet.
Each row begins with a single crochet and ends with a double crochet. The chain 1 used for turning does not count as a stitch.
Stitch Pattern Checkpoint
Look at the stitch directly below the hook before making the next stitch. Work a short single crochet into a tall double crochet, then work a tall double crochet into a short single crochet. That visual rhythm is often easier to follow than recounting the entire row.
US Crochet Abbreviations
| Abbreviation | Meaning |
|---|---|
| ch | chain |
| sc | single crochet |
| dc | double crochet |
| sl st | slip stitch |
| st or sts | stitch or stitches |
| rep | repeat |
Count the stitches at the end of the first three blanket rows. Each row should contain 104 stitches. Once the edges are established and the stitch pattern is familiar, place a marker in the first and last stitch of each row to make the turning points easier to see.
How to Crochet the Pumpkin Blanket Base
The blanket base is worked back and forth in rows with the 5.5 mm hook and the main background color. The foundation chain forms the lower short edge, and the rows build the length of the blanket. The turning chain does not count as a stitch, so always place the first stitch into the first actual stitch of the previous row.
Chain the foundation loosely. A tight starting chain can pull the lower edge inward even when the remaining rows are worked at the correct gauge. If your chains tend to be snug, make the foundation chain with a 6 mm hook, then change to the 5.5 mm hook for Row 1.
Foundation Chain
Chain 105.
Foundation-loop note: For Row 1, work under the two top loops of each foundation chain, leaving the single bump along the underside unworked. Those unused underside bumps will be used later when the border is crocheted across the lower edge.
Row 1
Work 1 sc in the second chain from the hook. Work 1 dc in the next chain.
Continue working 1 sc in the next chain, 1 dc in the following chain across the foundation chain.
You should finish with a dc in the final chain.
Stitch count: 104 stitches.
Row 2
Chain 1 and turn. The chain 1 does not count as a stitch.
Work 1 sc in the first stitch, which is the dc at the end of the previous row. Work 1 dc in the next stitch.
Continue working 1 sc in the next stitch, 1 dc in the following stitch across the row.
Finish with a dc in the final stitch.
Stitch count: 104 stitches.
Rows 3 Through 111
Repeat Row 2 until you have completed 111 rows, or until the blanket base measures approximately 37 inches from the foundation edge.
Continue checking that every row begins with a sc and ends with a dc. Count the stitches every ten rows so a missed stitch can be corrected before much more of the blanket is completed.
Blanket Base Checkpoints
- After Row 12: The blanket should measure approximately 4 inches long.
- After Row 36: The blanket should measure approximately 12 inches long.
- After Row 72: The blanket should measure approximately 24 inches long.
- After Row 111: The blanket should measure approximately 37 inches long.
- Width throughout: Approximately 32 inches with 104 stitches in every row.
Keeping the Blanket Edges Straight
The first and last stitches can blend into the textured rows, particularly when working with a pale yarn. Place a stitch marker in the first stitch as soon as it is made, then move the marker up with each new row. A second marker in the final stitch can be helpful until the edge pattern becomes familiar.
Lay the blanket flat every several inches and look along both sides. If an edge begins stepping inward, recount the current row. If it begins widening, check that no extra stitch was worked into the turning chain.
Do not stretch the blanket while measuring. Smooth it gently across a flat surface and measure from the lower foundation edge to the top of the most recently completed row.
Prepare the Blanket for the Border and Pumpkins
After Row 111, place a removable marker on the side you would like to use as the front. The stitch pattern is nearly reversible, so choose the side that looks the most even to you.
Fasten off after Row 111 whether you are keeping the same color or changing colors for the border. Cut the yarn, leaving a 6-inch tail, pull the tail through the final loop and weave it securely through several stitches on the back of the blanket. The border will be joined separately at the upper-right corner so its starting position and direction remain clear.
Before adding the appliqués, gently straighten the base by hand or lightly block it according to the yarn label. Allow it to dry completely before placing the pumpkins.
Easy Crochet Pumpkin Appliqué Pattern
Make six flat pumpkins with the 5 mm hook. Each pumpkin is worked in joined rounds around both sides of a foundation chain, which creates an oval without requiring separate front and back pieces.
The finished pumpkin body should measure approximately 5 inches wide by 3 to 3 1/2 inches tall before the stem is attached. Use the same orange for all six, or divide them among coordinating shades of rust, terracotta and muted pumpkin.
For a separate flat pumpkin motif with more leaf detail, use my free crochet pumpkin applique pattern for blankets, bags and other fall projects.
Crochet the Pumpkin Body
Make 6.
Round-start note: The chain 1 at the beginning of a round does not count as a stitch. After each slip-stitch join, work the first single crochet of the next round into the same stitch as the join. Do not work into the joining slip stitch, and do not skip the first stitch.
With orange yarn, chain 11.
Round 1: Work 2 sc in the second chain from the hook. Work 1 sc in each of the next 8 chains. Work 4 sc in the final chain.
Rotate the work so you can crochet along the unused loops on the opposite side of the foundation chain. Work 1 sc in each of the next 8 loops, then work 2 sc in the remaining loop at the end. Join with a sl st to the first sc.
Stitch count: 24 stitches.
Round 2: Chain 1. Work 2 sc in each of the next 2 stitches. Work 1 sc in each of the next 8 stitches. Work 2 sc in each of the next 4 stitches. Work 1 sc in each of the next 8 stitches. Work 2 sc in each of the final 2 stitches. Join with a sl st to the first sc.
Stitch count: 32 stitches.
Round 3: Chain 1. Work 1 sc in the next stitch, 2 sc in the following stitch twice. Work 1 sc in each of the next 8 stitches.
Work 1 sc in the next stitch, 2 sc in the following stitch four times. Work 1 sc in each of the next 8 stitches.
Work 1 sc in the next stitch, 2 sc in the following stitch twice. Join with a sl st to the first sc.
Stitch count: 40 stitches.
Round 4: Chain 1. Work 1 sc in each of the next 2 stitches, 2 sc in the following stitch twice. Work 1 sc in each of the next 8 stitches.
Work 1 sc in each of the next 2 stitches, 2 sc in the following stitch four times. Work 1 sc in each of the next 8 stitches.
Work 1 sc in each of the next 2 stitches, 2 sc in the following stitch twice. Join with a sl st to the first sc.
Stitch count: 48 stitches.
Round 5: Chain 1. Work 1 sc in each of the next 3 stitches, 2 sc in the following stitch twice. Work 1 sc in each of the next 8 stitches.
Work 1 sc in each of the next 3 stitches, 2 sc in the following stitch four times. Work 1 sc in each of the next 8 stitches.
Work 1 sc in each of the next 3 stitches, 2 sc in the following stitch twice. Join with a sl st to the first sc.
Stitch count: 56 stitches.
Fasten off, leaving approximately 60 inches of yarn for sewing the pumpkin body to the blanket. Keep this long tail at the point where it exits the outer edge of the pumpkin. Weave in the beginning tail, but leave the long finishing tail untrimmed.
After completing the first pumpkin body, lay it flat without stretching it. It should measure approximately 5 inches wide by 3 to 3 1/2 inches tall. If it is noticeably larger or smaller, change the appliqué hook size and remake the first pumpkin before making the remaining five. Use the corrected first pumpkin as the size reference for the other five.
Keep the side that faced you while working the joined rounds as the front of the pumpkin. The opposite side is the wrong side. Keep this orientation consistent when attaching the stems, securing the ridge ends and sewing the appliqués to the blanket.
Pumpkin Shape Check
The piece may look more like a plain oval when it first comes off the hook. That is expected. The stem, embroidered ridges and slightly indented top edge are what give it the finished pumpkin shape.
Crochet the Pumpkin Stems
Make 6.
With green or brown yarn, chain 4.
Row 1: Work 1 sc in the second chain from the hook and in each remaining chain. Chain 1 and turn.
Stitch count: 3 stitches.
Rows 2 and 3: Work 1 sc in each of the 3 stitches. Chain 1 and turn after Row 2 only.
Fasten off after Row 3, leaving approximately 30 inches of yarn. Weave in the beginning tail, but leave the long finishing tail untrimmed.
Place the lower edge of the stem behind the upper center of the pumpkin so approximately three-quarters of the stem remains visible. Use part of the long green or brown tail to sew the lower edge of the stem securely to the wrong side of the pumpkin with several small stitches. Leave the remaining tail untrimmed. It will be used later to sew the visible stem edges to the blanket.
Add the Pumpkin Ridges
Stitch the ridges before attaching the pumpkins to the blanket so the yarn ends can be secured on the back of each appliqué and covered when the pumpkin is sewn down.
Thread a tapestry needle with approximately 36 inches of darker orange or brown yarn. This provides enough yarn for five ridge lines, the movements across the wrong side, securing stitches and weaving in both ends.
- Bring the needle from the wrong side to the front near the lower center of the pumpkin.
- Use small backstitches or evenly spaced running stitches to make one line from the lower center to the upper center.
- Make a second line that curves gently from the lower center toward the left side of the stem.
- Make a third line between the center ridge and the left ridge, following the rounded shape of the pumpkin.
- Make a fourth line that curves gently from the lower center toward the right side of the stem.
- Make a fifth line between the center ridge and the right ridge, following the rounded shape of the pumpkin.
- Keep all five ridge lines relaxed so they define the pumpkin sections without puckering the appliqué.
- Secure and weave both yarn ends into the wrong side of the pumpkin.
The five ridge lines do not need to be perfectly identical from pumpkin to pumpkin. Keep them reasonably balanced across the width while allowing the curves to follow the shape of each appliqué.
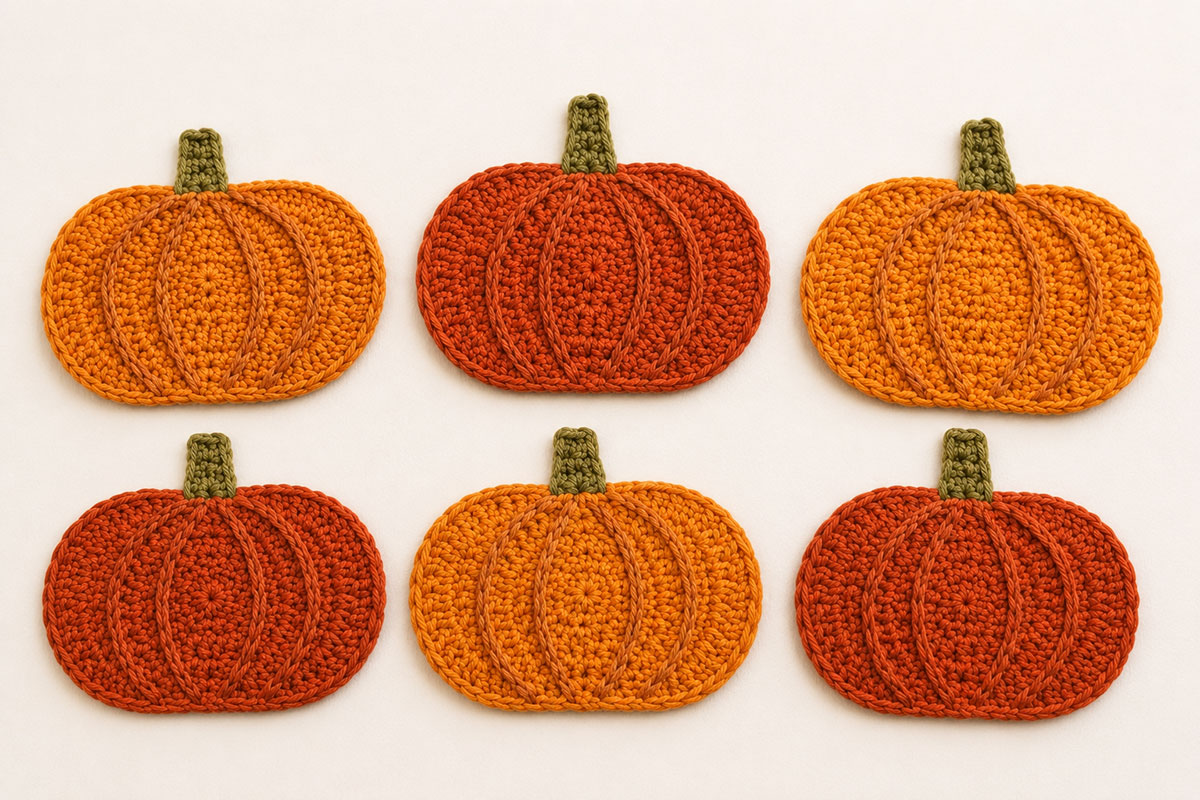
Arrange all six pumpkins together before sewing so you can balance the colors, stem angles and embroidered details.
Shape the Top of Each Pumpkin
Cut a separate 12-inch length of orange yarn and thread it onto the tapestry needle. Make one small anchoring stitch at the top center of the pumpkin, directly below the stem. Draw that point inward by approximately one-quarter inch, then secure and weave both ends into the wrong side of the pumpkin.
Do not use the long perimeter-sewing tail for this step. Keep that tail available for attaching the pumpkin to the blanket. Do not pull the shaping stitch hard enough to fold or pucker the appliqué. The goal is only to create a shallow dip where the pumpkin meets the stem.
For smaller projects that coordinate with the same fall colors, try the crochet pumpkin lovey pattern or the free crochet pumpkin rattle pattern. If you also want a realistic-looking pumpkin for your fall decor, my free crochet pumpkin pattern makes an almost-real looking stuffed pumpkin with a crocheted stem and optional leaf.
For more pumpkin projects beyond the blanket and stuffed version, browse my pumpkin craft ideas.
Add the Blanket Border
Complete the border before sewing the pumpkin appliqués to the blanket. The border straightens the outside edges, covers the small gaps along the row ends and gives you the finished measurements needed for accurate pumpkin placement.
Use the 5.5 mm hook and the main blanket color for a quiet, finished edge. A muted orange, rust or olive border can also be used, but keeping the border the same color as the blanket allows the pumpkins to remain the focus.
Prepare to Work Around the Blanket
- Place the blanket with the marked front side facing you.
- Join the border yarn with a slip stitch in the upper-right corner stitch.
- The first edge worked will be the top short edge, moving from the upper-right corner toward the upper-left corner.
- Place a marker in each corner as you reach it.
Border round-start note: The chain 1 at the beginning of each border round does not count as a stitch. At the end of each round, join with a slip stitch to the first single crochet, not to the beginning chain 1.
Border Round 1
Chain 1. Work 3 sc in the same corner stitch.
Work 1 sc in each of the next 102 stitches across the top edge. Work 3 sc in the final stitch to form the upper-left corner.
Working down the first long side, make 109 sc evenly between the upper and lower corner groups when the blanket contains exactly 111 rows. These 109 stitches correspond to the interior row ends from Rows 2 through 110.
If you changed the number of blanket rows to reach the desired length, use the actual number of rows minus 2 as the starting number of stitches for the first long side. Adjust that number only as needed to make the edge lie flat, then record the final side count.
Work 3 sc in the first foundation-chain stitch at the lower-left corner.
Work 1 sc in each of the next 102 unused foundation-chain bumps across the lower edge. Work 3 sc in the final foundation-chain stitch at the lower-right corner.
Working up the second long side, make exactly the same number of sc used on the first long side. Distribute the stitches evenly so the two long edges match.
Join with a sl st to the first sc of the round.
Round 1 stitch-count formula: Add 216 to twice the actual number of stitches used on one long side. If each long side contains 109 stitches, the Round 1 total is 434 stitches.
Check the Border Before Continuing
Lay the blanket flat after Round 1.
- If the long edges ripple, too many stitches were added along the row ends.
- If the edges pull inward, the side stitches are too widely spaced.
- If an adjustment is needed, remove or add the same number of stitches on both long sides.
- Keep 3 sc in every corner so the blanket can turn without curling.
Border Round 2
Slip stitch forward until the hook is positioned in the center stitch of the first 3-sc corner. Place a marker in that center stitch.
Chain 1. Work 3 sc in the same marked corner stitch.
Work 1 sc in every stitch until you reach the center stitch of the next corner. Work 3 sc in that center corner stitch.
Continue in the same manner around the blanket, working 1 sc in every regular stitch and 3 sc in the center stitch of each corner.
Join with a sl st to the first sc of the round.
Round 2 stitch count: The actual Round 1 count plus 8 stitches. The total will be 442 stitches only when Round 1 contains 434 stitches.
Fasten off, leaving a 6-inch tail. Pull the tail through the final loop. Weave it through several stitches on the back of the border, reverse direction and weave through several more stitches before trimming it.
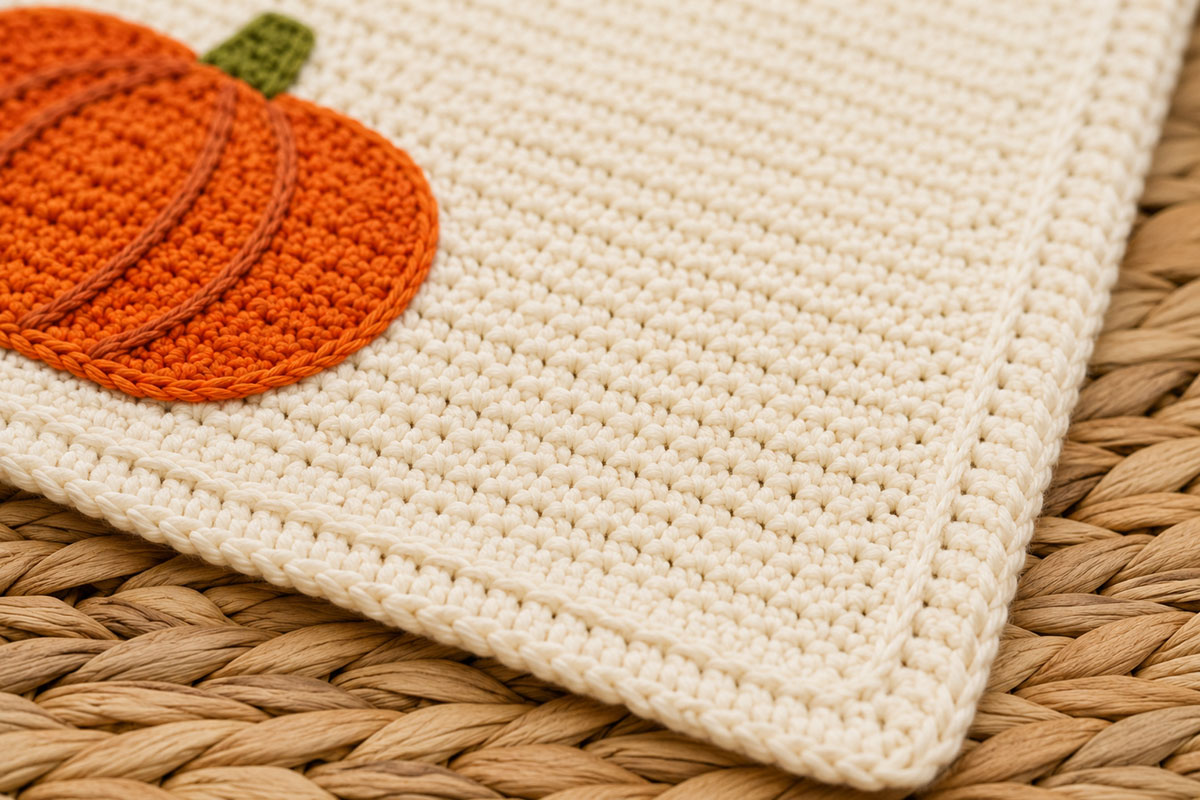
Two rounds of single crochet create a tidy edge without adding a heavy band around the blanket.
Final Border Check
Smooth the blanket across a flat surface and check all four corners. Each corner should form a gentle angle without folding upward or spreading into a ruffle.
The finished blanket should now measure approximately 33 inches wide by 38 inches long. A difference of an inch in either direction is acceptable when the blanket lies flat and the fabric feels soft.
Weave in every remaining blanket and border tail before arranging the pumpkins. Yarn ends hidden beneath an appliqué may be difficult to inspect or repair later.
Arrange and Sew the Pumpkin Appliqués to the Blanket
Finish the blanket border before attaching the pumpkins. A completed border gives you the true outside measurements and makes it much easier to center the arrangement.
Lay the blanket flat with the marked front side facing up. Place the six pumpkins in two rows of three near one short end. Position the bottom edges of the pumpkins in the lower row approximately 4 inches above the inside edge of the border. Leave approximately 2 to 3 inches between the closest edges of the pumpkins in the lower and upper rows.
Center each row across the width of the blanket. Leave an equal amount of open space at the left and right sides, with approximately 2 to 3 inches between the closest edges of neighboring pumpkins. The upper row may be aligned with the lower row or shifted slightly to create a softer, less formal arrangement.
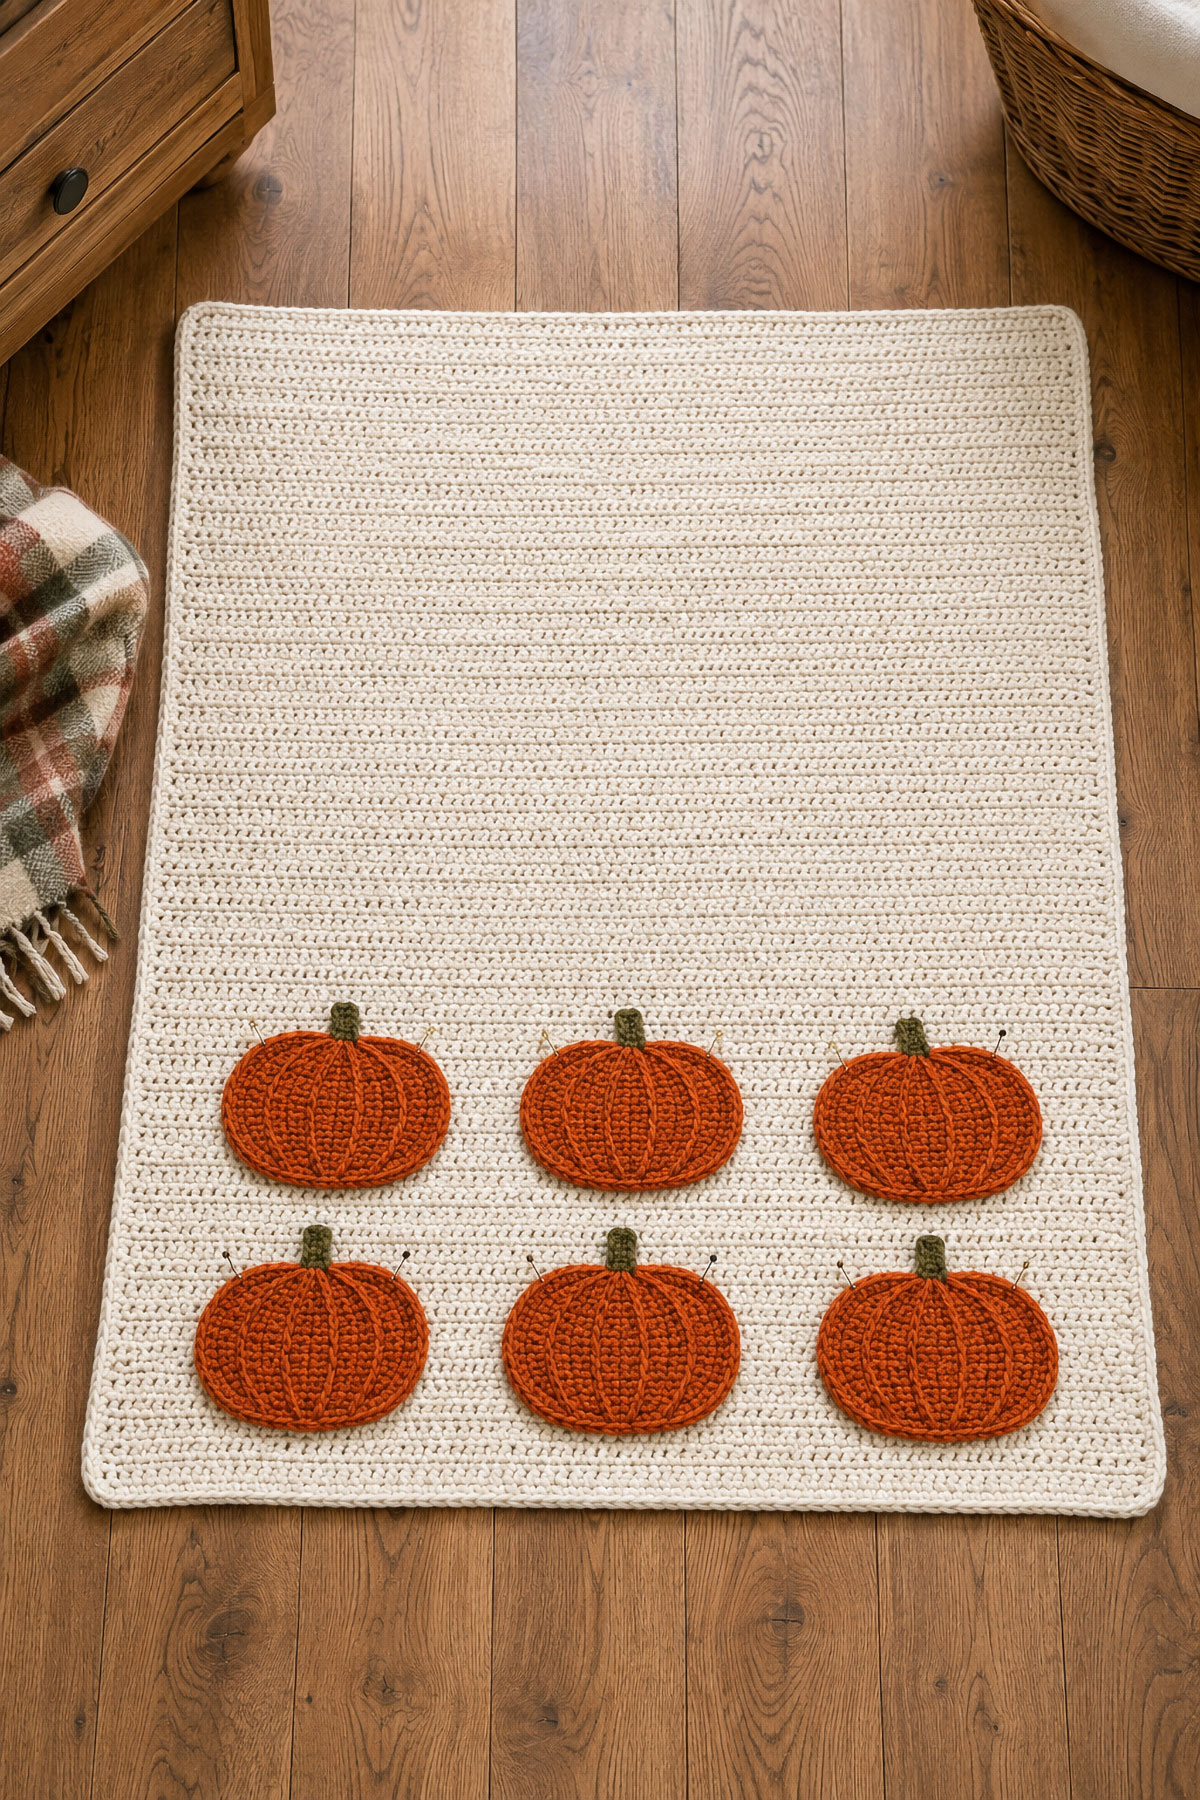
Lay out every pumpkin before sewing and step back for a look at the spacing from all four sides.
Check the Arrangement Before Sewing
Turn the stems in slightly different directions and move repeated colors apart. If one pumpkin is a little larger than the others, place it near the center of a row rather than at an outside edge.
Measure from the blanket border to the outer pumpkins on both sides. The measurements do not need to be exact to the fraction of an inch, but the finished arrangement should look balanced when the blanket is folded.
Secure each pumpkin with rustproof pins or locking stitch markers. Pin the center first, then the top, bottom and both sides. The appliqué should lie flat without stretching the blanket underneath it.
Before You Pick Up the Needle
Fold the lower third of the blanket upward as it might be folded over a stroller or nursery chair. Check that the pumpkins remain visible and are not hidden inside the fold. A small adjustment now can make the finished design much more useful.
Sew Each Pumpkin Securely in Place
- Thread the long orange finishing tail onto the tapestry needle.
- Begin sewing at the point where the tail exits the pumpkin edge. There is no need to move the tail to the lower edge.
- Pass the needle through the pumpkin edge and the blanket fabric, then use small whip stitches to sew completely around the outside edge of the pumpkin body.
- Keep the stitches approximately one-quarter inch apart and remove each pin or locking stitch marker as you reach it.
- Pause after sewing one side and smooth the blanket beneath the appliqué. Loosen any stitches that cause puckering.
- Continue around the complete pumpkin edge until you return to the starting point.
- Make several small securing stitches on the back of the blanket.
- Weave the yarn tail through the blanket stitches in one direction, reverse direction and weave through several more stitches before trimming the end.
Thread the retained green or brown stem tail onto the tapestry needle. Sew along both visible side edges and the top edge of the stem, removing any remaining pin or stitch marker as you work. The lower stem edge is already secured behind the pumpkin. Make several small securing stitches on the back of the blanket, then weave the tail in two directions before trimming it.
Anchor the Middle of Each Pumpkin
After the outer edge is sewn down, add a few small anchoring stitches along the embroidered pumpkin ridges. Match the sewing yarn to the ridge color and place one or two stitches along each line. Secure the yarn on the back of the blanket, weave it through several stitches in one direction, reverse direction and weave through several more stitches before trimming it.
These center stitches keep the appliqué from lifting away from the blanket after washing. They should be snug enough to hold the layers together without pulling the blanket into a dip.
Repeat the sewing and anchoring process for all six pumpkins. Turn the blanket over after each appliqué and check that the yarn ends are secure, the reverse side is reasonably neat and no long loops have formed.
For another seasonal baby project using embroidered details rather than plastic features, visit the free crochet ghost pattern.
Finishing, Washing and Caring for the Blanket
Once the border and all six pumpkins are attached, inspect the entire blanket from both sides. Run your fingers around every appliqué edge and stem to make sure there are no loose sections, long yarn loops or ends beginning to work free.
Weave any remaining tails through several stitches, reverse direction and weave through a second time before trimming. Avoid knots that sit directly against the baby’s skin or create a hard bump beneath an appliqué.
Wash the Finished Pumpkin Crochet Blanket
Follow the care instructions printed on the yarn label. For washable acrylic or cotton-blend yarn, a gentle machine cycle with cool water is often suitable, but the yarn manufacturer’s directions should take priority.
- Place the blanket in a large mesh laundry bag if the appliqués could catch on other items.
- Use a mild, fragrance-free detergent.
- Do not use bleach.
- Wash the blanket by itself or with other soft items that do not have hooks, zippers or rough fasteners.
- Reshape the pumpkins and border while the blanket is damp.
- Lay flat to dry when possible, or use the dryer setting permitted by the yarn label.
Check the appliqués again after the first wash. Tighten or repair any stitches that have loosened before the blanket is used.
Lightly Shape the Blanket After Washing
Spread the damp blanket on clean towels or blocking mats. Smooth the long edges, straighten the corners and gently shape each pumpkin with your fingertips.
Do not stretch the blanket to force it to match the listed measurements. The goal is to help the stitches settle evenly and allow the appliqués to dry flat.
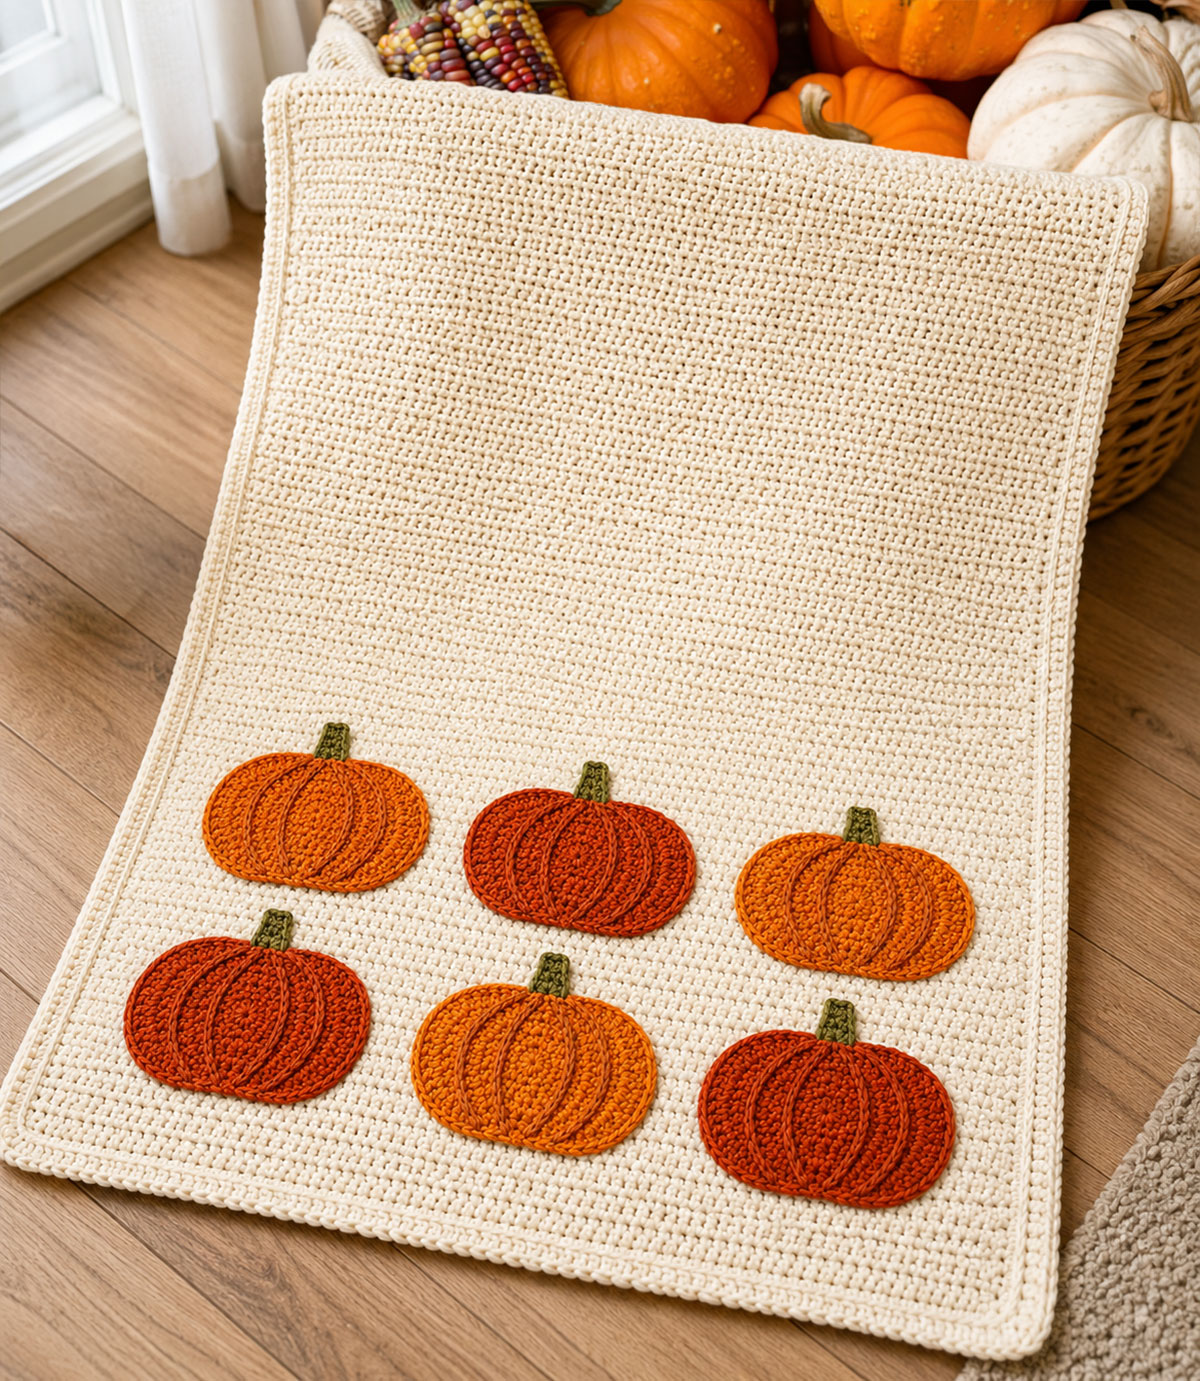
A neutral background keeps the finished pumpkin blanket useful throughout fall, from early September through Thanksgiving.
How to Make a Smaller or Larger Blanket
The stitch pattern requires an even number of stitches. To change the width, begin with any odd-numbered foundation chain. Working into the second chain from the hook will leave an even number of stitches for the alternating single crochet and double crochet repeat.
For a smaller stroller blanket, begin with fewer chains and continue until the base reaches the length you prefer. For a larger child-size blanket, add foundation chains in groups of two and work additional rows.
Make a gauge swatch first, then use this calculation:
Desired width in inches × stitches per inch = approximate stitch count.
Round the result to the nearest even number, then add one chain for the foundation chain.
Border note for a resized blanket: Do not use the original counts of 102 stitches across the short edges or 109 stitches along the long edges. On each short edge, work 3 sc in the first corner stitch, 1 sc in each stitch between the two corners, and 3 sc in the final corner stitch. Along each long edge, begin with the actual number of blanket rows minus 2 and adjust the spacing evenly only as needed so the edge lies flat. Use the same final number of side stitches on both long edges. Record the actual Round 1 total. For Round 2, work 3 sc in the center stitch of each corner group and 1 sc in every other stitch. Round 2 will contain the actual Round 1 total plus 8 stitches.
Changing the blanket dimensions will also change the yardage. A larger blanket may need additional pumpkins so the design does not look too small against the expanded background.
Baby Blanket Use and Safety
This blanket is intended for supervised use, stroller outings, tummy time, photographs, gifting and nursery display. It should not be placed loose in a crib, bassinet or other infant sleep space.
The U.S. Consumer Product Safety Commission advises keeping pillows, quilts, comforters and other loose items out of a baby’s sleep area. You can review current guidance on the CPSC Safe Sleep information page.
Inspect the blanket regularly for pulled stitches, loose appliqué edges, damaged yarn or unraveling ends. Stop using it until any damage has been repaired securely.
Before Giving the Blanket as a Gift
- Wash and dry it according to the yarn label.
- Confirm that every pumpkin and stem is sewn down completely.
- Check both sides for loose yarn loops.
- Include the fiber content and washing instructions with the gift.
- Let the recipient know that the blanket is for supervised use and should remain outside the infant sleep space.
Fall Color Ideas for a Pumpkin Crochet Blanket
The same pattern can look quite different depending on the background and pumpkin colors. A cream blanket with traditional orange pumpkins feels cheerful and familiar, while oatmeal, rust and olive create a softer harvest palette that can remain in the nursery well past Halloween.
I would keep the blanket base lighter than the appliqués so the pumpkin shapes remain easy to see. Very dark background yarn can hide the embroidered ridges, especially when the blanket is folded or photographed indoors.
Neutral Harvest Palette
- Blanket: Oatmeal, warm ivory or pale taupe
- Pumpkins: Rust, terracotta and muted orange
- Stems: Olive, moss or medium brown
- Ridges: Cinnamon or dark rust
This combination has a warm autumn look without feeling tied to one holiday. It also works well with natural wood furniture, woven baskets and simple cream bedding.
For a full room plan using these same rust, olive, warm ivory and pumpkin colors, see my fall nursery room ideas for harvest, woodland and farmhouse decorating directions.
Little Pumpkin Baby Girl Palette
- Blanket: Soft cream or pale blush
- Pumpkins: Peach, dusty coral, muted orange and rose
- Stems: Sage or olive
- Ridges: Terracotta
Use blush sparingly so the pumpkins still read clearly as pumpkins. Two orange appliqués, two peach and two dusty rose create a balanced mix without making the blanket look overly coordinated.
Little Pumpkin Baby Boy Palette
- Blanket: Warm ivory, pale tan or soft sage
- Pumpkins: Burnt orange, rust and golden brown
- Stems: Moss green or chocolate brown
- Ridges: Dark rust
A pale sage background gives this version a gentle fall nursery look while still providing enough contrast for the orange appliqués.
Halloween Color Variation
- Blanket: Ivory or light gray
- Pumpkins: Bright orange and deep rust
- Stems: Charcoal or dark green
- Border: Charcoal, orange or the main blanket color
Keep the blanket background light if you want to add charcoal accents. A narrow dark border and a few darker stems provide a Halloween touch without turning the whole project into a heavy black-and-orange throw.
Choosing Colors from Leftover Yarn
Place all possible pumpkin colors on top of the main blanket yarn before beginning the appliqués. View them in daylight and remove any shade that disappears into the background. The pumpkins do not need to match, but they should have enough contrast to remain visible from several feet away.
Readers planning a fall nursery or seasonal shower may also find useful ideas on the little pumpkin baby shower page. The same cream, rust, sage and peach combinations can be repeated in table linens, invitations and simple nursery accents.
Frequently Asked Questions About the Pumpkin Crochet Blanket
Is this pumpkin crochet blanket pattern suitable for a beginner?
Yes. A confident beginner who can make chains, single crochet stitches and double crochet stitches should be able to complete the blanket base. The pumpkin appliqués include increases and joined rounds, so read each round completely before beginning and count the stitches before moving ahead.
The project is easier to manage when it is completed in stages. Crochet the blanket base first, make all six pumpkins and embroider the ridges, add the border, then arrange and attach the appliqués.
Can I use bulky blanket yarn?
You can use bulky yarn, but the finished size, texture, hook size and yardage will all change. The instructions and stitch counts on this page are written for category 4 medium-weight yarn.
If you use a yarn such as Bernat Blanket, make a large gauge swatch before starting. Bulky yarn may create a much larger blanket and appliqués that feel too thick when layered on top. You may need fewer foundation chains, fewer rows and a redesigned pumpkin size rather than simply following the original counts with a larger hook.
Can I crochet the blanket in one solid color?
Yes. A solid cream, oatmeal, sage or pale tan blanket gives the orange pumpkins plenty of contrast. Using the same color for the blanket base and border also makes small variations in border spacing less noticeable.
For a quieter design, make the pumpkins in two related shades instead of six different colors. Rust and muted orange, or peach and terracotta, provide variation without making the blanket look busy.
Can I make fewer pumpkin appliqués?
Yes. Three pumpkins arranged in one row near a short edge make a simpler version. You could also place one larger pumpkin in a lower corner, provided every edge and the center of the appliqué are sewn securely to the blanket.
Arrange the pieces while the blanket is lying flat before deciding. A single appliqué that looks large in your hand may appear quite small against a 33-by-38-inch blanket.
Why is my blanket edge getting narrower?
The most common cause is missing the final stitch of a row. Because the turning chain does not count as a stitch, work the last double crochet into the final actual stitch from the previous row.
Place a stitch marker in the first and last stitch of every row until the edges are easy to recognize. The blanket should maintain 104 stitches throughout the base.
Why is the border rippling?
A rippled border generally means there are too many stitches along the long sides. Remove Round 1 and space the side stitches a little farther apart. Make the same adjustment on both long edges so the blanket remains balanced.
If the border pulls inward instead, add a few evenly spaced stitches to each long side. The blanket should lie flat before Round 2 is added.
How do I keep the pumpkin appliqués from curling?
Check that the appliqué increases were worked evenly and that the outer round was not crocheted too tightly. Lightly shape each pumpkin before attaching it, then pin the center and edges to the blanket without stretching either layer.
Sew around the complete outside edge and add small anchoring stitches through the embroidered ridges. Those center stitches help the pumpkin remain flat after washing.
Can I add faces to the pumpkins?
A face is optional, but avoid buttons, beads, glued felt and plastic safety eyes on a baby blanket. Any features should be embroidered securely with yarn or embroidery floss before the pumpkin is attached.
Keep the stitches short, knot-free on the front and firmly woven into the back of the appliqué. Inspect them after washing and repair any loose section before use.
Can this blanket be placed in a crib?
No loose blanket should be placed in an infant sleep space. Use this project for supervised cuddling, stroller outings, tummy time, photographs or nursery display, then store it outside the crib or bassinet before sleep.
What can I make with leftover pumpkin-colored yarn?
Small amounts of orange, rust and green yarn can be used for another crochet pumpkin lovey, extra appliqués for a coordinating nursery basket or a set of flat pumpkins for gift wrapping.
For more handmade baby projects, continue through the collection of free baby crochet patterns. A pumpkin blanket paired with a small lovey makes a thoughtful fall gift, but either project is useful and complete on its own.
For a gift with a stronger October theme, browse the spooky-cute Halloween crochet collection of soft ghost, bat, pumpkin, spider, black cat and candy corn projects.
Final Pattern Check
- Confirm that the blanket lies flat and the corners are not curling.
- Confirm that every straight pin, locking stitch marker and temporary placement marker has been removed.
- Check every appliqué edge and embroidered ridge for loose stitches.
- Weave in all yarn tails in more than one direction.
- Wash and reshape the blanket according to the yarn label.
- Keep the finished blanket outside the infant sleep area.
The result is a cheerful fall baby blanket with enough texture to be interesting, enough repetition to remain approachable and pumpkin details that can be changed to suit the nursery. Once the appliqués are arranged and sewn down, the design feels finished without needing fringe, buttons or extra decorations.
More Free Crochet Baby Patterns to Make Next
If you enjoyed working the simple blanket texture but would like a smaller project next, an animal lovey is a practical way to use partial skeins left in your yarn basket. The blanket colors can often be carried into the next project so the finished pieces coordinate without looking like a matched set.
Continue with Another Free Baby Crochet Pattern
Explore the Animal Lovey Pattern Collection
Make a Soft Crochet Bunny Lovey
A few carefully chosen stitches and colors can do plenty of the decorating. That is part of the charm of this pumpkin blanket. It feels unmistakably like fall, but it remains soft, useful and simple enough to let the handmade details speak for themselves.
When you click on links to various merchants on this site and make a purchase, this may result in this site earning a commission. This does not affect the price you pay.

UBGI Gold Standard 2026
Reviewed under the site's
editorial checklist.
Photos, decorating ideas, party setups and reader submissions are shared for inspiration unless a page is specifically presented as a pattern, tutorial, reference guide or step-by-step project. Follow the instructions, measurements, safety guidance and manufacturer directions provided for the particular project or product.
About Jan | Contact | Baby Nursery Ideas (Blog) | Site Map | Privacy Policy | Disclosure Policy | Disclaimer | Affiliate Disclosure | Earnings Disclosure | Facebook | Pinterest
I am a participant in the Amazon Services LLC Associates Program, an affiliate advertising program designed to provide a means for us to earn fees by linking to Amazon. As an Amazon Associate I earn from qualifying purchases.
Copyright © 2006-2026. All Rights Reserved.