Free Crochet Pumpkin Baby Rattle Pattern
By Jan Bay
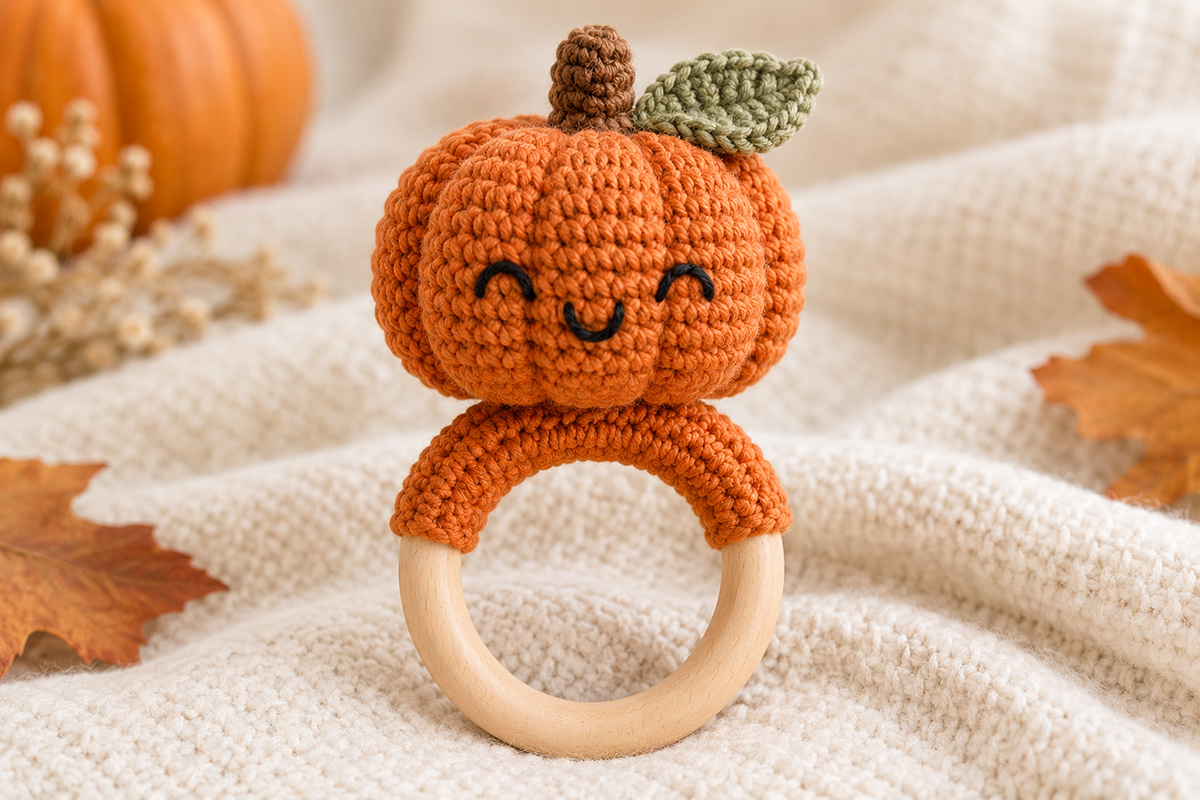
This free crochet pumpkin rattle pattern creates the ribbed orange pumpkin shown here with a smooth wooden ring handle, short brown stem, sage green leaf and embroidered happy face. Keep that sweet pumpkin face for a handmade fall baby gift, or change only the embroidery to make the Jack o lantern version for Halloween that coordinates with my pumpkin lovey and other seasonal crochet projects.
Explore More Free Crochet Baby Patterns
Wooden Ring and Supplies for This Project
Jump to:
Pumpkin Rattle Size and Finished Design
The finished rattle is designed to look like the example image: one plump ribbed pumpkin head sitting above a smooth wooden ring, with a short brown stem, one sage green leaf and a simple embroidered face. The orange crochet at the top of the ring forms a neat covered arch, so the pumpkin doesn't look as though it was simply stitched onto a bare wooden circle.
Using worsted weight cotton yarn and a 3.5 mm crochet hook, the pumpkin head should finish at about 4 1/2 to 5 inches wide and about 3 1/2 inches tall before the stem is added. A wooden ring about 2 3/4 to 3 inches across gives the rattle the proportions shown in the example image. The complete rattle should measure approximately 7 to 7 1/2 inches from the top of the stem to the bottom of the ring.
Those are expected finished measurements based on the stitch counts, gauge and construction below. This pattern has not been physically test-made, so don't treat the measurements as laboratory-tested specifications. A small difference in yarn thickness, stuffing or tension can change the finished size.
The pumpkin itself will be crocheted as one stuffed piece in continuous rounds. After the basic pumpkin shape is complete, one long strand of orange yarn will be carried around the outside of the stuffed piece to form the deep vertical pumpkin ribs you see in the finished example. That gives us the rounded sections without having to crochet and sew together several separate wedges.
I'd keep those ribs fairly pronounced. If you barely tighten the shaping yarn, you'll end up with an orange ball rather than the pumpkin shown here. Pull each pass of the shaping strand just firmly enough to make a visible groove without puckering or crushing the stuffing.
The brown stem and sage leaf are made separately and sewn securely to the top. The face is embroidered directly onto the pumpkin with black yarn or embroidery floss. There are no plastic safety eyes or buttons on the finished design.
If you want an actual sound when the toy is shaken, the pattern will use one small, fully enclosed commercial rattle insert inside the stuffed pumpkin. Don't substitute loose beads, pellets, bells or other small pieces inside the stuffing. The insert goes into the center of the pumpkin and is completely surrounded by fiberfill before the opening is closed.
Gauge: approximately 18 single crochet stitches and 20 rounds = 4 inches in firmly worked single crochet. Exact gauge isn't as critical here as it would be for clothing, but the fabric needs to be tight enough that the stuffing and rattle insert cannot work through the stitches.
Materials for This Free Crochet Pumpkin Rattle Pattern
I would use cotton yarn for this project because it gives the pumpkin enough stitch definition for those deep ribs without making the finished head look fuzzy. You don't need much yarn, so this is also a good project for using smaller amounts left from another pumpkin or fall crochet project.
You'll need:
- About 80 yards worsted weight cotton yarn in pumpkin orange
- About 10 yards worsted weight cotton yarn in brown for the stem
- About 8 yards worsted weight cotton yarn in sage or olive green for the leaf
- A small amount of black embroidery floss or black yarn for the face
- 3.5 mm crochet hook
- One smooth solid wood ring approximately 2 3/4 to 3 inches across
- One small fully enclosed commercial rattle insert, approximately 1 to 1 1/4 inches across
- Polyester fiberfill
- Tapestry needle for sewing and finishing
- One long yarn or doll needle, about 4 to 5 inches long, with an eye large enough for the yarn
- One working stitch marker plus 8 removable stitch markers or short pieces of contrasting yarn for rib placement
- Scissors
The yarn amounts are expected amounts for the stated gauge, not yardage measured from a physically test-made sample. The orange allowance includes the 3-yard strand used to shape the pumpkin ribs. Keep a little extra yarn available if you crochet more loosely.
If this rattle will actually be handled by a baby, don't grab a generic craft ring simply because it happens to be the right size. Choose a smooth solid wood ring from a supplier that provides information about the material and its intended use for baby-toy craft projects. Check it carefully for cracks, rough spots and splinters before you crochet around it. Don't treat the completed crochet rattle as a teether simply because the wooden ring itself may have been marketed for teether making.
I would also use a sealed rattle insert rather than trying to make one from a container filled with loose beads. The insert is going inside the stuffed pumpkin, but it still needs to remain one enclosed piece.
Abbreviations used in the pattern:
- ch = chain
- sc = single crochet
- hdc = half double crochet
- dc = double crochet
- tr = treble crochet
- sl st = slip stitch
- inc = work 2 single crochet stitches in the same stitch
- inv dec = invisible decrease over the next 2 stitches
The pumpkin is worked in continuous rounds. Don't join at the end of each round unless the instructions specifically tell you to. Put a stitch marker in the first stitch and move it up after every round. The number in parentheses at the end of each round is the stitch count you should have before moving on.
For an invisible decrease, insert the hook through the front loop of each of the next 2 stitches, yarn over and pull through both front loops, then yarn over and pull through the 2 loops on the hook. That keeps the decreasing rounds neater than ordinary single crochet decreases.
Secure each magic ring: Both the pumpkin head and the brown stem begin with a magic ring. Leave at least a 6-inch starting tail. After Round 2 of each piece, pull the center opening firmly closed, thread the starting tail onto the tapestry needle and weave it through several stitches around the inside of the center ring in one direction and then back in the opposite direction. The center should stay closed when you gently pull on the fabric. Bury the remaining tail before that piece is stuffed.
Crochet the Pumpkin Head
The pumpkin head is one stuffed piece. We're going to crochet a fairly simple rounded form first and then pull shaping yarn around the outside to make the pumpkin ribs. That second step matters. It changes the piece from a round orange amigurumi head into the plump segmented pumpkin shown in the example image.
With pumpkin orange yarn:
Round 1: Make a magic ring and work 6 sc into the ring. Pull the ring closed. (6)
Round 2: Inc in each stitch around. (12)
Round 3: [Sc in next stitch, inc in next stitch] 6 times. (18)
Round 4: [Sc in next 2 stitches, inc in next stitch] 6 times. (24)
Round 5: [Sc in next 3 stitches, inc in next stitch] 6 times. (30)
Round 6: [Sc in next 4 stitches, inc in next stitch] 6 times. (36)
Round 7: [Sc in next 5 stitches, inc in next stitch] 6 times. (42)
Round 8: [Sc in next 6 stitches, inc in next stitch] 6 times. (48)
Round 9: [Sc in next 7 stitches, inc in next stitch] 6 times. (54)
Round 10: [Sc in next 8 stitches, inc in next stitch] 6 times. (60)
Round 11: [Sc in next 14 stitches, inc in next stitch] 4 times. (64)
Rounds 12 through 13: Sc in each stitch around. (64)
Round 14: Sc in each stitch around. (64) As you work this round, place a removable rib marker in stitches 1, 9, 17, 25, 33, 41, 49 and 57. Keep your beginning-of-round marker separate. The eight rib markers divide the 64-stitch round into eight equal sections of 8 stitches each.
Rounds 15 through 17: Sc in each stitch around. (64)
You should now have the widest part of the pumpkin. Don't stuff yet. Leave the eight rib markers in Round 14 while you finish and stuff the head.
Round 18: [Sc in next 14 stitches, inv dec] 4 times. (60)
Round 19: [Sc in next 8 stitches, inv dec] 6 times. (54)
Round 20: [Sc in next 7 stitches, inv dec] 6 times. (48)
Round 21: [Sc in next 6 stitches, inv dec] 6 times. (42)
Round 22: [Sc in next 5 stitches, inv dec] 6 times. (36)
Start stuffing the pumpkin now. Add the fiberfill in small amounts and push it out toward the sides instead of packing one hard lump into the middle. You want a firm head that keeps its shape, but leave enough give for the shaping strands to pull grooves into it.
Place the sealed rattle insert in the center of the stuffing. Surround it on every side with fiberfill so it isn't sitting directly against the crochet fabric.
Round 23: [Sc in next 4 stitches, inv dec] 6 times. (30)
Round 24: [Sc in next 3 stitches, inv dec] 6 times. (24)
Add more stuffing around the opening. Check the sides and top for soft or hollow spots before the opening becomes too small to correct them.
Round 25: [Sc in next 2 stitches, inv dec] 6 times. (18)
Round 26: [Sc in next stitch, inv dec] 6 times. (12)
Round 27: Inv dec around. (6)
Fasten off, leaving a tail about 12 inches long. Thread the tail onto a tapestry needle, pass it through the front loops of the remaining 6 stitches and pull firmly to close the opening. Secure the yarn and bury the tail inside the pumpkin.
Shape the pumpkin ribs:
Cut a long length of orange yarn, about 3 yards, and thread it onto the long yarn or doll needle. Secure the yarn at the bottom center of the pumpkin, leaving a 6-inch tail to bury later. The shaping yarn will stay on the outside of the pumpkin rather than passing through the stuffed center, so the needle never has to travel through the rattle insert.
Bring the yarn up the outside of the pumpkin so it passes directly over the first rib marker in Round 14. At the top center, slide the needle under 2 adjacent crochet stitches on the surface only. Pull gently until the yarn makes a definite vertical groove. Don't cinch it hard enough to flatten the pumpkin. Remove that rib marker once the groove is in position.
From the top center, bring the yarn down the outside over the next rib marker. At the bottom center, slide the needle under 2 adjacent surface stitches, pull until the second groove matches the first one in depth, and remove that marker.
Continue alternating between the top and bottom centers, taking the yarn down or up the outside over the next rib marker each time and passing the needle under 2 surface stitches at the center before moving to the next groove. Do not push the needle through the stuffing or through the rattle insert.
Repeat until all 8 evenly spaced grooves are formed and all eight rib markers have been removed. Because the markers were placed every 8 stitches around the 64-stitch round, the grooves will remain evenly distributed around the pumpkin.
Look at the pumpkin from the top before securing the shaping yarn. The eight sections should be reasonably even, and the top and bottom should remain centered. If one groove is noticeably deeper than the others, adjust its tension before you tie off. The ribs should be easy to see without crushing the stuffing.
Secure the shaping yarn at the bottom center and bury both ends securely inside the crochet fabric. After shaping, the pumpkin should be wider than it is tall, with eight softly rounded sections like the example image.
Add the Crochet Stem and Leaf
The stem is deliberately short and chunky. A long skinny stem would change the look of the finished rattle quite a bit, so keep this one compact. The leaf sits beside it and points out across the upper edge of the pumpkin rather than standing straight up.
Crochet the brown stem:
With brown yarn, make a magic ring.
Round 1: Work 6 sc into the ring. (6)
Round 2: Inc in each stitch around. (12)
Rounds 3 through 7: Sc in each stitch around. (12)
Fasten off, leaving a 15-inch tail for sewing. Add a very small amount of fiberfill to the stem. You only need enough to keep the little cylinder upright. Don't pack it hard.
Set the stem aside while you make the leaf.
Crochet the sage green leaf:
Ch 10.
Beginning in the second chain from the hook, work 1 sl st in the next chain, 1 sc in the next chain, 1 hdc in the next chain, 1 dc in the next chain, 1 tr in the next chain, 1 dc in the next chain, 1 hdc in the next chain and 1 sc in the next chain.
In the last chain, work [1 sc, ch 2, 1 sc]. The ch-2 makes the pointed tip.
Now work back along the unused loops on the opposite side of the foundation chain: 1 sc in the next chain, 1 hdc in the next chain, 1 dc in the next chain, 1 tr in the next chain, 1 dc in the next chain, 1 hdc in the next chain, 1 sc in the next chain and 1 sl st in the last chain.
Fasten off, leaving a 12-inch tail for sewing.
Lay the leaf beside the stem before attaching either piece. I would angle the leaf slightly to one side, as shown in the example image, instead of placing it directly behind the stem where most of it disappears.
Sew the open bottom edge of the stem securely over the top center of the pumpkin. Stitch all the way around the base rather than catching it in only two or three places. The stem will be handled every time the rattle is picked up, so it shouldn't be able to pull away from the pumpkin easily.
Sew the base of the leaf beside the stem. Secure about the first 3/4 inch of the leaf to the pumpkin and leave the pointed end free. That lets the leaf sit naturally against the top while keeping it firmly attached.
Once both pieces are attached, give each one a gentle tug and check your stitches. If the base shifts or you can see a gap where a finger could catch underneath it, add more sewing stitches before moving on.
Embroider the Pumpkin Face
The face in the example image is simple on purpose: two small curved closed eyes and a little curved smile. I wouldn't add separate crocheted eyes or any other pieces here. Embroidery keeps the front of the pumpkin clean and gives us fewer attached parts on a baby rattle.
Use black embroidery floss or a thin strand of black yarn. Before you stitch, set the pumpkin upright with the stem at the top and choose one rounded pumpkin section as the center front, with a shaping groove on either side of it. The face should sit across the middle third of the pumpkin, not high under the stem.
Place the eyes about 1 1/4 to 1 1/2 inches apart. Make each eye a small upside-down U about 1/2 inch wide, matching the closed-eye expression in the example image. Use 2 or 3 short stitches for each curve rather than one long loose stitch that could catch on a finger.
Put the mouth midway between the eyes and slightly below them. Make a small U-shaped smile about 1/2 inch wide with 2 or 3 short stitches.
I would enter and leave with the embroidery thread at the bottom of the pumpkin, in the area that will later be covered by the orange ring attachment. Secure the ends well, then bury them deeply inside the stuffed head. Don't leave knots, long floats or thread ends exposed on the face.
Check the expression before you secure the last end. The two eyes should be at about the same height, but they don't need to look machine-perfect. The finished example has a soft handmade expression, not a complicated amigurumi face.
Jack o Lantern Rattle Option
If you're making this for a first Halloween gift, you can turn the same pumpkin into a Jack o lantern without changing any of the crochet construction. Only the embroidery changes.
Skip the curved eyes and smile. With black embroidery floss, make two small triangular eyes about 1/2 inch wide. Fill each triangle with closely spaced satin stitches. Add a tiny triangle for the nose if you want one, but keep it flat and embroidered.
For the mouth, stitch a shallow zigzag or slightly crooked smile about 1 inch wide. Use short individual stitches so there are no long loose strands across the surface.
I wouldn't add felt pieces, glued features or separate crocheted facial pieces. The embroidered version gives you the Jack o lantern look while keeping the pumpkin construction exactly the same.
If you want the rattle to coordinate with the free crochet Jack o lantern lovey pattern, use the same orange, brown and black color family for both projects. Or leave the happy pumpkin face from the main pattern if you want something that works through the whole fall season rather than only for Halloween.
Attach the Wooden Ring
The orange section above the wooden ring isn't a separate stuffed handle. It's a short crocheted band worked directly around the upper part of the ring and then sewn to the bottom of the pumpkin. That is what gives the finished rattle the broad orange arch shown in the example image while leaving most of the natural wood exposed.
With pumpkin orange yarn:
Hold the wooden ring with the section you want covered at the top. Make a slip knot on the hook and bring the hook through the center of the ring.
Foundation row: Work 18 sc snugly around the wooden ring itself. To make each stitch, insert the hook through the center of the ring, yarn over, pull the loop back around the wood, yarn over again and complete the single crochet. Push the stitches together as you work so the covered section stays centered at the top of the ring. (18)
The 18 stitches should cover roughly the upper third to upper half of the ring, depending on the thickness of your wooden ring and your tension. Don't keep adding stitches merely to fill more space. We want a short orange arch like the one in the example, not a completely crocheted ring.
Row 2: Ch 1 and turn. Sc in each stitch across. (18)
Row 3: Ch 1 and turn. Sc the first 2 stitches together, sc in the next 14 stitches, sc the last 2 stitches together. (16)
Row 4: Ch 1 and turn. Sc the first 2 stitches together, sc in the next 12 stitches, sc the last 2 stitches together. (14)
Fasten off, leaving a tail about 24 inches long for assembly.
Turn the band so the 14-stitch edge points upward. Center the pumpkin over it with the embroidered face pointing straight forward. The band should meet the bottom center of the pumpkin and curve down toward the wooden ring on both sides.
Thread the long orange tail onto the tapestry needle. Sew the entire 14-stitch upper edge of the band securely to the bottom of the pumpkin. Go through actual crochet stitches on both pieces rather than catching only surface fibers. Work back across the seam a second time if necessary.
Use another length of orange yarn to make 4 small sewing stitches through the upper 1/2 inch of one side edge of the band and into adjacent stitches along the lower edge of the pumpkin. Repeat with 4 stitches on the other side. Leave the lower part of the band around the wooden ring free. The connection should look broad and smooth, with no narrow neck between the pumpkin and ring.
Now hold the pumpkin and gently pull the wooden ring in several directions. The crochet stitches around the ring may settle slightly into position, but the pumpkin shouldn't separate from the band and no seam should open.
Don't use glue to compensate for loose sewing. If the attachment isn't firm, add more yarn stitches through the crocheted band and pumpkin.
Finish and Check the Pumpkin Rattle
Before you call it finished, make sure the working stitch marker and all eight temporary rib markers have been removed, then work your way over the whole rattle with your fingers. Check the stem, leaf, embroidered face, pumpkin seam and orange ring attachment. Give every attached crochet piece a gentle pull. Look at the wooden ring from all sides for cracks, rough areas or splinters.
Shake the rattle and make sure the insert stays centered inside the stuffed pumpkin rather than feeling as though it is working toward the outside fabric. You shouldn't be able to see stuffing through the crochet stitches.
Trim or bury any remaining yarn ends. Don't leave a loose end hanging from the stem, leaf, face or ring attachment.
Because this project is designed in the form of an infant rattle, there's an important difference between following a handmade pattern and having a finished children's product that has passed safety testing. The U.S. Consumer Product Safety Commission's rattle requirements use dimensional and use-and-abuse tests to address choking and suffocation hazards. Commercially manufactured or imported rattles are also subject to applicable testing and certification requirements. Following this crochet pattern by itself does not establish that a handmade finished rattle would pass those tests.
If you make the project without having the completed rattle evaluated to the applicable requirements, don't describe it as a safety-certified infant toy. Inspect every seam and attached piece carefully, and stop use immediately if the wood cracks, yarn loosens, stuffing or the rattle insert becomes accessible, or the stem, leaf or ring attachment begins to pull away. Adult supervision does not replace product testing. Don't add a cord, ribbon, pacifier clip or long loop to the wooden ring, and don't leave the rattle in a crib or other sleep space with a baby.
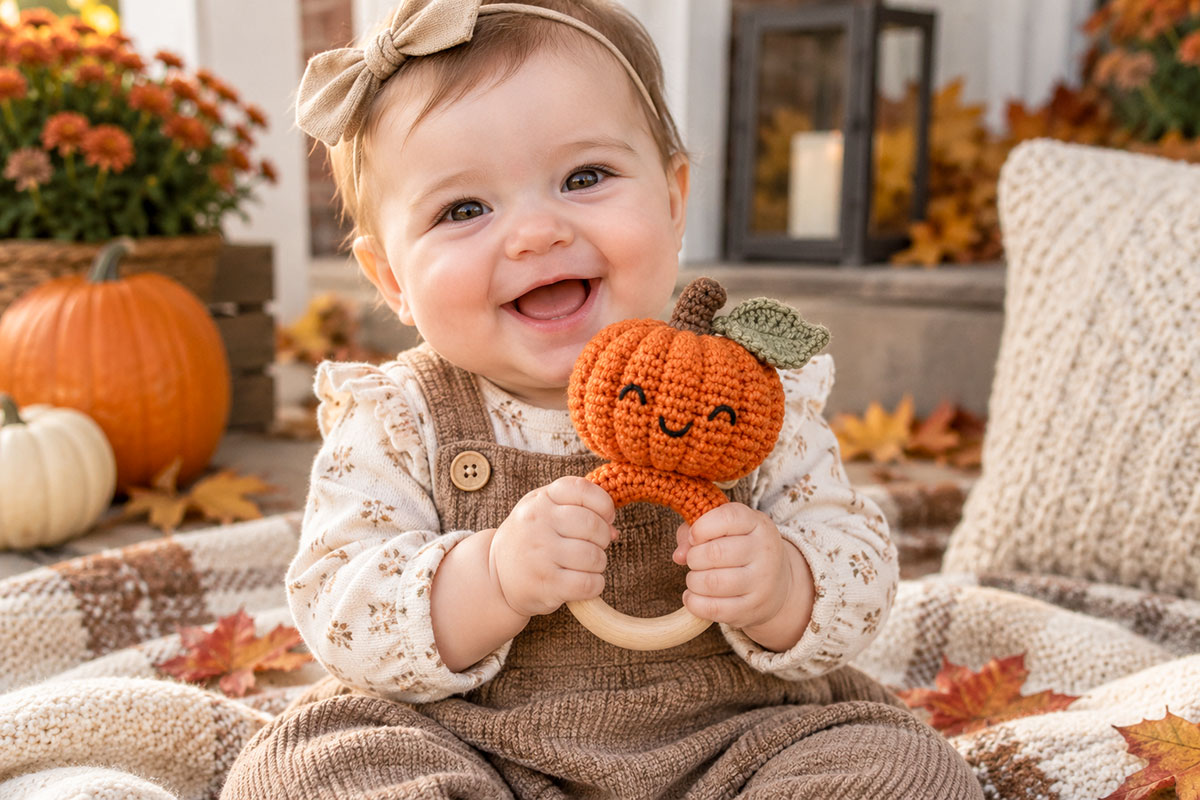
The example above gives you a visual sense of the intended scale and grip of the finished design, but it isn't evidence that a handmade rattle has passed CPSC testing. Visually, I still prefer this open wooden ring construction because most of the ring stays exposed while the pumpkin ribs, stem and leaf remain easy to see.
Matching Pumpkin Crochet Projects
You can stop with the rattle. It works perfectly well as one small fall baby gift.
If you want to turn it into a matching set, I would keep the colors consistent and change the project rather than covering everything with extra decorations. Pair the rattle with the crochet pumpkin lovey pattern for a soft toy set, or use the free crochet pumpkin pattern to make a coordinating fall decoration for the gift basket or nursery shelf.
For a broader chooser that includes crochet, quilt and other pumpkin projects, browse my pumpkin craft ideas.
For Halloween, the Jack o lantern lovey makes the most obvious partner for the embroidered Jack o lantern variation above. Use the happy pumpkin face instead if you'd rather have a set that doesn't look tied to one holiday.
I wouldn't try to make every piece identical. Repeating the orange pumpkin color, brown stem and muted green leaf is enough to make the projects look as though they belong together.
When you click on links to various merchants on this site and make a purchase, this may result in this site earning a commission. This does not affect the price you pay.

UBGI Gold Standard 2026
Reviewed under the site's
editorial checklist.
Photos, decorating ideas, party setups and reader submissions are shared for inspiration unless a page is specifically presented as a pattern, tutorial, reference guide or step-by-step project. Follow the instructions, measurements, safety guidance and manufacturer directions provided for the particular project or product.
About Jan | Contact | Baby Nursery Ideas (Blog) | Site Map | Privacy Policy | Disclosure Policy | Disclaimer | Affiliate Disclosure | Earnings Disclosure | Facebook | Pinterest
I am a participant in the Amazon Services LLC Associates Program, an affiliate advertising program designed to provide a means for us to earn fees by linking to Amazon. As an Amazon Associate I earn from qualifying purchases.
Copyright © 2006-2026. All Rights Reserved.