Free Crochet Pumpkin Pattern for an Easy Stuffed Pumpkin
By Jan Bay
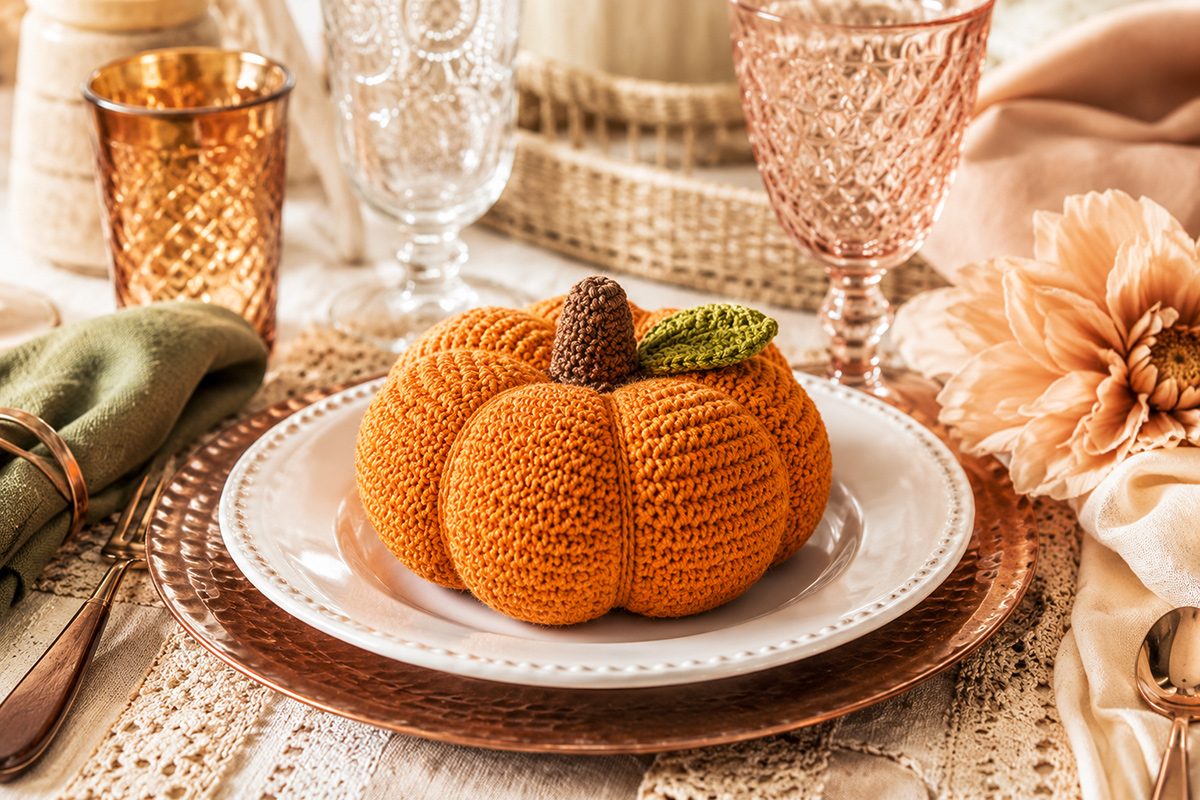
This free crochet pumpkin pattern makes a plump stuffed pumpkin with defined ribs, a brown crocheted stem and an optional green leaf. The simple three-dimensional design works as a handmade fall decoration, Thanksgiving accent or autumn gift without using a face or Halloween features.
Explore More Free Crochet Baby Patterns
See Orange Worsted Weight Yarn for This Crochet Pumpkin
Jump to:
Materials
This pumpkin is worked as one ribbed rectangle, then seamed, gathered, stuffed and shaped. The construction keeps the stitch work simple while the finishing creates the rounded pumpkin shape and deep sections.
- Approximately 140 to 160 yards of #4 worsted weight yarn in orange for the pumpkin body
- Approximately 10 yards of #4 worsted weight yarn in brown for the stem
- Approximately 8 yards of #4 worsted weight yarn in green for the optional leaf
- 5 mm (H-8) crochet hook, or the hook size needed to obtain the gauge below
- Approximately 3 ounces of polyester fiberfill
- Yarn needle with an eye large enough for the yarn
- Long yarn or doll needle for shaping the pumpkin, if available
- Scissors
- Removable stitch marker
I would choose an orange yarn with clear stitch definition rather than a very fuzzy yarn. The raised ridges are part of the finished design, and they are easier to see when the individual stitches remain visible.
The green leaf is optional. Leave it off for a simpler farmhouse-style pumpkin, use olive or muted green for an autumn look, or use a brighter green if you want more contrast. The construction of the pumpkin does not change.
Skill level: Easy to advanced beginner. You should be comfortable making chains, single crochet, half double crochet, double crochet, treble crochet, slip stitches and a magic ring. The crochet itself is simple. Most of the shaping happens during assembly.
Finished Size and Gauge
Based on the stated body gauge, the finished pumpkin is expected to measure approximately 6 to 6 1/2 inches across and 4 1/2 to 5 inches high, not including the stem. Stuffing and shaping can change the final dimensions slightly. The stem is worked for six single-crochet rounds, so its exact height will vary with yarn and stitch tension.
Gauge: Approximately 13 hdc and 10 rows = 4 inches in back-loop-only half double crochet, measured with the fabric relaxed and unstretched.
Exact gauge is not critical for a decorative pumpkin, but it does affect the finished proportions. A tighter gauge makes a smaller, firmer pumpkin. A looser gauge makes a larger pumpkin and can allow the stuffing to show between stitches.
After Row 48, the body rectangle should measure approximately 7 inches across each row and about 19 inches from the Row 1 edge to the Row 48 edge when it is lying relaxed. A small difference is fine. Do not stretch the ribbing when you measure it.
If you want to change the size, make the starting chain longer for a taller pumpkin and work more rows for a wider pumpkin. When changing the width, I recommend keeping the total number of rows divisible by six. That makes it easy to divide the finished pumpkin into six even sections during shaping.
Pattern Notes
- The turning chain does not count as a stitch.
- Keep 23 hdc in every pumpkin-body row.
- Work the pumpkin body in rows. Do not join the rows into rounds while crocheting.
- Work into the back loop only where instructed. This produces the raised ribbing that runs from the top to the bottom of the finished pumpkin.
- Do not stuff the pumpkin until the bottom opening has been gathered and secured.
- Stuff firmly enough to hold the rounded shape, but do not pack the fiberfill so tightly that the ribbing spreads apart.
- Piece count: Crochet 1 pumpkin body and 1 stem. Add 1 leaf for the three-piece version shown in the example image.
If you would rather make a pumpkin-shaped baby project, the crochet pumpkin lovey pattern uses the motif in a completely different construction, while the free crochet pumpkin rattle pattern turns the pumpkin into a smaller wooden-ring project with an embroidered face. You can also browse the free baby crochet patterns collection for more handmade projects.
To keep baby's head warm all while still embracing the fall theme, use my free crochet pumpkin hat pattern.
Abbreviations
- ch: chain
- hdc: half double crochet
- sc: single crochet
- sl st: slip stitch
- st(s): stitch(es)
- BLO: back loop only
- MR: magic ring
- dc: double crochet
- tr: treble crochet
Crochet Pumpkin Free Pattern: Make the Ribbed Body
The pumpkin starts as a flat rectangle. Do not worry if it does not look much like a pumpkin at this stage. The vertical ribbing, gathered openings and final shaping strands are what turn this simple piece into a plump six-section pumpkin.
Pumpkin Body
With orange yarn, ch 24.
Row 1: Hdc in the 2nd ch from the hook and in each ch across. Turn. 23 hdc.
Row 2: Ch 1. Hdc BLO in each st across. Turn. 23 hdc.
Rows 3 through 48: Repeat Row 2. 23 hdc.
At the end of Row 48, count the rows before you continue. You should have 48 rows total, with 23 hdc in each row. The rectangle should have enough stretch to curve easily without becoming loose or floppy.
Fasten off, leaving a yarn tail approximately 36 inches long for seaming.
Seam the Body
Lay the rectangle flat. Each row should span the approximately 7-inch dimension, while the distance from Row 1 to Row 48 should measure about 19 inches. Bring the Row 1 edge and the Row 48 edge together so the rectangle forms a tube. After seaming, the ribbed rows should run from one open edge of the tube to the other. Make sure the tube is not twisted.
Thread the long orange tail onto the yarn needle. Sew the Row 1 edge to the Row 48 edge with a neat whipstitch or mattress stitch. Match the 23 stitch positions along one edge to the 23 stitch positions along the other edge, working from one open edge of the tube to the other.
Do not pull the seam tight enough to pucker the fabric. The seam will become one of the natural vertical lines in the pumpkin, so a flat, flexible join gives the best result.
Secure the yarn at the end of the seam. Weave the tail several stitches into the inside of the tube and trim it.
Gather the Bottom
Cut a separate strand of orange yarn approximately 30 inches long and thread it onto the yarn needle.
Choose either open edge of the tube to become the bottom. Run the needle in and out through each of the 48 row ends once around the opening, keeping the stitches close to the edge. This distributes the gathers evenly around the pumpkin.
After you return to the starting point, pull both yarn ends gradually. The opening should close toward the center rather than folding to one side.
When the opening is almost closed, check the outside of the pumpkin. Redistribute any large folds with your fingers before you pull the opening completely shut.
Pull the yarn firmly to close the center. Sew across the gathered opening several times in different directions. Knot securely.
Push the remaining yarn ends into the inside of the pumpkin. This gathered end is now the bottom.
Stuff the Pumpkin
Turn the pumpkin so the open end faces upward.
Add polyester fiberfill in small handfuls. Push some filling toward the outer edges before filling the center. This helps the sides become rounded instead of leaving a dense lump in the middle.
Continue until the pumpkin feels full and keeps its shape when you set it down. Leave enough flexibility for the body to compress slightly when the shaping strands are tightened.
Look around the outside before closing the top. Add a small amount of filling anywhere the surface appears hollow. Remove some filling if the stitches are spreading enough to expose the fiberfill.
Gather the Top
Cut another 30-inch strand of orange yarn and thread the yarn needle.
Run the needle in and out through the row ends around the entire top opening, using the same method used for the bottom.
Pull the yarn slowly while guiding the gathers toward the center with your fingers. Before the opening closes completely, add a final small amount of fiberfill if the top looks hollow.
Pull the opening closed. Sew across the center several times to secure it.
Do not try to make the top perfectly flat. A small natural depression at the center gives the stem a better place to sit.
Knot securely and hide the yarn ends inside the pumpkin.
Create Six Pumpkin Sections
Cut approximately 120 inches of orange yarn. Thread it onto a long yarn needle. If your needle is too short to pass through the center of the stuffed pumpkin, use the longest blunt yarn needle you have and compress the pumpkin gently as you work.
Secure the yarn at the bottom center with several small stitches through the gathered crochet fabric. Leave the knot tucked into the center indentation.
Insert the needle through the bottom center of the pumpkin and bring it out through the gathered center at the top.
For the first groove, bring the yarn down over the outside of the pumpkin along the seam line. Insert the needle into the bottom center again and bring it back out through the top center.
Pull gently until the yarn creates a visible groove. Do not tighten so much that the pumpkin folds inward.
Make five additional shaping grooves for six grooves total. Count eight body rows around the circumference from one groove to the next. With 48 body rows, the six grooves divide the pumpkin into six sections of eight rows each.
After the sixth section, set the pumpkin on a flat surface before making the final knot. Turn it slowly and compare the sections. Loosen or tighten individual shaping strands as needed until the pumpkin looks balanced and sits without tipping.
Secure the shaping yarn at the top center. The knot and final yarn end will be covered by the crocheted stem.
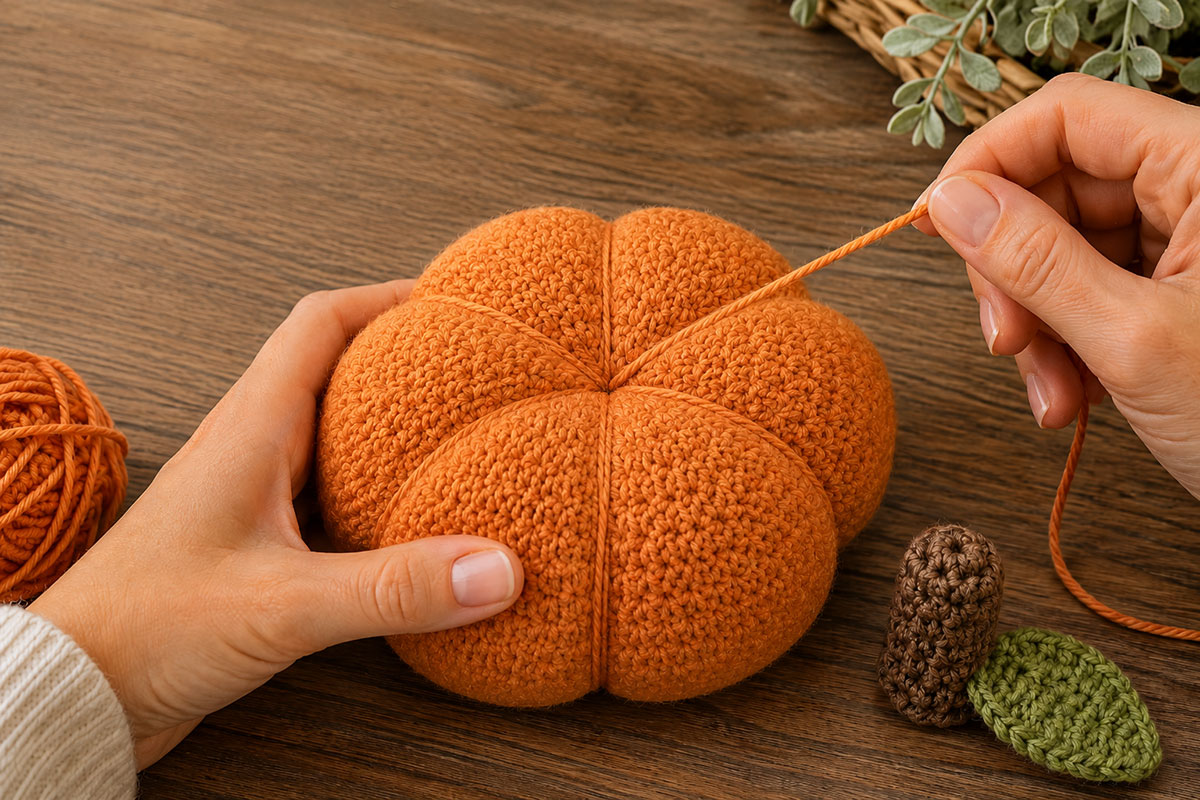
The shaping does not need to be severe. A little unevenness between the sections can make the finished pumpkin look more natural, while the ribbed crochet keeps the overall shape tidy.
Crochet the Pumpkin Stem
The stem is made as a narrow tube and lightly stuffed. There is no wire inside it, so the finished pumpkin remains easy to store and the stem can lean slightly without needing a rigid support.
Work the stem in continuous rounds without joining.
With brown yarn, make an MR.
Round 1: Work 8 sc into the MR. Pull the ring closed. Place a removable stitch marker in the first sc. 8 sc.
Rounds 2 through 6: Sc in each st around, moving the marker to the first sc of each new round. 8 sc.
Remove the marker after Round 6. Add only a small pinch of fiberfill. The stem should hold its shape without becoming hard or bulky. Do not add extra rounds to reach a fixed height; six rounds is the stem used for this pattern.
Fasten off, leaving an 18-inch tail for sewing. Do not close the bottom of the stem.
Crochet the Optional Pumpkin Leaf
The leaf is made in one round around both sides of the foundation chain. It is intentionally simple so it does not compete with the ribbing on the pumpkin.
With green yarn, ch 9.
Starting in the 2nd ch from the hook, work:
Sl st in the next ch, sc in the next ch, hdc in the next ch, dc in the next ch, tr in the next ch, dc in the next ch, hdc in the next ch.
Work 3 sc in the final ch.
Rotate the work so you can crochet along the unused loops on the opposite side of the foundation chain.
Work hdc in the next ch, dc in the next ch, tr in the next ch, dc in the next ch, hdc in the next ch, sc in the next ch and sl st in the final ch.
You should have 17 sts total around the leaf, including the 3 sc worked into the tip.
Fasten off, leaving a 12-inch tail for sewing.
Use your fingers to flatten the leaf and gently shape the point. Blocking is optional. If you block it, follow the care instructions for the yarn you used and allow the leaf to dry completely before attaching it.
Assembly and Finishing
Attach the Stem
Place the open end of the brown stem directly over the gathered center at the top of the pumpkin. The stem should cover the shaping knot and the small opening created by the gathers.
Thread the brown sewing tail onto the yarn needle.
Sew around the bottom edge of the stem, passing through each of the 8 stem stitches once and then through the orange pumpkin fabric directly beneath it. Continue until all 8 base stitches are anchored and you return to the starting point.
Check the stem from several sides before making the final knot. If it leans more than you want, add one or two small anchoring stitches on the opposite side.
Knot securely and hide the yarn end inside the pumpkin.
Attach the Leaf
Place the wider end of the green leaf beside the stem. Let only the base sit beneath or against the stem so the rest of the leaf remains visible.
Thread the green tail onto the yarn needle. Make 3 small stitches across the base of the leaf and through the orange pumpkin fabric beneath it, ending near the starting point on the underside of the leaf. Do not sew around the outer edge of the leaf.
Secure the yarn on the underside of the leaf and hide the remaining end inside the pumpkin.
Final Shape and Inspection
Set the finished pumpkin on a flat surface. Press gently around the lower sides to distribute the filling and create a stable base.
If one section looks slightly larger than the others, massage a little filling toward the neighboring section. The shaping yarn should already be secured before the stem is attached, so do not pull on the stem or leaf to change the groove placement.
Check that all six shaping grooves are visible, the stem and optional leaf are firmly sewn in place, all yarn tails are secured and hidden, the removable stitch marker has been removed, and no fiberfill shows through the stitches.
The finished pumpkin should look rounded and full without becoming a perfect sphere. The gathered top and bottom flatten the profile, while the six shaping lines give it the familiar segmented pumpkin form.
For a small fall grouping, make the pattern again in rust, golden orange or muted green. Change the yarn color rather than adding facial features if you want the pumpkins to remain useful from early fall through Thanksgiving.
If you want a larger crochet project built around the same seasonal motif, the pumpkin crochet blanket pattern turns the idea into a full baby blanket. For projects that genuinely October specific, see the Halloween crochet patterns collection.
To compare this stuffed pumpkin with the other pumpkin projects on the site, browse my pumpkin craft ideas. If you are into decorating with gourds of all shapes, sizes and colors; I think you'll find something you like.
Using a Crochet Pumpkin in a Nursery
This stuffed pumpkin is intended as seasonal decoration rather than infant sleep equipment. If you use it in a nursery, place it on a shelf, dresser or other display area that is out of the baby's sleep space and out of reach when necessary.
The U.S. Consumer Product Safety Commission recommends keeping a baby's crib, bassinet or play yard bare except for a fitted sheet. Decorative crochet pieces, pillows, blankets and toys should not be placed in an infant sleep space. You can read the current guidance on the CPSC Safe Sleep page.
Frequently Asked Questions About the Crochet Pumpkin Pattern
What yarn is best for this crochet pumpkin?
#4 worsted weight yarn is a good choice because it gives the pumpkin enough structure while keeping the ribbed stitches easy to see. Acrylic, wool and many cotton blends can work. Choose a yarn that produces a dense fabric at the gauge given in the pattern so the fiberfill does not show through.
Can I make the crochet pumpkin larger?
Yes. Add chains to make the body taller and add rows to increase the circumference. If you change the row count, using a total that is divisible by six makes it easier to space the six shaping sections evenly. For example, 54 rows gives you nine rows per section, while 60 rows gives you ten rows per section.
Can I make a smaller pumpkin with the same pattern?
Yes. Use fewer starting chains and fewer body rows, or use a lighter yarn with a smaller hook. Keep the fabric dense enough to contain the stuffing. If you reduce the row count, keep the total divisible by six if you want six evenly spaced sections.
Why does my crochet pumpkin look too tall?
The body may be too narrow around the circumference, or the shaping strands may not be tight enough. Before changing the pattern, press the stuffed pumpkin gently from the top and bottom and redistribute the filling toward the sides. If you make another pumpkin, add six or twelve body rows to create a wider shape.
Why can I see the stuffing between my stitches?
The gauge may be too loose or the pumpkin may be overstuffed. Try a smaller crochet hook if the fabric has visible gaps before stuffing. If the gaps appear only after filling, remove a little fiberfill and reshape the pumpkin.
Do I have to add the green leaf?
No. The leaf is optional. The ribbed orange body and brown stem are enough to make the project clearly read as a pumpkin. Leaving off the leaf also gives you a simpler finished design.
Can I add a face and turn it into a jack-o'-lantern?
You can add embroidered features if you want a Halloween version, but the basic pattern is intentionally left without a face. That makes the finished pumpkin useful throughout the fall season instead of limiting it to Halloween.
For a complete baby project built around that look, my free crochet Jack-o'-lantern lovey pattern uses a ribbed pumpkin head with triangular embroidered eyes, a nose and a toothy smile.
Can I wash the finished crochet pumpkin?
Check the care instructions for both the yarn and the fiberfill you used. Because the pumpkin contains shaping strands and a sewn-on stem and leaf, spot cleaning is the simplest choice for minor marks. If the materials are washable and you wash the entire pumpkin, reshape the sections while damp and allow it to dry completely.
When you click on links to various merchants on this site and make a purchase, this may result in this site earning a commission. This does not affect the price you pay.

UBGI Gold Standard 2026
Reviewed under the site's
editorial checklist.
Photos, decorating ideas, party setups and reader submissions are shared for inspiration unless a page is specifically presented as a pattern, tutorial, reference guide or step-by-step project. Follow the instructions, measurements, safety guidance and manufacturer directions provided for the particular project or product.
About Jan | Contact | Baby Nursery Ideas (Blog) | Site Map | Privacy Policy | Disclosure Policy | Disclaimer | Affiliate Disclosure | Earnings Disclosure | Facebook | Pinterest
I am a participant in the Amazon Services LLC Associates Program, an affiliate advertising program designed to provide a means for us to earn fees by linking to Amazon. As an Amazon Associate I earn from qualifying purchases.
Copyright © 2006-2026. All Rights Reserved.