Free Crochet Pumpkin Applique Pattern
By Jan Bay
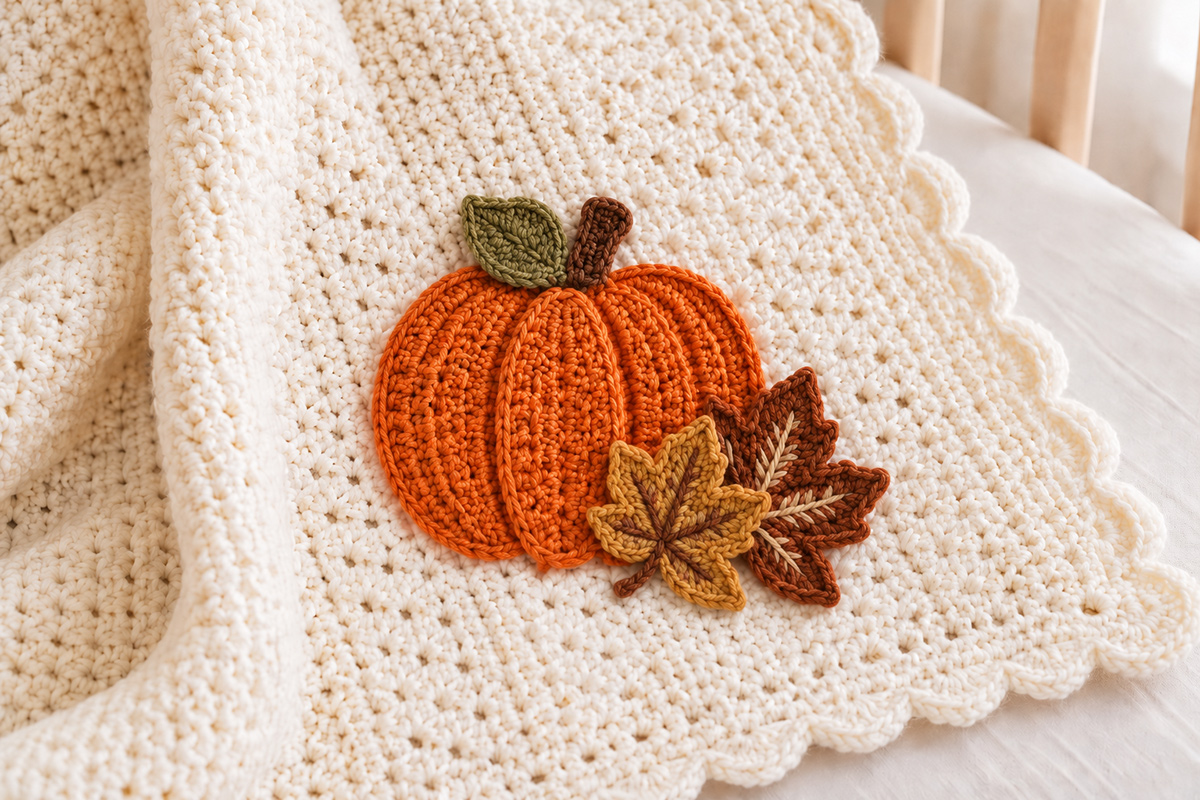
This free crochet pumpkin applique pattern makes an orange pumpkin with a little extra fall style. I added a small olive green leaf at the top and two autumn leaves at the lower right to give the applique more personality, so it is not just any pumpkin. The finished design has a unique seasonal look for blankets, clothes, costumes, banners, bags, wreaths and other handmade Halloween or harvest projects.
Explore More Free Crochet Baby Patterns
Free Halloween Crochet Patterns
Free Crochet Halloween Applique Patterns
Crochet Supplies for This Pattern
Jump to:
Supplies – yarn, hook and materials Finished Size – pumpkin applique measurements Pumpkin Body – crochet the flat ribbed pumpkin Stem and Top Leaf – add the brown stem and small olive leaf Autumn Leaves – make the two lower fall leaves Assembly – position and sew the pieces together Ways to Use It – ideas for fall and Halloween projectsSupplies for the Crochet Pumpkin Applique
This applique is made with medium weight yarn and a smaller hook than you might normally use with that yarn. The slightly tighter stitches help the pumpkin and leaves lie flat instead of feeling loose or floppy.
Yarn: Medium weight #4 yarn in pumpkin orange, medium or dark brown, muted olive green and warm tan or mustard.
Approximate yarn amounts: Have at least 75 yards of orange available for the three pumpkin pieces and their edging. Small amounts of brown, olive green and tan or mustard are enough for the stem and leaves. Exact yarn use will vary with yarn construction and tension.
Hook: 3.5 mm E/4 crochet hook.
Other supplies: Tapestry needle, scissors and a few straight pins or locking stitch markers for holding the pieces in place before sewing.
US crochet terms are used. The abbreviations in this pattern are ch for chain, sl st for slip stitch, sc for single crochet, hdc for half double crochet, dc for double crochet, tr for treble crochet, dtr for double treble crochet, sc2tog for single crochet two together and hdc2tog for half double crochet two together. If you need a reference, the Craft Yarn Council crochet abbreviations page includes the standard terms used here.
Sc2tog: Insert the hook in the next stitch and pull up a loop. Insert the hook in the following stitch and pull up a loop. Yarn over and pull through all three loops on the hook.
Hdc2tog: Yarn over, insert the hook in the next stitch and pull up a loop. Yarn over, insert the hook in the following stitch and pull up a loop. Yarn over and pull through all five loops on the hook.
Turning chains: The ch 1 at the beginning of a row does not count as a stitch.
Leave a long sewing tail on each piece. You can use those tails during assembly instead of cutting separate lengths of yarn.
Finished Size and Gauge
At the gauge below, expect the assembled orange pumpkin to finish close to 7 inches wide and about 6 to 6 1/2 inches tall, not including the stem or leaves. Those dimensions include the sc edging around the three orange pieces.
With the leaves arranged as shown, expect the complete applique to span roughly 8 1/2 to 9 1/2 inches across and about 7 1/2 to 8 1/2 inches from the top of the stem to the lowest leaf point. Treat the overall size as a placement estimate rather than an exact gauge calculation because the leaves use several stitch heights and can be angled during assembly. The orange pumpkin body is the better size checkpoint to match.
Gauge: About 8 hdc and 6 rows = 2 inches.
Gauge isn't about fit on an applique, but it does matter if you want the proportions shown in the example image. Check the first orange side lobe immediately after Row 17 and before working the sc edging. At that point, it should be close to 3 3/4 inches across at its widest point and about 5 1/2 to 5 3/4 inches tall.
If yours is much larger, go down a hook size. If it's much smaller, go up a hook size.
The three separate orange pieces are intentional. Their overlapping edges make the raised pumpkin ribs instead of relying on embroidered lines to suggest the shape.
Crochet Pumpkin Applique Pattern: Make the Ribbed Pumpkin Body
The pumpkin body uses two wider side lobes and one narrower center lobe. Crochet all three in orange.
Orange Side Lobe, make 2
Ch 8.
Row 1: Hdc in the 2nd ch from the hook and in each ch across. Turn. 7 sts.
Row 2: Ch 1. Work 2 hdc in the first st, hdc in the next 5 sts, 2 hdc in the last st. Turn. 9 sts.
Row 3: Ch 1. Work 2 hdc in the first st, hdc in the next 7 sts, 2 hdc in the last st. Turn. 11 sts.
Row 4: Ch 1. Work 2 hdc in the first st, hdc in the next 9 sts, 2 hdc in the last st. Turn. 13 sts.
Row 5: Ch 1. Work 2 hdc in the first st, hdc in the next 11 sts, 2 hdc in the last st. Turn. 15 sts.
Rows 6 through 13: Ch 1. Hdc in each st across. Turn. 15 sts.
Row 14: Ch 1. Hdc2tog, hdc in the next 11 sts, hdc2tog. Turn. 13 sts.
Row 15: Ch 1. Hdc2tog, hdc in the next 9 sts, hdc2tog. Turn. 11 sts.
Row 16: Ch 1. Hdc2tog, hdc in the next 7 sts, hdc2tog. Turn. 9 sts.
Row 17: Ch 1. Hdc2tog, hdc in the next 5 sts, hdc2tog. 7 sts.
Do not fasten off yet.
Edging: Ch 1. Work 22 sc evenly down the first long side, 7 sc across the foundation edge, 22 sc up the opposite long side and 7 sc across Row 17. Join with a sl st to the first sc. 58 sc.
To make the 22 sc along each 17-row side, work 1 sc in every row end and add a second sc in row ends 3, 6, 9, 12 and 15, counting from the foundation edge. If the edging cups or ripples noticeably, recheck the stated gauge instead of changing the stitch count.
Fasten off, leaving a long sewing tail.
Make the second side lobe the same way.
Orange Center Lobe, make 1
Ch 6.
Row 1: Hdc in the 2nd ch from the hook and in each ch across. Turn. 5 sts.
Row 2: Ch 1. Work 2 hdc in the first st, hdc in the next 3 sts, 2 hdc in the last st. Turn. 7 sts.
Row 3: Ch 1. Work 2 hdc in the first st, hdc in the next 5 sts, 2 hdc in the last st. Turn. 9 sts.
Row 4: Ch 1. Work 2 hdc in the first st, hdc in the next 7 sts, 2 hdc in the last st. Turn. 11 sts.
Rows 5 through 15: Ch 1. Hdc in each st across. Turn. 11 sts.
Row 16: Ch 1. Hdc2tog, hdc in the next 7 sts, hdc2tog. Turn. 9 sts.
Row 17: Ch 1. Hdc2tog, hdc in the next 5 sts, hdc2tog. Turn. 7 sts.
Row 18: Ch 1. Hdc2tog, hdc in the next 3 sts, hdc2tog. 5 sts.
Edging: Ch 1. Work 24 sc evenly down the first long side, 5 sc across the foundation edge, 24 sc up the opposite long side and 5 sc across Row 18. Join with a sl st to the first sc. 58 sc.
To make the 24 sc along each 18-row side, work 1 sc in every row end and add a second sc in row ends 3, 6, 9, 12, 15 and 18, counting from the foundation edge. Fasten off and leave a long sewing tail.
Before moving on, lay the three pieces together. The center lobe should be a little narrower and a little taller than the two side lobes. That's what we want.
Crochet the Brown Stem and Olive Top Leaf
The brown stem sits close to the center of the pumpkin but leans slightly to the right. The olive leaf goes on the opposite side, at the upper left. That keeps all of the visual weight from collecting on the right side with the two autumn leaves.
Brown Stem
With brown yarn, ch 4.
Row 1: Sc in the 2nd ch from the hook and in each remaining ch. Turn. 3 sts.
Rows 2 through 5: Ch 1. Sc in each st across. Turn. 3 sts.
Row 6: Ch 1. Sc2tog over the first 2 sts, sc in the last st. Turn. 2 sts.
Row 7: Ch 1. Sc in each st across. 2 sts.
Fasten off and leave a long tail.
Small Olive Leaf
With olive yarn, ch 9.
Working along the first side of the foundation chain, sl st in the 2nd ch from the hook, sc in the next ch, hdc in the next ch, dc in each of the next 2 ch, hdc in the next ch and sc in the next ch.
In the last ch work: sc, ch 2, sl st in the 2nd ch from the hook, sc in the same foundation ch. The little chain point forms the tip of the leaf.
Now work back along the unused loops on the opposite side of the foundation chain: sc in the next ch, hdc in the next ch, dc in each of the next 2 ch, hdc in the next ch, sc in the next ch and sl st in the last ch.
Fasten off and leave a long tail.
The original foundation chain runs through the middle of the leaf and gives it a simple raised center vein. Shape the point with your fingers before sewing.
Crochet the Two Autumn Maple Style Leaves
The example uses two leaves at the lower right instead of one. The darker brown leaf sits behind and spreads farther to the right. The smaller tan or mustard leaf overlaps it in front.
You don't have to use both. One leaf works if you want a simpler pumpkin, and you can leave both off when you want the basic ribbed pumpkin by itself.
Leaf Point: Whenever the instructions say to make a point, ch 2 and sl st in the 2nd ch from the hook.
Large Dark Brown Autumn Leaf
With brown yarn, make a magic ring. Ch 1 and work 10 sc into the ring. Do not join. Pull the ring snug.
The five lobes are worked into every other sc, with a sl st in the stitch between the lobes.
Lobe 1, lower left: In the first sc work sc, hdc, dc, tr, make a point, tr, dc, hdc, sc. Sl st in the next sc.
Lobe 2, upper left: In the next sc work sc, hdc, dc, tr, dtr, make a point, dtr, tr, dc, hdc, sc. Sl st in the next sc.
Lobe 3, center: In the next sc work sc, hdc, dc, tr, 2 dtr, make a point, 2 dtr, tr, dc, hdc, sc. Sl st in the next sc.
Lobe 4, upper right: In the next sc work sc, hdc, dc, tr, dtr, make a point, dtr, tr, dc, hdc, sc. Sl st in the next sc.
Lobe 5, lower right: In the next sc work sc, hdc, dc, tr, make a point, tr, dc, hdc, sc. Sl st in the last sc.
Stem: Ch 6. Sl st in the 2nd ch from the hook and in each of the next 4 ch. Sl st back into the base of the leaf.
Fasten off and leave a long tail.
Use tan or mustard yarn and a tapestry needle to add the visible veins. Sew one line from the base toward the center point, then add four shorter diagonal stitches toward the side lobes. Keep these stitches flat rather than pulling them tightly enough to pucker the leaf.
Smaller Tan or Mustard Autumn Leaf
With tan or muted mustard yarn, make a magic ring. Ch 1 and work 10 sc into the ring. Do not join. Pull the ring snug.
Lobe 1, lower left: In the first sc work sc, hdc, dc, make a point, dc, hdc, sc. Sl st in the next sc.
Lobe 2, upper left: In the next sc work sc, hdc, dc, tr, make a point, tr, dc, hdc, sc. Sl st in the next sc.
Lobe 3, center: In the next sc work sc, hdc, dc, tr, dtr, make a point, dtr, tr, dc, hdc, sc. Sl st in the next sc.
Lobe 4, upper right: In the next sc work sc, hdc, dc, tr, make a point, tr, dc, hdc, sc. Sl st in the next sc.
Lobe 5, lower right: In the next sc work sc, hdc, dc, make a point, dc, hdc, sc. Sl st in the last sc.
Stem: Ch 5. Sl st in the 2nd ch from the hook and in each remaining ch. Sl st back into the base of the leaf.
Fasten off and leave a long tail.
Use brown yarn to sew the center vein and four short diagonal vein stitches. The opposite vein colors help the two leaves remain separate visually even where they overlap.
After making the leaves, spread the lobes with your fingers. The points should look irregular and leafy rather than perfectly symmetrical.
Assemble the Pumpkin Applique
Before sewing, you should have seven separate pieces: two orange side lobes, one orange center lobe, one brown stem, one olive top leaf, one large brown autumn leaf and one smaller tan or mustard autumn leaf.
1. Arrange the two side lobes. Lay the orange side lobes flat with the right sides facing up and their long direction running vertically. Overlap their inside edges by about 3/4 inch. Keep the outside edges wide enough to give the pumpkin its rounded shape.
Tack the overlapping section together with orange yarn. Keep these stitches toward the middle because the center lobe will cover them.
2. Add the center lobe. Place the narrow center lobe over the middle and center it vertically. At the stated row gauge, it is about 1/3 inch longer than the side lobes before edging, so let it extend about 1/8 to 3/16 inch past them at the top and about the same amount at the bottom.
The sc edging on the center piece should remain visible. Those raised edges are two of the pumpkin ribs shown in the example.
Sew the center lobe to the side lobes with orange yarn. Work from the back where possible and catch the back portion of the edging so you don't flatten the raised outline on the front.
3. Add the stem. Tuck about 1/2 inch of the brown stem behind the top center of the pumpkin. Let the upper part lean slightly to the right. Sew the hidden portion firmly to the back of the orange pieces.
4. Position the olive leaf. Place the small olive leaf at the upper left of the stem. Let its lower portion overlap the top of the pumpkin and angle the point up and slightly left. Sew it securely in place.
5. Add the large brown autumn leaf. Put this leaf at the lower right of the pumpkin, behind the smaller leaf. Tuck the base and a little of the stem underneath the pumpkin edge. Angle the center point out toward the right.
6. Add the smaller tan leaf. Place it in front of the brown leaf, overlapping both the lower right edge of the pumpkin and part of the brown leaf. Let it sit a little lower than the brown leaf so both colors and both leaf shapes remain visible.
Don't stack the leaves directly on top of each other. The brown leaf should extend farther right while the tan leaf fills the lower part of the cluster.
7. Attach the applique to your project. Pin the complete arrangement where you want it. Sew around the outside of the pumpkin, around the exposed brown stem and around the exposed edges of each leaf with matching yarn or sewing thread.
If you're adding the applique to something for a baby, sew the projecting leaf points and stems down securely instead of leaving loose edges that can be pulled or caught.
Final check: Remove every straight pin or locking stitch marker. Make sure all yarn ends are woven in, the stem and every leaf point are secured, and the applique lies flat before the finished project is used.
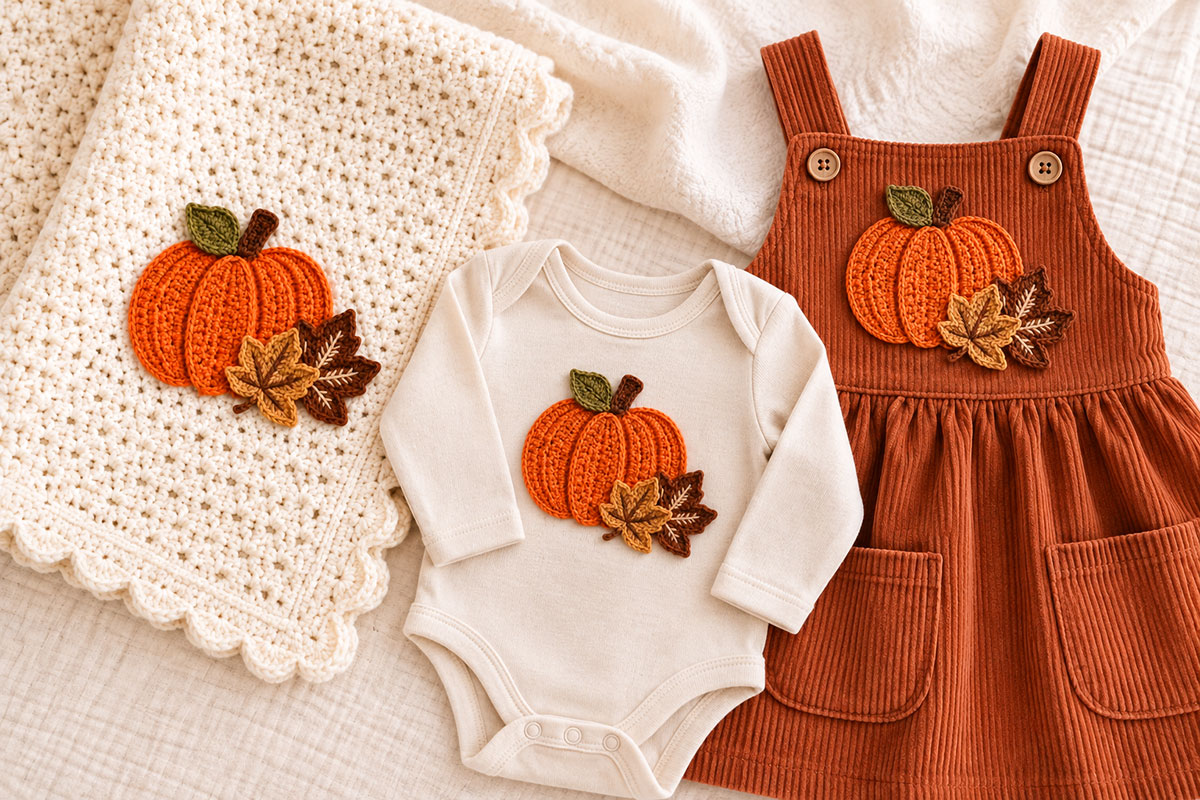
The finished applique should still read as a pumpkin first. The leaves are there to give it that extra autumn look, not cover the ribbed shape you just made.
Ways to Use Your Crochet Pumpkin Applique
The example shows all three leaves, the small olive leaf at the top and two autumn leaves at the bottom. You can change that without changing the pumpkin pattern.
Use both lower leaves when you want the full harvest look. Use only the brown or tan leaf for a simpler version. Leave the bottom leaves off altogether if you want a plain pumpkin for a smaller project.
On a baby blanket, I would use one complete applique near a corner or along the lower portion of the blanket rather than scattering pumpkins everywhere. The extra leaves give one motif enough detail to stand on its own.
If you use the applique on a baby blanket, keep the finished blanket out of an infant's sleep space. The U.S. Consumer Product Safety Commission safe sleep guidance recommends keeping an infant sleep space bare except for a fitted sheet.
For clothes, costumes or smaller bags, one lower leaf may make more sense because it keeps the applique flatter and more compact. You can also make the same stitch counts with a lighter yarn and smaller hook if you want the whole design reduced in size.
The applique can also go on fall banners, tote bags, wall hangings and wreaths. Just remember that the leaf points are more exposed on something that gets handled frequently, so sew those edges down well.
If you want a realistic, round pumpkin to use in arrangement instead of a small, flat one, my free crochet pumpkin pattern makes a separate stuffed fall decoration. For a smaller pumpkin project with an embroidered face and wooden ring handle, use the free crochet pumpkin rattle pattern.
For more ways to use the pumpkin theme across crochet, quilting and fall decor, browse my pumpkin craft ideas.
You can also browse my free Halloween crochet patterns when you want another project to use with the pumpkin.
Keep the colors flexible too. Orange with brown and tan gives the leaves more contrast, which is why I like that combination here, but cinnamon, muted mustard, olive and deeper pumpkin shades can all fit the same arrangement.
When you click on links to various merchants on this site and make a purchase, this may result in this site earning a commission. This does not affect the price you pay.

UBGI Gold Standard 2026
Reviewed under the site's
editorial checklist.
Photos, decorating ideas, party setups and reader submissions are shared for inspiration unless a page is specifically presented as a pattern, tutorial, reference guide or step-by-step project. Follow the instructions, measurements, safety guidance and manufacturer directions provided for the particular project or product.
About Jan | Contact | Baby Nursery Ideas (Blog) | Site Map | Privacy Policy | Disclosure Policy | Disclaimer | Affiliate Disclosure | Earnings Disclosure | Facebook | Pinterest
I am a participant in the Amazon Services LLC Associates Program, an affiliate advertising program designed to provide a means for us to earn fees by linking to Amazon. As an Amazon Associate I earn from qualifying purchases.
Copyright © 2006-2026. All Rights Reserved.