Free Crochet Christmas Granny Square Blanket Pattern
By Jan Bay
This free crochet Christmas granny square blanket pattern is one of those projects you can make for a baby's first Christmas and then turn around and make again for your own sofa. The fun is in choosing which Christmas appliqués to sew onto the squares. We'll use one coordinating square design, add Christmas trees, reindeer, snowflakes and other favorite holiday motifs, then join everything into a blanket with a matching border. I've included plans for three sizes, so you can make a baby keepsake, a child's Christmas blanket or a full-size holiday throw without learning three different patterns.
Explore More Free Christmas Crochet Patterns
Free Christmas Crochet Appliqué Patterns
Free Christmas Crochet Patterns
Crochet Holly Leaf Pattern with Berries
Crochet Christmas Tree Appliqué
See Supplies For This Project Here.
Jump to the Free Crochet Christmas Granny Square Blanket Pattern
Yarn and Supplies
This blanket looks detailed, but the supply list is actually pretty manageable. The featured baby-size blanket uses one granny-square pattern over and over, then gets its personality from the appliqués. That's the whole trick.
I would use a smooth medium weight #4 yarn instead of anything fuzzy or heavily textured. You want the granny-stitch openings to stay crisp and the appliqués to sit flat. If you want a reference for yarn categories, the Craft Yarn Council's Standard Yarn Weight System is useful.
Yarn colors for the featured 4 x 4 blanket
- Warm ivory for 8 six-round granny-square centers and Border Round 2
- Cranberry red for 4 six-round granny-square centers and Border Round 3
- Sage green for 4 six-round granny-square centers
- Deep evergreen for Round 7 of all 16 squares, the 24 square-edge joins, Border Round 1 and Border Round 4
- Small amounts of brown, white, black, gold, and extra red for the appliqués
Yardage note: The complete blanket has not been physically test-crocheted, so exact yarn consumption is not established. Use the sample-weighing method below to calculate your main color quantities, then allow extra yarn for the appliqués, joins, border and weaving in ends.
Estimating yarn for the larger sizes
Don't multiply every yarn color by the same number when you enlarge the blanket. The three sizes use different numbers of ivory, cranberry and sage squares.
Child blanket, 30 squares:
- 12 ivory squares, or 1.5 times the featured ivory-square quantity
- 9 cranberry squares, or 2.25 times the featured cranberry-square quantity
- 9 sage squares, or 2.25 times the featured sage-square quantity
- Evergreen yarn for 49 square-edge joins, compared with 24 in the baby blanket, plus the larger outside border
Adult throw, 42 squares:
- 16 ivory squares, or twice the featured ivory-square quantity
- 13 cranberry squares, or 3.25 times the featured cranberry-square quantity
- 13 sage squares, or 3.25 times the featured sage-square quantity
- Evergreen yarn for 71 square-edge joins, compared with 24 in the baby blanket, plus the larger outside border
Those comparisons describe the number of components, not tested yarn consumption. To estimate yardage, make one square in each background color and weigh it after Round 6, before adding the evergreen edging. Divide that weight by the original skein's labeled weight, then multiply by the skein's labeled yardage. Multiply the result by the number of squares needed in that color.
Weigh the square again after adding Round 7. The difference gives you an estimate for the evergreen edging on one square. Multiply that by the total number of squares, then allow additional evergreen yarn for joining, the outside border and weaving in ends. Keep appliqué yarn allowances separate.
Keep the evergreen joining and border yarn separate from the square calculations. Make one joining seam and measure its yarn use before estimating the remaining seams. Allow additional yarn for the full border and for weaving in ends. I would buy an extra skein of each main color when matching dye lots matters.
Hooks and notions
- 5 mm crochet hook for the granny squares and border
- Smaller hook if your chosen appliqué patterns call for one
- Tapestry needle
- Scissors
- Stitch markers, optional but helpful
- Blocking tools or a clean towel and rust-proof pins
Appliqué pages used for the featured blanket
- Crochet Christmas Tree Appliqué
- Christmas Reindeer Appliqué
- Crochet Snowflake Appliqué
- Gingerbread Crochet Appliqué Set
- Crochet Snowman Family Appliqué Patterns
- Crochet Holly Leaf Pattern with Berries
- Large Crochet Star Appliqué Pattern
If you already have a favorite Christmas appliqué from your own stash, you can swap it in. Just keep it flat and keep it roughly in the 4- to 6-inch range so it doesn't crowd the square.
Crochet Christmas Granny Square Blanket Pattern in 3 Sizes
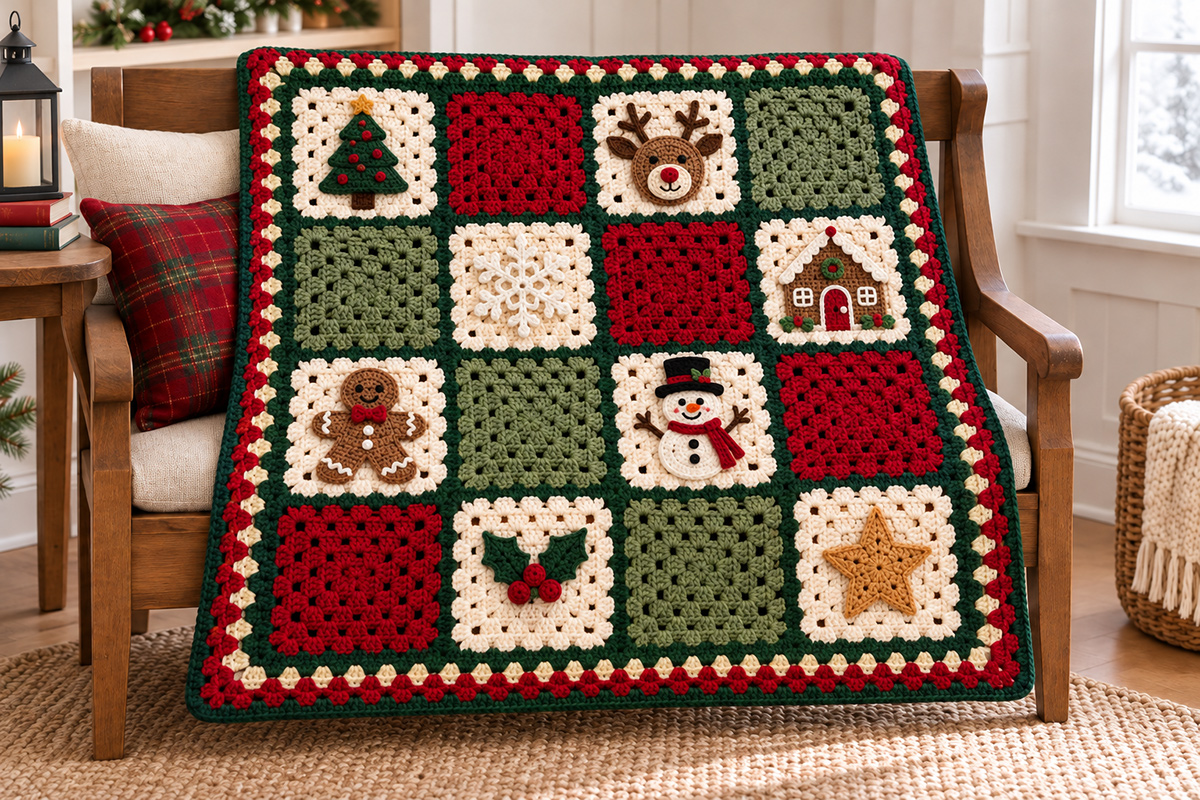
The featured blanket is the baby size. That's the one shown in the example image, and it's the one I would make first. Once you have the square size right, scaling up is easy.
Gauge
One finished granny square should measure approximately 8 x 8 inches after blocking.
Finished sizes
- Baby keepsake: 4 x 4 squares, about 36 x 36 inches
- Child's blanket: 5 x 6 squares, about 44 x 52 inches
- Adult throw: 6 x 7 squares, about 52 x 60 inches
Those finished measurements include the joining and the outer border. They are expected measurements, not physically sample-tested ones.
Square counts by size
- Baby: 8 ivory appliqué squares, 4 cranberry plain squares, 4 sage plain squares
- Child: 12 ivory appliqué squares, 9 cranberry plain squares, 9 sage plain squares
- Throw: 16 ivory appliqué squares, 13 cranberry plain squares, 13 sage plain squares
If your square is coming out small, go up a hook size. If it comes out too large, go down a hook size. I'd solve that now instead of trying to stretch or shrink sixteen finished squares later. That gets old fast.
Crochet Abbreviations
The blanket itself uses straightforward stitches. The appliqué pages may use a few extras, depending on the motif.
- ch = chain
- dc = double crochet
- hdc = half double crochet
- sc = single crochet
- sl st = slip stitch
- sp = space
- st = stitch
- rep = repeat
- rnd = round
- WS = wrong side
- RS = right side
Crochet the Granny Square Base
Every square in the blanket starts the same way. That's what keeps this page practical instead of turning it into sixteen different little projects.
Color plan for the squares
- Make 8 ivory squares for the featured appliqué blanket
- Make 4 cranberry squares
- Make 4 sage squares
- Work Round 7 of every square in deep evergreen
Square pattern
Stitch-count note: A beginning ch-3 counts as the first dc of its granny group throughout the square pattern and granny border. A beginning ch-1 used for a single crochet seam or foundation round does not count as a stitch. Joining slip stitches are not counted as stitches.
Round 1: With your main square color, ch 4 and join with a sl st to form a ring. Ch 3, work 2 dc in ring, ch 2. Work [3 dc in ring, ch 2] 3 times. Join with a sl st to top of beginning ch-3. You now have 4 corner groups.
Round 2: Sl st into the next 2 dc and into the first corner sp. In that corner sp work (ch 3, 2 dc, ch 2, 3 dc), ch 1. In each remaining corner sp work (3 dc, ch 2, 3 dc), ch 1. Join with a sl st to top of beginning ch-3.
Round 3: After joining Round 2, sl st in the next 2 dc and into the following corner ch-2 space. Work (ch 3, 2 dc, ch 2, 3 dc) in that corner, then ch 1. Work (3 dc, ch 1) in the next side ch-1 space. In each remaining corner ch-2 space, work (3 dc, ch 2, 3 dc), then ch 1. Work (3 dc, ch 1) in every side ch-1 space between corners. Continue around all four sides. Join with a sl st to the top of the beginning ch-3. You now have 12 granny groups.
Round 4: Sl st in the next 2 dc and into the following corner ch-2 space. Work (ch 3, 2 dc, ch 2, 3 dc) in that corner, then ch 1. Work (3 dc, ch 1) in each side ch-1 space until you reach the next corner. In that corner work (3 dc, ch 2, 3 dc), then ch 1. Repeat this method around all four sides, placing a granny group in every side ch-1 space and a corner group in every ch-2 corner space. Join to the top of the beginning ch-3. You now have 16 granny groups.
Round 5: Repeat the construction of Round 4, adding a granny group in every available side ch-1 space. Join to the top of the beginning ch-3. You now have 20 granny groups.
Round 6: Repeat the construction of Round 4. Join to the top of the beginning ch-3. You now have 24 granny groups. Fasten off the main square color.
Round 7, evergreen edging: Join deep-evergreen yarn in any corner ch-2 space. Work (ch 3, 2 dc, ch 2, 3 dc) in that corner, then ch 1. Work (3 dc, ch 1) in each side ch-1 space until the next corner. Work (3 dc, ch 2, 3 dc) in each remaining corner, followed by ch 1, and continue filling every side ch-1 space with a granny group followed by ch 1. Join to the top of the beginning ch-3 and fasten off. You now have 28 granny groups.
Stitch-count check: Rounds 1 through 7 contain 4, 8, 12, 16, 20, 24 and 28 granny groups respectively. Each round has four ch-2 corner spaces. Round 7 has seven 3-dc groups along each side, counting the two groups belonging to the corners, and six ch-1 spaces between neighboring groups.
Square check
After blocking, each square should measure about 8 inches. Each side should have 7 granny groups total, counting the 2 corner groups and the 5 groups between them.
How many to make
- Baby: 16 total squares
- Child: 30 total squares
- Throw: 42 total squares
Don't skip blocking the squares. With granny squares, blocking is what takes them from homemade to finished. There's no point pretending otherwise.
Choose Your Christmas Crochet Appliqués
The featured blanket uses eight different appliqués. That's enough variety to make the blanket interesting without turning it into a cluttered sampler.
Featured appliqué set for the baby blanket
- 1 Christmas tree
- 1 reindeer
- 1 snowflake
- 1 gingerbread house
- 1 gingerbread man
- 1 snowman
- 1 holly cluster
- 1 star
Use the existing pattern pages linked in the supplies section for the Christmas tree, reindeer, snowflake, gingerbread house, gingerbread man, snowman and holly. The Dad Snowman with his black top hat and red scarf is the version shown on the finished blanket.
The antique-gold star shown on the finished blanket is a large crochet star applique that is approximately 5 inches across. It is the blanket-sized gold star pattern that matches the example. Our smaller crochet star pattern is an optional alternative, but it won't fill the square in quite the same way.
Placement tips for the featured blanket
- Christmas tree: center it with the trunk sitting slightly below the midpoint. To match the photographed blanket, add a tiny five-point gold star to the top of the tree. Use the small crochet star pattern with fine gold yarn or crochet thread and a suitably smaller hook, aiming for a finished topper about 3/4 to 1 inch across. Check the size before attaching it. Sew down all five points securely, and include the red embroidered ornaments.
- Reindeer: place the face slightly high so the antlers sit comfortably inside the square
- Snowflake: center it evenly
- Gingerbread house: keep the bottom edge level and place it a little low in the square
- Gingerbread man: center him with even spacing on all sides
- Snowman: place him slightly low so the hat still clears the top edge. Use Dad Snowman's black top hat, red scarf, embroidered face and brown twig arms. To match the blanket photographs, embroider two black coal dots down the front of his body instead of the three used in the separate snowman pattern. Sew the scarf ends and twig arms flat against the square.
- Holly: center the cluster
- Star: center the star with one point facing straight up
Size note
Check the appliqué fit before sewing. The tree, gingerbread man and snowflake are smaller than the reindeer, gingerbread house and Dad Snowman. Don't assume that all eight patterns will fit an 8-inch granny square in exactly the same way.
Make and block one ivory square first. Measure the open area inside its evergreen edging, then lay each completed appliqué on top without stretching either piece.
The reindeer and gingerbread house are expected to measure about 6 1/2 inches tall at their published gauges. They may need to sit fairly close to the inner edge of the evergreen frame to match the example.
Dad Snowman needs special attention. His published height is approximately 7 to 7 1/2 inches, including the top hat. For this blanket, aim for a finished appliqué no taller than about 6 to 6 1/4 inches. You can try lighter yarn and a smaller hook while keeping the original stitch counts, but measure the result before attaching it. That smaller size is a target, not a physically verified variation of the original snowman pattern.
Don't trim away part of the hat, change the snowman's shape or stretch the granny square simply to make everything fit. If the appliqué won't sit flat with all its parts inside the border, correct its size before sewing.
For the larger blanket sizes
Repeat the same motif set in balanced numbers. A simple approach works best.
- Child size: repeat tree, reindeer, gingerbread man, and snowman once each for a total of 12 decorated squares
- Throw size: repeat all 8 motifs once for a total of 16 decorated squares
Finish and block each appliqué before attaching it to the blanket. Complete all facial embroidery and assemble the smaller pieces according to their individual patterns.
Lay the ivory granny square flat with its right side facing up. Position the appliqué, check the spacing and temporarily hold it with removable stitch markers or rustproof pins.
Thread a yarn needle with matching yarn. Sew the appliqué to the square using small stitches around the outside edge, catching the appliqué and the underlying crochet without pulling either fabric out of shape.
Secure narrow or projecting pieces separately. This includes reindeer antlers and ears, tree branches, snowflake arms, snowman hat and scarf edges, and the projecting corners of the star. Sew down each piece so it cannot lift away from the blanket.
For the holly square, use the flat-berry version of the existing holly pattern. Skip dimensional berry balls on the baby blanket. Embroidered eyes and other securely stitched facial details are preferable to loose buttons, beads or plastic pieces.
On the wrong side, weave the sewing yarn through several stitches in more than one direction. Check the square from the front for puckering, then remove all temporary pins or markers.
Arrange the Christmas Granny Squares
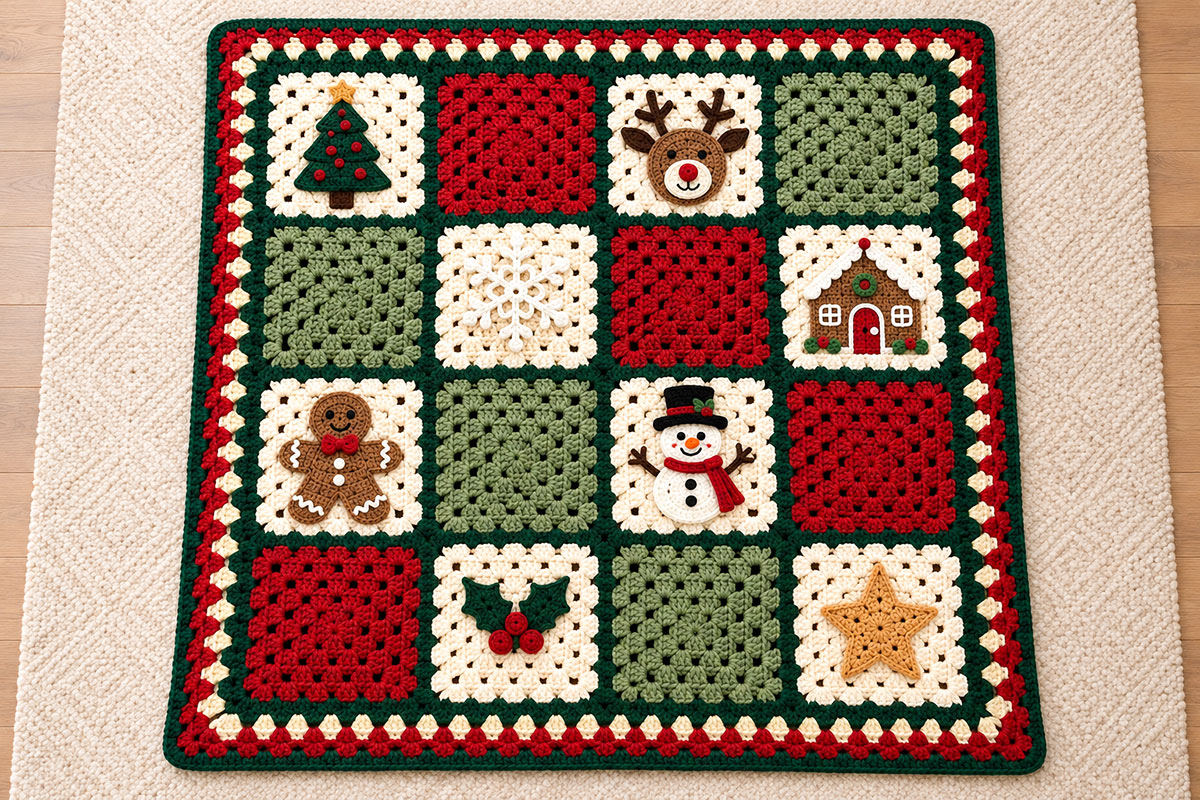
The blanket in the example image uses a fixed 4 x 4 layout. If you want yours to match the page exactly, use this arrangement.
Featured 4 x 4 layout
- Row 1: tree, cranberry, reindeer, sage
- Row 2: sage, snowflake, cranberry, gingerbread house
- Row 3: gingerbread man, sage, snowman, cranberry
- Row 4: cranberry, holly, sage, star
This arrangement keeps the decorated squares moving around the blanket instead of forming a strict checkerboard of motifs. I like that better here because the blanket already has a lot going on visually.
Child blanket layout: 5 squares across and 6 rows down
This version uses 12 appliqué squares, 9 cranberry squares and 9 sage squares. Repeat the Christmas tree, reindeer, gingerbread man and snowman once each. Make only one of the remaining four motifs.
- Row 1: Tree, cranberry, reindeer, sage, sage
- Row 2: Sage, snowflake, cranberry, gingerbread house, cranberry
- Row 3: Gingerbread man, sage, snowman, cranberry, sage
- Row 4: Cranberry, holly, sage, tree, cranberry
- Row 5: Sage, cranberry, gingerbread man, sage, snowman
- Row 6: Reindeer, cranberry, star, cranberry, sage
Adult throw layout: 6 squares across and 7 rows down
The adult version uses 16 appliqué squares, 13 cranberry squares and 13 sage squares. Make two of each Christmas motif for a total of 16 decorated squares.
- Row 1: Tree, cranberry, sage, reindeer, cranberry, snowflake
- Row 2: Sage, cranberry, gingerbread house, sage, cranberry, gingerbread man
- Row 3: Snowman, sage, cranberry, holly, sage, cranberry
- Row 4: Sage, star, sage, tree, cranberry, sage
- Row 5: Reindeer, cranberry, snowflake, sage, cranberry, gingerbread house
- Row 6: Sage, gingerbread man, cranberry, snowman, sage, cranberry
- Row 7: Cranberry, sage, holly, cranberry, star, sage
Both layouts are counted to use exactly the number of each square specified in the size chart. You can rearrange the colors and decorations if you prefer, but I'd lay out the entire blanket before joining anything. Keep repeated decorations separated enough that each one gets a chance to show.
Join the Granny Squares
Once all squares are blocked and the appliqués are sewn in place, lay the blanket out exactly as you want it before you join anything. This is not the part to wing.
Join rows first
Place the first two squares with wrong sides together and right sides facing outward. Align the corner ch-2 spaces, the seven granny groups and the six ch-1 spaces along the edges to be joined.
With deep-evergreen yarn, insert the hook through both corresponding starting corner spaces. Draw up a loop, ch 1, and work 1 sc through both corner spaces.
Continue along the matched edges, working 1 sc through both corresponding double crochet stitches and 1 sc through both corresponding ch-1 spaces. Work through both layers with every stitch. Finish with 1 sc through the two ending corner spaces.
Seam count: Each completed square edge contains 21 dc and six ch-1 spaces. Including one joining sc at each end corner gives 29 sc for the completed seam.
Fasten off, leaving a tail long enough to secure the end of the seam. Open the two squares flat with right sides facing up. The evergreen single crochet join should form a visible ridge along the front.
Repeat to join the remaining squares in Row 1. Make four separate joined rows for the featured baby-size blanket.
Join the rows together
Place Rows 1 and 2 with wrong sides together and right sides facing outward. Match the outside ends, square corners and existing vertical seam intersections. The edges to be joined must line up stitch for stitch.
Join deep-evergreen yarn through the two corresponding starting corner ch-2 spaces. Ch 1 and work 1 sc through both corner spaces. Continue along the first pair of squares, working 1 sc through both corresponding dc stitches and 1 sc through both corresponding ch-1 spaces. Work 1 sc through the two matching ending corner ch-2 spaces.
Crossing a four-square intersection: You have just completed the ending-corner stitch for one pair of squares. Bring the working yarn across the existing vertical joining ridge without adding a separate stitch into that ridge. Insert the hook through the two corresponding starting corner ch-2 spaces of the next pair of squares and work 1 sc. Continue across their matching dc stitches and ch-1 spaces in the same way.
At every remaining intersection, finish the previous pair with 1 sc through its matching ending corner spaces, pass across the existing seam ridge without adding a stitch, and begin the next pair with 1 sc through its matching starting corner spaces. Keep these two corner stitches close together without pulling the intersection tight.
Horizontal joining count: Each paired square edge contributes 29 sc, including its beginning and ending corner stitches. A complete horizontal seam therefore contains 116 sc across four squares, 145 sc across five squares, or 174 sc across six squares. Do not count the beginning chain as a stitch or add extra stitches over the existing vertical ridges.
Fasten off at the far outside corner, leaving enough yarn to secure the end. Open the joined rows flat and check each intersection from the front and back. If a small opening remains beside a crossing seam, close it with the joining tail without pulling the fabric together.
Complete the assembly for your blanket size:
- Baby blanket: Join Row 1 to Row 2, Row 2 to Row 3, and Row 3 to Row 4.
- Child blanket: Continue the same method until all six rows are joined, making five complete horizontal seams.
- Adult throw: Continue until all seven rows are joined, making six complete horizontal seams.
Spread the completed blanket flat with its right side facing up. Check that all square intersections meet, the raised evergreen joining ridges remain on the front, and the corners have not been pulled out of shape. Correct any tight joining section before beginning the outside border.
Open the completed blanket flat and check the joining ridges. If one seam is noticeably tighter than the others, loosen or remake that seam before adding the border.
Square count reminder
- Baby: 4 rows of 4 squares
- Child: 6 rows of 5 squares
- Throw: 7 rows of 6 squares
After joining, weave in any loose ends on the back before you move on to the border. You'll thank yourself later.
Crochet the Christmas Blanket Border
The border pulls the whole blanket together. A plain edge would work, but it wouldn't give you the same finished look as the example image.
Border Round 1, evergreen foundation: With the right side facing, join deep-evergreen yarn in one outside corner ch-2 space. Ch 1 and work 3 sc in that corner space.
Work 1 sc into each of the 21 dc stitches and six ch-1 spaces along the first exposed square edge. You will have 27 sc for that edge.
At the junction with the next square, work 1 sc into the first square's exposed corner ch-2 space, 1 sc into the top of the evergreen joining stitch, and 1 sc into the next square's exposed corner ch-2 space. These three stitches bridge the junction between the squares.
Continue across the next square with 27 sc, followed by another three-stitch junction wherever two squares meet. Repeat this method around the outside, working 3 sc into each of the four outside blanket corners.
Join with a sl st to the first sc. Do not count the joining slip stitch as an additional stitch.
Round 1 stitch-count check:
- Baby blanket: 117 sc along each straight side, plus four 3-sc outside corners. Total: 480 sc.
- Child blanket: 147 sc along each shorter side and 177 sc along each longer side, plus four 3-sc outside corners. Total: 660 sc.
- Adult throw: 177 sc along each shorter side and 207 sc along each longer side, plus four 3-sc outside corners. Total: 780 sc.
Count the foundation round before beginning the granny border. If a junction is pulling tightly or spreading apart, check the three stitches worked across it before continuing.
Border Round 2, ivory granny border: Fasten off evergreen. Join ivory yarn in the middle sc of any 3-sc outside corner group. Work (ch 3, 2 dc, ch 2, 3 dc) in that middle corner sc, then ch 1.
Skip the next 2 sc and work 3 dc in the following sc, then ch 1. Continue by skipping 2 sc and working (3 dc, ch 1) in the next sc.
Work 39 granny groups along each straight side of the baby blanket, 49 along each shorter side and 59 along each longer side of the child blanket, or 59 along each shorter side and 69 along each longer side of the adult throw.
At the end of each side, two stitches will remain between the final side group and the middle stitch of the next corner group. Skip those two stitches, then work the next corner as instructed.
Work (3 dc, ch 2, 3 dc) in the middle sc of the next corner group, then ch 1. Repeat around all four sides. Join to the top of the beginning ch-3.
Border Round 3, cranberry: Fasten off ivory. Join cranberry yarn in any corner ch-2 space. Work (ch 3, 2 dc, ch 2, 3 dc), then ch 1. Work (3 dc, ch 1) in every side ch-1 space. Work (3 dc, ch 2, 3 dc) in each remaining corner ch-2 space, followed by ch 1. Continue around and join to the top of the beginning ch-3.
Border Round 4, evergreen: Fasten off cranberry. Join deep-evergreen yarn in any corner ch-2 space. Repeat the construction of Round 3, working one granny group in each side ch-1 space and a corner group in every ch-2 corner space. Join and fasten off.
Border counts for all three sizes:
- Baby, 4 by 4: Round 1 has 480 sc. Round 2 has 39 side granny groups between each pair of corners.
- Child, 5 by 6: Round 1 has 660 sc. Round 2 has 49 side groups along each shorter side and 59 along each longer side.
- Adult throw, 6 by 7: Round 1 has 780 sc. Round 2 has 59 side groups along each shorter side and 69 along each longer side.
Each additional granny-border round adds one group between the corners on every side. Keep the ch-2 corners directly above one another so the blanket stays rectangular.
If you want a slightly wider border for the child or throw size, add one more granny round in ivory or cranberry. I would stop at one extra round. More than that starts to pull attention away from the squares.
Finishing and Care
Weave in all remaining ends securely. Give the finished blanket a gentle final blocking so the corners sit flat and the border relaxes into place.
Finishing checklist
- Make sure every appliqué edge is stitched down securely
- Check the back for loose ends, especially around the appliqué squares
- Lightly steam or wet block if your yarn allows it
- Store the blanket folded flat or draped neatly
If you're making the baby size, keep every appliqué and embroidered detail flat and securely attached. This is a handmade keepsake for supervised use and display, not a blanket to leave in an infant's crib, bassinet or play yard during sleep. The U.S. Consumer Product Safety Commission's safe sleep guidance explains why infant sleep spaces should be kept free of loose blankets and other soft items.
Pattern development note: The granny-square round counts, proposed joining counts and blanket-border arithmetic have been checked for internal consistency. Finished square dimensions, blanket measurements, yarn quantities and any resized appliqué measurements are estimates. The complete blanket has not been physically test-crocheted from these instructions.
If you enjoy this blanket style, you may also want to browse the full Christmas crochet appliqué collection or the broader Christmas crochet patterns page for more ways to mix and match holiday motifs.
Frequently Asked Questions
Can I use different Christmas appliqués?
Yes. The blanket works best with flat appliqués that fit comfortably inside an 8-inch granny square. Keep some open background showing around the motif so the square still reads clearly.
Do I have to make the blanket in red, green, and ivory?
No, but I think that palette suits this design best. If you want a softer look, try dusty rose, sage, cream, and muted evergreen. If you want a brighter holiday look, use a truer red and a stronger green.
Can I make only the baby size?
Absolutely. The baby size is the featured version on this page, and it's the easiest place to start.
Where can I find the Christmas appliqué instructions?
Each Christmas decoration has its own crochet pattern, so you can use it for other projects, too. Follow the individual appliqué links in the supplies section, then return here for the granny-square arrangement, sewing and blanket assembly instructions.
What if my appliqué is too large for the square?
Go down a hook size for the appliqué, or swap in a slightly smaller holiday motif. Don't cram it into the square and hope for the best.
Can I wash the blanket?
That depends on your yarn. Check the label for the yarn you use. If you're making a baby gift, washable yarn is usually the smarter choice.
When you click on links to various merchants on this site and make a purchase, this may result in this site earning a commission. This does not affect the price you pay.

UBGI Gold Standard 2026
Reviewed under the site's
editorial checklist.
Photos, decorating ideas, party setups and reader submissions are shared for inspiration unless a page is specifically presented as a pattern, tutorial, reference guide or step-by-step project. Follow the instructions, measurements, safety guidance and manufacturer directions provided for the particular project or product.
About Jan | Contact | Baby Nursery Ideas (Blog) | Site Map | Privacy Policy | Disclosure Policy | Disclaimer | Affiliate Disclosure | Earnings Disclosure | Facebook | Pinterest
I am a participant in the Amazon Services LLC Associates Program, an affiliate advertising program designed to provide a means for us to earn fees by linking to Amazon. As an Amazon Associate I earn from qualifying purchases.
Copyright © 2006-2026. All Rights Reserved.