Free Crochet Holly Leaf Pattern with Berries
By Jan Bay
This free crochet holly leaf pattern with berries gives you two useful sizes: a large three-leaf focal cluster for Christmas bows, stockings and holiday decor, plus a smaller flat-berry version for bibs, loveys and other baby projects. Make the large leaves and berries when you need a centerpiece or focal point on a larger project. Use the smaller version when you just need a touch of Christmas tucked into one corner of a blanket or on a small item.
Explore More Free Christmas Crochet Patterns
Christmas Crochet Appliqué Patterns
Worsted Weight Christmas Yarn for This Holly Pattern
Jump to a Section
Free Crochet Holly Leaf Pattern: Pattern Overview
This pattern gives you two sizes of the same holly design. The large version is meant to be seen. Three substantial pointed leaves make a focal cluster for a Christmas bow, stocking, wreath, gift bag or other holiday project. The smaller version keeps the same look but is scaled down for a bib, hat, lovey corner or another place where you want the holly to be an accent instead of the whole show.
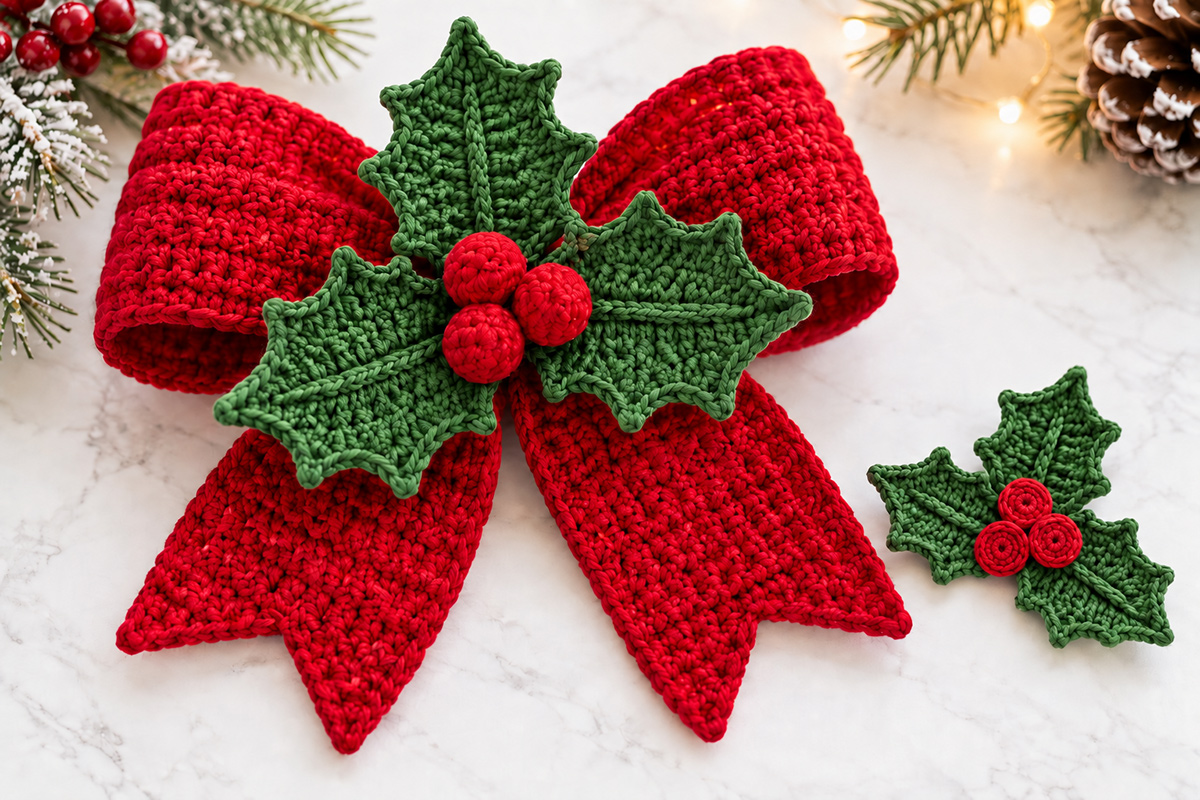
I’m also giving the two sizes different berry treatments for a reason. The large decorative version uses the three dimensional crocheted berries shown on the Christmas bow in the example image. The small version uses three flat crocheted berry discs. They still look like berries, but they sit close to the surface and can be sewn down around the entire edge.
If you’re making something for a baby, use the flat berry version. I would not put the dimensional berry balls on a bib, lovey or other baby item.
The leaves themselves are worked around both sides of a foundation chain. A second round forms the pointed holly lobes, and a line of surface slip stitches creates the raised center vein you can see in the finished example.
The red crocheted Christmas bow in the example image is not part of this pattern. I’m using it here to show how substantial the large holly cluster is supposed to be. The holly should look like the decoration on the bow, not like three tiny leaves sitting in the middle of an oversized bow.
The expected measurements below are calculated from the yarn, hook and construction used for this pattern. This pattern has not been physically test crocheted, so use the size checkpoints as you work and adjust your hook slightly if your pieces are coming out noticeably larger or smaller.
If you want more small Christmas motifs to mix with this one, you can find the rest of my free Christmas crochet appliqué patterns here.
Finished Sizes of the Crochet Holly Leaf Pattern with Berries
Large focal holly leaf: approximately 4 1/4 to 4 1/2 inches long and about 2 1/2 to 2 3/4 inches wide at the widest point.
Large assembled holly cluster: approximately 7 to 7 1/2 inches wide and 5 to 5 1/2 inches tall, depending on how far you fan the three leaves apart.
Large dimensional berry: approximately 3/4 to 7/8 inch across.
Small holly leaf: approximately 2 1/4 to 2 1/2 inches long and about 1 1/4 to 1 1/2 inches wide.
Small assembled holly cluster: approximately 3 3/4 to 4 inches wide and 2 3/4 to 3 inches tall.
Flat berry disc: approximately 5/8 to 3/4 inch across.
Those two sizes are intentionally far enough apart to matter. If you want a focal decoration, make the large leaves. If you just need a little holly tucked into the corner of something, make the small ones. You don’t need to change yarn weight to get the two sizes.
Supplies
- Yarn: smooth #4 worsted weight cotton or cotton blend yarn in evergreen green and Christmas red
- Estimated green yarn: about 35 to 45 yards to make one complete large cluster and one complete small cluster
- Estimated red yarn: about 8 to 12 yards to make both berry styles
- Hook: G/6 4.0 mm crochet hook
- Tapestry needle for weaving in ends and assembly
- Stitch marker for the dimensional berries
- Small amount of polyester fiberfill: only for the dimensional decorative berries
- Blocking mat and rustproof pins: optional, but helpful if you want to straighten the leaf points before assembly
Use a smooth yarn for this project rather than anything fuzzy. The leaf shape depends on those pointed edges and the raised center vein being easy to see.
You can use acrylic if that’s what you have, but stay fairly close to worsted weight if you want the finished measurements above. A much thicker yarn will turn the large version into something closer to an ornament or wreath piece, while a fine yarn can make the small version too tiny to show the leaf shaping well.
Abbreviations
This pattern uses standard U.S. crochet terminology.
ch = chain
dc = double crochet
hdc = half double crochet
rnd = round
sc = single crochet
sc2tog = single crochet 2 stitches together
magic ring = adjustable loop used to begin crocheting in the round
sl st = slip stitch
st/sts = stitch/stitches
tr = treble crochet
If you ever need to check a crochet abbreviation, the Craft Yarn Council crochet abbreviation list is a handy reference.
Pattern Notes
Target gauge for the calculated sizes: approximately 17 sc and 18 rows = 4 inches in single crochet with the 4.0 mm hook. Exact gauge is not critical, but the size of the foundation chain is.
Before you start shaping a leaf, check the foundation chain. The large 17 chain foundation should measure close to 4 inches relaxed. The small 10 chain foundation should measure about 2 1/4 inches. If yours is dramatically different, change hook size before making all six leaves.
Each leaf begins at the stem end. You’ll crochet down one side of the foundation chain, work around the far end, and then crochet back along the unused loops on the opposite side.
Round 2 creates the actual holly shape. The slip stitches form the valleys between the lobes, while the taller stitches and little chain points make the sharp outer points.
Keep the slip stitches loose. If you pull them tight, the leaf will cup more than the leaves in the example image.
The raised center vein is added last with surface slip stitches. Keep those loose too. They should define the center of the leaf without shortening it.
Right side and wrong side: The leaves are reversible until the center vein is added. Choose one face as the right side and work the center vein on that same face for all three leaves in a cluster. For the flat berries, use the face you want visible as the right side and keep the starting tail and woven ends on the wrong side.
Optional blocking: After the leaves are finished, lightly dampen them and shape the points to the expected measurements on a blocking mat. Pin the outer points with rustproof pins and let the leaves dry completely. Remove every pin before assembly.
Piece count for one large cluster: 3 large leaves and 3 dimensional berries.
Piece count for one small cluster: 3 small leaves and 3 flat berry discs.
The dimensional berries are a decorative option. Do not substitute them for the flat berries on a baby item.
Before assembly, weave in every unused yarn tail securely, including the foundation-chain starting tail on each leaf. Keep only the tails specifically reserved for sewing or assembly.
Large Holly Leaf Pattern
Make 3.
Foundation: Ch 17.
Round 1: Sc in 2nd ch from hook and in next 14 ch. You will have 15 sc before the final chain. Work 3 sc in the last ch.
Rotate the work so you can crochet along the opposite side of the foundation chain. Work 1 sc in each of the 15 unused loops. Do not join. (33 sc)
You now have 15 sts along the first side, 3 sts around the tip, and 15 sts along the second side.
Round 2, first side: *Sl st in next st, sc in next st, work (hdc, dc, ch 2, sl st in 2nd ch from hook, dc, hdc) all in next st, sc in next st, sl st in next st.*
Repeat from * to * 2 more times. You now have 3 side points and have used all 15 sts along the first side.
Leaf tip: Sc in next st. In the next st work (hdc, dc, tr, ch 3, sl st in 2nd ch from hook and in next ch, tr, dc, hdc). Sc in next st.
That uses the 3 sts at the tip and gives you the longer center point visible at the end of the leaf.
Round 2, second side: *Sl st in next st, sc in next st, work (hdc, dc, ch 2, sl st in 2nd ch from hook, dc, hdc) all in next st, sc in next st, sl st in next st.*
Repeat from * to * 2 more times. Join with a sl st to the first sl st of Round 2 at the base of the leaf. You should have 6 side points and 1 tip point.
Fasten off and weave in the end unless you want to use that tail for assembly.
Add the center vein: With the right side facing, join green yarn at the base of the leaf directly over the foundation chain. Work loose surface slip stitches straight up the center, following the foundation chain toward the tip. Stop just below the long tip point.
Fasten off, pull both vein ends to the wrong side and weave them in securely.
The finished leaf should lie mostly flat with a slightly raised edge and a clearly visible center ridge. If it curls sharply inward, your Round 2 slip stitches or center vein are probably too tight.
Large leaf checkpoint: Before making the other two leaves, check the first one against the expected measurement of roughly 4 1/4 to 4 1/2 inches long. A small difference is fine. A half inch or more is enough that I’d change hook size before continuing.
Small Holly Leaf Pattern
Make 3.
This version uses the same basic construction as the large leaf, but I would not simply crochet the large instructions with a smaller hook. The point placement changes so the little leaf keeps a recognizable holly shape instead of turning into a narrow miniature.
Foundation: Ch 10.
Round 1: Sc in 2nd ch from hook and in next 7 ch. You will have 8 sc before the final chain. Work 3 sc in the last ch.
Rotate the work and crochet along the opposite side of the foundation chain. Work 1 sc in each of the 8 unused loops. Do not join. (19 sc)
You now have 8 sts along the first side, 3 sts around the tip, and 8 sts along the second side.
Round 2, first side: *Sl st in next st, sc in next st, work (hdc, dc, ch 2, sl st in 2nd ch from hook, dc, hdc) all in next st, sl st in next st.*
Repeat from * to * once more. You now have 2 side points and have used all 8 sts along the first side.
Leaf tip: Sc in next st. In the next st work (hdc, dc, tr, ch 3, sl st in 2nd ch from hook and in next ch, tr, dc, hdc). Sc in next st.
Round 2, second side: *Sl st in next st, sc in next st, work (hdc, dc, ch 2, sl st in 2nd ch from hook, dc, hdc) all in next st, sl st in next st.*
Repeat from * to * once more. Join with a sl st to the first sl st of Round 2 at the base. You should have 4 side points and 1 tip point.
Fasten off.
Add the center vein: Join green yarn at the base on the right side. Work loose surface slip stitches along the foundation chain to just below the tip. Fasten off, pull the ends to the wrong side and weave them in securely.
Small leaf checkpoint: The finished leaf should measure roughly 2 1/4 to 2 1/2 inches long. Make all three leaves with the same yarn tension so the little cluster stays balanced.
Dimensional Berries for Decorative Projects
Make 3 in red.
These are the berries shown on the large Christmas bow in the example image. They are intentionally rounded and dimensional.
Work these berries in a continuous spiral. Place a stitch marker in the first stitch of each round and move it up as you work.
Round 1: Make a magic ring. Work 6 sc into the ring. Do not join. (6)
Round 2: Work 2 sc in each st around. (12)
Round 3: Sc in each st around. (12)
Round 4: Sc2tog around. (6)
Remove the stitch marker before stuffing and closing the berry.
Pull the magic-ring starting tail firmly closed again. Before adding the stuffing, weave that starting tail securely through several stitches on the inside of the berry so the center cannot work loose.
Add a very small amount of fiberfill. You only need enough to round the berry. Don’t pack it hard.
Cut the yarn, leaving a long sewing tail. Thread the tail through the front loops of the remaining 6 sts and pull the opening closed. Secure the yarn, but keep the long tail for assembly.
Roll the berry gently between your fingers to round it. Each one should be about 3/4 to 7/8 inch across.
Do not use these dimensional berries on a baby bib, lovey, blanket, hat or other baby item. Use the flat version below instead.
Flat Berry Option for Baby Items
Make 3 in red.
These are the flat crocheted berries shown on the smaller holly in the example image. I wanted them to still look crocheted, so they have a visible center and a real round of stitches instead of being little red fabric circles.
Round 1: Make a magic ring. Work 5 sc into the ring. Pull the ring firmly closed. Join with a sl st to the first sc. (5)
Round 2: Ch 1; this does not count as a st. Work 2 sc in each st around. Join with a sl st to the first sc. (10)
Fasten off, leaving a long tail for sewing.
Pull the magic-ring starting tail firmly closed again and weave it securely through several stitches on the wrong side of the berry. Trim that starting tail only after it is secure. Keep the long finishing tail for sewing the berry to the project.
Do not stuff the berry and do not cup it into a ball. Lay it flat and gently shape it into a circle with your fingers.
The center ring and second round should remain visible. That is what gives the little berry the round crochet texture shown in the example instead of making it look like a plain red dot.
When you attach one to a baby item, sew around the entire outside edge of the berry with the red tail. Then make one additional small anchoring stitch through the center of the berry and the fabric or crochet beneath it. Knot securely on the wrong side and weave the tail well away from the knot before trimming.
I would use the same approach with the leaves. On a baby item, don’t just tack the holly cluster down at the center. Sew the leaves securely around their outer edges so there aren’t loose points that can be pulled away from the project.
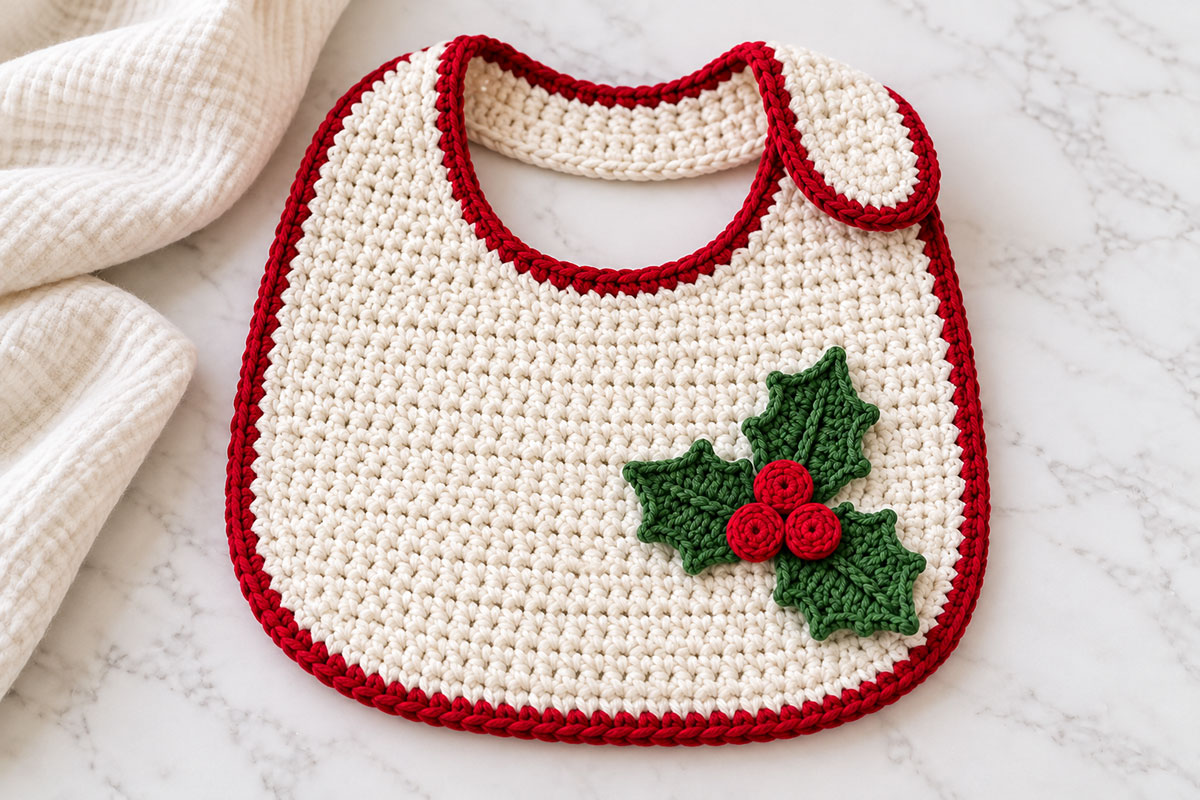
If you want to make the bib shown here, use my free crochet baby bib pattern, then add the small holly with the flat berry discs after the bib is finished.
If you use this appliqué on a lovey or blanket, keep the finished item out of an infant sleep space. The U.S. Consumer Product Safety Commission recommends keeping a crib, bassinet or play yard bare except for a fitted sheet. You can read the current CPSC safe sleep guidance here.
Assembly
Large focal cluster: Lay one large leaf vertically with the tip pointing up. Angle the second leaf down and to the left and the third down and to the right. Overlap the three stem ends by about 1/2 to 3/4 inch.
Use green yarn to sew the overlapping bases together. Keep your stitches inside that center area so the outer portions of the leaves can keep the slightly raised look shown in the example image.
Arrange the three dimensional berries over the center join in a small triangle, with one berry slightly higher and the other two just below it. This matches the arrangement shown in the finished example.
Use each berry tail to sew through the berry base, the overlapping leaf bases and back through the berry several times. Tie off securely on the wrong side and weave in the ends.
If you’re attaching the large cluster to a Christmas bow, stocking or another decorative project, secure the center first. Then add a discreet anchoring stitch through the inner third of each leaf. Leave the outer lobes and points free so the cluster keeps some dimension.
Small cluster for a baby item: Arrange one leaf upright with the other two fanning down and outward. Overlap the bases by about 1/4 inch.
Position the leaves directly on the finished bib, lovey, hat or other item. Sew each leaf securely around its outer perimeter with matching green yarn or thread. Add a few extra stitches through the overlapping center.
Place the three flat berries over the center in a compact triangle. Sew completely around the outside edge of every berry and add the center anchoring stitch described above.
Before weaving in the final ends, turn the project over and check the back. There shouldn’t be long floats, loose loops or short tails that can work their way free.
If the item will be washed, check the appliqué again after laundering. That takes about ten seconds and is worth doing.
Ways to Use Crochet Holly
The large and small versions really have different jobs, which is why I wanted both on this page.
I’d use the large focal cluster where the holly is supposed to be part of the main design. The red crocheted Christmas bow in the example is exactly the scale I had in mind. It would also work on the cuff of a large Christmas stocking, the corner of a decorative holiday pillow, a wreath, a handmade gift bag or the center of a garland.
The small version is better when the holly needs to stay in its lane. Put it in the corner of a crocheted bib, near one end of a scarf, on a hat, on a gift pouch or as a small accent on a larger handmade piece.
For baby projects, keep the whole thing flat. Use the flat berry discs, sew the leaf edges down and skip beads, buttons and dimensional berry balls.
You can also make the leaves without berries. Three green leaves by themselves make a quieter Christmas accent, especially if the project already has plenty of red elsewhere.
If you’re building a set of Christmas appliqués, pair the holly with my crochet candy cane pattern, or head back to the Christmas crochet appliqué collection and pick the pieces you actually need. You don’t have to cover the project with them. One good focal appliqué is often plenty.
When you click on links to various merchants on this site and make a purchase, this may result in this site earning a commission. This does not affect the price you pay.

UBGI Gold Standard 2026
Reviewed under the site's
editorial checklist.
Photos, decorating ideas, party setups and reader submissions are shared for inspiration unless a page is specifically presented as a pattern, tutorial, reference guide or step-by-step project. Follow the instructions, measurements, safety guidance and manufacturer directions provided for the particular project or product.
About Jan | Contact | Baby Nursery Ideas (Blog) | Site Map | Privacy Policy | Disclosure Policy | Disclaimer | Affiliate Disclosure | Earnings Disclosure | Facebook | Pinterest
I am a participant in the Amazon Services LLC Associates Program, an affiliate advertising program designed to provide a means for us to earn fees by linking to Amazon. As an Amazon Associate I earn from qualifying purchases.
Copyright © 2006-2026. All Rights Reserved.