Free Christmas Crochet Snowflake Applique Pattern
By Jan Bay
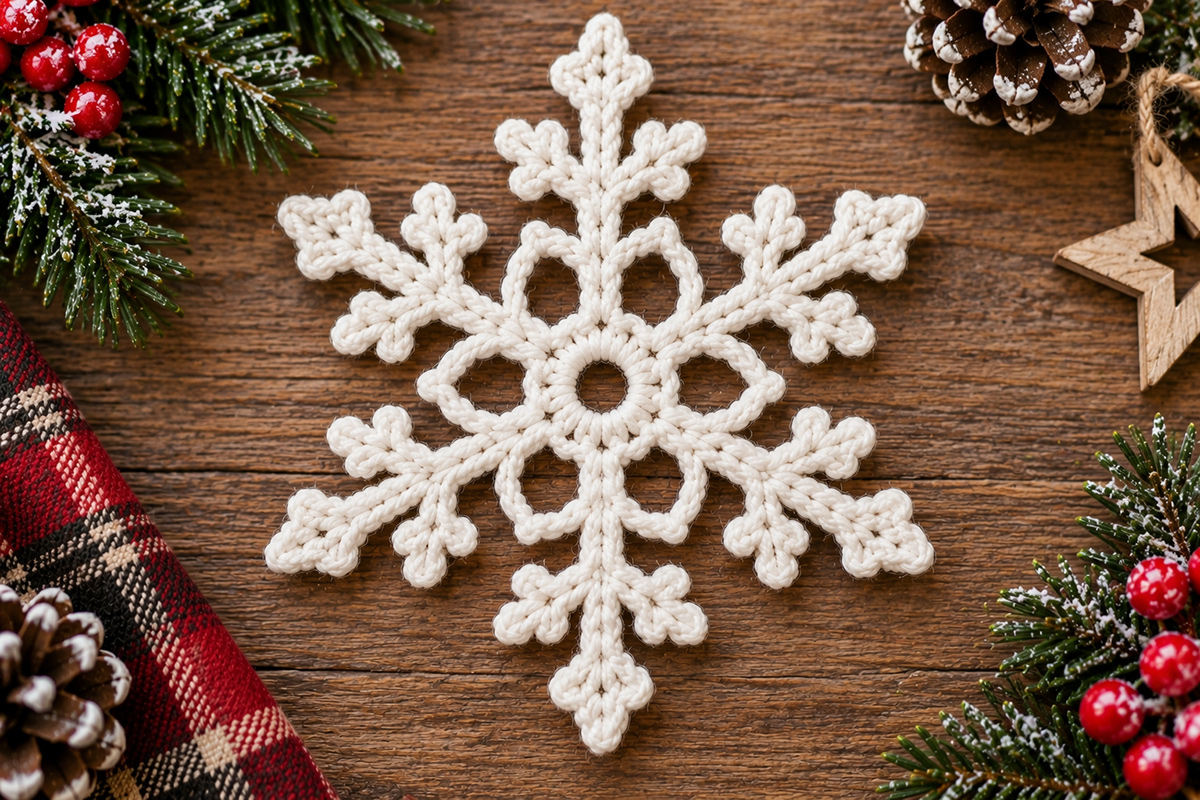
This free Christmas crochet snowflake appliqué pattern gives you one crisp six-point snowflake with a frosty looking center, matching side branches and pointed tips. I kept the construction to three rounds so it still looks like a snowflake instead of turning into a little lace doily. Use it for Christmas blankets, stockings and ornaments, then keep the same pattern handy for winter crafts after the holidays.
More Christmas Crochet Appliqué Patterns
Gingerbread Crochet Appliqué Set
Shop Crochet Yarn and Supplies for This Christmas Snowflake
Jump to the Christmas Snowflake Pattern
Pattern at a Glance
Finished size: Expected to be about 5 to 5 1/4 inches from tip to tip after light blocking with the listed yarn and hook. This pattern has not been physically test-crocheted, so the finished size may vary with yarn and tension.
Yarn: Worsted weight #4 yarn in warm white, soft cream or clean white.
Hook: 4.0 mm crochet hook.
Skill level: Intermediate. The stitches themselves are familiar, but you’ll be building six matching arm spines with paired side branches and keeping all six sections even.
Construction: One-piece snowflake worked in three joined rounds. The center establishes six evenly spaced sections. The final round builds six narrow spoke-style arms while edging the six open spaces around the center.
Number of pieces: 1.
Main structure: 6 open inner spaces, 6 matching arm spines, 4 side branches on each arm and 1 main tip on each arm.
Gauge: Exact gauge isn’t critical for an appliqué, but keep your stitches fairly firm and consistent. A loose center or floppy chains will make it harder to keep the six arms even.
Blocking: Light blocking is recommended. It should straighten the arms and spread the branch pairs evenly, not correct a snowflake that is badly ruffled or cupped.
Testing note: This pattern has been developed mathematically around the finished example design, but it has not been physically test-crocheted from these instructions.
Christmas Crochet Snowflake Applique Pattern Materials
You only need a small amount of yarn for one snowflake. I’d use a smooth worsted weight yarn rather than anything fuzzy or heavily textured because the branch shape is much easier to see when the stitches stay crisp.
You’ll need:
- Worsted weight #4 yarn in warm white, soft cream or clean white, approximately 15 to 20 yards
- 4.0 mm crochet hook
- Yarn needle
- Scissors
- Blocking mat or another pin-safe surface
- Rust-resistant blocking pins
If you substitute a different yarn, stay close to the same weight unless you deliberately want to change the finished size. The Craft Yarn Council yarn weight system is useful for comparing yarn categories when the label wording differs between brands.
You don’t need beads, sequins or other decorations for this one. The branching does enough on its own.
Abbreviations
This pattern uses standard US crochet terms.
- ch = chain
- sc = single crochet
- sl st = slip stitch
- sp = space
- st = stitch
- sts = stitches
Pattern Notes
The snowflake starts with a small chain ring. Round 1 builds the center, and Round 2 divides it into six equal sections with six open arches. Those six arches are important because they create the open area you can see between the center and the long snowflake arms.
Round 3 builds all six arms. Each arm starts from one of the six anchor stitches established in Round 2. You’ll make a narrow chain spine, work back along that spine, add two matching pairs of side branches and finish the outer point before moving across the next inner arch.
Work all six arms the same way. Don’t change the branch length or add an extra stitch to one arm because a very small difference shows quickly in a geometric motif like this.
The branch chains are worked out from the arm and back to the same point before you continue along the spine. That keeps the snowflake in one piece and gives you the repeated branch pattern shown in the finished example.
Keep the chain stitches firm but not tight. If the arm spines are noticeably looser than the center stitches, the points can look limp even after blocking.
Beginning chains used to start a round do not count as stitches unless the instructions specifically say otherwise.
Join each completed round with a slip stitch where directed. Do not turn.
Once the crochet is finished, light blocking will spread the six arms evenly and help the side branches sit at matching angles. The pattern should already lie reasonably flat before you block it.
Christmas Crochet Snowflake Pattern
Start with warm white, soft cream or clean white yarn and your 4.0 mm hook.
Starting ring: Ch 4. Join with a sl st in the first ch to form a ring.
Round 1: Ch 1. Work 12 sc into the ring. Join with a sl st in the first sc.
Count: 12 sc.
Round 2: Ch 1. Sc in the same st, ch 7, skip the next st. Repeat [sc in next st, ch 7, skip next st] 5 more times. Join with a sl st in the first sc.
Count: 6 sc anchor stitches and 6 ch-7 spaces.
Stop and count those six ch-7 spaces before you continue. If you don't have exactly six, fix the round now. Each one becomes one open section between two finished snowflake arms.
Round 3: The entire snowflake edge is made in this round. You'll build one arm from each Round 2 sc anchor, return to that same anchor, then slip stitch across the next ch-7 space to reach the following anchor.
Arm 1: From the current Round 2 sc anchor, ch 3. The third chain is your first branch junction.
First short branch: Ch 3. Sl st in the second ch from the hook, sc in the next ch, then sl st in the same spine chain where this branch began.
Ch 2 along the main spine. The second chain is your upper branch junction.
First long branch: Ch 4. Sl st in the second ch from the hook, sc in each of the next 2 chs, then sl st in the same spine chain where this branch began.
Ch 2 along the main spine. The second chain is the base of the main point.
Main point: Ch 5. Sl st in the second ch from the hook, sc in each of the next 3 chs, then sl st in the same spine chain where the point began.
Now work back down the opposite side of the arm.
Sl st in the next 2 spine chs. You are back at the upper branch junction.
Second long branch: Ch 4. Sl st in the second ch from the hook, sc in each of the next 2 chs, then sl st in the same spine chain where this branch began.
Sl st in the next 2 spine chs. You are back at the lower branch junction.
Second short branch: Ch 3. Sl st in the second ch from the hook, sc in the next ch, then sl st in the same spine chain where this branch began.
Sl st in the next 2 spine chs, then sl st in the same Round 2 sc anchor where the arm began.
You should now have one complete arm with 2 short side branches, 2 longer side branches and 1 main outer point.
Move to Arm 2: Sl st in each of the next 7 chs of the first ch-7 space, then sl st in the next Round 2 sc anchor.
Arms 2 through 5: Repeat the complete Arm 1 instructions from the current anchor. After each of these arms, sl st in each of the next 7 chs of the following ch-7 space and sl st in the next Round 2 sc anchor.
Arm 6: Repeat the complete Arm 1 instructions from the current anchor. After Arm 6, sl st in each of the 7 chs of the final ch-7 space, then sl st into the first Round 2 sc anchor to close the round.
Fasten off, leaving enough yarn to weave in securely.
Final count check: You should have exactly 6 main arms, 24 side branches in all, 6 main outer points and 6 open inner spaces. Every arm should have the same short branch, long branch, main point, long branch, short branch sequence.
If one arm has a different number of branches, fix it before blocking. Blocking can straighten the shape. It can't fix a missing branch.
Blocking and Finishing
Weave in both yarn ends securely before you do the final shaping. The snowflake should already lie reasonably flat at this stage.
Dampen the snowflake using a blocking method suitable for your yarn fiber. Place it on a blocking mat and straighten the center first.
Pin the six main points so they're spaced evenly around the center. Then arrange the two branch pairs on each arm so the left and right sides mirror each other. You don't need to pull hard. You're shaping the stitches, not stretching the snowflake into a larger size.
Check the six open spaces around the center too. If one has been pulled noticeably smaller, ease the surrounding slip stitches until it looks more like the other five.
Let the snowflake dry completely before removing every blocking pin.
The expected finished diameter is about 5 to 5 1/4 inches from one main point to the point directly opposite it. Because this design has not been physically test-crocheted from these instructions, treat that measurement as an expected size rather than a physically measured finished size.
Ways to Use Your Snowflake
I like this size because it isn't limited to one Christmas project. It's large enough for the branching to show, but it doesn't have to take over whatever you put it on.
Sew one onto a Christmas stocking, tote, gift bag or wall hanging. Use several across a winter garland, or attach one to a decorative pillow or blanket that isn't being used in an infant sleep space. You can also add a separate yarn hanging loop after blocking if you want to use the snowflake as an ornament.
Warm white keeps it easy to mix with the other Christmas appliqués, but pale icy blue works if you're carrying the pattern into January or a winter woodland project. I wouldn't add beads or sequins. The six-arm shape and branch pattern are already doing the decorative work.
Safety Note
If you're sewing the snowflake onto a baby-oriented project, weave in every yarn end securely and stitch the motif down firmly enough that the arms and branches can't become loose dangling pieces. Skip beads, buttons, bells and other small detachable decorations.
Keep decorated blankets and pillows out of an infant sleep space. The U.S. Consumer Product Safety Commission recommends a bare infant sleep space with only a fitted sheet. You can read the current CPSC safe sleep guidance here.
When you click on links to various merchants on this site and make a purchase, this may result in this site earning a commission. This does not affect the price you pay.

UBGI Gold Standard 2026
Reviewed under the site's
editorial checklist.
Photos, decorating ideas, party setups and reader submissions are shared for inspiration unless a page is specifically presented as a pattern, tutorial, reference guide or step-by-step project. Follow the instructions, measurements, safety guidance and manufacturer directions provided for the particular project or product.
About Jan | Contact | Baby Nursery Ideas (Blog) | Site Map | Privacy Policy | Disclosure Policy | Disclaimer | Affiliate Disclosure | Earnings Disclosure | Facebook | Pinterest
I am a participant in the Amazon Services LLC Associates Program, an affiliate advertising program designed to provide a means for us to earn fees by linking to Amazon. As an Amazon Associate I earn from qualifying purchases.
Copyright © 2006-2026. All Rights Reserved.