Free Christmas Crochet Reindeer Applique Pattern
By Jan Bay
This free Christmas crochet reindeer applique pattern makes a festive decoration for craft and sewing projects. Red nose optional for those of you that want to make a more natural woodland animal decoration.
Explore More Free Christmas Crochet Patterns
Gingerbread Crochet Appliqué Set
Yarn and Crochet Supplies for This Reindeer Appliqué
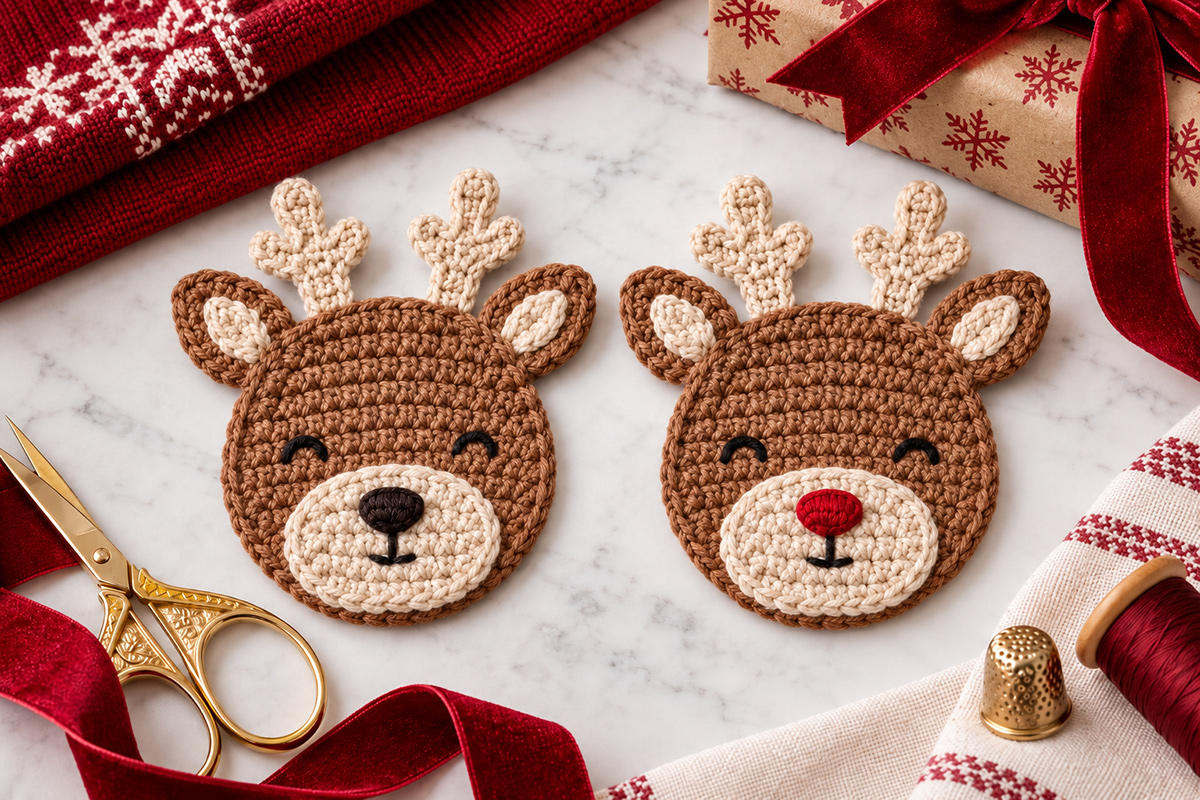
I kept this reindeer as a face rather than adding a body, hat or other Christmas pieces. The antlers do enough. With the dark brown nose, it can go on a winter woodland project. Switch that one little piece to red and it has a much more obvious Christmas look.
The head, ears, muzzle, antlers and nose are all worked flat. Nothing is stuffed, and there are no plastic eyes, buttons, beads or other hardware to add later.
Materials, Finished Size and Gauge
Yarn: #4 medium weight cotton yarn works well for the firm, clearly defined stitches shown in the example. You'll need approximately 30 yards of medium cocoa brown, 20 yards of warm cream or oatmeal, and less than 2 yards of dark brown or Christmas red for the nose. Those yardages are estimates rather than amounts measured from a physically completed sample.
Hook: 4 mm (G-6) crochet hook, or the hook size needed to match gauge.
You'll also need:
- Black embroidery floss for the eyes and mouth
- Embroidery needle
- Yarn needle
- Scissors
- Stitch marker
- Blocking mat and pins if you want to lightly shape the finished pieces before assembly
Gauge: About 16 single crochet stitches and 18 rows = 4 inches in single crochet worked flat.
Expected finished size: Approximately 6 1/4 inches wide from ear to ear and about 6 1/2 inches tall from the chin to the tallest antler tip when made at the stated gauge.
The measurements are estimated from the stitch counts, stated gauge and planned assembly. Because the ears and antlers are sewn on with some overlap, the exact finished dimensions can vary slightly. The pattern has not been physically test-made, so I don't want to present those dimensions as though they came from measuring a finished sample.
Pattern Notes
This pattern uses U.S. crochet terms. The head is worked in joined rounds so the shaping increases and decreases stay in predictable positions. Chain 1 at the beginning of a round or row does not count as a stitch. A joining slip stitch also does not count as a stitch. When the instructions say Join, join with a slip stitch to the first single crochet of the round.
The smaller pieces are made separately and sewn together. Leave a reasonably long yarn tail whenever the instructions say to fasten off because those tails can be used for assembly.
Piece count: Before final assembly, you should have 15 crocheted pieces: 1 head, 2 outer ears, 2 inner ears, 1 muzzle, 2 antler stems, 2 center antler prongs, 4 side antler prongs and 1 nose.
If you need to check an abbreviation, the Craft Yarn Council crochet abbreviations list gives the standard U.S. terms used here.
Abbreviations
- ch = chain
- inc = work 2 sc in the same stitch
- MR = magic ring
- rnd = round
- sc = single crochet
- sc2tog = single crochet 2 stitches together
- sl st = slip stitch
- st = stitch
Free Christmas Crochet Reindeer Applique Pattern
Make the head first. It gives you the reference point for everything else, especially the muzzle, ears and antler placement.
Brown Reindeer Head
With cocoa brown yarn, make an MR.
Rnd 1: Work 6 sc in MR. Join with sl st to first sc. (6)
Rnd 2: Ch 1. Inc in each st around. Join. (12)
Rnd 3: Ch 1. *Sc in next st, inc in next st.* Repeat around. Join. (18)
Rnd 4: Ch 1. *Sc in next 2 sts, inc in next st.* Repeat around. Join. (24)
Rnd 5: Ch 1. *Sc in next 3 sts, inc in next st.* Repeat around. Join. (30)
Rnd 6: Ch 1. *Sc in next 4 sts, inc in next st.* Repeat around. Join. (36)
Rnd 7: Ch 1. *Sc in next 5 sts, inc in next st.* Repeat around. Join. (42)
Rnd 8: Ch 1. *Sc in next 6 sts, inc in next st.* Repeat around. Join. (48)
Rnd 9: Ch 1. *Sc in next 7 sts, inc in next st.* Repeat around. Join. (54)
Rnd 10, shaping round: Keep the round join at the top center of the head. Ch 1. Sc in next 3 sts, inc in next st, sc in next 3 sts, inc in next st, sc in next 3 sts, inc in next st, sc in next 3 sts, inc in next st, sc in next 3 sts, sc2tog, sc in next 13 sts, sc2tog, sc in next 2 sts, inc in next st, sc in next 3 sts, inc in next st, sc in next 3 sts, inc in next st, sc in next 3 sts, inc in next st, sc in final 3 sts. Join. (60)
This round still adds the six net stitches needed for the head to stay flat, but the increases are concentrated across the upper face while the two decreases pull in the lower sides. That gives the head the slightly narrower lower face shown in the example without turning the outer edge into a wall.
Fasten off, leaving about a 36-inch tail if you plan to use the head tail to sew the finished applique to another project. Keep the join at the top center when you lay the head flat.
Outer Ears
Make 2 with cocoa brown.
Ch 6.
Work 2 sc in the second ch from the hook. Sc in each of the next 3 ch. Work 4 sc in the last ch.
Continue along the unused loops on the opposite side of the foundation chain. Sc in each of the next 3 ch. Work 2 sc in the same foundation ch that holds the first 2 sc. Join with sl st. (14)
Fasten off, leaving a tail for sewing.
Optional blocking: Before assembly, lightly block the head, ears, muzzle, antler pieces and nose if needed. Shape each piece flat, pin it in place and allow it to dry completely before sewing the reindeer together. Use a blocking method appropriate for the yarn fiber you chose.
Cream Inner Ears
Make 2 with cream or oatmeal yarn.
Ch 4.
Work 2 sc in the second ch from the hook. Sc in the next ch. Work 4 sc in the last ch.
Continue along the opposite side of the foundation chain. Sc in the next ch. Work 2 sc in the same foundation ch that holds the first 2 sc. Join. (10)
Fasten off, leaving a sewing tail.
Center one cream piece on each brown ear. Leave an even brown edge showing around it and sew the inner ear securely in place.
Cream Muzzle
With cream or oatmeal yarn, ch 8.
Row 1: Sc in second ch from hook and in each ch across. Turn. (7)
Row 2: Ch 1. Inc in first st, sc in next 5 sts, inc in last st. Turn. (9)
Row 3: Ch 1. Inc in first st, sc in next 7 sts, inc in last st. Turn. (11)
Row 4: Ch 1. Sc in each st across. Turn. (11)
Row 5: Ch 1. Sc2tog, sc in next 7 sts, sc2tog. Turn. (9)
Row 6: Ch 1. Sc2tog, sc in next 5 sts, sc2tog. Turn. (7)
Border: Ch 1. Sc across the 7 sts of Row 6. Work 1 sc in each of the 6 row ends down the first side. Work 1 sc in each of the 7 unused loops along the bottom of the foundation chain. Work 1 sc in each of the 6 row ends up the second side. Join with sl st. (26)
Fasten off, leaving a long tail for sewing.
Antler Stems
Make 2 with cream yarn.
Ch 3.
Row 1: Sc in second ch from hook and next ch. Turn. (2)
Rows 2 through 5: Ch 1. Sc in each of the 2 sts. Turn. (2)
Fasten off, leaving a sewing tail.
Center Antler Prongs
Make 2 with cream yarn.
Ch 5.
Work 2 sc in second ch from hook. Sc in each of next 2 ch. Work 4 sc in last ch.
Continue along opposite side of foundation chain. Sc in each of next 2 ch. Work 2 sc in the same foundation ch that holds the first 2 sc. Join. (12)
Fasten off with a sewing tail.
Side Antler Prongs
Make 4 with cream yarn.
Ch 4.
Work 2 sc in second ch from hook. Sc in next ch. Work 4 sc in last ch.
Continue along opposite side of foundation chain. Sc in next ch. Work 2 sc in the same foundation ch that holds the first 2 sc. Join. (10)
Fasten off with a sewing tail.
Assemble Each Antler
Lay one stem vertically. Center one longer 12-stitch prong over the top of the stem with its rounded end pointing straight up. Overlap the lower third of the prong over the top two rows of the stem.
Place one smaller 10-stitch prong on each side of the center prong. Angle each side prong outward about 35 to 45 degrees. Let the lower third of each side prong overlap the stem, with its inner lower edge just overlapping the center prong.
With cream yarn, sew around the lower overlapping portion of the center prong, catching both the prong and stem. Sew the lower overlapping portion of each side prong to the stem in the same way, catching the adjacent edge of the center prong where the pieces overlap. Leave all three rounded tips free.
Keep the lower part of the stem visible beneath the three prongs. Repeat the same placement and sewing sequence for the second antler.
That separate-piece construction gives the finished antler the three rounded tips shown in the example while keeping the entire piece flat.
Small Nose
Make 1 in dark brown for the woodland version or Christmas red for the red-nose version.
Ch 4.
Work 2 sc in second ch from hook. Sc in next ch. Work 4 sc in last ch.
Continue along opposite side of foundation chain. Sc in next ch. Work 2 sc in the same foundation ch that holds the first 2 sc. Join. (10)
Fasten off, leaving a tail for sewing.
Assemble the Reindeer Face
Lay every piece out before you sew anything to the head. The spacing matters more than adding extra detail.
1. Position the antlers. Place the two cream antlers behind the upper edge of the brown head. The stems should sit just inside the ears rather than directly above them. Keep the center prongs nearly vertical and let the outer prongs angle away from the center. Sew the lower part of each stem securely to the back of the head.
2. Add the ears. Set one finished ear at each upper side of the head, roughly around the 10 o'clock and 2 o'clock positions. Tilt them slightly outward. Tuck only the base of each ear behind the edge of the head, then stitch that base securely in place.
3. Position the muzzle. Center the cream muzzle across the lower part of the face. The bottom edge should sit roughly 3/8 inch above the bottom of the brown head. Pin or hold it flat, then sew all the way around the outer edge with cream yarn.
4. Sew on the nose. Center the little nose horizontally on the upper half of the cream muzzle. Use the yarn tail to sew around its edge. Keep it flat rather than padding it.
5. Embroider the mouth. With black embroidery floss, make one short vertical stitch from the center bottom of the nose downward about 1/4 inch. At the lower end, add two very short angled stitches to make the restrained little mouth shown in the example. Don't make the smile wider than the nose.
6. Embroider the eyes. Use black embroidery floss to make two short curved eyes above the muzzle. Each eye should be about 3/8 inch wide. Place them the same distance from the center line and roughly 1/2 inch above the top edge of the muzzle.
The eyes in the finished design are simple curved embroidered lines. Don't add eyelashes or replace them with plastic eyes. Keeping them small is part of what gives the reindeer its softer woodland look.
7. Finish the back. Weave in any ends you don't need for attaching the applique to another project. If you know where the reindeer is going, you can leave the brown head tail available for sewing it down.
8. Check the finished applique. Remove any blocking pins and stitch markers. Gently tug each ear, antler, inner ear, muzzle and nose to make sure it is securely attached. Check the back for loose yarn ends or open loops before sewing the reindeer onto another project.
Brown Nose or Christmas Red Nose?
You don't need a second reindeer pattern to get the two looks shown in the main page image. Make every piece exactly the same and change only the nose yarn.
I'd use dark brown when the applique is going into a woodland project, especially with cocoa, oatmeal, rust, cream or muted evergreen.
Use red when you want the Christmas connection to be immediate. Keep the nose at the same 10-stitch size. Making it bigger would start changing the character of the face, and I wouldn't do that.
No Santa hat is needed. No bells either. The little red nose is enough.
Ways to Use the Finished Reindeer Applique
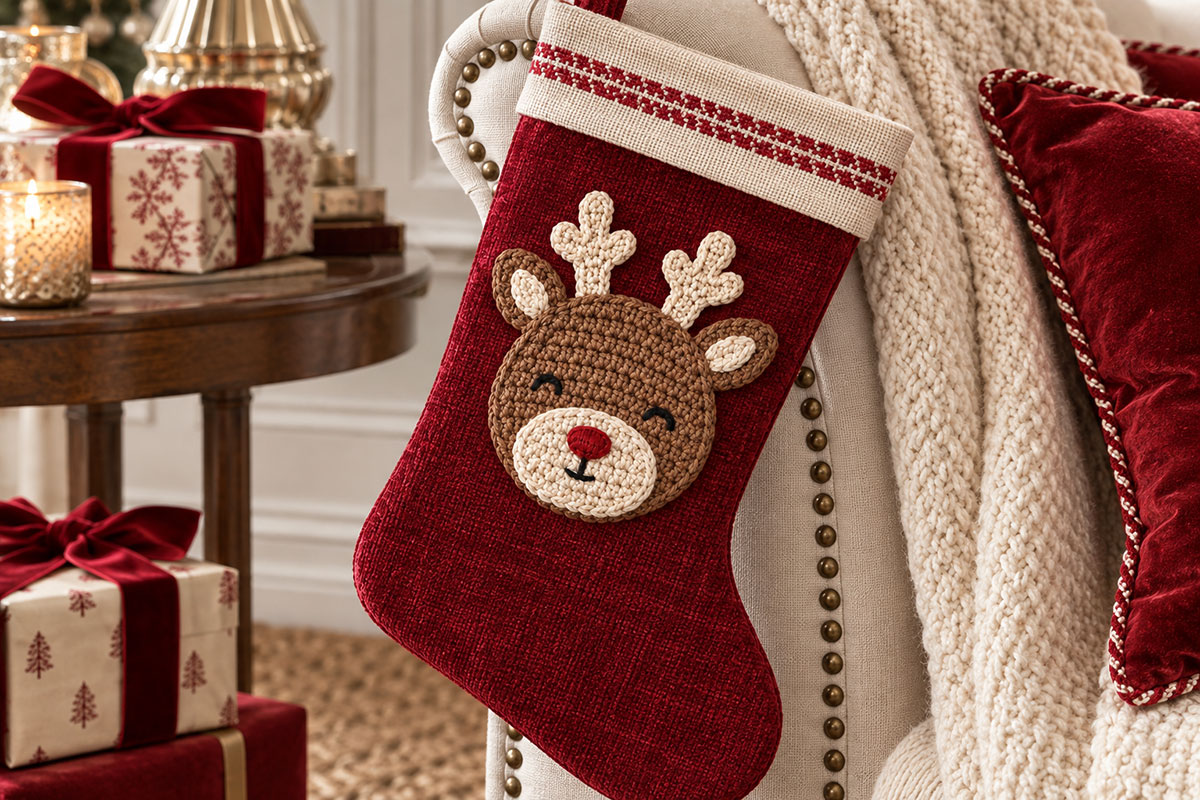
A flat reindeer face like this is easy to work into projects where a stuffed character would be too bulky. Sew it to a Christmas stocking, fabric gift bag, quilted wall hanging, handmade banner or the front of a decorative pillow cover.
It also looks very nice on a winter woodland nursery craft with the brown nose. If you're using it on something made for a baby, sew the applique down securely around the head and make sure the ears and antlers are firmly attached. Keep it as a flat decoration rather than adding detachable embellishments. If you attach it to a baby blanket or decorative pillow, keep the finished item out of an infant sleep space; the CPSC safe sleep guidance recommends a bare sleep space with only a fitted sheet.
If you want a reindeer that stands on its own as a character instead of a flat decoration, that's a different project. This pattern is deliberately staying with the face applique shown in the example.
Christmas Crochet Reindeer Applique FAQ
How big is the finished reindeer applique?
At the stated gauge, the estimated finished size is about 6 1/4 inches wide from ear to ear and about 6 1/2 inches tall from the lowest edge of the head to the tallest antler tip. Your size can change with yarn, hook, tension and the amount of overlap used when attaching the ears and antlers.
Can I make the reindeer smaller?
Yes. The simplest way is to use a lighter yarn and a hook suited to that yarn while keeping every stitch count the same. That preserves the proportions better than removing rounds from the head or shortening individual pieces.
Can I use acrylic yarn instead of cotton?
Yes. Match the gauge as closely as you can. Cotton gives the flat pieces a crisp edge, but a smooth acrylic can work too. I would avoid a fuzzy yarn here because it can hide the small antler and facial details.
Is the red nose a different pattern?
No. The brown-nose and red-nose reindeer use exactly the same head, ears, antlers, muzzle, nose stitch count and assembly. Only the nose color changes.
Does this applique need stuffing?
No. Every piece stays flat. The muzzle, nose, ears and antlers are sewn directly to the head without stuffing.
Has this crochet pattern been physically tested?
No. The stitch counts, shaping and assembly have been designed to reproduce the proportions of the finished example, but the instructions have not been physically test-made. The stated finished measurements are estimated from the gauge, stitch counts and planned assembly rather than taken from a completed sample.
When you click on links to various merchants on this site and make a purchase, this may result in this site earning a commission. This does not affect the price you pay.

UBGI Gold Standard 2026
Reviewed under the site's
editorial checklist.
Photos, decorating ideas, party setups and reader submissions are shared for inspiration unless a page is specifically presented as a pattern, tutorial, reference guide or step-by-step project. Follow the instructions, measurements, safety guidance and manufacturer directions provided for the particular project or product.
About Jan | Contact | Baby Nursery Ideas (Blog) | Site Map | Privacy Policy | Disclosure Policy | Disclaimer | Affiliate Disclosure | Earnings Disclosure | Facebook | Pinterest
I am a participant in the Amazon Services LLC Associates Program, an affiliate advertising program designed to provide a means for us to earn fees by linking to Amazon. As an Amazon Associate I earn from qualifying purchases.
Copyright © 2006-2026. All Rights Reserved.