Free Crochet Snowman Family Applique Patterns
By Jan Bay
These free crochet snowman family applique patterns make separate snowman appliques for a Dad, a Mom, and a little snowman in three coordinating sizes, each with its own winter hat, scarf and embroidered details. Use the snowmen individually or as a group on baby bibs, blankets, Christmas stockings, nursery banners and other small handmade holiday gifts.
Explore More Free Christmas Crochet Patterns
Snowman Lovey Snuggler Pattern
Christmas Tree Crochet Appliqué Pattern
Crochet Supplies for This Project
Jump to a Snowman Pattern
About These Crochet Snowman Appliqué Patterns
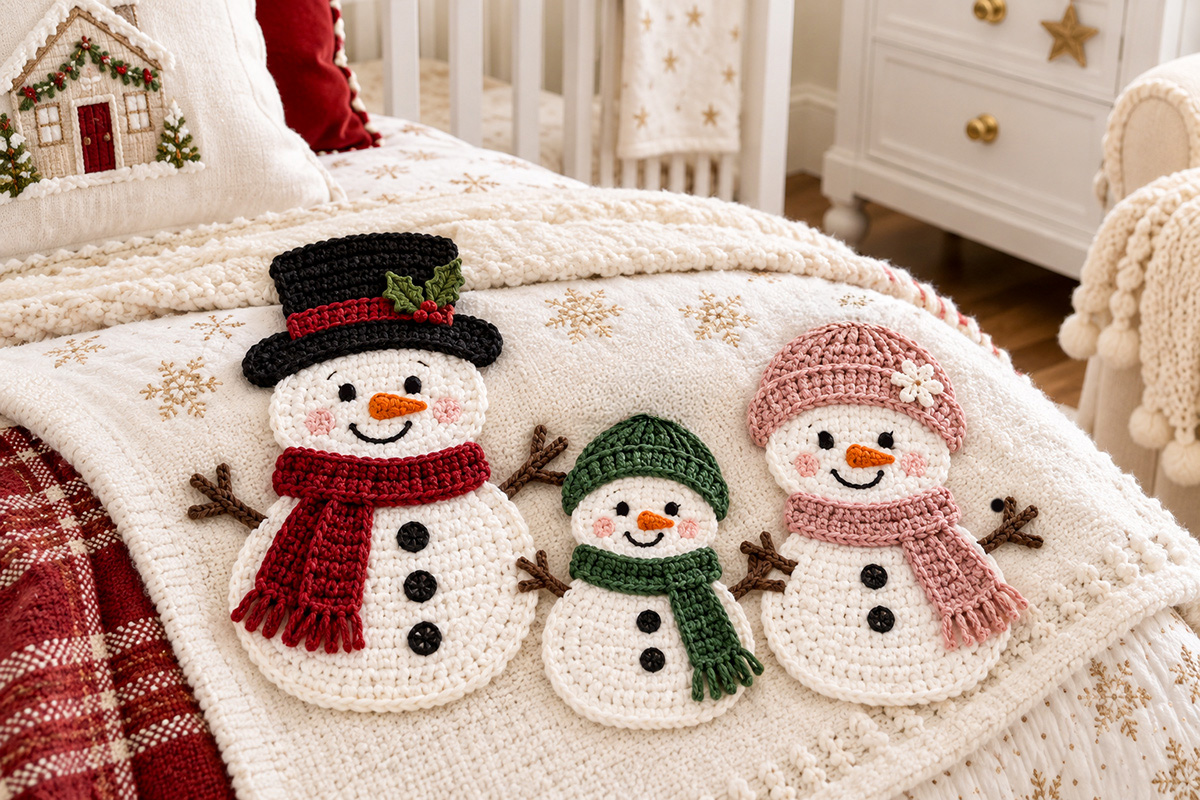
This snowman family is made as three separate flat appliqués. They are not stuffed snowmen. Dad is the largest, Mom is a little smaller, and Little Snowman is sized for even smaller projects or as a child in the family group. Each one has a crocheted white body and head, a flat carrot nose, a scarf, a hat and simple stitched facial details.
I wanted the three snowmen to look like they belong together as a family without making the same snowman three times. Dad gets the black top hat and red scarf shown in the example image. Mom wears the dusty rose hat with its small white flower and matching scarf. Little Snowman gets the evergreen hat and scarf. The size changes along with the accessories, so you can use the three together as a family or pick just one for a smaller project.
These are meant to stay flat. There is no stuffing anywhere in the pattern. The head overlaps the upper part of the body slightly, and the accessories are sewn flat against the snowman rather than built out into dimensional pieces.
Finished Snowman Appliqué Sizes
The finished measurements below are expected measurements using medium weight yarn and the gauge given here. Your finished size can vary a little with yarn choice and tension.
Dad Snowman: approximately 7 to 7 1/2 inches tall from the bottom of the body to the top of the top hat and about 4 to 4 1/4 inches across the widest part of the body.
Mom Snowman: approximately 6 1/2 to 7 inches tall including the hat and about 3 1/2 to 3 3/4 inches across the widest part of the body.
Little Snowman: approximately 5 to 5 1/4 inches tall including the hat and about 2 3/4 to 3 inches across the widest part of the body.
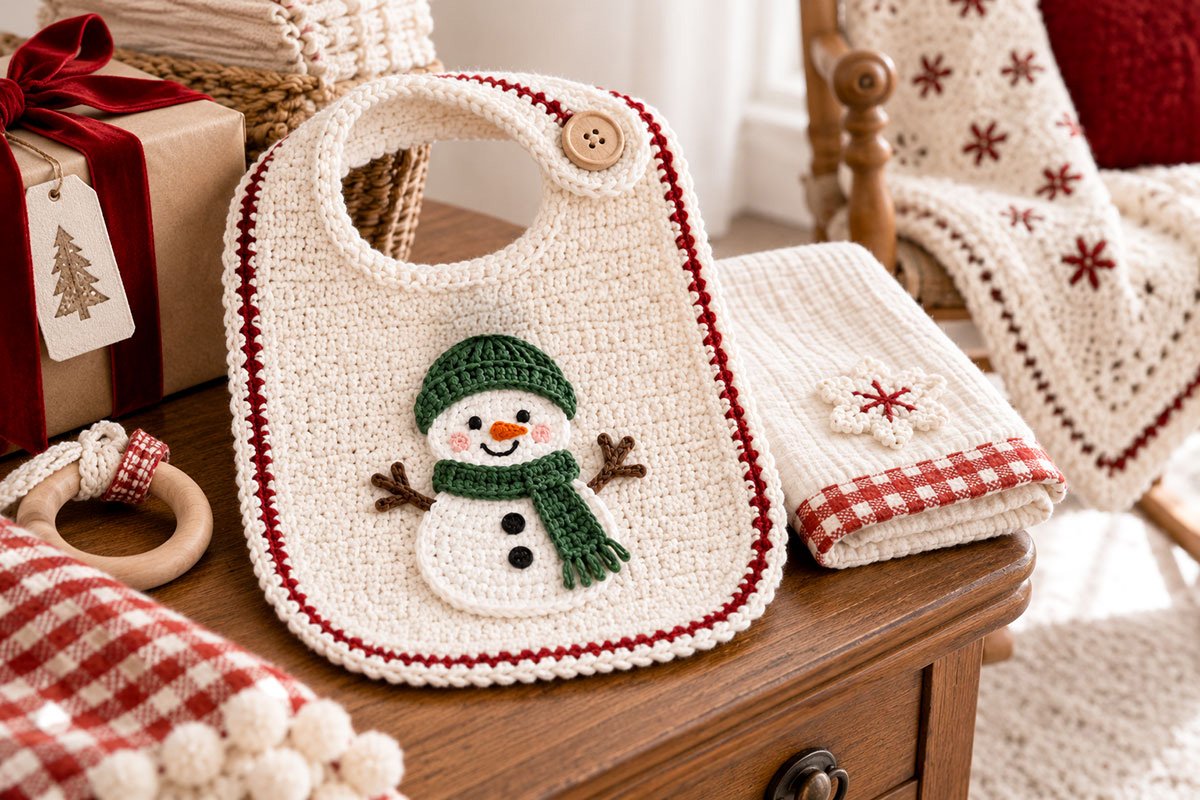
If you're using one of these on a baby bib, Little Snowman is the size I'd start with. Dad and Mom make better focal pieces for a blanket corner, stocking, Christmas banner or larger gift project.
Materials for the Snowman Family
You don't need much yarn for any one snowman, which makes this a good scrap-yarn project if you already have coordinating Christmas colors on hand.
Yarn: Medium weight #4 yarn in the following colors:
White for the heads and bodies
Black for Dad's top hat
Deep Christmas red for Dad's hat band and scarf
Dusty rose for Mom's hat and scarf
Evergreen for Little Snowman's hat and scarf
Brown for the twig arms
Orange for the carrot noses
Small amounts of pink for the cheeks
Small amounts of green and red for Dad's holly trim
Small amount of white for Mom's small hat accent
Hook: 4 mm crochet hook, or the hook size needed to get a firm, flat fabric that doesn't curl badly.
You'll also need:
Yarn needle
Scissors
Black embroidery floss or a small amount of fine black yarn for the eyes, smiles and coal details
I would keep the snowman fabric fairly firm. A loose gauge makes the circles stretch and can make the finished appliqué look floppy once it's sewn onto another project.
Gauge and Construction Notes
Skill level: Advanced beginner. You should be comfortable working in joined rounds, making a magic ring, working simple increases and decreases, sewing small crochet pieces together and adding basic embroidered details.
Target gauge for the expected finished measurements: approximately 14 to 15 half double crochet stitches and about 11 rows over 4 inches before blocking.
Exact gauge isn't as critical here as it would be for clothing, but it does affect the finished size. Check the width of the body before you start the accessories. If your Dad Snowman body is coming out much larger than about 4 1/4 inches across, go down a hook size. If it's noticeably smaller, go up a hook size.
The heads and bodies are worked separately in joined rounds and then overlapped and sewn together. Keeping them separate makes it easier to control the proportions and lets the neck area stay flat under the scarf.
The twig arms are also made as flat crochet pieces and sewn behind the body edges. They should lie against whatever project you're attaching the snowman to. Don't stuff or pad them.
The scarves and hats are made separately and sewn in place after the head and body are joined. Sew through the back of the accessory and the surface stitches of the snowman so the attachment stitches don't show more than necessary from the front.
The eyes, smiles and coal details are embroidered. I prefer that over hard buttons or plastic eyes, especially if the finished appliqué might end up on a baby project.
If you want to check standard U.S. crochet abbreviations as you work, the Craft Yarn Council crochet abbreviation guide is a useful reference.
Crochet Abbreviations Used in This Pattern
ch = chain
dc = double crochet
hdc = half double crochet
sc = single crochet
sc2tog = single crochet 2 stitches together
sl st = slip stitch
st = stitch
sts = stitches
inc = work 2 stitches in the same stitch
MR = magic ring
Unless a step says otherwise, the beginning chain does not count as a stitch. Join each completed round with a slip stitch to the first stitch of that round.
Keep your right side facing you as you work the main circles. Before fastening off a head or body, lay it flat for a moment. A slight natural curl at the outer edge is fine, but the piece should not cup like the beginning of a stuffed amigurumi shape.
Dad Snowman Appliqué
Dad is the largest snowman in the family. His wide white body, black top hat, red scarf and little holly detail are what separate him from the other two, so I would keep those features even if you change the rest of the color palette.
The stitch counts below are calculated to reproduce the proportions in the finished example image. This pattern has not been physically test-made, so check the stated measurements as you work and adjust hook size rather than adding extra rounds if your pieces are coming out noticeably larger or smaller.
Dad Snowman Body
With white yarn, make a magic ring.
Round 1: Ch 1. Work 8 hdc into the ring. Join with a sl st to the first hdc. 8 sts.
Round 2: Ch 1. Work 2 hdc in each st around. Join. 16 sts.
Round 3: Ch 1. *Hdc in next st, 2 hdc in next st.* Repeat around. Join. 24 sts.
Round 4: Ch 1. *Hdc in next 2 sts, 2 hdc in next st.* Repeat around. Join. 32 sts.
Round 5: Ch 1. *Hdc in next 3 sts, 2 hdc in next st.* Repeat around. Join. 40 sts.
Round 6: Ch 1. *Hdc in next 4 sts, 2 hdc in next st.* Repeat around. Join. 48 sts.
Fasten off, leaving a long tail for assembly. The body should lie flat and measure approximately 4 to 4 1/4 inches across at the widest point.
Dad Snowman Head
With white yarn, make a magic ring.
Round 1: Ch 1. Work 8 hdc into the ring. Join. 8 sts.
Round 2: Ch 1. Work 2 hdc in each st around. Join. 16 sts.
Round 3: Ch 1. *Hdc in next st, 2 hdc in next st.* Repeat around. Join. 24 sts.
Round 4: Ch 1. *Hdc in next 2 sts, 2 hdc in next st.* Repeat around. Join. 32 sts.
Fasten off, leaving a long tail. The head should measure approximately 2 3/4 to 3 inches across.
Dad's Black Top Hat
Crown: With black yarn, ch 11.
Row 1: Sc in the second ch from hook and in each ch across. 10 sts.
Rows 2 through 6: Ch 1, turn. Sc in each st across. 10 sts.
Fasten off.
Brim: With black yarn, ch 17.
Row 1: Sc in the second ch from hook and in each ch across. 16 sts.
Row 2: Ch 1, turn. Sc in each st across. 16 sts.
Fasten off, leaving a sewing tail.
Center the crown over the brim and sew the lower edge of the crown to the upper portion of the brim. Keep everything flat. The brim should extend beyond the crown on both sides.
Red Hat Band
With red yarn, ch 11.
Sc in the second ch from hook and in each ch across. 10 sts.
Fasten off, leaving a sewing tail. Sew the band horizontally across the lower part of the black crown just above the brim.
Dad's Holly Accent
Make two tiny leaves with evergreen yarn.
Ch 5. Sl st in second ch from hook, sc in next ch, hdc in next ch, sc in last ch.
Fasten off, leaving a sewing tail. Make a second leaf the same way.
Sew the two leaves near one side of the red hat band so they angle away from each other. Add two or three tiny red embroidery stitches between the leaves for the berries. Keep this detail small. It should decorate the hat without taking over the whole brim.
Dad's Red Scarf
With red yarn, ch 33.
Row 1: Sc in the second ch from hook and in each ch across. 32 sts.
Row 2: Ch 1, turn. Sc in each st across. 32 sts.
Fasten off, leaving a long sewing tail.
Wrap the center of the scarf across the neck area where the head and body overlap. Cross the ends slightly and angle them toward one side as shown in the finished example. Sew the scarf flat rather than letting the ends hang loose.
Fringe: To match the finished example, cut 4 strands of red yarn about 2 inches long. Divide them into two pairs. Fold each pair in half and pull the folded center through one of the two row ends at the bottom of the longer hanging scarf end. Pull the loose ends through the loop and tighten gently. Trim the fringe to about 3/4 inch. Omit the fringe on baby-use projects.
Dad's Carrot Nose
With orange yarn, ch 5.
Row 1: Sc in second ch from hook and across. 4 sts.
Row 2: Ch 1, turn. Sc2tog, sc in next 2 sts. 3 sts.
Row 3: Ch 1, turn. Sc2tog, sc in next st. 2 sts.
Row 4: Ch 1, turn. Sc2tog. 1 st.
Fasten off. Turn the small triangle sideways when you sew it to the face so the broad end sits near the center of the face and the pointed end extends toward the side. Sew all edges down so the nose stays flat.
Dad's Twig Arms
Make two with brown yarn.
Ch 13.
Starting in the second ch from the hook, sl st in the next 4 ch.
Ch 3. Sl st in the second ch from hook and in the next ch to form the first small twig branch.
Return to the main chain and sl st in the next 3 ch.
Ch 3. Sl st in the second ch from hook and in the next ch to form another branch.
Return to the main chain and sl st through the remaining chains.
Fasten off, leaving a sewing tail.
Make the second arm the same way. When you assemble Dad, angle the arms gently upward and sew the inner ends behind the body. Tack down the outer portions in one or two places if the appliqué will be used on a baby item so the arms cannot catch or flop away from the surface.
Dad's Face and Coal Details
Use black embroidery floss for the eyes, smile and three body dots.
Make each eye with a small group of close satin stitches. Place the eyes level with each other and leave enough room between them for the carrot nose.
Use short backstitches to make the curved smile. Keep it simple. You only need a few stitches.
Add three compact black satin-stitched coal dots down the center of the body below the scarf.
For the cheeks, add a few short dusty pink stitches on each side of the smile. These should read as a small blush rather than two large circles.
Mom Snowman Appliqué
Mom uses the same flat two-circle construction, but her lower body is one round smaller than Dad's. Her dusty rose hat and scarf are the main visual difference, along with the small white flower accent on the hat.
Mom Snowman Body
With white yarn, make a magic ring.
Round 1: Ch 1. Work 8 hdc into the ring. Join. 8 sts.
Round 2: Ch 1. Work 2 hdc in each st around. Join. 16 sts.
Round 3: Ch 1. *Hdc in next st, 2 hdc in next st.* Repeat around. Join. 24 sts.
Round 4: Ch 1. *Hdc in next 2 sts, 2 hdc in next st.* Repeat around. Join. 32 sts.
Round 5: Ch 1. *Hdc in next 3 sts, 2 hdc in next st.* Repeat around. Join. 40 sts.
Fasten off, leaving a long sewing tail. The body should measure approximately 3 1/2 to 3 3/4 inches across.
Mom Snowman Head
With white yarn, make a magic ring.
Round 1: Ch 1. Work 8 hdc into the ring. Join with a sl st to the first hdc. 8 sts.
Round 2: Ch 1. Work 2 hdc in each st around. Join. 16 sts.
Round 3: Ch 1. *Hdc in next st, 2 hdc in next st.* Repeat around. Join. 24 sts.
Round 4: Ch 1. *Hdc in next 2 sts, 2 hdc in next st.* Repeat around. Join. 32 sts.
Fasten off, leaving a long sewing tail.
Mom's Dusty Rose Hat
With dusty rose yarn, ch 13.
Row 1: Sc in the second ch from hook and across. 12 sts.
Rows 2 through 4: Ch 1, turn. Sc in each st across. 12 sts.
Row 5: Ch 1, turn. Sc2tog, sc in next 8 sts, sc2tog. 10 sts.
Row 6: Ch 1, turn. Sc in each st across. 10 sts.
Row 7: Ch 1, turn. Sc2tog, sc in next 6 sts, sc2tog. 8 sts.
Row 8: Ch 1, turn. Sc in each st across. 8 sts.
Row 9: Ch 1, turn. Sc2tog, sc in next 4 sts, sc2tog. 6 sts.
Fasten off.
With the right side facing you, join dusty rose yarn at one lower corner of the hat. Work 1 sc in the end of each of the 9 rows up the first side, 1 sc in each of the 6 sts across the shaped top, then 1 sc in the end of each of the 9 rows down the opposite side. 24 edging sts. Fasten off. Do not work across the lower foundation edge. The alternating straight and decrease rows create the softer rounded cap shape shown in the finished example.
Mom's White Hat Flower
With white yarn, make a magic ring.
*Ch 2, work 2 dc into the ring, ch 2, sl st into the ring.* Repeat from * to * five times.
Pull the ring closed and fasten off, leaving a sewing tail.
Flatten the flower with your fingers and sew it to one side of the hat near the lower edge. Keep the flower flat against the hat.
Mom's Dusty Rose Scarf
With dusty rose yarn, ch 29.
Row 1: Sc in the second ch from hook and across. 28 sts.
Row 2: Ch 1, turn. Sc in each st across. 28 sts.
Fasten off, leaving a sewing tail.
Place the scarf across the neck and angle the crossed ends toward one side. Sew it flat.
Fringe: Cut 4 strands of dusty rose yarn about 2 inches long. Divide them into two pairs and attach one folded pair through each of the two row ends at the bottom of the longer hanging scarf end. Pull the loose ends through each folded loop and tighten gently. Trim the fringe to about 3/4 inch. Omit the fringe on baby-use projects.
Mom's Carrot Nose
Work the same 4-stitch-wide carrot nose used for Dad.
After fastening off, turn the triangle sideways and sew it flat to the center of Mom's face.
Mom's Twig Arms
Make two with brown yarn.
Ch 11.
Starting in the second ch from hook, sl st in the next 3 ch.
Ch 3. Sl st in second ch from hook and next ch.
Return to the main chain and sl st in the next 3 ch.
Ch 3. Sl st in second ch from hook and next ch.
Return to the main chain and sl st through the remaining chains.
Fasten off, leaving a sewing tail.
Sew the arms behind the body at a gentle upward angle.
Mom's Face and Coal Details
Embroider the eyes with compact black satin stitches and make the smile with short black backstitches.
Add two black satin-stitched coal dots down the center of the body below the scarf, matching the finished example.
Add a few short dusty pink stitches to each cheek.
Little Snowman Appliqué
Little Snowman is the one I would use first for bibs and other small baby crafts. The proportions stay the same, but both circles and the accessories are scaled down so you don't end up trying to squeeze a full-size snowman onto a small project.
Little Snowman Body
With white yarn, make a magic ring.
Round 1: Ch 1. Work 8 hdc into the ring. Join. 8 sts.
Round 2: Ch 1. Work 2 hdc in each st around. Join. 16 sts.
Round 3: Ch 1. *Hdc in next st, 2 hdc in next st.* Repeat around. Join. 24 sts.
Round 4: Ch 1. *Hdc in next 2 sts, 2 hdc in next st.* Repeat around. Join. 32 sts.
Fasten off, leaving a long sewing tail. The body should measure approximately 2 3/4 to 3 inches across.
Little Snowman Head
With white yarn, make a magic ring.
Round 1: Ch 1. Work 6 hdc into the ring. Join. 6 sts.
Round 2: Ch 1. Work 2 hdc in each st around. Join. 12 sts.
Round 3: Ch 1. *Hdc in next st, 2 hdc in next st.* Repeat around. Join. 18 sts.
Round 4: Ch 1. *Hdc in next 2 sts, 2 hdc in next st.* Repeat around. Join. 24 sts.
Fasten off, leaving a long tail. The head should measure approximately 2 to 2 1/4 inches across.
Little Snowman's Evergreen Hat
With evergreen yarn, ch 11.
Row 1: Sc in the second ch from hook and across. 10 sts.
Rows 2 through 3: Ch 1, turn. Sc in each st across. 10 sts.
Row 4: Ch 1, turn. Sc2tog, sc in next 6 sts, sc2tog. 8 sts.
Row 5: Ch 1, turn. Sc in each st across. 8 sts.
Row 6: Ch 1, turn. Sc2tog, sc in next 4 sts, sc2tog. 6 sts.
Row 7: Ch 1, turn. Sc in each st across. 6 sts.
Fasten off.
With the right side facing you, join evergreen yarn at one lower corner. Work 1 sc in the end of each of the 7 rows up the first side, 1 sc in each of the 6 sts across the shaped top, then 1 sc in the end of each of the 7 rows down the opposite side. 20 edging sts. Fasten off. Do not work across the lower foundation edge. The straight rows between the decreases give the hat the rounded cap shape shown in the finished example instead of a pointed top.
Little Snowman's Evergreen Scarf
With evergreen yarn, ch 23.
Row 1: Sc in the second ch from hook and across. 22 sts.
Row 2: Ch 1, turn. Sc in each st across. 22 sts.
Fasten off, leaving a sewing tail.
Cross the ends slightly below the chin and sew the entire scarf flat.
Fringe: Cut 4 strands of evergreen yarn about 1 3/4 inches long. Divide them into two pairs and attach one folded pair through each of the two row ends at the bottom of the longer hanging scarf end. Pull the loose ends through the folded loops and tighten gently. Trim the fringe to about 5/8 inch. Omit the fringe on baby-use projects.
Little Snowman's Carrot Nose
With orange yarn, ch 4.
Row 1: Sc in second ch from hook and across. 3 sts.
Row 2: Ch 1, turn. Sc2tog, sc in next st. 2 sts.
Row 3: Ch 1, turn. Sc2tog. 1 st.
Fasten off. Turn the triangle sideways and sew it flat to the face.
Little Snowman's Twig Arms
Make two with brown yarn.
Ch 9.
Starting in second ch from hook, sl st in next 3 ch.
Ch 3. Sl st in second ch from hook and next ch.
Return to the main chain and sl st in next 2 ch.
Ch 2. Sl st in second ch from hook.
Return to the main chain and sl st through the remaining chains.
Fasten off, leaving a sewing tail.
Sew the arms behind the body and tack them down where needed.
Little Snowman's Face and Coal Details
Use black embroidery floss for two small satin-stitched eyes and a short curved smile.
Add two small satin-stitched coal dots to the body.
Add just a few dusty pink stitches for each cheek. Scale these details down with the rest of the snowman. Big eyes or oversized cheeks will change his expression surprisingly fast.
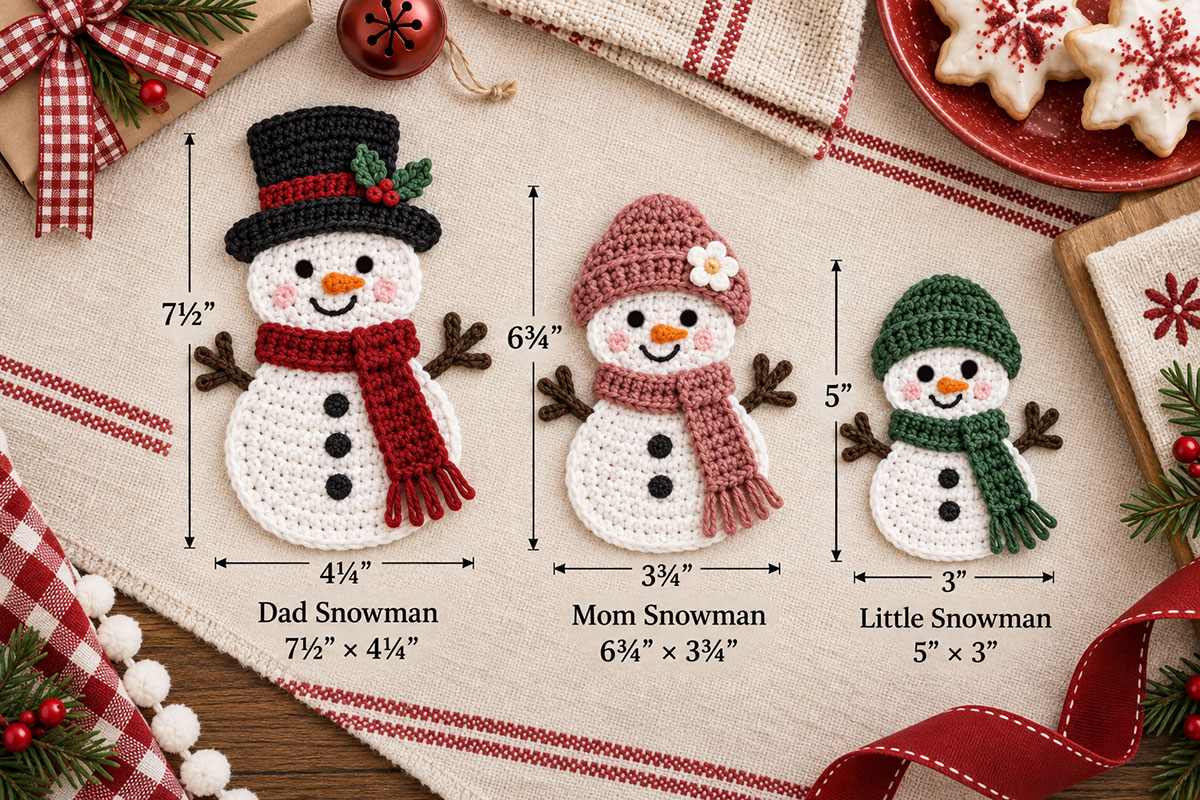
The size comparison shows the same flat rounded hat finish used for Mom and Little Snowman in the finished family example.
Hats, Scarves and Face Details
The accessories are what keep this from looking like one snowman copied three times. I would resist the temptation to give everybody the same hat and simply change the color. The top hat, rounded rose hat and small evergreen hat create three different silhouettes before you even notice the size difference.
You can change the red, rose and green yarns to match the project you're making, but keep enough contrast between the snowman and the accessory colors that the shapes don't disappear. White snowmen on a white blanket, for example, need either a contrasting backing area or stronger accessory colors around the face and neck.
Where to Place the Hats
Lay each hat over the upper edge of the corresponding head before you sew anything down. Cover approximately the upper 1/4 of the white head circle.
Dad's brim should run almost straight across the head.
Mom's hat can sit at a very slight angle so the white flower remains visible.
Little Snowman's evergreen hat can tilt slightly in the opposite direction. Keep the tilt modest. The family should look playful, not as though the hats are falling off.
Where to Place the Scarves
The scarf hides the join between the head and body, which is useful as well as decorative.
Overlap the lower edge of the head over the upper part of the body by approximately 1/2 inch on Dad and Mom and about 3/8 inch on Little Snowman.
Once those two pieces are sewn together, lay the scarf directly over the join. Cross the scarf ends toward one side and stitch them down.
Don't leave long loose scarf ends on a baby bib or blanket. Sew them flat along their length.
Embroidering the Faces
I would do all of the facial embroidery before permanently attaching the appliqué to a bib, blanket or stocking. It's much easier to hide the backs of the stitches while you can still reach the back of the snowman.
Use black embroidery floss for the eyes and smile. Work the eyes with several short satin stitches laid closely beside one another.
The smile needs only four or five small backstitches. Place it below the carrot nose and curve it gently upward.
Use the same compact satin-stitch method for the black coal dots. There are no buttons or plastic eyes on these snowmen.
For the cheeks, use dusty pink yarn or embroidery floss and make two or three short horizontal stitches on each side. Keep them subtle.
Blocking the Flat Pieces
If a body or head curls slightly at the edge, lightly block it before assembly according to the care instructions for the yarn you're using. You want the circles to lie comfortably flat, but you don't need to stretch them into perfect hard-edged disks.
A little softness at the edge looks more natural on the finished appliqué.
Assembly and Finishing
Assemble each snowman in the same general order. Doing the face before the final attachment is easier, but I would position everything first so you don't finish a face and then discover that the hat needs to cover part of it.
Before you start sewing, check your pieces. Dad should have a body, head, hat crown, hat brim, red hat band, two holly leaves, scarf, carrot nose and two twig arms. Mom should have a body, head, hat, flower, scarf, carrot nose and two twig arms. Little Snowman should have a body, head, hat, scarf, carrot nose and two twig arms.
1. Join the Head and Body
Lay the body right side up.
Place the head over the upper edge of the body with approximately 1/2 inch of overlap for Dad and Mom or about 3/8 inch for Little Snowman.
Check that the head is centered.
Using the long white yarn tail, sew through both layers along the overlapping area. Keep your stitches small and work through the back loops or surface strands where practical so the joining stitches don't dominate the front.
2. Add the Arms
Place one twig arm behind each side of the body.
Angle the arms slightly upward, following the relaxed position in the finished example image.
Sew the inner 3/4 to 1 inch of each arm securely behind the body.
If the snowman is going onto a bib or baby blanket, add one or two small securing stitches farther along each arm so there are no loose loops or projecting branches to catch.
3. Position the Hat
Lay the hat over the upper edge of the head and check the face area before sewing.
Sew around the outer edge of the hat with matching yarn.
For Dad, make sure the red band and holly remain visible.
For Mom and Little Snowman, smooth the shaped upper edge of each hat into a gentle rounded cap before sewing it in place. Keep the entire hat flat against the head, matching the finished family example.
4. Add the Nose and Embroider the Face
Sew the carrot nose flat with orange yarn.
Embroider the eyes, smile and cheeks.
Step back for a second before adding the coal dots. Tiny changes in the eye and smile placement affect the expression more than adding extra decoration will.
5. Add the Scarf
Lay the scarf across the neck join.
Cross the ends slightly toward one side.
Sew around the scarf edges using matching yarn, keeping the scarf flat against the snowman.
6. Add the Coal Details
Dad gets three black embroidered coal dots below the scarf.
Mom gets two.
Little Snowman gets two smaller dots.
Keep all of them embroidered rather than substituting hard buttons if you're using the appliqué on a baby item.
7. Weave In and Check the Back
Weave in every yarn tail securely on the back of the appliqué.
Trim only after the yarn has been worked back through several stitches.
Run your fingertips over the back. It should feel reasonably flat without large knots or bulky yarn ends.
If you're sewing the appliqué to fabric, that flatter back will make the final project sit much better.
Attaching a Crochet Appliqué to a Baby Project
If you're putting one of these snowmen on a baby bib, burp cloth or similar baby-use item, omit the loose scarf fringe and sew the arms, scarf ends, flower, hat and every other appliqué edge completely flat to the fabric.
Pin or baste the finished snowman in position before sewing.
Using matching yarn or strong sewing thread, stitch around the outer edge of the body, head, hat, scarf and the full length of any arm sections that could otherwise lift away from the fabric.
I would sew rather than glue these onto anything that will be washed regularly. Glue may be convenient for decorative crafts, but stitching gives you much more control over the edges and is the better choice for a bib or blanket.
Check the back when you're finished. Remove every temporary pin and piece of basting thread before the project is used.
For baby projects, inspect the appliqué after washing and repair any loose stitching before using it again. Remove bibs before sleep, and keep blankets, pillows and other soft items out of an infant's sleep space. The U.S. Consumer Product Safety Commission safe-sleep guidance recommends a bare infant sleep space with only a fitted sheet.
Baby Craft and Gift Ideas for the Snowman Appliqués
Little Snowman is the obvious choice for the baby bib project we're building around these appliqués. At about 5 inches tall, he's large enough to be the main feature without taking over the whole bib.
Dad and Mom are better where you have a little more room. Use one on a blanket corner, put the pair on matching Christmas stockings, or use all three across a fabric or crocheted nursery banner.
You can also use the snowmen on:
Baby bibs
Burp cloths
Baby blanket corners
Christmas stockings
Fabric gift bags
Nursery banners
Tree skirts
Holiday wall hangings
Pillow covers intended for decoration rather than the crib
If you're building a set of small Christmas projects, the Christmas tree crochet appliqué pattern and Christmas reindeer crochet appliqué pattern give you two more motifs that can be used the same way.
For a larger snowman baby project rather than a flat appliqué, see the crochet snowman lovey snuggler pattern.
And if you want to keep going with handmade Christmas gifts, the free crochet Santa doll pattern gives you a completely different finished project without leaving the Christmas crochet collection.
How to Make the Snowman Appliqués Smaller or Larger
The easiest way to change the finished size is to change yarn weight and hook size while keeping the stitch counts the same.
For a smaller appliqué, use a lighter yarn and a correspondingly smaller hook.
For a larger appliqué, use a heavier yarn and a larger hook.
I prefer that approach to adding random extra rounds because the head-to-body proportions stay intact.
If you do add a round to one of the circles, continue the established increase pattern. For example, after a 48-stitch round you would work *hdc in next 5 sts, 2 hdc in next st* around for 56 sts.
Just remember that you'll probably need to enlarge the hat, scarf, nose and arms too. Changing only the body is how a nicely proportioned snowman turns into a completely different character.
Snowman Crochet Appliqué Pattern Questions
Can I use cotton yarn instead of acrylic?
Yes. A smooth cotton yarn can work very well for a flat appliqué, especially on a bib or other washable project. Check your gauge because cotton may produce a slightly different finished size and drape than the yarn used for the calculated measurements here.
Do I have to make all three snowmen?
No. Each snowman can be used separately. Make Little Snowman for a bib, Dad for a stocking, or Mom for a blanket corner. The family arrangement is an option, not a requirement.
Can I leave off the twig arms?
Yes. If the appliqué is going onto a small baby item and you want the cleanest possible outline, you can leave the arms off. The hats, scarves and size differences still distinguish the three snowmen.
Can I use buttons for the coal details?
I would not use buttons on a baby bib, blanket or other item intended for a young child. The embroidered coal dots shown in this pattern keep the front flatter and avoid adding small hard pieces.
Why are the heads and bodies made separately?
Separate circles make it easier to control the head-to-body proportions and keep the appliqué flat. The overlap also disappears neatly under the scarf, so you get the two-snowball silhouette shown in the finished example without having to shape an irregular one-piece body.
Can I turn one of these into an ornament?
You can use the same flat snowman as the decorative front of an ornament, but I would treat that as a separate finishing project. For this page, the snowmen are constructed as appliqués meant to be sewn onto another surface.
When you click on links to various merchants on this site and make a purchase, this may result in this site earning a commission. This does not affect the price you pay.

UBGI Gold Standard 2026
Reviewed under the site's
editorial checklist.
Photos, decorating ideas, party setups and reader submissions are shared for inspiration unless a page is specifically presented as a pattern, tutorial, reference guide or step-by-step project. Follow the instructions, measurements, safety guidance and manufacturer directions provided for the particular project or product.
About Jan | Contact | Baby Nursery Ideas (Blog) | Site Map | Privacy Policy | Disclosure Policy | Disclaimer | Affiliate Disclosure | Earnings Disclosure | Facebook | Pinterest
I am a participant in the Amazon Services LLC Associates Program, an affiliate advertising program designed to provide a means for us to earn fees by linking to Amazon. As an Amazon Associate I earn from qualifying purchases.
Copyright © 2006-2026. All Rights Reserved.