Free Gingerbread Crochet Applique Pattern Set
By Jan Bay
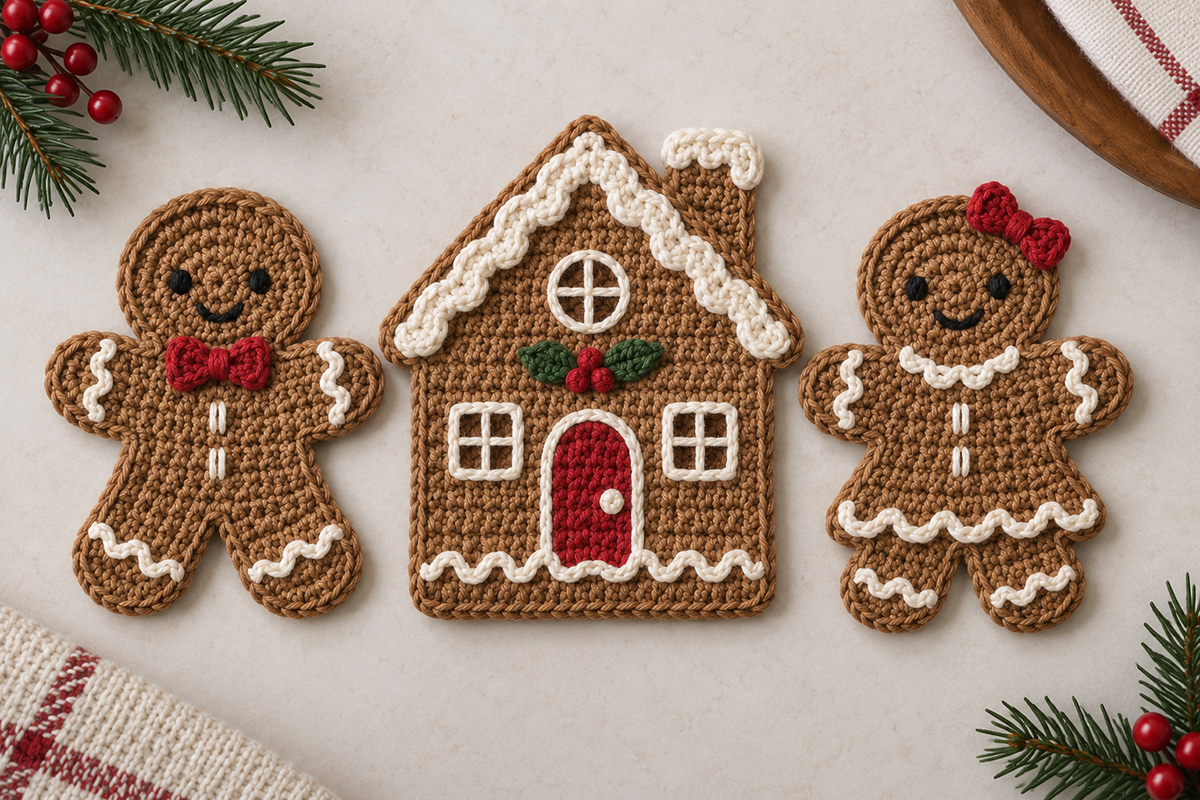
This free gingerbread crochet applique pattern set gives you three complete patterns: a gingerbread man, gingerbread woman and gingerbread house. The three designs use the same gingerbread shade of brown, warm cream and Christmas red palette, with embroidered details and a small holly decoration on the house. Use them alone or together on stockings, bags, ornaments, gift tags, blankets and other Christmas crafts.
Explore More Christmas Crochet Patterns
Gingerbread Man Snuggler Lovey Pattern
Free Christmas Crochet Patterns
See Crochet Supplies for These Projects
Jump to a Pattern
Gingerbread Man Crochet Appliqué
Gingerbread Woman Crochet Appliqué
Gingerbread House Crochet Pattern
Pattern at a Glance
Gingerbread Man: About 5 1/2 inches tall; flat construction with separate head, body and arms.
Gingerbread Woman: About 5 1/4 inches tall; flat construction with separate head, flared body, arms and legs.
Gingerbread House: About 6 1/2 inches tall and 5 1/2 inches across the widest part of the roof; flat construction with separate body, roof, chimney, door, upper window and holly details.
Crocheted pieces before assembly: Gingerbread man 5 pieces; gingerbread woman 7 pieces; gingerbread house 10 pieces.
Yarn: Medium weight #4 yarn
Hook: 3.5 mm crochet hook
Skill level: Confident beginner to intermediate
Main stitches: Chain, slip stitch, single crochet, half double crochet, double crochet, increases and decreases
Finishing: Embroidered eyes, smiles and icing details; no plastic eyes, buttons, beads or loose hardware.
Pattern note: Finished dimensions are calculated from the stated gauge. This pattern has not been physically test-made.
Gingerbread Crochet Applique Pattern Materials and Supplies
I’m keeping all three gingerbread pieces in the same yarn weight and hook size so the man, woman and house look like they belong together. A smooth cotton or cotton-blend yarn is a good choice here because the stitches stay easy to see and the finished pieces lie flatter than they would in a fuzzy yarn.
The example set is designed for medium weight #4 yarn. If you substitute another yarn, match the gauge rather than relying only on the number printed on the label. The Craft Yarn Council yarn weight system explains the standard yarn-weight categories. I’m deliberately using a smaller hook than you might normally pair with #4 yarn because these are appliqués. I want a firm fabric with very little space between the stitches.
Yarn:
- Gingerbread brown, approximately 75 yards for the complete set
- Warm cream, approximately 25 yards for icing and trim
- Christmas red, approximately 15 yards for the bows, door and berries
- Evergreen, approximately 5 yards for the holly leaves
- Black embroidery floss or a small amount of fine black yarn for the eyes and smiles
You’ll also need:
- 3.5 mm crochet hook
- Yarn needle
- Embroidery needle if you’re using black floss
- Scissors
- Removable stitch markers
- Blocking mat and rustproof pins, optional but useful for getting the house and figures to lie flat
Gauge: 18 single crochet stitches and 20 rows = 4 inches before blocking.
Gauge matters more than it usually does for a small appliqué because these three pieces are meant to work together as a set. If your stitches are much larger, the house can start looking oversized beside the figures. If your stitches are much tighter, some of the little icing and window details get crowded.
Expected finished sizes at the stated gauge:
- Gingerbread man: approximately 5 1/2 inches tall with an arm span of about 4 1/4 inches
- Gingerbread woman: approximately 5 1/4 inches tall with an arm span of about 4 1/4 inches
- Gingerbread house: approximately 6 1/2 inches tall and 5 1/2 inches across the widest part of the roof
Those measurements are calculated from the stitch and row counts at the stated gauge. This pattern has not been physically test-made, so your finished measurements may vary a little with yarn, tension and blocking.
US crochet terms used in this pattern:
- ch = chain
- sc = single crochet
- hdc = half double crochet
- dc = double crochet
- sl st = slip stitch
- st or sts = stitch or stitches
- inc = work 2 sc in the same stitch
- dec = single crochet 2 stitches together
- sc3tog = single crochet 3 stitches together
- MR = magic ring
Unless a section says otherwise, chain 1 at the beginning of a row does not count as a stitch. Each row that requires turning tells you to ch 1 and turn before working that row.
The gingerbread man and woman heads are worked in continuous rounds. Place a removable stitch marker in the first stitch of each round and move it up as you work. Join only after Round 5.
Weave in the brown construction ends as each piece is finished unless an instruction tells you to leave that end as a sewing tail. Leave the cream, red and green decorating until the main shapes are complete. It’s much easier to place the icing evenly when you can see the whole figure or house in front of you.
The facial features are embroidered with black floss. The cream marks on the figures are stitched icing details, not buttons. The small cream detail on the red door is also stitched with yarn. The holly berries are crocheted from yarn. There are no beads, plastic eyes, buttons or loose hardware in the finished set.
Free Gingerbread Crochet Appliqué Pattern for the Man
The gingerbread man is built from a round head, one shaped body with the legs worked directly from the lower edge, and two short arms. That keeps the silhouette flat and gives us the separated legs from the example image without turning him into a stuffed figure.
Head
With gingerbread brown, make a magic ring.
Rnd 1: Work 6 sc in the ring. Pull the ring closed. (6 sts)
Rnd 2: Inc in each stitch around. (12 sts)
Rnd 3: [Sc in next st, inc in next st] 6 times. (18 sts)
Rnd 4: [Sc in next 2 sts, inc in next st] 6 times. (24 sts)
Rnd 5: [Sc in next 3 sts, inc in next st] 6 times. (30 sts)
Join with a sl st, fasten off and leave a long tail for sewing. The head should lie flat. If the edge begins to cup, block it before assembly rather than adding an extra round.
Body
With gingerbread brown, ch 8.
Row 1: Sc in second ch from hook and across. (7 sts)
Row 2: Ch 1, turn. Inc in first st, sc in next 5 sts, inc in last st. (9 sts)
Rows 3 through 11: Ch 1, turn. Sc across. (9 sts)
Do not fasten off. The two legs are worked from this lower edge.
First leg
Leg Row 1: Ch 1, turn. Sc in first 3 sts. Leave the remaining 6 sts unworked. (3 sts)
Leg Rows 2 through 4: Ch 1, turn. Sc across. (3 sts)
Leg Row 5: Ch 1, turn. Inc in first st, sc in next st, inc in last st. (5 sts)
Leg Rows 6 and 7: Ch 1, turn. Sc across. (5 sts)
Fasten off.
Second leg
With the body facing you, skip the middle 3 unworked stitches from Body Row 11. Join gingerbread brown with a sl st in the first of the final 3 unworked stitches.
Leg Row 1: Ch 1 (does not count as a stitch). Sc in the same stitch as the join and in the next 2 stitches. (3 sts)
Leg Rows 2 through 4: Ch 1, turn. Sc across. (3 sts)
Leg Row 5: Ch 1, turn. Inc in first st, sc in next st, inc in last st. (5 sts)
Leg Rows 6 and 7: Ch 1, turn. Sc across. (5 sts)
Fasten off and weave in the leg ends.
Arms, make 2
With gingerbread brown, ch 4.
Row 1: Sc in second ch from hook and across. (3 sts)
Rows 2 through 5: Ch 1, turn. Sc across. (3 sts)
Row 6: Ch 1, turn. Inc in first st, sc in next st, inc in last st. (5 sts)
Row 7: Ch 1, turn. Sc across. (5 sts)
Fasten off, leaving a long sewing tail.
Red bow tie
With red, make a magic ring.
Work [ch 2, 2 dc, ch 2, sl st into the ring] twice.
Pull the ring closed. Fasten off, leaving a sewing tail. Wrap the tail around the center of the bow two or three times before securing it. This pinches the middle and keeps the bow flat.
Assemble the gingerbread man
Lay the body flat with the legs pointing down. Center the head over the top edge of the body and overlap the pieces by about 1/4 inch. Sew the lower part of the head securely to the body with gingerbread brown.
Place one arm on each side of the upper body. Let about two rows of each arm sit behind the body so the visible arm length stays short. Angle the arms slightly downward rather than straight out to the sides. Sew them securely in place.
Sew the red bow tie over the center of the neck seam.
Embroidered face
Use black embroidery floss for the face. Make each eye as a short vertical satin stitch running from approximately Rnd 2 toward Rnd 3. Keep the eyes symmetrical with about four crochet stitches between them.
Center the smile below the eyes. Use two or three small backstitches to make a shallow curve. Keep it soft and simple. There is no plastic eye, bead or separate mouth piece.
Cream icing
Thread warm cream yarn onto a yarn needle.
Across each wrist, make a shallow zigzag using three short stitches about 1/4 inch above the end of the hand.
Repeat the same three-stitch icing line across each ankle just above the widened foot.
Add two short vertical cream icing marks down the center of the torso. Space them about two rows apart. Make each mark with two close satin stitches so it reads as a narrow strip of icing rather than a button.
Crochet Gingerbread Woman Appliqué Pattern
The woman uses the same round-head construction so the two figures clearly belong together, but her body is different. Instead of the straight lower torso used for the man, her body widens toward the bottom to make the little skirt-like shape from the example image. Her legs are made separately and sewn behind that lower edge.
Head
With gingerbread brown, make a magic ring.
Rnd 1: Work 6 sc in the ring. Pull the ring closed. (6 sts)
Rnd 2: Inc in each stitch around. (12 sts)
Rnd 3: [Sc in next st, inc in next st] 6 times. (18 sts)
Rnd 4: [Sc in next 2 sts, inc in next st] 6 times. (24 sts)
Rnd 5: [Sc in next 3 sts, inc in next st] 6 times. (30 sts)
Join with a sl st, fasten off and leave a long sewing tail.
Flared body
With gingerbread brown, ch 8.
Row 1: Sc in second ch from hook and across. (7 sts)
Row 2: Ch 1, turn. Inc in first st, sc in next 5 sts, inc in last st. (9 sts)
Rows 3 through 5: Ch 1, turn. Sc across. (9 sts)
Row 6: Ch 1, turn. Inc in first st, sc in next 7 sts, inc in last st. (11 sts)
Row 7: Ch 1, turn. Sc across. (11 sts)
Row 8: Ch 1, turn. Inc in first st, sc in next 9 sts, inc in last st. (13 sts)
Rows 9 and 10: Ch 1, turn. Sc across. (13 sts)
Fasten off and weave in the end.
Legs, make 2
With gingerbread brown, ch 4.
Row 1: Sc in second ch from hook and across. (3 sts)
Rows 2 through 4: Ch 1, turn. Sc across. (3 sts)
Row 5: Ch 1, turn. Inc in first st, sc in next st, inc in last st. (5 sts)
Rows 6 and 7: Ch 1, turn. Sc across. (5 sts)
Fasten off, leaving a sewing tail.
Arms, make 2
With gingerbread brown, ch 4.
Row 1: Sc in second ch from hook and across. (3 sts)
Rows 2 through 5: Ch 1, turn. Sc across. (3 sts)
Row 6: Ch 1, turn. Inc in first st, sc in next st, inc in last st. (5 sts)
Row 7: Ch 1, turn. Sc across. (5 sts)
Fasten off, leaving a sewing tail.
Small red hair bow
With red, make a magic ring.
Work [ch 2, dc, ch 2, sl st into the ring] twice.
Pull the ring closed. Fasten off, leaving a sewing tail. Wrap the tail around the middle of the bow twice to define the center.
Assemble the gingerbread woman
Center the head over the narrow top of the body. Overlap the two pieces by about 1/4 inch and sew them together with gingerbread brown.
Turn the body over. Position the left leg behind the lower edge under stitches 3 through 5. Position the right leg behind the lower edge under stitches 9 through 11. This leaves three body stitches between the legs and two stitches outside each leg. Sew the top of each leg securely to the back of the body.
Turn the body front-side up again. Place one arm on each side of the upper body with about two rows hidden behind the body. Angle the arms slightly downward and sew them in place.
Sew the red hair bow near the upper right edge of the head as viewed from the front. Keep it close to the head rather than letting it extend far beyond the cookie silhouette.
Embroidered face
Use black embroidery floss. Make two short vertical satin-stitch eyes in the same general position used for the gingerbread man.
Make a shallow smile with two or three small backstitches centered below the eyes.
Cream collar and icing
With warm cream yarn and a yarn needle, make three shallow V-shaped stitches across the upper body just below the head. These form the little icing collar.
Add a three-stitch zigzag icing line across each wrist and each ankle.
Finish the torso with two short vertical cream icing marks spaced about two rows apart. Make each mark with two close satin stitches so it reads as icing rather than a button.
Skirt icing
With the front of the body facing you, join warm cream with a sl st in the first stitch along the 13-stitch lower edge of the flared body.
[Sl st in next st, work 3 hdc in next st, sl st in next st] 4 times across. Fasten off and weave the ends into the back.
This makes four small cream scallops across the skirt edge to match the finished gingerbread woman.
Crochet Gingerbread House Pattern
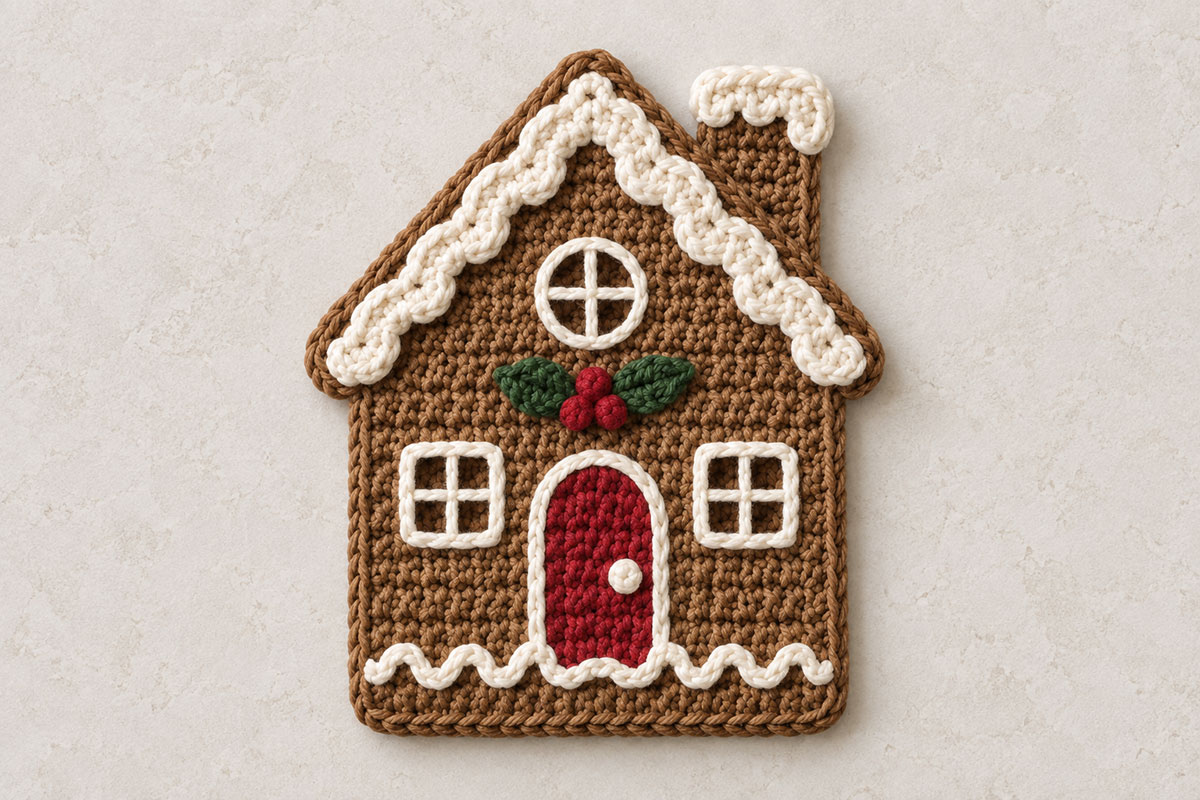
The house is only a little larger than the two figures. The body is a flat rectangle, the roof is a separate triangle, and the chimney sits behind the right roof slope. The windows are embroidered instead of built from several tiny pieces. That keeps the finished appliqué flatter and leaves the red door and holly cluster as the main accents.
House body
With gingerbread brown, ch 20.
Row 1: Sc in second ch from hook and across. (19 sts)
Rows 2 through 18: Ch 1, turn. Sc across. (19 sts)
Fasten off and weave in the end.
For all decoration placement below, choose the side you want as the front of the house. With that side facing you, treat Row 1 as the bottom edge and Row 18 as the top edge. Number the 19 stitch columns from left to right.
Triangular roof
With gingerbread brown, ch 26.
Row 1: Sc in second ch from hook and across. (25 sts)
Row 2: Ch 1, turn. Dec, sc across to final 2 sts, dec. (23 sts)
Row 3: Ch 1, turn. Dec, sc across to final 2 sts, dec. (21 sts)
Row 4: Ch 1, turn. Dec, sc across to final 2 sts, dec. (19 sts)
Row 5: Ch 1, turn. Sc across. (19 sts)
Row 6: Ch 1, turn. Dec, sc across to final 2 sts, dec. (17 sts)
Row 7: Ch 1, turn. Dec, sc across to final 2 sts, dec. (15 sts)
Row 8: Ch 1, turn. Dec, sc across to final 2 sts, dec. (13 sts)
Row 9: Ch 1, turn. Dec, sc across to final 2 sts, dec. (11 sts)
Row 10: Ch 1, turn. Sc across. (11 sts)
Row 11: Ch 1, turn. Dec, sc across to final 2 sts, dec. (9 sts)
Row 12: Ch 1, turn. Dec, sc across to final 2 sts, dec. (7 sts)
Row 13: Ch 1, turn. Dec, sc across to final 2 sts, dec. (5 sts)
Row 14: Ch 1, turn. Dec, sc in next st, dec. (3 sts)
Row 15: Ch 1, turn. Sc3tog. (1 st)
Fasten off.
Cream roof icing
Join warm cream with a sl st in the first row end at the lower left corner of the roof.
[Sl st in the next row end, work 3 dc in the next row end, sl st in the next row end] 4 times. Sl st in each of the final 2 row ends.
Sl st in the single stitch at the roof peak.
Working down the 15 row ends along the right roof slope, sl st in the first 2 row ends. [Sl st in the next row end, work 3 dc in the next row end, sl st in the next row end] 4 times. Sl st in the final row end.
Fasten off. Do not add cream icing across the lower edge of the roof.
Chimney
With gingerbread brown, ch 4.
Row 1: Sc in second ch from hook and across. (3 sts)
Rows 2 through 5: Ch 1, turn. Sc across. (3 sts)
Fasten off, leaving a sewing tail.
Use warm cream yarn to make three short icing stitches across the top of the chimney.
Choose one side of the roof as the front. With the front facing you, position the chimney behind the right roof slope. Hide approximately the lower two rows behind the roof so about three rows remain visible above the slope. Turn the roof over and sew the chimney securely to the back.
Red door
With red, ch 6.
Row 1: Sc in second ch from hook and across. (5 sts)
Rows 2 through 6: Ch 1, turn. Sc across. (5 sts)
Row 7: Ch 1, turn. Sl st in first st, hdc in next st, 3 dc in next st, hdc in next st, sl st in last st.
Fasten off, leaving a sewing tail.
Center the door over Body stitches 8 through 12 with its lower edge even with the lower edge of the house. Sew securely around the complete outer edge.
With warm cream yarn, backstitch a narrow icing line up both sides of the door and around the rounded top.
Make the little doorknob with one small cream satin stitch near the right side of the door. Do not attach a button or bead.
Two square windows
Use warm cream yarn and a yarn needle to embroider the window frames directly onto the brown house body.
Embroider the left window over Body stitches 2 through 5 and Rows 7 through 10. Make the right window over Body stitches 15 through 18 and Rows 7 through 10. Each window should be approximately four stitches wide and four rows tall.
Add one short vertical stitch and one short horizontal stitch through the center of each square so each window has four simple panes.
Round upper window
With warm cream, ch 10 and join with a sl st to form a ring.
Rnd 1: Ch 1, work 12 sc evenly into the ring and join with a sl st to the first sc. Fasten off, leaving a sewing tail.
Center the ring on the roof with its lower edge near Roof Row 5 and its upper edge near Roof Row 8. Keep it centered on the vertical line running from the middle of the roof base to the peak. With warm cream yarn, backstitch one vertical bar and one horizontal bar across the opening to divide the window into four panes.
Holly leaves, make 2
With evergreen, ch 5.
Beginning in the second ch from the hook, work sl st in next ch, sc in next ch, hdc in next ch and sc in final ch.
Ch 1. Turn the work so you can crochet along the unused loops on the opposite side of the starting chain.
Work sc in first loop, hdc in next loop, sc in next loop and sl st in final loop.
Fasten off, leaving a sewing tail. Gently pinch the two ends of the leaf so the shape stays narrow and pointed.
Holly berries, make 3
With red, make a magic ring.
Work 4 sc into the ring. Pull the ring tightly closed and join with a sl st to the first sc.
Fasten off, leaving a sewing tail. Do not stuff the berry. Flatten the tiny circle between your fingers.
Repeat twice more for three berries total.
Assemble the holly cluster
With the round-window side of the roof facing you, center the holly cluster on the lower center of the roof directly beneath the round upper window. Sew one evergreen leaf pointing toward the left and the second pointing toward the right, with their inner ends overlapping slightly. When the roof is later centered over the house body, the holly cluster should line up above the red door.
Place the three flat red berries over the overlapping leaf ends. Arrange the berries in a tight triangle at the center and sew each one securely around its edge.
Finish the house
With the decorated front of the roof and the decorated front of the house body both facing you, center the roof over the top of the house body. The roof should extend beyond the body on both sides, and the holly cluster should line up above the red door. Overlap the roof and body by approximately one row and sew them together with gingerbread brown.
With warm cream yarn, embroider three shallow U-shaped icing scallops across Body stitches 1 through 7 along the lower edge, stopping at the left side of the door. Make three matching scallops across Body stitches 13 through 19 on the right side. Keep each scallop about two stitches wide and approximately one row tall.
Keep the rest of the house simple. The roof icing, windows, red door and little holly cluster are enough detail to make it read as a gingerbread house without covering the brown crochet.
Make Your Gingerbread Appliqués Into Christmas Ornaments
You can use all three pieces as ordinary sew-on appliqués, but they also work nicely as flat Christmas ornaments. I would finish the motif completely first, block it flat, and add the hanging loop last.
Hanging loop
With gingerbread brown, cream or red, ch 18. Fasten off, leaving a sewing tail at each end.
Fold the chain in half to form a loop.
For the gingerbread man, sew both ends securely to the back of the top center of the head.
For the gingerbread woman, place the loop at the back center of the head so it does not interfere with the red hair bow.
For the house, sew the loop behind the roof peak.
Keep the attachment stitches on the back so they do not show from the front.
If you are sewing one of these appliqués onto a blanket, bag, stocking or another fabric project, skip the hanging loop completely. I wouldn't leave an unnecessary loop on a baby or nursery project.
You can also use the three designs together on a Christmas garland. In that case, keep the appliqués flat and attach their backs securely to one crocheted cord rather than adding separate long hanging loops to every piece.
Assembly and Finishing
Before you attach the appliqués to anything, lay all three pieces beside one another. The house should be only a little taller than the figures, and the man and woman should look close in scale even though their lower-body shaping is different.
Block the pieces flat. Lightly damp-block the finished motifs on a blocking mat, shaping the heads into smooth circles, straightening the arms and legs, and keeping the roof triangle even. Pin the house corners and roof points if needed. Let everything dry completely, then remove every blocking pin and removable stitch marker before attaching or using the appliqués.
Secure every decoration. Check the bows, embroidered icing, door, holly leaves and berries from the back. Weave each yarn end through several stitches before trimming it. The berries should stay flat against the house rather than hanging away from the surface.
To sew an appliqué onto fabric: Thread a yarn needle with a matching yarn color. Work small whipstitches through the outer crochet stitches and the fabric underneath. Sew around the complete outer edge rather than tacking the motif only at a few points.
For the figures, also secure the inner edges around the leg gap and any arm area that wants to lift away from the fabric.
For the house, stitch around the body and roof separately so the roof overhang cannot curl. Check the chimney and holly cluster too.
If you add one of these appliqués to a baby blanket, keep the finished blanket out of an infant sleep space. The U.S. Consumer Product Safety Commission recommends keeping infant sleep spaces bare except for a fitted sheet.
If you like the gingerbread character but want a larger cuddly project, the gingerbread man snuggler lovey pattern is a completely different construction with a soft three-dimensional body.
You can also browse the free Christmas crochet patterns for more holiday projects, or use the crochet animal appliqué patterns if you want more small flat motifs for blankets, bags and nursery crafts.
For another simple flat holiday shape, the free crochet star pattern also works well beside gingerbread pieces on handmade Christmas projects.
When you click on links to various merchants on this site and make a purchase, this may result in this site earning a commission. This does not affect the price you pay.

UBGI Gold Standard 2026
Reviewed under the site's
editorial checklist.
Photos, decorating ideas, party setups and reader submissions are shared for inspiration unless a page is specifically presented as a pattern, tutorial, reference guide or step-by-step project. Follow the instructions, measurements, safety guidance and manufacturer directions provided for the particular project or product.
About Jan | Contact | Baby Nursery Ideas (Blog) | Site Map | Privacy Policy | Disclosure Policy | Disclaimer | Affiliate Disclosure | Earnings Disclosure | Facebook | Pinterest
I am a participant in the Amazon Services LLC Associates Program, an affiliate advertising program designed to provide a means for us to earn fees by linking to Amazon. As an Amazon Associate I earn from qualifying purchases.
Copyright © 2006-2026. All Rights Reserved.