Free Large Crochet Star Applique Pattern for Blankets and Christmas Crafts
By Jan Bay
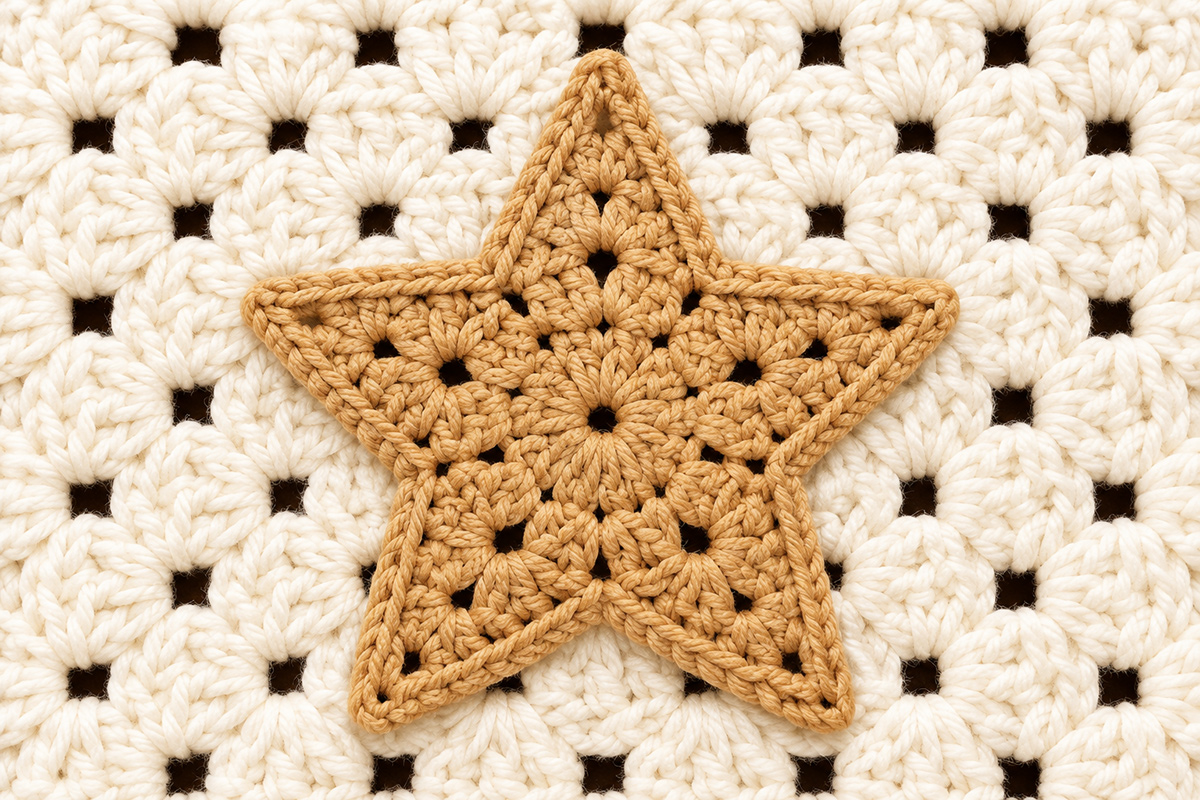
This free large crochet star applique pattern is designed to make a five-point gold star approximately 4½ to 5½ inches wide, with a textured center, softly pointed tips and a neatly defined edge. It's the size I wanted for my Christmas granny square blanket, but it would look just as good on baby's Christmas stocking, a holiday pillow or wall hanging.
Explore More Free Christmas Crochet Patterns
Free Christmas Crochet Applique Patterns
Free Christmas Crochet Patterns
Free Crochet Christmas Granny Square Blanket Pattern
See Supplies For This Project Here
Materials and Supplies
I'd stick with a smooth antique-gold yarn for this star. The open stitches and little spaces between the clusters are part of its appearance, and a fuzzy yarn would hide too much of that detail.
For one large crochet star, you'll need:
- Approximately 25 to 35 yards of smooth medium-weight #4 yarn in antique gold
- 4.0 mm (G-6) crochet hook, or the size needed to reach the finished measurements
- Yarn needle for weaving in ends and attaching the star
- Scissors
- Tape measure
- Rustproof blocking pins
- Blocking mat or another suitable blocking surface
If you're making the star for a granny-square blanket, use yarn with a similar fiber content and washing requirements to the blanket itself. It doesn't have to be exactly the same brand, but I wouldn't put a delicate, hand-wash-only star on a blanket that's supposed to go straight into the washing machine.
Keep the entire star one color. The textured stitches already give it enough interest, and the antique gold makes a lovely contrast against the ivory granny square.
Finished Size and Gauge
The finished star is designed to measure approximately 4 1/2 to 5 1/2 inches across its widest points after gentle blocking.
That's large enough to stand out on an individual granny square without covering the entire background. You'll still have a visible border of ivory stitches around the applique.
Target measurements:
- Width across the widest points: 4 1/2 to 5 1/2 inches
- Point count: five
- Construction: two center rounds, five shaped points and one outer edging round
- Thickness: flat crochet, without stuffing or backing
Suggested starting gauge: Approximately 17 double crochet stitches and 10 rows = 4 inches in a separate double crochet swatch.
This is a working gauge target rather than a measurement from a completed sample. The open spaces and shaped points mean the finished star won't measure exactly like a rectangular swatch.
Check the width after you've completed the star. If it's too small, try a slightly larger hook. If it's too big, go down a hook size. I'd rather adjust the hook than change the number of stitches and lose the five matching points.
Keep your tension reasonably even. Tight stitches can pull the points inward, while loose stitches may leave the outer edges looking floppy.
Stitch Abbreviations and Pattern Notes
This pattern uses US crochet terminology.
- ch = chain
- ch-sp = chain space
- dc = double crochet
- dc2tog = double crochet two stitches together
- sc = single crochet
- sc2tog = single crochet two stitches together
- sl st = slip stitch
- st/sts = stitch/stitches
- RS = right side
- WS = wrong side
- yo = yarn over
If you're used to UK crochet terms, remember that the US double crochet is called a treble crochet in UK terminology. You can check the differences in the Craft Yarn Council's crochet abbreviation guide.
Double crochet decrease (dc2tog): Yarn over, insert your hook into the first indicated stitch and pull up a loop. Yarn over and pull through two loops. Yarn over, insert your hook into the next indicated stitch and pull up a loop. Yarn over and pull through two loops. Yarn over and pull through all three remaining loops.
Single crochet decrease (sc2tog): Insert your hook into the first indicated stitch and pull up a loop. Insert your hook into the next indicated stitch and pull up another loop. Yarn over and pull through all three loops.
The center is worked in joined rounds. Each of the five points is then worked back and forth in rows. You'll finish by crocheting one continuous border around the outside.
Beginning chain-3 stitches count as double crochet stitches in the center rounds. Turning chains used in the points do not count as stitches.
The five points are identical. Each one begins in one ch-2 space from Center Round 2 and ends in the next ch-2 space, spanning six double crochet stitches and the ch-1 connecting space between them. Those five ch-2 spaces become the valleys between the finished points.
Free Large Crochet Star Applique Pattern
Start with the little circular center. Once that's finished, you'll work each of the five points separately. They all follow the same five-row sequence, so there's no need to learn a different set of stitches for each one.
Make the Center
With antique-gold yarn, chain 4 and join with a slip stitch into the first chain to form a ring.
Round 1: Chain 3 (counts as first dc). Work 2 dc into the ring, then ch 1. Work (3 dc, ch 1) into the ring four more times. Join with a slip stitch to the top of the beginning chain 3.
Round 1 count: 15 dc in five groups, with five ch-1 spaces.
Round 2: Slip stitch across the next two dc and into the following ch-1 space. Chain 3 (counts as first dc), work 2 dc, ch 2, and 3 dc into that same space. *Chain 1. In the next ch-1 space, work (3 dc, ch 2, 3 dc).* Repeat from * to * three more times. Chain 1 and join with a slip stitch to the top of the beginning chain 3.
Round 2 count: 30 dc, five ch-2 spaces and five ch-1 connecting spaces.
Fasten off and weave in the center tail.
You should now have five little fan-shaped sections around the center. Each ch-2 space sits between two halves of one fan. Those five spaces will become the inward valleys separating the star points.
Make the First Star Point
Lay the center flat with its right side facing you.
Choose any ch-2 space from Round 2. Attach antique-gold yarn in that space with a slip stitch.
Point Row 1 (RS): Chain 1, sc in the same ch-2 space. Dc in each of the next 3 dc. Chain 1 across the following ch-1 connecting space. Dc in each of the next 3 dc. Sc in the next ch-2 space. Turn.
Row 1 count: 8 worked stitches (2 sc and 6 dc), plus one ch-1 space.
Point Row 2 (WS): Chain 2 (does not count as a stitch). Dc2tog over the first two stitches. Dc in each of the next 2 dc. Chain 1 across the ch-1 space below. Dc in each of the next 2 dc. Dc2tog over the final two stitches. Turn.
Row 2 count: 6 dc-type stitches, including the two decreases, plus one ch-1 space.
Point Row 3 (RS): Chain 2. Dc2tog over the first two stitches. Dc in the next stitch. Chain 1 across the ch-1 space below. Dc in the next stitch. Dc2tog over the final two stitches. Turn.
Row 3 count: 4 dc-type stitches, including two decreases, plus one ch-1 space.
Point Row 4 (WS): Chain 2. Dc2tog over the first two stitches. Chain 1 across the ch-1 space below. Dc2tog over the remaining two stitches. Turn.
Row 4 count: 2 dc2tog stitches with one ch-1 space between them.
Point Row 5 (RS): Chain 1. Work sc2tog using the two dc2tog stitches from Row 4, leaving the intervening ch-1 space unworked.
Row 5 count: 1 sc2tog stitch forming the tip.
Fasten off, leaving a tail for weaving in.
The first point should taper from its broad base to a single stitch at the tip. The little chain spaces running through the center keep it open and textured rather than completely solid.
Make the Remaining Four Points
Return to Center Round 2 and locate the next ch-2 space around the center.
Attach yarn in that space and repeat Point Rows 1 through 5, working across the next section of 3 dc, one ch-1 connecting space and 3 dc, ending in the following ch-2 space.
Repeat until all five sections of the center have been worked.
Each ch-2 valley space will hold the starting sc of one point and the ending sc of its neighboring point. That's intentional.
Check your work:
- There should be exactly five star points.
- Each point should have five shaping rows.
- All five points should decrease in the same sequence: 8, 6, 4, 2 and 1 worked stitches.
- The chain spaces should remain open through Rows 1 to 4.
- The points should radiate evenly from the center.
Don't worry if the edge looks a little unfinished right now. The last round will tidy up the sides and define the points.
Work the Outer Edging
With the right side facing you, attach antique-gold yarn at the tip stitch of any point.
Edging Round: Work 3 sc into that tip stitch.
Moving down the outside edge of the same point, work 2 sc into the exposed side edge of Point Row 4, 2 sc into the side edge of Row 3 and 2 sc into the side edge of Row 2.
At the valley, work sc2tog into the two neighboring Row 1 single crochet stitches anchored in the same center-round ch-2 space. This draws the valley inward.
Move up the adjoining point. Work 2 sc into the exposed side edge of its Row 2, 2 sc into Row 3 and 2 sc into Row 4.
Work 3 sc into the tip stitch of that point.
Continue around the remaining points in the same sequence. When you return to the starting point, work the final upward side edge and join with a slip stitch to the first edging sc. Do not work a second set of 3 sc into the starting tip.
Edging count: 80 sc-type stitches in total, including five sc2tog valley stitches. Each point accounts for 3 tip stitches, 6 stitches down one side, 1 valley decrease and 6 stitches up the adjoining point.
Fasten off and weave in the remaining end.
You now have one connected five-point star with a narrow border following the outside of every point.
Shaping and Finishing the Crochet Star
Before attaching the star to anything, spread it out on a flat surface and check the five points.
Start with the center. It should sit flat without bulging upward. Then straighten the five points so they're spaced evenly around it.
If one point looks shorter than the others, check that it contains all five shaping rows. A missing decrease row will change the outline, and blocking won't correct that.
Blocking the star:
- Lay the finished applique on a blocking mat.
- Lightly dampen it using a method suitable for your yarn fiber.
- Position the five tips evenly around the center.
- Pin each tip in place without stretching the stitches excessively.
- Adjust the valleys so they remain clearly defined.
- Allow the star to dry completely before removing the pins.
Measure the star after blocking, from the widest points of the finished outline.
If it measures between approximately 4 1/2 and 5 1/2 inches and lies flat, you're within the intended size range.
I wouldn't stretch it just to reach a particular measurement. It's better to have a slightly smaller star with five tidy points than a larger one with thin, distorted stitches.
Don't add a second decorative border, either. The approved star has a simple outer edge, and that's enough.
Attaching the Star to a Granny Square
The gold star in our Christmas granny-square blanket sits against an ivory crochet background. The contrast is what makes those five points so easy to see.
Center the star on the finished square before you pick up your sewing needle. You want enough ivory showing around it that the star doesn't crowd the square's border.
For a blanket square, I'd attach the star after the ivory background has been completed and blocked to its intended size.
Sewing the Star in Place
- Place the star right side up in the center of the ivory granny square.
- Adjust all five points so they're evenly spaced and lie flat.
- Temporarily secure the star with removable stitch markers or rustproof pins.
- Thread a yarn needle with matching antique-gold yarn.
- Beginning on the back of the square, bring the needle through near the outer edge of one star point.
- Use small, discreet stitches to catch the back loops of the star's outer edging and secure them to the ivory stitches beneath.
- Continue around the complete star, following both sides of every point and each inward valley.
- Add a few discreet securing stitches around the center so it doesn't lift away from the background.
- Fasten the sewing yarn securely on the wrong side and weave in the ends.
- Remove every pin or removable stitch marker. Check that all five tips, the valleys and the center are securely attached.
Try not to pull the attachment stitches so tight that they close the open spaces or bunch up the ivory square. The star should lie against the background, not draw it inward.
For a baby blanket, secure the entire perimeter and every point rather than leaving any tips loose. Skip beads, buttons and other small decorative additions. Keep decorated blankets out of an infant sleep space.
If you're using the star on a Christmas pillow or wall hanging instead, the attachment method is much the same. Just match your sewing yarn and avoid catching too much of the background fabric with each stitch.
Tips for Keeping Your Large Crochet Star Applique Flat
A little shaping is normal, especially before you've finished the outer edging. But a star that cups badly or has wildly uneven points needs more than blocking.
If the Center Buckles
Check your first two rounds before continuing. You should have five groups of 3 dc in Round 1, followed by five matching six-dc fans in Round 2.
A missing group changes the spacing for every point that follows. Don't try to hide that mistake by stretching the star later.
If the Points Curl
Check the turning chains and the decreases. Each point must narrow evenly from both sides.
If your tension is very tight, try a slightly larger hook. A smooth yarn will also make it easier to see whether you've worked into the correct stitches.
If the Star Is Too Large for Your Blanket Square
Try using a smaller hook or a slightly lighter yarn. Keep the stitch counts the same so the five-point design stays consistent.
If you'd rather use a much smaller accent, my free crochet star pattern is intended for smaller decorating projects. This larger version is specifically for a prominent blanket-square motif.
If You're Making Several Stars
Use the same yarn, hook and tension for every star. Make the first one, block it and measure it before beginning the others.
Once you've settled on the size, jot down the hook size and finished measurement. That's particularly helpful if you're putting together a Christmas blanket over several weeks and want every applique to match.
I'd keep the entire group antique gold rather than changing colors from one square to the next. With the red, evergreen and ivory granny squares surrounding them, the gold stars already have plenty of contrast.
And don't add a hanging loop to stars intended for blankets. That's unnecessary bulk, and it changes the outline you're trying to reproduce.
Pattern development note: The stitch counts and construction have been reviewed mathematically for internal consistency. The finished dimensions and yarn quantities are estimates, and the pattern has not been physically test-crocheted. The final shape, dimensions and match to the approved example image require confirmation with a completed crochet star.
When you click on links to various merchants on this site and make a purchase, this may result in this site earning a commission. This does not affect the price you pay.

UBGI Gold Standard 2026
Reviewed under the site's
editorial checklist.
Photos, decorating ideas, party setups and reader submissions are shared for inspiration unless a page is specifically presented as a pattern, tutorial, reference guide or step-by-step project. Follow the instructions, measurements, safety guidance and manufacturer directions provided for the particular project or product.
About Jan | Contact | Baby Nursery Ideas (Blog) | Site Map | Privacy Policy | Disclosure Policy | Disclaimer | Affiliate Disclosure | Earnings Disclosure | Facebook | Pinterest
I am a participant in the Amazon Services LLC Associates Program, an affiliate advertising program designed to provide a means for us to earn fees by linking to Amazon. As an Amazon Associate I earn from qualifying purchases.
Copyright © 2006-2026. All Rights Reserved.