Free Crochet Christmas Tree Applique Pattern
By Jan Bay
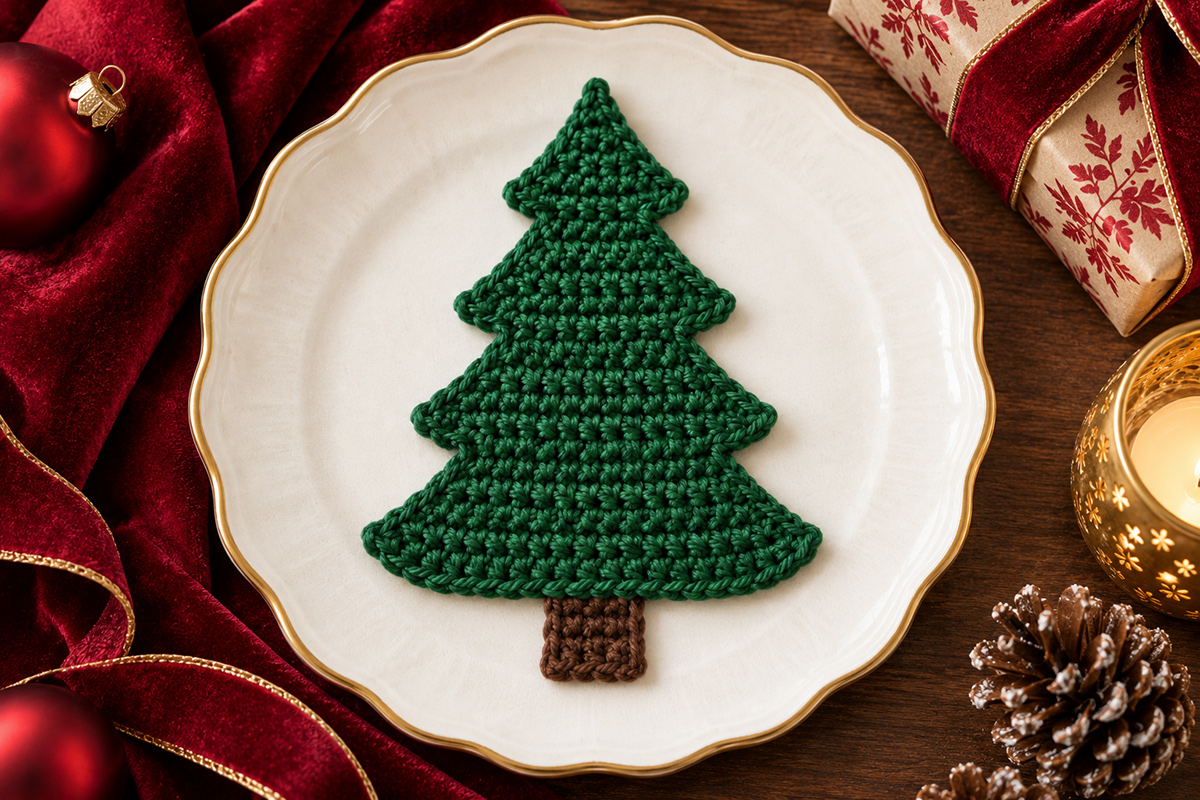
This free crochet Christmas tree applique pattern makes one flat evergreen tree with a pointed top, four shaped branch tiers and a small brown trunk. Use the finished tree on Christmas blankets, stockings, tote bags, gift bags, pillows, wall hangings and other handmade holiday projects.
Explore More Free Christmas Crochet Patterns
Crochet Supplies for This Project
Jump to the Pattern
Pattern at a Glance
Finished size: About 5 inches tall by 4 1/2 inches wide, including the trunk, when worked close to the target gauge. This is a calculated size rather than a physically measured sample.
Yarn: DK weight yarn in evergreen for the tree and a small amount of brown for the trunk. A smooth cotton, cotton blend or other yarn with good stitch definition will show the branch tiers best.
Hook: 4.0 mm (G) crochet hook, or the size needed to make a firm, flat fabric.
Target gauge: About 9 single crochet stitches and 10 rows = 2 inches. Exact gauge isn't critical for an appliqué, but a looser or tighter gauge will change the finished size.
Skill level: Advanced beginner.
Construction: The evergreen is worked flat from the pointed top down in four shaped branch tiers. Each new tier begins in the centered stitches of the tier above it, then widens evenly toward the lower edge. The small trunk is made separately and sewn behind the center of the bottom edge.
Pieces: 2 main pieces: one tree and one trunk.
Stitches used: Chain, slip stitch and single crochet. The shaping is made with two single crochet stitches worked into the first and last stitch of selected rows.
The plain tree is complete on its own, so you don't have to decorate it. I'd keep that option. The tiered outline is what makes this look like an evergreen rather than a plain green triangle.
A Simple Tree You Can Use Almost Anywhere
I kept this tree in one green piece instead of stacking several separate triangles. The four branch tiers are made right into the row shaping, so you get the little side steps that make the outline look like an evergreen without having to sew a pile of pieces together.
I also wouldn't add an edging around this one. The stepped branch tips are part of the design, and a border would start rounding them off. Once the tree is lightly blocked, the outline should do the work on its own.
The finished size is useful for more than one project. It's large enough for the branch shape to show clearly on a blanket or stocking, but it isn't so large that it takes over a tote bag, pillow, wall hanging or other Christmas craft.
Materials
You'll need:
- DK weight yarn in evergreen, about 20 yards
- DK weight yarn in brown for the trunk, less than 2 yards
- Optional small amount of red yarn or embroidery floss for the decorated version
- 4.0 mm (G) crochet hook
- Yarn needle
- Embroidery needle if you're adding the optional red details
- Scissors
- Rustproof pins and a blocking surface
The yardage amounts are planning estimates because this pattern has not been physically test-made. You'll need so little yarn that scraps from another DK weight project may be plenty.
I'd use a smooth yarn rather than something fuzzy or heavily textured. The whole point of this little tree is the outline, and you want those branch steps to show.
Abbreviations
This pattern uses standard US crochet terms.
- ch = chain
- sc = single crochet
- sl st = slip stitch
- st/sts = stitch/stitches
Pattern Notes
The tree is worked from the pointed top down. You'll widen one branch tier, narrow back to the centered stitches, and then widen again. Those little resets are what form the visible branch tips along each side.
Chain 1 at the beginning of a row does not count as a stitch.
On regular increase rows, work 2 sc in the first stitch and 2 sc in the last stitch. That adds 2 stitches to the row.
Rows 5, 10 and 16 begin new branch tiers. On those rows you'll slip stitch across a few stitches from the previous row before working the centered group of single crochet stitches. The slip stitches simply move your working yarn into position. Do not count them as part of the new row's stitch total.
Work the slip stitches loosely. Tight slip stitches can pull the branch tip inward and make one side of the tree look shorter than the other.
The final tree row has 21 stitches. The trunk is centered behind stitches 10 through 12 so it sits directly under the middle stitch of the tree.
No edging is used in this version. Light blocking is enough to straighten the rows and define the branch tips.
Pattern status: The stitch counts, proportions and finished measurements have been calculated from the construction below. This pattern has not been physically test-made, so I am not describing the finished measurements as physically verified.
Free Crochet Christmas Tree Applique Pattern
Main Tree
With evergreen yarn, ch 4.
Row 1: Sc in 2nd ch from hook and in each ch across. (3 sc)
Row 2: Ch 1, turn. 2 sc in first st, sc in next st, 2 sc in last st. (5 sc)
Row 3: Ch 1, turn. 2 sc in first st, sc across to last st, 2 sc in last st. (7 sc)
Row 4: Ch 1, turn. 2 sc in first st, sc across to last st, 2 sc in last st. (9 sc)
That's the pointed top tier. Now you'll narrow back to the center to start the second tier.
Row 5: Turn. Sl st loosely in first 2 sts. Ch 1. Sc in next 5 sts. Leave final 2 sts unworked. (5 sc)
Row 6: Ch 1, turn. 2 sc in first st, sc across to last st, 2 sc in last st. (7 sc)
Row 7: Ch 1, turn. 2 sc in first st, sc across to last st, 2 sc in last st. (9 sc)
Row 8: Ch 1, turn. 2 sc in first st, sc across to last st, 2 sc in last st. (11 sc)
Row 9: Ch 1, turn. 2 sc in first st, sc across to last st, 2 sc in last st. (13 sc)
The second branch tier is finished. The next reset is a little wider so the whole tree keeps growing as you move down.
Row 10: Turn. Sl st loosely in first 3 sts. Ch 1. Sc in next 7 sts. Leave final 3 sts unworked. (7 sc)
Row 11: Ch 1, turn. 2 sc in first st, sc across to last st, 2 sc in last st. (9 sc)
Row 12: Ch 1, turn. 2 sc in first st, sc across to last st, 2 sc in last st. (11 sc)
Row 13: Ch 1, turn. 2 sc in first st, sc across to last st, 2 sc in last st. (13 sc)
Row 14: Ch 1, turn. 2 sc in first st, sc across to last st, 2 sc in last st. (15 sc)
Row 15: Ch 1, turn. 2 sc in first st, sc across to last st, 2 sc in last st. (17 sc)
Now make the fourth and widest branch tier.
Row 16: Turn. Sl st loosely in first 4 sts. Ch 1. Sc in next 9 sts. Leave final 4 sts unworked. (9 sc)
Row 17: Ch 1, turn. 2 sc in first st, sc across to last st, 2 sc in last st. (11 sc)
Row 18: Ch 1, turn. 2 sc in first st, sc across to last st, 2 sc in last st. (13 sc)
Row 19: Ch 1, turn. 2 sc in first st, sc across to last st, 2 sc in last st. (15 sc)
Row 20: Ch 1, turn. 2 sc in first st, sc across to last st, 2 sc in last st. (17 sc)
Row 21: Ch 1, turn. 2 sc in first st, sc across to last st, 2 sc in last st. (19 sc)
Row 22: Ch 1, turn. 2 sc in first st, sc across to last st, 2 sc in last st. (21 sc)
Row 23: Ch 1, turn. Sc in each st across. (21 sc)
Fasten off and weave in the yarn tail unless you'd rather keep it available for sewing the appliqué to another project.
The four completed tiers should progress like this: 9 stitches at the widest point of the first tier, 13 at the second, 17 at the third and 21 at the fourth. If those totals don't match, I'd fix the row before moving on. The symmetry of the finished tree depends on them.
Trunk
With brown yarn, ch 4.
Row 1: Sc in 2nd ch from hook and in each ch across. (3 sc)
Rows 2 and 3: Ch 1, turn. Sc in each st across. (3 sc)
Fasten off, leaving a sewing tail.
Lay the tree flat with the side you want to use as the front facing down. Center the trunk behind the bottom edge of the tree. The three trunk stitches should sit behind stitches 10, 11 and 12 of Row 23.
Let about two-thirds of the trunk extend below the tree and hide the remaining upper portion behind it. Sew the top of the trunk securely to the back of the green tree. Keep the stitches on the back so the join doesn't show from the front.
Check the tree from the front before weaving in the tail. The trunk should line up under stitch 11, which is the exact center of the 21-stitch lower edge.
Optional Decoration
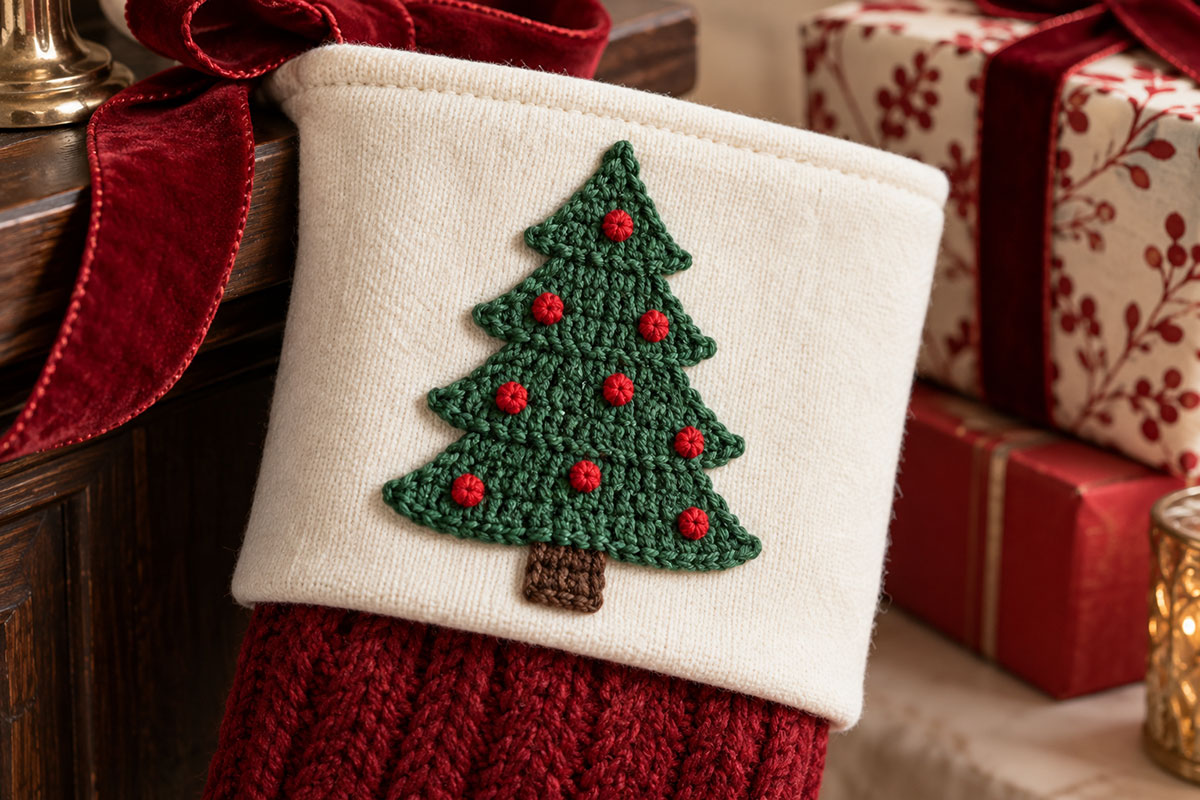
I like the plain tree because you can use it with almost anything. If you want a little more Christmas color, nine small embroidered red ornaments add enough detail without covering up the branch shape. You don't need beads, bells or buttons.
Thread an embroidery needle with red yarn or embroidery floss. Make each ornament with 3 or 4 short satin stitches placed over roughly one crochet stitch. Keep the stitches snug against the fabric without pulling hard enough to pucker the tree.
To match the decorated version shown here, place the nine red details approximately like this:
- 1 on Row 4, around stitch 5
- 2 on Row 8, around stitches 4 and 8
- 3 on Row 14, around stitches 4, 8 and 12
- 3 on Row 21, around stitches 5, 10 and 15
Carry as little yarn as possible across the back between ornaments. For an appliqué that will be attached to fabric, I'd secure and trim the yarn between widely separated areas rather than leaving long floats.
I would skip a star topper on this version. The pointed green top is cleaner at this size, and the tree doesn't need another piece to read as a Christmas tree.
Finishing
Weave in any remaining ends on the back of the work.
Lightly block the tree before attaching it to anything. Pin the top point, each visible branch tip and the two lower corners into shape. Don't stretch the center just to make the tree larger. You're trying to straighten the piece and define the outline.
Use a blocking method that's appropriate for your yarn fiber and follow the yarn manufacturer's care instructions. Let the tree dry completely before removing the pins.
To attach the appliqué, pin it in position first. Using matching evergreen yarn and a yarn needle, sew around the outside edge of the green tree with small stitches. Catch the edge of the crochet fabric and the project fabric without pulling tightly enough to distort either one.
Then use matching brown yarn to sew around the two exposed sides and bottom edge of the trunk so the trunk lies flat and is fully secured to the project.
Pay particular attention to the branch tips. Each little point should be secured instead of left sticking up where it can curl or catch.
If you're attaching the tree to a stretchier crocheted or knitted background, lay everything flat while you sew and check it every few inches. An appliqué can look fine by itself and still pucker the background if the sewing yarn is pulled too tightly.
Before the finished project is used, make one last check that every blocking or positioning pin has been removed and that all yarn and embroidery ends are secured on the back.
Ways to Use the Tree Appliqué
A stocking is an easy place to use one tree by itself. Put it toward the lower half of the stocking and leave enough open space around the branch tips for the shape to show.
For a blanket, you can repeat several trees along one edge instead of covering the whole blanket. That keeps the motif easy to see and saves quite a bit of sewing.
The same tree can go on a tote bag, reusable gift bag, pillow cover, wall hanging or seasonal bunting. You can also use a single appliqué as part of a handmade Christmas card or fabric gift tag if the finished scale works for your project.
If you want a larger or smaller tree, changing yarn weight and hook size is simpler than rewriting all of the tier math. Keep the same 9, 13, 17 and 21-stitch branch progression and let the yarn change the overall scale.
For more seasonal projects, see my free Christmas crochet patterns. If you like making small flat motifs in particular, there are more ideas in the free crochet animal appliqué patterns collection.
Safety Note for Baby Projects
If you're sewing this tree to something a baby will use, attach every edge and branch tip securely. Use embroidered or crocheted decoration instead of buttons, beads, bells, plastic pieces or other loose hardware.
A crocheted blanket or decorative pillow should not be placed in an infant sleep space. The U.S. Consumer Product Safety Commission recommends keeping a baby's crib, bassinet or play yard bare except for a fitted sheet. You can read the current CPSC safe sleep guidance before using handmade nursery items around an infant sleep area.
When you click on links to various merchants on this site and make a purchase, this may result in this site earning a commission. This does not affect the price you pay.

UBGI Gold Standard 2026
Reviewed under the site's
editorial checklist.
Photos, decorating ideas, party setups and reader submissions are shared for inspiration unless a page is specifically presented as a pattern, tutorial, reference guide or step-by-step project. Follow the instructions, measurements, safety guidance and manufacturer directions provided for the particular project or product.
About Jan | Contact | Baby Nursery Ideas (Blog) | Site Map | Privacy Policy | Disclosure Policy | Disclaimer | Affiliate Disclosure | Earnings Disclosure | Facebook | Pinterest
I am a participant in the Amazon Services LLC Associates Program, an affiliate advertising program designed to provide a means for us to earn fees by linking to Amazon. As an Amazon Associate I earn from qualifying purchases.
Copyright © 2006-2026. All Rights Reserved.